
basically, colorings, psd and other stuff I create for gifs and edits on my main account that I decided to share/store here
Don't wanna be here? Send us removal request.
Statistics
We looked inside some of the posts by creationsofthedark and here's what we found interesting.
Average Info
Notes Per Post
130K
Likes Per Post
76K
Reblog Per Post
54K
Reply Per Post
204
Time Between Posts
1 month
Number of Posts By Type
Text
13
Note
3
Photo
1
Last Seen Tumblr Blogs


Fun Fact
In 2020, 44% of users from Denmark used Tumblr daily.
Text
p iracy is BAD!!!!!!!1!
i think piracy is EVIL!!!
ANYONE that pirates ANYTHING should go to JAIL!!
NOBODY should EVER take this base64 string (aHR0cHM6Ly9tZWdhLm56L2ZvbGRlci9NQTB4aElZSSNQX3BqNl82SkxkaFdCcl9odllqSm13) and put it into the converter at https://www.base64decode.org/ to get all the major adobe programs for free! that would be a crime!
ANYONE that pirates adobes 500 dollar programs should be ASHAMED!
that would just be evil!
88K notes
·
View notes
Note
hello I love the psds you share especially the ones you make for dark scenes, idk if someone already asked this but do you have any 'how to colour dark scenes' tutorial or some tips you could share about that?
Hi! I do not have any other tutorials but those that are under the tag 'tutorials' on my page, and tbh I am not sure I can add anything new to those, I usually use the same tools.
The best tip I can give is use the best quality video you can grab your hands on.
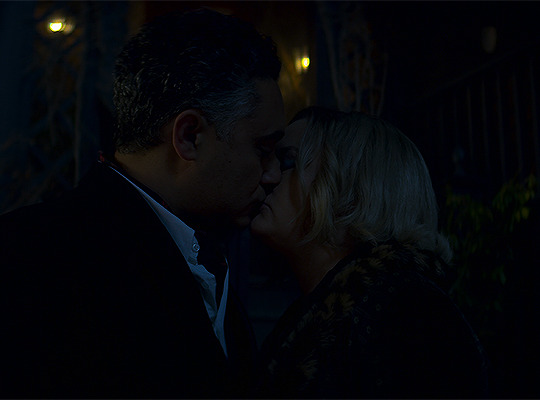
Best example is the darkest show out there: chilling adventures of sabrina
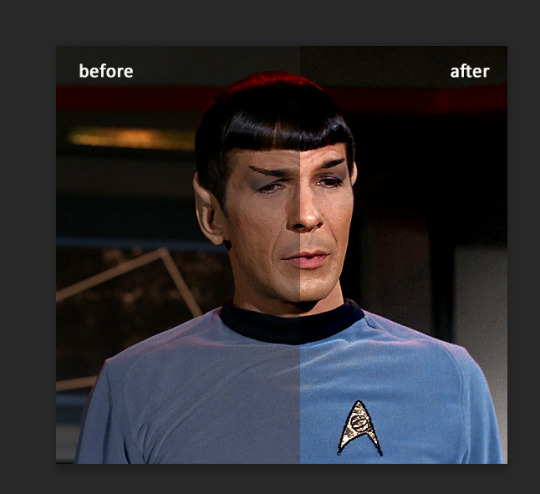
My files are 2160p and each episode of caos I have is around 10-13GB or more. Did not really try hard to make anything good, cos it's just for example, I used the same tools I use in almost every psd I shared: exposure, curves, brightness and contrast, levels, selective colors, color balance, hue and saturation
Sometimes, when you try to lighten up scene you get the colors all over your image that you did not see on the original image, so you add brightness to a scene and then work on removing those colors. At least, that's how I am lol
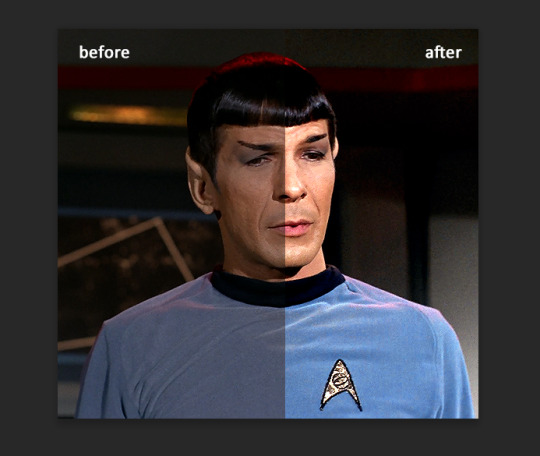
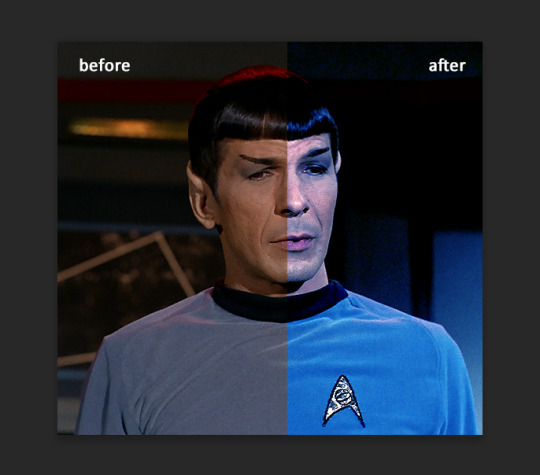
So, if you just take and add too much exposure all at once you will get this

With all my love for blue we don't need it that much here. So you add it slowly until you like the result, then you add other things and you get something nice and visible

here's psd for it PSD#331 (hardly gonna work on any other scene)
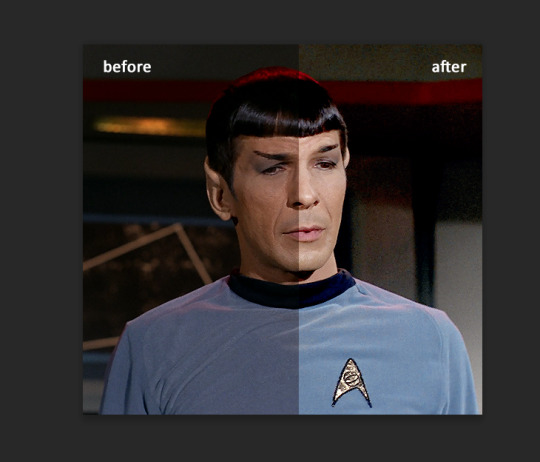
And that's what happens if you use poor quality video for your work, , for comparison I found same scene screenshots on thetvshows website. Same coloring, same sharpening settings but the result is

Definitely not something I would enjoy watching.
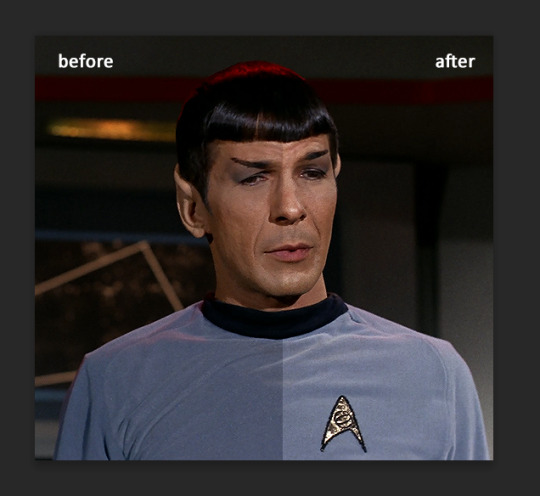
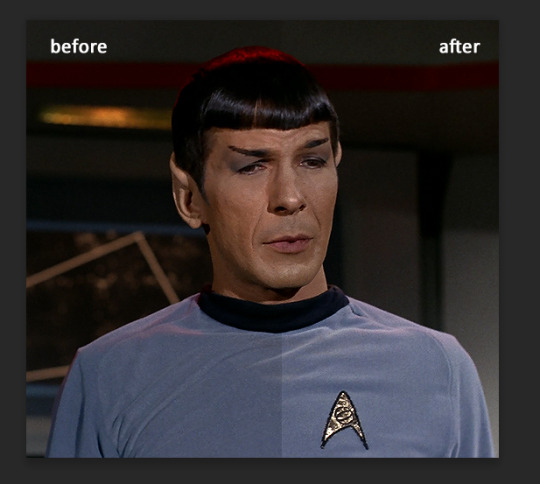
If you are giffing a very red\yellow scene then removing red\yellow by channel mixer also brightens scene, like in this one
Anyway, not sure it will help but the most important thing is having fun, enjoy the process :3
13 notes
·
View notes
Text


Theme #09: Astral by @pneuma-themes
May this Song lead us to our Paradise.
Live Preview (Temporary) / Static Preview: [Index] [Permalink] / Get the code: [Pastebin] [Github]
A sleek and minimalist sidebar theme created around the idea of having a music player and a monochrome aesthetic. Suitable for all kinds of blogs.
Features:
Optional monochrome images. Can be enabled or disabled from the Customize page.
One accent, 8 color options.
Customizable post width and font size. The live preview uses 600px posts and 13px font size.
4 custom links.
Optional audio music player. Can be enabled or disabled from the Customize page. Paste the direct link of your audio file to the song url field in the Customize page and type the name of your audio file into the song title field. To add the artist name of your audio file, type the artist's name into the song artist field.
Custom link menu title, can be filled by typing the title of your custom link menu into the custom link menu title.
Customizable photoset gutter.
Built-in lightbox for photoset posts.
Mostly NPF-friendly.
Notes:
Usual disclaimer applies.
The audio player only supports one song.
Credits:
Un-blue polls, NPF Image Fix 3.0, NPF Audio Player, Music Player #07, minified spotify player: @glenthemes
customAudio.js: @annasthms
NPF reverse compatible template: @eggdesign
photoset.css: @eggdesign, @annasthms
Icon fonts: Lucide
Sidebar image: たえ (tae402 @ X/Twitter)
Font: Rubik @ bunny.net
Toggle tags on click: @alydae
Responsive video script: @nouvae
Song on preview: Class::DISTLLISTA; by Shimotsuki Haruka from the game Ar nosurge: Ode to an Unborn Star.
Please like and reblog if you like or are using this!
828 notes
·
View notes
Text

theme 16 - for good by @gloriapritchetts ♡
previews
static
features
read the pinned post on the preview!
guidelines
full rules and credits are listed here
please like/reblog if you like this theme!
message me if you have any issues or questions
tips ☕️ code + alt 📝
258 notes
·
View notes
Text
I think tumblr just needs to work a bit on telling people about this stuff
36K notes
·
View notes
Text

jade | theme by sage
get the code: static preview a full length sidebar theme
features (more info below the cut):
toggle: tags on click, explore tab, sidebar stats, updates
headerbar includes custom title, home/ask/archive/explore links | day/night & tumblr controls buttons
sidebar includes an uploadable image, custom description, optional sidebar stats, optional updates, optional footer
customizable: blog title, description, colors, body & title fonts, and font size
explore tab includes up to 5 extra links and a search bar
npf supported, responsive design, scroll to top, 4 corner options, tabler icons
nothing needs to be changed in the code, everything can be changed in the customize panel!
terms:
reblog if using
do not touch the credit
all terms / faq
credits listed in the code / credits page
please consider supporting me ♡
blog name !! important
make sure you fill out the blog name field, this is what will show on the top of all your original posts. to clarify: your blog name is your blog’s url - for example: phantomcodes
responsive sidebar
when the browser window gets too small the sidebar will disappear and become toggleable, the sidebar toggle button will appear on the left side of the header
sidebar footer
leave the sidebar footer field blank if you don't want this!
reminders
remember tumblr’s customize panel is buggy, you may have to toggle the options on/off before saving
i’m still on a sort of semi-hiatus, i’ll be around for questions but please check my faq, answered asks, etc. before asking - i will not answer repeated questions!
656 notes
·
View notes
Text
Fandom resources intro & explainer (with a bit of history)
Hi! So I’ve been reading fic for like… 25 years (I’m 37). I’ve been around for a lot and seen a lot, but I only started writing last year, and I remember what it was like to feel like I wasn’t really involved in fandom in the past. Even though I was reading fic constantly and I wanted to be involved. And I remember the feeling of being new to something and not having any idea what people are talking about. So, I figured I’d share some resources. (If this helps just one person I will be happy.) Below you'll find more on how to figure out what people are talking about and some ideas for engaging actively with fandom. (Also, I'm not an expert, I'm just good at research.)
Fanlore, or how to figure out what the heck people are talking about
Have you ever been reading a post on tumblr and thought, ok, everyone seems to know what this thing is but I don’t? Maybe it’s “strikethrough,” maybe it’s a reference to the founding of ao3 (by fans), maybe it’s the ball pit. Well, I have a website for you: fanlore.org
Note: this is not to say that I think we should all necessarily be using the same slang from 20 years ago, or that everyone needs to be an expert on fandom history. I just know and remember the feeling of being left out because I didn't know what people were talking about, and I love to look things up. So this is how I do that. and similar to wikipedia, it's a great starting point for research... and then maybe you'll find a thread you want to tug on a bit more.
Fanlore is the wiki for fandom, in both a general and specific sense. It’s got pages on fandom history and slang and tropes and everything else. Here are some pages that may be of interest to get you started:
Strikethrough, or what happened to livejournal? And while we’re on the subject, why is everyone so nostalgic for LJ anyway?
What's the deal with the fanfiction.net purge?
The founding of ao3 (and see the "no direct advertising" section for more on why you can't talk about commissions or sales on ao3, and the section on racism for an overview of various discussions with links to more)
What’s a lemon?
A list of tropes, fun to explore
YKINMKATO (or, kink tomato)
What's the ball pit?
What’s up with people using the word slash?
A big list of fandom slang in the fandom glossary
What's a fandom challenge?
And they have a new visitor portal! and more!
Fandom and all the ways we engage with it
Something I often wondered as a fan before I started writing was, what is my role here? How do I engage with fandom? What do fans do if they don’t write or make art?
So I thought I’d make a list! I love lists. And maybe you’ll see something in my list that speaks to you and makes you feel like you have something for you where you didn’t before. That would make me so happy. Fanlore also has a whole category page for fan activities which is way more exhaustive than my list!
Writing (fic, poetry, meta, and more)
Making art - fanart, gifs, memes, so much more
Recording podfics
Making podcasts
Organizing fic archives/libraries/fic rec pages or tumblr accounts (the hours I spent exploring the Sterek library account, y’all...)
Creating and organizing character or media archives (think of all the possibilities - outfit compendiums, dialogue arhives, etc.)
Making fic rec lists (around themes, authors, etc.) and sharing them
Making playlists (around themes, fandoms, characters, relationships, more!) and sharing them - also called fanmixes
Making fanvids (videos) and sharing them
Contributing to a wiki
Cosplay
Crafts - knitting, crocheting, sewing, woodworking, and more!
Commenting and contributing to discussions
Creating and sharing polls
Interviewing fellow fans
Fan surveys
Creating moodboards and/or collages
Liveblogging as you watch or rewatch new episodes or movies (make sure to tag it)
Sending asks and comments
Leaving kudos and comments (on ao3) and commenting/reblogging (on tumblr)
Hosting viewing parties
Running fandom events (or helping with them), like challenges
Bookbinding (not for profit)
Making zines
How do I get started?
In my experience, when people say their inboxes are open, they mostly mean it. If you see someone who makes art you love, tell them you love it and ask them how they got started. Ask them what tools they use! If you see someone making amazing gifs, tell them you love them and ask for tips or resources. And share their work!
Fanlore also has resources, so the links and ideas are out there. And reaching out to someone on tumblr is often the easiest way in. Send an ask, write a comment, reblog with a comment. Explore the tags for your fandom. Tell someone you loved something or ask them a question. And on that topic, consider my asks and messages open if you want to chat! Or talk about any of this! Or share your ideas for more ways to do fandom!
Talking to people can be scary, I know, but just remember that we all have something in common - we're waaaaaaaay too into something (or a lot of things) and would love to talk about it. We're dying to talk about it. Please talk about it with us. And that is a foundation we can build on! Even if it’s just in comments or in reblogs or in tags - we love comments and reblogs and tags.
If talking to someone doesn’t go anywhere, that’s ok. Like in non-tumblr life, we all get along with some people more than others. We all have different types of connections all across this platform, some closer than others. Sometimes people are busy or life is happening or they just can’t engage right then. Sometimes you won’t click with someone. That’s all ok! Reaching out gets easier with practice.
If you do make or share something, tag it! Use fandom tags and broader tumblr tags (e.g., 'podfic') to help people find it.
I love fandom, and I always have, even when I was the lurkiest of lurkers. So I hope this helps. 🧡 My inbox, as I said, is open.
1K notes
·
View notes
Note
i love your gifs! do you have a colouring psd for doctor who season 1-4?
Thanks 😊
Unfortunately, I do not have any psd's for doctor who saved 😕
0 notes
Photo

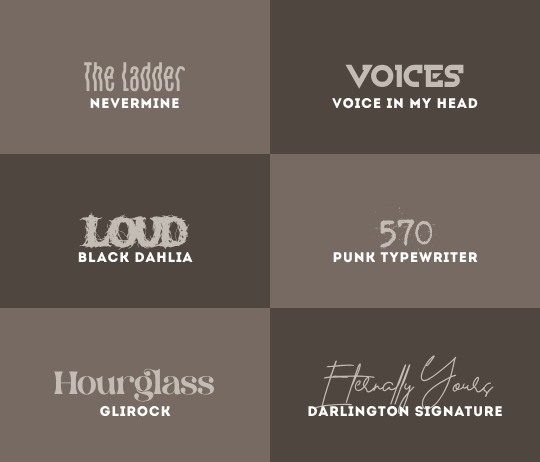
rats / queen for queen / necessary evil / soft / untouchable / not my type / the ladder / voices / LOUD / 570 / hourglass / eternally yours
i do not take ownership of any of these fonts, so there’s no need to credit me — but please reblog this post if you found it helpful at all! :)
489 notes
·
View notes
Note
Are you able to make a colouring for doctor who s1-4? ❤️ and Friends love your account!
I don't really make colorings specifically for shows\seasons, cos they never work the same way for two different scenes. I just share those colorings that I create while making gifs for my blog and save those colorings sometimes. Next time I gif any of DW scenes from those seasons I will try to remember to save the coloring and share it, but it won't work for entire season.
0 notes
Text
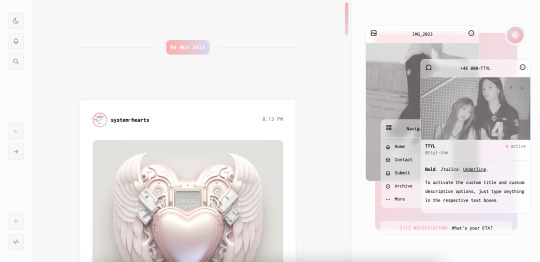

[ Theme #11: TTYL ]
Preview + Install (Theme Garden) Live Preview + Static Preview + Code (GitHub)
A responsive, all-in-one theme that includes the option to hide the about, navigation, muses, following, and recently liked sections!
Features:
Day and night toggle button that will stay in the selected mode until it is turned off. A dark mode option is available for those who prefer a dark color scheme on their blogs instead of the default light colors. The day and night mode button will also change according to the scheme you are using.
6 sections are included in the theme (blog posts, an about me, navigation links, muses, following, and recently liked posts).
Left or right sidebar. Both layouts are responsive on multiple screens including mobile.
You can also choose icons that you like for various elements of the theme (i.e. the menu links in the sidebar) from Tabler Icons. Please refer to the theme guide linked below for more information.
Like and reblog buttons, a search bar, an updates tab, and a custom "Not Found" page.
A drop-down menu with 3 custom links.
Supports NPF posts and page links.
Options:
Instead of giving you a selection of post sizes to choose from, you can enter your desired post size (i.e. 500px or 40vw). The same applies to the sidebar.
A custom title and/or description. To activate the custom title and description options, just type anything in the text boxes "Custom Title" and "Custom Description."
You have the option to choose whether your accent colors will be a gradient or one color.
There is a selection of border styles and header styles to choose from.
Different sidebar images are optional. However, the first sidebar image that uses your header image as the default will always be visible on your blog. There is no option to hide it like the other sidebar image.
Show or hide tags on the index page.
Notes:
The search bar will be hidden automatically if you have the option to hide your blog from search results enabled.
The following and recently liked sections will only work if you're using the theme on a primary blog. It will not work with side blogs. Please also make sure you have enabled the options to share your following and liked posts in your blog settings.
For an in-depth explanation and tutorial on how to customize the theme to your liking, please refer to the theme guide! Everything you need to know will be addressed there.
Credit:
NPF Audio Player by @glenthemes
Tabler Icons by Paweł Kuna
See full list of credits here.
Please make sure to read the theme guide before sending in any questions about customization, thank you!
2K notes
·
View notes
Text


psd #330 <- CLICK TO DOWNLOAD
it will not work on every gif/picture!
you can edit it to fit your gif/picture but
do not reupload psd itselt, do not use to create new colorings and do not claim as your own.
reblog if using. that motivates to share them :)
crediting me if using is nice as well, but not required.
#dailypsd#gifpsd#coloring#resources#itsphotoshop#psd#photoshop resources#photoshop#coloring resources#psd resources
33 notes
·
View notes
Text


psd #329 <- CLICK TO DOWNLOAD
it will not work on every gif/picture!
you can edit it to fit your gif/picture but
do not reupload psd itselt, do not use to create new colorings and do not claim as your own.
reblog if using. that motivates to share them :)
crediting me if using is nice as well, but not required.
#dailypsd#gifpsd#coloring#resources#itsphotoshop#psd#photoshop resources#photoshop#coloring resources#psd resources
48 notes
·
View notes
Text
psd #328 <- CLICK TO DOWNLOAD
it will not work on every gif/picture!
you can edit it to fit your gif/picture but
do not reupload psd itselt, do not use to create new colorings and do not claim as your own.
reblog if using. that motivates to share them :)
crediting me if using is nice as well, but not required.
#dailypsd#gifpsd#coloring#resources#itsphotoshop#psd#photoshop resources#photoshop#coloring resources#psd resources
112 notes
·
View notes
Text


psd #327 <- CLICK TO DOWNLOAD
it will not work on every gif/picture!
you can edit it to fit your gif/picture but
do not reupload psd itselt, do not use to create new colorings and do not claim as your own.
reblog if using. that motivates to share them :)
crediting me if using is nice as well, but not required.
#dailypsd#gifpsd#coloring#resources#itsphotoshop#psd#photoshop resources#photoshop#coloring resources#psd resources
50 notes
·
View notes
Text


psd#325 & #326 <- CLICK TO DOWNLOAD
it will not work on every gif/picture!
you can edit it to fit your gif/picture but
do not reupload psd itselt, do not use to create new colorings and do not claim as your own.
you can use this coloring on anything you want, except do not drag and drop it on the same scene i giffed here, will look like a copying.
reblog if using. that motivates to share them :)
crediting me if using is nice as well, but not required.
63 notes
·
View notes
Text
a very foking detailed GIF tutorial you asked for and how I color my gifs
However, I color them individually, so there will be explanation of tools I choose instead of showing what settings I used for this specific gif in this tutorial.
I will go through entire process of how I create gifs, the process of gifmaking can be different for others and there is no obligation of how to create a gif. Basically, do it however you like and enjoy the process.
this is part I, part II is here\in reblogs.
First, you will need to prepare everything, you choose the moment you want to gif and make screencaps. I use mpv player to create them, here is a great tutorial on how to install it. So I won't go over it, just follow it and or use another player which allows to make screencaps, such as kmplayer.
Once you make screencaps go to photoshop - file - scripts - load files into stack - browse - select screencaps and upload them.
At this point I will also add that I use keyboard shortcuts a lot, you can set them up to your preference, that is much easier for me and might be for you too, and I am so used to them that I forget where are some settings. You can do it from edit - keyboard shortcuts, you may set up anything there.
You will have all screencaps uploaded into one file. Once I have it I change canvas/image size, I also remove 10 pixels from each side, because I hate that some files have that weird black line which looks awful on gifs. But that's up to you. Use proper dimensions for tumblr, that is important since your gifs will look 'not good' when you upload them. I will go with 540x500px this time. (correct dimensions for tumblr are 540px for big gifs, 268px for two gifs along each other and 177-178-177px for the three gifs together)
Go to images - image size (crtl+alt+i) and change the size.
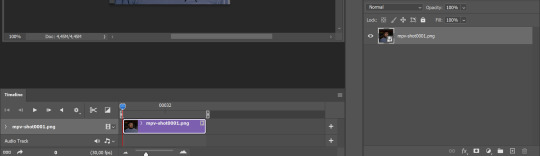
After that I make animation, because without it we would not be able to convert all the screencaps into smart filters. Go to windows - timeline
you will have something like this by default

click on create frame animation - then on 4 horizontal lines which will open menu - make frames from layers

click on convert to video timeline (that 3 horizontal lines and 1 vertical line or whatever it is, right under the first layer) you will get something like this.
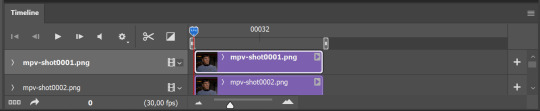
now, this will be animated. If you choose convert to video timeline right away it will not be animated.
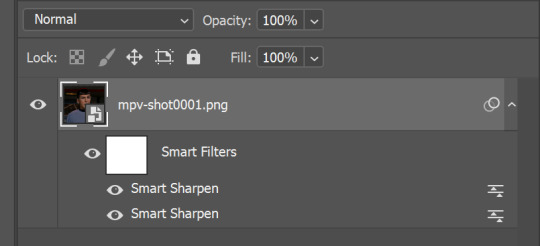
Now, select all the layers - filters - convert to smart filters
You will have something like this, and if you play it - it will be animated anyway. That way you can edit ALL the screencaps at once.
I usually start with sharpening, settings may change according to the files I have, for some you will need more sharpening, for some less. I go with filters - sharpen - smart sharpen and usually that's enough
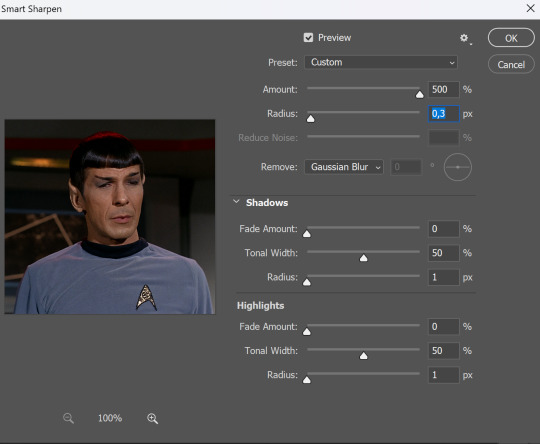
but I sometimes add more sharpening, just change radius to 0,2. So, repeat the action.
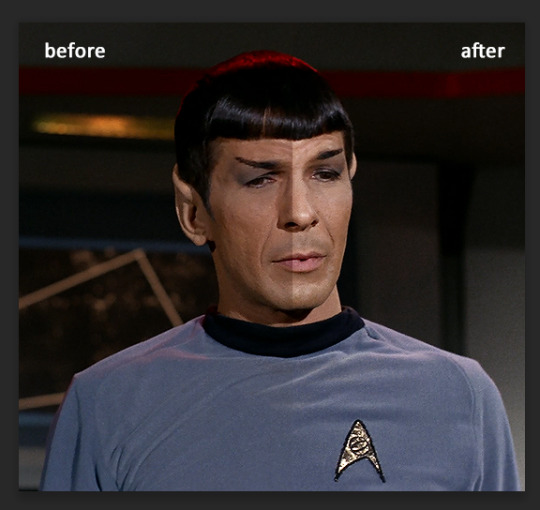
You will have it like this
and at any point of making gif you will be able to change settings for it, if after coloring it will look not as good as you wanted to.
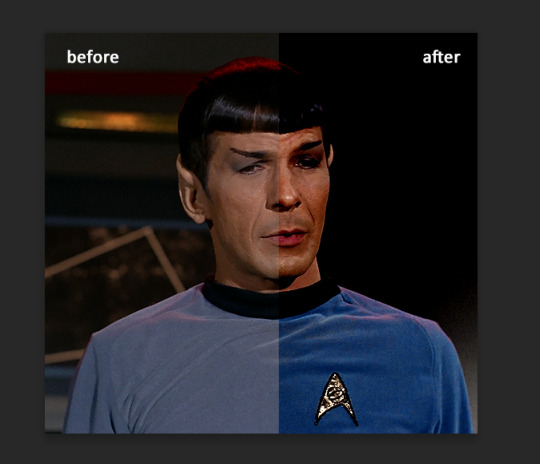
I will not go into a lot of details about coloring for this gif, because does not matter how good the coloring on this gif will be, it won't work as good on another gif.
There is no right way to start coloring, you may start with curves, levels or selective colors depending on the screencaps you want to edit.
Well, this time I did start with layer - new adjustment layer - curves. (yeah, i guess by the end of the day we all do lmao) (Always use 'layer - new adjustment layer'. That's the only thing I suggest to remember when you color. ) Just to brighten gif a little bit, but you also can change colors with it.
those are not settings I used for this gif!
Curves have option to edit colors, just press RGB and you will see options for RED, GREEN, BLUE. Upper slider adds the said color, the slider at the bottom removes it. That's a great tool if you have a very red\yellow\blue\green scene, with those settings and moving sliders here and there you will be able to add the color you want, for red scene I suggest to use more green and blue, as well as for yellows but with less green. Just move them to see what fits your gif better.


there are also eyedrop tools which will help you to edit picture, with the first one you need to find the darkest part of your gif and click, it will adjust your picture according to it. If there's too much red, it will make it bluer, etc. The middle one is the one I use the most out of them, cos it changes the midtones, it's great if you have very yellow picture, just press the yellow part and it will make it bluer\greenish, depends on the picture, and then you can adjust it to make it look better. And the last one you can use to lighten picture as well, just find the brightest part of the picture and press it. It will adjust other colors accordingly.
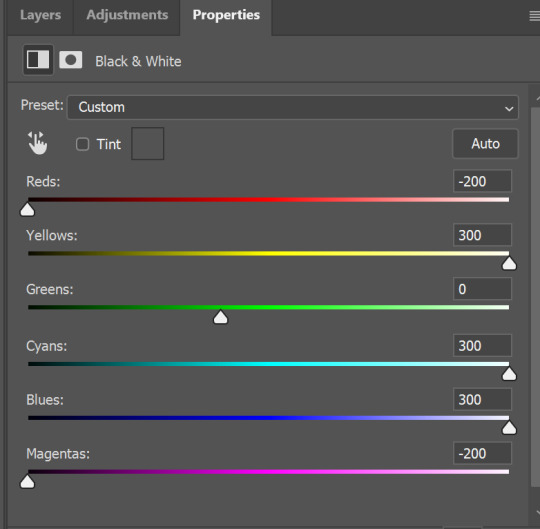
I like to play with settings, I could add more darkness to the gif by levels, by selective colors making dark colors even darker, but sometimes I just use layer - new adjustment layer - black & white. Putting it on soft light blending mode and changing opacity. Idk, I like the effect :D Also, by using these, you will be able to darken part or lighten specific colors

so yeah, play around and figure out what is the best way for you.
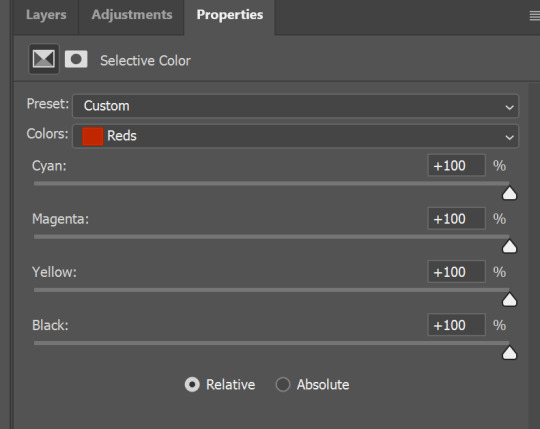
after that I used layer - new adjustment layer - selective colors. I think this is one of my favorite tools out there, I love it, I usually end up with 30 selective color layers if I make a super complex gif :D
You can change colors with it, make them more vibrant, or less.

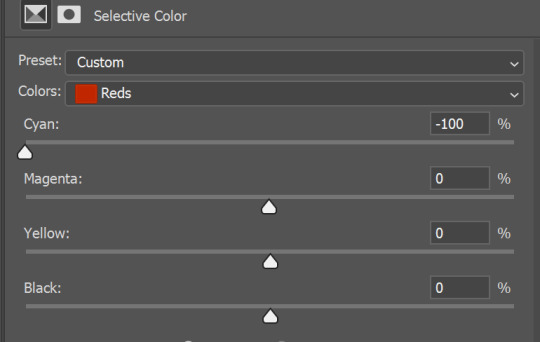
for each color you will have 'cyan, magenta, yellow and black' and by dragging sliders you can change colors, make them darker or lighter for the lovers of those paster gifs :D
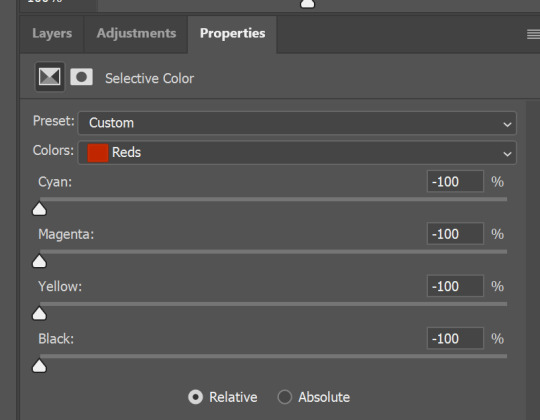

But don't worry, that's not where I will go with the gif, so it will look better, i promise.
You know how much I love making blue even more blue. So I go with more selective color layers to enhance it.
You do not have to use just one, and you won't be able to make it with just one sometimes. So add as many as you like to get the result you want.
next is one of my favorites - layers - adjustment layers - levels
with it you can darken colors or lighten them, there's also auto, as well as on curves, which will find the most suitable settings for your picture.
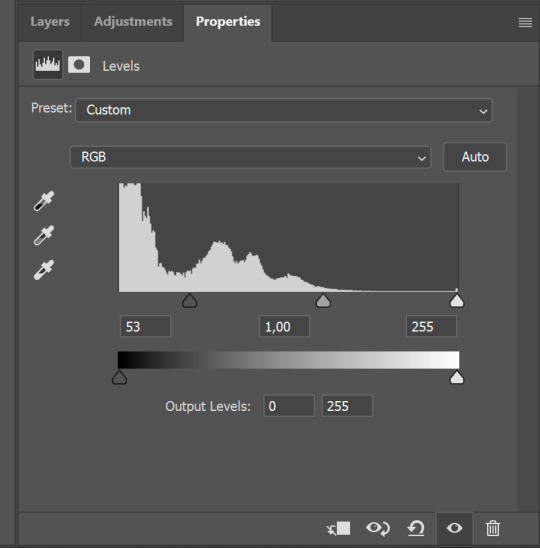

I hardly ever change the middle slider, cos
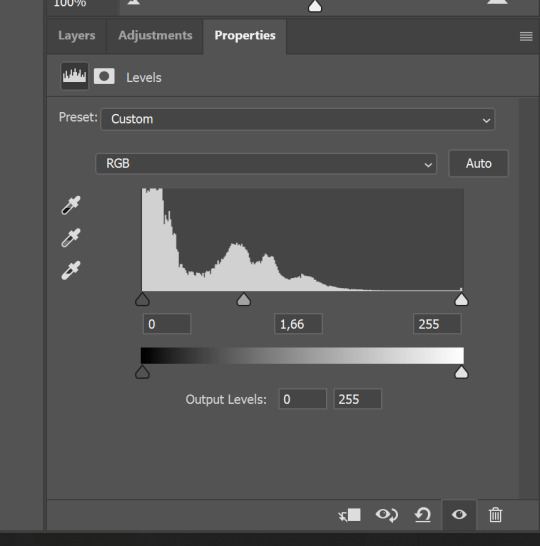
nope.
so, we are at this part of the gif by dragging sliders.
next one I used is layers - adjustment layers - color balance. right now I will stop adding directory, this tutorial is already long enough, so most of the things are there in layers - adjustment layers.
Absolutely love it, most of settings do the same things but a little differently, this one changes colors but also entire picture, not just part of it. You have shadows, midtones and highlights
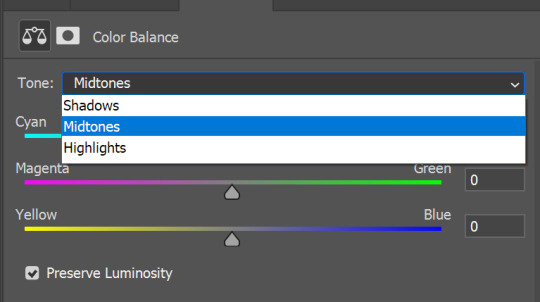
Each of them is really great when you have a yellow\red\blue\green picture to edit. And each of them has 3 sliders cyan\magenta\yellow.
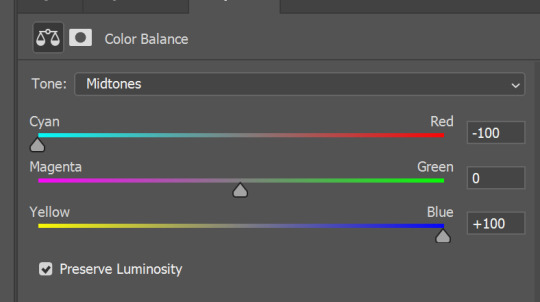
You see, if you drags sliders the other way it will make picture more yellow.
END OF PART I
since tumblr

132 notes
·
View notes