
Don't wanna be here? Send us removal request.
Statistics
We looked inside some of the posts by crystalywang-blog and here's what we found interesting.
Average Info
Notes Per Post
1
Likes Per Post
1
Reblog Per Post
0
Reply Per Post
0
Time Between Posts
8 days
Number of Posts By Type
Text
7
Photo
1
Last Seen Tumblr Blogs


Fun Fact
In Q3 of 2020, 31% of US users access the Tumblr app daily.
Text
Final Project Outline
For my final project, I will be creating a STEM kit for kids, focusing on Math, Physics, and Chemistry. The materials should be able to fit in a small, portable box, and will incorporate toy interactive elements as well as crafting elements. The purpose of the box is to incorporate play and creativity with learning math and science, either individually or collaboratively with others.
I plan to use flashlights and photosensors, shadows, a small projector, conductive ink, an accelerometer, and Processing to achieve these elements.
0 notes
Text
Piano Painting

For this project, I created a series of interactive paintings which come to life when touched.
Concept:
Usually in museums, there are big “Do Not Touch” signs next to paintings. In my concept, I wanted to break that barrier and give the paintings the extra element of sound. With this idea, I created a series of five paintings which all reacted to touch with sound and sometimes visuals.
There’s a lot of flexibility with what can be created with this medium, but the pieces that I made were made with children in mind.
Details:
The first piece was a makeshift piano. This piano had 7 keys and a metronome which plays in two tempos. This is an easy way for children to learn simple scales without owning a full piano.
The second piece is a series of 6 Disney princesses. When you press the stand under the princess, a corresponding music video plays on the computer screen.
The third piece is created with gamers in mind. When you press the weapon, a corresponding Legend of Zelda Ocarina of Time song plays.
The fourth piece is a simple piece. When you press a mountain painted in a traditional Chinese style, it plays Ain’t No Mountain High Enough by Marvin Gaye, with stars on the computer screen which correspond to the volume of the song.
The last piece is a drawing of storefronts. Different interactive pieces are hidden in the painting -- the dog, the car, the restaurant window, the flower shop, and the second story window.
Technical Summary:
I used an Arduino Uno, p5, and conductive ink to make this project. Using Capacitive Sensing I was able to create sections of my drawings that were sensitive to touch. The schematic of the wiring on the Arduino is below.
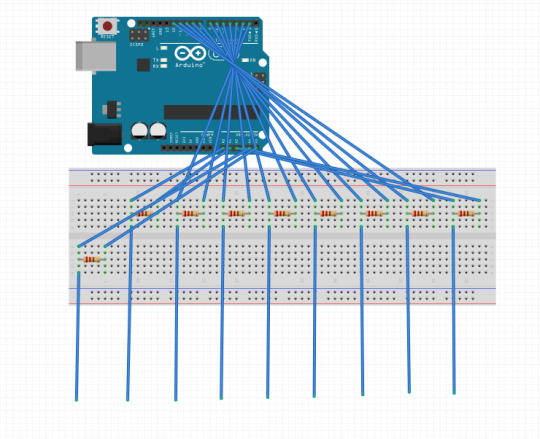
At the end of every wire, I attached alligator clips. This made it easy to switch between the different paintings.
In the Arduino code, I collected the values from the different clips, concatenated them into a comma delimited string that I then sent over to p5. Each different painting had a different sketch. I housed mp3 sound files on Cloudinary, and hosted images and gifs on Giphy.
Please find my Arduino code and my p5 sketch codes at my github.
Video and Photos:
vimeo


Analysis and Next Steps:
The conductive ink was very sensitive and was easy to paint with. Once I figured out the code for the piano, it was relatively easy to translate it to other paintings -- I just had to swap out the sound files after I uploaded them on Cloudinary.
There was a slight delay on my piano which I’m still working on. In addition, it was difficult to switch between different paintings - although alligator clips made it possible, it is still somewhat annoying to have to clip the wires onto the new painting each time. In a future iteration, I’m going to create a stand that you can slot the painting cards into - hidden inside the stand will be the wires so that there is minimal effort from the user. That way, the box can also hide the Arduino and the wires as well. For those paintings, the conductive ink lines will have to converge at the same place on the canvas so that I can slot in the different places.
0 notes
Text
Project: Connecting Arduino with p5
This week, we wanted to connect Arduino with p5. What we attempted to do is make is a piano. We connected 3 potentiometers and a button to the arduino, inputting a string of four values, pot1, pot2, pot3, and button1.
Taking this string and translating it to p5, we are making the following mappings:
pot1 = C Note = Red
pot 2 = D Note = Green
pot 3 = E Note = Blue
Using the modulus function and importing sound clips using Cloudinary, we were able to emulate a simple piano.
When pressing the button, we can also sync the notes in order to play a chord.
Please see the demo below:
youtube
P5 Sketch Code:
https://gist.github.com/anonymous/0ee74588695fbb02bfca387041b9024a
Arduino Code:
https://gist.github.com/ulrichzwingli/2c94958570bc32488ec97ef8d1c9346e
1 note
·
View note
Text
Project: Dynamic Combination Lock Box
For my assignment, I wanted to not only create a Combination Lock Box, but also have the combination change as a function of time. In order to achieve this, I needed the following materials:
Arduino Uno
Breadboard
Green and Red LED
9V Battery
3V Coin Cell Battery
Wires
DS3231 AT24C32 IIC High Precision RTC Module Clock Timer Memory Module for Arduino
4 x 4 Matrix Array 16 Key Membrane Switch Keypad Keyboard for Arduino AVR PIC
220K Ohm Resistor

My first step was to solder together the LEDs with the wire and the resistor.
Then, following the tutorial of how to hook up the keypad to the Arduino, I was able to create a static combination lock box. Please see the code for a static combination lock box below. In this code pressing * after entering the password submits it, and pressing ‘#’ resets the currently entered passcode. I needed to get the Keypad library for Arduino as well from online.
Now that I’ve set up the static keypad, I want to make the password a little more interesting. What if the passcode wasn’t a set number, but depended on what time or day it was?
I decided to set a rule that the passcode would:
Be a 3 digit Number
Be the factorial of the current day (Sunday = 1, Monday = 2, etc) mod 101
Be submitted by pressing * and reset by pressing #
My logic behind finding modulo 101 of the passcode was to ensure that the number was not larger than a 3 digit number. Technically, it could have been mod any 3 digit number (for instance 999), to keep the passcode 3 digits. Feel free to change that in the code.
The function for getting the factorial of the date is below:

Please note that the function had to be type “long”. Originally, making it into an integer caused a bunch of strange errors and ultimately resulted in a negative number output. After a ton of troubleshooting, I realized that this issue was caused because the factorial number was too big to fit into the int data type.

In order to ensure that the password is always 3 digits, I first created a default keycode 000. When getting the factorial value, we replace the digits with the appropriate new keycode.
For certain entries, such as 1 or 4, the keycode would end up being 100, since the factorial of 1 is just 1, or 240, since the factorial of 4 is 24.
In addition, the DS3231 tells time and keeps the time correct once you set it the first time in the code. This also required the DS3231 library which I found online.
Please see videos below for a quick demo, and the full code below:
youtube
youtube
youtube
Ta-da! A dynamic keypad.
0 notes
Text
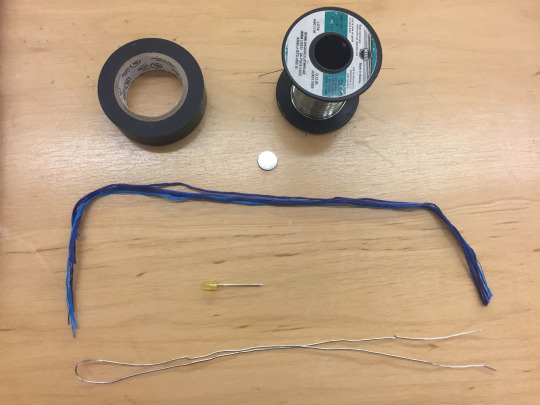
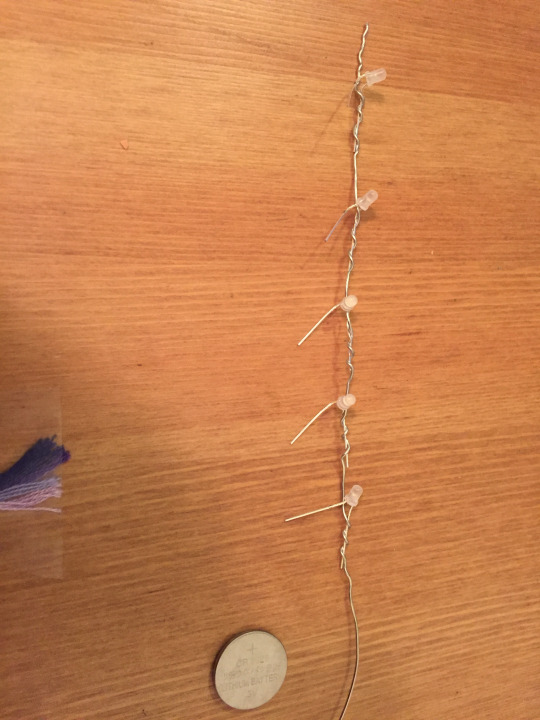
Assignment: Enhancement to Homemade Switch
To add to my friendship bracelet, I connected it with the Arduino. To start off, I just tried the general LED blinking code to see if it was working. I wanted to give off a star blinking in a night sky.
As seen in the post below, the schematic is pretty simple, just a yellow LED connected to a 3V battery, with a conductive wire running through the bracelet.
In order to try out different types of Arduino code, I also tried out different versions of blinking, as well as the fading code.
Blinking Bracelet:
https://youtu.be/B5mySSAD5rE
Fading Bracelet:
https://youtu.be/vLfKyw2fh7Y
The Arduino code can be found in the general Arduino example library.
0 notes
Text
Cool Imogen Heap Media Project
youtube
I found this really cool demo by Imogen Heap, an award winning English musical artist. She is wearing a pair of gloves developed by MIT Media Lab to be an interactive “instrument”. There are wires going up and down her arms, and two LEDs on her gloves that change color depending on what “mode” you are in. This is paired with an Xbox Kinect to help to sense how she interacts with the space.
You can create, distort, and echo sounds, and pan them across the room depending on your gesture and what “mode” the gloves are in.
This makes her electronic music more visible to her audience, and incorporates dance and the physical space with her music, instead of just relying on a screen and knobs.
In her words:
“Basically, inside this software I can play virtual instruments and loop things, add layers and textures that I spend hours working on in my basement. But I wanted to bring those sounds on stage with me. I strapped keyboards onto me, had microphones attached to my wrists so that I can mic up wine glasses or guitars or whatever I wanted to record. The problem was, how could I do this on the move. A lot of what I do, like adding a huge reverb to an instrument, is done by pressing a button on a keyboard — which isn’t very exciting. You can’t even see what i’m doing,” Heap said, picking up a synth and pressing said button. “I could be checking my email for all you know. Fifty percent of the show gets hidden. I wondered how to make it fluid on the stage without these buttons — I wanted to make a gesture like this [she throws her arm out in a wide arc] to add the reverb so you could see and hear the sound, which is much more interesting than turning a pot around.”
0 notes

Text
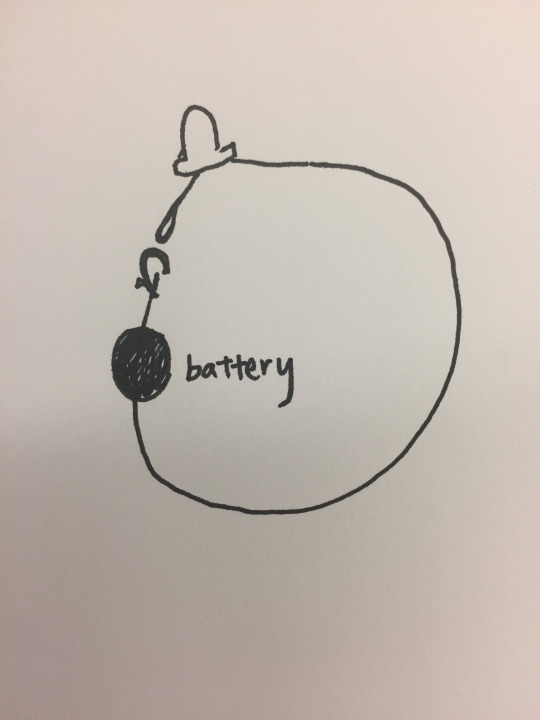
Week 2: Homemade Switch
Background:
For our first Physical Computing Project, we were given the task to create a homemade switch. I wanted to create something wearable since I always love wearing sparkly jewelry.
I thought back to all the friendship bracelets I used to make as a child during summer camp. I used to make tons of them for my friends and family.
I decided to create an upgraded version of these braided bracelets. The switch would be the clasp of the bracelet -- that way when you put it on, it will light up!
Materials:
3V Coin Battery
Embroidery Thread
5mm LED light
Conductive Thread
Metal Jewelry Clasp
Drawings:

Process:
I started off by testing out the LED and battery. Then I started to weave a friendship bracelet, and incorporated the LED attached to conductive wire inside of the weave.
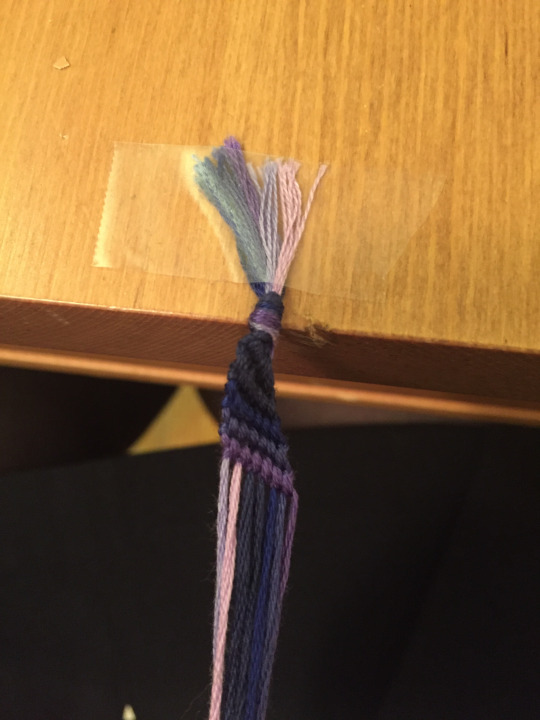

youtube
Tada! The finished product in use...

Extra:
I wanted to try to make some lights in parallel as well, to see if i could incorporate multiple lights into the bracelets. It was a little more difficult to incorporate the weave around the wires in this example..
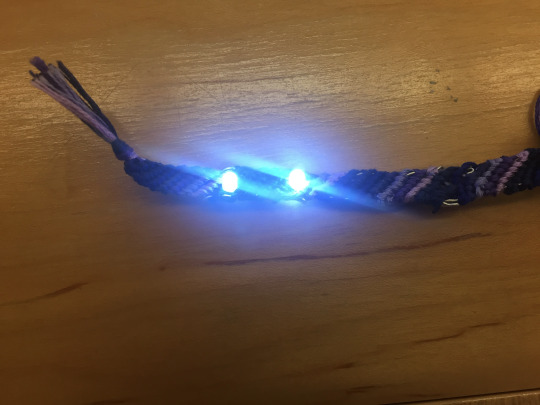
Lots of fun! Next up, light up earrings and a necklace to match!
0 notes