
daydreaminginkorean-blog
Daydreaming In Korean
My Journey to Fluency in Korean
47 posts
Don't wanna be here? Send us removal request.
Last Seen Blogs

neoxoneit
tooru

thechicdaily
The Chic Daily

alshall
Shall

not-the-president
Not the president

-morgenroete-
16 1/2 -> 23 1/2
Text
Please follow me here I have moved my blog
New blog location
I have moved to http://thestudyingnightowl.tumblr.com
1 note
·
View note
Text
New blog location
I have moved to http://thestudyingnightowl.tumblr.com
1 note
·
View note
Text
Moving
My main blog on this account is for a Korean hip hop artist. I have gotten some news that good news for that blog and the work I have been doing there. I have decided to create a separate account for this blog and I will attempt to move my posts to that blog. I will post a link to the new blog once it’s finished. Sorry to move so quickly after just starting. I honestly didn't expect my main blog to take off like it has
1 note
·
View note
Photo


This March I was one of the 100 students selected from my department to go to Korea to complete my psychology internship. While I was there I got to visit my first choice university, Korea University. I was able to see the campus, meet the students, eat lunch, shop at the bookstore and Take a psychology class which compared the cultural difference of China ,Japan and Korea. The class was held with the Korean students who normally take it and it was in Korean with English translation from my professor. It was such an amazing lecture. I knew then and there I had to study here.
I’m the type to believe that if you work hard for something you can have it. No matter what you have working against you in life. Keep going and stay focused on your goal and you will get there.
I brought a hoodie, a tee shirt, a bag, and some fridge magnets. Which aren’t pictured. If I get into Korea University I plan to wear this my first day of class. The tee shirt if I get into spring semester and the hoodie if it’s fall/winter.
I know some people are thinking what if you don’t get in. I don’t like to think that way because then that’s when doubting myself comes in. I guess you will have to check back in 2018 to find out if I did or not
4 notes
·
View notes
Note
Good info for those not familiar with revision
Hey! I'm usually just an observer of the studyblr community, as my school life is NOT pretty enough for that,,, but I was wondering, since I know you talked about revision a lot in your advice post, my school is in the US and we focus more on homework instead of revision, but honestly, I feel like revision is more useful for me, especially now that I am consuming so much studyblr media. Could just give me an overview/crash course/general guide on how to revise and its merits and such? Thanks!

okay here’s helena’s crash course guide for revising! this is late bc i needed a laptop and i was in belgium when i got this
what is it?
simply, revision is revisiting topics previously learnt, and refreshing your knowledge on the subject. revision also tends to be self led, rather than being set specific tasks by teachers
why do it?
revising during the year makes preparing for exams easier. by frequently revisiting the subjects throughout the year, you can better your knowledge and understanding of the subject (and it makes it a hell of a lot easier when preparing for exams)
types of revision
there are three main types of revision:
note-taking/note-making
memorising
practise questions
note taking/making: this is making notes from your previously made notes, and condensing them, only focusing on the important parts and what you know you are not as strong on.
note taking can be in many forms, such as:
spider maps / brain storms
cue cards / revision cards
timelines
annotations
mini revision booklets
rewriting and condensing older notes
memorising: used for learning facts or key points + vocabulary and key terms.
mnemonicsare useful for memorising points, as well as flash cards and tests such as apps like quizlet and gojimo
practise questions:this is finding past papers and answering the paper under test conditions (ie without any help and in the certain amount of time). there are hundreds of past papers available online (free!) for every course, which can help you learn how the questions work and the kind of answers the examiner will expect. dont skimp on the marking either, spend time looking through the mark scheme and where you went wrong/ right and why. look for what the examiner is looking for and learn what they will allow/disallow as it can be the difference between grades
it can also be helpful to find out what type of learner you are (there are seven):
visual (spatial)
aural (auditory-musical)
verbal (linguistic)
physical (kinesthetic)
logical (mathematical)
social (interpersonal)
solitary (intrapersonal)
here are some quizzes to find what type of learner you are, here and here
general tips from mama helen:
a big mistake that people make is revising what they already know or find easier, rather that what the struggle on or find more difficult. revision is meant to help you improve your weaknesses, not your strengths.
start revising the oldest stuff first bc i guarantee u remember next to none of it
make em colourful and shit if it helps, but if it doesn’t not waste time making ur notes pretty if it doesnt help and nothing goes in
small amounts of revision frequently are better than large amounts every now and then
keep ur revision separate from ur class notes, so its easier to revise as everything is in one place, and not spread out through ur class notes.
u cannot revise too much
test urself and test friends
teach friends stuff if it helps
even if its over skype or something and they aint listening
hell teach ur dog
practise practise practise
remember revision tends to be self led, so only you know how much u know and dont know and how well you know stuff
to help with languages, watch films/tv in the language (bonus points if u dont have the subtitles with your first language!)
its never too early to start revising pal
okay thats me done peace out homies i hope this helps a bit and i didnt just babble nonsense
helena (uglystudies)
656 notes
·
View notes
Photo
Good reminder to myself and others

👌🏾
4K notes
·
View notes
Text
Studyblr/langblr
This is technically my side blog and it's a studyblr where I focus on studying Korean. I graduated in May with my bachelor's in psychology. I am learning Korean because I love the language and culture but I hope to attend university in Korea for my masters degree. I hope to study Social Welfare as a part of the incoming class of 2018. I know the world of studyblr are mainly high school - early 20's. I'm 31 and I don't feel it has to be limited. I study. I worked very hard the past 4yrs after overcoming some life hardships to achieve my dream of a college degree. I'm the first in my immediate family to do so. And I have bigger dreams I'm working towards. I started this out of the blue, right now my main focus is Korean, and I'm playing around with blogging my studying once I start preparing for the GRE in a few months to come. Anyways thank you to those who have followed me thus far! I really appreciate it. I'm learning a lot about a lot hahaha so sorry about the sporadic posts
2 notes
·
View notes
Photo


Note-taking tips -Three Note-taking methods:
Always write the date of your class at the top of the page and number the pages on the bottom. This will help you when reviewing as you can just go to the lecture notes given on a certain day and, if you have time you can even create a table of contents for your notes.
The Cornell note taking method:
You have to divide your page into three sections. Draw a vertical line in a quarter of your page and then draw a horizontal line near the bottom of the page like in the picture. On the right vertical section you will take notes of the lecture. On the left section, after class you will write any main ideas, cue words, or questions that will help when reviewing that topic. On the horizontal section, you will summarize your lecture notes. You should try to keep the summary concise and should be a few sentences long
The Mapping method:
This method requires you to write your notes like a mind-map. You write your main idea or topic on the center and then go adding ramifications as that idea or topic expands as you continue learning about that idea or topic.
The Outlining Method:
This is the method that I use because, I take notes on the computer and that’s just easier for me. You start with your main idea or topic, this can be general and, then as you learn more about that idea or topic, you can add more details about that idea or topic. You expand that topic using space indentation; to keep track of your ideas and details, you can use numbers, bullets, dashes, Roman numerals, etc. You can also use color coding (red for definitions, blue for main ideas, etc.)
Hope that helps,
xoxo, G
10K notes
·
View notes
Photo


I brought this stuff today so that throughout this challenge I can make nice notes. I notice studyblr here have really pretty notes and I want to try it out see if I like note taking this way I got everything for a really good price. It was all 50% off. I got things at Michael's , Target and Hobby Lobby. I don't want to invest too much until I have a good idea of what I like when it comes to note taking style but it's a nice start of a collection I think
3 notes
·
View notes
Photo


Stationary that I got while in Korea a few months ago. I didn’t buy much because I had no space but I really liked stores like Artbox and Morning Glory
2 notes
·
View notes
Photo
Study tips

No one is instantly a perfect student. It’s well known that ‘’perfect’’ studying requires some practice. Fortunately, there is a bunch of information available on this topic on the internet. In this way everyone can become a professional student.
1. Choosing the right study spot
Create a study space
Desk organisation
Study music (x) (x) (x)
Remove distractions
Study space guide
2. Being well equipped
Studyblr on a budget
Organizing systems
How to stationery smart
Save money on stationery
School supplies shopping
Study apps everyone needs to use
Things you need in high school
Things that are useful in college
DIY school supplies
3. Getting focused
How to concentrate
Useful apps for focus
How to focus when a thousand things happen at the same time
Tips on staying focused
Academic goals
Getting started
4. Improve your handwriting
Handwriting goals
Improve your handwriting (1) (2) (3)
Fake calligraphy
How to calligraphy
Some banners
Some fonts to try out
5. Taking useful notes
Cornell notes
Outline notes
Alternative to flashcards
Taking notes in class
Or during a lecture
Mindmaps
Highlighting
Typing your notes
Flashcards
Feymann’s technique
Colour coding
Sticky notes
Annotating
Decorate your notes
2 notebook method
Taking notes efficiently
6. Creating an efficient study routine in your life
How to create a study habit
Public transport productivity
Prevent the curve of forgetting
Make the most of your day
Study snacks
Succeed at school
Effective studying
Improve memory
Last minute studying
10 best study habits
After school routine
7. Planning your studies
Scheduling studying masterpost
Promodoro method
Plan during your study breaks
Bullet journalling
Plan for multiple tests using a calendar
Use printables
Use your productivity wisely
Be more productive with a planner
7 ways to better organise your study time
8. Study strategies
Types of learners + strategies
Study skills for test taking
Study strategies masterpost
SQ3R reading method
Tips for effectively studying
Finding your perfect study method
How to memorise
Studying in a group
Study from textbooks
Quizing yourself
Secrets of a straigt A - student
My other masterposts
Scheduling studying
Acing vocab lists
27K notes
·
View notes
Photo

“Productivity is about making smart choices (continuously) with your energy, focus and time in order to maximise your potential and achieve beneficial results.” – Mohammed Faris
1. Find your energy hours.
Everyone has a specific time in the day where their energy levels are much higher than usual. Use that time to your advantage. Take that energy and get the majority of your work done and out of the way.
For me, the mornings are usually when I feel the most energised, so I get to work straight away. To find your energy hours, try working at different times during the day. See which time of the day allows you to work at your very best.
2. Establish routines.
Once you have found your energy hours, base your day around this. Create a routine for each day of the week.
When do you study? When do you go to school? Do you relax for an hour after coming back from school? Do you tidy your room on Sunday?
Establish a schedule and you’re less likely to get side-tracked and much more likely to maximise your productivity.
3. Ditch the to-do lists.
Yes, it’s good to write lists of things you need to do, but you’re never going to get around to doing them if you don’t plan time for it. So instead of relying on a to-do list, add the task to your routine. Will you be able to work on this task on a Saturday afternoon? Great! Put it into your schedule. This will ensure the task is completed.
4. Don’t multi-task.
You can’t do multiple things at once. It seems like you’re able to, but what you’re really doing is constantly switching your attention from one task to another. Don’t do that. Focus on one thing at a time. That way, you’re putting all of your attention on a task and are likely to get it completed faster and at a higher standard.
5. Complete similar tasks together.
If you’re studying, instead of switching from subject to subject throughout the day, try to stick to one subject. On Monday, create flashcards for a Biology topic, then revise the topic and then do a Biology past paper. This will ensure your mind is concentrated on one thing at a time and not constantly switching gears.
So get your chores done together. Study one subject at a time. Send your e-mails and messages at one time. Dedicate today to your English essay. Don’t interrupt tasks with an unrelated task.
6. Finish quick and easy tasks first.
If you need to make a dentist appointment, do it. Do you need to write a quick e-mail to your teacher? Get it out of the way.
Finishing the quick and easy tasks right away will leave you with ample time to tackle the more challenging ones you’ve got up ahead. It will also give you peace of mind that you’ve gotten something done today.
7. Take breaks.
You’re not a machine. Productivity is not working 24/7.
“Being productive is about knowing when to have fun and when to work hard; when to relax and when to be serious. It’s about making smart choices.”
Allow your mind and body to take a break every now and then and relax. Scheduling these breaks can be beneficial so that you’re not constantly taking a break when you don’t need to.
8. Prioritise.
Yes, that idea you had on the train was appealing, but is it really that beneficial? Is it important enough for you to spend your valuable time and energy on it? Will it get you where you want to go? Probably not.
So prioritise projects and tasks. Ensure important tasks are completed first and well before any upcoming deadlines. Make sure that your time is better spent doing things that will actually benefit you and bring you closer to your goals.
9. Become accountable to someone.
It’s super easy to make promises to yourself, saying that you will do this and do that. Likewise, it’s also extremely easy to break those promises.
However, this is different when you have someone you are accountable to. Perhaps, at the end of every week, you can report to a parent or a trusted friend on your progress so far. It’s extremely difficult to tell someone that you haven’t accomplished your goals for the week. This will make it far more likely for you to get your work done.
10. Review your progress.
At the end of each day, you should evaluate your progress. What did you accomplish today? What did you do well? What did you not complete today? Why? How could you improve? When will you complete it?
Asking yourself these questions and being honest will help you see where you’re going right and where you’re not doing so well.
I hope this is useful to some of you and that you put your time and energy into good use. 😊

6K notes
·
View notes
Text
100 hours in 40 days
Day 0 - Introductory Post Language : Korean Time frame: 100hr in 40 days 2.5hrs a day September 1- October 10th Focus : Grammar, Vocabulary, Reading, Writing, Listening, Speaking Materials: Ewha Korean 1-1, Korean Grammar in Use Beginner, Ttmik Level 1&2. Naver Webtoons. Korean dramas and TV shows Starting Point: I started studying Korean back in May 2016 seriously. In July I completed Ttmik level 1 and Ewha 1-1. I didn't retain the vocabulary well enough nor do I feel completely comfortable using the concepts without referring to my book/notes. Goals: 1. To complete all exercises in Ewha 1-1, Ttmik 1 2. To feel comfortable using all concepts learned without continuous book reference 3. To improve my retention of vocabulary . 4. To be able to write basic sentences comfortably and use all the main tenses 5. To be ready for Ewha 1-2, and Ttmik level 2 or 3 6. Feel comfortable speaking I may post daily but not sure yet
#10040 challenge#10040 challenge korean#Korean#korean langblr#korean studyblr#Korean language learning
3 notes
·
View notes
Text
I like this
How to Make a Language Notebook
I’ve been using a language notebook for about a month now, and I finally figured out a format that works for me, so I figured I’d share it with you guys! Keep in mind these are only recommendations, feel free to do your own thing if you think it’ll be more convenient for you!
Okay, so to start, here’s what you’ll need:
1) Pens
I recommend three pens of different colours. I used blue, orange and black. The blue is for words/ sentences in my target language. I chose a dark colour so they would stand out more. The orange, a light colour, is for words/ sentences in my native language (or English, in my case). It’s a lighter colour because it makes the blue stand out more, so I focus more on the words in my target language instead of the English ones. The black is for titles, drawings, and words in another language that isn’t my target or my native. For example, I compare German with Spanish in this entry:

As you can see, the German phrases are in blue because it’s my target language. The explanations in English are in orange, and the title and Spanish words are in black.
2) A notebook
Some people recommend separating grammar and vocabulary. This is an excellent idea if you have many notebooks or notebooks with different sections. If you don’t, it’s not a problem. I only use one notebook, which works for me, because I don’t use it too much (it’s mostly a space to write down stuff I like, not stuff I will necessarily use). If you plan on using your notebook in a more serious manner, but cannot afford to get several notebooks, I recommend you write everything concerning vocabulary (or grammar) in the front of the notebook, and the rest (grammar or vocabulary, it depends) at the back. Make sure to not use a very thin notebook though!
If you don’t feel the need to separate grammar and vocabulary, there are ways of dividing the topics:
3) Sticky Tabs
I have four different topics in my language notebook: vocabulary, grammar, verbs, and miscellaneous. To divide them, I add sticky tabs of different colours next to each entry. For example, vocabulary is pink, grammar is blue, verbs are orange, and miscellaneous is green.

This allows me to see what the topic is immediately, and it makes my notebook very colourful!
4) 4cm margin
It doesn’t exactly have to be 4 centimeters, but it shouldn’t be more than a third of the page. This margin (I place mine on the right of the page) is for any notes you might want to add about the entry. For example, definitions, formal/ informal forms, etc. It doesn’t necessarily have to be used for every entry, but it’s easier to trace it for all, instead of just adding it when you need it. It’s also a good place to put the sticky tabs (refer to the previous image). I trace the line with a pencil so that it’s lighter and more discreet than the rest of the writing, but that’s up to you.
5) Index/ Key
One last thing you’ll (maybe) need: an index/ key! I don’t personally have an index, because I have too many entries per page, but a key is definitely useful if you use the sticky tab method. I still haven’t gotten around to making one, but that’s because I’m lazy Just write it (or stick it) on the back of the cover so you don’t waste a page on it.
Next you’ll need to decide what to write in the notebook. If you already know what to write, great! If not, here are some suggestions:
- Class notes
- Grammar rules/ verb conjugations/ etc. that you struggle with
- Funny sayings or random slang you learn
- Tumblr posts (these are great because they are generally explained simply, but make sure to check the info, because there might be some small mistakes)
- Journal entries (these are a great way to practice what you’ve written in previous entries!)
It doesn’t all have to be useful, necessarily. I have jokes, and puns that I might never use, but that are funny anyways. I find it’s a great way to stay motivated!
If you want more photos from my notebook, you can find ‘em here :)
So yeah, that’s all! :D I hope you guys like it, and feel free to ask me questions about my language notebook!
885 notes
·
View notes
Photo
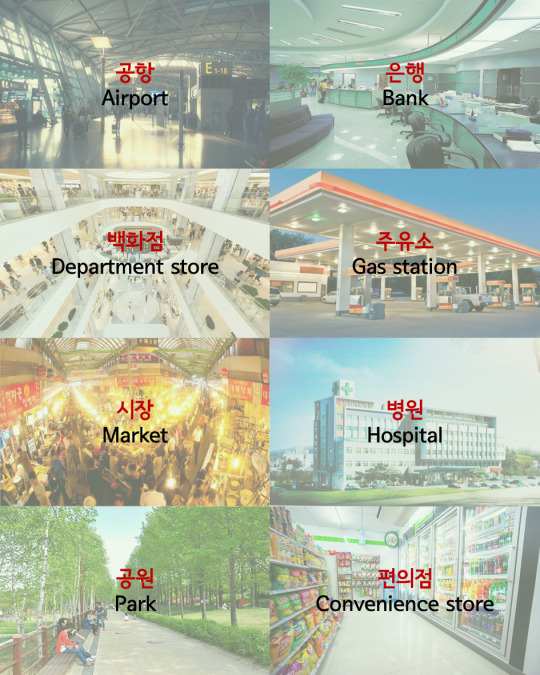
Learn Korean words : Places
1. 공항 [gong - hang]
2. 은행 [eun - Haeng]
3. 백화점 [baek - hwa - jeom]
4. 주유소 [joo - yu - so]
5. 시장[si - jang]
6. 병원 [byeong - won]
7. 공원 [gong - won]
8. 편의점 [pyeon - ui - jeom]
414 notes
·
View notes
Photo
This is useful

[LEARN KOREAN]
Useful Language Learning Questions in Korean
* 무슨 뜻이에요? = What does this mean?
* 잘 모르겠어요. = I don’t understand quite well.
* 천천히 말해 주세요. = Please speak slowly.
* 적어 주세요. = Please write it down.
* 아직 이해가 안 돼요. = I still don’t get it.
* 질문 있어요. = I have a question.
2K notes
·
View notes
Photo

자매 - Sister
형제 - Brother
어머니 / 엄마 - Mother
아버지/ 아빠 - Father
할머니 - Grandmother
할아버지 - Grandfather
삼촌 - Uncle
이모 - Aunt
사촌 - Cousin
남편 - Husband
아내 - Wife
딸 - Daughter
아들 - Son
손녀 - Grandaughter
손자 - Grandson
Extra*:
언니 - Older sister (If the speaker is female)
오빠 - Older brother (If the speaker is female)
누나 - Older sister (If the speaker is male)
형 - Older brother (If the speaker is male)
동생 - Younger sibling
할아버지 - Elderly man
할머니 - Elderly woman
아저씨 - older man
아줌마 - older woman
* Used on non-family members also
A&R
876 notes
·
View notes