
Current Project - Final Project for Art & Design! (Colour & Electricity)
Don't wanna be here? Send us removal request.
Statistics
We looked inside some of the posts by eagerbeva and here's what we found interesting.
Average Info
Notes Per Post
1
Likes Per Post
1
Reblog Per Post
0
Reply Per Post
0
Time Between Posts
2 days
Number of Posts By Type
Text
17
Last Seen Tumblr Blogs


Fun Fact
The total number of visits Tumblr.com received during January 2021 is 327 million.
Text
29/05/25 - Stitching it Together Part 2 (Final Evaluation)
To put all of my scenes together, I used Adobe Premiere Pro. I had a file open on this program throughout the project just to track progress, but I now replaced all of the scenes with their fully rendered versions and also put the audio track in separately. I did this instead of relying on the audio of each of the scenes because this method ensures that I have an anchor to attach all my scenes to, making the song consistent with no cuts or changes in audio quality/volume.

I also edited together the opening tweens through keying out the background of one of the characters and then layering them on top of each other. I also slowed down the real character's movements as I thought it looked nicer to have a slower, smoother movement.


Once I had put in and timed all the animated scenes, I added in the storyboard to the parts that were missing, to ensure something was moving on screen at all times. Finally, I added the opening text with a bit of animation to make them more interesting to read and then faded out the audio at the end of the first chorus.
Here is what it looks like all put together!
youtube
v Final Evaluation v
The artists I researched throughout this project were (in chronological order) ChannelCastStation, Otoiro, Helen Wells, and Badjaune as well as the genre of Hyperpop art and smooth tweens in the style of Genshin Impact's promotional material. I took inspiration for storytelling through Otoiro, art style and colour from Wells and Jaune, and animation from Otoiro, Channel, and Genshin Impact. In my previous project, there was a significant gap in my research on creative studios. The world of studio art is completely different from anything done independently so my research into the animation industry through Otoiro was very insightful. If I was under less time constraints, I would have love to done a fully fleshed storyboard with accurate perspective and notes, but I wanted to get as much animation done as possible so I went with the scruffier, indie approach. The colours of Jaune and Wells inspired me a lot especially in the backgrounds in the forest. The completely surreal environments described in the lyrics of Pokkan Kara were very fun to transform into appealing imagery. I also planned for reality to be decently colourful (though definitely toned-down to show the contrast between fantasy and reality).

(Above: Sneak peak at airport background scene)
The animation was mostly from my research and the developing of my skills throughout this project and in previous years of making short animations. The research into Channel and Genshin was the first time I properly used interpolation and the warp tool in Adobe Animate and it was an interesting (and extremely frustrating) experience. I am more confident in my hand drawn animation, but with some practice and knowledge in wrangling with a program as complicated as Animate I think I could use these tools in a very fun way.
My initial ideas for Colour & Electricity were quite varied and it took me a while to fully settle on making an AMV (Animated Music Video). I am more well versed in being an illustrator but I have enjoyed animation for as long as I have been serious about drawing. I was originally not planning on making a full length animation as in the back of my mind I knew I wouldn't have enough time, but every time I researched something or listened to a new song, my ideas always revolved around making something move. The short animation tests I was doing were so much fun and I wanted to put my skills to the test. I chose the name Colour & Electricity because I was initially inspired by the song created by MushiP of the same name. It has a wonderfully surreal music video itself and deals with the topic of guilt in a very visually interesting way.

(Above: snippet of 色彩電気)
Since it already has a brilliant music video, I decided to pivot to looking at Kikuo songs instead, which are known for being upbeat despite their dark lyrics. I think I brought out the colour and electricity in my animation with their simple yet surreal designs which come to life through digital animation. I intend to finish this animation in the next few months. I think it would be very fun to experiment with how the fantasy world and reality could blend together and try to incorporate that into later scenes.
In terms of ethics, I lent heavily into escapism by showing how the fantasy world doesn't care about distance, identity, or differences and is simply a world where everyone can enjoy themselves and partake in simple pleasures like singing and dancing together. I took from my experiences as a queer, nonbinary person and experiences from my fellow lgbt+ friends as well as research from reading queer literature, biographies, and online discourse (especially with the intersections between queerness and other parts of people's identities such as race, religion, nationality, etc.)
This project was the first time I dedicated time purely to researching the animation principles. I was previously only aware of them from animators talking about how they used them, but actually looking through them one by one showed me the similarities between animation and other storytelling methods like theatre and film. Animation requires a good balance between theory and practice and developing my theory knowledge meant that when an animation didn't quite look right, I had ideas for where to adjust to make it more convincing and appealing. I also had more tweening/interpolation planned - like at the pink and yellow scene - but decided to pivot to hand drawn animation after not getting the results I wanted. I don't regret the change as I think it looks a lot more fun and lifelike this way. One technique that I wish I explored more was more graphical animation that is often seen in Otoiro's music videos. A huge amount of their appeal is how they twist and swirl the lyrics around their characters and sync up their graphics to the music. I think in the future I will make some shorter animations to experiment more through animating graphics. I may also potentially use Adobe After Effects as I've heard great things about its animation tools.
As of 31/05/25, we haven't yet started preparation for our exhibition. I have, however, printed out my illustrations of the yellow and pink characters on satin paper in advance. I also have plans to either have a laptop or a screen presenting my animation and do some mural work to blend with my backgrounds.
#animation#2d animation#digital art#kikuo#vocaloid#tone rion#pokkan kara#pokkan colour#work in progress#Youtube
0 notes
Text
27/05/25 - Stitching it Together Part 1
! FLASHING GIFS AHEAD !
Since my deadline of May 31st is fast approaching, I decided now is the time to stop animating and start putting together all of the scenes that I had. I first started by properly rendering all of the scenes I had done. I was initially just using the fast render, but to ensure the frame rate and the line quality was as I intended I did the full render as well.

I also did the little bit of the opening scene that I had left to do in OpenToonz, including the zoom in on space and the characters all together.


For the very start of the animation, however, I decided I wanted to show off both the character designs and my tweening skills that I had developed.


I started in a similar but more refined version of my previous tweening endeavors. I adapted the sketch from my storyboard into my art program and split up each moving part into its own layer. I made the arms one layer instead of splitting into two or three as I could use the warp tool to give the arms bones and make them warp in a convincing way. I did the same with the fantasy version of the pink character, and tried to line up the outlines as best as I could. I then shaded and adjusted the parts (keeping the gray boundary box in mind as that was the edge of my canvas) and imported it over piece by piece into Adobe Animate.

I decided to do each character separately and then later edit them together in Premiere Pro. I converted every piece that required warping into a classic tween and every other piece into a motion tween. I planned to move the entire character along the canvas, so every piece was technically moving. I started with the arms and hair, tweaking as I go to ensure they aren't too warped, and then adjusted all of the easing to make it look like her entire body was moving together (which was quite annoying to figure out) I made the animation 20 frames long which was enough time to have the fantasy version overlap her. Once I completed both tweens, they looked like this:


Not super impressive in GIF format but they will look nice all together. I also made the tweens for the yellow character too. Ideally, I would have finished all of the tweens that I had planned but I did not have the time as drawing all of the pieces was quite time consuming.


Stay tuned to see how I put all of these pieces together!
0 notes
Text
26/05/25 - Forest Friends Part 2
Going back to the forest friends scene, I started the long process of animating the rest of the characters coming up to the yellow character, and their reactions to the transformation.

On the left side of the composition, I made the red character step around the foreground stones and the purple character casually walk into frame. I then made the orange character run towards them to contrast the fast and slow movement. I had to make them shuffle a bit to give everyone enough breathing room but I still think it works.

On the right side of the composition, I made the blue character step over one of the foreground rocks and turn to face the centre. I then made the pink character's walk cycle. I realised pretty quickly that they would not get to their place in time for the transformation, so I made them do an excited jump to their spot, utilising smear frames to make up for the speed. Finally, I made the green character float into her spot using the small butterfly wings on her back. I think I was quite successful in making everyone enter the frame in a unique way.

Once they were all in their spots, I drew their reaction to the transformation, inbetweened between the two main keyframes, then added all the facial expressions leftover.
I am super happy with this scene!! It took the longest out of any of the scenes as I animated 7 characters on screen simultaneously but I think it was quite worth it and it shows off the animation skills I have developed throughout the course of the project. Hopefully once I get my reference footage for the alternate angle of this scene I will be able to complete it.
1 note
·
View note
Text
21/05/24 - Campfire Singing
Skipping the scenes in reality for now, I went on to animating the campfire scene where the orange character strums guitar to their friends.


I again started with the backgrounds. I drew this forest scene in a similar style to my previous ones, except this time I made slightly different trees and also set the scene at sunset rather than at night as I thought the lighting would be more fun. I was originally thinking of doing a red-black background but opted for dark blue instead as that gave me room to make beautiful purple clouds and warm red-brown trees. I took a few of the colours from my previous backgrounds and adjusted them to work in the scene. I also drew 2 additional angles of the scene to go with the storyboard as well as a zoomed and blurred version of the last one. Once I was happy with them, I started drawing in the characters around the fireplace. I started by just making the poses, then added the guitar and the hands strumming along to the beat of the song. Finally, I used some straight ahead animation for the fire to make it look like it's flickering and sputtering in the wood.

I then animated the other camera angles, showing the joy of being able to see friends and family even if they are hours away in real life. These were quite simple as they were just simple head turns and emotion changes.
I am quite happy with this scene as I think it shows a lot of emotions in a short time and is generally heartwarming. It's also the scene that shows the escapism of the fantasy world the clearest. When combined with the surrounding storyboard scenes, I think this scene shows how queer people very often lean into fantasy and surrealism as a means of escapism, especially when stuck in places that are unfriendly to the queer community.
0 notes
Text
20/05/24 - Bubble Blower
Now that I had the whole chorus boarded, I decided to jump straight into it as it would be the most memorable parts of the animation. I went with animating the fantasy world first as I already had its style fully established and it wouldn't take that long.

I started by making the background. I used the same 3x3 grid as the storyboard to keep the rule of thirds in mind in my composition. I did this subconsciously with my previous forest backgrounds, but having an accurate grid of thirds helped me a lot, especially on scenes like this with a simple background and foreground.
I then added some background swirls and stars in familiar colours. If I was to redraw this, I would probably use adjacent colours rather than the exact ones of my characters, as in the animation the purple bubble is a bit harder to see due to all the purple.

I then made the bubbles using a reference of a coloured bubble I found online. I was originally give it a translucent background like the bubble blower, but I decided they looked better without it.


I used 4-5 colours on each bubble and also gave each one a little facial expression to show that they are related to the colourful cast of characters that are introduced at the start of the animation.

This scene had by far the most colours in it as I had 5 different bubbles in total!
Once I was happy with the base bubble, I animated the bubbles stretching out from the bubble blower and one splitting up into two bubbles. Once I was happy with it, I animated all of the colours to go with it, letting them rotate slightly with the bubble to make them more interesting.
A real bubble reflects and refracts the colours around it which means the colours should have probably been rapidly shifting as they move across the background, but I decided that since the bubbles already had their own hue to them anyway that I think I have the artistic license to bend how their shadows and highlights work. I still think it looks convincing.
0 notes
Text
16/05/24 - Storyboard Part 2
Now that I was making reasonable progress on the animation side of things, I decided to extend the storyboard to include the whole of the first chorus, as I felt that that would be a comfortable cutting off point for my animation as I do not have enough time to animate the entire song before the project's end unfortunately.
For the chorus, I went back to my paper storyboard which had the repeating lines in grids of different possible scenes. I decided to go with the bubble, confession, theatre, and plant growing scenes for the born/come out lyrics and the airplane, and kicking out scenes for the chastised lyrics.


I realised halfway through making these drawings, though, that I missed an important part of the chorus (and we'll stay together forever.) I remedied this by extending the plant growing and the theatre scenes to cover that part of the lyrics. For the plant growing scene, I decided to include some of the characters running across the screen after the massive rolling hills of plants is shown off, and for the theatre scene I added extra dancing and drama and then transitioned the scene out with a wipe of roses. I am not as happy with the theatre scene as I am with the plant one, so I may redo it in the future.
Putting it all together, here is the final storyboard:
0 notes
Text
12/05/25 - Forest Friends Part 1
Now going back to the scenes I missed, I got to animating the scene that introduces one of our main characters. I started by adding in the backgrounds I made and animating the sea lapping at the beach the character is sitting on.

The storyboard shows first a shot where you are looking at the character and the beach from one side, and then cutting to the character facing the camera. I did a test to see how to animate the sea from that side view.

I tried my best to use references of water splashing as well as what I remember from my visits to the seaside. I am still not happy with this, however, as I think it doesn't look convincing enough. To finish this scene, I will go to get more primary source videos to use to make the movement actually feel right.
I instead decided to focus on the front on scene which I had plenty of reference for. I noticed that the sea gets absorbed by the sand in all the references I was looking at. I mimicked this by lowering the opacity of the wave as it climbs up the beach. Opentoonz handles opacity per colour so I ended up just making 4 different variants of the blue. I then kept the short sequence looping throughout the scene.


I wanted the main character to slowly wake up and realise where they are as I think it ties well to the surrealism of the main line Lightly, buoyantly, we are born. I started by getting some keyframes of the character getting up and then jumping up in excitement. I mostly kept them white through this process and used reference photos of people getting up.


I noticed that the weight shifts between each side of the body as you get your feet flat onto the ground ready to stand up. I also didn't have a lot of frames to play with in order to get the character to stand up fast enough to go with the timing of the song, so I added a couple smear frames. Smear frames are super useful in 2D animation and are used in basically every animation, both new and old. They trick the viewer as the eyes fill in the gap between the drawings. They can also be used for exaggeration and are even added in to modern 3D animations for greater appeal.

Once I was happy with the entire movement, I went on to colouring the character. I was originally thinking of having the character rapidly transform to yellow once they are jumping in the air. But I thought it would be more interesting to have them start slowly turn yellow at the palms and then burst into full yellow. It gave me the chance to add just a few frames of them looking at their palms in wonder, which I think adds to the charm of the whole scene a lot.
Stay tuned to see how I add the remaining forest friends!
0 notes
Text
09/05/25 - Pink & Yellow
Skipping ahead a scene, I decided to focus on the buildup to the chorus with the lyrics:
When you, in a ripened pink, and I, sparkling in a yellow hue,// are born onto this blue planet, we feel so warm and buoyant.
I wanted this to be the yellow and pink characters dancing with each other in the fantasy world, before transitioning to them spinning and revealing the blue planet.

First, I had to come up with how the fantasy characters would be represented in the animation. I knew that I wanted them to be quite simple, with no noses or ears and two defining features aside from their colour to make them feel unique. I spoke to various classmates and friends to see which one people liked the best.

I ended up going with the black lined design, but I gave the characters eyebrows as I felt they were far more expressive with them. I then split my drawing of the pink character to attempt to tween it to the beat of my song...and I hated it. I ended up only leaving the flower tweened (using some lines to ensure the movement was as even as I could get it) to the beat and instead hand drew the shoulders wiggling by hand.

The colours and expressions are off in this draft version, so I went back to OpenToonz to make the proper version.


I set up my animation file as shown here, starting with the shoulder wiggle, adding the black lines (and the cape for the yellow character), then the flower and stars, then the faces. For the flower and stars, I just drew one frame and used OpenToonz' version of tweening, the animate tool. It works by moving the entire canvas in the way you want, with keyframes being automatically added on any frame that you use the tool on. It is an interesting tool with some drawbacks but it is very quick to use and gives you a lot of autonomy. I used it to make the flower and stars spin and sway along with the characters to look like they're attached to them. I then copied the motion to fill in the rest of the frames, and animated a few frames at the end myself for when the characters rotate.

I also used the animate tool to tween the spinning of the blue planet getting faster and faster. The way OpenToonz handles tweened drawings means that by drawing on any frame of this sequence I could edit the look for the whole sequence, so I used that to add the yellow character's cape and the pink character's tutu. Making the world spin faster and faster was a matter of putting the keyframes closer and closer together.
With some transitions and extra details it all came together like this!
I really enjoy this combination of interpolated and hand drawn animation and I had a blast making this!
0 notes
Text
05/05/25 - Red Sky Green Moon
For my first scene, I decided to skip the intro and go right to the first verse as I typically like saving the first impressions of an animation for when I am more immersed in the world I am creating. I also don't animate super often, so I expect the later parts of my animation to be higher quality than the earlier ones; having the beginning few seconds be high quality would be good to engage the viewer.


I started by first making the backgrounds I planned in the storyboard, using the lyrics as a reference for the colours (see my background post). I then split the background up into different elements so that they could all move independently of each other. When importing the files, you need to adjust their scale using the animate tool, which I realised works a lot like the motion tween in Adobe Animate. It's obviously not as robust but I think it works fine for simple camera movements.

The only drawback with importing files is that OpenToonz does not like you drawing or erasing over images you have imported, often reverting your changes when you save the file. To ensure that my white wipe at the beginning of the scene still worked, I instead made a big white shape and used the animate tool to scale and move it as necessary. The animation file looks very silly but I think the result itself came together quite nicely.
0 notes
Text
29/04/25 - Digital Storyboard
Once I was happy with my paper storyboard, I finally started working on my actual animation file.

In OpenToonz, a single project can have several scenes in it, which all get grouped together into one folder, meaning imported files are shared and accessible between all scenes. I made a new project for this and made the storyboard scene first. Since Pokkan Kara is 140bpm, I decided to make my animation at 14fps as if you have a frame rate that is a factor of the bpm, timing becomes a lot more straightforward.


I then had to determine the offset of the audio. Once I got the .mp3 for Pokkan Kara I timed it so that the downbeat (the first major sound in the song) links up to a frame on the animation. I ended up going with a 9 frame offset. I could have always just cropped the audio, but I found this method was reliable and easy to remember. I will probably crop the audio properly when I edit the entire animation together.

For the storyboard itself, I mainly used 3 layers - a background, a foreground, and a vector layer. I used the vector layer for tweening things like the planets zooming in as vector files don't diminish in quality and can be tweened super easily in OpenToonz.
Video below has slight flash!!
My storyboarding style is very rough as I just want to draw the gist of whats happening in order to get as much storyboard out as quickly as possible. Following my paper storyboard, I made all the scenes transition nicely between each other and used red and blue to determine where characters are going and where the camera will be moving.
For specific characters like our mains, I used their specific colour. I decided to only do the scenes up to the chorus for now as if I don't have enough time to finish everything, I can at least tie down the first part of the animation to have something to show for my final piece. Once I was done, I made all of the colours go to 50% opacity, so that when I upload the storyboard onto a different scene it won't distract from the tie downs or the animation.
This storyboard would not be suitable on a collaborative project or in a professional sense as it is far too rough. In the animation industry, what the storyboard artist depicts is usually what they will get as a final result. Since I am the only one working on this, however, I know my intentions and my creative vision. I personally prefer the rough version as it gives me the freedom to change my mind about certain elements as I am tying everything down.
0 notes
Text
28/04/25 - Paper Storyboards
Continuing my trend of making paper sketches and then working digitally from there, I decided to make a very broad storyboard in my sketchbook for most of the song. The most story driven bits were in the lyrics as they aren't exact repeats so I started with that.
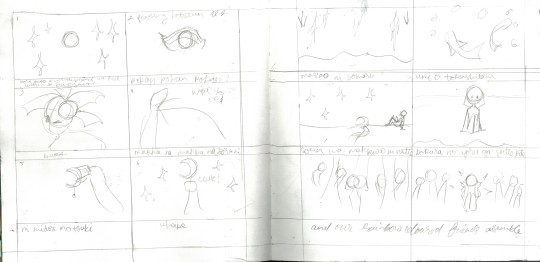


I divided my page into 6 squares with space to put the lyrics (either romanised or English translation depending on what was more useful) and listened to the song several times to get the feelings I wanted to convey and the story I wanted to tell. This wouldn't be suitable as an actual animation base, though, as it is way too broad, with each panel being a few seconds at least, but it is still very useful and I will use it to base my true storyboard later.


For the chorus, I decided to count how many times each important lyric was repeated and dedicate half a page to each of them. To show the aforementioned split between reality and fantasy, I kept all the real situations to be negatives, showing the struggles the queer community (and other marginalised groups) go through (e.g. having to move countries for safety, being hatecrimed, being estranged from family, etc). The fantasy world is then used for the lines about birth and coming out as well as the line(s) Let us, no matter when or where, dance/sing as much as we want. I also marked the panels with the colours I had to make sure each character gets some screen time.
I think with this plan I am now ready to move on to the real storyboard! Stay tuned!
0 notes
Text
28/05/25 - Pokkan Kara Backgrounds
The reason why I find Pokkan Kara so interesting is how the lyrics describe the setting of the world.


These are colours that sound like they absolutely shouldn't go together and would be hard to work with, but I trusted in my colour theory practice and decided to try painting some of the images I saw when listening to the song and reading through the lyrics.


In order to quickly produce decent-quality sketches, I used a square brush that I made a while back to block out the rough shapes. It feels a lot like a flat paintbrush and I like it a lot (it was the one I primarily used for the badjaune study). Then, once I was happy with it, I would go over it using my normal brushes to make everything sharp (unfortunately some of the progress images didn't save properly).


It was a lot of fun trying to figure out which colours wouldn't completely clash with each other. I ended up basing the character's colours based off how these drawings turned out. This gave me a variety of values to work with rather than them all being pastel or bright.
The official colours of all the characters are below:

Stay tuned to see what these characters will get up to!
0 notes
Text
23/04/25 - Pokkan Kara Characters
The main interpretation I have of Pokkan Kara is it's depicting what it feels like to be queer or different in an unfriendly world. The translated lyrics have a lot of subtle and unsubtle hints to this.


The actual description of the world that this song takes place in is also quite surreal with bright red skies and green moons. I want to lean in to this surrealism by keeping the characters quite simple and just conveying some ideas about the colours they represent. This is where my surreal paintings come in handy as I took ideas from them to give each character one unique element about them.
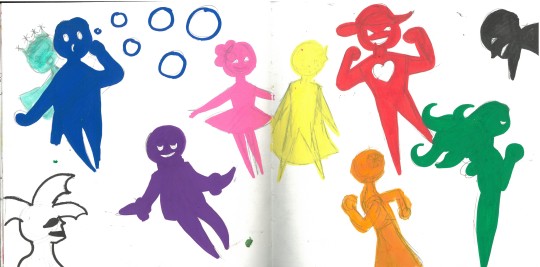
I couldn't resist more detailed, human character designs, however, so with the lyric We are chastised And forced to Part/Leave I decided to split the surreal world from the reality that all the characters face.


Escapism and Queerness often go hand in hand, as a lot of media made by queer artists often imagine a world where the stigmas and prejudices of the world were overcome. I decided to make all the designs have the essence of their fantastical versions but with human proportions and lots of variety in age, gender, race, and identity. If I was to make a longer series with these characters, it would be really fun to explore the intersections between all of these characters.
I also decided that the main characters in the story are the pink and yellow characters, as they are mentioned the most in the song and have important story beats. I took some dynamic poses that I liked and made full scale illustrations of the two, starting with a paper sketch:

and then scanning it in and completing it digitally. I tweaked the compositions a bit and then went crazy with the colour, using the same style as my badjaune study. I am getting more and more confident in this style now so I used less layers and did two rounds of drawing, one blocking everything and the second being refining everything.


I love how these turned out!! I think they go really well together and also show the personalities of the two main characters quite well. A friend pointed out to me that my yellow character sports the intersex colours, so I will definitely try to reference that in my music video! If I were to do this again I would probably also try to illustrate their living environments in the background rather than having a gradient background.
Stay tuned to see how I depict the surreal world!
#character design#illustration#sketchbook#sketching#digital painting#digital art#digital illustration#hyperpop art
0 notes
Text
22/04/25 - Idea Generating and Storyboarding!
Now that my Easter Holidays were over, I am now focusing on the final outcome for this project. As stated in my project proposal, I would really like to make something move to a song, but just what song should I choose?
I decided I definitely want to go with a Kikuo song. I was originally thinking about using MushiP's Colour & Electricity because it's the name of this project, but it already has a wonderful official music video and I wanted to touch new ground.
Kikuo is a vocaloid producer known for his upbeat melodies with dark yet excellent lyrics. He's covered dozens of topics and a lot of his songs resonate with me. His most popular song is Love me, Love me, Love me (愛して愛して愛して) with over 107 million views!


He has one of the most diverse yet simultaneously cohesive sounds of any vocaloid producer and has been producing vocaloid music consistently since 2010.
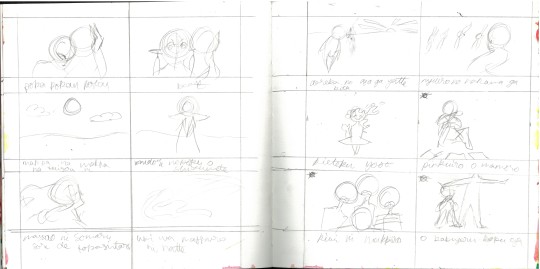
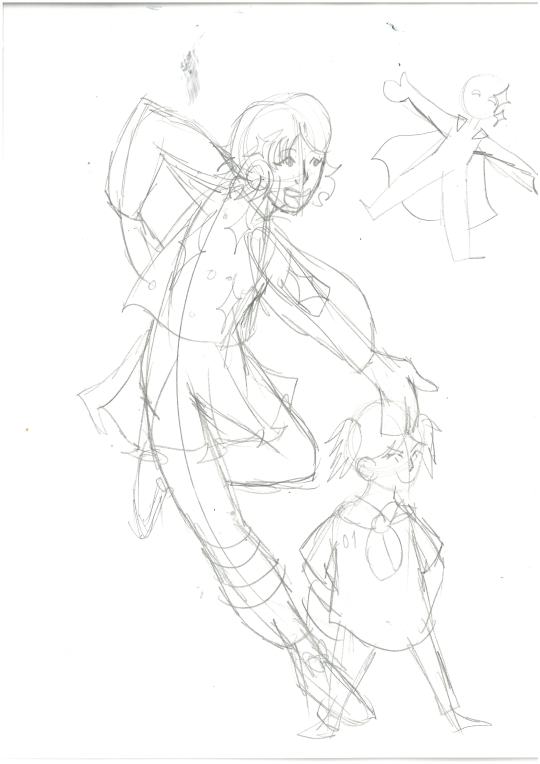
To decide what song I wanted, I listened to a few of his albums with a sketchbook open in front of me - specifically songs that didn't have official music videos. Some of my favourite ideas were from The Good Child and The Fox Spirit, We Shouldn't Do Bad Things, A Happy Death, and Stardust Cleaning Lady.

[Left: Good Child and The Fox Spirit character design. Right: We Shouldn't Do Bad Things ideas.]
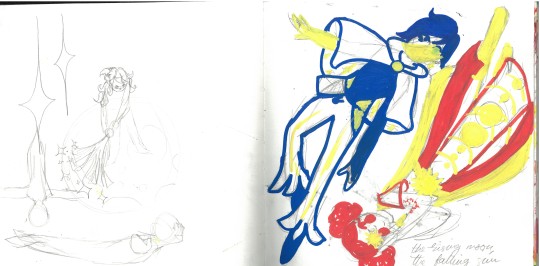
[Left: Stardust Cleaning Lady (slightly unfinished sketches). Right: Rising Moon, Setting Sun character design]

[Left: A Happy Death ideas. Right: Pokkan Kara ideas.]
My favourite idea, though, was one that I had thought about in the beginning; Pokkan Kara. The name literally translates to "Byouant Colour" and is a demo song he made for Tone Rion, a vocaloid he uses quite a lot nowadays. The song uses colour in almost all of it's lyrics, making some really surreal images! Stay tuned to see how I depict its complex story!
0 notes
Text
21/04/25 - 24FPS Colour Test
For this animation test, I decided to animate with colours as I haven't been super dynamic with colour in my animations. I came up with the idea of my paintbrush spewing with colour when I was making my profile picture and my banner for this tumblr.

The animation principles I had in mind for this were anticipation, timing, straight ahead, solid drawing, and just a bit of appeal :)
I originally did the sketch in 12fps but I felt the whimsy could be better expressed with more frames as this would create a smoother animation. So, I kept my movement (some simple rotation and lifting of the paintbrush) at 12fps (twos) and then made the actual magic spewing from my brush 24fps (ones). For the magic itself, I basically just went straight ahead with whatever I could think of that would look cool. It was quite fun drawing all the inbetweens.

0 notes
Text
16/04/25 - 12 Principles of Animation
To better understand the medium and for easy referencing in my later animations, I decided to look into the 12 Principles of Animation. From my experience in animation, I know all of these principles intuitively, but I felt like going through them properly one by one would be quite beneficial for this project.
1 - Squash and Stretch
Squash and stretch refers to the fact that only very rigid objects keep their exact shape when moving. Most objects (including things like the human face) squash and stretch as they move, depending on elasticity and speed. By emphasising this squashing and stretching, you make the animation look more lively and less stiff.

2 - Anticipation
Anticipation is like an action before the action. Almost no movement is without anticipation before it and reaction after it. To make movement more believable and less like a doll being puppet-ed along a stage, you can add a couple frames of anticipation before your big movements. Anticipation is also another form of emphasis - the more anticipation you put into an action, the more lively (and at some points cartoony) the whole sequence looks.
3 - Staging
Staging is probably the easiest to understand for artists of other media as it is essentially the animation equivalent of composition. The main difference between composition in art and staging in animation is that you are working with the additional dimension of time. To achieve good staging it must be "completely and unmistakably clear" what is happening. Staging in animation follows similar rules to staging in theatre with rules such as "only one thing should be happening at a time".
4 - Straight Ahead Vs Pose to Pose
This principle is referencing the two main techniques of animation. The former is where you animate an action one frame after another, and the latter is where you first draw the important parts of an action (the keyframes) and then animate between them (inbetweening). Both methods are very valuable to the animation process as they both have their strengths and weaknesses.
5 - Follow Through and Overlap
Follow Through refers to when certain parts of an object (the most common example being hair and accessories on a person) continue to move even after an action has finished. Overlapping action is similar, and describes how not every part of an object will move in exactly the same way in exactly the same time. This (along with squash and stretch) makes every action have a weight to it and makes your animation a lot more believable.
6 - Easing
Easing (also known as slow in & slow out) refers to how objects don't immediately go to full speed and typically ease in and ease out of motion. Anybody who knows how to make animations on video editing programs would know about this too, as it generally just looks better when more time is spent on the acceleration and deceleration of a movement.
7 - Arcs
Arcs are essential to animating humans and animals. Very few actions happen in perfectly straight lines as most creatures follow arcs with their movements. Having an arc in mind (or even drawing one onto a lower layer) is immensely useful when drawing all kinds of movement, especially when something is rotating, like an arm rotating about a shoulder to give the viewer a wave.
8 - Secondary Action
Secondary action refers to additional actions that might happen at the same time as the main action. This is an easy way to give a character more life and have the whole scene be more engaging to the viewer without making the scene too busy and introducing poor staging. Secondary action can also be used strategically to show something more about the character and helps with the storytelling principle of Show, Don't Tell.
9 - Timing
Timing refers to how you can use the benefit of being able to manipulate frames to make different actions have different speeds. Even with two objects on the same frame rate, the amount of frames you put between each keyframe determines how fast the object is moving. This is also where the phrase 'animating on ones' etc. comes into play.

Animating on ones (right) refers to a new drawing every frame in the standard frame rate (24fps). Drawing every other frame makes the frame rate 12fps and is called animating on twos (left). The naming scheme keeps going as such. For indie animation, frame rate is a little more flexible, as people like experimenting with different frame rates as different rates can give a completely different feeling to an animation.
10 - Exaggeration
Exaggeration comes into play in nearly every other animation principle, hence it gets its own entry. One of the greatest advantages of animation is the ability to exaggerate beyond what is reasonable for a human actor to perform. In the context of the real world, these extra movements and pushed poses look silly, but it's exactly what brings an animation to life. A good rule for exaggerating a movement is actually to push it until it's too much and then scale back as desired afterwards. Unlike in real life, in animation you can always take away and add spice!
11 - Solid Drawing
Solid drawing refers to the fact that despite the typically 2-dimensionality of classic animation, an animator must draw with weight and dimension in mind to make a believable animation. This is why even full-time animators still very regularly practice their drawing skills and anatomy and that full time animation courses still provide model drawing and studies of shape and form. To be a good animator is to be a good artist!

12 - Appeal
Appeal is probably the most subjective of the animation principles, as what appeals to one may not appeal to others. The principle generally refers to how every character you animate should be interesting to look at so that the viewer stays engaged. This doesn't necessarily mean every character has to look beautiful, as every type of character can and should have its charms. This is done with both exaggerating and simplifying as you really don't need a complicated character for appeal (very fortunate for us as you really don't want to be drawing a character's details over and over again for thousands of frames).
I will keep all 12 of these principles in mind and will mention when they come up in my thought process for my future animations. Having some sort of guide to improving my animations is very useful for me as while I have most of them memorised, I don't have enough experience to know them all intuitively just yet.
v sources v
Becker, A. (2017). 12 Principles of Animation (Official Full Series). YouTube. Available at: https://www.youtube.com/watch?v=uDqjIdI4bF4&ab_channel=AlanBeckerTutorials
Salsberg, A. (2019). The 12 Principles of Animation | Lesley University. [online] Lesley.edu. Available at: https://lesley.edu/article/the-12-principles-of-animation
Wikipedia Contributors (2019). Twelve basic principles of animation. [online] Wikipedia. Available at: https://en.wikipedia.org/wiki/Twelve_basic_principles_of_animation
Thomas, F. and Johnston, O. (1995). The illusion of life : Disney animation. New York: Hyperion.
0 notes
Text
14/04/25 - Lipsync Test!
I really like Pinkpantheress songs, and the looping bit of Capable of Love gets stuck in my head a lot, so I decided to do a short animation to the ending bit to practice my lip syncing.
I drew a static drawing of Pinkpantheress with the front hair, back hair, and rest of the body separate. I then animated her hair swaying dramatically in the wind and started sketching out the mouth shapes. I first pieced together every word and when it was said, using the official lyrics as reference. I then used my own mouth as reference by just saying the words over and over and figuring out what shape my mouth was making. I then put it all together and added some lips to each frame.
I miss animating to music! I used to make stuff like this all the time for fun when I was younger so being able to go back to it more seriously this time is so much fun!
0 notes