
Last Seen Blogs

dagbisex
Sin título

thebabyboutique1
The Baby Boutique


patch-jev-cipriano
Luchando contra el recuerdo amable

enneadic
( mind like fire. )
Text
Weekly Summaries 9:
25th November:
Film Language:
I started, restarted, edited, and finally completed my essay this week. I’m not very good at keeping to the word limit, which was the main problem this week, as well as trying to put thoughts down into written word, but I have wonderful friends and siblings that helped me out with this, so I thank them profusely! I’m glad I was able to finish this, even if it did take me a few days, and keep within the word limit which was 1000 but 1100 with the +10%, due to having help rewording it all (Thank you Lauren!). The hardest part of this all was deciding what clip and scenes to use, which took a couple days itself. But I am finished and free of this essay, and just have to wait for the results to see how well I have done.
I have to say that I actually enjoyed analysing the shots I did choose in the end, and found it easy overall to type about filming techniques, which is probably why I went over the limit a few times. Analysing films is now a habit for me, which you would think was an annoying habit, but it allows me to appreciate films even more, as I know the trouble and to what extent the filmmakers may have gone to to get the perfect shots for a film.
0 notes
Text
Weekly summaries: 8
18th November:
Inanimate Objects:
I’m Finally finished with my inanimate objects project, yay!
I used most of this week to power through and finish all of the animation, which seemed easy at first, but then I noticed things weren’t right, which meant spending whole days in the media lab fixing everything. However, I made it out alive and I am proud of my final piece. Next time when I do a stop motion animation like this, I will remember to take many photos of clean plates and make a list beforehand of what clean plates I need, as this will make editing rigs a lot quicker and I won’t have another crisis like I did with the ruler.
Overall, this week was tiring to say the least, but my project is done and I have learnt a lot from editing my animation, both from the tutors that have helped me and from trying to fix problems myself.
Motion Graphics:
I was able to finish my 10 seconds completely this week, which is great, as it frees up time to do the other projects and tasks we were given. The animation turned out well and I am quite proud of the result. I only ran into one problem which was fixed the next day with the help of Kris, which I am really thankful for. I’ve realised that even though my skills and knowledge have increased I still have much to learn about adobe after effects, so in my spare time I will aim to watch some online tutorials as it may come in handy later on in life.
Other than that I didn’t run into anymore problems, and have given it to Luke who will edit all the animations together, which I hope goes well.
0 notes
Text
Inanimate objects: Editing, rig removal, sound, and credits
youtube
The is the animation that I will be editing the rig out of, and hopefully finishing completely to hand in.
1st November:
Before removing the rig I had to edit the whole animations timing, as when Jon reviewed it he said some of the pencils jumps and movements were not completely life like and rather floaty. This was rather easy to do, as I dragged the raw footage images into premiere pro, deleted some of the extra frames that made it floaty, then exported it for when I remove the rig.
5th November:
Today I completely removed the eraser rig, which is great, and it didn’t take too long, as it took around 5-6 hours to do. Even though I have much to do on this animation, I’m proud with my progress so far!
14th November:
Todays focus was on removing the pencils rig, a very arduous task indeed, but it needs to be done, as I aim to have the whole animation finished this week, which is seeming more possible as the days go by.
This is also day I shed tears of frustration. I finally finished removing the pencil rig and celebrated a little, but then I watched it back and realised I didn’t have shadows, so asked for help from Jon, so he came over and showed me how to create shadows by using masks on solid layers around the original animations shadows. It took me quite a while to finish this (11 hours in total for todays work), but I was so happy when it was finally done.
15th November:
Watching the animation back that I did yesterday I noticed the ruler doesn't move and I didn’t have a clean plate without the ruler in it. So, I tried many things myself to try and edit in the moving ruler myself, but was not able to get anywhere with it. I finally gave in and asked for help, looking back I should have done so straight away, and Jon (wonderful Jon) came and helped me out. He showed me that by using masks of the background, and hanging the feathering and colour a bit, that is was possible to cover the original ruler. Crisis averted and I finished editing the ruler out, and voila a finished animation and no more tears from me!
After this was done I created the opening title and credits in after effects and put it all together in Premiere pro and rendered it all ready for adding sound tomorrow.
youtube
(finished edit with credits)
16th November:
Today I spent adding in the sound for the animation, which was a lot easier than I had expected, and I actually had fun doing. I was able to finish adding sound in adobe audition, so today was the last day for inanimate objects for me!
I used sound I found in the shared media folder at uni, and some downloaded from audio sites,
My final animation:
youtube
This animation Turned out a lot better than I was expecting, as due to all the problems I thought it was going to look rushed, but the movement is smooth and the sound works well with the images. The only thing I would change if I had more time, would be to make the mask better on the ruler, as its still quite noticeable.
Overall, I’m very happy and proud with myself for creating this, and I very much enjoyed this project.
0 notes
Text
Motion Graphics: Animating my 10 seconds.
12th November:
Today I started to animate my 10 seconds for the motion graphics group project. I started by putting all the needed assets into adobe after effects, such as the wolfs eyes, the human lamb, and the character shadow that I also made today.
To animate the shadow behind the wolf I used a shape layer, moved and keyframed the path, then added wiggle paths to make it all look uneven. I also added a glow effect to the yellow parts of the eyes, as well as adding a set matte to the yellow and pupil to keep them within the confines of the eye shape.
I cut down the Lamb character to just a torso, arms, and head (with the hair and face). Added a set matte to the face and parented it to the head shape, so I could then create a null layer and animate the head looking around.
I spent 5-6 hours working on this non-stop today, and was able to finish the first part of the animation before I hit a wall, due to not knowing how to transition from the first part to the second part, which I will ask Kris about tomorrow.
13th November:
Today I got the whole 10 seconds animation done!
For the transition from the wolf eyes to the wolf shadow consuming a silhouetted character, I was able to ask Kris to help me which he done so by adding a nice effect into the animation and went through the settings with me, which I played around with afterwards until I was happy with it.
The ending part was easy, as I just animated the lamb characters head so it grew from the previously shrinking shadow. I then kept the head in the middle and animated the face to look around, then added a glow effect to her hair, so she shines slightly.
This is the final outcome:
youtube
Now it will be added and edited with the others, which will be done by Luke, who will also be adding in the sound.
Overall, I am very pleased I am finished, as I now how time to focus on the other projects. I also proud of myself, as this is the first full animation that I have done in after effects, other than the tests in class (which really helped), and I feel my skills have greatly improved over these past weeks. The only things I would change would be the shadow consuming the silhouette, as its not as smooth as I thought it would turn out, which I may aim to do if I have spare time.
0 notes
Text
Weekly Summaries: 7
11th November:
Inanimate Objects:
This week I was able to fully remove the rig from the eraser, which doesn’t seem much, but it took a while and its one of the many things I can cross off the list. I spent only a day on Inanimate objects this week due to having classes and tutorials, as well as the motion graphics project. Even so, I’m still proud and I am confident that I can get this animation finished next week, and be able to add in sound as well.
Motion Graphics:
Another busy week for motion graphics, packed with tutorials, a lesson with Millie, and a sound recording, with some group chats and meetings on the side.
Myself and my group were able to edit the script, as well as getting our animatics done completely (hurray!), Jenny completed the script template (something we need for submission), we also edited the script to match the new animation idea, and recorded this ne scripts. I’m very proud with my group and how much everyone is doing and has been able to do. Many of us are aiming to finish animating next week, so next week will be busy again. Luke has also said that he is still up for editing the animations together with the sound as well, so it’s just an onward and upward journey from here.
Overall, I’m feeling very optimistic about this project and how it will look like at the end, I’m also proud with mine own progress as I am more work focused this year when compared to first year, which is an excellent sign.
0 notes
Text
Motion Graphics: Character and colours!
9th November:
My given task in our motion graphics group, was to create the wolf human character, a wolf shadow, and come up with the colour palettes, and to make sure the character was also rigged in after effects.
I loved having the job of creating the colour palettes and was able to do it by using adobes colour wheel website: https://color.adobe.com/create/color-wheel/ which is a truly amazing website!
These are the colour palettes I came up with:


(palettes for the night city scene)


(palettes or the forest night scene)

(sheep human colour palette)
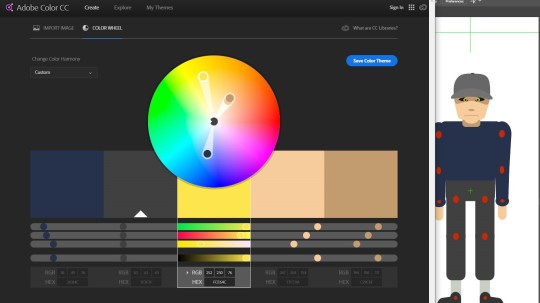
(wolf human colour palette)
This is the wolf human character from the front, and a ¾ view as this view is needed for the animation, and also a side view of the head.


I’m not overly sure or happy about how they turned out, but the members in my group said that they were good and we should use them in the animation.
The image below is the wolf shadow that will be behind the human character.

This turned about better than expected, as I have no prior experience in drawings wolves, so I had to use a google image as a reference and get feedback from a group member.
Overall I have been very productive making these and hope the animating part of this project goes smoothly.
0 notes
Text
Motion Graphics: second Sound recording
9th November:
As we all decided as a group to change the script it called for another sound recording session.
Below is the script we will be using:
The Wolf and The Lamb: Script -
bold - Ellora
Underlined - Wil
Italic - Katherine
A stray Lamb stood drinking one evening on the bank of a woodland stream. That very same evening a hungry Wolf came BY farther up the stream, hunting for something to eat.
He soon got his eyes on the Lamb. Usually the Wolf snapped up such delicious morsels without making any bones about it, but this Lamb looked so very helpless and innocent that the Wolf felt he ought to have some kind of an excuse for taking its life.
>>>>>>>>> Scene 1
"How dare you paddle around in my stream and stir up all the mud! You deserve to be punished severely for your actions!" he shouted fiercely.
"But, sir, don’t be angry! I can’t possibly muddy the water you are drinking up there. Remember, you are upstream and I am downstream." replied the trembling Lamb,
"You do muddy it! And besides, I have heard that you told lies about me last year!" retorted the Wolf savagely.
>>>>>>>>>>> Scene 2
"How could I have done so? I wasn't here until this year." pleaded the Lamb.
"If it wasn't you, it was your brother!"
"I have no brothers."
"Well, then, It was someone in your family anyway. But no matter, I do not intend to be talked out of my meal." snarled the Wolf.
>>>>>>>>>>>>> Scene 3
And without more words the Wolf seized the poor Lamb and carried her off to the forest.
The tyrant can always find an excuse for his tyranny.
The unjust will not listen to the reasoning of the innocent.
>>>>>>>>>>> Scene 4
However, instead of Wil (as he didn’t show up for the booking) Luke read out his part instead.
This recording session went quite well, even though we started late and had to change around people, and I’m quite pleased with the end recording.
0 notes
Text
Motion Graphic: Animatic
8th November:
Part of the motion graphics project was to produce an animatic within your group, so I worked and finished my 10 seconds of animatic today in tv and this is the version without sound:
youtube
And then this is everyone's animatics together with sound:
youtube
Overall, I am happy with my groups progress so far, and I’m hoping that the animation goes well.
0 notes
Text
Motion Graphics: Millie’s lesson 2
7th November:
Today marked our last lesson with Millie woodcock, one of the wonderful guest tutors we had for motion graphics, and we spent the session animating our characters we made with her last time.
For this session I actually used the character that I had made for the homework instead, as I preferred the look of it. So we started by being shown how to create controllers, like those used for the legs and arms, for the body, by clicking the body layer, launching duik and creating a new controllers, which should automatically be placed where the anchor is, then from here you just need to parent the body to the new controller.
The next part I found amazing, as we created a null layer, named it face control, placed it in the centre of the head, then parented the eyes and mouth (and hair if you have it) to the null layer, and voila! When you move the null it will move the face parts!! We also added a set matte onto the face features then parented it to the head, doing so allows you to move the face around without the worry of it floating off the face, as it confines it to the head shape.
Once everything was ready, we were given time to now animate our fully rigged characters, and I had a great time doing so. My final outcome was this:
youtube
I’m so very happy with this animation, as it was so simple to make, yet the outcome is simply beautiful! I added a little bob into this wave and extended the space between some of the hands rotation and position keyframes to slow it down. Adding the slow face turn added to the creepiness of the character, which is what I was aiming for.
Millie then showed us a different technique of rigging with puppet pins, simpler than it sounds. To start off with we created a new composition, made a shape layer, called leg, used the pen tool to draw out a basic leg silhouette, and dragged the anchor point to the top of the newly drawn out leg. Once this was done we used the puppet pin tool, found up in the bar with the other tools, and added pins to the top, middle and bottom of the leg, for the hip, knee, and ankle joints.
Going onto the drop down menu of the leg layer, to effects, puppet, then mesh, and then finally deform to find those new pins, we highlighted them and the in duik we clicked bones, which turns these pins into joints. Now onto selecting the new layers created by the bones, we once again went into duik, auto rig, then leg/arm rig, and rigged the bone layers into the right place. We finally have a rigged leg, which moves in a peculiar way.
Animating our characters was very fun and I also enjoyed experimenting with the new way of rigging, although I didn’t like the look of it being animated, so I probably won’t be using it much, it was still good to learn about it. I still have much to learn in terms of working in after effects, so I will visit some tutorial sites to learn some more things in any spare time I have.
0 notes
Text
Film Language: Possible film choices
6th November
After the individual tutorial with Mhairi I spent a day working out which films I could analyse and came up with a list:
Apostle
Hush
I am the pretty thing that lives in this house
The autopsy of Jane doe
Malevolent
I kill giants
Don’t breathe
Mother!
Out of this list I went through and decided what scenes would be best to analyse from each then narrowed my choice down to three:
Autopsy of Jane doe
Malevolent
Mother!
With this new a shorter list I will go through and re-watch all of them to narrow it down to just one. I’ve chosen to focus and analyse one film, as I will be comparing the emotions in the first scene to a scene where everything is in a state of panic, to show how the filmmaker is able to change the emotions in a film with filming techniques.
0 notes
Text
Motion Graphics: Group Tutorial
6th November:
Today was group tutorial day, so myself and the rest of the group that I am in for the motion graphics project, went to go speak to Kris about how far we are with the project and help us by giving us tips and advice on what to do from here.
The tutorial lasted for half an hour and we were able to speak about our ideas that we have had and discuss things that needed to be done. One such thing that was talked about was that Kris thought the idea of each of us doing our own storyboards for our separate 10 seconds was not a good idea, as this may create confusion and it wouldn’t look good at the end. With this problem brought to the front, Jenny decided that she would create the storyboard, as Kat and myself were working on the characters and the backgrounds were being done by the other two, problem solved!!
The other thing that was discussed was that the characters don’t have to be fully animated, as the animation would work quite nicely with certain words, or objects popping up on screen and being animated. This took a lot of stress off our shoulders and after hearing this ideas started brewing. One such idea being, having water turning muddy after the line “how dare you paddle around in my stream and stir up all the mud”, which will be simple yet effective.
For this idea we were also able to find a motion graphic example:

And the person animating this part agreed that it would work well and won’t be too time consuming to create.
I also found some simple background examples for the people making them:


I found this tutorial so stress relieving as we were able to sort out some of the problems and pass out the roles quite nicely and in a way that everyone is able to focus on their strengths as well as having time for the final animating. I’m hoping that everything will turn out well in the end and as planned.
0 notes
Text
Film Language: Individual tutorial
5th November:
Instead of the usual film language lesson, today was split up into time slots for our individual tutorials, where we speak to Mhairi about our essay plans, discuss ideas, and be given tips on how to set out our essays.
When I got to mine it turned into a group tutorial instead, as a couple people tutorials were running over time, which I thought was great, as then I could also talk to the other people about ideas and films that I could write about.
The tutorial only lasted 10 or so minutes, but I was able to clarify that it can be a comparison of two scenes within one film and its doesn’t have to be two scenes from different films, which is a life saver and gave me many ideas. The main idea being that I would look at a horror film and compare the first scene, which is all bright and warm, to the scene in which it gets darker and creepier at the end.
With this idea in mind I now just have to pick a film and the two scenes, which shouldn’t be too hard, as I will be able to watch a lot of horror movies on the weekend.
0 notes
Text
Weekly Summaries: 6
4th November:
Inanimate objects:
This week wasn’t too busy for the inanimate objects project, as I was focused more on getting the motion graphics homework and animation idea sorted out. We were also given our Film language essay brief as well, so my mind has been elsewhere. However, I was able to edit the timing of my animation, using the tips I got from Jon a couple weeks back, and made the jump of the pencil less floaty and more realistic.
I will aim to focus more on this project next week and get most of the rig removal out of the way, which may clash with motion graphics work, but now that Film language lessons are finished I will have more time to animate and finish off things.
Motion Graphics:
Second week of this project and I’m feeling more confident as my group and I have got a temporary sound clip done, which will go over our animatic when that is done. We also figured out what idea we are going to go with and have already got the character designs under way. There is a little problem with one member, but I’m hoping that it is sorted soon. Next week we have a group tutorial so we will be able to discuss any worries and ideas in length there, and also sort out who is doing what part of the animation.
I’m aiming to get the characters done next week as well, or at least started, and hopefully have my part of the animatic done and ready for the experimentation reels.
Film Language:
This week we finally go the topic of our essay, yaay!! So I’ll be able to start finding a film or films to analyse. The essay sounds quite easy to do and I am very confident in myself that I will be able to get it done in time. The major thing I have to remember this time round is to not go over the word count, as this was something I did for both essays in first year. I also learnt a lot about transition in films and why filmmakers use them and what they are used to convey. This information will definitely help for the essays as it is one of the things we have to analyse.
I aim to find a film/ films to analyse by next week, or at least have a list of films to choose from with what I will analyse from each.
0 notes
Text
Motion Graphics: Sound recording
30th October:
Today my motion graphics group had the sound room booked so we could record a temporary voice over for our animation. We spent around 3 hours in the recording and live room to get it all done. We also had spare time to record some wolf and lambs sound, which was funny to do, so we could add them into the background if we wanted to.
This session was not only fun, but also helped our group visualise the animation more and allowed us to discuss parts we thought wouldn’t work well and what we could add in.
0 notes
Text
Motion Graphics: Text animation
30th October:
Carrying on from last week’s shape layer animating, we once again found ourselves in adobe after effects, but this time we were going to look at text!
As Kris was running a tad bit late to the lesson, Tracey told us to go ahead and have a go ourselves at animating some text. So, without any instruction I went ahead, got out the text tool and typed away, and seeing it was nearing the spooky day called ‘Halloween’ I went with that and aimed to create a spooky text animation.
These were the results of said animation:
youtube
I’m not that impressed by the outcome, but it was my first go so I let it be, as it will be good to look back and reflect on in the future.
Kris turned up and we finally moved onto something a little more complex, such as rotating the text, which I also added on an effect that I had found that makes it look like a magnifying glass is passing over it.
We were then shown how to use a null layer on words and using the easy ease tool. Using the null layer added such a nice effect and was super easy to use.
This was the outcome of using the null layer:
youtube
For this we simply made the words “one”, “two”, and “three” different sizes in different places around the null layer, then parented them to the null layer and just animated said null layer, which created this nice turning and growing effect.
After I had finished I then played around with my own text and more effects, which lead me to find one that looked like teeth biting and the amazing liquify tool, so create this:
youtube
By using the liquify tool and changing the colour of the word ‘Lamb’ I was able to make it look like blood running off the page (morbid I know), which fits in with my groups fable.
Once again I have learnt a lot from this after effects session, where all information gained will help me with the final motion graphics fable animation. With this new knowledge I feel even more confident in my skills and cannot wait to put them to the test in the future.
0 notes
Text
Film Language: 4
29th October:
Today was our final film language lesson, as the next two weeks will be individual tutorials with Mhairi, and we looked at the different transitions, so the different ways a filmmaker moves from one scene to the next and how they are used to communicate the story.
The different transitions we looked at are:
A cut - the most common transition, it is the the replacement of one scene with the next.
A wipe - can be either horizontal,vertical, diagonal, or even a shaped wipe, and is when one scene is pushed into frame whilst it pushes the other scene off.
A fade - used to show the passing of time and can be shown as a fade to black. Fades can also use an image to fade in on before moving/ fading into the next scene.
A dissolve - This is when one image dissolves into the other, which creates a mix of both scenes for a second before the new scene. Dissolve is commonly used for passing of time or flashbacks.
A morph - a technique used mainly by animators, it is when one object changes shape and transforms into another.
After looking through the basic transition we looked at the variations of cuts and match cuts. The cut transition has a variety of ways that it can be used, as well as the simple way of going from one scene to the next. One such variation is the balanced cut used when two or more characters are having a conversation, the camera will cut from one face to the other characters face when either of them talk, this type of cut shows the audience who is in scene and who is talking.
Another cut technique is the cut on action, where the scene will change/ cut to another scene as an action is happening/ or after and action has happened. There is also the cut away which is when a continuously filmed scene is interrupted by the camera quickly focusing on something else in the scene (usually this object will have some importance) and then usually focus back on the first shot.
The last type of cut we looked at was match cuts, where the camera will be focusing on an object or character before cutting to a new scene with the focus on an object or character of similar shape. There are also shapes cuts where the filmmaker will try to match the shape of an object in one scene with a shape in the next scene. Filmmakers also do cuts with sounds, such as the J-cut, where the sound from the next scene is heard in the first scene before a transition, and the L-cut, where the audio from the previous scene transitions into the new scene.
Following this discussion we looked at some youtube videos on the previously talked about topics.
youtube
youtube
youtube
(skip to 5.27 in the above YouTube video to see dissolve/ match cut)
Before we finished for the day we briefly discussed the requirements for the essay that is to be written for submission and the topic. We are to analyse a sequence of shots, roughly six shots, of a scene in our chosen movie, looking at the timing, colour, framing, type of transition, pacing, and then compare it to another sequence of shots that are either in the same movie or a different movie, for example, a hero introduction compared to a villains introduction.
The film/s can be live action or animated and of any genre that we choose, and it is to be 1000 words, or -10% +10%. Mhairi also ran through how this essay should be structured, so the intro should consist of providing context for the essay, as well as what movie/s we have chosen to analyse. Then for the main body of the essay we are write the analysis of the shots and explain why the filmmaker has done this. Then the ending we must conclude the essay by writing what we think about the shots, for example say if we think they work well or not.
The briefing concluded our lesson today, and I must say that I feel a lot more confident about writing the essay now that I’ve heard the specifics and some examples from Mhairi. My main focus after today for film language will now be to try and find a film to analyse and then try and write it without sounding like I’m rambling.
0 notes
Text
Film Language: Camera Movement Homework
27th October:
For the film language lesson we were all given homework, which was to find examples of the camera movement that we had talked about, such as, pan, tilt, track, crane, dolly zoom, handheld, etc.
It took me a while to find which examples to use, but I have done so and listed them below and the reasons that I think these movements were used in the scene.
Tracking - a good example of this shot I found was in the beautifully made film, ‘I am the pretty thing that lives in the house’. There are many tracking shots in this film, all of which are slow, causing a feeling of suspense and dread to fill the viewers. Not only that but the majority of these shots are mainly focused on the main character, Lily Saylor, once again verifying for the audience that she is indeed the main focus of the film. These shots are also used to show just how alone Lily is in the house as they are always empty, apart from herself.
(I was unable to find a clip of a tracking shot for this example)
Dolly zoom - used to make the audience feel disoriented.One great example I found in the film, Poltergeist (1982 version), where the producer used a dolly zoom in a hallway scene to increase the feeling of struggle that the mother is going through when running down the hallway. This also able to link to many peoples nightmare in which when they are running from something or trying to save someone, the journey to the end grows. It also adds a sense of urgency and panic, leaving viewers on the edge of the seat, hoping the mother gets there in time to help her children. https://www.youtube.com/watch?v=tMXJdsFcVa0 - the scene.
However, in a scene from ‘Jaws’ (the first one) the same camera movement, only this time used to zoom in on a characters face, creates the feeling of disbelief and bewilderment in the character at what he has just seen. https://www.youtube.com/watch?v=NB4bikrNzMk
I’ve learnt much from this homework, and its help me understand the terminology and techniques used by filmmakers and why they use them.
0 notes