
When I was small and my mom would ask me what I wanted to eat, I would say, "我想吃好吃的東西" which translates to, "I want to eat something delicious." This is still my wish. I'm always on the lookout for something good to eat! Contact: [email protected]
Don't wanna be here? Send us removal request.
Statistics
We looked inside some of the posts by eliu and here's what we found interesting.
Average Info
Notes Per Post
81
Likes Per Post
68
Reblog Per Post
12
Reply Per Post
1
Time Between Posts
1 month
Number of Posts By Type
Text
17
Last Seen Tumblr Blogs


Fun Fact
The total number of visits Tumblr.com received during January 2021 is 327 million.
Text
mocha cake
location: chez moi
I haven’t posted in forever! My apologies. But no worries, I have been continuing to bake. I have been posting more frequently on my instagram page (@elainealiu) so please check that out as well!

For this post, a mocha cake. It’s made with layers of sponge cake soaked with coffee syrup, and covered in coffee buttercream. To add some texture, I put some chopped almonds on the outside, and some chocolate covered espresso beans. Can’t go wrong if you’re a coffee lover!


To make the cake, I baked sponge cake and soaked it in coffee syrup. To make things easy, I used instant coffee powder, but if you have a really good coffee extract, use that! The better the coffee, the better the flavor of the cake. Be generous with the imbibing to let the coffee soak in.

Next, layer on the coffee buttercream! This buttercream is made with egg yolks and of course, butter.


Top with another layer of sponge cake, and then you are ready to bring the cake together.

Cover the sides and the top with buttercream and decorate as desired. I piped some designs, used a serrated knife to create swirls on the top, and decorated with chopped almonds and chocolate covered espresso beans (I love the one’s at Trader Joe’s!).


And that’s it! This is a pretty simple cake - not too many components, but tasty. Just eat and enjoy.
2 notes
·
View notes
Text
chocolate cardamon cake
location: chez moi

I was in the mood for making cakes, particularly wedding inspired cakes. Just one tier for this though. I made a basic chocolate cake and soaked it with a cardamom infused milk and layered it with cardamom chocolate ganache and cardamom caramel. Fresh cardamom pods are pretty sweet. Fun to cook with!


So first, the chocolate cake. Pretty simple. Just mix all the ingredients together - eggs, milk, sugar, cocoa powder, flour..


Once the cake is baked, let the stacking begin. For this cake I had 3 layers of cake and 2 layers of filling. To bring it all together, I made an Italian meringue buttercream, which only has egg whites (no yolks) so it make a nice white color. First, I soaked the cake with a cardamom infused milk, and then piped a ring of buttercream around the edge. This allows the filling to be contained.

I put on chocolate ganache, another piece of cake and then piped a ring of frosting to contain the cardamom caramel.

One more piece of cake, cover it all with buttercream and you’re pretty much done! You can decorate it however you like. I made some buttercream flowers and did a little piping along the bottom rim.

It’s so nice to cut into a cake and see all the layers. If you refrigerate the cake, be sure to let it sit out for a while so the buttercream and soften and come back closer to room temperature. Chocolate, caramel and cardamom. Pretty tasty combination.
4 notes
·
View notes
Text
doughnuts
location: chez moi

If you know me, I love yeast leavened desserts. That includes doughnuts! I remember trying to make doughnuts a long time ago.. back when I was in middle school probably. I don’t think they turned out well. Luckily this time around, I think I’ve made significant improvement!

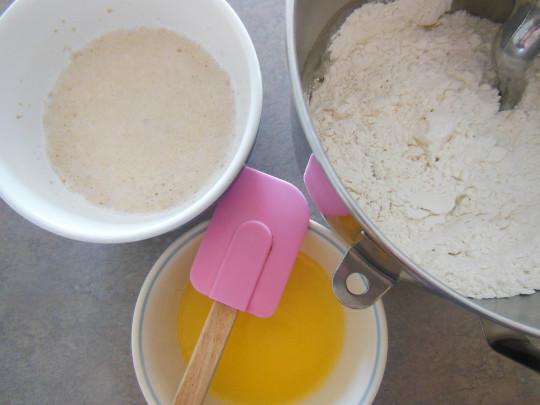
This dough is pretty simple, made with your typical ingredients - milk, yeast, sugar, flour, eggs and butter. After letting the yeast sit with warm milk for 5-10 minutes, you see how it generates all this foam and bubbles and puffs up.


To bring the dough together, knead all the ingredients together until it becomes smooth. I finish up kneading by hand.

Once the dough comes together, place it in a bowl and let it rise in a warm place. I put it in a closet, as that’s the warmest place in my house! It’s so amazing to see how much the dough increases in volume.

After the dough has risen, roll it out and cut out individual doughnuts! You can save the small rounds for doughnut holes of course. You can bring the scraps together and re-roll it. It’s good to let the dough rest for a bit before re-rolling.


Let the cut out doughnuts rise until they are puffed and full in volume. In the meantime, you can start preparing the oil.

I fried in regular vegetable oil and brought it up to 350-60F before carefully placing the doughnuts in. I let it fry for 1-2 minutes per side before taking it out on some paper towels.

Soon after the doughnuts come out of the fryer, dunk it into your choice of topping. In this case, I made cinnamon sugar, regular glaze and coffee glaze. It’s particularly important to get the warm doughnuts into the cinnamon sugar right away or else it won’t stick as well.

Glaze is made simply by combining powdered sugar and water/milk until it gets to a thick glaze consistency. It’s important to make it thicker than you might think it needs to be or else it won’t stick well. For the coffee glaze, I just used instant coffee powder and dissolved it in water before combining with powdered sugar.

Doughnuts warm out of the fryer are the best - pillowy, fluffy doughnuts in every bite. But if you can’t eat it right away it definitely helps to warm it up before eating! Microwave or a few minutes in a hot oven and you’re good to go.
6 notes
·
View notes
Text
matcha chocolate tart
location: chez moi

I was really in the mood for matcha. In tart form. And here’s what I came up with. Chocolate and matcha? Really can’t go wrong.

Since I was going to make a matcha cream, I wanted some textural contrasts. You would get the crisp tart crust, but I wanted an even greater crumb factor.

Hence, some chocolate crumb, recipe courtesy of Milk Bar, which they put in their chocolate chip cake.


This tart starts off with a chocolate crust, and then a layer of chocolate ganache.

The ganache serves multiple purposes. First, of course, a contrasting texture from the crisp crust and rich, matcha cream. Second, enhancing the chocolate flavor. And third, the ganache also serves as a semi barrier against the cream and protects the crust from getting soggy through time.

I layer on the chocolate crumb on top of the ganache and then cover with matcha cream.

Then, dust the top with more matcha powder for an even more potent matcha kick.

To finish off, decorate as you wish with some fresh whipped cream. I’m really loving the St. Honoré tip.

Once the tart is fully set, you can slice and eat!

A mix of textures and flavors that all complement each other so well. Delicious and relatively easy to make!
5 notes
·
View notes
Text
truffle cuts
location: chez moi

I remember making these back in college and bringing it to lab once, and how much people loved it. I think that was basically the only time I ever made it though, and since then I’ve been wanting to make it again. Chocolate, ganache, meringue, all packed together in one bite - how can you go wrong?


First, the meringue, which is made from egg whites and sugar and ground almonds folded in.

This gives a nice, slightly chewy layer that will contrast the rich, creamy ganache and sponge layers.

Next - the chocolate sponge. Beaten eggs, combined with cocoa powder and meringue.

Once you have all your layers, you are ready to assemble.


The cake begins with a layer of sponge, then ganache and then meringue. Another layer of ganache and sponge finishes the layers off.

Once that is set, spread ganache over the top and sides and sprinkle with cocoa powder on top.

Use a knife to create a cross hatch pattern and slice into pieces once the whole thing is set.

These cuts are small and can be eaten in just a few bites. It’s easy to eat too much at a time!
9 notes
·
View notes
Text
peach plum blueberry crostata
location: chez moi

Summer has come to a close, but back when it was still nice and warm, I made this crostata with peaches, plums and blueberries. That goes to show how long its been since I’ve made a post - sorry!

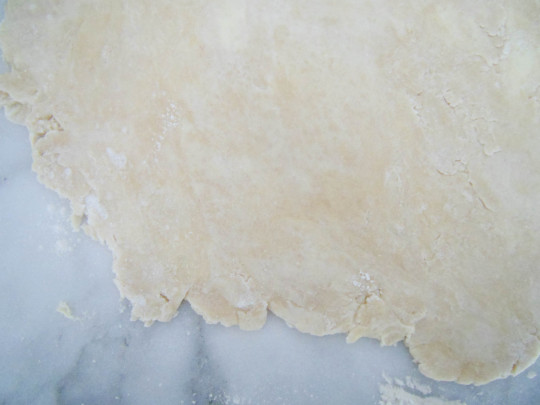
You can make this with your choice of fruit - whatever is in season, but if you’re making a crostata, you’ll need a crust! To make it nice and flaky, use cold ingredients. Cold butter, even cold flour. Work the dough together so you still see small bits of butter running throughout the dough.

Also very important to let the dough rest before using to let the gluten relax and prevent shrinkage when you bake.

The filling is pretty simple - fresh fruit with some cornstarch and sugar. I also added some lemon zest and lemon juice. Having some acid balances the sweetness of the fruit.


Brush some egg wash on the dough and bake! I bake it on a lower rack in the oven so the bottom of the crust gets a high heat to help it cook through and get crisp. The juicy fruit on top weighing it down can prevent it from baking through thoroughly.

Once the crostata is golden brown and the fruit is cooked down, you’re done! Let it cool down slightly before slicing so it stays together well. You can serve it warm or at room temperature. Of course, it’s best eaten the day it’s made.

The combination of flaky crust and soft, sweet fruit is so good. What combination of fruits do you want to use?
2 notes
·
View notes
Text
chocolate babka
location: chez moi

I got one of these from Trader Joe’s a few months ago and thought it was so tasty I wanted to make it myself. There are different varieties of babka, but this one here is a central and eastern European yeast cake that is rolled up and has swirls of pecans, and as you can see, chocolate.

I love yeast leavened baked goods. And chocolate. So this is pretty perfect for me.

The start of any yeast leavened baked good of course starts with yeast.

The dough is made by combining the activated yeast mixture with butter, flour and an egg. It’s basically like a brioche dough. I let the dough rise slowly in the refrigerator overnight before use.

For the filling, I also made a flourless chocolate cake to add even more chocolate and texture variety to the babka. It’s made by combining meringue and a chocolate mixture.


Flourless chocolate cake is really light since it has no flour, so it adds chocolate to the babka without making it heavy or dense.

Next, the chocolate filling - made by melting chocolate with butter, sugar and cocoa powder.

Having some pecans adds an extra crunch and toastiness that is always welcome in my book.

Once you have all the filling ready, it’s time to assemble! Just roll out the dough, spread on the chocolate filling and top with crumbles of flourless chocolate cake and toasted chopped pecans. Roll into a long and slice the log in half lengthwise.

You can see all the layers of filling after you cut it open.

Braid the two halves together and you have your babka! Just transfer to a loaf pan and let it rise before you bake.


Yeast is amazing. It’s so great to see how dough rises. You have to be patient for the process though - I know it’s hard!

After baking, brush with a honey syrup and you’re done!

The babka absorbs the flavors from the syrup and all the filling gets integrated into the dough.


The result is a product that has a slightly toasty texture on the outside and is fluffy, gooey and oh so chocolatey inside. Can’t get enough of this stuff.
7 notes
·
View notes
Text
salted caramel ice cream
location: chez moi

I’ve wanted an ice cream machine for many, many years, and finally succumbed to a promotional ad and got one! (I guess they were successful). First ice cream I decided to make - salted caramel. I love caramel, and this recipe also incorporates bits of caramel pieces swirled inside the ice cream, which gives an even greater caramel flavor and mix of textures.

It’s important to cook the caramel to a very dark color to get the most flavor. You may need to beware of your smoke detector though. If it’s anything like mine, it won’t be able to handle the caramel process.

Most ice cream bases start with a crème anglaise, which is made with egg yolks, sugar and milk. It’s important to be careful when cooking the base, as if you cook it too much, the egg will curdle. However, you need it cooked enough so it will thicken properly.

If you want to make ice cream, you need to plan in advance, as you need to freeze the entire bowl. That will be important to allow the ice cream to churn properly.

It’s really cool to watch the transformation of your base mixture as it starts to thicken and turn into ice cream!

To finish off the ice cream, I swirl in pieces of hardened caramel. As it sits in the ice cream, it begins to melt slightly and become gooey.

Nothing better than to have some ice cream on a hot summer day! Although it is starting to get a bit chillier these days. Guess I should make the most of it before winter comes.
1 note
·
View note
Text
praline millecrêpe
location: chez moi

I remember the first time I had millecrêpe. It was at Lady M in New York, a place my cousin recommended when it was my first time visiting the city. I remember it being made well, but I wasn’t able to enjoy it fully because even at that point, I wasn’t a huge dessert fan (even though I enjoyed making desserts), and I particularly didn’t like creamy things. Well, my tastes have developed a lot since then, and although I still prefer savory over sweet, I think desserts can be quite enjoyable too.

I made this praline millecrêpe shortly after I made the praline millefeuille, since I wanted to make use of my homemade praline. Don’t want to waste any of that delicious blend of nuts and caramel!

Millecrêpe of course has crêpes as the main foundation, but you also need a tasty filling! I made a praline pastry cream, which I made by simply incorporating my praline paste into pastry cream. Pastry cream is made by beating egg yolks and sugar with some flour and cornstarch and then incorporating hot milk and cooking it over the stove into thickened. You can prepare the pastry cream filling ahead of time as it needs to chill to fully set.

Next, the crêpes. Eggs, sugar, milk and flour. Easy.

It takes some time to cook all the crêpes one by one and you need quite a few to make your layered cake in the end.

I assembled my cake in a cake ring because I thought that would be neater and lead to a nicer cake in the end. I also trimmed each of my crêpes to make it a perfect round.

To add more texture, I made a layer of feuilletine and chocolate and also added a layer of hazelnuts in another layer. If you are going for the pure creamy texture, you may omit it, but I like contrasting textures.


Once you are done layering, let it chill in the fridge to set up and then you are ready to serve!

It may not be really noticeable, but I also dusted some sugar on top of the cake and caramelized it with a blow torch.

Cutting it open you can see all the alternating layers of crêpe and pastry cream. It’s kind of a cool look.

Once you let everything set, you can get a bite with all the layers running through. A mix of flavors and textures, and the possibilities are endless of what you could do!
0 notes
Text
chocolate chip cake
location: chez moi

I’ve been inspired by Christina Tosi and Milk Bar recently (also seen with the kimchi croissants), and wanted to make their chocolate chip cake, which is layered with passion fruit curd and coffee buttercream. It is an interesting combination of flavors that I haven’t used before. Instead of using passion fruit though, I used mango. It was more accessible to me and I could make my own mango pureé more cost efficiently.

Milk Bar makes all their cakes in cake rings, with the sides unfrosted so you can see all the layers inside. I think that is the way to go. Cake rings also make the finished product look neater and more together, since you get a perfect round in the end.

There are several components to this cake, but each individual part doesn’t take too long. As long as you plan it out well you can make the whole cake in one afternoon.

Another reason I wanted to make this cake was that I haven’t made butter cakes in a while. I’ve been mostly making sponge, chiffon, etc. where the major leavening is in whipping eggs and/or egg whites. This cake has quite a bit of liquid in it, from eggs to buttermilk and vanilla. It’s important to beat everything really well so get the volume and emulsion you need.

For it to be chocolate chip, just sprinkle mini chocolate chips all over the top. They don’t need to be fully pressed in or anything, as the cake rises in the oven the chips will be engulfed into the cake.

It’s nice to bake cakes in sheet pans as opposed to round cake pans, because this allows more even baking and allows for a flatter surface as well. You would wind up with some more scraps in the end, but you can find good uses for that..

Always take a cake out of the pan after baking. You don’t want it to continue to cook and dry out in the hot pan.

Next, Christina Tosi always puts some kind of crumble in the cake. I’m always a big fan of texture and crunch. Since it’s a chocolate chip cake, this is a chocolate crumble.

Butter combines the dry ingredients together and then just bake briefly to achieve the desired texture.

Next, mango curd. I first made mango pureé by blending up fresh mango. Then, I added in eggs and sugar and cooked it over the stove until thickened. It’s finished off with gelatin and butter and blended until smooth.

Once the cake has cooled, you can start assembling! Use your cake ring to cut out rounds of cake to your desired size. You can cut full rounds, or use some scraps to form a round in the cake ring. The cake will still come out in one piece in the end.

Line your cake ring with acetate, and then start the building process. Acetate helps for easy unmolding and also allows me to build the cake higher than the height of the actual cake ring. To start off, first, a layer of cake.

Then, to keep the cake moist, brush some mango pureé on top of the cake and then top with the mango curd.

Add the chocolate crispy bits, and then layer on with some coffee buttercream.

The coffee buttercream is just a mixture of butter, milk and instant coffee. Again, the ratio of liquid to fat is quite high, so take time to mix everything together evenly.

You will repeat this process a couple times - three slices of cake with the various fillings in between.

The final layer is a layer of coffee buttercream. Once everything is assembled, put the cake in the freezer to let it set up before you remove the cake ring and acetate.


Top with chocolate chips or more chocolate crumble and the cake is finished!

It’s nice to let the cake sit out briefly at room temperature before you eat so the buttercream can soften slightly and the chill is taken off the cake.

There’s a lot going on in this cake, but it’s nice to eat it all in one mouthful. You get the moist cake with crunchy pieces of chocolate, the fruity sweetness of the mango, bits of crunch, and the coffee buttercream.
2 notes
·
View notes
Text
praline millefeuille
location: chez moi

I love millefeuille, mostly because I love puff pastry and I love the different layers and textures. I’ve been wanting to make praline millefeuille for some time, since I also love the flavor of caramel and nuts, and wanted to see if I could buy praline paste. It was available in too large quantity, or at a price that wasn’t ideal, so I decided to make my own. I was quite pleased with the result.

This millefeuille is layered with 3 pieces of puff pastry, with praline pastry cream sandwiched in between, and a crispy praline feuilletine layer at the bottom. The first thing I made was the puff pastry. Since I have shown that before, I don’t have pictures here, but basically it’s made by rolling and folding a dough with butter to create many layers that will lead to the puff and flakiness in the final result.

For the praline, I first toasted a mixture of hazelnuts and almonds. Toasting them makes a big difference in flavor.

Then, cook a sugar syrup to the soft ball stage, and then add the toasted nuts and keep cooking the caramel over the stove. At some point it will crystallize, but if you keep going, the sugar will melt and turn into delicious, golden brown caramel.


Let the caramelized nuts cool down on a silpat or silicone baking sheet, and once it’s cool, break the caramel and nuts into pieces and place into a food processor and pulverize. As you keep blending, the texture will become finer and some of the oils from the nuts will be drawn out.

If it’s too thick, add some vegetable oil until you achieve the consistency of a paste. I could probably eat this praline just on its own it’s so good. But of course, it will have some higher purpose.


To make praline pastry cream, simply add praline paste to pastry cream. Simple as that. Pastry cream is made by beating eggs and sugar, then adding some flour and cornstarch. After you bring milk up to a boil, add the hot milk to the egg mixture and then return it all back to the stove until it’s thickened.

Next component - the crispy praline feuilletine layer. Feuilletine is a type of crêpe that’s crispy and crushed up. It adds a marvelous texture and flavor.

To complete the layer, I combine melted chocolate with the praline paste made earlier and fold in the feuilletine. I shape it into rectangles that I can then cut up into individual portions for each millefeuille.


Next, baking the puff pastry. Roll out the puff pastry into a rectangle of desired dimensions and dock it all over to prevent it from rising too much and becoming uneven. At the end, dust with powdered sugar and let that melt and form a thin caramel on top of the puff pastry.

Now that all the components are finished, it’s just down to assembly.


Take the puff pastry sheet and cut it into individual rectangles. You will need 3 per millefeuille.

Then, top with a crispy praline feuilletine layer and pipe on some praline pastry cream.

Add another layer of puff pastry and pipe on more praline pastry cream.

Finally, top off with the last piece of puff pastry and voilà you’re done! Of course, it does take some time to put everything together, but the work is well worth it if you can enjoy this delicious dessert.

I am partial since I love flaky things, chocolate, caramel and nuts, and this combines all of those things together, but I don’t think my bias is causing any misinformation about its tastiness.

Hopefully you can have one bite that combines all the layers - flaky puff pastry, the crisp feuilletine and intensely rich chocolate and praline, and the creamy praline filling in between.
4 notes
·
View notes
Text
kimchee turkey croissants
location: chez moi

I love croissants. When I saw that Milk Bar made kimchee bleu cheese croissants, I was intrigued. It’s a simple yet intelligent idea to flavor the butter within the croissant dough, and you can make all kinds of different croissants, with whatever ingredient you are interested in incorporated in all the layers of the finished product.

In this case, kimchee is blended and incorporated into the butter. They add bleu cheese, but since I don’t like cheese, I added some turkey slices, so it becomes a kind of croissant sandwich. More hearty and filling than your average croissant.


First, the dough. Using a stand mixer makes it pretty easy to knead and combine together this yeast dough.

Once the dough is made, let it rise before moving onto the next step.


Now, for the kimchee butter. Just take kimchee and blend it up into a paste.
Then, whip it into softened butter, letting the kimchee fully incorporate. Once it’s fully mixed, form the kimchee butter into a block and let it chill and harden in the refrigerator.


By the time the butter is ready, the dough should also be risen and ready to roll.


Add the butter block on top of the risen dough, cover with the rest of the dough and seal it in.


Then, it’s all about the turns. Roll the dough out into a rectangle and fold the two ends towards the middle and fold that on top of itself. Do that three times, letting the dough chill in between each roll.

Once the dough is ready, roll it out into a rectangle and cut into triangles. You can see the layers of dough and kimchee butter running throughout.


I also added a couple slices of turkey inside, but the flavoring is all up to you. Once the croissants are rolled up, let it rise once again.


Then, brush the risen croissants with egg wash and bake! We’re almost there..

I love how croissants make the whole house smell good. In this case, the smell of kimchee may be an acquired taste, but it made the house aromatic nevertheless.

You can see the layers of the croissant and the turkey inside. Croissants are best eaten fresh out of the oven, when they are the flakiest and freshest. But it’s also fine to refrigerate or freeze, and heat it up in the oven when you want to eat.
5 notes
·
View notes
Text
fraisier
location: chez moi


I’ve made fraisier several times before, but just never got to make a blog post out of it. So finally, here it is! Fraise means strawberry in French, and as the name implies, this cake is a strawberry cake. When I was doing my internship at Dalloyau, everyone loved eating the remaining scraps of fraisier after the nice pieces were cut out. It is made with layers of sponge cake with mousseline cream and strawberries. A lot of times, it’s topped with a decorative marzipan layer at the top, but here I used meringue.

The sponge cake is imbibed with a syrup, often flavored with some kind of liqueur. In my case, I don’t have any liqueur, but I thought adding more strawberry flavor to the cake itself would be good. As such, I made a strawberry syrup. I just sliced up fresh strawberries and let it simmer slowly in just plain water. After some time, the flavor and color from the strawberries gets drawn out into the water, and I use that to make a syrup.

It’s always good when making a dish to time things out, so the things that take the longest time are made first. In this case, that would be the mousseline cream. It’s not that it takes a long time per se, but it needs time to chill before proceeding to next steps. The base of a mousseline cream is pastry cream, which is a base for a lot of different things. Pastry cream is made by beating egg yolks (or whole eggs) with sugar, then combining some flour and/or cornstarch. Then, heat up some milk and incorporate the hot milk into the egg mixture. After putting it back on the stove and cooking it out until thick - you have pastry cream. What makes pastry cream into mousseline cream is the addition of butter, and the whole thing is whipped until light and fluffy.

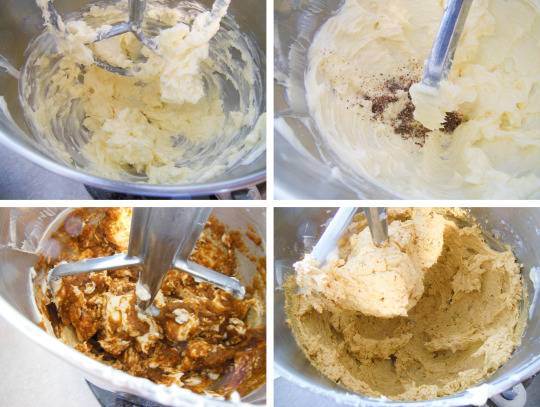
Next, the sponge cake. Sponge cake has very few ingredients - eggs, sugar, flour and butter. But it’s amazing what simple ingredients can do! First step - beat the eggs with sugar until it becomes super light, fluffy and increased in volume. I am still so amazed by how eggs can transform - it just never gets old!

You can see how the eggs transformed so much just by beating (top left picture). To finish the cake batter off, fold in flour and butter.

Have your baking sheet prepared ahead of time with parchment paper and then you can put the whole thing in the oven.

Sponge cake doesn’t take too long to bake, so keep an eye on it. You don’t want it to be overbaked and get dry. Once the sponge cake is out of the oven, remove it from the baking sheet onto a cooling rack.

Next - assembly. I used a cake ring with an acetate liner because my cake ring doesn’t come up high enough. It also allows for easy removal of the cake once its finished.

The first layer of the fraisier is a round of sponge cake, which I imbibe with my strawberry syrup. Sometimes it can feel like too much syrup, but the cake really needs it. Not only does it add more flavor, but it also helps prevent the cake from drying out.


Once the first cake base is in place, pipe a ring of mousseline cream along the outside to serve as a resting place for the strawberries. Cut strawberries that are of similar size in half and line them around the outside of the cake ring.

Then, fill the inside with more mousseline cream and load in more strawberries.

Using a piping bag to add the mousseline cream not only makes things neater, but it also helps you get the cream into all the nooks and crannies between the strawberries.


To finish off the cake, top with more cream, level it off with a spatula, and place the last layer of sponge cake on top.

Of course - don’t forget to imbibe! Once all the layers are finished, let it sit in the refrigerator (or freezer) until it’s completely set.

To finish off the decorative portion of the cake, I made an italian meringue and covered the top of the cake with it. I also used a serrated knife to create the swirly pattern, and piped some designs with a st. honoré tip.

Of course, you are free to decorate your cake however you like! That’s the time to get even more creative.

Letting the cake sit for a bit actually helps improve the flavor, as the syrup and mousseline cream and strawberries all meld together. On the other hand, you don’t want to let it sit in the refrigerator uncovered or else it will dry out.


Fraisier is relatively simple to make - there aren’t that many components, and yet the end result is quite tasty. It feels light and fresh to eat, especially with all the fresh fruit packed in throughout. And even though pastry cream is rich, and butter is even richer, because it’s whipped, all the air incorporated inside makes it feel much lighter than it actually is (which could be good or bad).
6 notes
·
View notes
Text
blackberry mousse cake
location: chez moi

I made a blackberry mousse cake a while back, but decided to make it again with some changes. Originally I was planning to make the cake with the mousse going the highest and the surrounding cake strip a little lower than the height of the mousse. In the end, I didn’t make enough mousse, so the cake became aligned with the mousse, but it created a different look this way, so all good!

First, I made the joconde sponge, which would surround the cake. It’s made with a combination of ground almonds, eggs, sugar and meringue.


I also made another batter that I could color and use to make a design for the outside of the cake. I just did random scribbles, but you could do something more intentional as well.

Once the cake is baked, remove it from the baking sheet and let it cool. Then you can cut it into strips of appropriate width and length to line the outside of the cake.

Next, the dacquoise, which will be the base of the cake.

It’s made by making a meringue (egg whites and sugar), and then folding in a ground almond mixture. Quick and easy.

I like the texture that meringue brings. Kind of crisp and crumbly on the outside, but moist inside.

Once you finish the joconde and the dacquoise, all the baking is done, and there’s just the filling of the cake left. To make the blackberry mousse, I pureéd fresh blackberries and strained it to remove the seeds. Then, I added some sugar and let it cook over the stove to boil - not only will the heated mixture help dissolve gelatin, but it also helps the finished product preserve longer.

After incorporating gelatin into the pureé, I fold in whipped cream and the mousse is finished.

Last time, I made a chocolate mousse to go with this cake. This time, I made a blackberry chocolate ganache. I thought it would be nice to have some contrasting textures within the cake, since ganache is thicker and richer, and it could balance out the light blackberry mousse. To make it a blackberry mousse, I incorporated blackberry pureé into the chocolate and cream mixture. I also put in sliced fresh blackberries to enhance the blackberry flavor even more and add additional texture.

Once the ganache layer is in place, top it off with the blackberry mousse and let the cake chill until set. Ideally, the mousse should go up to the top of the cake ring - this also helps you smooth it out into an even layer. However as stated, I did not make enough this time, so it didn’t reach the height I had planned. That all goes along with recipe testing I guess!

Once the mousse is set, then you can remove the cake ring and line the outside with the cooled joconde sponge.

After that, it’s just a matter of decorating the finished cake - and that is totally up to you! This time, I sliced some blackberries in half and arranged them around the cake with some fresh, sweetened whipped cream.

I like the versatility of mousses. You can really do almost anything you want. I love blackberries and since they looked so fresh and nice, I just had to make something with it.
2 notes
·
View notes
Text
berry frangipane tart
location: chez moi

Since I’ve been studying for my board exam, I haven’t gotten a chance to bake for over a month - way too long! During that time, one of my friends went to California and stopped by Tartine and brought me back a frangipane tart (how nice of her!). Since then, I’ve been wanting to make it.

I like how Tartine makes a lot of their tarts with a pie crust type base, which is super layered and flaky. And you can’t really go wrong with the rest of the components - almond cream and fruit, sliced almonds and powdered sugar to finish it all off.

First, make the crust. It’s good to have all the ingredients cold to end up with a flaky product (including chilling the flour). You can make this in a food processor (which could be easier/faster, but also requires more clean-up), but I just make it by hand. Slice up some cold butter and add it to the flour, with a bit of salt and sugar. I also add some shortening, which adds to the flakiness. Work the butter into the flour and break it up with your hands until the butter is in smaller pieces. To combine it together, add ice water, just enough to bring it together into a dough.

Importantly, let the dough chill before using to allow it to relax. It will make it easier to roll out and help it keep its shape when you form it in the tart molds.

Making individual tarts is more work than making one large one, but it’s nice to treat people with - everyone can have their own.

I roll the dough so it reaches out a little further beyond the borders of the tart ring so I could accommodate a bit more filling. I also let the shape go a little free form to end up with a more rustic result. I let the dough chill in the refrigerator while I prepared the rest of the filling.


Next, the part that makes it a frangipane tart - the almond filling. It’s made by combining butter, eggs, sugar and ground almonds until it forms a nice, smooth, and fluffy filling.


Next, top with fruit, and most of the work is done! You could use fresh fruit, but I find that for this purpose, using frozen fruit works just as well. I use a berry mix with blueberries, blackberries and raspberries. You should put more fruit than you think you need to, as it really sinks into the almond filling as it bakes and the filling puffs up.


When it’s almost done baking, I took each tart out of the shell and topped it with almonds and gave it one last chance to toast up and brown. It’s important to make sure it’s fully baked, especially the crust. You don’t want it to be soggy and wet. You want that flakiness and crispness.

After allowing it to cool slightly, dust with some powdered sugar, and it’s done! This dessert is relatively quick and easy to make - not too many components, but the result is pretty great.

Flaky pastry and the combination of fruit with creamy and flavorful almond filling, and the crunch from the sliced almonds - just delicious. It’s not overly sweet either, which is perfect for me.
3 notes
·
View notes
Text
profiteroles
location: chez moi

If you want to make a quick and easy, yet still impressive dessert that you can have for company, profiteroles are a great way to go. All you have to do is make the pâte à choux and the rest comes together quite quickly.

Choux pastry is made by heating milk and butter with a bit of sugar and then adding flour all at once, mixing until it comes together into a dough. After letting it cook out a bit, add eggs progressively until the dough comes together. The high water content allows the dough to puff up in the oven and become hollow in the middle.

Once the choux pastries are baked, just split in half and add a spoon of vanilla ice cream (or whatever flavor you like) in the middle, and make a kind of ice cream sandwich.
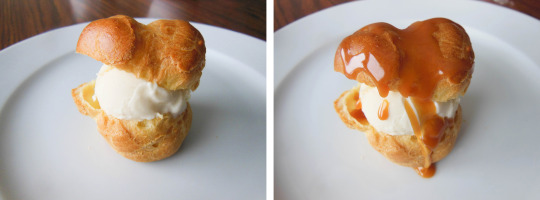
To finish it off, drizzle some caramel and/or chocolate sauce. If you wanted to make it even easier you could buy these sauces, but making it homemade isn’t so hard either!

Simple to make, yet delicious and satisfying to eat. Great contrast between cold, creamy ice cream, with slightly warm and gooey chocolate and caramel, and the choux pastry pulls it all together.
9 notes
·
View notes
Text
macaron ispahan
location: chez moi


I’ve been making a lot of lychee, raspberry and rose combinations recently. I’ve just loved this “ispahan” combination of flavors since having it in Paris. Isapahan macarons, croissants, even jam (delicious). Since macarons seem most classic, I’ve been wanting to make it for a while. You could make small macarons, a huge macaron confection, or a medium sized one like this, that can serve as an individual dessert.

First, making the macaron. You can make macarons with Italian meringue (meringue made with cooked sugar syrup), or French meringue (raw sugar added to egg whites). I’ve always preferred the Italian meringue, but you can try out what you think works best for you.

The process of making a macaron is relatively straightforward, but you need to be careful at particular steps to ensure a good result in the end. When making the meringue, I find it helpful to beat the egg whites sufficiently before adding the sugar syrup. And don’t add it too quickly - add it in a slow steady stream and slowly incorporate it in. Then, add the meringue to the ground almond, powdered sugar, and egg white mixture with some food coloring. You want to beat the batter just enough but not too much, not too little. That’s one of the trickiest parts.


Then, pipe out the macarons with a round tip onto your baking sheet. To get it perfectly round, it’s important to have a flat, smooth surface. For me, there are always some wrinkles in my parchment paper that distorts the shape slightly. You may also try using silicone baking mats.


Baking macarons is also important. To have the right temperature in the oven and bake for the right amount of time. Since moving to a new place, I’ve been wrestling with my oven and getting used to it. I think I’m slowly getting the hang of it. You want to bake macarons enough so they are set, but not over bake them such that they become crunchy rather than retaining a slightly moist interior. Letting the macarons sit with the filling for some time also helps with that.


Next, the filling. The main base is a rose cream. I made another Italian meringue, and then whipped some butter with a rose cream mixture. I incorporated the meringue in the end, and that’s it!


Finally, assembly! Pipe the rose cream around, and then encircle the macaron with raspberries. Making these smaller individual sized macarons actually required quite a bit more raspberries. It’s definitely not cheap to make, but gives nice presentation. I think having a higher ratio of raspberries also cuts the sweetness of the macarons and rose cream.

To complete the ispahan flavor profile, put some lychees in the middle. I like to put a little more just because I love lychee.


Finally, top with some more rose cream to help the macaron cap sit on top nicely, and you’re done!

They look so pretty you might want to eat them right away, but it’s good to let it sit for a bit to allow the flavors to meld and incorporate into each other and the macaron shell.

I love the texture of macarons. Slightly crisp as you cut into it, but slightly chewy and soft in the middle. There’s a reason why Ispahan is so popular!
14 notes
·
View notes