
This is my art dump for my own creations, things that inspire me, and tutorials to help me learn. Feel free to submit anything you love or feel proud of! We're here to learn and to create something new.
Don't wanna be here? Send us removal request.
Statistics
We looked inside some of the posts by emmys-doodles and here's what we found interesting.
Average Info
Notes Per Post
2M
Likes Per Post
1M
Reblog Per Post
842K
Reply Per Post
641
Time Between Posts
1 month
Number of Posts By Type
Text
8
Photo
8
Video
1
Last Seen Tumblr Blogs


Fun Fact
Tumblr Inc. is funded by 13 investors.
Text
Drawing Heads and Faces: Cheekbones

I’ve found that drawing the head starts to make a lot more sense once you start thinking about cheekbones and cheeks, and how the fit into the head structure.
You might be aware of the Mysterious Indent that Looks Good Next to the Outer Part of the Eye, or the Mystery Indent for short.
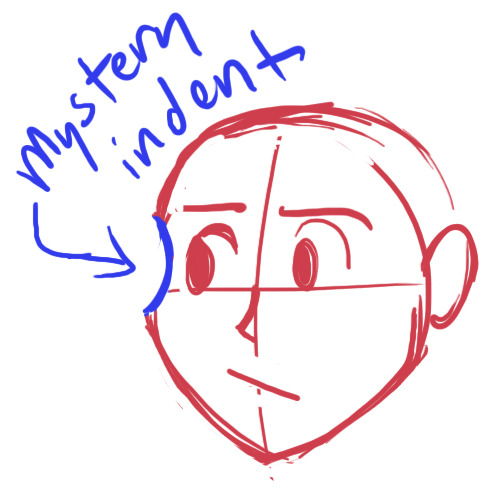
Drawing a Mystery Indent may serve you fine if you only draw the head from flat angles, but it falls apart when you get adventurous.
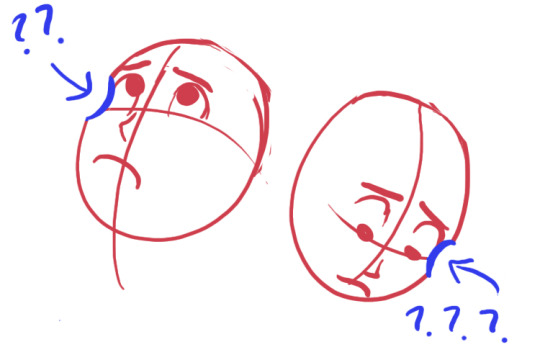
Why isn’t this making sense anymore?
Drawing a ‘Mystery Indent’ is an attempt to imply cheekbones without knowing how they actually incorporate into the skull, and this is why it looks so unconvincing when you use it to draw the head in anything other than ¾ view.
The cheekbones wrap around the head and eye sockets from above the bridge of the nose. The concave you draw if you draw the ‘Mystery Indent’ is a misunderstanding. There is no concave. You should instead be thinking of this as where the eye socket/brow overlaps the (convex!) cheekbone.


Compare the cheekbones on both sides for placement. They should match up and correspond with each other.
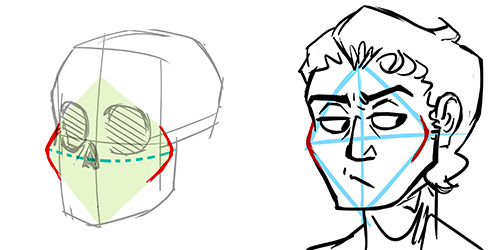
(Knowing cheekbone structure helps when drawing gaunt characters, because their cheekbones may stick out. Remember to compare the cheekbone placement on both sides!)

* This is part of a much larger tutorial I’m working on about head, face, and facial feature structure. Hopefully more to come eventually?
17K notes
·
View notes
Photo
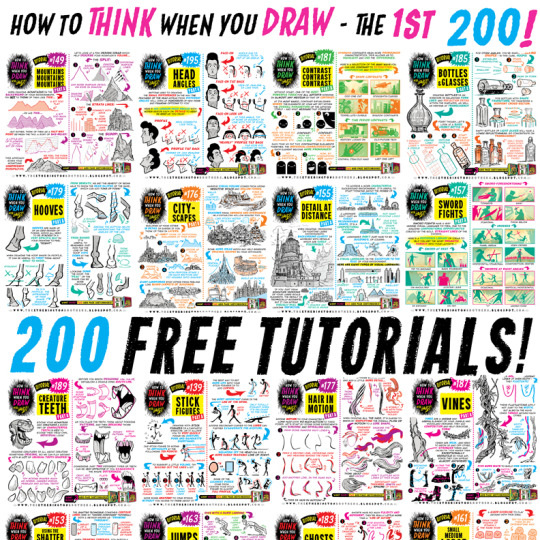
The ONLY WAY to combat the lack of funding in arts education is for professionals to take a few hours a week to share their skills for FREE, to empower and encourage the next generation of artists. THIS IS WHAT THE INTERNET IS FOR. Here’s 200 tutorials:
How to draw ANGRY EXPRESSIONS How to draw BATTLE DAMAGE How to draw BIRD HEADS How to draw BOOKS How to draw BOTTLES and GLASSES How to draw BOXES How to draw BREAKING GLASS How to draw BRICKWORK How to draw CABLES and WIRES How to draw CAR CHASES How to draw CATERPILLAR TRACKS How to draw CAVES How to draw CHARACTERS (3-SHAPES) How to draw CHARACTERS (FLIPPED-SHAPES) How to draw CHARACTER SHAPES How to draw CITYSCAPES How to draw COMIC COVERS How to draw COMPOSITION How to draw CONTRAST How to draw CONVERSATIONS How to draw CREATURE TEETH How to draw CROSS-CONTOURS How to draw DETAIL AT DISTANCE How to draw EARS How to draw FABRIC How to draw FEET & SHOES How to draw FEMALE HANDS PART ONE How to draw FEMALE HANDS PART TWO How to draw FLAGS How to draw FOOD TRUCKS How to draw FOREGROUND MIDGROUND BACKGROUND How to draw GAME BUILDINGS How to draw GEMS and CRYSTALS How to draw GHOSTS How to draw GIRL’S HAIR How to draw GOLD How to draw GRASS How to draw HAIR (1940s styles) How to draw HAIR IN MOTION How to draw HAPPY EXPRESSIONS How to draw HEAD ANGLES How to draw HOOVES How to draw HORNS How to draw HORSE HEADS How to draw IMPACT DEBRIS How to draw IN 3D How to draw INTEGRATING LOGOS How to draw INTERIOR BASICS How to draw IN-WORLD TYPOGRAPHY How to draw JUMPS How to draw JUNGLE PLANT CLUSTERS How to draw JUNK HOUSES How to draw LAMP POSTS How to draw LAVA How to draw LIGHTNING and ELECTRICITY How to draw MECHANICAL DETAILS How to draw MUSHROOMS and FUNGUS How to draw MONSTER HEADS How to draw MONSTER TENTACLES How to draw MONSTER TRUCKS How to draw MOUNTAINS How to draw NEGATIVE SPACE How to draw NEWSPAPERS How to draw NOSES How to draw OVERGROWN VEGETATION How to draw PEBBLES AND GRAVEL How to draw PERSPECTIVE BOXES How to draw PIGS How to draw PILLOWS and CUSHIONS How to draw POD HOUSES How to draw POURING LIQUID How to draw ROBOT ARMS How to draw ROCK FORMATIONS How to draw RUNNING FIGURES How to draw SAND How to draw SAUSAGE DOGS How to draw SEA WEED How to draw SHADOW COMPOSITION How to draw SHOULDER ARMOUR How to draw SIEGE WEAPONS How to draw SILHOUETTE THUMBNAILS How to draw SMALL FLAMES How to draw SMALL, MEDIUM, LARGE How to draw SMOKE EFFECTS How to draw SNOW How to draw SPACE BIKES How to draw SQUIRRELS How to draw STICK FIGURES How to draw SWORD FIGHTS How to draw THE HORIZON How to draw TIKI STATUES How to draw TREASURE CHESTS How to draw TREE BARK How to draw TREE ROOTS How to draw USING THE SHATTER TECHNIQUE How to draw VEHICLE STANCE How to draw VINES How to draw VINTAGE PLANES How to draw WATER How to draw WOODEN HOUSES
46K notes
·
View notes


Text
i’m gonna drop an art tip here
i think an important thing to learn, especially if you start out with drawing anime, is that faces don’t necessarily have to narrow from top to bottom
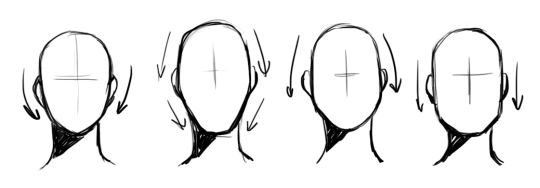
i like to think of wide top, wide middle, wide bottom, and rectangle-like as the 4 main face shapes
what you should keep in mind about them:
you’re only halfway done: the jawlines, the width-length ratio, the amount of fat in the cheeks, the intensity or subtlety of the face’s curves are all important components you still have to decide on after choosing the shape itself
none of these shapes are exclusively feminine or masculine, don’t hesitate drawing them on any gender
most people in real life have some variation of the wide middle type
if you are trying to draw real people, getting the shape of their face down is the first step
i’ve seen tutorials say the shape of the face can tell a lot of the character’s personality - you don’t necessarily have to live by that rule. as long as you aren’t unrealistically drastic about their proportions, their face shape determines their inner qualities as much as it would in real life (not at all)
73K notes
·
View notes
Photo


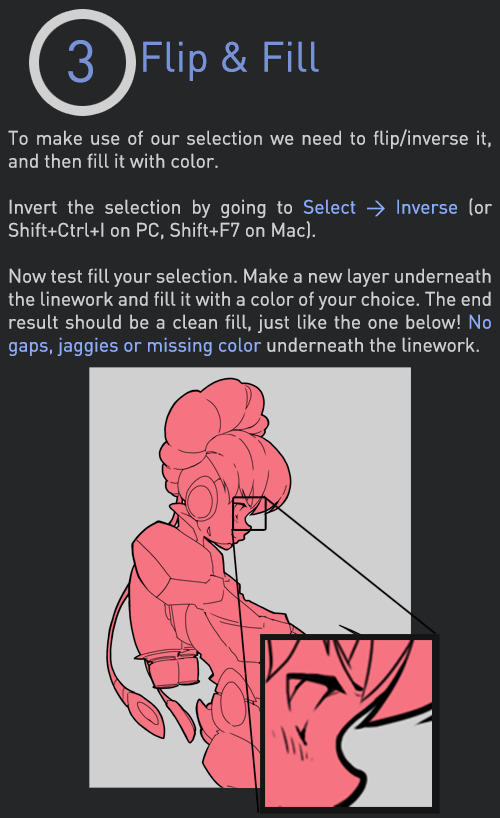
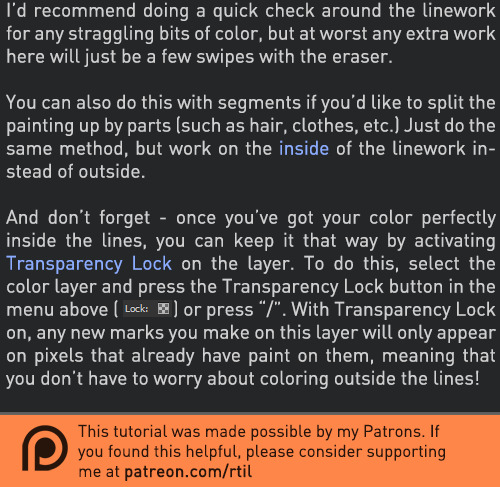
Late last year I wanted to start a series of short tutorials called Tip Jar, as a way of saying thanks to my fans and giving back to my patrons. This is the first of the series I have made, showing my technique on quickly filling in lineart so you can get to painting without coloring outside the lines faster.
Someday I hope to turn these into video tutorials when I have the income and the time, but for now I hope that I will be able to share useful tips in this infographic format.
Full tutorial image
Support me on Patreon
83K notes
·
View notes
Text
An artist : Aw man! I saw my arts were reposted on Instagram. I’ve asked them to take my arts down but they ignored me.
Me : Say no more! Click this link, then click ‘fill out this form’. Fill the form and wait for about 1-2 days, the staffs will remove the image you were reporting from the reposter’s account :^)
361K notes
·
View notes
Photo


Inspiration can be found everywhere! #Love it!
149K notes
·
View notes
Text
So it appears that Autodesk did a thing.

Go nuts, my friends.
204K notes
·
View notes

Text
Things I wish I knew when I started drawing
My experiences with traditional art have been challenging to say the least, mostly because I didn’t really *get* some of the more obvious tips and tricks. Some of it was definitely jealousy of people with tablets, though. If someone had reminded me about a couple of these things, I wouldn’t have gotten frustrated enough to give up on art for a year. Hopefully they can help prevent others from doing the same.
It can take a painfully long time to learn new or unfamiliar techniques. If they don’t come naturally, your intuition isn’t going to help you.
The time it takes to draw something decreases drastically once you really start practicing it. Ever heard of ‘muscle memory’? It’s real. Your hands have it. Even after just a couple tries, you’ll be surprised at how much easier it gets.
Don’t force yourself to try and copy someone else’s style, or learn a bunch of complicated techniques. It’s time consuming and will end up costing you more in the long run.
Adding more lines isn’t going to make it look better. It’s good to trace the outline of what you have in mind before filling it in, but adding a bunch of dark lines in close proximity to each other just makes it look messier.
Avoid sketching and making lineart with a dark pencil. The easiest pencils to find in a school store are almost definitely HB pencils, which are a middle ground. You’ll have better luck erasing those extra lines if you use a(n) H pencil (2H, 4H, H).
WAIT UNTIL YOUR INK DRIES BEFORE YOU START TO COLOR OR ERASE ANYTHING. Inking is a delicate process and one wrong move can distort how your drawing looks overall. Wait a good 1-2 minutes before checking with a piece of paper or fingernail to see if it’s finished drying.
Unless it’s a really special marker, don’t color using a light marker over a dark marker. A mark will stay on the tip of your marker and stain everything you try to draw with it afterwards.
STOP COMPARING YOUR ART TO STUFF OTHER PEOPLE DRAW! When you look at some of the fantastic artwork online, it can feel intimidating. What you need to remember, is that you’re seeing the finished product of what was a long process of trials and errors leading up to a culmination of the artist’s strongest efforts.
And, last but not least, the tools don’t make the artist or the art. YOU, the artist, are the one with the vision to achieve a final result. Even if you don’t have that fancy white marker that shows up on top of black, you can still demonstrate good technique and a sense of style.
Thanks for coming to my TED talk! Now get out there and go make something beautiful!
7K notes
·
View notes
Photo


Art by IG: @cameronmarkart Instagram: @artwoonz
15K notes
·
View notes

Text
For artists who have problems with perspective (furniture etc.) in indoor scenes like me - there’s an online programm called roomsketcher where you can design a house/roon and snap pictures of it using different perspectives.
It’s got an almost endless range of furniture, doors, windows, stairs etc and is easy to use. In addition to that, you don’t have to install anything and if you create an account (which is free) you can save and return to your houses.
Examples (all done by me):

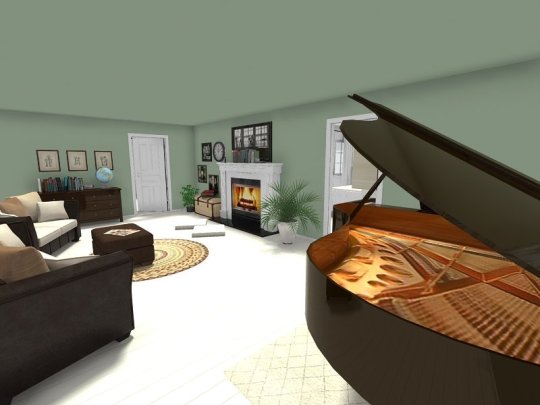
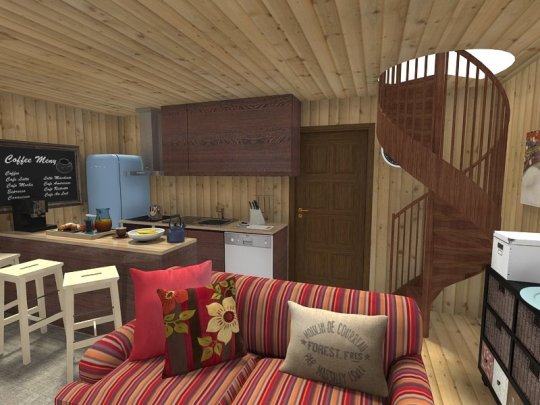

Here’s an example for how you can use it


327K notes
·
View notes
Text

i saw a post on my dash with image sites that basically was like “it’s okay to use pictures off pinterest etc. for your edits because it’ll be hard for the original photographer to find and sue you,” which, um, made me a bit annoyed, so here is a list of 100% free stock photo sites, many of which have quite aesthetic-y photos! please do not steal photos in your work, guys!
freeimages
pixabay
pexels
publicdomainarchive
gratisography
picography
stocksnap.io
unsplash
everystockphoto
morguefile
flickr commons
deviantart’s resources section (check creators’ pages for specific terms of use)
22K notes
·
View notes
Photo

A big eye opening (and learning experience) was when I took a portrait painting class. It really taught me how important it is to know where the planes of the face are. Not just for painting BUT for drawing too. It helps you anchor the facial features down.
Not only that…it makes your paintings/drawings more realistic and now a days with so much of your 2d art being turned into 3d films…it’s knowledge you must have.
5K notes
·
View notes