
Just a little place to share the various things I’ve created, and whatever mischief and mayhem I've gotten into!
Don't wanna be here? Send us removal request.
Statistics
We looked inside some of the posts by foxymitts and here's what we found interesting.
Average Info
Notes Per Post
96
Likes Per Post
63
Reblog Per Post
32
Reply Per Post
1
Time Between Posts
4 days
Number of Posts By Type
Text
17
Last Seen Tumblr Blogs


Fun Fact
The “We are the 99%” Tumblr blog became the slogan for the Occupy Wall Street movement.
Text
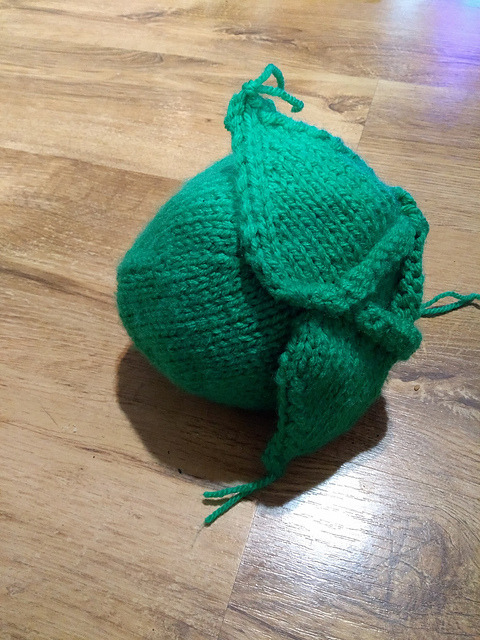
A Pearl of a Personality
So...I'm not gonna sugar coat it, life shucks a bit at the moment. It has very much been one thing after another, after another, after another. I tend to clam up about my personal life, and that's a trend I intend to continue, but life right now has been very much a fight against the tide.
So its a very good thing that I am surrounded by so many gems of friends. I want to thank them all, in many ways, but that's gonna take time. I have however made one little gift for a friend with some serious pearl-sonality, a real shell-ibrity in my friendship group, who is never shell-fish and always ready with a cuddle and pearl of wisdom.
...
Ok, wisdom is maybe pushing it, but a good little hard earned life lesson or a perfectly timed quip, are gems in their own rights.
So shall we get on to the shell-ibration?

Pattern is Strings of Purls by Jennifer Stafford from the book Domiknitrix, knit in the perfect colours for my friend.
With that, lets end this post on a high (tide) note, rather than the low (tide) note it started on, things will improve. Things will get better. I'm battling the storm at the moment, but there are pearls of laughter which make life shine bright, and pearls do string friends together.
Until next post, stay safe, and find something of your own to shell-ebrate.
Roxy, more a purl girl than a pearl.
Wool Count
Starting total – 790
Wool used – 14 Wool bought – 5 Wool given to me – 15 Wool gifted to others – 11 Wool handspun – 0
Total – 785 (Net difference: -5)
4 notes
·
View notes
Text
Feeling Thor-oughly knackered
I have just about recovered from Ragnarocking all long weekend as a Viking at the Pagans and Witches event in Coventry.
One of my (many) hobbies is Viking re-enactment - I display drop spinning, weaving, braiding in my girl kit, and now that I have passed my tests, I get to join the warriors in battle in my boy kit!
And thats what I did this weekend. It was Thor-ome.
I wont go into detail, but it was Thorific. Even if I am now limping from a few injuries. Nothing major, just Loki injuries.
Anyhow... I'll be including my viking related crafts and creations on here as and when I'm chipping away at them. To start, my favourite and also second piece of tablet braid, a replica of a find in Birka, and some nice Hedeby braid to trim the cloak the tablet weave is also on.
Did I mention that my girl kit is rich? That baby has bling!

For those who like to see my knitting, I have done Viking knits too:

This is the long boat from Vikings Shields & Axes by Amanda Berry - I tweaked the shields to match my group shield.
I had far too much fun making those tiny shields...
Anyhow, till next post, stay safe!
Roxy the Mischief Maker
Wool Count
Starting total – 790
Wool used – 14 Wool bought – 1 Wool given to me – 7 Wool gifted to others – 5 Wool handspun – 0
Total – 779 (Net difference: -11)
#knitters of tumblr#knitting#viking#viking knit#longboat#tablet weaving#braids#reenactment#woolcount
8 notes
·
View notes
Text
A lily wait...
I wanted to go for 'Simply Iris-istable' but was corn-cerned you would all go 'what in carnation?' when you saw this was a post about knitted lilys...
Bear with me, thistle be worth the awful puns.
Apologies for the lack of content, I haven't been feeling particularly bouquet, but that's bouquet.
Things are in motion and hopefully my cress levels will drop and I'll be back to my posie-tive self.
On to the knitting!
For mothers day I met up with friends and wanted to gift one with a mothers day present also. I did a little digging and the bud of an idea began to blossom.
Favourite flower: Lily of the valley
Pets: Cats
Problem: Lily of the Valley highly poisonous to cats.
Solution: Knit one!
New problem: No knit patterns, just crochet ones.
New solution: Make my own pattern!
Result:

Not gonna lie, I am head clover heels with how this came out. It was mint to be.
Yes, I am a succa for a good pun.
Let me know if anyone would like me to write this pattern up and post it on here.

Until the next post, I hope you all have a fern-tastic day, and remember, try and be the dandy to someone's lion!
Your budding pun poet, Roxy
Wool Count
Starting total – 790
Wool used – 13 Wool bought – 1 Wool given to me – 5 Wool gifted to others – 5 Wool handspun – 0
Total – 778 (Net difference: -12)
Sadly, no changes since the last post. Used a bit of lots of different balls of wool, but haven't finished anything.
4 notes
·
View notes
Text
Its rice to meet you!
FYI, in the rice circumstances, I will always use a pun.
We'll get to the grain of these puns in a moment, first, I just wanted to say hello to everyone. I've decided to restart my blog and move all my free patterns over to here as life's too short, and then you fry, so why pay for something I only touch every now and again?
I hope for those who stick around that you enjoy my unique brand of quirky, and can rice above my puns and enjoy the crafty content.
Which is a rice-tacular point to switch this back to the reason behind the puns.
First, story time: My friend at work, whom I sit next to, has permission to throw pokeballs at me whenever she catches me scratching my eczema -
Quick aside, these are the pokeballs:

I knit 40 for my wee lads (Inkling) birthday party, one made it to my friend for this reason.

I also ended up upgrading one to an ball for her as one alone wasn't enough to stop me...
(Free pattern: pokeball pokemon toy by Emma Whittle)
Back to the story! I'll try and keep it rice and short now, promise!
I currently have eczema in my hair and inside my ears. This cannot be scratched because...well, I'm highly a-grain-st putting cream on these areas.
My friend suggested a rice bag. Then after discussing it, called it a rice ball.
I knew then what had to be knitted.

Free pattern: Knit Onigiri by Alyssa Lynough
Isn't that such a little grain of sunshine?
And for those curious, I gave it to her on Monday. Today is Friday. I have been hit by it around eight times.
Last but not least, the wool count! I'm gonna be rice and easy on myself and admit that I have a SABLE (stash acquisition beyond life expectancy) and am working hard on reducing it. Plus the fleece. And fabric. Moving on...
Wool Count
Starting total – 790
Wool used – 13 Wool bought – 1 Wool given to me – 5 Wool gifted to others – 5 Wool handspun – 0
Total – 778 (Net difference: -12)
Until the next post, stay safe, and it was rice to meet you all!
Your Crazy Crafter, Roxy
2 notes
·
View notes
Text
Short cuts for you all!
Link to page with all my free patterns
Old blog till its subscription runs out
0 notes
Text
Companion Cube - Free Knitting Pattern

Materials 4mm Needles 3mm Needles Light grey DK Dark grey DK Bright pink DK Foam block Soft polyfill type stuffing
Sides (make 6) In dark grey, with 4mm needles, CO 20sts, st-st 25 rows, BO
Edge (make 12) In light grey, with 3mm needles, CO 6sts, st-st 8 rows, BO
Corner (make 24) In light grey, with 3mm needles, CO 12sts, st-st 7 rows starting with a P row BO 4sts, K across row *Dec 1 st at end of row, K1 row* 3 times (5 sts) P 1 row, BO
Circle (make 6) In light grey, with 3 mm needles, CO 3sts *Inc 1st and last st, P1 row* to 11sts St-st 2 rows *Dec 1st and last st, P1 row* to 3 sts. Break yarn and thread through remaining sts.
Heart (make 6) In bright pink, with 3mm needles, CO 2sts *Inc 1st and last st, P 1 row* to 8 sts K2tog, K2, turn, P2tog, P1, turn, K2tog, pull yarn and cut. Reattach yarn to remaining sts on needle. K2sts, K2tog P1 st, P2tog K2tog, pull yarn and cut.
To make, sew six ‘side’ pieces around foam block. Sew three ‘corner’ pieces together using photo as a guide, sew these onto each corner of the cube and add stuffing to give a firm 3-D texture. Using bright pink DK, make long braids and wrap around cube, creating lines. Pin these roughly in place before sewing ‘edge’ and ‘circles’ onto cube, these will secure them in place. Alternatively, you can thread the braids underneath the edge and circle pieces if you’ve sewn them on first. Lastly, sew on hearts and then love.
Just remember, the cake is a lie, and even though this cube wont stab you, it isn’t fire proof!
Pattern copyright to Foxymitts.co.uk
4 notes
·
View notes
Text
You ‘octopi’ my thoughts (octopus hat) - Free Knitting Pattern
My sister wanted an octopus hat, so I created her one!

As you can see, this carnivorous octopus has only left a skull behind…
Materials -4mm circular needles -4mm double-pointed needles -Stitch marker -Main colour yarn (100g DK, shown here in King Cole Riot DK, colour way ‘Cool’) -Contrast colour yarn (about 20g DK, shown here in some unlabeled light yellow) -Tapestry/yarn needle for seaming -Small amount of stuffing for eyeballs and octopus body
Abbreviations St(s) = Stitch(es) CO = Cast on K = knit P = purl Inc = Increase by your preferred method K2tog = Knit 2 stitches together P2tog = Purl 2 stitches together MB = Make Bobble – K stitch in contrast colour, turn, increase st to 3 sts, turn, K3tog, slide back onto left needle, K in main colour
Pattern notes The hat, tentacles and ‘body’ is worked in seed stitch. This is a stitch where there first row is worked as K1P1, the following row is worked as P1K1, essentially you K your P stitches and P your K stitches to create a tightly woven reversible bumpy fabric. (Google it for tutorials etc)
Throughout the pattern you will have to increase and decrease the number of stitches. Try to increase/decrease in the K1P1 pattern as best you can – you will end up with two K/P sts next to each other, but that fine, in the next increase/decrease you will be back to K1P1 the whole way round.
Gauge 6sts by 6 rows per inch in seed stitch

Tentacles (top side) make 8 For the tentacles, you work each tentacle flat and then cut the yarn at the end and leave sts on a spare needle to be used for the bottom edge of the hat.
CO3sts in main colour and work in seed stitch 1-4 – seed stitch 5 – Inc 1 at at beginning of row, keeping pattern correct, continue in seed stitch (4sts) 6-12 – seed stitch 13 – As row 5 (5sts) 14-24 – seed stitch 25 – As row 5 (6sts) 26-40 – seed stitch 41 – As row 5 (7sts) 42-60 – seed stitch 61 – As row 5 (8sts) 62-86 – seed stitch
Tentacles (bottom side) make 8 For these tentacles, you work each tentacle flat and then BO the yarn at the end. You can chose to knit these pieces separate to the main colour tentacles and sew them together at the end, as I have, or work the two pieces together using intersia to change colours. Up to you guys!
CO3sts in contrast colour, work in stockinette stitch (K row followed by P row) starting with a K row. 1-2 – stockinette 3 – K1, MB, K1 4 – P row 5 – Inc 1 at at beginning of row, K to end (4sts) 6 – P row 7 – K2, MB, K1 8-10- stockinette 11 – K2, MB, K1 12 – P row 13 – As row 5 (5sts) 14 – P row 15 – K1, MB, K1, MB, K1 16-18 – stockinette Repeat last 4 rows once more 23 – K1, MB, K1, MB, K1 24 – P row 25 – As row 5 (6sts) 26 – P row 27 – K1, MB, K2, MB, K1 28-30 – stockinette Repeat last four rows 2 more times 39 – K1, MB, K2, MB, K1 40 – purl 41 – As row 5 (7sts) 42 – K1, MB, K3, MB, K1 43-46 – stockinette Repeat last four rows 3 more times 59 – 42 – K1, MB, K3, MB, K1 60 – P row 61 – As row 5 (8sts) 62 – P row 63 – K1, MB, K4, MB, K1 64-66 – stockinette Repeat last four rows 5 more times (86 rows in total) BO all sts
Hat In main colour, CO 39sts, working in seed stitch, work across the 8 sts on each of the 8 tentacles (64sts) that were left on the spare needle. Join in the round, careful not to twist sts. 103sts. Work in seed stitch until work measures 5cm from the CO edge. Decrease 2 sts evenly across hat (I decreased sts 1&2, 52&53) to give 101 sts. Now decrease for the crown: Dec row: *work 8 sts in seed st, K/P2tog* to last st, K/P1. (91sts) Work 2 rows seed stitch. Dec row: *work 7 sts in seed st, K/P2tog* to last st, K/P1. (81sts) Work 2 rows seed stitch. Dec row: *work 6 sts in seed st, K/P2tog* to last st, K/P1. (71sts) Work 2 rows seed stitch. Dec row: *work 5 sts in seed st, K/P2tog* to last st, K/P1. (61sts) Work 2 rows seed stitch. Dec row: *work 4 sts in seed st, K/P2tog* to last st, K/P1. (51sts) Work 2 rows seed stitch. Dec row: *work 3 sts in seed st, K/P2tog* to last st, K/P1. (41sts) Work 2 rows seed stitch. Dec row: *work 2 sts in seed st, K/P2tog* to last st, K/P1. (31sts) Work 1 rows seed stitch. Dec row: *work 1 sts in seed st, K/P2tog* to last st, K/P1. (21sts) Dec row: *K/P2tog* to last at, K/P1. (11sts) Cut yarn and thread through remaining sts.
‘Body’ In main colour, CO 71sts, join in the round careful not to twist sts. 1 – K 1 row 2 – *K6, inc1* to last st, K/P1. (81sts) 3-8 – work in seed stitch 9 – *work 7 sts in seed st, inc1* to last st, K/P1. (91sts) 10-20 – work in seed stitch 21 *work 7 sts in seed st, K/P2tog* to last st, K/P1. (81sts) 22-25 – work in seed stitch 26 – *work 6 sts in seed st, K/P2tog* to last st, K/P1. (71sts) 27-30 – Work in seed stitch 31 – *work 5 sts in seed st, K/P2tog* to last st, K/P1. (61sts) 32-35 – Work in seed stitch 36 – *work 4 sts in seed st, K/P2tog* to last st, K/P1. (51sts) 37-38 – Work inseed stitch 39 – *work 3 sts in seed st, K/P2tog* to last st, K/P1. (41sts) 40-41 – Work in seed stitch. 42 – *work 2 sts in seed st, K/P2tog* to last st, K/P1. (31sts) 43 – Work in seed stitch. 44 – *work 1 sts in seed st, K/P2tog* to last st, K/P1. (21sts) 45 – Work in seed stitch. 46 – *K/P2tog* to last at, K/P1. (11sts) Cut yarn and thread through remaining sts.
Eyeballs (make 2) In contrast colour, CO3 sts and divide across 3 dpns, work in the round. 1 – Inc every st (6sts) 2 – K 3 – *Inc1, K1* to end (9sts) 4-6 – K Stuff eyeball lightly 7 – *K1, K2tog* to end (6sts) 8 – *K2tog* to end (3sts)
Eyelids (make 2) In main colour, CO12sts and work flat. 1-10 – work in seed stitch. BO all sts.
Assembly Sew tentacle bottom sides underneath the tentacle top sides (see photo), making sure to pull thread tight to encourage the tentacles to curl. Sew octopus body onto the back of the hat, I lined up the CO edge of the body at the start of the decreases, then pulled and tacked a few of the body sts onto the top of the crown to emphasise the bulb like shape. Stuff very lightly, again to emphasis it’s shape. Attach eyeballs to hat (use photo as a guide) then partially cover these with the eyelids (again see photo).
Wear and enjoy!
Pattern copyright of foxymitts.co.uk
20 notes
·
View notes
Text
Its been a while...
Since someone with style has treated you to a broadcast!
...I have been listening to Hazbin Hotel far too much...
Quick note to let everyone know that I am planning on moving all my patterns on to here and not try and backdate all my old blog posts. Theres over 200 and the thought of trying to do all that...
Just no.
Once I have caught up with the patterns I'll be looking to blog fresh content as well as little past highlights every now and then.
And of course, the wool count. I'll be sure to keep everyone updated on the big destash!
So until those updates are done, stay safe, and keep crafting!
Your Mischievous Maker, Roxy
0 notes
Text
Salami - Free Knitting Pattern

As part of an ambitious project to knit the entire Hungry Caterpillar food set, I needed to knit salami. I had a look online and couldn’t find any patterns so decided to make my own. The idea behind this is that it’s the end of the salami sausage with a slice just about fully cut out, which the caterpillar can ‘eat’. Some embroidery is needed for the chunks of fat in the salami meat as well as for the netting.

Materials -3mm double-pointed needles (or size required to obtain a dense fabric) -Stitch marker -Colour A (a light red/orange for the salami meat) -Colour B (a darker red/brown for the salami skin) -Small amount of white for embroidery (fat and netting) -Tapestry/yarn needle for seaming
Abbreviations St(s) = Stitch(es) CO = Cast on K = knit P = purl Inc = Increase by your preferred method (I prefer to M1) M1 = Increase by inserting the left needle from front to back into the horizontal strand between the two stitches: Knitting the stitch through the back loop Dec = Decrease by knitting 2 stitches together BO = Bind off
Gauge Not important, as long as a thick fabric is achieved
Salami sausage The salami is worked in the round starting at the end that has been ��sliced’.
CO4 sts in colour A, divide across four needles marking the start of the row with stitch marker (4sts) 1 – Inc every st (8sts) 2 – K 1 row 3 – (M1, K1) X 8 (16sts) 4 – K 1 row 5 – (M1, K2) X 8 (24sts) 6 – K 1 row 7 – (M1, K3) X 8 (32sts) 8 – K 1 row 9 – (M1, K4) X 8 (40sts) 10 – K 1 row 11 – (M1, K5) X 8 (48sts) 12 – Change to colour B. K 1 row 13 – (M1, K6) X 8 (56sts) 14 – P 1 row 15-32 – K 18 rows 33 – (K5, K2tog) X 8 (48sts) 34-35 – K 2 rows 36 – (K4, K2tog) X 8 (40sts) 37-38 – K 2 rows 39 – (K3, K2tog) X 8 (32sts) 40-41 – K 2 rows 42 – (K2, K2tog) X 8 (24sts) 43 – K 1 rows 44 – (K1, K2tog) X 8 (16sts) 45 – K 1 rows 46 – (K2tog) X 8 (8sts) 47 – K 1 rows 48 – (M1, K1) X 8 (16sts) 49 – K 1 row 50 – (M1, K2) X 8 (24sts) 51 – K 2 rows 52 – (M1, K3) X 8 (32sts) BO all sts
Salami slice CO4 sts in colour A, divide across four needles marking the start of the row with stitch marker (4sts) 1 – Inc every st (8sts) 2 – K 1 row 3 – (M1, K1) X 8 (16sts) 4 – K 1 row 5 – (M1, K2) X 8 (24sts) 6 – K 1 row 7 – (M1, K3) X 8 (32sts) 8 – K 1 row 9 – (M1, K4) X 8 (40sts) 10 – K 1 row 11 – (M1, K5) X 8 (48sts) 12 – Change to colour B. K 1 row 13 – (M1, K6) X 8 (56sts) 14 – P 1 row 15 – (K5, K2tog) X 8 (48sts) 16 – K 1 row 17 – (K4, K2tog) X 8 (40sts) 18 – K 1 row 19 – (K3, K2tog) X 8 (32sts) 20 – K 1 row 21 – (K2, K2tog) X 8 (24sts) 22 – K 1 rows 23 – (K1, K2tog) X 8 (16sts) 24 – K 1 rows 25 – (K2tog) X 8 (8sts) Cut yarn and thread through remaining sts.
Finishing Work netting on the body of the salami then work white spots onto the salami meat. See the edge of the salami slice onto the salami sausage.
Enjoy!
Pattern copyright of foxymitts.co.uk
6 notes
·
View notes
Text
Pusheen cat Scarf - Free Knitting Pattern

My neice is a huge fan of Pusheen, and subsequently I decided she needed a Pusheen scarf for winter! But after some searching, couldn’t find any knitted ones, so…this was made!
I’ve been trying to use up my stash so held my wool double/triple stranded to obtain a nice thick cosy fabric. As such, guage isn’t incredibly important.
The scarf starts with a provisional cast on, worked in the round, and then the back legs and tail are worked into the scarf by binding off and working small groups of stitches in the round. The provisional cast on is removed and the front legs worked in the same manner. The stripes are knit separate and sewn on and the face sewn on at the end.
You can easily change the colours and add/remove stripes to make a variety of cat scarfs. Have fun!
Materials Light brown/grey wool for body Dark brown/grey wool for tail, stripes and face 6.5mm dpns or side needed to obtain guage
Abbreviations St(s) = Stitch(es) CO = Cast on K# = knit # stitches BO = Bind off
Gauge 13 stitches and 17 rows = 10 cm in stockinette stitch
Scarf
CO 28sts using a provisional cast on in the light brown/grey Divide across four needles and work in the round for desired length (example is 145cm) Next round: K3, BO3, K2, BO3, K6, BO3, K2, BO3, K3 – (when folded flat, the sts should line up as a group of six, a group of four and another group of six. This makes a leg, the tail and another leg) Work the first set of 6sts in round for 7 rows, cut yarn and thread through remaining sts. Attach yarn to start of the other group of 6sts, work in round for 7 rows, cut yarn and thread through remaining sts. Attach darker yarn to start of 4sts, this is for the tail, work 3 rounds dark grey, 3 rounds light, 3 rounds dark, 3 rounds light, 5 rounds dark, cut yarn and thread through remaining sts. Pick up provisional cast on, (28sts) K3, BO8, K6, BO8, K3, (this makes the two front paws) work 6sts in round for 7 rows, cut yarn and thread through remaining sts. Repeat for other 6 sts.
Stripes (make 2)
The stripes are knit separate so that they could be placed just either side of the halfway mark of the scarf. Alternatively, these could be knitted into the scarf to save on sewing.
CO 14sts in dark grey/brown Row 1 – K all sts Row 2 – P all sts Row 3 – K all sts BO purl-wise.
Finishing
Tuck in all loose threads. Sew top and bottom edges between legs and tail closed. Sew on face – use an actual Pusheen image for placement, or alternatively, make up your own. Wear and enjoy!
Pattern is on Ravelry, so if you make one or many, please put photos up!
Pattern is copyright to Foxymitts.co.uk
21 notes
·
View notes
Text
Owl Bear Chart

Materials -Yarn in two contrasting colours -Needles suitable for your yarn
Chart Work from the bottom of the chart up, changing colours as indicated. I worked the example in intarsia, but it will work in fair isle also. Use whichever method suits the item you are adding the chart too!
The chart is 39sts wide, and 44 rows tall. Recommend adding at least a further five stitches and rows on either side to create a nice even space around the design itself.

Have fun! And may an army of cute tiny Owl-Bears conquer the knitting world!
Pattern copyright of foxymitts.co.uk
17 notes
·
View notes
Text
Little Axe - Free Knitting Pattern

Have you ever needed to attack / defend yourself from hoards of knitted monsters?
Or perhaps your little (or large) viking needs an axe-essory to sharpen their day?
No need to worry about gauge either!
Materials -3mm needles -Light silver/grey DK yarn -Dark silver/grey DK yarn -Brown DK yarn -Tapestry/yarn needle for seaming
Abbreviations CO = Cast on St(s) = Stitch(es) St-st = Stocking Stitch – K 1 row, P 1 row G-st: = Garter stitch – K every row K# = knit # stitches P# = purl # stitches K2tog = Knit 2 stitches together P2tog = Purl 2 stitches together Inc = Increase by your preferred method (I prefer to M1) Dec = Decrease by knitting (purling) 2 stitches together (if you’re on a K (P) row) BO = Bind off Three needle BO = Pick up CO sts whilst BO to create a neat edge seam
Finished size: Approx 13cm
Axe Head (make 1) Start at the bit (sharp edge) then decrease for the beard, before knitting a length that forms the butt. Increase again for the other side of the beard and then finish on the bit again. Three needle BO the start and end to join the axe head together. Additional sewing will be required at the end around the other edges of the axe.
CO12 sts in In light silver/grey: 1 – 2 – Starting with a K row, work 2 rows st-st. Change to dark silver/grey 3 – 4 – st-st 2 rows 5 – BO 4 sts, K2tog, K to end (7sts) 6 – P1, P2tog, P to last 2 sts, P2tog (5sts) 7 – 18 – St-st 12 rows 19 – K1, inc 1, K to last 2 sts, inc 1, K1. (7sts) 20 – P to last st, inc 1, CO 4 sts (12) 21 – 22 – st-st 2 rows Change to light silver/grey 23 – 24 – st-st 2 rows Three needle BO
Handle Knit length of handle, fold in half edgeways to create a firm tube and stitch closed.
CO 30 sts in brown (less if you want a smaller shaft). 1 – 3 – In G-st, K 3 rows BO
Assembly Slide handle into axe head opening until enough of the handle is visible at the top to your liking (or use photo as a guide). Sew edges of axe head closed and firmly fix the handle in place.
You are now armed and ready to take on the world, one little axe at a time!
Pattern copyright of foxymitts.co.uk
5 notes
·
View notes
Text
Lettuce or cabbage - Free Knitting Pattern
As part of my ‘Flopsy’s bunnies’ project, I needed lettuce. After a bit of hunting I realised that if I wanted to knit a lettuce, I was going to have to make the pattern for one…

So in case anyone else wants to make a lettuce, here’s how I made mine.
Materials -5.5mm double-pointed needles -Stitch marker -Two strands of DK weight yarn held together throughout -Stuffing -Tapestry/yarn needle for seaming
Abbreviations St(s) = Stitch(es) CO = Cast on K = knit P = purl Inc = Increase by your preferred method K2tog = Knit 2 stitches together
Gauge Not important, as long as a thick fabric is achieved
Lettuce centre
The lettuce is composed of a ‘ball’ (it’s more egg shaped really), knitted in the round, with several leaves then knitted and tacked onto the ‘ball’ to give it that distinct lettuce shape.
CO6 sts, divide across three needles marking the start of the round with a stitch marker (6sts) 1 – (and all odd rounds) – K 1 round 2 – Inc all sts (12 sts) 4 – *Inc1, K2; repeat from * (18 sts) 6 – *Inc1, K3; repeat from * (24 sts) 8 – *Inc1, K4; repeat from * (30 sts) 10 – *Inc1, K5; repeat from * (36 sts) 12 – *Inc1, K6; repeat from * (42 sts) 14 – *Inc1, K7; repeat from * (48 sts) 16 – *Inc1, K8; repeat from * (54 sts) 18 – *Inc1, K9; repeat from * (60 sts) 20 – *Inc1, K10; repeat from * (66 sts) Rounds 21-25 26- *K2tog, K9; repeat from * (60sts) 27 – (and all odd rounds) – K 1 round 28 – *K2tog, K8; repeat from * (54sts) 30 – *K2tog, K7; repeat from * (48sts) 32 – *K2tog, K6; repeat from * (42sts) 34 – *K2tog, K5; repeat from * (36sts) 36 – *K2tog, K4; repeat from * (30sts) 38 – *K2tog, K3; repeat from * (24sts) 40 – *K2tog, K2; repeat from * (18sts) – at this point, stuff ball 42 – *K2tog, K1; repeat from * (12sts), cut yarn and thread through remaining sts
This will give an egg like ball shape. The pointier end is the bottom of the lettuce. Keep this in mind when sewing on the leaves – the pointy end of the leaves go to the pointy end of the egg/ball!

Small Lettuce Leaves – make three
CO10 sts, each leaf is knit flat in st-st. Starting with a K row: 1 – Inc 1st and last st 2 – P Repeat rows 1-2 twice more (16 sts) 7 – 10 – work in st-st 11 – k1, ssk, K to last 3sts, k2tog, k1 12 – P Repeat rows 11-12 until 4 sts remain, BO.
These three leaves are sewn CO edge around the ‘top’ of the lettuce.
Large Lettuce Leaves – make three
CO14 sts, each leaf is knit flat in st-st. Starting with a K row: 1 – Inc 1st and last st 2 – P Repeat rows 1-2 three more times (22 sts) 9 – 14 – work in st-st 15 – k1, ssk, K to last 3sts, k2tog, k1 16 – P Repeat rows 11-12 until 4 sts remain, BO.
These are the final three leaves – the bottom edge (the point) is sewn onto the bottom edge of the lettuce body and then the CO edges of the leaves are sewn in the gaps created by the small lettuce leaves.


And there you have it, a lettuce! Optional extra: for a salad or for bunnies to nibble on, knit a few extra small lettuce leaves!

Copyright to foxymitts.co.uk
1 note
·
View note
Text
Kirby - Free Knitting Pattern
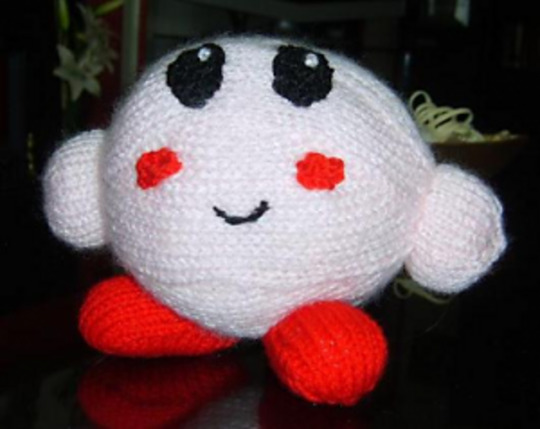
Kirby is a pattern created by sis, Rabbie aka themagpiesnest, whose knitted (and sewn, and baked) goodies can be found here, or her blog over here. She asked me to host the pattern, and I couldn’t resist having such a cutie on my site!
Kirby Requires: 4mm dpns 4mm straight needles pink, red, black and white DK woolBody Cast on 6, split between 3 dpn’s and changing to a circular needle if desired when stitch number is high enough Round 1, and all odd rounds: Knit Round 2: Inc in every st Round 4: K1, inc 1 across row Round 6: K2, inc 1 across row Round 8: K3, inc 1 across row Round 10: K4, inc 1 across row Round 12: K5, inc 1 across row Continue in this manner until completion of row K12, inc 1 across row Work 4 rows and start to stuff the body Round 1, and all odd rounds: Knit Round 2: K2tog, K12 across row Round 4: K2tog, K11 across row Round 6: K2tog, K10 across row Round 8: K2tog, K9 across row Continue in this manner until 3 sts remain, cut yarn and thread through remaining sts
Arms (make 2) Cast on 30 on straight needles Work 10 rows st-st Row 11: K2tog across row Row 12: Purl Row 13: K2tog across row Row 14: Purl cut yarn and thread through remaining sts, sew seam, stuff and stitch to body
Feet (make 2) Cast on 25 on straight needles Row 1: K11, inc 1, K1, inc 1, K11 Row 2: P1, inc 1, P23, inc 1, P1 Row 3: K12, inc 3, K1, inc 1, K12 Row 4: P3, inc 1, P27, inc 1, P3 Row 5: K13, inc 1, K5, inc 1, K13 Row 6: P Row 7: K20, K2tog, sl 1, bring yarn forward (byf) turn Row 8: sl 1, P6, P2tog, sl 1, byf, turn Row 9: sl 1, K6, K2tog, sl 1, byf, turn Repeat rows 8 and 9 until 23 sts remain Work 1 row Cast off, sew seam and stuff, stitch to body
Face Rabbie made crochet chains and sewn them on for the face, but you can use cloth or even knit the parts if so desired.
1 note
·
View note
Text
Foxy Mitts - Free Knitting Pattern

My first ever pattern, and where I got my online name. Must be getting on…8 years since I wrote this? (Edit: reposting this and we're at...22 years since...)
I feel old now. (Edit: Even older now...)
Materials 6½ mm needles 2 x 50g balls brown fluffy wool 4 x 50g balls red fluffy wool 1 x 50g ball white fluffy wool NB: If you feel your fluffy wool isn’t giving a thick enough fabric, you can mix it was a strand of matching coloured DK wool.
Wristwarmer (make 2) With 6 ½ mm needles and brown fur, cast on 30sts. Work in st-st for 6 rows Row 7 – knit 13 sts, cast off 4, knit to end Row 8 – purl 13, cast on 4, purl to end, cont in st-st until; Row 35 – change to red fur, cont to 50 rows, cast off.
Legwarmer (make 2) With 6 ½ mm needles and brown fur, cast on 50sts. Work in st-st for 34 rows, dec at beginning and end of every 8th row, 42 stitches remaining. Row 35 – change to red fur Continue pattern, until row 48. Next 4 rows, dec at each end Cont straight for next 1 row, cast off.
Tail (make 1) With 6 ½ mm needles and red fur/wool combo, cast on 10sts. Work in st-st for 12 rows, inc at beginning and end of every 4th row to 16 sts Inc both sides of every 2nd row, work 20 rows like this, 36 sts Inc both sides every 5th row, work 10 rows like this, 40 sts The next 20 rows is when the white integrates with the red to form the tip, in the worked example a swirly motif was used – I would never, ever recommend swirls with furry wool. Zig zags, or even straight would be more suitable, and easier. So insert your own motif in here for the next 20 rows. Decrease both sides of every row until 10 sts remain, cut and pull thread through remaining stitches. Sew edges together.
And there you have it, your own set of Foxy Mitts!

Pattern copyright to foxymitts.co.uk
1 note
·
View note
Text
Fox bag holder - Free Knitting Pattern

Materials -3mm dpns (if picking up sts, normal needles can be used if working flat) -Brown, cream and black DK yarn -1x14mm Black button for nose -2x16mm Green buttons for eyes (safety eyes could be used, or you could embroider them on) -Tapestry/yarn needle for tucking in ends -Optional – 1xD shaped carabiner clip (to attach to bag)
Abbreviations St(s) = Stitch(es) CO = Cast on K# = knit # stitches K2tog = Knit 2 stitches together Inc = Increase by your preferred method (I prefer Kfb on garter st) Dec = Decrease by knitting 2 stitches together YO = Yarn over, creating a stitch by looping the yarn round the needle BO = Bind off

Head
Once the snout and back of the fox head are knitted, the yarn is changed from brown to cream. When working the cream, every other row you pick up and knit the brown stitches from the knitting you’ve done. This creates the pocket shape that allows you to make this pattern seamless. This is why dpns are used, so that both sides can be picked up similtaneously.
If you prefer you can knit this without picking up the stitches and instead sew the sides together at the end. I hate sewing so avoid it by all means necessary!
CO 4sts in brown. Row 1: K all sts Row 2: K all sts (this creates garter stitch and is done throughout the pattern.) Row 3: K2sts, YO, K2tog, K to end (4sts) Row 4: Inc one st at each end of needle Row 5: K all sts Repeat rows 4 and 5 until 28sts has been reached (you can add or subtract rows depending on the size you want quite easily) Row 30 – 64: K all sts Row 65: Dec one st at each end of needle Row 66: K all sts Repeat rows 65 and 66 until 18sts.
Change yarn from brown to cream. Row 75-76: K all sts
As noted at the start of the pattern, from this point on you pick up sts as you work the fox purse. So you fold the knitting in half and pick up the 1st brown st so that its in front of your 1st cream st and then k2tog. You do the same at the very end by picking up the last brown st at the ens of your knitting next to your last cream stitch and k2tog. You only do this every other row, and not on a row you are increasing the sts – no real reason why other than it can get a bit tight on the needles!
Row 77: Inc one st at each end of needle Row 78: K all sts Repeat rows 77 and 78 until 28sts. Rows 87 – 118: K all sts BO.
Ears (Make 2)
CO 10sts in black Rows 1-4: K all sts Row 5: Dec 1st st Repeat row 5 until only one two sts remain. Row 13: K2tog, pull yarn and cut.
Finishing
Sew ears to top of head. Thread in all loose ends. Position and sew buttons to correspond with nose and eyes. If used, create a braid in brown yarn and use this to fasten the D ring to the fox purse.
Enjoy!
I reckon with different colours and a few minor tweaks this pattern could be easily adapted to make an owl, or badger or perhaps a little monster?
Pattern copyright to Foxymitts.co.uk
0 notes
Text
Cthulhu - Free Knitting Pattern

This is a cute, snuggly, knitted version of the cosmic entity, Cthuhlu, created by H. P. Lovecraft back in 1928.
Materials
DK yarn of your colour choice 3mm DPN’s (or one or two sizes smaller than recommended by yarn Safety eyes (I used black 6mm ones, alternatively eyes can be sewn on with scrap yarn) Soft polyfill type stuffing
A quick note, Cthulhu is worked entirely in reverse stockinette, this means that the ‘bumpy’ side of normal stockinette is the correct side to achieve a scaly looking fabric. When working in the round, you purl every row instead of knit. If you don’t like to purl, you can always knit every row but will need to turn the pieces inside out before stuffing.
Head (make 1)
CO 10sts, join in the round, careful not to twist any stitches.
Round 1 – P Round 2 – P4, PFB (Purl front and back of stitch, if easier, this can be done in the traditional KFB) P to last 5 sts, PFB, P to end Round 3 – P to last 5 sts, w & t, K to last 5 sts, w & t, P to end
Repeat rounds 2 and 3 until 30 sts has been reached, making sure to end after a round 3.
BO all sts.
Tentacles (make 1)
CO 32sts
Row 1 – P Row 2 – *CO a further 17 sts, then BO 19 sts.* This should leave you with 30 sts and the first tentacle. Repeat from * to * until 0 sts are left. You should have 16 tentacles.
Body (make 1)
CO 6sts, join in the round, careful not to twist any stitches.
Round 1 – PFB every stitch Round 2 – P Round 3 – P1, (PFB)x3, P3, (PFB)x3, P2 (18 sts) Round 4 – P Round 5 – P1, (PFB, P1)x3, P4, (PFB, P1)x3, P1 (24 sts) Round 6-18 – P Round 19 – *P2, P2tog*, Repeat from * to * end (18 sts) Round 20 – P Round 21 – *P1, P2tog*, Repeat from * to * end (12 sts) Round 22 – P Round 23 – (P2, P2tog, P2)x2
BO all stitches
Legs (make 2)
CO 11 sts, join in the round, careful not to twist any stitches.
Round 1-10 – P Round 11 – P3, P2tog, P1, P2tog, P3 (9 sts) Round 12 – PFB every stitch Round 13-15 – P Round 16 – P12,* turn work, do not wrap sts throughout foot, K6, turn, P6, turn, (K2tog)x3, turn, P3tog, pull yarn through one remaining loop, cut and you can use this to sew the side of toe closed.*
Reattach yarn to first unworked P st of Round 16, P3 then repeat * to * to make second toe.
Reattach yarn to first unworked P st of Round 16, P3 then repeat * to * to make final toe.
Arms (make 2)
CO 9 sts, join in the round, careful not to twist any stitches.
Round 1-10 – P Round 11 – P5,* turn work, do not wrap sts throughout hand, K3, turn, P3, turn, K3, turn, P3tog, pull yarn through one remaining loop, cut and you can use this to sew the side of finger closed.*
Reattach yarn to first unworked P st of Round 11, P2 then repeat * to * to make second toe.
Reattach yarn to first unworked P st of Round 11, P2 then repeat * to * to make final toe.
Wings (make 2)
CO 2sts, this piece is worked flat and in garter stitch (every row is knit)
Row 1 – K to last st, KFB Row 2 – K
Repeat rows 1 and 2 another 4 times (7sts)
Row 11 – K to last 2 sts, K2tog Row 12 – K
Repeat rows 11 and 12 another 3 times (3sts), BO
Assembly
Tuck in all loose threads.
For head, pin the CO edge to the edge of the BO so that a curved shape is achieved. Stuff and attach/embroider eyes. Sew the CO edge of the tentacles around the BO edge of the head, there should be enough tentacles to go completely round and enough to go around again. Sew this into place and sew the centre closed.
Stuff body, sew head on so that the tentacles rest comfortably on its chest. Stuff arms and legs and position as desired. I positioned mine so it would be sitting, the back legs need to be spread a bit to stop it falling over.
Lastly, position wings so that the curve is on top and the straight edge at the bottom, sew onto back.
Allow your Cthuhlu to drive the world into madness and chaos with its cutness!
Pattern copyright to Foxymitts.co.uk
2 notes
·
View notes