
he/him · early 20sThis blog is mostly for reblogs!If you want to see art, check my pinned post or sidebar
Don't wanna be here? Send us removal request.
Statistics
We looked inside some of the posts by fxlmine and here's what we found interesting.
Average Info
Notes Per Post
602K
Likes Per Post
343K
Reblog Per Post
258K
Reply Per Post
899
Time Between Posts
1 month
Number of Posts By Type
Text
17
Last Seen Tumblr Blogs


Fun Fact
The most popular pages on Tumblr are about Minecraft, GIFs, and David J. Peterson.

Text


Always a good time to burn down yet another village!
Patreon
50K notes
·
View notes
Text

What if instead of playing Chess in Ford's Mindscape they play Parkour Civilization 🤔
5K notes
·
View notes
Text
So there's a thing where a bunch of countries have national variants of the rainbow pride flag, right?
Like, they'll combine their nation's flag (or some national symbol) with the rainbow stripes. The Brazilian one haunts me to this day but that's a long story. They're usually done in a quite lazy manner, cause it's not really something you can do super well and not many people try.
But I have just found one that is lazier than the rest! Are you ready to see it?

WITNESS THE LGBT PRIDE FLAG OF THE NETHERLANDS!
23K notes
·
View notes
Text
Bulk part recoloring for Picrew: a guide

Hi! Some of my friends asked me about this and I figured I'd make a tumblr post instead of writing it all in a discord message never to be seen again.
This guide covers how i personally quickly recolor parts for my own picrews, to use with picrew creator's bulk uploading tool. This likely isn't going to work for everyone, especially since I rely on Clip Studio Paint very heavily.
Using this tutorial will give you the files you need to bulk upload with picrew creator a bit faster than if you were to recolor everything by hand. Especially if doing a bunch of parts and colors.
Tutorial under the cut!
What you'll need
Clip studio paint (or another art program with animation features that lets you export each frame to a separate layer. I only will be showing CSP however)
Your artwork. Each color needs to be on a separate layer. (Sorry for those who like to paint everything on the same layer! This won't work for you)
(optional, if on windows) https://www.bulkrenameutility.co.uk/ to speed up one specific step
Let's do this
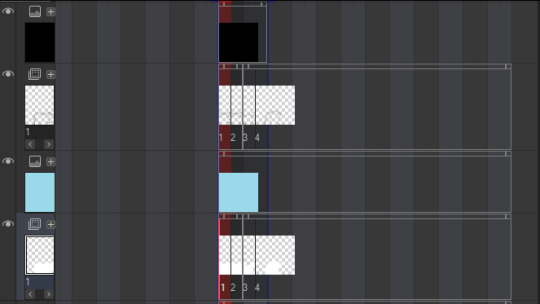
1) open the animation timeline, with CSP pro you can do 24 parts at a time due to the frame limit, which is still plenty to speed the process up.
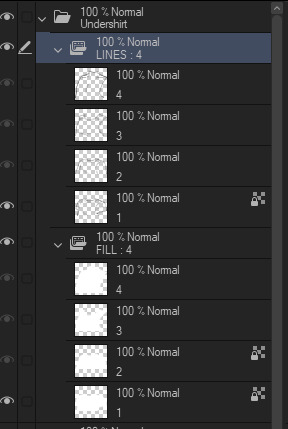
2) say you're doing the shirts like i did. make an animation folder for the shirt fill color, as well as the lineart. if you have any more layers that are recolored with the same color each time, make an animation folder for those as well (so say, shadows. or secondary colors)
3) put each individual shirt part in it's own animation cell. make sure the frames for each part line up. you'll want to be able to go through the timeline with each shirt on a separate frame
Your layers should end up looking somewhat similar to this

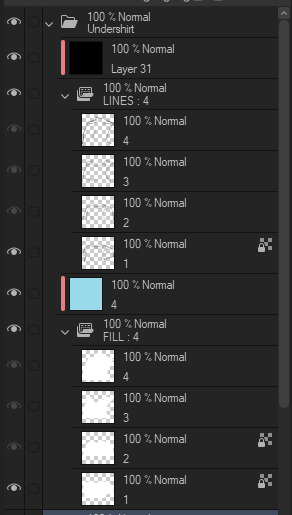
4) now for recoloring: clip a layer to each animation folder. so clip one to the shirt fill folder for instance. fill that entire layer up with the color you want that part to be. Check the frames in your animation again, now every part should be recolored with the colors in the clipped layer.
Your layers should now look something like this

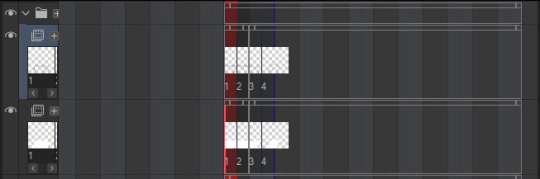
5) Shorten the timeline so only frames with an actual item in them are included. (Otherwise you'll end up with a bunch of blank images later that you're not going to do anything with)
6) Hide every layer other than the animation folders and their clipped layers. So only the part is visible. Go through your frames one more time to make sure they look alright and nothing is out of place.
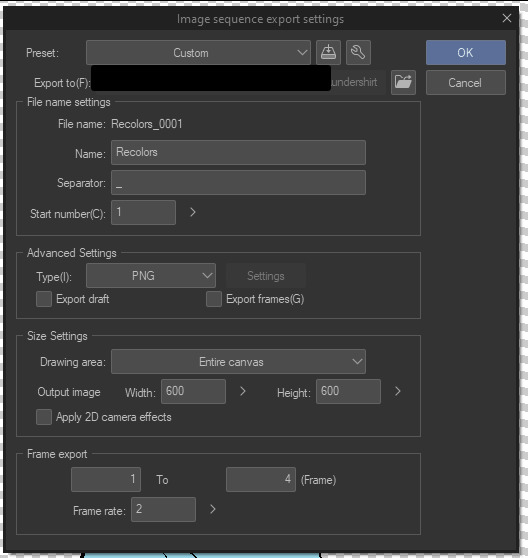
7) Time to export! Go to file -> export animation -> image sequence (you might want to set a shortcut for this so you don't have to go through 3 menus haha).
Make sure you're exporting to the correct folder. Set file name settings to anything you like, but make sure the start number is 1 (there might be exceptions to this, I'll go over that later). Set the image type to PNG, make sure the canvas size is correct and that the framerate lines up with your timeline's framerate.

8) Export it! You should have some files in your folder that look like this now. We'll want to rename them to just 1.png, 2.png... etc.

9) You can rename them by hand, but this is rather slow to do each time and I'm lazy. So here's how you rename them in the bulk rename utility. Open your folder in there, and then copy the settings I have here.


Yes, this is EXTREMELY overwhelming. I know. The first box (RegEx) is the only one you'll need to touch. Set the Match field to something like "Recolors_0{0,3}". Replace "Recolors_" with whatever your files start with. Also check the v2 box.
Replace can be left empty, since we're essentially removing anything that matches the regex (which is a text pattern matching syntax. We're essentially matching "Recolors_" with up to 3 zeros after it)
Select all the files in the top panel, then hit Rename in the bottom right! It should rename everything to just 1.png, 2.png... etc in one go.
10) Go to your part page in picrew. Make sure your colors are set up and you have created the amount of parts you'll need. Go to the Bulk Upload tab (there's a link in the top right).
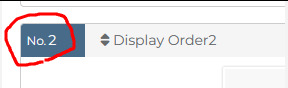
11) Select the color you're uploading, then select the files you're uploading. Make sure the filenames match with your part ID numbers. This is important. 1.png Will match the first part, 2.png will match the second. Note how I said ID numbers, not the display order.
This means in the exporting step, you might need to change the starting number of your files. If you messed this up since you didn't read the tutorial in full before following it (I get it. I've been there before), just export and rename again.
12) If everything looks good and you got your files previewing no problem, hit upload, then wait a few seconds while picrew uploads your files.

13) YOU DID IT!!! You successfully added a recolor for your parts. Now go back to your file in CSP and fill each clipping layer up with a different color. You can now repeat the process from step 7. (export, rename and upload) to upload all parts for the other colors.
How much time does this actually save?
I never timed myself, but from experience, once you have set everything up and get the hang of it. It's pretty damn fast! Granted it does take a bit of set-up to get working. It gets more efficient the more parts you recolor at once.
I'll often go ahead and recolor the next color while the previous color is still uploading. Usually a single color only takes me a minute max to create and upload, instead of several minutes recoloring every single layer and saving each file separately.
For bulk rename utility, I set it to allow overwriting files. Which means I keep every color in the same folder and just overwrite the files whenever I rename. It's the fastest for me and saves me some storage space on my PC as well. Just make sure to click out of and then back into the folder to reload the files in there.
Hopefully this should help someone! Creating your own picrew is a daunting task and this made it a little easier for me at least ^^
#picrew#picrew tutorial#picrew guide#image maker#my picrew#the example picrew im showing isn't out yet. it's still in the early stages#idk if it'll ever be finished#i'll reblog this post + make a separate post on my blog if it does tho!
28 notes
·
View notes
Text
Flight Rising players! How do you organize your lair?
230 notes
·
View notes


Text

I don't normally make "political" art like this, but after recent events I felt I had to say something
18K notes
·
View notes
Text

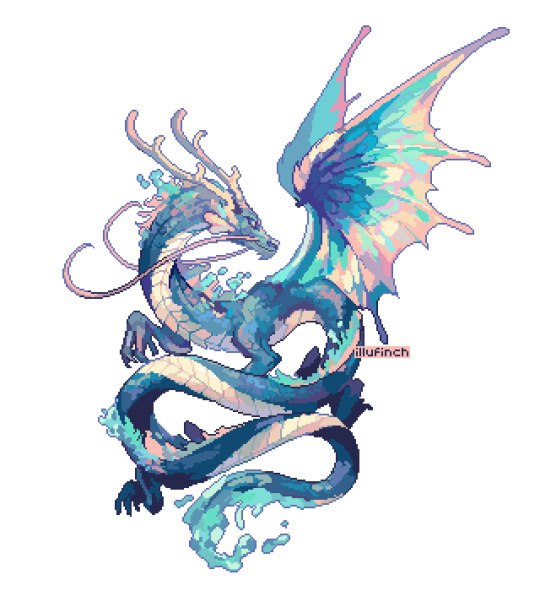
Pixel art Color Caricature from a while back
#this is so cool#the colors here. woah#love the tones of pinks and purples and greens in the shading on the brick
3K notes
·
View notes
Text
the most fucked up thing ever is being obsessed w ur own oc. why do i have to make content of them why cant they just magically appear on my screen for me to reblog 200 times. fucked up and also evil
41K notes
·
View notes


Text
reblog to give the prev a hot chocolate with (optional) whipped cream and marshmallows
62K notes
·
View notes
Text
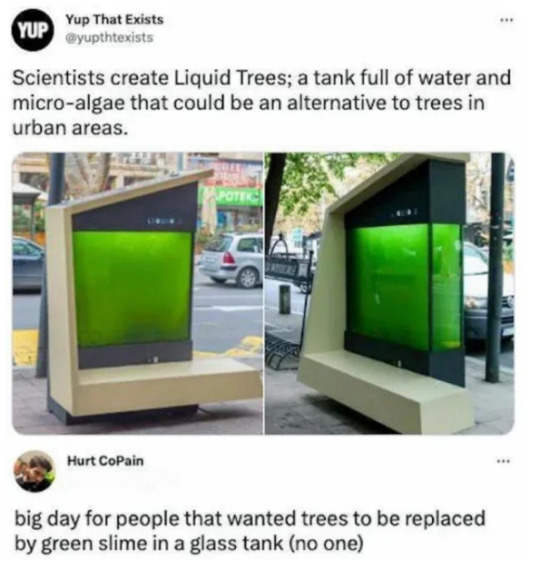
#love it when people dismiss something scientists have worked years on#because it 'looks bad' or whatever#theres a reason for every bit of research that we do#anyway thank you for the addition. this is really cool
147K notes
·
View notes
Text
If a post doesn't apply to you it means the person who made it is excluding you on purpose. If someone makes a broad generalization in a tumblr post it means they know about your individual experiences and they're ignoring you deliberately because they hate you and want to make you mad. So if you see a post that doesn't factor in your personal perspective you should make sure to leave a comment of at least three paragraphs to make sure the op knows how deeply they have hurt you and how serious the matter truly is
29K notes
·
View notes
Text
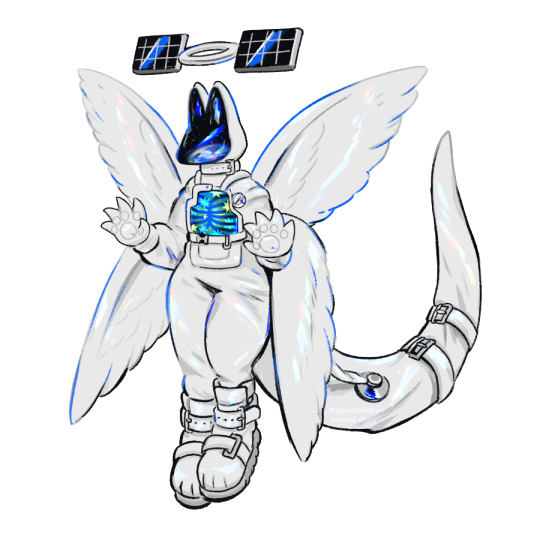
in-orbit
1K notes
·
View notes