
Last Seen Blogs

alonsolomon1
אלון סולומון

alonfeder
Alon Feder

hyperfixat
professional lucifer fan (obey me)

allenswaifu-blog
you can give up,give in,or give it your all.

alolasbestsins
Inactive
Text
FINAL ASSESSMENT
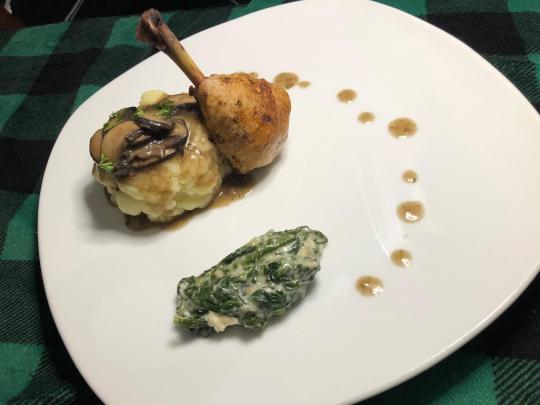
Main dish:
Chicken leg, mashed potatoes, creamed spinach and mushroom gravy.

Appetizer: Chicken Salad Wonton Bite.
Hey everyone, its B and I’m back with a new blog.
Writing this blog is a bit different this time around tho, we’re on our third week of quarantine for Covid-19. So we’ve been doing our classes online like everyone else and its been quite the experience. There’s a basic range of emotions almost daily and being overwhelmed is well, overwhelming. The chefs and everyone at school have been great as we’re all experiencing this together, but in many different ways. I’ve been spending my time cleaning my apartment and organizing all my stuff. I’ve been baking bread and making pasta alot... lol ...
I’ve also been baking a bunch so that’s fun but I’m starting to get concerned with the gym being closed and not being able to get outside to exercise so maybe I should watch the stress overeating ya’know. Easier said than done for sure. I have not had a hard time finding anything but Lysol wipes or rubbing alcohol so I’ve been pretty lucky.
Here is a meal I made for an assignment for school. I had to create a menu that demonstrated the skill I have learned over the last 2 semesters.
I made a chicken salad wonton bite as an appetizer and a pan seared frenched chicken leg that I then roasted, paired with mashed potatoes, creamed spinach and a delicious mushroom gravy as a main.


Frenched chicken legs.

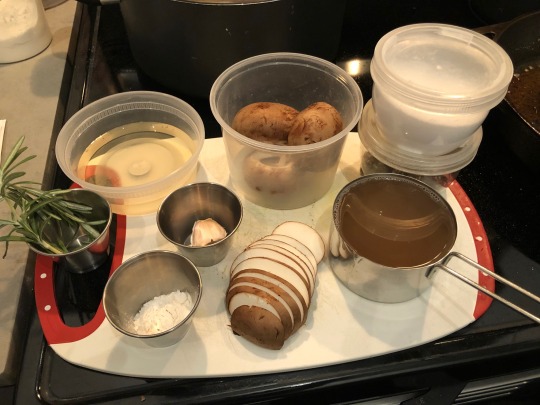
Mise-en-plus for mashed potatoes.
Mise-en-plus for mushroom gravy.

Mise-en-plus for chicken salad (minus the chicken)
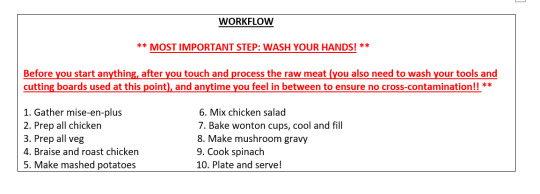
INSTRUCTIONS
Chicken Salad Wonton Bites
Roasted Chicken
1. Preheat oven to 400F.
2. Pat dry skin on chicken thigh and season with salt and pepper.
3. Place seasoned thigh on baking sheet lined with parchment paper and place into the oven.
4. Bake thigh for __ minutes until internal temperature reaches 155F-160F take out of oven and let rest.
(Remove the skin at this stage, so it stays crispy) The chicken will continue to cook to 165F while it rests.
5. While the thigh is roasting, you can prepare the rest of the ingredients.
Chicken Salad
1. Peel carrots and cut into a small dice.
2. Peel celery and cut into small dice.
3. Zest and juice ½ a lemon.
4. Pile the dill on clean cutting board and finely chop.
5. Mix mayo, dill, zest and juice of the lemon to combine for the dressing. Adjust seasoning. Refrigerate.
6. Once the thigh has cooled, you can start picking the meat and separating it from the bone.
7. Add the carrots, celery and picked thigh meat to the dressing and mix well. Cover and refrigerate.
8. Using premade frozen wontons and a small lightly greased muffin tin, form the wonton wrappers into cups.
9. Bake wonton wrappers in a 350F oven for 8 minutes, take out of oven and let cool.
10. Once wonton wrappers have cooled, fill them with chicken salad mix. Top with black pepper and dill.
Wonton Wrappers
1. Place flour into large bowl.
2. In separate bowl, whisk eggs, salt and water.
3. Create a well in the center of the flour and pour in the wet ingredients.
4. Mix everything together with a spoon or your hands, until the mixture begins to come together.
5. Turn the dough onto the counter and kneads for 3-5 minutes. The dough should be firm but silky smooth when you are done. If the dough is too tacky add a little extra flour to your counter.
6. Cover the dough with a damp towel and let rest for an hour.
7. Divide the dough in half. Cover one half of the dough with your towel. Lightly dust your counter-top with cornstarch (not flour) and roll half the dough out to as thin as you can. (You are aiming for 15”x9” for wontons)
8. Cut the sheet into desired shapes.
9. Repeat with remaining dough.
10. Use immediately or dust with more cornstarch and place in Ziplock bag to freeze.
*I had these premade and frozen in my freezer so I removed them 30 minutes before I needed them*
Wonton recipe retrieved from:
Ozimek, S., Sarah, Sarah, Cook, R., & Nguyen, A. (2018, February 17). Homemade Wonton Wrappers • Curious Cuisiniere. Retrieved from https://www.curiouscuisiniere.com/wonton-wrap
INSTRUCTIONS
Fried Frenched Chicken Leg
1. Preheat oven 350F.
2. French chicken legs and season with salt and pepper.
3. Wrap end on leg without meat on it in tinfoil. The tinfoil prevents the bone from burning.
4. Put flour and cornstarch into bowl and coat meaty part of chicken leg with mixture.
5. Heat oil in cast iron over medium heat. Add butter and let foam.
6. Once butter foams add chicken legs and let cook for __ minutes, turn and repeat. You just want a little browning on the skin as you will finish off the cooking in the oven.
7. Place the entire cast iron in oven and cook chicken until internal temperature reaches 160F.
8. Take out of oven and let rest before you serve.
INSTRUCTIONS
Mushroom Gravy
1. Using the same pan that was used for cooking the chicken, add sliced mushrooms.
2. Stirring often to scrape all the brown bits up from the bottom of the pan and the mushrooms are tender and brown, about 5 minutes.
3. Add garlic to pot.
4. Add flour and stir about a minute until the flour has cooked out slightly.
5. Whisk in stock and add thyme.
6. Simmer gravy whisking constantly until gravy thickens.
7. Remove thyme and add parsley, thoroughly mix.
8. Season with salt and pepper.
INSTRUCTIONS
Mashed Potatoes
1. Peel and cut potatoes into medium size dice, store in cold water.
2. Add potatoes to large pot and cover with cold water. Always salt your water.
3. Bring pot to a boil and turn heat down. Cover pot and let simmer for __ minutes, until potatoes are soft.
(To check doneness of potato use a fork - if its still hard it is not cooked completely, if its soft it’s done.
4. While the potatoes are cooking, heat up the milk and butter.
5. Add milk to small saucepot and bring it up to temperature slowly over low heat.
(You do not want it to boil – you just want to scald the milk, bring it to 181F)
6. Add _tsp of butter to pot and let melt into milk. Mix to combine.
7. Once potatoes are cooked, about __ minutes, drain the water and return pot to stove. Let sit a minute to evaporate the leftover water and turn off heat.
8. Using a potato masher, mash the potatoes to break them down slightly while incorporating the milk in stages.
(Using about _cup at a time) mixing to combine.
9. Rasp some nutmeg and adjust seasoning.
INSTRUCTIONS
Creamed Spinach
1. Thaw frozen spinach and drain as much liquid as possible an set to the side.
2. Heat a small saute pan over medium heat, add butter.
3. Add minced garlic and cook for 1 minute.
4. Add flour to butter and garlic and whisk until combined, cook for 2 minutes.
5. Add milk and continue whisking until sauce has thickened.
6. Add drained spinach and parmesan and mix. Add nutmeg.
7. Continue cooking over low heat for 5 minutes and adjust seasoning.
This dish turned out amazing!!! My boyfriend had no suggestions for how I could make it better, he just wanted more gravy :)
I loved brainstorming to create a dish that will compliment all ingredients included and everything still stood out. I had to substitute goat cheese for parmesan cheese in the creamed spinach but it turned out fantastic so I was very happy with that.
I also had alot of fun writing down methods/instructions and having to change things as I went.
0 notes
Text
INNOVATION in the CULINARY INDUSTRY

Photo by: https://www.willysmoke.com/george-foreman-grills/
Hey guys, its B and I’m back with a new blog.
Today’s blog is all about innovation in the culinary industry and I chose the George Foreman Grill as my focus.
The George Foreman Grill was designed by Michael Boehm and engineered by Bob Johnson. The original prototype was pitched to Salton Inc. in Illinois by Tsann Kuen. The grill was an extremely innovative idea at the time it was first put on the market, largely due to the fact that in the 1990’s people were becoming more aware of the foods they were putting into their bodies. It marked the beginning of the “low fat/no fat” era. Continuing into 92’, the Atkins Diet was introduced as the “low carb-high protein” diet, next came the Zone Diet. The Zone Diet requires individuals to stay within the “zone” to burn fat and to do this each meal they consume is supposed to consist of a specific ratio; 30:30:40. 30% protein, 30% fat, 40% carbs. As well as the Zone Diet allowing healthy fats, all of these diets have an emphasis on lean meats and unprocessed foods.
The concept of the indoor grill was originally created by Michael Boehm in the early 90’s in Illinois. The 2 key intentions Michael had was to create an indoor grill with the unique benefit of grilling on both sides at the same time and to reduce the fat consumption by removing it from the cooking surface. Michael's design details included a floating hinge to accommodate variations in thickness and the slanting of the grill in which the fat or other liquids could easily drain into a reservoir. Michael Boehm was not involved in the process of the grill teaming up with George Foreman in 1994.
These innovative grills were originally created as a quicker and healthier alternative to indoor stove-top cooking and gas or charcoal grilling. The Foreman Grill simultaneously heats the top and bottom surfaces thoroughly cooking the item eliminating the need to flip your food. The grooved heating surfaces were designed to reduce direct contact with the food. The engineering of the bottom grill plate allows the hot, liquid fat and other fluids to properly drain through the grooves into the removable drip tray. This feature was marketed as a way to “knock out the fat”.
Bob Johnson was responsible for the engineering of the grill prototype but Salton Inc. did make several of their own changes to the technical function of the grill. Salton Inc. removed the four risers that were meant for the user to lift up the grill and slide in one of the trays and another try used to fill the taco shells as the grill was originally designed around the concept it would be used for grilling fajita meat for tacos.
The George Foreman Grill is now offered in various sizes for individuals and family size as well as different models. The “Next Grilleration” Health Grill features detachable plates for easier cleaning. An updated version was released in 2014 called the “Evolve Grill”. This version included interchangeable PTFE-free ceramic plates. The new design included the traditional grill plates, waffle plates, a bake dish, mini burger plate, a flat griddle and a muffin pan! The undeniable popularity of the George Foreman Grills eventually brought some competition, however these other “celebrity-endorsed” brands were never able to reach the same level of success.
The reason I chose the George Foreman Grill was because it is an invention, I have personally used it in my day to day life. I used the grill for years when I was in my early 20’s and I was living in a basement apartment. I was slightly limited with space, but my actual apartment severely lacked the equipment I needed to cook meals. The kitchen was a shared space located on the top floor of the house, so if I wanted to cook, I would usually have to clean the kitchen first because of the mess from others sharing the same space. Eventually this became such a chore I had to find alternatives methods and ultimately had to purchase counter-top appliances. It was oval shaped and about 16” in diameter. It has color coded light indicators for fool proof cooking and the non-stick coating makes it super easy to clean. I loved seeing how much fat was coming out of my food so I could safely discard of if rather then eating it. It was an appliance I used multiple times a day as you can cook a variety of things because of the interchangeable plates! The Foreman Grill is easy to use, clean and store. Most of all, I was able to regularly cook an entire healthy meal for 4 people and it never failed me.
REFERENCES:
George Foreman Grill. (2020, January 26). Retrieved from https://en.wikipedia.org/wiki/George_Foreman_Grill
Best George Foreman Grills – 2020 Round-up Review. (2020, March 13). Retrieved from https://www.willysmoke.com/george-foreman-grills/
0 notes
Text
Fixed Budget Food Challenge
Hey guys, its B. I’m back for my second blog of 2020, but this one is a lot different from my usual blogs. For the topic of today's blog, we are taking a look into some of the challenges faced by people on a severely fixed budget and come up with a creative 7-day meal plan using a food hamper from a food bank and a minimal allowance.
According to reports from The Welfare Challenge that was introduced in British Columbia in 2014, it was calculated that after paying for cheap rent, basic sanitation supplies and some bus tickets, for a single person - there would be approximately $26.00 left weekly for food. In 2017 the weekly food allowance was reduced to $19.00 and then it was dropped again in 2018 to only $6.00, which was when the challenge was cancelled as it was deemed the participants would face starvation.
I currently live downtown Toronto so I do believe we have a lot of resources available.
There are a few options for Food Banks around the city. The 3 food banks closest to me that I found through a google search (meaning I needed access to the internet to find them) were all within a 45-minute commute each way. You could also find some information regarding food bank locations by visiting your local community center or library and checking the “Community Board” or by calling 2-1-1.
The first and closest food bank to me is the Fort York Food Bank that is located at 380 College Street. This food bank location offers both food and counselling services. The Fort York Food Bank does not provide either of the services on Sundays or Mondays and the Food services are also not available on Wednesdays. The services are available to the public between the hours of 9am-2pm Tuesdays, Thursdays, Fridays and Saturdays.
The second food bank I found that would be the next closest to me would be the Parkdale Community Food Bank that is located at 1499 Queen Street West. This food bank only offers food supply services and does not offer any counselling. The Parkdale Community Food Bank does not offer food services on Sundays, Mondays or Tuesdays. The food bank is open to the public on Wednesdays and Thursdays between 11am-330pm, Fridays the food bank is open between 1030am-130pm but it is only offering services to those in the community that are seniors or have a mobility disability and then it is opened back up to the public again on Saturdays between 1030am-130pm.
The third food bank I found called Churches on the Hill Food Bank required the longest to commute – taking about 45 minutes each way by streetcar.
The Churches on the Hill Food Bank is located at 230 St. Clair Ave W. This food bank offers both food and counselling services but is only open 2 days a week. They are open Monday evenings between 6-8pm and on Wednesdays between 1030am-1230pm. While they are very limited with the hours they operate, they do offer a choice between a day and an evening, making it a little more accessible for the public that use the service because they are underemployed and can not afford to eat even though they do have a job.
Using 2-1-1 via telephone or internet you can find information on community/recreation centers, community information and community programs that offer free computer and internet access to members of the public.
Community/Recreation Centers are city-run neighborhood facilities with a wide range of social programs and recreational services. There are programs that provide free general information about community, social, health and government services for a specific neighborhood or area.
The problem with the food banks is the hours of operation can sometimes make it difficult for those that have a job but are so underemployed they can not afford enough food and groceries face difficulties with commuting during the workday.
I think personally I would use 2-1-1 to find all the information I needed regarding all programs offered to the community has it would have the most up to date information available and there are many ways to use 2-1-1 and access the information.
The Fort York Food Bank offers food hampers that should last 3 days. With this 3-day hamper and the $16.00 left over from the monies allotted from welfare for other living expenses excluding $3.00 for transportation to take the streetcar (while being given a 2-hour transfer window) to the food bank and the regular grocery store, I was able to create a meal plan for 7 days.
This 7-day meal plan would not fully meet all requirements necessary to meet the Canada Food Guide standards but I do believe it would provide someone with enough energy and nutrients to be sufficiently nourished and would definitely not be starving.
Due to the fact I am currently a full-time student and am only working very limited hours at my job, I am already familiar with strict food budgets. I am a little luckier than most as I have a Costco membership and I am able to shop once every 2 weeks. I buy my proteins, potatoes, rice, pasta and sauce etc. in bulk and then butcher the meat and divide it up into individual serving sizes and freeze it for future use.
If I had to strictly use the services provided from a food bank and was limited to $16.00 a week extra funds for the odds and ends I needed to complete a dish, I do not believe it would be too hard as it was easy to throw together meals, but I do believe it would disrupt my schedule as it would likely pose issues due to my scheduled class times and the hours of operations at the food banks.
7-day Meal Plan
SUNDAY
B: 1 egg, 1 sausage, 1/3 cup cottage cheese and 1 piece of toast
L: Peanut butter sandwich (2 pieces of bread)
D: Leftover Meatball sub from Saturday
S: 5 Oreos
MONDAY
B: 1 egg, 1 sausage, 1/3 cup cottage cheese and 1 piece of toast
L: ½ cup rice with carrots and corn
D: 1 can beef stew
S: 5 Oreos
TUESDAY
B: 1 egg, 1 sausage, 1/3 cup cottage cheese and 1 piece of toast
L: Leftover meatball sub from Saturday
D: 1 box KD + ¼ milk and ground pork ($)
S: 5 Oreos
WEDNESDAY
B: 1 egg, 1 sausage, 1 Potato (cubed and roasted) and 1 piece of toast
L: 1 can of peaches + 1/3 cup cottage cheese smoothie
D: 1 can beef stew
S: 5 Oreos
THURSDAY
B: 1 egg, 1 sausage, 1/3 cup cottage cheese and 1 piece of toast
L: 1 can of soup
D: 1 box KD + ¼ milk and ground pork ($)
S: 5 Oreos
FRIDAY
B: 1 egg, 1 sauasage, 1/3 cup cottage cheese and 1 piece of toast
L: Peanut butter sandwich (2 pieces of bread)
D: ½ cup rice, 1 can salmon
S: 5 Oreos
SATURDAY
B: 1 ind. Dry cereal and ¼ cup milk ($)
L: 1 can soup
D: 1 can tomato sauce + 1 med onion + ground beef ($) + 2 pieces of toast
S: 5 Oreos
0 notes
Photo

PORK, MY SECOND FAVOURITE P WORD.
Hey everyone, its me, B, and I’m back with a new blog!

Pork Jowl Bbq photos, royalty-free images, graphics, vectors & videos. (n.d.). Retrieved from https://stock.adobe.com/search?load_type=search&native_visual_search=&similar_content_id=&is_recent_search=&search_type=usertyped&k=pork+jowl+bbq&asset_id=109405273.
This is my first blog of the new year and I am super excited its going to be all about meat! This past weekend I took a walk down Queen street and came across a butcher shop that caught my eye. When you walk in you are immediately greeted with a standing cooler stocked with in-house made stocks, soups, ready made lasagna and shepherd’s pie, some sliced meats and cheese. When you walk in a bit more there is a cute and informative hand drawn picture of the farms-to-store process.
Looking through the glass meat case, there were so many options; beef, lamb and chicken to name a few. I found myself being drawn to the pork rib chops. Pork rib chops come from the rib section of the loin and run from the hip up to the shoulder. These chops contained a bone on one side and a strip of fat running around the other. The cuts were big and thick, plus the chops were only $10.99/lb so I couldn’t resist!

Photo by: me
The meat of the chops is lean so using quick cooking techniques like grilling, broiling or the method I used and my personal favourite, sear-roasting are the best ways to ensure you can lock in moisture and get a slight crust on the outside. A tip I once got from my grandmother but did not use this time is brine the chop before cooking it to help keep it super moist and tender.
Once I got home, I then had to cook dinner. I decided to go with a pretty simple flavouring for the meat as my boyfriend is currently following a LOW FODMAP diet and is super restricted in the flavouring department for me as a chef. Although it didn’t take long, I threw a little something together. We would have seared pork rib chops topped with a think mustard sauce crust and some oven-roasted potatoes!

Photo by: me
I first patted the chops dry and generously seasoned with salt and pepper. I heated a medium sized cast iron pan (or any oven safe pan should do) over medium heat and added some vegetable oil to it. I added the chops and browned on one side for a few minutes. I then added a few sprigs of thyme to the pan and flipped the chops. I covered the tops of the chops with the thick mustard sauce I previously made and switch the pan to a hot oven that had been preheated to 350F and continued to cook the chops for about 30-40 minutes or until the internal temperature had reached about 140-145F. I took the chops out once they were done cooking and let them rest. During the time the chops were cooking, I also had some potatoes roasting in the oven along side it. They just got a simple toss in olive oil and seasoned with some salt and pepper and those were cooked for 30-40 minutes as well.

Photo by: me
Overall a pretty simple but super delicious meal. The only thing I really had to “make” was the mustard sauce that topped the chops, and it was still easy as I literally just threw it all together without really even measuring. I opened my fridge and took out a Dijon and a yellow mustard and mixed it with mustard powder, cayenne, paprika and a small bit of maple syrup to sweeten it up. Stir, stir, stir and just scooped a heaping spoon of sauce on top of the browned chop and spread to the edge, bake then eat.

Photo by: me
0 notes
Text
RED PEPPER SAUCE

Hey guys, its me, B and I’m back with another food blog. Todays blog is all about fermentation. I made a red pepper sauce we have been eating in my family for as long as I can remember. The recipe came from a Portuguese uncle who is married to my dad’s sister.
This red pepper sauce is a little sweet from the natural sugars of the red pepper, it has a beautiful spice/heat that lingers on your tongue and it adds a fresh yet salty bite that ties all the flavours together for what I find to be a sort of umami sensation.

This is such a versatile addition to soo many meals! We add it to breakfast dishes like fried eggs or omelettes as well as to breakfast potatoes. It can be added to meat dishes like steak or tacos! I honestly eat it on just abut anything.
I love the vibrant red colour that is produced from the fermentation process from all the salt. You can smell the sweetness and spice especially when it hits a hot steak, seriously, just so delicious! The peppers kept a slight crunch which was due to the fact I hand-cut all the peppers into a small brunoise instead of blending the peppers with a mixer.

The process takes about 3 weeks from start to finish but could take longer depending on the amount you plan to make. For this recipe I was just making a small batch, about 4 small mason jars worth so the process took me 3 weeks. Once all the peppers were cut up and, in the container, I added a full small chili pepper I cut in small dices with the seeds and mixed it all together. I added about a ½ a cup of m table salt, gave it another really good mix and covered the top of the container leaving a slight opening so the gases could escape and not explode all over my fridge (my uncle stores his in his cold room in the basement of his house, but I don’t have that living in a tiny condo so I had to put it in the fridge)
Every other day I gave it a stir and a slight press down to extract some liquid from the peppers and let it sit some more. After about 3 weeks it was ready to add to the mason jars, so to prepare those I simply boiled them on the stove to clean and disinfect before adding the pepper sauce. Add the sauce about 2/3 of the way and cover with the lids and refrigerate.

HOPE YOU ENJOY!
0 notes
Photo


Hey guys! Welcome back, its me, B! Todays blog is going to be all about plant-based diets vs. animal-based diets.
I personally eat meat with most meals, so I wanted to start making smore conscious choices to decrease my intake of animal products. This is the beginning of my “meatless Monday” journey. I have decided to start off small and just eliminate the meat part of the meals I make or consume on Mondays. Starting off with just one weekday per week will work best for me as I can control more of my meals as my schedule is not as hectic and I can eat most meals at home. This recipe is for breakfast tomorrow, but you can also eat it as a snack midday.
The definition of a plant-based diet has changed a lot over time. Originally being used to describe a vegan diet which contains no animal products or by-products, a plant-based diet now includes vegetarian diets that contain eggs and some dairy and semi-vegetarian diets which contains small amounts of meat.
Retrieved from: https://en.wikipedia.org/wiki/Plant-based_diet
A plant-based diet emphasizes the consumption of fruits, vegetables, grains, beans, legumes and nuts. It is rich in fiber, vitamins and other nutrients.
People who don't eat meat - vegans and strict vegetarians - can eat fewer calories and consume generally less fat so they can usually weigh less.
Research shows that people who do not consume red meat are at a decreased risk of dying from heart disease, stroke or diabetes.
It's time to try meatless meals. (2017, July 26). Retrieved from https://www.mayoclinic.org/healthy-lifestyle/nutrition-and-healthy-eating/in-depth/meatless-meals/art-20048193.
A plant-based diet supports good gut health and helps promote healthy skin.
Hunnes, D., & R.d. (n.d.). An R.D. Explains Why She Sticks To A Plant-Based Diet. Retrieved from https://www.self.com/story/an-rd-explains-health-benefits-plant-based-diet.
In my future culinary career, I would love to incorporate as many plant-based meals in my menus as possible. I myself am huge meat eater and I am currently trying to incorporate more plant-based meals into my personal diet, so I do understand the importance of limiting red meant and processed meats.
For this dish it was super easy to find ingredients, everything was found at my local grocery store. The chia seed cereal was the most expensive item used for this dish, but you use such a small amount that you can use it for many meals or dishes and the rice becomes more affordable. The combinations are endless when it comes to overnight oats, it is something you could everyday for a week and never have the same one twice. This dish is so easy to make and takes almost no time so I generally only prep two at a time and do so every other day.
Below you will find the recipe for my favourite Peanut Butter and Banana Overnight Oats:
Prep Time: 5 minutes Total Time: 12 hours – Overnight
Servings: 2
Cuisine: Vegan
Ingredients
Oats
- 1 ½ cups Vanilla Almond Milk (Vegan)
- 2 tbsp Chia Seeds
- 4 tbsp Peanut Butter
- 2 tbsp Maple Syrup
- 1 ½ cup Oats (I used steel-cut but you could use rolled as well)
Toppings (optional)
- Sliced Banana
- Peanut Butter drizzle
- Chocolate Chips (vegan)
Instructions
1. In 2 mason jars or 2 small containers with lids, add ¾ cup almond milk to each jar,1 tbsp chia seeds, 2 tbsp peanut butter, and 1 tbsp of maple syrup, stir with a spoon to combine (peanut butter does not need to be completely mixed)
2. Add oats and press with spoon to ensure all oats are covered with liquid.
3. Cover and let sit for 12 hours or overnight ideally.
4. Garnish with toppings and enjoy!
OPTIONAL:
You can heat your oats in the microwave for 45-60 seconds – add more liquid if needed.
0 notes
Text
Out with the old, In with the new?!

Pork Jowl Bbq photos, royalty-free images, graphics, vectors & videos. (n.d.). Retrieved from https://stock.adobe.com/search?load_type=search&native_visual_search=&similar_content_id=&is_recent_search=&search_type=usertyped&k=pork+jowl+bbq&asset_id=109405273.
Hey guys! Welcome back, its me, B! For this blog I am going to try something new. I’m going to try something that I’d honestly never try anywhere else, or ever order while out to eat. I’m going to try a traditional Chinese dish; I’m going to try pork jowl with fungus and Chinese yam.
My boyfriend’s cousin is married to and has a beautiful daughter with a Chinese woman and in her culture, they celebrate the first 100 days of life for new babies born into the family. This was also the day of the grandfathers 70th birthday, so we were all invited to a traditional Chinese dinner celebration. I knew this would be the perfect opportunity for me to expand my palate and try new and interesting flavour combos that I would never make myself.
At first when I see the pork jowl, I am surprised it actually doesn’t look that bad. I can smell the fat and grease, as well as a soft sweetness coming from the pork. It feels crispy but soft. When you slice into the chunk of caramelized, succulent fat your mouth will instantly water. I wish I could add just a little salt to it, a nice sprinkle of a beautiful rosemary salt would be divine! Even without the added salt this is fantastic. It’s a great mix of sweet and salty. It reminds me of the best bacon I’ve ever had. This food is unique because it is a special dish you could not eat everyday, its pretty heavy. You can definitely taste the fattiness of the pork, there is not much meat, but it is still full of caramelized highlights throughout if cooked correctly.
Out of all the things I ended up trying for my first time, this had to be my favourite. I assumed the pork would be a safe bet as I am familiar with many variations of pork, but it’s the whole experience that I am not. I have never eaten pork jowl before, but it will not be my last time! I really enjoyed this dish.
I have discovered it is mainly the texture of food that will completely deter me from trying something new. I can generally try most things but if it is slimy or way too soft, I just can not do it! I understand with the career I want I will have to be more willing to try things I “can’t” and I am working on it!
One way I think will be super helpful when trying new things is cooking it at home in my own house adding as much or little as I’d like, and if I completely fail, I can always order delivery!
0 notes
Text
Roasted Butternut Squash Soup

Hey guys! Its me again, B! I’m back for blog #3, can you believe it?! Well I hope you are excited because you are in for a treat today! For this blog I decided to make the best Roasted Butternut Squash Soup. This soup is one of my must-haves for fall! I have made many variations, but this is my favourite recipe.
Below you will find the workplan I made, with step-by-step instructions on how to re-create the dish.
Market List
Roasted Butternut Squash Soup
3½ lb butternut squash,
med dice1 tbsp olive oil
1 small onion, rough chop
2 cloves of garlic, peel and slice
2 tsp maple syrup
1 tsp salt
¾ tsp fresh nutmeg
¾ tsp fresh ginger
2 cups broth
black pepper to taste
Garnish
* save seeds from the squash *
(roast and use for garnish)
olive oil to coat
season with salt and
lemon pepper*
(store bought brand*)
Equipment List
Chef knife
Paring knife
Veg peeler
Roasting pan
Baking sheet
Parchment paper
Wooden spoon
Blender
Microplane
Spoons
Instructions
1. Preheat oven to 400*
2. Cut squash in half vertically
3. Peel the skin
4. Clean the seeds and membrane
(save the seeds for later)
5. Cut the squash to med dice
6. Coat the squash in olive oil
7. Season with salt and pepper
8. Put in roasting pan and into the oven
9. Roughly chop the small onion
10. Roast squash for 20 mins
11. Put onion on tray with squash, continue cooking for 10 minutes
12. Add maple syrup to roasting squash and sliced garlic cloves to pan, turn veg and continue cooking for 10 mins
13. Take veg out of oven and let cool
14. While veg cools, coat seeds with oil and season
15. Roast in oven for 15 mins or until light toasted colour
16. Add roasted veg and ½ the broth to blender
17. Blend on high for 1 min
18. Add remaining broth to blender, continue to blend for 1 min
19. Add nutmeg, taste soup and season accordingly
20. Serve soup and garnish with seeds

This is a favourite because it is a perfect combo of sweet and savoury. The earthiness and sweetness of the roasted squash is nicely rounded out with the hint of nutmeg added at the end. You first smell the nutmeg which is followed by the warmth of the squash. It is super velvety and smooth. The only thing that could make this better in my opinion, is my favorite “grown-up” grilled cheese!
This meal always reminds me of back to school when I was a kid because we quite often had soup and a sandwich to dip in it. Soo good. I honestly love it so much I still eat it quite often, sometimes it is just fancier than others. This is a quick and easy meal if you save the rest of the soup and freeze it you can take it out and pop it in a pot add a splash of water if you need and just reheat it.

My boyfriend, my niece and I all ate the soup for dinner, and both my boyfriend and my niece had different reactions. My boyfriend loved it, especially the roasted seeds on top. My niece absolutely hates squash and protested eating it for dinner, however she did try a small spoon! We evidently confirmed how repulsed squash makes her, but she did try it though and I’m proud of her and appreciated it regardless.


I overfilled the squash in the blender that I had available this time, so it was difficult to add broth unless you move it around to disperse the liquid. I think the next time I make the Roasted Butternut Squash soup I will use a hand blender to puree the squash and other veg in a large pot. Optionally, you could always blend the soup in batches in the blender, ladling in the broth slowly until desired consistency is reached.

This is always a great soup to make and super delicious on a cold night in the fall or winter or when entertaining guests. With this soup the roasted squash seeds not only help you utilize pretty much the entire squash, they are also the most delicious (and almost mandatory in my opinion) garnish I’ve discovered, to top this dish. They add a certain tang because of the lemon pepper and salt combo, just fabulous. Overall, I’d say this soup was a success but I’m still looking for something else to add to help make leftovers more fun!

0 notes
Text
I’m Back! Blog post #2 - Nutrition
Hey guys! Welcome back to getcookingwithb! It’s me, B, back with my second ever blog post.
This time were quickly chatting about nutrition. One thing I find really interesting about nutrition is the idea of a super food. When you hear the term “super food” it makes you think you’d get everything you need nutrient wise from one particular item. I would like to learn more about whether any single food item can really be a “super food” and if there is a combination you need to consume them in for optimal results.
I feel like nutrition plays an important role in the culinary industry. There are restaurants that cater specifically to vegans, vegetarians, fresh/raw food diets etc, and there are always healthier options available at every establishment that serves food now a days.

Super foods. Retrieved from https://www.shutterstock.com/image-photo/super-foods-spoons-bowls-on-wooden-392265631
Photo by: Elena Schweitzer
This website has a lot of information regarding meal planning, recipes and food safety. I know this is a credible website because it is a reputable university website. The author(s) are credible registered dietitians.
https://www.utm.utoronto.ca/health/health-promotion/nutrition-healthy-eating/eatright-ontario
I found an interesting article on blogs to read to learn how to keep you keto motivated when all you want is carbs. This website is not a credible nutrition website as the author is not a registered dietitian, she does have an athletic background that she has paired with some nutrition education. Her blog is opinion based and it is not a credible website linked to a reputable university, hospital or government organization.
https://www.everydayhealth.com/authors/katie-robinson

Bananas-Cherries-Carrots. Retrieved from https://www.pexels.com/photo/abundance-agriculture-bananas-batch-264537/
Photo by: Pixabay
0 notes
Text
Am I even doing this right?
This is my first blog post EVER, so honestly, I don’t even know if I’m doing this right; but here we go!

Let’s start off with introductions; Hey guys! I’m Baillie. Welcome to “getcookingwithb”! I started my journey to become a chef long before I even realized I had such a passion for cooking. Growing up my mother wasn’t the best cook, to be blunt (she’s my mother and I love her), that lady just can’t cook. I vividly remember forcing myself to eat dinner most nights. As I got older and started staying at friends houses for dinner, I soon understood just how amazing food can be. I specifically remember eating steak at a friend’s house as a kid and dreading the idea of it the whole time. Her mother called us downstairs for dinner and I remember the smell was amazing. Once the food was served, I noticed the steak looked extremely different; super juicy and tender looking, which was the complete opposite from my mother’s dry, chewy steak. Dripping with garlic butter and peppercorns, taking up most of the plate, my mouth immediately salivating. Once I was in high school and could make my own dinner and dinner for the family, I started watching the food network and writing the recipes down by hand as the host would be making the dish. After trying a few recipes, I felt great and more confident in my skills. Over the years I have worked in the restaurant industry as a host, server, bartender and manager. I decided last year I needed to do something I loved instead of forcing myself to go to a job I hated and not feeling fulfilled. I decided I would take a chance on myself and I applied to work in the kitchen at a casual fine-dining restaurant in downtown Toronto. One of my favorite culinary quotes comes from the culinary trailblazer Julia Child; “People who love to eat are the best people.”

Chicken and waffles. Retrieved from https://www.shutterstock.com/image-photo/close-rustic-southern-american-comfort-food-463452416?customer_ID=&campaign_ID=shutters.11154505&launch_ID=10580185&utm_source=sstkemail&utm_medium=email&utm_campaign=!Auto_API_Share_Module
Photo taken By: zkruger

Chicken and waffles. Photo taken by me.
I think my personal philosophy on cooking would be keep playing around with different ingredients and keep having fun, because that’s what its all about. You can really taste the passion in someone’s dish. This is also the same philosophy I am applying to this whole blogging thing. I am going to find what I’m good at, work on getting better and have more fun doing it!
https://food-attack.tumblr.com/ is an awesome food photography blog I’ve come across recently. The thing I like most about this blog is the clarity and attention to detail in the pictures. As I continue to work on my blogging skills, I really hope to get better at my photography and lighting. They really have a way with grabbing your attention, bringing you into the picture and making your mouth water! The only thing I wish they included was the link to the recipes or restaurants for the food in the photo, so we could all enjoy the deliciousness!
1 note
·
View note