
I make stuff I think is cool; you can find some of it at at my shop. Custom orders and commissions welcome. I'm also on bluesky and instagram. Woodworking, 3D printing, resin casting, and other assorted projects. I don't release project files or STLs.
Don't wanna be here? Send us removal request.
Statistics
We looked inside some of the posts by helioscraftworks and here's what we found interesting.
Average Info
Notes Per Post
175
Likes Per Post
154
Reblog Per Post
20
Reply Per Post
1
Time Between Posts
5 days
Number of Posts By Type
Text
17
Last Seen Tumblr Blogs


Fun Fact
25% of US internet users with an annual income of $80-100K use Tumblr.
Text


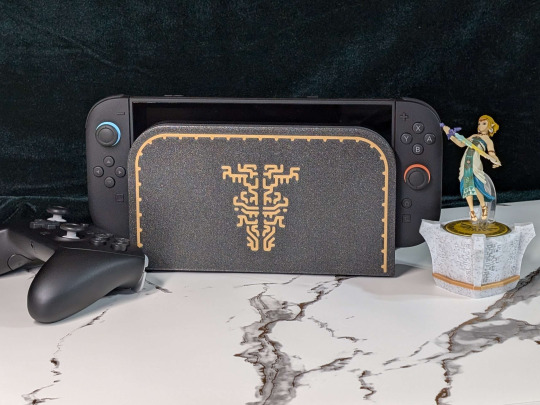
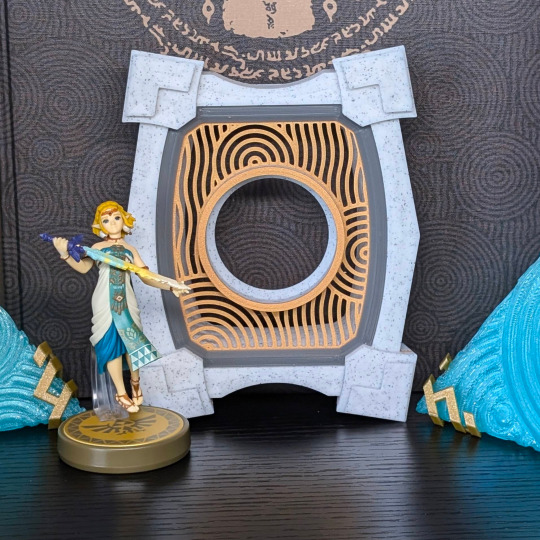
A different version of the dock cover I made a couple of weeks back, this time with the Hylian Crest - I tried out gold silk filament for the first time and was enthralled by it; it catches the light in a really nice way depending on where it comes from, which gives it a lot of depth even though it's still a flat surface; almost tricks the eye into thinking it's 3D. As usual, galaxy black is my go-to for things like this, but I also tried out a textured stone gray which came out nicely, too.
2 notes
·
View notes
Text


Some dust covers for the Switch 2 to prevent dust and debris settling inside those ports while the JoyCons are disconnected - I ended up liking the satin black finish way more than expected, it feels almost like a factory-made insert, but the textured finish is also pretty good. I also decided to try two-tone on a whim; nice slim bit of contrast. For now, I've just got black with gold and black with JoyCon-themed colours, but I could add more if anyone wants specific colours or if there's demand for them.
I went through 7 sets of prototypes before I got the fit just right - they (magnetically) snap in effortlessly and can also be taken out easily, I'm very pleased with how these turned out.
1 note
·
View note
Text


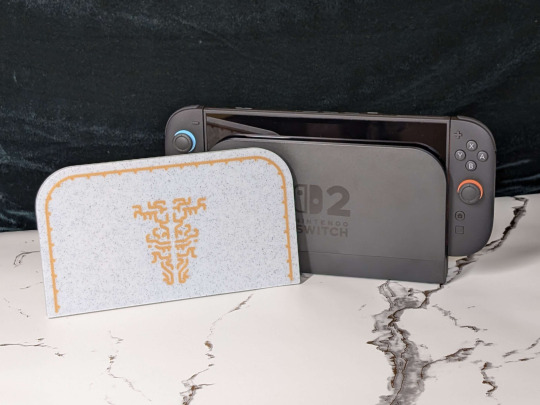


The Switch 2 is finally out! I felt the dock looked a bit plain and wanted to add something simple but elegant; since I've been making a lot of the Zelda lamps recently I felt it was only fitting that I make a dock cover to go along with it. I think the galaxy black one fits with the sleek new style of the Switch 2, but the white marble one has a nice contrast.
23 notes
·
View notes
Text


And here it is, the Gerudo lamp. I had a lot of fun with this one; the shapes are simple, but mesh well - I debated adding a top to it since it's ambiguous ingame, but decided against it, and liked the result; the contrast between the darkening rim and the bright inside looks great to me.
#3D printing#Zelda#tloz#totk#botw#Gerudo#tears of the kingdom#breath of the wild#Lamp#Light#Riju#Urbosa
41 notes
·
View notes
Text

Experimentation with some lampshades. They don't look like much on their own, but they'll be a part of something that should be done within the next few days or so.
0 notes
Text


Cleaning day for my laser cutter; some long-overdue maintenance. Mirrors don't work very well when there's several months of smoke from projects caked on them.
0 notes
Text


Another, simpler Zonai pillar amiibo stand; this was more along the lines of what I initially had in mind, but I got carried away a little with the other design. This one is a lot more compact and won't take up more much more space than most amiibos would by themselves, but still elevates it and draws the eye to it.
#3d printing#Zelda#amiibo#nintendo switch#tloz#totk#zonai#princess zelda#tears of the kingdom#switch
24 notes
·
View notes
Text
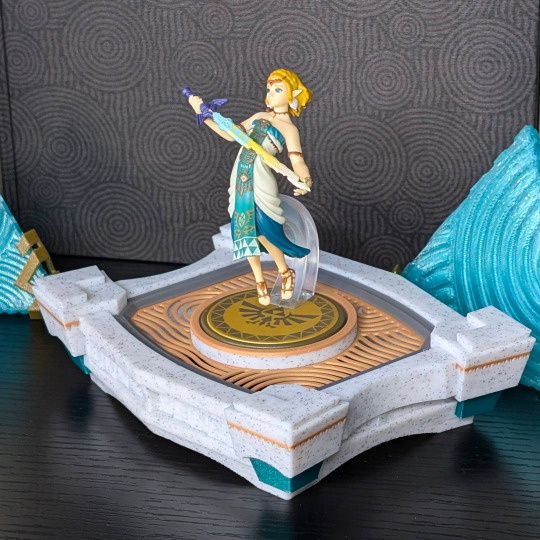


Here's the final result - a Zonai-style amiibo stand. It was fun to try and make the same style as some of the Zonai structures and buildings, there's a lot of little fiddly bits you miss at first until you start looking closer. The combination of jade, gold, and marble works really well.
This should fit any existing amiibo, I think; there's enough clearance on all sides for any extra features and it's pretty well-balanced.
#3d printing#Zelda#amiibo#nintendo switch#tloz#totk#zonai#princess zelda#tears of the kingdom#switch
26 notes
·
View notes
Text


New model made over the past few days, related to my last post. So far, so good, now to see how it looks in real life. Those curves can be fussy, but I think I got the proportions right.
1 note
·
View note
Text


A little bit of a preview of a project I've had in mind for a while; still in the rough stages while I get the general shape down, since there's a lot of design elements to play with here - sizes, shapes, colours, and how they all interact with each other.
10 notes
·
View notes
Text


These things are probably what kicked off all of this - the Zonai Crystallized Charges. I first saw these and thought they looked pretty cool, wanted some of my and they'd be easy to recreate - right?
Absolutely wrong. I spent ages trying to get the patterns right, to have everything match up, to get them to print properly without losing detail, to find the right colour material, and so on, and so forth. Much more hassle than I initially thought, but hey, they turned out pretty well, even if they can't hover in place.
Almost 2 years later, I think they're about due for a refresh. Soon. I've got plans. Maybe some new shapes, even.
4 notes
·
View notes
Text


Back when I first got a CNC, I was looking for ways to practice more complex shapes - this happened right around the time I picked up Tears of the Kingdom, and I was also experimenting with resin back then; one thing led to another, and now I have these snazzy walnut coasters. Was definitely a learning experience in multiple ways, and I've since gotten way better at carving deeper shapes without tearing the wood apart.
3 notes
·
View notes
Text

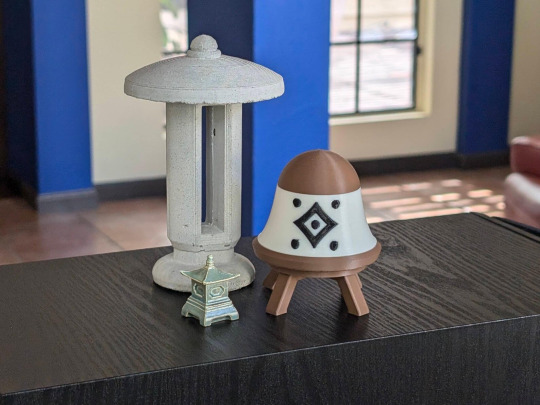
And last for this batch, the mini Tarrey Town lamp. To be honest, unlike the other two, I'm not quite a fan of this as much as the big size version. Since the "normal" size version is made out of wood and has quite a heft to it, feel it loses a lot of its charm being this small. I still like it, though - and hopefully, I can fit some lights in here too to give it a little extra charm.
3 notes
·
View notes
Text


And here are the mini Rito lamps - these scaled down quite nicely, didn't need to fuss with them much, if at all. They fit quite well nestled in these pinecones, or any little corner I've put them in so far; remarkably versatile. About 4 inches high.
12 notes
·
View notes
Text

I finally finished the (mini) Kakariko lamp! This was the design that launched this whole series, kind of ironic that it's one of the last to be made - it took way more time than I expected to get the curves right, plus the sigil in the center was a pain since it's a single part with the shade (multimaterial printing - no glue). Having it show up clearly while not muddying the area around it was hard. Though, this is the unlit version, without any lights inside - that comes next, and hopefully soon. This one's about 3.5 inches high; I haven't made a "regular" size version yet.
7 notes
·
View notes
Text


Something I've been meaning to get back to for a while is these dragon spike shards. Getting the transparency right can be hard; some filaments don't play nice while printing, and sometimes they just don't look very good when they're done. I don't really like how the clear yellow looks, and the translucent yellow is way too green. My favorite is the matte translucent blue.
16 notes
·
View notes
Text


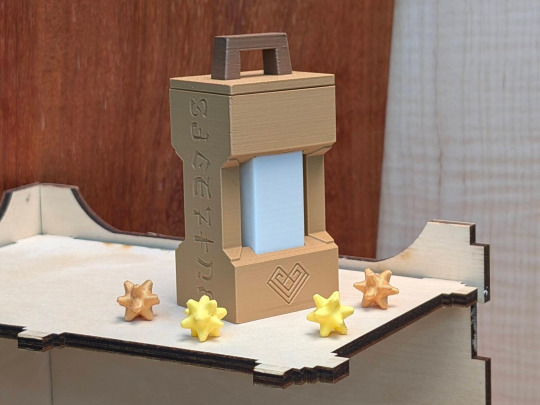
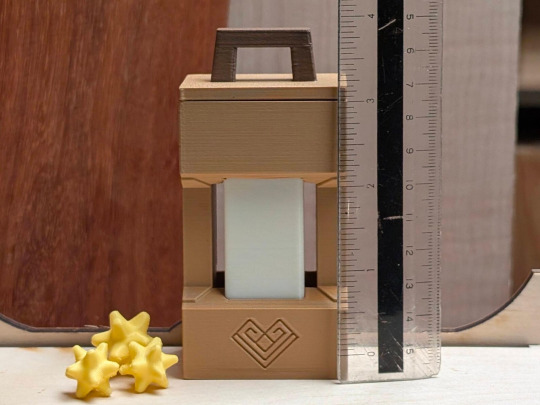
Personally, my favorite next to the electric battery lamp is the Tarrey Town Lantern; it took a while to get the joints right. I tried printing it at full size, but it just didn't look right - so I ended up making them out of wood, and laser engraved the symbols; so far I've done both hickory and cherry. The hickory looks pretty good unfinished, but the cherry ones really get a lot of depth after I give them a final coating.
They take a lot of effort to make, but it's well worth it in the end; they really add a lot to a room if you put them in the right spot, makes it quite cozy. I'm very happy with these.
2 notes
·
View notes