hivefleet-hellbender
Hive Fleet Hellbender
Jay » she/her » Warhammer 40K / Necromunda / AOS hobbyist » here to paint minis and play make-believe
2 posts
Don't wanna be here? Send us removal request.
Last Seen Blogs

ether-blooms
Disasteriffic

triptuckers
Marit

missmisacos-blog
( • 8 • )

my-rose-tinted-glasses
Rose Tinted Glasses

ming-zik
Mingzi
Text
Out in the desert, no one can find you... (Hex Tiles 1)
A sharp wind whistles through the desert dunes, bringing no reprieve to the travelers following the thin paths left out in the sand. Don't drink from the river — the plants that grow along its shores contain toxins that could leave a grown man coughing up blood, and chemical spills float through the current. A faraway road carries the rare drone-tank, long abandoned from any sort of human use.
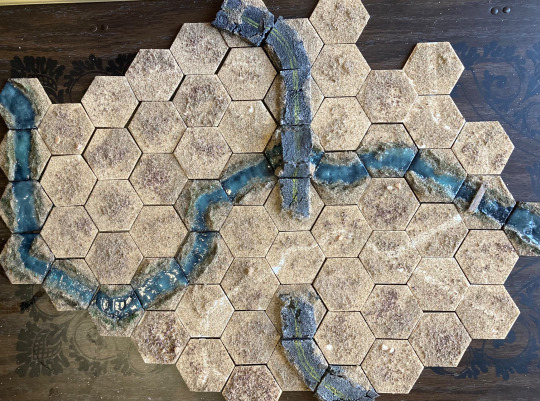
My newest hobby, to distract myself on months when the purse is a bit too tight to be buying plastic crack from Games Workshop, is to build modular hex tiles! It's super easy — I pick up a hundred of these wooden MDF tiles from Amazon for $10 (they're advertised as 2", but they're 1.75" from tip to tip, and each side is 1"), grab any spare craft supplies I have lying around, and get to work! They're super quick (this first batch of one hundred took me around a week) and they open the door to a lot of cool experimentation. A lot of this is inspired by the work of u/Marcus_Machiavelli over on Reddit, who makes these fantastic modular hive city components that I hope to someday be able to emulate.
I'm making these for two purposes, neither of which I've put in practice yet but I'm hoping to get to do at some point. They're for:
Any mass-battle games played at 6mm. This could also work for Adeptus Titanicus or the upcoming Epic reboot that Games Workshop is working on.
Tactical TTRPGs like Lancer that are played with large beings, who can operate on a 6mm scale.
Once I get some games in with them, I'm sure I'll encounter future problems and reassess how I approach them. But for now, this is what I've got!
I Hate Sand
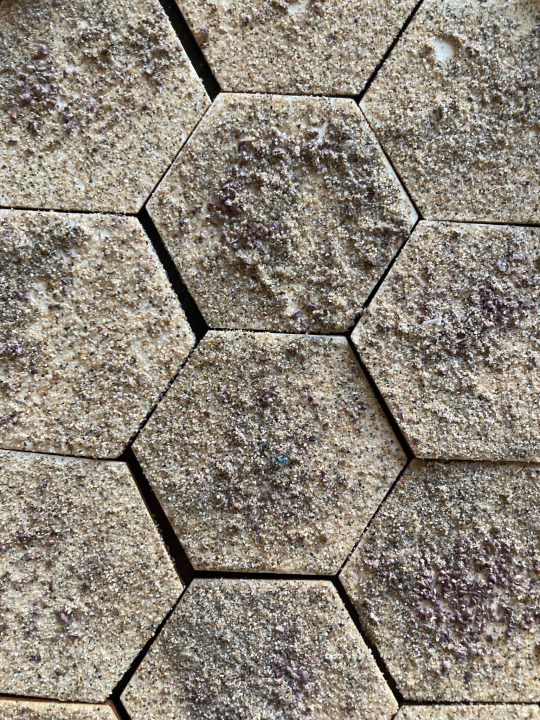
The first set of tiles I made, to serve as the backdrop for the rest of them, are these sand tiles. I chose to make this a desert (and thus make a bunch of sand tiles) because I already had some sand lying around, and because it's really cheap and easy to work with. Be careful though! Anakin was right; sand sucks. Try and pick up a finer grain than what I went with, apply the sand in a more-controlled location than I did, and secure it better than I did too. But here's how I did them:
Coat the surface of the hex with a mix of PVA glue and water.
Sprinkle on a light dusting of gravel or small rocks.
Apply a thick coat of sand on top of the gravel.
Knock off excess sand and recycle it for next time.
Spray with 1-2 layers of varnish. (I would recommend a sealant instead, but I didn't have any at the time)
For the ones with little paths on them, I painted the path on with White before applying the gravel or sand, and it shows through well enough! The paths are unnecessary — they're a fun experiment, but I don't think I'll be making more of them in the future.
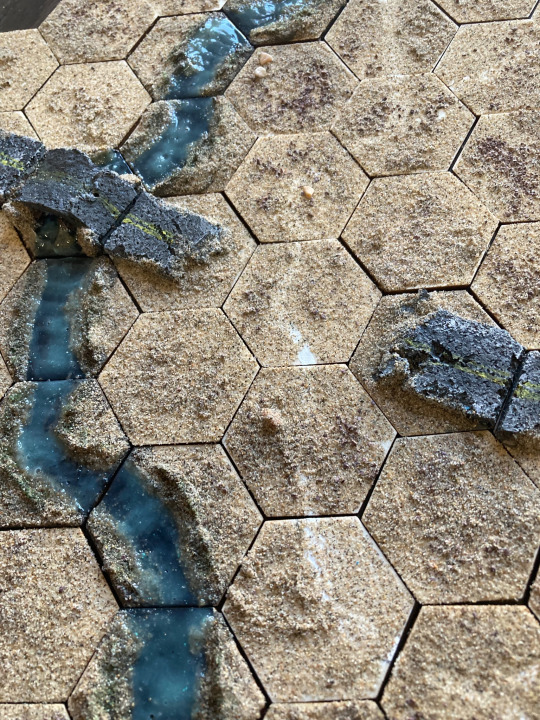
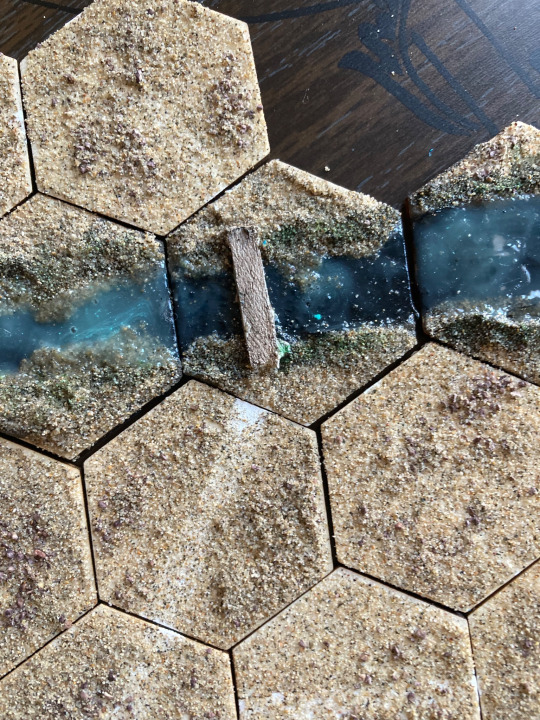
The Gurgling Creek
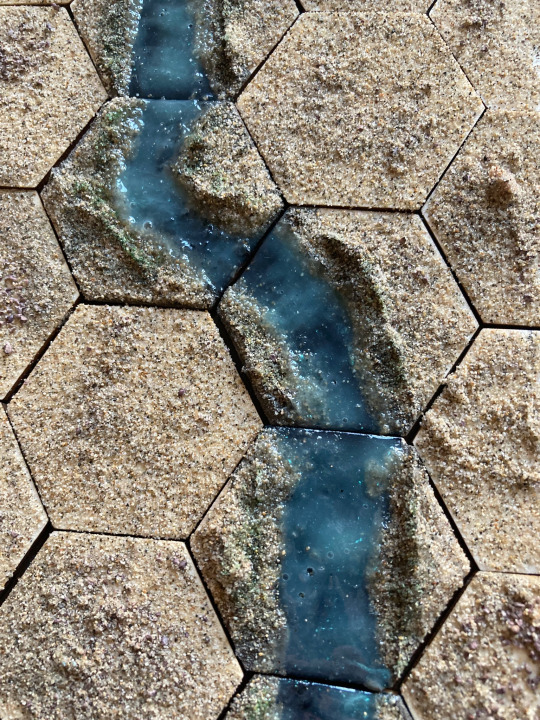
Making the river tiles was a bit more involved, but still pretty easy. The method I came up with I think looks a lot better than just painting on water, and is a lot easier to work with than resin or water effects.
Use some kind of texture gel to build up the riverbanks, trying to have them end around 1/4" on the sides of the tiles where you want your river to connect.
Paint a strip Black where you want the river to flow, running from one edge to another.
Apply sand as before, everywhere except where you painted the black. (If you're worried about fucking this up, you can swap the order)
Varnish (or use sealant) as before.
Take some gloss mod podge and mix it with a light blue paint, and apply in large goopy quantities everywhere you want water to be. Leave overnight to dry. (If you want the river to be less cloudy, apply many thin coats of mod podge instead, letting each layer dry before applying the next)
As an extra, stipple green along the edges of the water and use a dark green wash to create patches of vegetation.
The river pieces are my favorites, and I'm the most proud of them. The tiny bridge was a thin strip of balsa wood, painted white and then washed black. It turned out fine.
I did a solid mix of straight river pieces and curving river pieces. If I was going to do it again I'd make more curving pieces than straight river pieces, because the curving ones make more sense for how rivers work.
The Road To Nowhere

These road tiles turned out really well, perfect for a run-down highway in the middle of nowhere. Here's how I made them:
Take a piece of corkboard and cut it down to be 1.75" long and 1" wide.
Glue it on a hex with the two edges of the corkboard touching two sides of the hex.
Go at the edges with a knife, making it all worn down and busted up.
In some of these spots, I fucked up and glued the corkboard on wrong. To fix that, break off a chunk and reposition it so it'll connect correctly. This will look like a big fat crack in the middle of the road, which is perfect.
Coat in a layer of mod podge or PVA glue. Leave to dry.
Once dry, paint the cork entirely Gray.
Drybrush White onto the corkboard, focusing on the edges and exposed spots.
Paint two thin yellow lines along the middle of the road. (These are optional, but they do a lot to make the 6mm scale convincing)
Apply sand, as before, onto the ground and up the sides of the road, so it looks like the road is emerging from the sand. Maybe apply some sand in a couple spots in the cracks to make it look like the sand has gotten in there.
Varnish and/or sealant, as before.
Apply a Black wash to the road. (There's a lot of tricks here! If you want the yellow stripes to be more vibrant, you can only paint them on after the first black wash. You can also target spots of sand on the road to make it look like it's asphalt runoff, soaking black into the cracks.)
Apply a second Black wash to the road.
The bridge was a bit more complicated, and took some finicky positioning and a trip to Kung-Fu Tea.
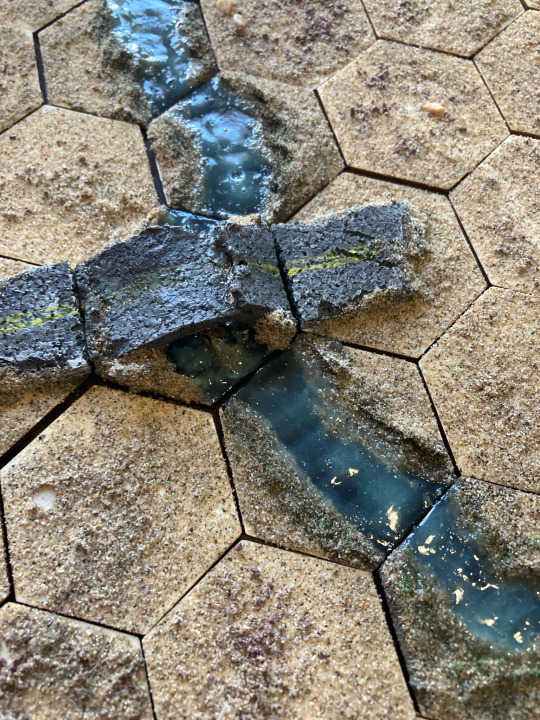
Take a boba tea straw and cut it into 1" segments, then cut them in half, gluing them to the middle of the hex as culverts.
Take corkboard and glue it over the culverts, bending it so it meets the two edges you want the bridge to run along. If it breaks, that's okay — this is a crumbling, middle-of-nowhere bridge.
Use texture gel and spare corkboard to fill in the gaps.
Use texture gel to define the steep edges of the river. Apply a little bit in between the culverts.
Do all the road steps to the road part of the bridge, and all the river steps to the river part of the bridge.
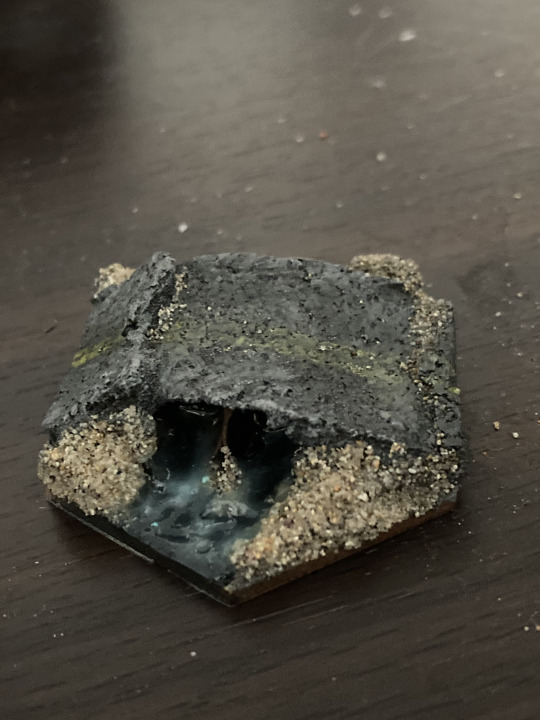
I'm exceedingly proud of the bridge hex. It turned out perfectly, and feels very emblematic of what I want this project to be like.
Why You, Too, Should Make 6mm Terrain
6mm terrain is amazing to make. Mistakes look like part of the landscape or the brain smudges them over due to the small size, and small changes look like fascinating little details. It really opens the imaginative space and I absolutely adore working at this scale. Plus I'm developing a ton of experience with various materials I've never worked with before, so I get to enjoy the triumph of carving foam or corkboard. It rules! I might even try to make a 28mm bridge after the success I had making a 6mm one.
My future plans for this project include cliffs, craters, 3D-printed shantytowns, and overpasses. But all that is for a later date — for now I'm gonna rest on my laurels, and spend the rest of the evening reconfiguring various tile combinations and cackling like a mad scientist.
161 notes
·
View notes
Text
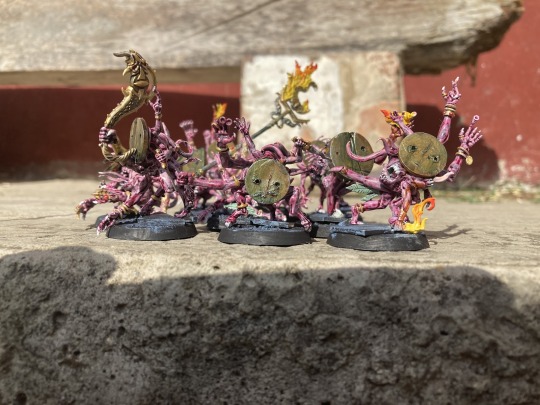
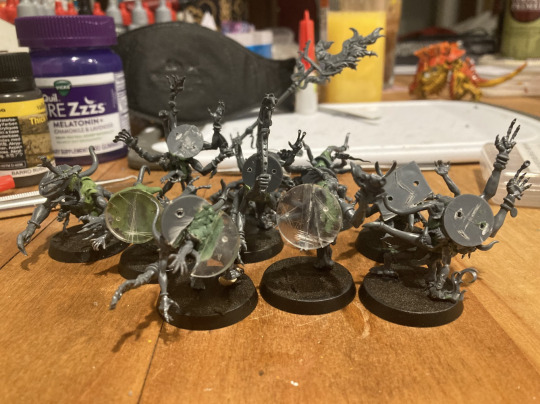
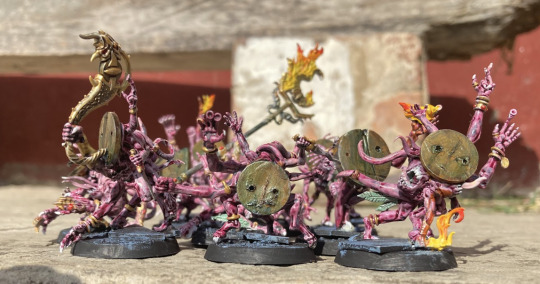
Pink Horrors of Tzeentch, bound to copper masks
I've been building and painting the start of my Tyranids Hive Fleet for the past three months, and towards the end of November I realized I needed a break. Plus, I'd be traveling to an artist residency program in rural Colombia and I knew I'd want something else to do while I was there. So I decided to build a squad of pink horrors but with an eerie and minimalist twist.
Now if you've seen Games Workshop's Pink Horror models, you'd know they're pretty much dogshit. Their faces are more orkish than daemonic, they have these strange long proportions that don't have much weight to them, and despite their ever-shifting chaotic nature, they look like just a stack of little dudes they look like a stack of little dudes with more arms than usual. They’d fit better in an old Betty Boop cartoon than on the battlefield of the 41st millennium. My goal for this project was the present an aesthetic for Tzeentch that fits with my own taste in monstrosity — blank-eyed every-shifting mounds of flesh that hover on the boundary between symbolism and raw horror.

My journal quickly filled up with drawings of weird masked monsters in the margins. My inspiration came from cubism, along with movies like Mirrormask and Ruban Brandt: Collector. I also was heavily inspired by the copper face on the Abominable Intelligence by John at Ex Profundis. I got really into the idea of the masks as some sort of binding vessel for the Tzeentchian cultists, who could use the daemons as attack dogs by trapping them within copper plates. I wasn't sure if I wanted the models to be 40K or Age of Sigmar, so I tried to keep the designs agnostic and avoid any technology or mechanical bits.

I knew I wanted to use the pink horror model as a base, but that the number and consistent size of arms would be insufficient for my needs. To make sure my little guys had all the arms they needed, I picked up a box of Mantic Games Zombie Horde. This box comes with forty zombies, and most of the arms are perfect and usable, meaning I’ve got about 72 human-sized arms to accompany the much larger horror arms of my gribblies. Towards the end I also picked up a box of blue horrors, so that I can expand my Tzeentch army once I’m done with my infinite ‘Nids.
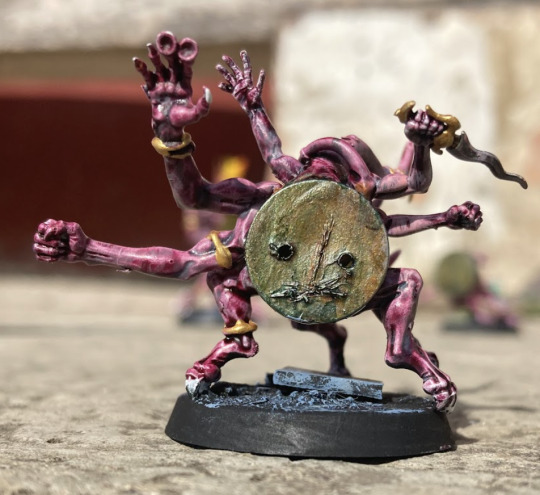
I made the mask from a couple different pieces of plastic. At first I used these clear disks I had, but they gave the models a “bobble-head” look which… I didn’t hate, but did obscure the size of the horror and make it look a bit too tiny. For later masks, I took the base of the zombie, tidied it up, and carved a face into it. I intentionally kept the faces very minimalist, focusing on just the bare necessities: two eye-holes, a little slit mouth, and a single haphazard nose.


I focused on a very improvisational building approach — using a base of either green stuff blob or a pink horror body, which I then superglued the mask onto and then applied as many arms and legs as I could reasonably manage. Often I would trim an arm straight off the spruce and barely clean it before attaching it on, meaning there's a few moldlines or sprue bits that I can't help but stare at. I think if I was to repeat this process I'd trim all the parts and set them aside before I even started working, but I also had no clue how this would go and was just enjoying the process as a way to decompress after a wildly hectic week.
Once the models were all done, I spraypainted them all white and tossed them in a box with me to Colombia, where they got damaged during transit and had to piece a couple back together with superglue.
I painted the bodies with two layers of Volupus Pink contrast paint, followed by a drybrush of 1 part Red to 3 parts White.
I painted the masks with Gunmetal followed by a wash of 1 part Orange to 1 part Mid Brown wash. Then I did a Dark wash with some streaking, followed by a Verdigris effect paint to get that gunky green rust effect at the edges of the copper.

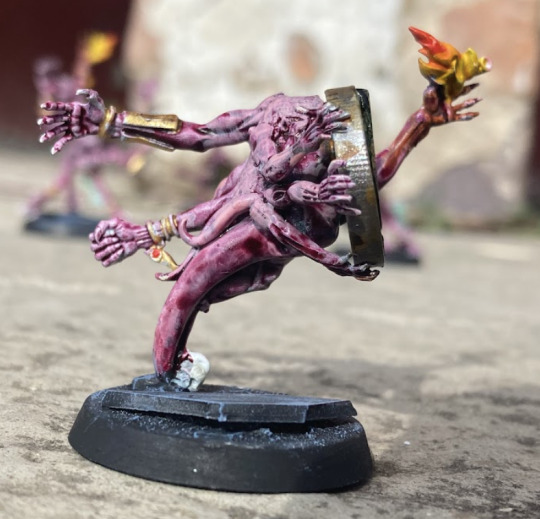
I painted the jewelry and various instruments / standards gold, and did the gems in red with a pink highlight. I did the nails and teeth in white, the tongues in a very light pink mix, and the feathers a light green mix followed by a dark wash. I hope to return to the feathers later to give them more detail if I ever end up doing a Lord of Change, as in my head I imagine those feathers are small gifts from it to its most loyal minions. The fire is yellow, orange, and red, and the OSL was done by mixing the contrast pink with orange.
The bases are admittedly an afterthought — I'm in rural Colombia right now and so I can't finish them the way I want to. I'm planning to pick up some resin cobblestone bases and candles, so I can make the models look like they're inside a weird cultist basement, skittering around in the darkness. There's a lot of lessons I've learned for next time I paint models like these, and this was my first time working with contrast paint, but it was still a ton of fun and I'm proud of how they turned out!


#tzeentch#pink horror#daemon#warhammer 40k#miniature painting#squad#painting#masks#mirrormask#ruben brandt#28mmwargaming#kitbash
64 notes
·
View notes