#epic 40k
Text

Epic 40k: Titan Legions Box Art
68 notes
·
View notes
Text

Epic 40k Box Art by John Blanche
68 notes
·
View notes
Text
Out in the desert, no one can find you... (Hex Tiles 1)
A sharp wind whistles through the desert dunes, bringing no reprieve to the travelers following the thin paths left out in the sand. Don't drink from the river — the plants that grow along its shores contain toxins that could leave a grown man coughing up blood, and chemical spills float through the current. A faraway road carries the rare drone-tank, long abandoned from any sort of human use.
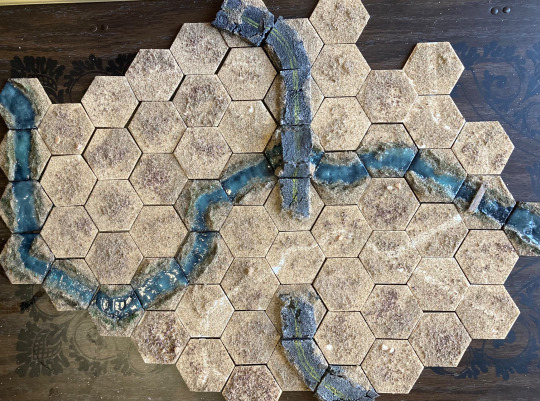
My newest hobby, to distract myself on months when the purse is a bit too tight to be buying plastic crack from Games Workshop, is to build modular hex tiles! It's super easy — I pick up a hundred of these wooden MDF tiles from Amazon for $10 (they're advertised as 2", but they're 1.75" from tip to tip, and each side is 1"), grab any spare craft supplies I have lying around, and get to work! They're super quick (this first batch of one hundred took me around a week) and they open the door to a lot of cool experimentation. A lot of this is inspired by the work of u/Marcus_Machiavelli over on Reddit, who makes these fantastic modular hive city components that I hope to someday be able to emulate.
I'm making these for two purposes, neither of which I've put in practice yet but I'm hoping to get to do at some point. They're for:
Any mass-battle games played at 6mm. This could also work for Adeptus Titanicus or the upcoming Epic reboot that Games Workshop is working on.
Tactical TTRPGs like Lancer that are played with large beings, who can operate on a 6mm scale.
Once I get some games in with them, I'm sure I'll encounter future problems and reassess how I approach them. But for now, this is what I've got!
I Hate Sand
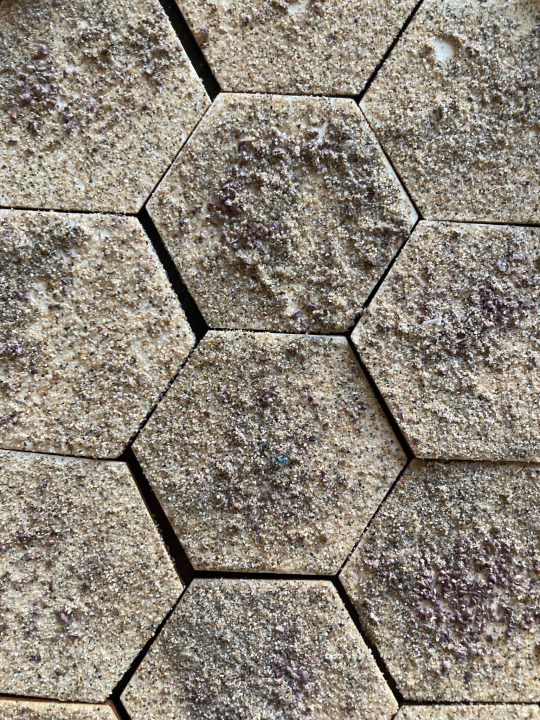
The first set of tiles I made, to serve as the backdrop for the rest of them, are these sand tiles. I chose to make this a desert (and thus make a bunch of sand tiles) because I already had some sand lying around, and because it's really cheap and easy to work with. Be careful though! Anakin was right; sand sucks. Try and pick up a finer grain than what I went with, apply the sand in a more-controlled location than I did, and secure it better than I did too. But here's how I did them:
Coat the surface of the hex with a mix of PVA glue and water.
Sprinkle on a light dusting of gravel or small rocks.
Apply a thick coat of sand on top of the gravel.
Knock off excess sand and recycle it for next time.
Spray with 1-2 layers of varnish. (I would recommend a sealant instead, but I didn't have any at the time)
For the ones with little paths on them, I painted the path on with White before applying the gravel or sand, and it shows through well enough! The paths are unnecessary — they're a fun experiment, but I don't think I'll be making more of them in the future.
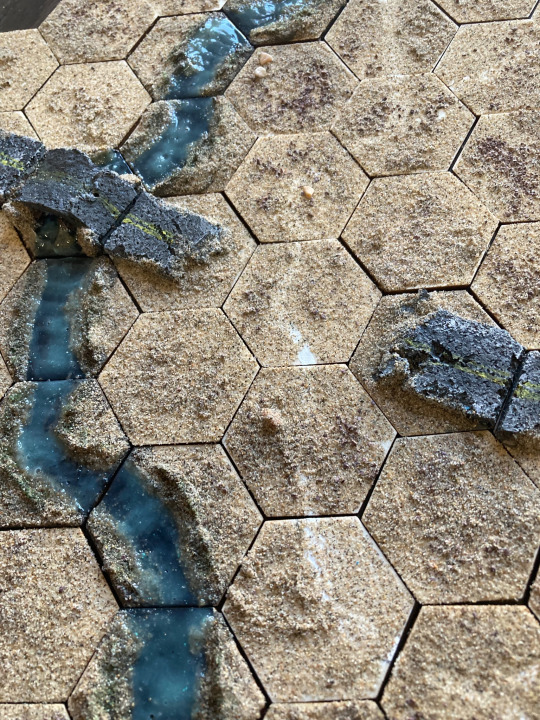
The Gurgling Creek
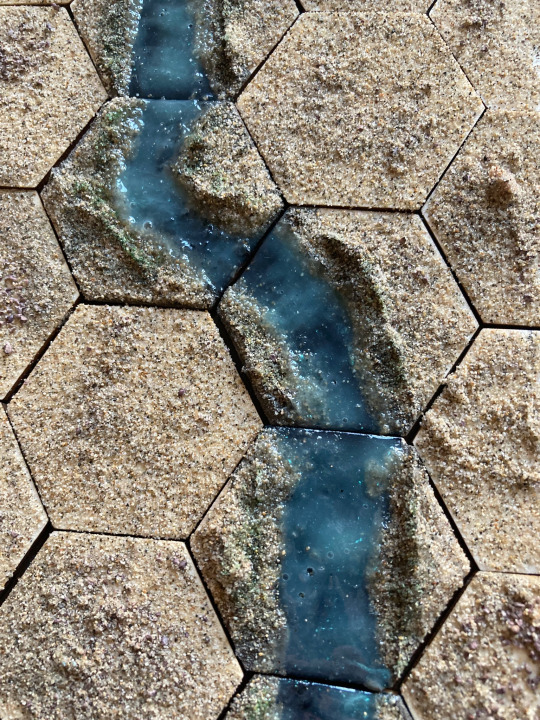
Making the river tiles was a bit more involved, but still pretty easy. The method I came up with I think looks a lot better than just painting on water, and is a lot easier to work with than resin or water effects.
Use some kind of texture gel to build up the riverbanks, trying to have them end around 1/4" on the sides of the tiles where you want your river to connect.
Paint a strip Black where you want the river to flow, running from one edge to another.
Apply sand as before, everywhere except where you painted the black. (If you're worried about fucking this up, you can swap the order)
Varnish (or use sealant) as before.
Take some gloss mod podge and mix it with a light blue paint, and apply in large goopy quantities everywhere you want water to be. Leave overnight to dry. (If you want the river to be less cloudy, apply many thin coats of mod podge instead, letting each layer dry before applying the next)
As an extra, stipple green along the edges of the water and use a dark green wash to create patches of vegetation.
The river pieces are my favorites, and I'm the most proud of them. The tiny bridge was a thin strip of balsa wood, painted white and then washed black. It turned out fine.
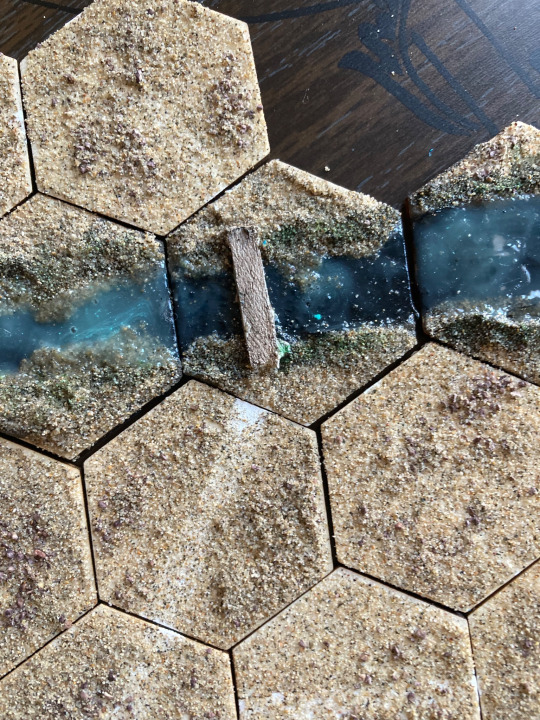
I did a solid mix of straight river pieces and curving river pieces. If I was going to do it again I'd make more curving pieces than straight river pieces, because the curving ones make more sense for how rivers work.
The Road To Nowhere

These road tiles turned out really well, perfect for a run-down highway in the middle of nowhere. Here's how I made them:
Take a piece of corkboard and cut it down to be 1.75" long and 1" wide.
Glue it on a hex with the two edges of the corkboard touching two sides of the hex.
Go at the edges with a knife, making it all worn down and busted up.
In some of these spots, I fucked up and glued the corkboard on wrong. To fix that, break off a chunk and reposition it so it'll connect correctly. This will look like a big fat crack in the middle of the road, which is perfect.
Coat in a layer of mod podge or PVA glue. Leave to dry.
Once dry, paint the cork entirely Gray.
Drybrush White onto the corkboard, focusing on the edges and exposed spots.
Paint two thin yellow lines along the middle of the road. (These are optional, but they do a lot to make the 6mm scale convincing)
Apply sand, as before, onto the ground and up the sides of the road, so it looks like the road is emerging from the sand. Maybe apply some sand in a couple spots in the cracks to make it look like the sand has gotten in there.
Varnish and/or sealant, as before.
Apply a Black wash to the road. (There's a lot of tricks here! If you want the yellow stripes to be more vibrant, you can only paint them on after the first black wash. You can also target spots of sand on the road to make it look like it's asphalt runoff, soaking black into the cracks.)
Apply a second Black wash to the road.
The bridge was a bit more complicated, and took some finicky positioning and a trip to Kung-Fu Tea.
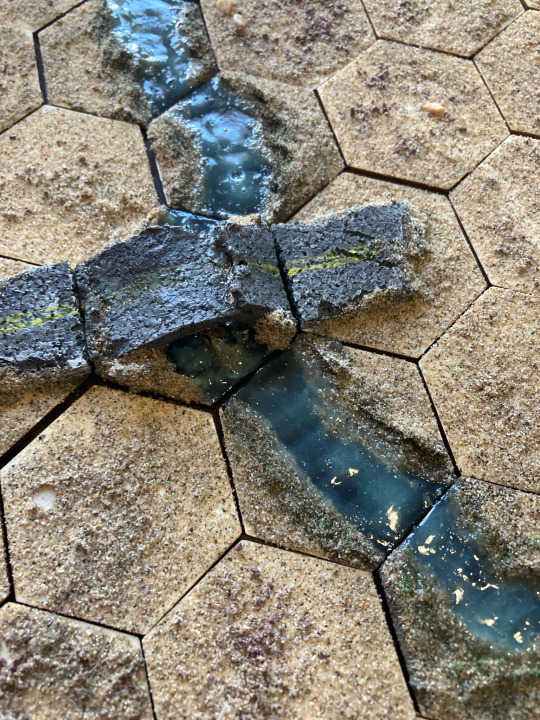
Take a boba tea straw and cut it into 1" segments, then cut them in half, gluing them to the middle of the hex as culverts.
Take corkboard and glue it over the culverts, bending it so it meets the two edges you want the bridge to run along. If it breaks, that's okay — this is a crumbling, middle-of-nowhere bridge.
Use texture gel and spare corkboard to fill in the gaps.
Use texture gel to define the steep edges of the river. Apply a little bit in between the culverts.
Do all the road steps to the road part of the bridge, and all the river steps to the river part of the bridge.
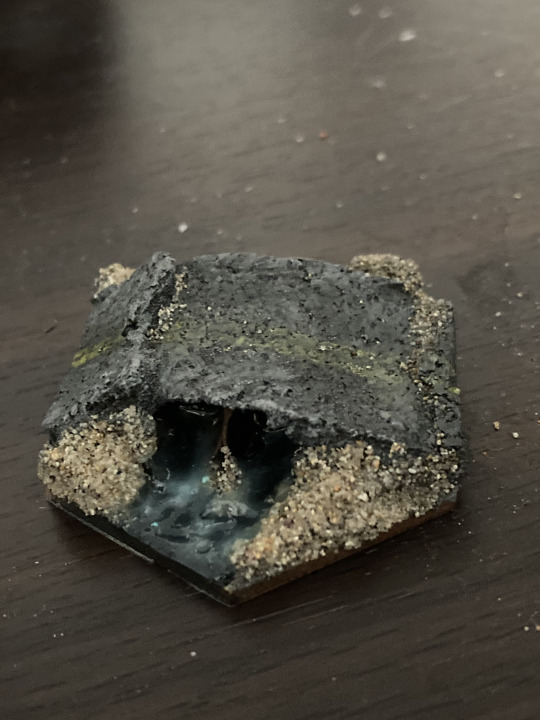
I'm exceedingly proud of the bridge hex. It turned out perfectly, and feels very emblematic of what I want this project to be like.
Why You, Too, Should Make 6mm Terrain
6mm terrain is amazing to make. Mistakes look like part of the landscape or the brain smudges them over due to the small size, and small changes look like fascinating little details. It really opens the imaginative space and I absolutely adore working at this scale. Plus I'm developing a ton of experience with various materials I've never worked with before, so I get to enjoy the triumph of carving foam or corkboard. It rules! I might even try to make a 28mm bridge after the success I had making a 6mm one.
My future plans for this project include cliffs, craters, 3D-printed shantytowns, and overpasses. But all that is for a later date — for now I'm gonna rest on my laurels, and spend the rest of the evening reconfiguring various tile combinations and cackling like a mad scientist.
161 notes
·
View notes
Text
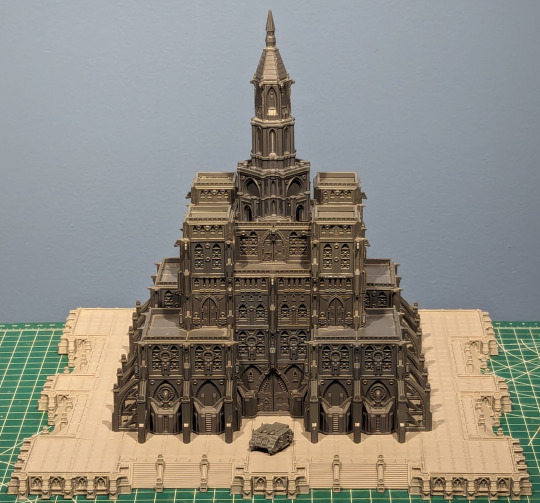
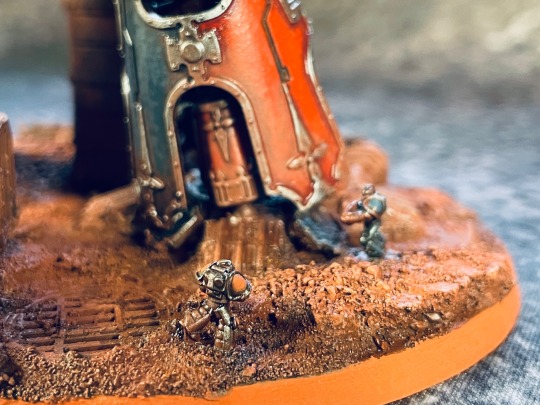
The complex organization of the Adeptus Ministratum, or Administratum, is responsible for the administration of the whole of the Imperium; it manages over a million inhabited worlds. Planetary government buildings, records offices, taxation centers, and many more are controlled by the Administratum; they are usually distinguished by the sign of the Imperial eagle over the main door. Many bloody assaults and valiant defenses have taken place in and around urban and planetary government buildings; they are natural command posts, and the fall of the Administratum normally indicates the fall of the city. This building is often the attacker’s primary target.
#games workshop#citadel miniatures#warhammer 40k#warhammer 30k#epic 40k#epic 30k#horus heresy#legions imperialis#civitas imperialis#grimdark terrain#imperial palace#strategium#terrain#3d printing#personal
56 notes
·
View notes
Text
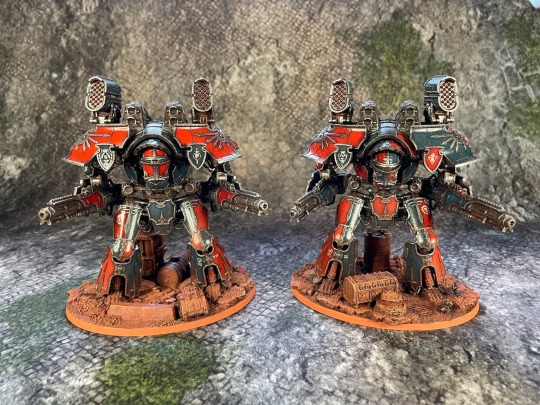
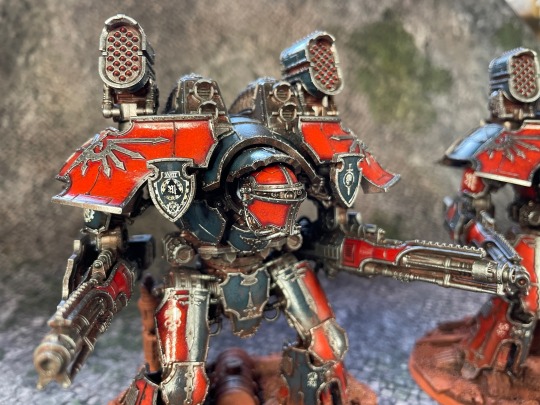

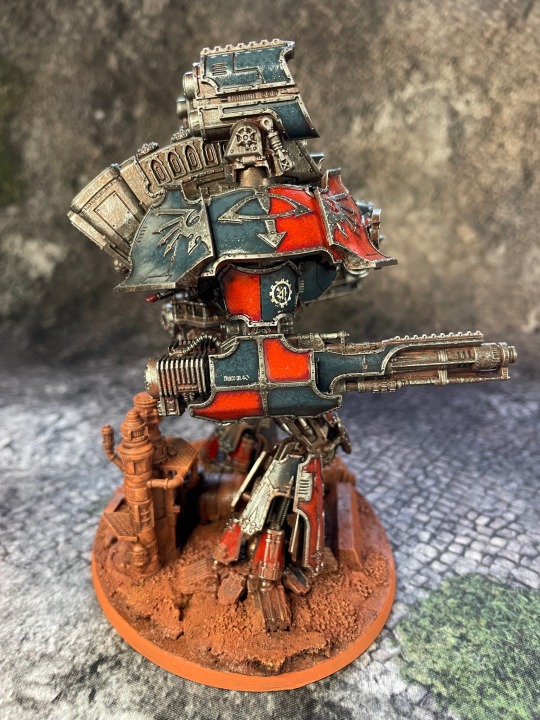
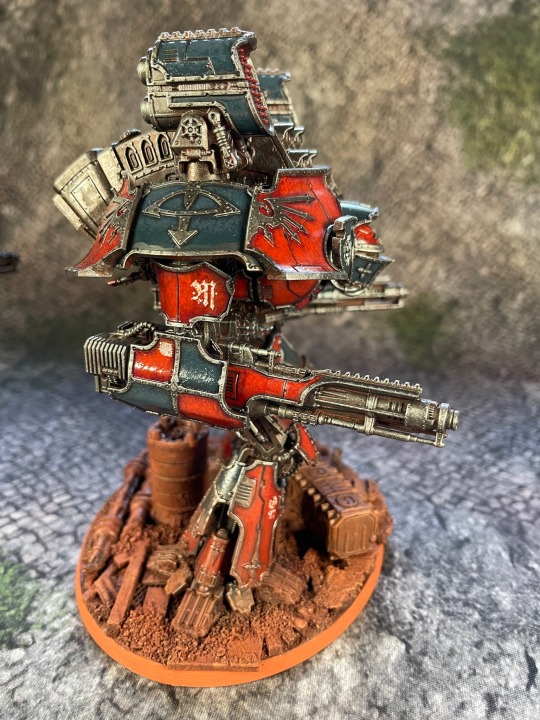
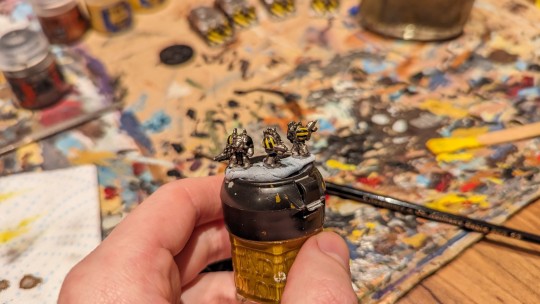
Warlord Titans, Adeptus Titanicus. Gosh these models were fun to build and paint.
Undercoated German Red Brown primer. Stippled with Warlock Bronze, drybrushed with silver. Panels were Vallejo Extra Opaque Heavy Red and Heavy Charcoal, stippling up with brighter reds and blue-greys. Oil pin washes and weathering powers.
My first time applying water-slide transfers since I was about 12. First experience with Micro Sol was very positive. Three coats of MicroSol then varnish and weathering made the transfers melt into the model.
Thought for the day: I have never varnished a model more times than these guys.
85 notes
·
View notes
Text
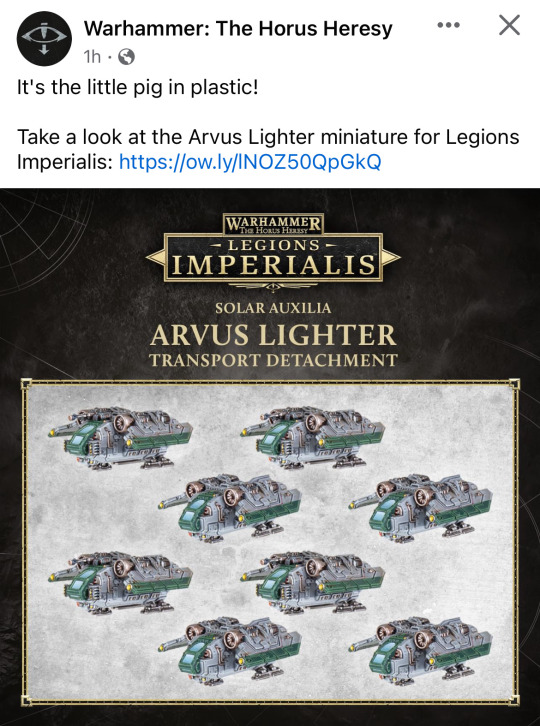
This is great news for people who like dumb looking airplanes!

And by Jove, can these little fellas boogie with a 25” movement!
#warhammer#40k#warhammer 40k#wh40k#horus heresy#the horus heresy#legions imperialis#epic 40k#solar auxilia
18 notes
·
View notes
Text
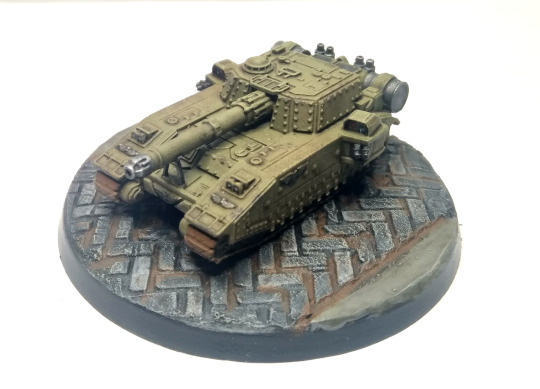


Warspite, a Shadowsword pattern super-heavy tank, of the Norcaster 4th Heavy Tank Company. Seen here during the liberation of the city of Mortain on Valence's northern continent. During the fighting the tank was credited with the destruction of two War Dogs and four Traitor Knights of various patterns.
***
Tiny tank!
In this case a 3D printed one I picked up via an auction, also have a Baneblade that I really should paint, but want to do something special with it and missing some stuff for it. To my great annoyance.
A real treat to paint, based it on Sonic Sledgehammer's Comet painting steps, which was just a wash and a drybrush and then I picked out some other details. No point spending too much effort on a 6mm sized tank.
The base was my first attempt at using a texture roller. Used filler instead of green stuff or putty, which took a couple of attempts. But even with the final one smearing a little it worked out pretty well.
Not to mention cleaning was a breeze since the stuff was water soluble when not dried.
I want to paint more tiny tanks now. Maybe I'll get some Legions Imperialis vehicles at some point. Who knows how well this one is going to square up against those.
#Warhammer#warhammer 40k#warhammer 40000#WH40K#painting warhammer#miniature#warmongers#warhammer#40k#wh40k#imperial guard#Shadowsword#Tank#Epic scale#Legions Imperialis#Epic Armageddon#Epic 40k
24 notes
·
View notes
Text

My friends have been talking alot about playing legions imperialis recently, so I decided to bust some epic models out of a decade long hiatus. They started life in the hands of my uncle, and now they'll hit the table again under my command.
I'm caught between a couple of things. I could do blood angels, or I could do iron warriors with death guard support. What u think?
20 notes
·
View notes
Text

13 notes
·
View notes
Text
Teeny tiny toys!
14 notes
·
View notes
Text
I like drawing dumb stuff
#40k#epic 40k#40k fanart#warhamer 40000#warhamemr 40k#warhammer#imperium of man#anime memes#necrons#necrontyr#trazyn the infinite#scarabs#pokemon shield#pokemon#pokemon master#stole 40 cakes
87 notes
·
View notes
Text


Our boy is finished I’m in love with this model can’t wait to start the rest of them!
#miniatures#painting#warhammer 40k#art#space marines#dark angel#painting warhammer#warhammer art#warhammercommunity#warhammerpainting#warhamer 40000#warhammer miniatures#wh 40k#epic 40k#40kart
11 notes
·
View notes
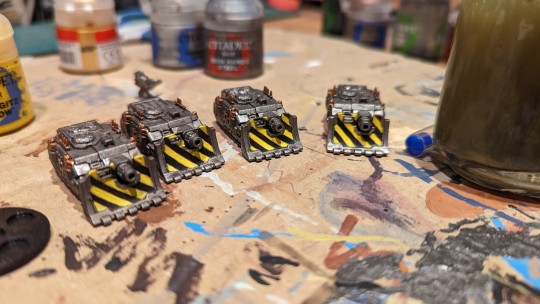
Text
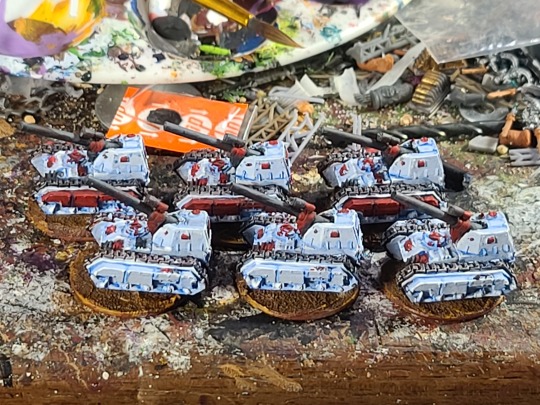


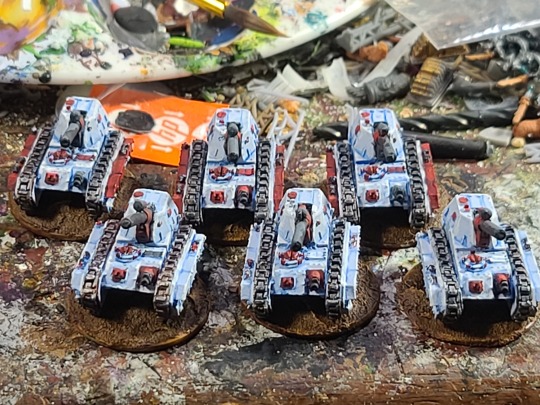
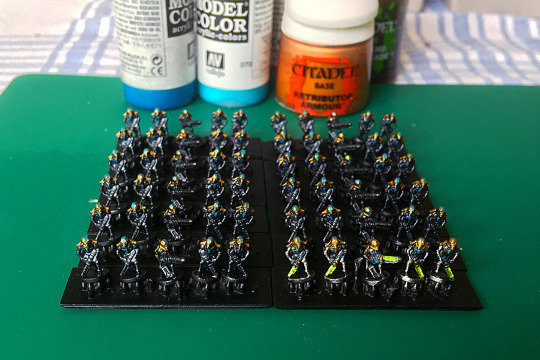
6mm steel legion basilisks, cast by Games workshop for their epic armageddon game. Painted up by me.
22 notes
·
View notes
Text
Pros of 6mm Necrons:
Small, but very cute
Does not use much paint
Easily massable and looks impressive as an army
Reasonable pricing
✨ Shiny ✨
Quick to paint
Space-saving
High degree of freedom in design, availability, and materials
Cons of 6mm Necrons:
Cute, but very small
Easy to lose if not based or on sprue
May be delicate (depends on materials)
May be difficult to paint (depends on level of detail)
Kitbash may be difficult (esp. if using converted/edited official parts)
Building a Nihilakh Dynasty necron army for Epic Armageddon at the moment. This is not my first rodeo with 6mm and I do love extremely tiny things, so my judgement is biased - but so far, it seems that the Epic scale comes with many pros, and just a few cons which are amenable. Highly recommend 👍
#warhammer 40k#necrons#necron#miniatures#epic 40k#epic armageddon#i didn't finish painting the weapons i need to do that next time#i was working on those on and off for about 4 hours and by the end my concentration was dropping like a rock 😖#i also got some immortals and flayed ones... will work on them next
22 notes
·
View notes
Text

I was dismayed to discover that the tall Civitas wall panels are not the same height as the combined short and medium wall panels but, overall, I don't think it's that much of an issue - shimming the gap between the floor and the next level ensured adequate contact and the whole thing is super solid.
The 3x3 plinth with stairs gives it that little bit extra, although I'm not yet sure what to do with the corners. The natural solution is 1x1 tiles, maybe with buttresses or decorative statues. Decisions, decisions.
#games workshop#citadel miniatures#warhammer 40k#warhammer 30k#epic 40k#epic 30k#horus heresy#legions imperialis#civitas imperialis#civitas imperialis spires#grimdark terrain#3d printing#imperial palace#terrain#personal
32 notes
·
View notes
Text


Chaos Warlord Titan, 1988 model.
28 notes
·
View notes
Last Seen Blogs

ameera111
سبحان الله وبحمده

numdoury
numdoury

voyevoda-thejoy
Reality Continued To Betray Me

seabeck
I’m Only Happy When It Rains

frankfosterphotography
P O R T F O L I O