
Don't wanna be here? Send us removal request.
Statistics
We looked inside some of the posts by iamsandy and here's what we found interesting.
Average Info
Notes Per Post
3
Likes Per Post
3
Reblog Per Post
0
Reply Per Post
0
Time Between Posts
7 days
Number of Posts By Type
Text
11
Photo
3
Last Seen Tumblr Blogs


Fun Fact
In 2020, 27% of US Tumblr users had an annual household income of over $100,000.
Text
3 MAJOR STRUCTURES OF WEBSITE CREATION – Html, Css & Java
People have wondered how and what it takes in creating a website from scratch to what you see on your web browser screen through your internet.
Currently there are 3 major structures considered when creating a website and these structure are:
* HTML ( Hypertext Markup Language) – The HTML coding element is the first stage and structure used when creating a website using tags, The markup language is known as the skeleton of a site. For example the html determines the position of a title, Images and paragraph etc.
* CSS ( Cascading Style Sheet) is a style sheet language that describes or interprets the document presentation from html.This aspect of the structure is considered the body of a website which involves editing fonts, colors, images etc.
* JAVA -The java structure is a more advanced programming language designed to allows Java code runs all applications supported by Java. It is also designed for creating web applications.

The CSS (Cascading Style Sheet) describes how the HTML element display on screen, media and paper. It controls the layer of multiple pages all at once which save a whole lot of work when designing.
Why Do You Need CSS?
It is important to use CSS when designing because it is used to design style on your web pages, Also it helps in inserting designs, layout and variations in display for screen sizes and different design.
HTML – Basic Elements Structure

The element for HTML are used for Building or creating a structure of how you want your website to look on a web browser.
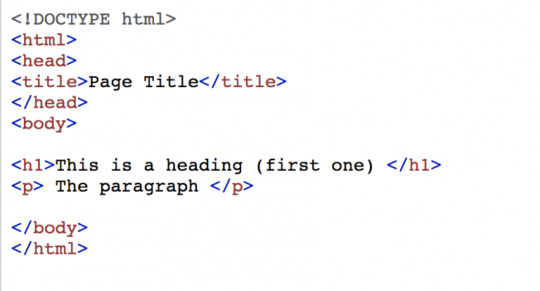
It is very important to know that all HTML documents must start with a document type declaration: <! DOCTYPE html> after which the document itself begins with <html> and ends with </html>, In-between the beginning of the document you can include other elements highlighted in the image below.
0 notes
Text
NOW THAT WE KNOW ABOUT DYNAMIC WEBSITES-LET’S PLAN & DESIGNING A WEBSITE(PART 2)
CONTENT
Will the client provide the content?
Find out where the content will come from as this is not always clear. Who will come up with the font, where will the text come from?
Who will maintain it?
Installing a content management system here is important. As it allows for a site to be run most efficiently.
Find out if you will be actively engaged in running the site after development of the site.Who will technically maintain the site?
COMPETITOR AUDIT
- Who is your competition?
Look at sites from similar or competing businesses. See where each website succeeds and fails.
Examine the competition’s brand, web site, services, content, experience.
This is a way of ensuring you are not completely out of step but not similar
Audit the other sites-What are they doing right? What are they not doing right?
Why should clients chose your products or services over the competition?
VIRTUAL SKETCHBOOKS / MOODBOARDS BROWSE.
If you see things you like, screenshot, save, put on PInterest. Build up a collection of inspirations and competitor’s sites.
Example: If developing political websites look at websites from other politicians around the world. Following trends are huge. Look at the fonts, colours, style.
Remember you do not just want to copy you want to draw inspiration as you want to remain distinct from the competition while remaining relevant.
IDEA GENERATION
Here we decide:
1. Content
What goes on the site? What are we offering
2. Functionality
What is the site going to do?
3. Design / Aesthetics
Colour, Imagery, Fonts(Last in order of importance)
Content & Information Architecture
What will the site have on it?
How will it be organized?
Here you are starting to decide what content and what page it goes and then group them together as seen below;

The sitemap is the overall design plan. By planning the content.
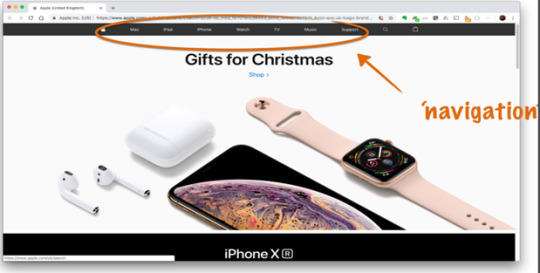
NAVIGATION
On almost all websites, Navigation is the most important thing no matter how aesthetically pleasing it is.
The most crucial part of a page is the navigation.
The main objective of any navigation structure should be to achieve optimum usability.
Users must be able to easily find their way around your site.
The navigation should be intuitive, natural and easy to understand quickly
The website navigation needs to be Consistent-Same place in every page and should be persistent.
Always consider this first as it does not change position on every page.
Users should be able to navigate throughout your site, from any page.
Example:
HEADER
Logo/Masthead to show ownership-This will be on every page.
Can also contain navigation
Search bar
Login options
Logo often acts as ‘home’ button
Context
The content/purpose/audience of your site should drive its design
Wireframe
A wireframe is a simple sketch of the basic layout of your site. The most important pages to sketch are the home page and the content page.
It defines the location/size of:
The page
The header
The navigation
Content areas Footer etc.
0 notes
Text
NOW THAT WE KNOW ABOUT DYNAMIC WEBSITES-LET’S PLAN & DESIGNING A WEBSITE(PART 1)
PLANNING A WEBSITE
It’s vitally important to research and plan a website before you build it.
So how do you get to that plan?

As you can see the arrows show that the arrows go back, this is because in the process of production we can always decide to make alterations that force us to go backwards
The Brief
The Brief represents a starting point of a project and is a constant reference point throughout it’s lifecycle.
There can be multiple briefs.
The Client Brief
What does the client want?
The initial brief from the client. Full tender/document… ….an email… …a phone call….
When designing a website, always keep in mind:
“Your number one goal on any web site should be to build something that’s useful for the people who will be using it.”
The Questions you as the designer should ask:
1. What is the purpose of your website?
What is the site’s end goal? Sales?Share Information?
The Creative Brief
This is produced by the designer in response to the Client Brief. It is used as a central document for the creative phase of the project.
RESEARCH
Step 1. Client Survey
What is the purpose of the site?
What are the goals?
Step 2. Needs Assessment
Who are you and what do you do?
Why was your company/org created?
How would you like to be perceived through your website?
Example:

The website above is clear and straight to the point making it easy for users to understand and use
Client Survey
What is your vision of what the site should do?
Describe your initial view of the project. What do you think the project should entail?
Always ask reasons why they are hiring you to design
What prompted the redesign?
What are users coming to this website for…
What is the single most important thing visitors want from your site? (Consider from users POV - not yours)
What is the single most important thing you want to convey on your site? (From your POV)
Define Audiences & Goals
Who are the users of the site? (Primary and Secondary users)
How would you describe the users? (User characteristics, i.e., age, experience, education, etc.)
Why will they come to the site? (User needs, interests, and goals)
When and where will users access the site? (User environment and context)
How will users access the site?
Task analysis
What will users do on the site? (User tasks, content, features and functionality)
Which tasks are critical to users' success on the Web site?
- Critically think of why is the user on this site and what are they going to do?

Looking at the website above the biggest task here is to have users to check the prices and thic is highlighted with a pink button
How will you judge if this is a successful website?
- Sales Go Up
- People sign up
- Revenue goes up
List some websites you like.
Why do you like them? List some websites you don’t like. Why? As a way of doing your research.
0 notes
Text
LET’S TALK DYNAMIC WEBSITES

So far we have been looking at client-side technologies, such as HTML & CSS.
All modern websites are made from HTML, CSS & JavaScript.
But almost all are also built using server-side technologies, including scripting languages and a database.
STATIC WEBSITES
Where the content does not change unless you change the source code.
How static website is delivered:

DYNAMIC WEBSITE
Here, the server application constructs the page, usually using a scripting language in conjunction with a database.
In the dynamic world, The content of the page may change depending on input (forms filled in) or user logins etc.
How to deliver a dynamic website:
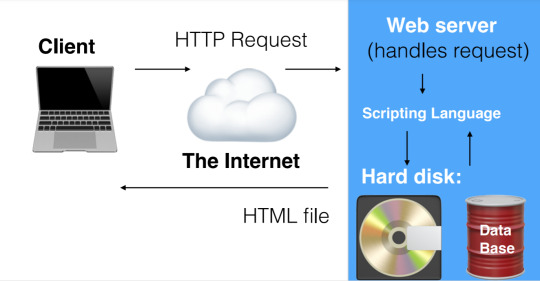
SCRIPTING LANGUAGE
It is also known as server side
Server-side scripts run on a web server and interpret requests to provide customized web pages depending on the user's request.
Examples of scripting languages: PHP, ASP, Python, Ruby, Java.
Java
You can write server processes using Java
JavaScript was traditionally known as a client-side scripting language, but now with technologies such as node.js it is often used on the server-side too.
PHP
PHP is a popular server-side scripting language.
PHP stands for: PHP: Hypertext Pre-processor.
This is a hypertext-pre processor meaning it processes before the scripting language.
PHP code must be executed by a PHP interpreter which must be installed a module on a web server.
A browser does not understand PHP (unlike, say, HTML or JavaScript) If you purchase web hosting it usually includes PHP
PHP code is often embedded in an HTML page.
Example:
<!DOCTYPE html>
<html lang="en">
<head>
<title>Example of PHP</title>
</head>
<body>
<?php echo '<p>Hello, World!</p>'; ?>
</body>
</html>
PHP is distinguished from HTML by it’s delimiters.
A block of PHP starts and with <?php and ends with ?>
DATABASE
This is an organised collection of data, typically stored and accessed on a computer.
A database management system is the software that allows users to interact with a database/ the software that manages the database
RELATIONAL DATABASES
A relational database organises the data into tables of rows and columns. Each record in the table is a row. Rows in different tables can be related or linked to each other.
MySQL
MySQL is a popular open-source relational database management system.
SQL stands for Structured Query Language, a language used to interact with, programme and edit databases.
PHP + MySQL
PHP and MySQL are often used together on servers to deliver dynamic webpages.
PHP is the most popular scripting language for web development. It is free, open source and server-side (the code is executed on the server). MySQL is a Relational Database Management System (RDBMS) that uses Structured Query Language (SQL). It is also free and open source.
CONTENT MANAGEMENT SYSTEMS
An application which allows users to add, edit, delete content on a website.
Example: Tumblr & Moodle-You can add, edit or delete posts without knowing any of the scripting languages
Users can run a dynamic, database driven website often without any knowledge of code.
With a Content Management System, a user can login and submit content to a website without altering any code.
Web Content Management Systems are installed on web servers.
WORDPRESS
WordPress is a popular Content Management System built using PHP and MySQL.
Originally associated with blogging, it is now used for news websites, eCommerce sites, forums, galleries, commercial sites etc.
A lot of websites which have a blog inside would have wordpress
Wordpress.com-This is like Tumblr where all the hosting is done for you
Wordpress.org-Here you have to install wordpress. Hosting is not done for you. In order to install WordPress you need a server, with PHP & MySQL (or MariaDB)
SERVER SIDE
The college has a server, Knuth.
You all have access to Knuth, to put up files and access them via a web browser.
You also have one MySQL database setup.
SFTP-Secure File Transfer Protocol
This is a piece of software that allows you to securely transfer files to a server
To access the server and put files on it, you need an SFTP Client.
To connect to the server, you will need to give your SFTP Client some information:
1. Server address
2. Port
3. Connection type
0 notes
Text
LET US TALK GRIDS

What is a Grid? They are intersecting set of horizontal and vertical lines. These lines form columns and rows.
We can declare an element as a grid container, and all direct children of that element become grid items.
TERMINOLOGIES IN GRID
A CSS Grid is made up of lines.
The space between the lines are known as tracks.
The space between tracks are known as gaps.
Example:
How To Make Something Into A GRID
Similar to FLEX-We have to display GRID
To declare an element a grid container, use display:grid
#container {
display:grid;
}
This does not automatically do anything. We now have to tell it the tracks to put things into.
Grids have a much more complex situations compared to a flexbox as it has rows and columns.
We need to add column tracks by telling it how many columns you want
We define our rows and columns
We define rows and columns in our grid with gridtemplate-columns and grid-template-rows
Example:
For instance, if we wanted to create 3 columns, each 200px wide:
#container {
display:grid;
grid-template-columns: 200px 200px 200px;
}
IMPLICIT VS EXPLICIT GRIDS
Note how we didn’t define any rows. The grid just adds rows automatically.
This is known as the implicit grid.
As we add content, it will just add more rows.
Also note: It did not add extra columns, because we explicitly stated 3 column tracks.
This is known as the explicit grid.
TRACK SIZING
We have a specific unit for grids to help us create flexible grid tracks.
The fr unit represents a fraction of the available space in the grid container.
Example:
#container {
display:grid;
grid-template-columns: 1fr 1fr 1fr;
}
This will create 3 equal width tracks that will grow or
shrink according to the available space.
REPEAT
This can be used to reproduce many tracks
Example:
#Container {
display: grid;
grid-template-colmns:1fr 1fr 1fr;
}
can also be written as:
#Container {
display: grid;
grid-template-columns: repeat(3, 1fr);
}
This will create 3 tracks, with a width of 1fr.
NOTE
We DO NOT have to make each column the same width.
If we wanted to make a three-column grid, with one track 2fr and two taking up 1fr each…
You can also define sizes for tracks created by the implicit grid with grid-auto-rows and grid-auto columns
Example:
#container {
display:grid;
grid-template-columns: 2fr 1fr 1fr;
grid-auto-rows:200px;
}
You can also set a minimum / maximum range for auto added rows
grid-auto-rows: minmax (200px, auto); This will automatically make new rows as high as you want them to be. Auto takes the maximum height to fit content by expanding the row.
PLACING ITEMS
We have now set up the basis of GRID.
We can precisely define where items are placed in the grid.
To do so, we use grid-column-start, grid-column end, grid-row-start and grid-row-end to position items between lines.
Note, you do this on the children not on the container.
Example:
#container {
display:grid;
grid-template-columns: 1fr 1fr 1fr;
grid-auto-rows:100px;
}
.one {
grid-row-start:1;
grid-row-end:3;
grid-column-start:1;
grid-column-end:4;
}
.two {
grid-row-start:3;
grid-row-end:5;
grid-column-start:1;
}
NOTE: SHORT-HAND
You can use; grid-row: start / end and grid-column: start / end as short hand.
EXAMPLE:
.two {
grid-row-start:3;
grid-row-end:5;
grid-column-start:1;
grid-column-end:2;
}
This is the same as:
.two {
grid-row: 3 / 5;
grid-column: 1 / 2;
}
GRID AREA
You can also define:
grid-row-start
grid-column-start
grid-row-end
grid-column-end
in one property called grid-area
Example:
. two {
grid-row: 3 / 5;
grid-column: 1 / 2;
}
becomes
. two {
grid-area:3 / 1 / 5 / 2;
}
SPAN
Instead of specifying start and end lines, you can specify the start line and say now spread over…
Example:
.one {
grid-row-start:1;
grid-row-end:3;
}
becomes
.one {
grid-row:1 / span 2;
}
GRID AREAS
As well as using lines to denote grid areas, with Grid areas you can also assign names.
With the grid-area property we can assign a name to an area, then lay it out with grid-template areas
Example:
.header {
grid-area:header;
}
.content {
grid-area:content;
}
.sidebar {
grid-area:sidebar;
}
.footer {
grid-area:footer;
}
This simply applies names to the areas. Instead of using the columns and rows
#container {
display:grid;
grid-template-columns:3fr 1fr;
grid-auto-rows:100px;
grid-gap:1rem;
grid-template-areas:
"header header"
"content sidebar"
"footer footer";
}
0 notes
Text
COLOR IN CSS
COLOR IN CSS
CSS allows us to control the colour of text, borders and backgrounds.
To control the colour of text, we use the color property.
Colours can be expressed in a number of different values.
1. use text to access 16 pre-defined colours
2. RGB Values to access over 16 Million Colours
3. Hexadecimal Value Colours
It’s the most common way to use colour in CSS
This system is used by most developers and is the system I will be using to write my code this semester
Hex values are 6-digit numbers. 2 digits for red, 2 digits for green, 2 digits for blue.
Most Common Example:
00 = 0 and ff = 255 in between these two digits we can put any number to generate a colour.
Example:
h3{
color:#FF0099;
}
With Hex Value Colours, NO Brackets are needed or the words RGB
To generate color you can use- https://html-color-codes.info/
If you want to change the background of a color, you can change the background colour of an element with the background-color property
Example:
body {
background-color:#CFCFCF;
}
Note-Background color does not inherit. It only change what it is requested to change
1 note
·
View note
Text
Web Authoring Week 5-HOW DO WE ADD CSS?

Now that we are familiar with HTML we can now begin the process of making our web page interesting by CSS
There are three ways to doing CSS:
1.Inline
Not a good method.
<p style="color:red;">Hello World</p>
2.Embedded
Better than inline. But will not be used for this semester
Styles are embedded into the web page.
<style type="text/css">
<!--
p{
color:red;
}
-->
</style>
3.External
The preferred method is External Style Sheets.
LINKING CSS TO HTML
To link a CSS file we use the <link> element
<link rel="stylesheet" href="style.css">
The style sheet here is called- "style.css" which is contained in the same folder as the HTML file.
<link rel=”style href=”style.css”> (This is what links your HTML and yourCSS
This link has to go ANYWHERE inside the head
HOW CSS WORKS
Css is made up of rules that control the way selected elements should be displayed.
There are 3 main parts to the CSS rules:
1.The Selector
The Selector identifies the HTML element that the rule will be applied to.
2.Properties
Properties define what you want to do with the elements you have selected. What you want to change.
3.Values
Values are the changes you want to make to the properties.
Value is dependent on the Property
Example:
p {
color:red;
font-family:Verdana;
margin:20px;
}
In this case, p is the selector
There are 4 ways to select elements:
1. Element
Here you select an element and it applies to the element as selected
Example:
h1 {
font-family:Georgia;
font-weight:normal;
text-decoration:underline;
}
2. Class
How the text appears on index.html
<p class="breaking">Lorem ipsum.</p>
In this case the class is breaking
Class selectors are indicated by a dot.
Example:
.breaking{
color:#FFAE00;
background:#666;
}
So here any element classified as "breaking" will sport orange text, on a grey background.
3. Id
Id selectors are identified by a # symbol.
Example:
#sidebar{
border:1px solid #000;
padding:10px;
}
4. Position in document
We can specifically select elements based on where they appear in the document.
NOTE:
In simple words;
#is used for ID elements .is used for all Class Elements All other elements are presented as is
0 notes
Text
Web Authoring Week 4(CONTINUATION)- STRUCTURING THE PAGE
One thing to note about structural elements is that they do not affect the appearance of your web page in any way.
However, they are very useful when it comes to CSS as they give information meaning
A lot of websites when viewed on a laptop they follow a similar structure.
HEADER
This element represents a group of introductory or navigational aids.
Header usually contains things such as;The site name, logo or branding, A login form, Navigation, A search form & Social Media links
Example:
<body>
<header>
<h1>The Daily Sponge</h1>
<p>News, Views and Reviews</p>
</header>
</body>
NAV
It stands for Navigation and represents a pages major navigation block.
<nav>
<ul>
<li><a href="index.html">Home</a></li>
<li><a href="news.html">News</a></li>
<li><a href="comment.html">Comment</a></li>
<li><a href="reviews.html">Reviews</a></li>
<li><a href="sport.html">Sports</a></li>
</ul>
</nav>
ARTICLE-Wrapping the Article
This element is a container for any section of a page that could stand alone.
You can have multiple <article> elements on one page.
<article>
<h1>Man Bites Dog</h1>
<p>by Sandra M</p>
<p>Lorem ipsum dolor sit amet, consectetur adipiscingelit. Nam sit amet massa maximus, imperdiet nisl vel,convallis velit. Fusce in aliquet est. Aliquam faucibus commodo tempus. Praesent cursus dui vel magna bibendum, vel aliquet mauris molestie.</p>
</article>
ASIDE-Aside From…
This element represents content related to the main content of the page or article, such as advertisements, links, recent posts etc.
(Also referred to as a ‘sidebar’)
Example:
<aside>
<h2>Most Read Articles:</h2>
<ul>
<li><a href="">Man Bites Dog</a></li>
<li><a href="">HTML vs XHTML</a></li>
</ul>
</aside>
FOOTER
This structural element is usually at the bottom of a web page or section and contains information like contact details, copyright information, links etc.
Example:
<footer>
<div id="footer_copyright">
<p>
©2018 spongemedia
</p>
</div>
</footer>
GENERIC GROUPING ELEMENT<div>
This is an element that has no meaning.
It is a way of grouping things together but has NO meaning
NOTE: ONLY use <div> if there is no better alternative (such as <header> or <article> etc.)
NOTE 2:
An article can have a header and a footer inside one article
0 notes
Text
Web Authoring Week 4-HTML CLOSING
RECAP ON IMAGES
As we round up this week is the last week of HTML
Just to note always remember to close your elements
Remember to always start with a well-formed page:
<!DOCTYPE html>
<html>
<head>
</head>
<body>
</body>
</html>
Remember and Image has to have a source <src> without a source it will not appear
Always ensure to have the alt tag as it allows differently abled people to also access the information
NAVIGATION SYSTEM
How do we separate the articles?
An unordered list is required as this is what the user sees(the context?)
<ul>
<li><a href="Terms&Conditions.html">Terms & Conditions</a></li>
<li><a href="Privacy Policy.html">Privacy Policy</a></li>
<li><a href="contactus.html">Contact Us</a></li>
</ul>
An open and closing quotation marks is needed
The link MUST ALWAYS be inside the list Item
Headings do not need to be wrapped up inside a paragraph.
Example: <h1>Man Bites Dog</h1>
WIDTH + HEIGHT
NOTE: By default, two block elements such as; Paragraph <P> will not sit side by side however in line elements such as links and images can sit side by side
An Image and a Link can sit side by side however if you put the link in a Paragraph it will not automatically move down to a paragraph
FIGURE
This is a containing element for an Image and can be used to put images one after another
Example:
<figure>
<img src="cat.jpg" width="400"
height="340" alt="A picture of a
cat" title="This cat is very
intelligent">
</figure>
FIGURE CAPTION
This is an Optional Caption for the image. It usually describes the element
Nested inside a figure, it says “this is the caption to go along with this figure”
Example:
<figure>
<img src="cat.jpg" width="400"
height="340" alt="A picture of a cat"
title="This cat is very intelligent">
<figcaption>Look at this cat</
figcaption>
</figure>
NOTE: You can have more than one image under one Figure but each image MUST be followed by <figcaption>
LINKS-GROUPING OUR PAGE INTO CONTENT
Linking to a Part of the Same Page-INTRODUCTION TO ID
This consists of links that take you to certain parts of the page. A good example of this is the Wikipedia Page.
What we need to do is include an attribute called ID which allows you to assign a unique identifier to an element
Id’s are also used for page layout and application of CSS.
We can apply ids to ANY ELEMENT, for instance, a heading.
Example:
<h2 id="html">HTML</h2>
<p>HyperText Markup Language, commonly
referred to as HTML, is the standard
markup language used to create web
pages.</p>
How do we Link to it? (INTERNAL LINK USING ID ATTRIBUTE?)
The value of the href attribute must start with a #
symbol, followed by the id.
Example:
<a href="#html">HTML</a>
1 note
·
View note
Text
Web Authoring Week 3-Lists,Links,Images
Wow! So yesterday Mark Zuckerbarg lost $7 billion with the outage of Whatsapp,Facebook and Instagram. In tern I lost 6 hours of my social life, Great! Back to Web Authoring.
This is my third blog on Web Authoring.
These can be used to group related pieces of information together
The types of lists include;
Unordered Lists
To create an unordered list, you use the <ul> element. Then, for each item on the list, you use the <li> element.
Example:
<ul>
<li>cats</li>
<li>dogs</li>
</ul>
Ordered Lists
An ordered list typically is a numbered list of items. HTML 3.0 gives you the ability to control the sequence number - to continue where the previous list left off, or to start at a particular number.
An ordered list starts with the <ol> tag. Each list item starts with the <li> tag.
The list items will be marked with numbers by default:
Example:
<ol>
<li>Coffee</li>
<li>Tea</li>
<li>Milk</li>
</ol>
LINKS
What is Links?
Links are absolutely fundamental to the web.
Imagine a world where Links were not existent.
How do we make them?
<a> element
Links are created using this element
As well as the element <a> we need href which is the hypertext reference.
Example:Here’s a link to the Griffith Homepage
Linking to External Sites
This is what is known as the ABSOLUTE URL. That is Http(Hyper Text Transfer Protocol?)
Linking to Pages on the same site
The alternative to an absolute URL is the relative URL. This is the location of the page, relative to the current page
How does a relative link work? It looks back in the same folder it’s in. It follows the same Path. You do not need to give it any other name.
IMAGES
In this week we see how to include image as part of content.it should be included using <img> element along with the source (src) attribute which includes the location and name of the image.
Example:
<img src="cat.jpg">
ALTERNATIVE TEXT
The ALT text adds a text description to an image on a Web page, and should be used for all images, graphical bullets, and graphical horizontal rules.
ALT text is accessed by screen reader users to provide them with a text equivalent of images. if it is being read by someone with visual impairments using assistive technology (like screen readers) We use the alt attribute.
Example:
<img src="cat.jpg" alt="A Picture of a Cat">
0 notes
Photo

BASICS
0 notes
Photo

some of the elements in HTML
0 notes
Photo

Web Authoring Week 2-Learning HTML
I tend to think of HTML as the child to Python (Story for another day). But when describing what HTML really is it’s a language to describe the contents of web documents, continuously updated as they receive feedback, either from Web designers, browser vendors, tool vendors, or indeed any other interested party.
HTML is a living standard.
HTML is a markup language (a system of annotating a text to describe information)
The very first thing in an HTML document is the DOCTYPE.
This declares that the file in an HTML5 document.<!DOCTYPE html>
It is also important to note that every HTML documents consist of elements:
TAGS
Tags are used to show the start and end in the markup.
A start tag is used to indicate where the element begins, and an end tag to indicate where they end.
Example in a sentence:
1. ROOT
The root element is <html>.
Everything in our document apart from the DOCTYPE will be inside this element.
Example:
<!DOCTYPE html>
<html>
</html>
2. HEAD
The first element inside <html> is <head>.
The head element represents a collection of metadata for the document. Metadata here refers to the information about the page. i.e: the title, the author, keywords.
Example:
<!DOCTYPE html>
<html>
<head>
</head>
</html>
3. TITLE
The title element represents the document's title or name.
It appears inside the <head>
The title will appear in the browser tab bar, and on search results.
Example:
<!DOCTYPE html>
<html>
<head>
<title>Our First Page</title>
</head>
</html>
4. BODY
After the <head> comes the <body>
The body element represents the main content of the document.
ALL CONTENT that the user sees and interacts with must appear in the body.
There can only be one <body> element per document.
Example:
<!DOCTYPE html>
<html>
<head>
<title>Our First Page</title>
</head>
<body>
</body>
</html>
NOTE:
It is important to follow these agreed standards to avoid future errorrs
0 notes
Text
Web Authoring Week 1-Introduction
Funny how a summer break can make you feel. How it can make you forget of the time you were unwillingly forced to stay home because of a “Global Pandemic” they say...
Then everything re-opens, this includes school and you’re now forced to have to dress up and get out of the PJ’s you used to attend class in when everything was virtual. Then comes the lecturer and boom first assignment.
Well, that basically sums up where I am right now as my title says this is my first assignment this semester...Yes, I am a writer who is interested in technology, I’m actually a writer who’s doing a Masters in Interactive digital media. Pretty Cool...I know!
I’ll take you on a journey with me with this Moodle, I’ll be sharing my understanding of every week’s discussion with you, sharing my thoughts on every week’s discussion and certainly welcome you to share your ideas and thoughts on web Authoring.
So what is web authoring? To help us gain an understanding of this, we must start by asking ourselves What is a web? A web is a system of interlinked elements accessed via the internet. Example; Web Pages when several of these web pages are grouped together, they form a website. The web pages are stored in servers and accessed via the browser.
Wow! All I can say I have learnt so far is that a Web Page is really not an application; they may look and feel like native applications, but are not implemented as such.
I’m so excited to take this journey with you.Let’s discover what web authoring really means together in the coming weeks!
1 note
·
View note