
Statistics
We looked inside some of the posts by iamskyuvraj-blog and here's what we found interesting.
Average Info
Notes Per Post
0
Likes Per Post
0
Reblog Per Post
0
Reply Per Post
0
Time Between Posts
3 days
Number of Posts By Type
Text
15
Photo
2
Last Seen Tumblr Blogs


Fun Fact
69% of Tumblr users are millennials.
Text
How To Delete or Unlock Undeletable files or folder from Windows 10,8 or 7

How To Delete or unlock Undeletable files or folder from Windows 10,8 or 7

Sometimes you are faced with an error when you try to delete a file or folder in your Widows PC or Lappy . It may be a Spyware, Malware, Ad-ware or any Trojan. In some situations, the file is being used by the essential Windows programs such as Windows Explorer, which prevents it from being removed.If You are a regular computer user then you've probably come across at least one of the following messages: Cannot delete file: Access is denied The file is in use by another program or user Make sure the disk is not full or write-protected and that the file is not currently in use There has been a sharing violation The source or destination file may be in use Some times stopping the process of file from Task Manager gives the ability to delete files.But If using Task Manager was unsuccessful, you can get rid of these files or folder and delete them forcibly by either completing the process manually or by downloading free and easy applications. So as we already said that there are two way to delete these types of files permanently .
1.Using a free Software
LockHunter – Foolproof File Unlocker LockHunter is a free software to unlock and delete files.The Procedure is very simple. Step 1.Download the software and Install it in Pc/Lappy. Step 2.Go to the file and Right click on it through the mouse.
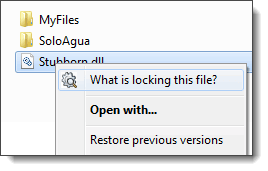
Step 3.From the New Opened menu click on What is locking this file? Step 4. Click on Delete it or Unlock it.

So with above method you can delete Undeletable files and folder from your pc. Malwarebytes FileASSASSIN – Delete Locked Files Steps to delete files with Malwarebytes FileASSASSIN;-

Start FileASSASSIN and select a file by dragging it onto the text area or selecting it using the (...) button. Select a removal method from the list Click Execute and the removal process will commence. IObit Unlocker – Undelete Files Folder
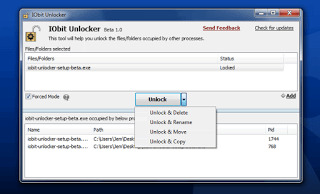
IObit Unlocker is a light-weighted (only 2.34mb) yet powerful tool designed to fix the 'Cannot Delete' or 'Access Denied' problems. It can 'Force' terminate all related processes that prevent you from deleting or accessing files / folders that you need to.
Using the Command Prompt
Go to the "Command Prompt." You can find this be going to "Start" and then typing "CMD" or "Command Prompt" without the quotation marks into the search bar. Right-click on "Command Prompt." This will prompt a drop down menu where you can select "Run as Administrator.You will need to have Admin Access in order to complete this method. Wait for a back window to appear. This is where you will input your command in order to delete a file. Enter your command. This command will look something like the following: .DEL /F /Q /A C:UsersYour usernameThe location of the fileName of the file you wish to delete. Press Enter. This will now permanently delete the file. For example if you are trying to delete a file named "abcde.exe," the command will look like this: .DEL /F /Q /A C:UsersYour UsernameDesktopabcde.exe So I hope After Using Any Of the Above Methode You will definitly delete the File or Folder which is undeletable through Windows Explorer..And Whenever you face these Errors then use any of the Above Methodes. Warning: Please use caution with FileASSASSIN as deleting critical system files may cause system errors. Also Visit:- Everything about Rooting Windows 10 Important features,tips and tricks. Read the full article
0 notes
Text
How to Remove GRUB Permanently from a Computer

Updated on 12 Oct 2018: Yesterday I tried to replace Elementry OS with Linux Mint 18.3. it was a failed attempt to dual-boot Linux Mint 18.3 and Windows 10 on the different partition of a single hard drive on my lappy which is having GPT partition table with UEFI firmware. While I was checking all log files and doing research on the internet I found that it failed due to an existing Elementry OS's Ubuntu GRUB folder, which exists in the Boot EFI folder.So I thought that If I could just delete or remove ubuntu folder from the Boot EFI folder, that the installation would complete. Thus I figured out how to delete or remove GRUB Permanently from Computer using Windows 10 Command Prompt or Command Prompt through bootable media.

This Method can be used if: You have deleted the Linux installed Partition and want to remove GRUB from Boot Menu. There are three boot managers visible/ installed, and you want to get rid of them. Windows boot manager Ubuntu Boot Manager(Grub) Ubuntu Boot Manager(Grub) There two boot managers are visible/ installed, and you want to get rid of them. Windows boot manager Ubuntu Boot Manager(Grub) or any other boot manager If You are getting the Following Error while installing or replacing Linux The grub-efi-amd64-signed package failed to install into target What is Grub? GNU GRUB stands for GNU GRand Unified Bootloader, it was developed from a package called the Grand Unified Bootloader. GNU GRUB is a boot loader package. It is predominantly used for Unix-like systems. The GNU operating system uses GNU GRUB as its boot loader, as do most Linux distributions. GRUB is the reference implementation of the Free Software Foundation's Multiboot Specification, which provides a user the choice to boot one of multiple operating systems installed on a computer or select a specific kernel configuration available on a particular operating system's partitions. If You Want to Fix UEFI Boot in Windows 10/8/7 Visit Here If you want to remove Linux from Dual Booted System visit Here You May Also Like:- How to Setup Apple Homepod and is really it worth to you? Which is the Best eBook Reader for Android, let’s find Out So now after explaining all the things here is the method to delete or remove Grub Permanently from your Computer:
Method to Remove Grub Permanently from your dual boot Computer
Open Command Prompt If you do have the Installation Media : Insert the Media (DVD/USB) in your PC and restart. Boot from the media. Click on Repair Your Computer. Select Troubleshoot. Click on Advanced Options. Click on Command Prompt from the menu If you can Log into Windows 10, Type and Serch cmd in the Search Bar which will be on the right side of the Start button on the Taskbar. Now After Searching you will see Command Prompt in the search result then Right click on Command Prompt and select run as administrator In the Command prompt type diskpart and press Enter.

Now, wait for few seconds until you see a new line starting with DISKPART>. Just After DISKPART> type list disk and press Enter. Now Select Your Disk( In my case, it was Disk 0 so I selected the disk 0) By using the Command sel disk 0 and press Enter. Now type list vol and press Enter. Now you will see a list of partition/Volume, Ltr, Label, Fs, Type, Size, Status, and other info.in this list find a volume which has no ltr assigned and having the FAT32 file format.(In my case, it was volume 4.) Now Select the volume by typing the command sel vol X and press Enter.Replace X with the Number of the volume which has no ltr assigned and having the FAT32 file format.in My Case, I typed sel vol 4 and pressed Enter. Now we will assign a letter for this volume by using the command assign letter=L and Press Enter.( You can replace L with any other unused letter). Type exit and Press Enter. Now the main Part begins from Here: After the previous step you will see new line starting with C:\Windows\system32>

Now Type cd /d L: and press Enter. Now the new line will start with L:\> type dir after it. Above command will show you all the directory present in the volume L. Type cd EFI and press Enter. Now the new line will start with L:\EFI>, type dir here and press Enter. Above command will show you Directory of L:\EFI. there will be 5 or more directories. if you see Ubuntu listed in this directory. Type rmdir /S ubuntu and press Enter. (Warning: Don't try to play with Boot & Microsoft directory ) Now you will be asked: ubuntu, Are you sure (Y/N)? Type Y and Press Enter. Now if you want to check that the ubuntu directory is deleted or not Type dir and Press Enter. this Command will show you all the directories of L:\EFI. there will be 4 directories without Ubuntu. Type exit and press Enter. Done, Restart Your PC/ Lappy. Note: if command dir not working for you, try ls instead of dir in Step 13,15 & 18. Actually, You don't need both commands because they are only to check the directories. This procedure is not necessarily the best or only way to go about do this, so if you know of a better method, post a comment. Commands I Used to delete or Remove Grub Permanently diskpart list disk sel disk 0 list vol sel vol 4 assign letter=L exit cd /d L: dir cd EFI dir rmdir /S ubuntu Y dir exit ## Command 1 to 7 used to select the disk and Volume, and assign an unique letter to the volume. ## Command 8 to 15 used to browse the EFI directory, Delete or Remove GRUB permanently, and re-check. A beneficial suggestion by our visitor "Giuseppe". After completing the removal of ubuntu directory, re-open diskpart and remove the letter assigned to the EFI volume, with using remove letter=X (X is the letter). This to avoid some strange behavior of Windows, especially after 1803 update. You May Also Like:- How to Block Microsoft to collect data on Windows 10 Convert Your Harddisk from MBR to GPT for Windows 10 installation Conclusion: I Deleted or removed the GRUB permanently from my computer using the above method and now I am going to install or dual boot Linux Mint 18.3 on it with Windows 10.Hope it will work for me and for all of you who are facing these problems like multi-nonusable boot managers, or error like, The grub-efi-amd64-signed package failed to install into the target. Please feel free to share your views, suggestions, Advise and the problem with us using the comment section below.Please share with your friends using sharing buttons.And Keep Visiting.Thank You. Read the full article
0 notes
Text
How To Flash or Install Custom Recovery on Any Android Smartphone
Today I am posting this Guide on How To Flash or Install Custom Recovery on Any Android Smart Phone.Before doing Anything First, make a custom recovery for your SmartPhone with our previous post" How to Make Custom Recovery For Any Android Device." Now the Main Part Begins in This part I will show you that How To Flash or Install Custom Recovery on your device so please read and follow all steps One By One. There are total 3 Ways, I will use in this post " How To Flash or Install Custom Recovery " If your Smart Phone is Rooted Then first try without PC Method.In First Two Methods No PC Required But In Last Method PC is Necessary.
How To Flash or Install Custom Recovery on Any Android Smartphone
If your device is rooted then there are many apps are available which makes the flashing easy. following are two well-known software so just download and Flash or Install Custom Recovery on your device. 1. Mobile Uncle Tool to Flash or Install Custom Recovery This is well-known tool to flash recovery.img easily.Mobileuncle Tools is power tools for MTK android device,there are many features in it like display device information of device and running status,easy open engineer mode and MTK engineer mode,backup IMEI for MTK mobile,recovery online update,easy update tool via sdcard,Enable USB Mass Storage Device,connect cable first,crack operator GPRS lock for MTK,free the network access limited via GPRS,power GPS search,Power the GPS search satellite ability,enable AP,easy reboot to recovery Requirements:- Rooted Android Smart Phone. Custom Recovery (Recovery.img) of your Phone. (search it on Google or make your own with the help of this guide) Mobile Uncle Tool Steps: Download and install mobile uncle tools from above given link to your phone. save recovery.img file to your sd card (in the root directory of the sd card) open mobile uncle app select recovery update wait as it searches your img file (recovery.img click ok to use recovery file click ok to reboot in recovery mode now your device will be booted into recovery mode.Have fun but first make a complete Backup of Your System. **Please do not use this app thoughtless and evaluating them without deeper KNOWLEDGE for Android.A wrong step will Hard brick your Device.** 2. Recovery Tools to Flash or Install Custom Recovery ROOT access requires! This app is used to Flash or Install Custom Recovery without rebooting it .this app is very fast and easy using. There are 3 flash options:"Flash Clockworkmod" and "Flash TWRP" and "Flash other"."Flash Clockworkmod" & "Flash TWRP" load the custom-recovery for your device down and install them automatically. "Flash other" lets you choose an image from the internal or external memory of your device. **Please do not use this app thoughtless and evaluating them without propper KNOWLEDGE of Android. A wrong step will Hard brick your Device.** Requirements:- Rooted Android Smart Phone. Custom Recovery (Recovery.img) of your Phone. (search it on Google or make your own with the help of this guide) Recovery tools -Download from here Steps:-

Download recovery tools.apk and install. Place Recovery.img on sd card's root directory. Open Recovery Tools and give it Root Permission. Backup your stock recovery(most times it fails to backup so you can skip this step). Click on Flash other Recovery. Select Recovery.img from sd card.(step2) A warning will Pop-up - Choosing recovery.img are you sure? Click on Yes Please. At last a message will new Pop-up - Reboot into Recovery Now? click on yes, please. That's all now custom recovery is flashed/installed on Your Device.Have fun but first make a complete Backup of Your System. 3. SP Flash Tool method to Flash or Install Custom Recovery on unrooted Smartphone

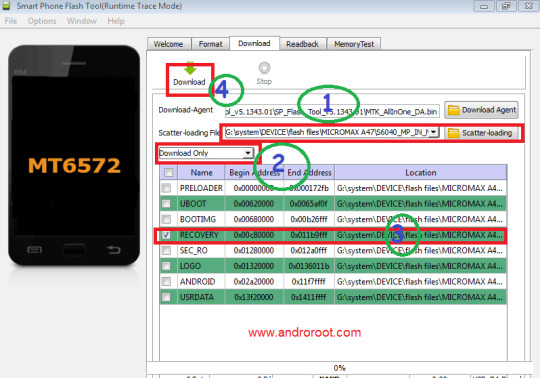
Download SP Flash Tool on your PC from HERE load scatter.txt from the stock flash files or make it with the help of ANDROIDHOW- For scatter.txt. Make everything ready and connect your device to your pc through data cable. Download and Install drivers from above link.(In some latest device(>Android 4. 0) there is an inbuilt driver cd you can use it manually.connect device with pc through USB cable now you will see 3 notifications(3, IF USB debugging enabled else 2) in notification area now click on “CONNECTED AS USB Storage” after it you will find some option under “USB computer connection” you will find connect as cd rom option,in it enable Built-in CD-Rom,now in pc a pop-up will appear >cd rom is connected>install all possible drivers from it) . Unplug the USB cable from the device. Extract it on your PC copy scatter file, Patched recovery.img & boot.img(recovery.img with our earlier Post How to Make Custom Recovery For Any Android Device.) and Boot.img and Scatter.txt from, ANDROIDHOW- For scatter.txt)in a folder. Run flash_tool.exe and click on scatter-load, then navigate to the scatter.txt of your device which you copied in step 3. Now regions of your device will be loaded. You are only want to flash the recovery.img so click on the recovery or its address and navigate to the folder in which you copied the files in step 3.and select the recovery.img. Make sure that only the box of Recovery is checked and everything else has to be unchecked. Remove battery from phone and reinsert it.now connect it to the PC with USB Cable and click on Download button. if success the Download OK window will appear. Now Unplug the USB cable from the device remove the battery and reinsert it and press the combination keys(mostly vol + vol-) with Power button. that's it.your phone will be booted in recovery mod. Before trying anything Make a complete Backup your system first. You May Aso Like:- How to Update SU Binary Manually on Android Smartphone What is Flashing and How to Flash Android Smartphone So if you followed all the above steps Surely You will know How to Flash or Install Custom Recovery on your device. have fun but made a full system backup first. *DISCLAIMER : All above methods are working and having good success and also risks but do it on your own risk we are not responsible for any damage or brick** *I am just a blogger so all credit goes to the original developer, respected bloggers/writer , nd websites *. Read the full article
0 notes
Text
How to Update SU Binary Manually on Android Smartphone

Hello Friends, We are back with another tutorial to update SU binary manually. It happens many time that After Rooting Your Android Smartphone the App 'Superuser' requests for SU binary update, It also gives two methods to update SU binary First 0ne is Normal and Second one is Using TWRP Recovery. Some time both methods works but if you are a quite unlucky one or maybe both will not work.So I am here with all the methods to Update SU Binary.

What is Superuser or SU? Let's start with Superuser, Superuser or su is a very powerful term in Linux. It gives the super and powerful permission to a Linux user to access and modify or making changes in the root directory of the System OS.In Linux OS we use "su" in the terminal for root permission but in android, there are some Root Managing apps which will make things more easy for the users.There is terminal emulator is also available for Android and some of the most popular Linux commands works in it.you can easily find one in google play store for free. "Well, I also faced this problem when I was working and using Intex Aqua Power.I rooted my Intex Aqua Power after many unsuccessful attempts but after rooting, When I opened Superuser app it showed me a message to update SU binary and after that, I downloaded a flashable zip of supersu.zip because I have TWRP ... And when I choose to update via TWRP/CWM recovery, my phone reboots into recovery and does nothing else. Luckily I was aware of the tricks and all the methods so I solved the " SU Binary Outdated" problem with one of the following methods and today I am going to share with you all the methods to Update the Outdated SU Binary Manually."
How to Update SU binary Manually or solve SU Binary Outdated Problem
Here are 4 Methods to Update SU Binary Manually or Solve SU binary Outdated Problem:- Automatic or Normal Method Using Custom Recovery Without Custom Recovery Using Flash Gordon With Computer Using ADB and Fastboot After listing all the methods, now I am going to explain all the methods One-By-One. Method 1) Automatic or Normal Method to Update SU binary Before Trying Any other method Try this.You can Update SU binary Easily Using following steps. OPEN SuperUser app. it will show you a message that The SU binary needs To be Updated, Continue? click on “Continue” and then click on” Normal” on the next windows.

It will take Some time to Update the SU binary so just wait. If the process is completed successfully then a new window with the message “Installation success” will be visible. Now reboot Your Android Smart Phone.Open the superuser app if the same message " The SU binary needs To be Updated, Continue?" appears, Try Next One. If not Appers then enjoy. Method 2) Update SU binary Manually Using Custom Recovery You can Update SU binary Manually Using following steps.Make sure Your Phone has TWRP or CWM Recovery installed. Download superuser.zip . and place it in Internal or sd-card memory. OPEN SuperUser app. it will show you a message that The SU binary needs To be Updated, Continue? click on “Continue” and then click on” TWRP/CWM” on the next windows. Wait until the phone booted to recovery mode. Now Click on Install and then Browse the downloaded superuser.zip (or /cache/superuser.zip) file. Flash it. Method 3) Update SU binary Manually Using Flash Gordon Flash Gordon is an app which allows us to flash any flashable zip (except for Roms) without having a recovery installed.This method is very helpful for those smartphones which don't have Custom Recovery.In this app, you just have to point it to the zip you want to flash, (a kernel, a mod, a gapps package, a modem, a RIL, or a recovery...) and it will interpret the updater-script of this package and install its content just like a recovery would. You can Update SU binary Manually Using following steps. Download superuser.zip . and place it in Internal or sd-card memory. Download, Install and open the app Tap the "select a zip" button, select the built-in file explorer to select the superuser.zip file. Flash Gordon will first extract the zip, depending on its size it can take a little time When you press the "Flash Now" button, Flash Gordon will locate the updater-script and start translating it into shell code, line by line It will output the resulting translated bash script on your sd card and execute it, thus installing the zip's content The app creates a notification, just tap on it to reboot. That's It. Source: Androguide.fr, Senior Member @ XDA-Developers Method 4) Update SU binary Manually Using ADB and Fastboot In this Method to Update SU Binary Manually There is no need to install the custom recovery permanently on your device, But Still, Recovery image is Required. Download superuser.zip to your sd-card Download TWRP or CWM recovery image for your device to your computer(in a folder : let's Say in Downloads Folder). Install the Android SDK . if you do not already have Android SDK or looking for a lightweight version of ADB + Fastboot (this tutorial might be useful) Open a shell / command prompt (Windows: + -> cmd -> ) Go to the location where you downloaded the recovery image: cd ~/Downloads (Windows: cd %USERPROFILE%\Downloads) and Press Enter. Make sure you have enabled ADB / USB-Debugging on your device and type adb devices to test if your device is recognized Then, Enteradb reboot bootloader and Press Enter. Your phone should now boot to bootloader. On your phone, you should now see a view green lines and a red line displaying FASTBOOT USB Type fastboot devices to see if your device is listed Now to start the recovery image without Permanently installing it: type fastboot boot .img and press enter If everything works, you should now have a recovery and can flash /sdcard/superuser.zip and Press Enter. That it. Hope it will work. Source:- Björn Richter (x3rAx) @ Github You may also like:- 6 Methods to Download Torrents Anonymously The Ultimate YouTube URL Cheat Sheet So in this post, We have talked about SuperUser, SU Binary and one more Common problem of Android " Update SU Binary Manually" and All Methods to " Update SU Binary Manually " or How to solve "SU binary outdated " issue.I Hope that this post will definitely help you to solve your Problem.If you Like Our Post, then please do Share it using the following Sharing buttons.You can share your views and problem related to Android with us using the Comment Section. Thank You, And Keep Visiting. Read the full article
0 notes
Text
Android Pie 9.0 Update: How To, Smartphones getting Pie Update

Android Pie or Android 9 P is now officially out, it is now out of the beta phase and making its way into the general public. The release of Android 9 pie is one of the proofs that Android as an operating system is now getting better. Android 9 Pie is the most imperforate, comprehensive and consistent version of Android yet. It delivers on many of the promises of Android versions past, bringing us a new navigation system and app overview and more embedded AI than you can poke a stick at. So in this Post first we will provide a list of devices which are getting Android Oreo Update and guide you to Update any smartphone to Android 9.0 Pie. and if Your Smartphone is not listed then don’t worry because we will also provide you a trick to use, feel and experience Android 9.0 Pie in your own Smartphone. So First check your luck and Smartphone in the list Of Smartphones that are getting Oreo Update:

List of Smartphones getting Android 9.0 Pie Update:-
Google Pie Update Google Pixel 2 Google Pixel 2 XL Google Pixel Google Pixel XL Google Nexus 5 Google Nexus 5x Google Nexus 6 Google Nexus 6P Google Nexus 10 Essential Pie Update Essential PH-1 Honor Pie Update Honor 9 Honor View 10 Honor 8 Lite Honor 8 Pro Honor 6X Honor 7X HTC Pie Update HTC U11 HTC U11 Life HTC One M8 Huawei Pie Update Huawei Mate 10 Lite Huawei Mate 10 Huawei Mate 10 Pro Huawei Nova 2i Huawei P8 Lite Huawei P10 Lite Huawei P10 Huawei P20 Huawei P20 Pro Huawei P20 Lite LG Pie Update LG G6 LG V30 LG V40 LG G5 Motorola Pie Update Lenovo Moto Z Moto Z Play Moto G6 Moto G6 Plus Moto G6 Play Moto G5 Moto G5 Plus Moto G5S Moto G5S Plus Moto X4 Moto Z2 Play Moto Z2 Force Moto Z3 Moto Z3 Play Nokia Pie Update Nokia 1 Nokia 2 Nokia 3 Nokia 5 Nokia 6 Nokia 6X Nokia 6 (2018) Nokia 7 Nokia 7 Plus Nokia 8 Nokia 8 Sirocco Oppo Pie Update Oppo R15 Pro OnePlus Pie Update OnePlus 5 OnePlus 5T OnePlus 6 Samsung Pie Update Samsung Galaxy A5 (2017) Samsung Galaxy A3 (2017) Samsung Galaxy S8 Samsung Galaxy S8 Plus Samsung Galaxy Note 8 Samsung Galaxy S9 Samsung Galaxy S9 Plus Sony Pie Update Xperia XZ Premium Xperia XZ2 Xperia XZ2 Compact Xperia XZ2 Premium Xperia XZ1 Xperia XZ1 Compact Xperia XA2 Xperia XA2 Ultra Xperia XA2 Plus Xperia XZ3 Vivo Pie Update Vivo X21
Xiaomi Pie Update
Xiaomi Mi 6 Xiaomi Mi MIX 2 Xiaomi Mi MIX 2S Xiaomi Mi 6X Xiaomi Mi 5 Xiaomi Redmi Note 3 So if your Smartphone is listed here, Than Don’t worry about ” How to Update Smartphone to Android P” Because Either you will receive Automatic Update through OTA Updates or they will provide the guide on ” How to Update your Smartphone UI to Pie Manually”. You just have to keep eyes on their Social Pages and Web sites. Now If your Smartphone is Listed in the above list then you can follow this method to:
Install Android Pie on Any Android Smartphone using OTA update
First of all, Make sure your Smartphone is fully charged or at least 80% charged.And having a good internet connection. Now open your device’s Settings app. Scroll down and go to About Phone Section. Click on Software Updates. Now give it few seconds to check for any software Update for Your Smartphone. If there is any Official Update available for your smartphone it will ask to allow it to download and install automatic Update. After Allowing it, the update should start downloading. Once the Update gets downloaded. The device will automatically flash and reboot into the New Android 9.0 Pie. That’s it. Enjoy the Latest Android 8.0 on your device.
How to Upgrade Smartphone to Android 9.0 Pie Manually :
Follow this Method If : You are having a Rooted Smartphone, and not getting any Android OTA Update Notification after Rooting. There is Any Android 9.0 Pie Custom Rom, Unofficial ROM / Flash File Available For Your Smartphone. There are two ways to Install Android Pie In your Smartphone Manually:- Find and install Any Android Pie Custom ROM Step 1: Find an Android Pie Custom Rom for your Android Smartphone. Step 2: Find and Install Custom recovery on your Smartphone. Step 3: Boot into Recovery Mode. Step 4: Make a Complete Backup. Step 5: Clear Data, Cache, and Dalvik Cache. Step 6: Flash The Custom ROM’s.Zip File. Step 7: After Completion: Reboot. Find any Android Pie Unofficial Update for Your Android Smartphone And Flash it using Aloof Tec’s three guides (According to your ChipSet) Qualcomm: How to Flash or Manually Upgrade Any Qualcomm Devices Samsung: How to Flash or manually Upgrade Samsung Smartphone MTK: How to Manually Upgrade or Flash Your Android Smartphone How to convert UI of Any Smartphone to Android Pie So in this part of the post, I am going to show you how to update UI of any Smartphone to Android Pie without installing ROM and Updates. Actually, we are installing Pie -style launchers for Android Pie feel in Your Smartphone and hence Your default Android UI will look alike Android Pie without doing any Permanent Changes in your Default Android OS. How to Install and Experience Android Pie Ui in Any Smartphone: Go to your Phone’s Settings. Open Security. Enable Unknown Sources. Now Install one of following Five Pie-style launchers. Rootless Pixel Launcher Nova Launcher Google Now Launcher Launcher 3 Once the App file is successfully installed, press the home button on your phone and choose your installed Launcher. You May Also Like:- How to Surf Anonymously on Android Smartphone How To Unbrick Any Android Smartphone
What is New in Android 9.0 Pie?
In this article, we are looking into the changes that have occur and how much have change and How to install Android 9.0 on your Phone Android Pie 9: Visual changes The first thing you will notice in Android 9 is that its design language Known as material design, has received a visual change. The primary changes are rounded corners, colored icons, and lots more white space. It is now flatter than ever, with even fewer drop shadows than before. Android Pie 9: Navigation Android 9 Pie is now included with the single-button gesture navigation system. It can be toggled on and off in the display, under settings sectionàSwipe on the home button. Note: Android 9 gesture navigation is not going to remain limited to Pixel and Android one devices. Google announced that the Pixel 3 will use it by default and it will be made available to any manufacturers. Android 9 Pie: Adaptive battery life Android Pie 9 has been designed to provide a more steady power supply by using on-device machine learning to figure out the apps you make use of every day and the ones you don’t make use of regularly, The on-device machine learning also figure out the time you make use of each app every day. With a 30% reduction in CPU app wake-ups for apps, adaptive battery help in increasing the battery for a few more hours during the period of testing with devices. Android 9 Pie: Adaptive Brightness The current auto-brightness settings is not good enough – Google. And that is why the phone makers were giving a more power adequate way to calibrate phone screen brightness based on both the environment and learned behavior. Google calls this adaptive brightness and claim 50% of users who tested these Android pie new features have stopped the manual control of brightness. you May Also Like: 20 Cool Things You Didn't Know Your Smartphone Can Do Sony Xperia XZ3 Launched at IFA 2018: Specification & Price Conclusion: So This is the ultimate guide For all of them who are searching on the internet for “How to Update Smartphone to Android Pie “.In this Post we have talked About Smartphones and devices that are getting Android Pie Update, Methods to Update Smartphone to Android Pie (Android 9.0) and Some Pie -style Launchers to give you feel and experience of Android Pie on Any Smartphone.If you have any suggestion and information related to this post Please use the comment section to share with us. Keep visiting and don’t forget to share with others. Read the full article
#Android#AndroidPie#Honor#Huawei#Lenovo#LG#Motorola#OnePlus#Oppo#Samsung#Smartphone#Sony#Vivo#Xiaomi
0 notes


Text
5 Top YouTube Alternative Apps You can try in this Festival Session

First of All, Happy Diwali Guys! YouTube is one top-notch prioritize platform of Google. And it is being watched by billions of people daily. Nevertheless, the YouTube platform is lacking some basic features suchlike downloading videos, listening to music in the background while in use, and watching popup videos and more. That's why we are here with 5 Top YouTube Alternative Apps just for you.
List of 5 Top YouTube Alternative Apps
OG YouTube The OG YouTube app looks very familiar to YouTube, it is the present moded version of the YouTube app. this app have some fascinating basic features suchlike popup video: the video normally shows up in a small popup window and grant you the ability to stream or accessing other web pages. Why it is one of the 5 Top YouTube Alternative Apps Download: you have the ability to download any YouTube video using the app at any kind of existing resolution. Background Play: this is an amusing feature most especially for music lovers, it enables a you to play music in the background. Advertisement: this app do not display advertisement. iTube iTube is mainly for those who loves music. However, you still have the ability of watching video using the app. Moreover, the platform is somewhat having a bad interface. So watching video with it is not that strictly preferable. Another interesting fact is that, it load the YouTube playlist, it also enables loading lyrics for the song that is playing. Although, it is only well-known songs lyrics that's loads up. And it also come with an option for timer which is absolutely useful at night before going to bed. This iTube application do not contain any YouTube advertisement. Nevertheless, the application has an in-app advertisement. The in-app advertisement is sometimes annoying when its displayed. Also Check: Best 5 Email Encrypting Tools Honor Magic 2 Price and Specification: Launched Yesterday TubeMate TubeMate is a well known app and most people choose this first among All the other YouTube Alternative Apps. The TubeMate application only have a slight difference from other apps, where by it has the ability to view the mobile web version of the YouTube webpage. Downloading videos is the main purpose of the TubeMate application. It has an excellent downloading ability, it gives ypu the previllage to download numerous video at a spot without having any problem. While downloading, you can pause and resume the download that is pretty excellent. Moreover, you can also desire to stream the video alongside a wide range of resolutions which you will find available. TubeMate has the capabilities to load other webpages as well. Therefore it has the ability to work as a multiple webpage video downloader. Webpages suchlike Facebook, YouTube, Dailymotion, Metacafe, Vimeo, etc. Can be loaded using TubeMate. iYTBP This is one of the best YouTube alternative app. This app has the same functionalities, like the YouTube red. The app does not contain advertisement, it has a very smooth process during background play. And it flow perfectly almost like the YouTube red. Moreover, the iYTBP has to do by installation. How to Install the iYTBP Installation for none rooted devices, moded version of YouTube and MicroG for YouTube must be installed. This two is necessary and it is required for signing in. After downloading the app, install the MicroG for YouTube followed by the YouTube APK. Open the application, you will be required to sign in. It's good to also support your favorite YouTubers as well. NewPipe NewPipe is also another pretty app and it is last in this list of YouTube Alternative Apps. There are other pretty YouTube alternative app, like the OG YouTube, GB YouTube and more. But there are not pretty much excellent compared to this app. NewPipe has fascinating features: it allows you to play video in the background, having a closer look at the YouTube official application, it doesn't support playing video in the background which is somewhat annoying. However, there is numerous method you can use to do this YouTube trick but it not all that work correctly and accurate as the New pipe. With this app, you have the ability to play a video in the background with just one click. New pipe enables playing YouTube video in popup mode. This is what makes the New pipe application different from other apps. The NewPipe app has downloading capabilities, you can download any kind of YouTube video. And the YouTube video will be saved in your gallery and it doesn't fail when downloading. All other apps do have the problem when playing video in popup mode. The app will get stuck and stop running and displaying a popup error message on the screen "Unfortunately stopped". This app works absolutely perfect and accurate when playing video in the pop-up mode. You May Also Like: What Is XAPK and How To Install XAPK on Android How to Remove GRUB Permanently from a Computer That's it guys for today. We hope you will try one of these for sure today because, As you know, Youtube is also a place where you can get all the solution easily, From Cooking to making robots, Everything is available there, so Try these apps and you will be amazed. Keep Visiting. And Wish all of you "Happy Diwali" Read the full article
0 notes
Text
How To Fix File is too Large for Destination File System, All Methods

Yesterday I was transferring some huge files from my PC Hard drive to USB everything was going very smooth but suddenly a system Notification/ Message Pop-Up, with a not so sweet message at-all "File is too Large for Destination File System". So I was not able to copy the big file due to this error, but not for too long. I just did a small thing and then I was able to copy the same file. So in this article, I am going to share all the methods to solve this error on USB/external hard drive.

Let me clear it out first, that "File is too Large for Destination File System" is not an error, it is just a limitation of FAT 32 Partition and our system warn us about it. Nothing else. To solve this issue, You just need to convert your usb drive from FAT32 to NTFS. Why you are getting Fix File is too Large for Destination File System Error? You get this error due to the Maximum File size limitation of FAT 32 Partition which is sadly 4GB Maximum. And that's why you are getting "File is too Large for Destination File System" Error message. For more ease, we are comparing both the Partition (FAT32 & NTFS) here in the table below. And you will also understand that's why the converting the partition is the best solution. FAT32 v/s NTFS

How To Fix File is too Large for Destination File System
There are various method to solve "File is too Large for Destination File System" Error on USB/external hard drive. I am covering most of them here in the article. Make sure to copy all the files/folder to a safe place. Because in First 2 Methods "Your Data will be lost". Fix File is too Large for Destination File System Using Windows built-in format feature Open My Computer or This PC. Right click on USB drive or external hard drive. Click Format. Change the File System to NTFS. Click on Start. Done!! Now you can copy the files without any "File is too Large for Destination File System" Error on USB/external hard drive. Solve File is too Large for Destination File System Using CMD Type CMD in the Search box. Right-click Command Prompt Click on Run as Administrator Enter the command, convert /fs:ntfs /nosecurity Replace with the drive letter of your USB or external hard drive, for example convert F: /fs:ntfs /nosecurity Done!! Now you can copy the files without any "File is too Large for Destination File System" Error on USB/external hard drive. You May Also like: RF and Multi-Octave Devices: 3 Tips for Buying Multi-Octave Devices ASUS ROG Phone Specification and Price, With All Accessories Solve File is too Large for Destination File System Using third-party software

There are many third party software which can Convert FAT32 to NTFS without data loss. You can use one of them to Fix "File is too Large for Destination File System" Error on USB/external hard drive.. I am using 3 Softwares, Use one of them if you want to skip the File Coping/Backup step. Download EaseUS Partition Master/ AOMEI Partition Assistant / MiniTool Partition Wizard, install it. Connect the USB or hard drive to your computer, launch the software. Right-click the disk you want to convert from FAT32 to NTFS and select Convert to NTFS. The pop-up dialog box will show the source and destination file system, click OK to continue. Now click on Apply (in EaseUS/ AOMI) and Start on pop up in Mini Tool.

You May Also Like: How to Remove GRUB Permanently from a Computer Convert Your Harddisk from MBR to GPT for Windows 10 installation I hope this post will help you out to solve the "File is too Large for Destination File System" Error on USB/external hard drive. So not trying anyone form the above method try to copy the same file this time it will be successfully transferred. That's it. Keep visiting. and share any other idea which will help to solve this problem. Thank You. Read the full article
0 notes
Text
Honor Magic 2 Price and Specification : Launched Yesterday

The Company launched the Honor Magic 2 on October 31 (Yesterday) in China. With the launch, many rumouredd details confirmed now. It also confirms that the phone is coming with 6 cameras. In this article, we will talk about Honor Magic 2 Price in India and its Specification.
Honor Magic 2 AnTuTu and GEEKBench Scores have appeared on the internet you can check it here: Magic 2 Specification, AnTuTu and GEEKBench Scores
Honor Magic 2 Price
The Honor Magic 2 Price for 6GB RAM/ 128GB inbuilt storage variant is around CNY 3,799, And For 8GB RAM/ 128GB storage variant Price is CNY 4,299. Honor Magic 2 Price for 8GB RAM/ 256GB storage variant is set at CNY 4,799. Honor Magic 2 Pre-orders start from 12am Today ( on November 1), and the smartphone will go on sale on November 6 via the company's Online Store "VMall". After Conversion, Honor Magic 2 Price in India for 6GB RAM/ 128GB inbuilt storage variant will be near Rs. 40,300, And for 8GB RAM/ 128GB storage variant Magic 2 Price in India will be roughly Rs. 45,600, And Finally Honor Magic 2 Price in India for 8GB RAM/ 256GB storage variant Will be around Rs. 50,100. Honor Magic 2 Price in India is not confirmed yet so we have to wait for price update here. Honor Magic 2 specification The smartphone sports a 6.39-inch full-HD+ AMOLED bezel-less display panel with a 19.5:9 aspect ratio, 1080x2340 pixels resolution, pixel density of 403ppi, support for the DCI-P3 (108 percent) colour gamut, and a 91.5 percent screen-to-body ratio. The Phone will be Powered by the company's flagship HiSilicon Kirin 980 SoC, with two Cortex-A76 cores clocked at 2.6GHz, two Cortex-A76 cores clocked at 1.92GHz, and four Cortex-A55 cores clocked at 1.8GHz. The variant will be available in two configurations – 6GB RAM + 128GB storage and 8GB RAM + 128/256GB storage.The Phone will runs Android 9.0 Pie Under the Magic UI 2.0. As per the Honor Magic 2 specification on TENAA and some other site the phone appears to have a total of 6 cameras. The vertically lined up rear camera setup will get a 16-megapixel primary sensor, a 24-megapixel secondary sensor, and then a 16-megapixel tertiary sensor. Now at the front side, the Phone will have a 16-megapixel primary sensor, and a 2-megapixel + 2-megapixel combo with an f/2.4 aperture for 3D Face Unlock features. The Cameras will have all the improved AI Features. After the cameras, Let's move to the other Honor Magic 2 Specs and features, The Magic 2 will get power from a 3,500mAh battery, which also supports 40W fast charging (full charge in 55 minutes). The Phone also has an in-display fingerprint sensor and 3D face recognition feature. The smartphone measures 157.32x75.13x8.3mm, and weighs 206 grams. It also comes with IPX2 rating that makes it dustproof and splash-proof. The Phone will have USB 3.1, Type-C 1.0 reversible connector, USB On-The-Go, Other than these the Phone will have 4G VoLTE, Wi-Fi 802.11ac, Bluetooth v5.0, GPS/ A-GPS, NFC, and a USB Type-C port. without 3.5mm headphone jack, But you will get USB Type-C to 3.5mm headphone jack adapter in the phone box. The phone will get a custom virtual assistant called “Yoyo”. Additionally, the Phone initially appeared in the Red and Black color variant, But we expect Blue and Purple Color variants also. You May Als Like: Nokia X7 aka Nokia 7.1 Plus Launched in China; Specification and Price ASUS ROG Phone Specification and Price, With All Accessories That's it for today guys, We will update this post after the final Honor Magic 2 Price in India, So keep Visiting and Have a nice day. Read the full article
0 notes
Text
OnePlus 6T Specification, Global Price and Availablity

The Company OnePlus launched its flagship Phone "OnePlus 6T" on October 29. It was launched in a huge event. After the launch, the OnePlus 6T Specification, Price in India as well as other country and launch date have been confirmed. So in This Article, We will provide you with all the details like specification, OnePlus 6T Price in India and Launch date. Before the launch leeks are coming out continuously. Other than some cool OnePlus 6T Specification we already know that the phone will have waterdrop notch and In Display fingerprint scanner. Now after the GeekBench report (OnePlus A6013) let's collaborate all the details about this phone at a single place here.
OnePlus 6T Price In India and Global
8GB + 256GB 8GB + 128GB 6GB + 128GB Price in India INR 45,999 INR 41,999 INR 37,999 Price in US $629 $579 $549 Price in UK £579 £529 £499 Price in EU €629 €579 €549 Price in Sweden SEK 6,795 SEK 6,295 SEK 5,795 Price in Canada CAD 839 CAD 769 CAD 719 OnePlus 6T Price of 8GB + 256GB is 629 EUR. And OnePlus 6T Price in India of 8GB + 256GB is 45,999 Indian Rupee. We will update the OnePlus 6T Price in India after it will be listed on Online Stores. OnePlus 6T Launch Date: The Phone will be Available in the States and India on November 1, it will be available on November 6 in Europe.
OnePlus 6T Specification
The OnePlus 6T Specification includes a 6.41-inch full-HD+ AMOLED display along with a 19.5:9 aspect ratio and 1080x2340 pixels resolution. OnePlus 6T will come with an in-display fingerprint sensor, waterdrop-style display notch. The Phone is expected with Corning Gorilla Glass 6 Protection. The OnePlus 6T will be powered by Snapdragon 845 Chipset, Octa-core (4x2.8 GHz Kryo 385 Gold & 4x1.7 GHz Kryo 385 Silver) CPU and Adreno 630 GPU. It will have 3 Memory Variants, First one is 6GB RAM and 128 GB Onboard Storage, then 8GB RAM and 128 GB Onboard Storage, and the most powerful one is 8GB RAM 256GB ROM of onboard storage. After the Geekbench report, we know that the model OnePlus A6013 which is the pre-production unit of the OnePlus 6T, received a single-core score of 2,387 and a multi-core score of 8,925. Which is similar to other smartphones having Snapdragon 845 Soc, including OnePlus 6.

However Battery capacity is confirmed by the company in Oneplaus 6T Specification, The Phone will get power from a 3,700mAh battery. The phone will have some enhanced low-light photography capabilities, and it will come without 3.5mm headphone jack. The Phone WIll Run Android Pie 9.0. The Camera feature in OnePlus 6T Specification is not confirmed yet, but it is expected that the phone will have a total of 3 Cameras. The Rear dual camera setup will be of 16 MP(f/1.5-2.4, Dual Pixel PDAF, OIS) + 20 MP(f/2.6, AF). There is also 16 MP HDR supported selfie camera at the front side of the phone. It will have some AI Optimized photography features. Also Check: Nokia X7 aka Nokia 7.1 Plus Launched in China; Specification and Price How To Fix File is too Large for Destination File System, All Methods Connectivity features in the phone include Dual sim/ Single sim + micro SD Supported, 4G LTE or might be 5G compatible, Wi-Fi 802.11 a/b/g/n/ac, Bluetooth 5.0, GPS, and USB 3.1, Type-C 1.0 reversible connector, and USB On-The-Go. The Phone will be in Mirror Black (glass back), Midnight Black (metal back) r Combination. It measures 157.5 x 74.8 x 8.2 mm and weights around 185 g. You May Also Like: HTC Exodus 1 Blockchain Phone With Zion Cryptocurrency Wallet Honor Magic 2 Specification, Live Image Leaked Ahead of Launch So In this article, we have collected all the rumored and know details of OnePlus 6T. The RAM, ROM, SoC, Battery capacity is almost Confirmed, Other details will be confirmed soon. So Stay connected with us and keep visiting. Read the full article
0 notes
Text
Honor Magic 2 Specification, AnTuTu and GEEKBench Scores appeared

After a great success of Honor Magic, The Company is going to launch Honor Magic 2 on October 31 in China. Just one day before its launch AnTuTu and GEEKBench Scores appeared on the internet. Which actually confirms the Kirin 980 chipset. On Social Sites 2 More gadgets has been teased along with Honor Magic 2. With all these performances report, some of The Honor Magic 2 Specification has been confirmed and updated in this article, we will collect all the small details and information about Huawei Honor Magic 2 Specs and Price in India.

Photo Credit: Weibo/ Zanilia Zhao Honor Magic 2 specification According to the Honor Magic 2 specification on TENAA listing, The smartphone sports a 6.39-inch full-HD+ AMOLED bezel-less display panel with a 19.5:9 aspect ratio and 1080x2340 pixels resolution. The Phone will be Powered by the company's flagship octa-core HiSilicon Kirin 980 SoC. The TNY-AL00 variant will be available in two configurations – 6GB RAM + 128GB storage and 8GB RAM + 256GB storage. The TNY-TL00 variant of the handset, on the other hand, will pack 8GB of RAM and 128GB of onboard memory. The Phone will runs Android 9.0 PieUnder the EMUI 9 UI.
Photo Credit: Weibo/ Zanilia Zhao As per the Honor Magic 2 specification on TENAA and some other site the phone appears to have a total of 6 cameras. The vertically lined up rear camera setup will get a 16-megapixel primary sensor, a 24-megapixel secondary sensor, and then a 16-megapixel tertiary sensor. Now at the front side, the Phone will have a 16-megapixel primary sensor, with two TOF lenses. The Front camera details are not confirmed yet, but we can see the rear camera setup on TENNA Listening as well as several live images posted by Chinese actress Zanilia Zhao.

Source: mysmartprice.com The Cameras will have all the improved AI Features. After the cameras, Let's move to the other Honor Magic 2 Specs and features, The Honor Magic 2 will get power from a 3,400mAh battery, which also supports 40W fast charging. The Phone also has an in-display fingerprint sensor and 3D face recognition feature.

The Phone will have USB 3.1, Type-C 1.0 reversible connector, USB On-The-Go, Other than these the Phone will haveWi-Fi 802.11 a/b/g/n/ac dual-band, Bluetooth 5.0 Low Energy, GPS with A-GPS, GLONASS, NFC, USB . The Posted Live images by actress Zanilia Zhao and some Weibo Posts also'reveals that the phone will get a custom virtual assistant called “Yoyo”. Additionally, the Phone initially appeared in the Red and Black color variant, But we expect Blue and Purple Color variants also. We will update this post for confirmed Honor Magic 2 Specification, Price in China and Honor Magic 2 Price in India soon. Along With Honor Magic 2 Phone The company also added the image of DJI Drone, which is might be some collaboration or Link of these two devises. However, The Company also released the teaser image of Flypod and an 8-inch Tablet Water Play. We will update more details in new articles. You May Als Like: Nokia X7 aka Nokia 7.1 Plus Launched in China; Specification and Price ASUS ROG Phone Specification and Price, With All Accessories Source: TENNA Listing || Weibo That's All we know till now about Honor Magic 2 specification, These all details are not confirmed by the company so the Honor Magic 2 specs / Specification will be confirmed after the Final launch, Which is scheduled on October 31 in China. The honer will be soon launched globally so just wait for the launch event. Read the full article
0 notes
Text
Nokia X7 aka Nokia 7.1 Plus Launched in China; Specification and Price

Just a few days ago I bought the new Nokia 6.1 Plus, Which literally costs "just"more than my One Month Salary. But no problem, because I can't explain the happiness, I felt after getting it into my hand (Only a true Nokia lover will understand " Even without words"). It is an awesome and beautiful phone and I truly loved it. Now today my source told me that "Nokia just launched Nokia X7 in China, and I have details of Nokia X7 Specification and Price". A New Nokia Phone ( Nokia 7.1 Plus ) and with New Specification, Wow... No, My true love doesn't get vaporized, but I was like, "Why my old Phone was in hurry to die? Could not stop 1-2 months?" and most important "My New phone got old in just One month". "Trust me, my phone having No issue with beauty products and aging effects. It Still looks very Cool".
Nokia's Backfire is not going to stop soon and we also want the same from this legend smartphone company. HMD Globel just launched Nokia X7 in China. As we know "Nokia does Naming two time of their Phones" so the same will be launched globally with a new name "Nokia 7.1 Plus". So in this article, we are going to list down all the known Nokia X7 Specification and also the Nokia X7 Price in India (Expected). Starting with Specification.
Nokia X7 Specification
Going through the same format, the Nokia X7 Specification starts with a 6.18-inch full-HD+ display with 18.7:9 aspect ratio, 86.5 % screen-to-body ratio, and 2.5D curved glass. The Nokia X7 aka Nokia 7.1 Plus is powered by an octa-core Qualcomm Snapdragon 710 SoC. it is packed with 4GB/ 6GB of LPDDR4X RAM and 64GB/ 128GB of eMMC inbuilt storage. The onboard storage can be expended up to 400GB via microSD card. Connectivity options according to received Nokia X7 aka Nokia 7.1 Plus Specification includes, dual-SIM, dual VoLTE, Wi-Fi 802.11ac with VoWiFi, Bluetooth v5.0, GPS/ A-GPS, GLONASS, BeiDou, FM radio, a USB Type-C port, and a 3.5mm headphone jack. In terms of the sensors, the handset has an accelerometer, ambient light sensor, electronic compass, gyroscope, and fingerprint sensor. It supports face unlock feature and measures 154.8x75.76x7.97 mm. It weighs 178 grams. Nokia X7 or Nokia 7.1 Plus runs Android 8.1 Oreo out of the box, but Android Pie is not far away. Also Check: Nokia 7.1 Plus Specification and Image Revealed on TENNA What Is XAPK and How To Install XAPK on Android Nokia X7 or Nokia 7.1 Plus Specification also indicates the complete details of Camera setup. The Phone is having a dual Zeiss-branded Rear Camera setup of 12 MP + 13MP Sensors. The primary 12-megapixel sensor has 1.4-micron pixels, dual-pixel autofocus, f/1.8 aperture, and OIS feature. The secondary camera sensor is of 13-megapixel, with fixed focus. At the front, there is a 20-megapixel selfie camera with f/2.0 aperture, AI enhancements, and fixed focus. The Phone will get all the power from a 3,500mAh battery which also supports 18W fast charging. The body is made up of 6000 Series aluminum. The phone is launched in Dark Blue, Night Red, Night Black, and Magic Night Silver color options in China and we can expect the same in global variant. After all the known Nokia X7 Specification lets Move to the Nokia X7 Price and what will be the Nokia 7.1 Plus Price in India.
Nokia X7 Price and Nokia 7.1 Plus Price in India

Nokia X7 Price in China is CNY 1,699 for the 4GB RAM add 64GB ROM variant. It costs CNY 1,999 for the 6GB RAM and 64GB ROM Model. The Most Expensive one is 6GB RAM/ 128GB inbuilt storage model which costs CNY 2,499 for the top-end. Now after a quick Conversion of Price and Name, Nokia 7.1 Plus Price in India will be roughly Rs. 18,500 for the 4GB RAM add 64GB ROM variant. Similarly, Nokia 7.1 Plus Price in India for the 6GB RAM and 64GB ROM Model wioll be about Rs. 21,500. Now finally the Nokia 7.1 Plus or Nokia X7 Price in India for the 6GB RAM/ 128GB inbuilt storage model is expected around Rs. 26,500. You May Also Like: ASUS ROG Phone Specification and Price, With All Accessories How To Fix File is too Large for Destination File System, All Methods Nokia 7.1 Plus will be soon launched in India and globally. Only then, we can confirm the final Nokia 7.1 Plus Specification and Price. Till than Enjoy your Old Phone and Be Happy. Keep Visiting and Sharing. Read the full article
0 notes
Text
Oppo A7 Specification leaked; New, or just re-badged Realme 2?

Oppo A7 is the upcoming smartphone. The Phone is expected to be available in China on 13th November. Before any Official announcement the Oppo A7 Specification, as well as Price leaked recently. The specification is almost similar to the Realme 2. There is a difference in Size of the phone which feels like "Either some extra ingredient are added, or the company could not fit everything in that same size". Whatever it is, We will find out soon. For Lets focus on Oppo A7 Price in India and Specification.
Fun Fact: Realme 2 Price is 8.9K- 10.9 K INR and Realme 2 Pro Price is 14k-16k INR in India, Today, So For almost same specification why would anyone will waste extra 5 to 7K? Why Companies couldn't think like us. PUBG 0.9.0 Released So you will need this: What Is XAPK and How To Install XAPK on Android Also Check: Honor Magic 2 Specification, Live Image Leaked Ahead of Launch
Oppo A7 Specification
According to leaked Oppo A7 Specification the phone will have 6.2-inch HD+ (720 x 1520) IPS panel with a waterdrop notch. The display seems nice but it is same as Realme 2. The Phone will be powered by Octa-core 1.8 GHz Cortex-A53 Snapdragon 450 chipset and Adreno 506 GPU. It is expected to be paired with 4GB of RAM and 64GB of memory. Now if the company will update something the RAM and ROM will be the easiest thing so keep ready for any variation. The leaked Oppo A7 Specification also indicates that the phone will have dual Camera setup on the back. The Rear Camera setup will be the combination of 13MP+2MP Camera Sensor. At the front side, There is a 16MP front facing camera perfectly fits in the waterdrop notch. The Oppo A7 will run on Android 8.1 with custem UI. The Phone will get poer from a Non-removable 4230mAh battery. The Phone measures 155.9×75.4×8.1mm (Realme 2=156.2 x 75.6 x 8.2 mm), and weights around 158g. Oppo A7 render image shows Gold Color varient. Now after Oppo A7 Specification Lets move to the Oppo A7 Price in India.
Oppo A7 Price in India and Launch Date
According to leaked report the Oppo A7 Price will be 1599YUAN (230.29 USD) in China Market and it will be Launched on 13th November. There are no details available about the shipment. Now After a quick conversion Oppo A7 Price in India will be 16,839.76 Indian Rupees. Similarly Oppo A7 Price in Pakistan will be around 30,745.66 Pakistani Rupee. and Oppo A7 Price in Bangladesh will be around 19,302.68 Bangladeshi Taka. Oppo A7 launch date is not confirmed yet also the Oppo A7 Price in India and all above countries are not 100% Confirmed yet. We have to wait for the final launch. You May Also Like: OnePlus 6T Performance Report Out Now: All Detail and specification HTC Exodus 1 Blockchain Phone With Zion Cryptocurrency Wallet Source: Slashleak On the basis of the leaks, one thing is sure that Re-branding smartphone with same specification is not good, If the Oppo does this for too long their reputation (if Any) will be harmed. other thing is that "The mind gets bored by eating the same ingredient repeatedly". If it is same that it is not good but if company does some serious up gradation than, at least we can think about once. Read the full article
0 notes
Text
Android Pie 9.0 Update: How To, Smartphones getting Pie Update

Android Pie or Android 9 P is now officially out, it is now out of the beta phase and making its way into the general public. The release of Android 9 pie is one of the proofs that Android as an operating system is now getting better. Android 9 Pie is the most imperforate, comprehensive and consistent version of Android yet. It delivers on many of the promises of Android versions past, bringing us a new navigation system and app overview and more embedded AI than you can poke a stick at. So in this Post first we will provide a list of devices which are getting Android Oreo Update and guide you to Update any smartphone to Android 9.0 Pie. and if Your Smartphone is not listed then don’t worry because we will also provide you a trick to use, feel and experience Android 9.0 Pie in your own Smartphone. So First check your luck and Smartphone in the list Of Smartphones that are getting Oreo Update:
List of Smartphones getting Android 9.0 Pie Update:-
Google Pie Update Google Pixel 2 Google Pixel 2 XL Google Pixel Google Pixel XL Google Nexus 5 Google Nexus 5x Google Nexus 6 Google Nexus 6P Google Nexus 10 Essential Pie Update Essential PH-1 Honor Pie Update Honor 9 Honor View 10 Honor 8 Lite Honor 8 Pro Honor 6X Honor 7X HTC Pie Update HTC U11 HTC U11 Life HTC One M8 Huawei Pie Update Huawei Mate 10 Lite Huawei Mate 10 Huawei Mate 10 Pro Huawei Nova 2i Huawei P8 Lite Huawei P10 Lite Huawei P10 Huawei P20 Huawei P20 Pro Huawei P20 Lite LG Pie Update LG G6 LG V30 LG V40 LG G5 Motorola Pie Update Lenovo Moto Z Moto Z Play Moto G6 Moto G6 Plus Moto G6 Play Moto G5 Moto G5 Plus Moto G5S Moto G5S Plus Moto X4 Moto Z2 Play Moto Z2 Force Moto Z3 Moto Z3 Play Nokia Pie Update Nokia 1 Nokia 2 Nokia 3 Nokia 5 Nokia 6 Nokia 6X Nokia 6 (2018) Nokia 7 Nokia 7 Plus Nokia 8 Nokia 8 Sirocco Oppo Pie Update Oppo R15 Pro OnePlus Pie Update OnePlus 5 OnePlus 5T OnePlus 6 Samsung Pie Update Samsung Galaxy A5 (2017) Samsung Galaxy A3 (2017) Samsung Galaxy S8 Samsung Galaxy S8 Plus Samsung Galaxy Note 8 Samsung Galaxy S9 Samsung Galaxy S9 Plus Sony Pie Update Xperia XZ Premium Xperia XZ2 Xperia XZ2 Compact Xperia XZ2 Premium Xperia XZ1 Xperia XZ1 Compact Xperia XA2 Xperia XA2 Ultra Xperia XA2 Plus Xperia XZ3 Vivo Pie Update Vivo X21
Xiaomi Pie Update
Xiaomi Mi 6 Xiaomi Mi MIX 2 Xiaomi Mi MIX 2S Xiaomi Mi 6X Xiaomi Mi 5 Xiaomi Redmi Note 3 So if your Smartphone is listed here, Than Don’t worry about ” How to Update Smartphone to Android P” Because Either you will receive Automatic Update through OTA Updates or they will provide the guide on ” How to Update your Smartphone UI to Pie Manually”. You just have to keep eyes on their Social Pages and Web sites. Now If your Smartphone is Listed in the above list then you can follow this method to:
Install Android Pie on Any Android Smartphone using OTA update
First of all, Make sure your Smartphone is fully charged or at least 80% charged.And having a good internet connection. Now open your device’s Settings app. Scroll down and go to About Phone Section. Click on Software Updates. Now give it few seconds to check for any software Update for Your Smartphone. If there is any Official Update available for your smartphone it will ask to allow it to download and install automatic Update. After Allowing it, the update should start downloading. Once the Update gets downloaded. The device will automatically flash and reboot into the New Android 9.0 Pie. That’s it. Enjoy the Latest Android 8.0 on your device.
How to Upgrade Smartphone to Android 9.0 Pie Manually :
Follow this Method If : You are having a Rooted Smartphone, and not getting any Android OTA Update Notification after Rooting. There is Any Android 9.0 Pie Custom Rom, Unofficial ROM / Flash File Available For Your Smartphone. There are two ways to Install Android Pie In your Smartphone Manually:- Find and install Any Android Pie Custom ROM Step 1: Find an Android Pie Custom Rom for your Android Smartphone. Step 2: Find and Install Custom recovery on your Smartphone. Step 3: Boot into Recovery Mode. Step 4: Make a Complete Backup. Step 5: Clear Data, Cache, and Dalvik Cache. Step 6: Flash The Custom ROM’s.Zip File. Step 7: After Completion: Reboot. Find any Android Pie Unofficial Update for Your Android Smartphone And Flash it using Andro Root’s three guides (According to your ChipSet) Qualcomm: How to Flash or Manually Upgrade Any Qualcomm Devices Samsung: How to Flash or manually Upgrade Samsung Smartphone MTK: How to Manually Upgrade or Flash Your Android Smartphone How to convert UI of Any Smartphone to Android Pie So in this part of the post, I am going to show you how to update UI of any Smartphone to Android Pie without installing ROM and Updates. Actually, we are installing Pie -style launchers for Android Pie feel in Your Smartphone and hence Your default Android UI will look alike Android Pie without doing any Permanent Changes in your Default Android OS. How to Install and Experience Android Pie Ui in Any Smartphone: Go to your Phone’s Settings. Open Security. Enable Unknown Sources. Now Install one of following Five Pie-style launchers. Rootless Pixel Launcher Nova Launcher Google Now Launcher Launcher 3 Once the App file is successfully installed, press the home button on your phone and choose your installed Launcher. You May Also Like:- How to Surf Anonymously on Android Smartphone How To Unbrick Any Android Smartphone
What is New in Android 9.0 Pie?
In this article, we are looking into the changes that have occur and how much have change and How to install Android 9.0 on your Phone Android Pie 9: Visual changes The first thing you will notice in Android 9 is that its design language Known as material design, has received a visual change. The primary changes are rounded corners, colored icons, and lots more white space. It is now flatter than ever, with even fewer drop shadows than before. Android Pie 9: Navigation Android 9 Pie is now included with the single-button gesture navigation system. It can be toggled on and off in the display, under settings sectionàSwipe on the home button. Note: Android 9 gesture navigation is not going to remain limited to Pixel and Android one devices. Google announced that the Pixel 3 will use it by default and it will be made available to any manufacturers. Android 9 Pie: Adaptive battery life Android Pie 9 has been designed to provide a more steady power supply by using on-device machine learning to figure out the apps you make use of every day and the ones you don’t make use of regularly, The on-device machine learning also figure out the time you make use of each app every day. With a 30% reduction in CPU app wake-ups for apps, adaptive battery help in increasing the battery for a few more hours during the period of testing with devices. Android 9 Pie: Adaptive Brightness The current auto-brightness settings is not good enough – Google. And that is why the phone makers were giving a more power adequate way to calibrate phone screen brightness based on both the environment and learned behavior. Google calls this adaptive brightness and claim 50% of users who tested these Android pie new features have stopped the manual control of brightness. you May Also Like: 20 Cool Things You Didn't Know Your Smartphone Can Do Sony Xperia XZ3 Launched at IFA 2018: Specification & Price Conclusion: So This is the ultimate guide For all of them who are searching on the internet for “How to Update Smartphone to Android Pie “.In this Post we have talked About Smartphones and devices that are getting Android Pie Update, Methods to Update Smartphone to Android Pie (Android 9.0) and Some Pie -style Launchers to give you feel and experience of Android Pie on Any Smartphone.If you have any suggestion and information related to this post Please use the comment section to share with us. Keep visiting and don’t forget to share with others. Read the full article
#Android#AndroidPie#Honor#Huawei#Lenovo#LG#Motorola#OnePlus#Oppo#Samsung#Smartphone#Sony#Vivo#Xiaomi
0 notes
Text
HTC Exodus 1 Blockchain Phone With Zion Cryptocurrency Wallet

HTC launched its first blockchain-focussed smartphone - HTC Exodus 1. The Exodus 1 has some new technology and features such as secure enclave, trusted UI, social key recovery, and more. The company has also developed its own cryptocurrency wallet called Zion. So in this article, we will talk about HTC Exodus 1 Specification and Price.
HTC Exodus 1
HTC Exodus 1 is a newly launched flagship blockchain-focused smartphone. The features of the Exodus 1 include a 6-inch display, Snapdragon 845 SoC, 6GB RAM, dual camera setups, and more. The Most concerned thing about this phone is that " There is no clarity on whether the Exodus 1 will arrive in the Indian market where the government is strict on cryptocurrency usage" . The smartphone is now available with early access for users As per the tweet from the company. The Company as shown below. "Genesis Block. Exodus Phone. This is official early access release to the EXODUS 1. We are inviting a community of developers and enthusiasts to work with us to keep building security. Join us in rebuilding trust together, one phone at a time. Get your early access now!" -- @HTC EXODUS The Company HTC had announced the development of a customized smartphone for the emerging market of cryptocurrencies back in the month of May 2018. The Smartphone has many new cool features like secure enclave, trusted UI, social key recovery, and Zion cryptocurrency wallet. More details of HTC Exodus 1 Specification and Price is given below. Also Check: Honor Magic 2 Specification, Live Image Leaked Ahead of Launch Nokia X7 aka Nokia 7.1 Plus Launched in China; Specification and Price
HTC Exodus 1 specifications
As per the summarized HTC Exodus 1 Specification, The smartphone sports a 6-inch QHD+ display with 18:9 aspect ratio. It is powered by the Qualcomm Snapdragon 845 SoC, paired with 6GB of RAM and 128GB of storage. The single-SIM (Nano) Exodus 1 runs Android Oreo out of the box. The HTC Exodus 1 is having dual rear camera setup of 12-megapixel and 16-megapixel sensors. At the front side, there is also a dual camera setup with 8-megapixel sensors. Connectivity options include in HTC Exodus 1 Specification, The Single sim Phone supports, 4G LTE, Wifi, Bluetooth, GPS, and more common connectivity options. The smartphone gets power from a 3,500mAh battery with HTC Rapid Charger 3.0 fast charging support. The smartphone also comes with an IP68 rating for dust and water resistance. HTC Exodus 1 Cool Features

Now here are some of the cool features of the flagship blockchain-focused smartphone HTC Exodus 1 listed below. The Smartphone has HTC BoomSound Hi-Fi edition and HTC USonic with Active Noise Cancellation for all the Audio. It has to make its new phone function as a hardware cryptocurrency wallet. The Wallet will hold your private keys. Private keys are a line of code which is only known to the owner of the cryptocurrency. Secure Enclave: It is a separate area on the phone's chip. That kept private things separate from the Android OS. Secure Enclave runs on — that uses technology made by SoftBank's Arm Holdings to keep a customer's cryptocurrency safe. HTC Exodus 1 also comes with a "Social Key Recovery" function that lets a user regain access to their funds if they lose their private key via a select number of trusted contacts. Also Check: Honor Magic 2 Specification, Live Image Leaked Ahead of Launch Nokia X7 aka Nokia 7.1 Plus Launched in China; Specification and Price
HTC Exodus 1 Price in India
The Company HTC has priced the Exodus 1 in Ethereum and Bitcoin. You can pre-order HTC Exodus 1 using either of these two coins, at a price of 0.15 Bitcoins or 4.78 Ethereum tokens. After quick conversion, The HTC Exodus 1 is roughly set to $960. Now again a quick conversion The HTC Exodus 1 Price in India is expected near Rs. 75,000. But as you know the Price will go Up and Down, due to the rate changes of cryptocurrencies. The Phone is expected to be shipped in the month of December. But as we said earlier it is not fixed that the phone will arrive in India. So wait and watch what is happening with this unique phone. Thank You for Your Time and Keep Visiting. Read the full article
0 notes