
Don't wanna be here? Send us removal request.
Statistics
We looked inside some of the posts by jag0137rapidproto and here's what we found interesting.
Average Info
Notes Per Post
1
Likes Per Post
1
Reblog Per Post
0
Reply Per Post
0
Time Between Posts
19 hours
Number of Posts By Type
Text
17
Last Seen Tumblr Blogs


Fun Fact
Celebrities use Tumblr as well.
Text
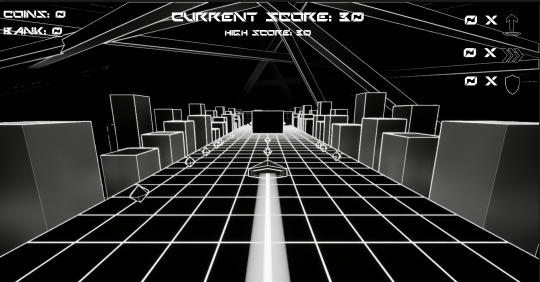
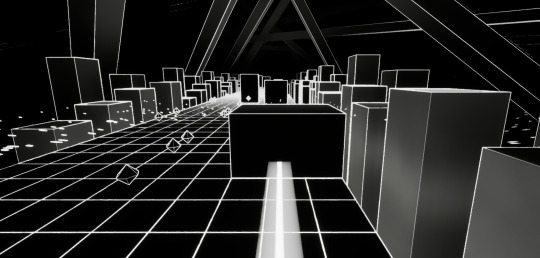
Vertex Velocity - My gameplay video
youtube
Here's my final product for Vertex Velocity! Assessing myself - i'm very sure that I hit my MVP (Minimum Viable Product). My MVP was to simply have the game itself without any powerups or shop system and I personally feel i've stretched myself above and beyond with this project.
Referring back to my project plan, i'd say I followed it accordingly, give or take a few adjustments as I went due to either longer time than expected on a segment or choosing to do another segment first. I think that the project plan helped very greatly in managing my time however, the proof is in the pudding with the complete game.
#games#video games#games design#gamedev#devlog#3d art#ue5#unreal engine#playtest#vertex velocity#Youtube
1 note
·
View note
Text
Final Pieces - Audio!!!
I added a D'N'B type rhythm to my game for the music, to do this in such way for the main map I created this code which muffles the audio after the player dies and returns it back to normal when the player is no longer dead:

For the menu - I used a different piece of the song which has very similar code though it simply plays the sound cue as there is no muffling needed in the main menu!
List of other audio added:
Shooting
Hit effects
Player death
All powerups
UI Sounds
0 notes
Text
Final Pieces - Tweaking the jump
To tweak this, I added a smaller version of the super jump particle system.
The way I did this is interesting, as to prevent the system playing whilst I was mid air I had to create a sort of boolean system to be able to tell if we're moving on the Z axis at all, which looks like this tagged onto the end of Event Tick:
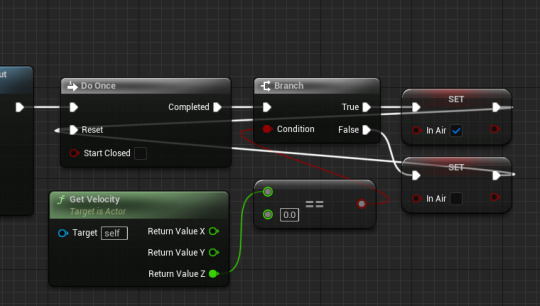
We can then Implement this in the jumping code like so:

Here's how it looks in game (screenshot taken to the best of my ability)

0 notes
Text
Final Pieces - Finishing the HUD fully and creating a Main Menu!
Whilst I was brainstorming ideas for my HUD, I came up with this nice margin design that I used to spice up each of the button rows:

To implement the main menu, I first began by creating a copy of my level and naming it StartScreen.
Inside, I began to prep the level as I wanted my final product here to have a slow scrolling version of the mastertile, as such, I made this level exclusively generate mastertiles, the collectibles to not spawn and for the player to be hidden with speed set to 50.
For the HUD itself, I used the margin template I made with three buttons for play game, controls, and exit. I also put text at the top with a title and subtitle for the screen you are currently acessing.

Alongside this, I created a nice sleek controls menu which matches the aesthetic well!

0 notes
Text
Playtesting part 2 - Focusing on the newly implemented features


Above is 3 responses I got for my most recent additions, I didn't need many questions as a lot of the game is similar to the last playtest, or has been semi-playtested since with the small paragraph inputs.
0 notes
Text
Finally deciding on the name
After lots of putting it off, i've decided to make the name: Vertex Velocity.
Other thoughts behind this name included: Arrowhead Velocity and V-LOCITY. I practically just wanted the word velocity in the name to reflect the fast paced nature of the game and I thought that vertex not only has alliteration if used in the name, but it also coincides with the aesthetical vertexmapped style of the game
0 notes
Text
Completing my HUD aesthetical work
All I simply did here, was swap out my fonts as i'd already picked my layout for the buttons and text when blocking it out previously.
To grab these, I found them on DaFont.net under the names of "Gamecube" and "Techno Hideo"


0 notes
Text
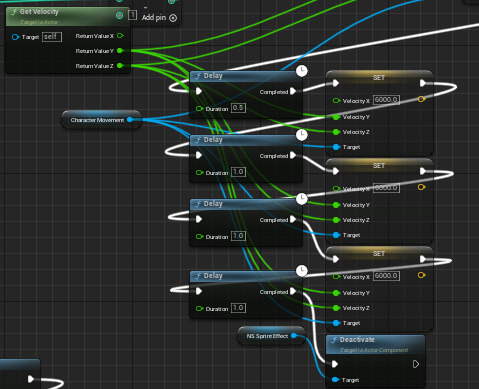
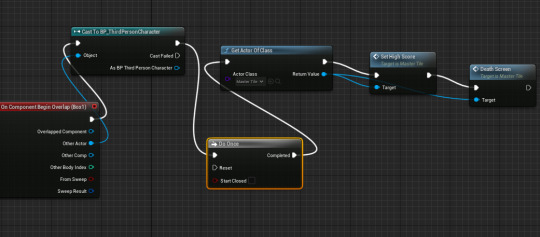
Creating my death animation and sorting out issues
To begin with, I reused the niagara particles from my super jump but this time at a larger scale and split my death screen function into two subfunctions.


Inside the main deathscreen function code was added to hold the player, add the particles and also hide the player mesh
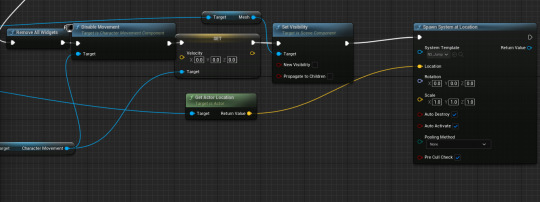
Whilst assembling these on the event graph, I place them apart with a delay in between, with extensive testing however this did NOT work and I couldn't figure out why, I remedied this by taking the second function and just placing it on the event graph to execute and it worked this time. I repeated this step for each tile to get code that looks roughly like so

Ingame, it works perfectly as intended per my original idea, the player explodes, a few seconds elapse and then the game pauses and the death widget shows!
0 notes
Text
Background Level Art

Here's the pipe type level design I took from my old corrupted project, I looked back and referenced my earlier blog posts to get a similar result.
0 notes
Text
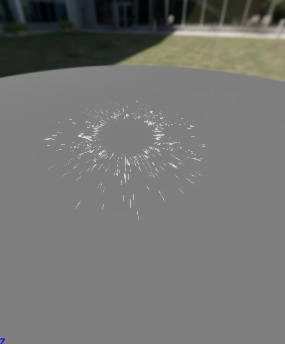
Niagara system for the Super Jump and small update
First off - I was able to fix an issue in which people were experiencing with the boost, because of the fact my boost is done using velocity, it would sometimes encounter glitches when jumping, especially super jumping.
To fix this it was as simple as grabbing the player's current Y velocity and assigning it to each as shown here.
As for the Niagara system, I used a directional burst in place for a small digital shockwave, it explodes outwards using attraction forces.
To implement this, I stringed this piece of code onto the existing super jump code

Here's how it looks ingame!

0 notes
Text
Third Powerup - Last part of the shop!
For my last buyable powerup I decided to create a small spinning shield, I got this idea after asking around briefly for feedback on powerups that people would like to see in game!
To begin, I created a model with 4 low poly spheres with highly emissive materials inside an actor with rotational movement in it.

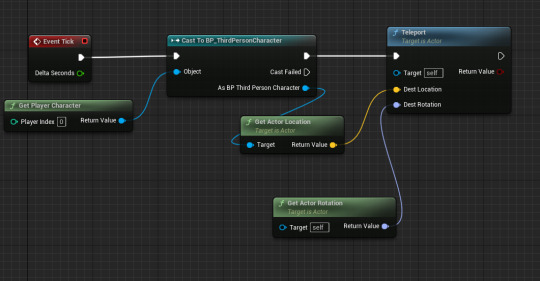
To keep the actor locked to the players ever changing position, I used a method that isn't really standard, however it's what works for me - here's the movement code in which I achieved via constant teleportation:
And here's the code to make the balls blink upon decaying.
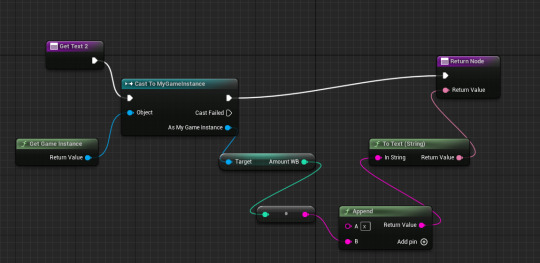
I used the exact same template i've made by now for the bindings of the UI and text, this time the variable inside my game instance is called "Amount WB".


0 notes
Text
Second Powerup - Super Jump
Firstly I modelled an arrow symbol with a small geometric shape underneath it and put it into orthographic view, took a screenshot, brought it into photoshop and turned it into this 2D texture

It's a very odd process of getting these smooth icons, however it works best for me.
Once importing into UE5, similarly to the dash I had to set up each section one by one.
Beginning on the ability itself, in the third person character I created this code which contains the logic behind the jump itself:

The "Amount SJ" variable you see in this was created in my game instance to keep the variable across level reloading.

Then, the bindings in the HUD were as simple as casting to this variable and appending to a string. (Exact same process with the text binding for the amount of super jumps in the shop).

And finally, the code inside the button to give super jumps while taking away money from the bank variable:

0 notes
Text
Creating the boost icon - second attempt
This time i'm a lot happier, I essentially took the 3D model and created a 2D texture out of it by placing it perpendicular to the camera in UE5, taking a screenshot and using the photoshop magic wand tool to erase the edges.
For the pseudo-cell shading effect to match the rest of the aesthetic, I used the stroke tool on photoshop with white to outline each shape.

0 notes
Text
Failed attempt at a boost icon
Here's what my initial idea was for the boost icon design that i've now scrapped. I modelled a triple chevron in blender and imported it into UE5

Afterwards, I placed it inside an actor which I gave rotational movement, and then moved this actor into my first person camera to give the effect of a small spinning icon, It's safe to say I was unhappy with how this ended up looking.

0 notes
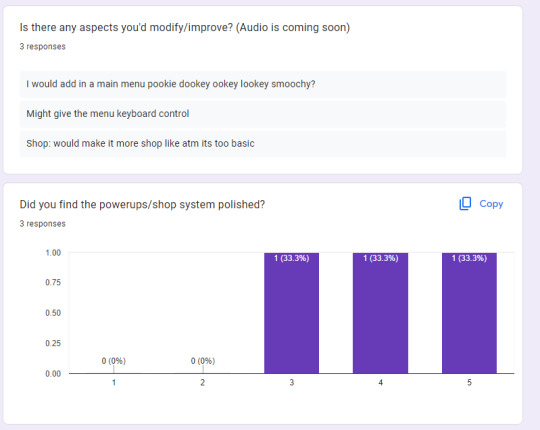
Text
Small Feedback on the shop system
Subject 1 - Rowan: Rowan thought the system was very good and reacted positively, he was able to use it intuitively without any help from me, his suggestion was to change the font and add sounds which I talked about doing in the previous post
Subject 2 - Haydn: Haydn said very similarly to Rowan to freshen up the UI and decorate it, aside from this he stated that the system was polished and he was able to use it without any help
Subject 3 - Adam: Adam brought up the aesthetics like the other 2 - said the shop reminded him of the shop from subway surfers which is what I was aiming for. Able to use without any help.
It's not often I get feedback where all 3 people give essentially the same answer and result, this makes it a lot easier for me to work on.
0 notes
Text
Research into & Making the basis of my Shop System
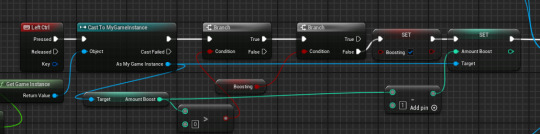
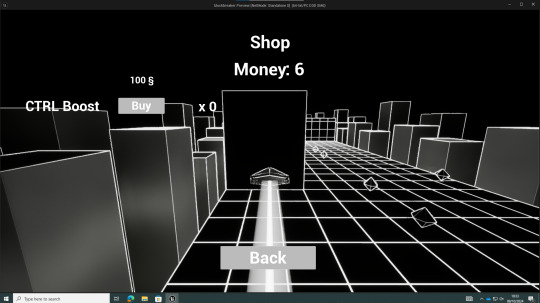
This morning, i've been working on implementing my CTRL boost into a shop system similar to Subway Surfers
I was also rather inspired by RE8 which I looked into for the shop system - one thing I found very interesting about this was the fact that items bought apply over every single game. This doesn't apply to my game specifically but I really loved the concept.

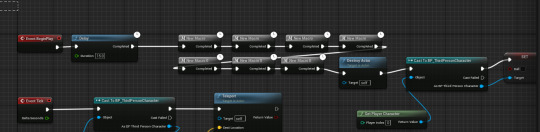
To begin with, I needed to create a new widget to use as the base for this whole system, I began by creating my basic text and bindings as shown here:

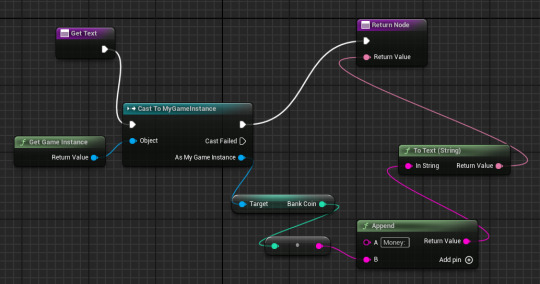
(Money Binding)
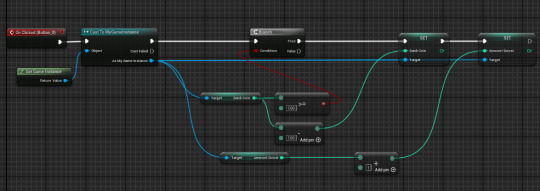
Then, using a new variable I created in my game instance, I modified the boost code itself slightly to decrement the variable, and only work when you have boosts in your inventory.
ERROR TROUBLESHOOTING - While I was on this part, I had to make two variants, the first variant I used a variable inside the player character which would clear upon loading the level. to remedy this as shown I remade it with the variable inside the game instance.
In the shop and death screen widgets, I implemented a two way button system next to switch between the two widgets:

And finally, to create the main bulk of the shop I came up with this template layout for each buyable item.
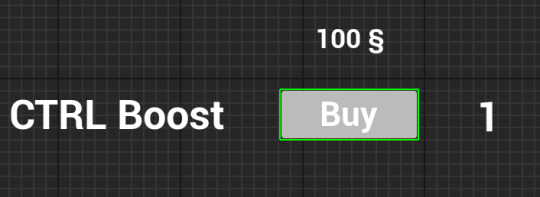
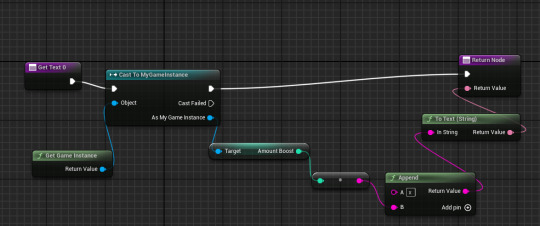
For the number on the side, I created a binding which would take the variable "AmountBoost" from my game instance and append it with an "x", and for the button click, I used the code below which would give me a boost and reduce the money accordingly:
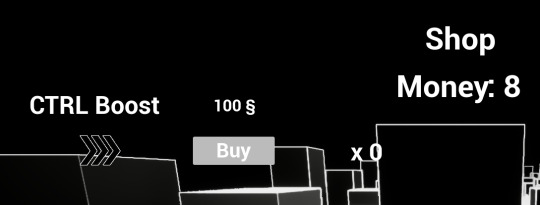
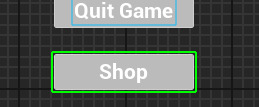
Overall - Ingame the shop looks like this! [ Of course the aesthetics will be accounted for when I overhaul all the UI :) ]
0 notes
Text
Creating my currency system
This was very simple, it's what i'm gonna use to save the coins after each run - I used a variable within a game instance, and made sure to set it after the player dies by adding the current score to the existing value as seen below.

I had to do a slight alteration within the obstacles though, as it would collide twice therefore running the deathscreen function twice making the bank double it's value, this was done by adding a do once gate.
0 notes