
Statistics
We looked inside some of the posts by jamesdyecg and here's what we found interesting.
Average Info
Notes Per Post
1
Likes Per Post
1
Reblog Per Post
0
Reply Per Post
0
Time Between Posts
6 days
Number of Posts By Type
Text
17
Last Seen Tumblr Blogs


Fun Fact
Mobile US users spent an average of 115.8 minutes on Tumblr app monthly.
Text
Final Project Blog - Project Reflection - Over-Estimating my skills
You're not as quick as you think you are...
During this project I have had to adjust the scope a few times, all for various different reasons. The first stems from over-estimating how quickly I could complete certain aspects of this project.
I had planned to complete this M4A3E8 tank model within the first 4 weeks of the project, however, It ended up taking me closer to 10 weeks start to finish.
This wasn't because I worked slowly, but rather, there was a lot more too the project than I first realised.
When I first thought about rigging this vehicle I thought to myself, "It can't be that difficult, I'll schedule an extra week in for it."
Little did I know the complications that came with it, taking me almost a month to get the tank driving, It took me almost 3 days just to get the plugin working!
This wasn't necessarily an issue, as I was still learning a huge amount, and creating a decent amount of work along with it. It was just my eyes being bigger than my stomach, and planning a project that was not realistic to finish.
At the end of the day however, I have still produced an incredible piece of work, that I am very proud of!
I look forward to seeing what I can create in the future
0 notes
Text
Final Project Blog - What I've learnt along the way - Planning for your deliverable
Hindsight is key...
I knew from the very beginning that this asset was going to come with it's challenges. This was something I had never tried before, and I am still learning all kinds of things about the industry.
Making an asset for a still render, verse making it to be rigged requires a different outlook on the pipeline for the asset.
During the modelling stage you have to think ahead,
What parts of this model are going to be rigged?
Do these parts need to be seperate?
Do they need custom origin points for animation?
How will this affect my Tri-count and Texel Density?
These are all things that need to be thought of when creating this sort of asset, aspects that you may not need to worry about if you are just making a still render, as you can position things how you would like, without the need for functionality.#
This is why I've learnt it is important to plan the creation of your asset around your deliverable.
0 notes
Text
Final Project Blog - What I've learnt along the way - Procedural texturing & what to avoid
Throughout the texturing of this asset I experimented with a few different methodologies of texturing within sustance painter.
This included the use of procedurally generated smart materials and maks for dirt and wear.
This is a topic that has long been debated in the industry as to whether procedural materials are a good idea, this is due to the repetitiveness they can create, along with some of the other dangers of using them, I have attached some resources that cover this issue:
youtube
youtube
0 notes
Text
Final Project Blog - What I've learnt along the way - Bake Issues, and how to fix them
Alongside the previous bake fix I came across another issue when creating the bake for my tank.
Even with my meshes split correctly, I found certain areas where creating artefacts around harsh areas of curvature, or similar areas. Unfortunately, this is just a limit of Substance Painters baker as you cannot change the ray distance for certain areas of an object, as opposed to a program like Marmoset in which you can.
There was a relatively simple fix to this however. Exporting the mesh maps from substance and tweaking them in photoshop seemed to be the easiest solution.
Using the clone stamp tool to copy the information from nearby areas to create the most accurate fix possible.
Reimporting these maps into substance then fixed these issues as best as they could.
I have attached a few resources that helped with this:
youtube
youtube
youtube
0 notes
Text
Final Project Blog - What I've learnt along the way - Zbrush Polygroups
As mentioned previously, splitting up your High and Low poly asset is essential for achieving a great bake within Substance Painter, however this became an issue later on within my project.
I was unaware at the start of the sculpting process that I was going to need to split this object up later on, which lead to a lot of manual seaming and splitting to get the highpoly to become two separate objects.
In hindsight however, there is a solution to this. Polygrouping
Zbrush has an option called polygrouping, in which a colour is assigned to each of the objects before you begin sculpting them, this means later on in the project you can split the object by these polygroups, and save yourself a lot of painful experience.
I wish I had known about this before I started sculpting, but I'm glad I have discovered this for the future, here are some helpful resources regarding polygroups:
youtube
youtube
0 notes
Text
Final Project Blog - What I've learnt along the way - Baking by Mesh Name (Substance Painter)
One issue I had when it came to baking the high-poly version of my Tank onto my Low-poly was objects bleeding onto others whilst baking.
By this I mean small object, such as handles or lights would create a bake 'shadow' onto the normal and AO map, as the rays cast by the baker are blocked by these object whilst trying to reach the main surface below.

This image provides a perfect example of the issue, in the first image you can see the bolt is bleeding over onto the body behind it, this is because the rays are being caught by it during the bake process.
The solution however os to split the two parts into separate objects, with correct suffixes (_Low _High_) and enabling bake by mesh name within substance painter.
This will bake the objects as separate pieces, and the 'shadow' created by the bolt is no longer an issue.
This is an issue I came across whilst trying to bake my tank, however using this solution I was able to solve the problem.
The article this image is taken from is very helpful for gaining a better understanding of this:
0 notes
Text
Final Project Blog - Forefront of the Industry - Creating an Aiming Laser with Narrative Texturing

One vital part of creating a believable material for an asset comes with narrative texturing, this 80.LV articles created by Dmytro Mykhailyk is an excellent example of this, and very informative!
0 notes
Text
Final Project Blog - Forefront of the Industry - Creating a Weathered Car in ZBrush, Blender & Substance 3D Painter

François Larrieu shared the workflow behind the Toyota FJ60 Offroad project, explained how the rust was made, and showed the rendering setup in Marmoset Toolbag 4.
This is another great article I found on 80.LV, go checck it out!
1 note
·
View note
Text
Final Project Blog - Forefront of the Industry - Making T-90A Tank in Blender & Substance 3D Painter

Artist Konstantin Yadevich posed an excellent article on 80.LV explaining his process in creating a very realistic looking T90A Tank asset, it is definitely worth a read, and can be found here:
0 notes
Text
Final Project Blog - Forefront of the Industry - Trim Sheets
Tileables and Trims
Trim sheets are certainly not a new concept to those of us in the environment art sector, however, they are something that I have overlooked for many years. Now I am creating more environment art however, they have proven extremely useful in reducing unique material numbers, and creating consistent texel density across an asset.
There are many useful videos regarding trim sheets, which will do a lot better job at explaining them than I can, a few of these examples are listed below:
youtube
youtube
youtube
youtube
0 notes
Text
Final Project Blog - Forefront of the Industry - Bent Normal Baking
Bent Normals
Within the latest release of Substance Painter, the addition of baking parameter titles "Bent Normals" has been added, but what exactly is this? and what does it do?
Essentially, this bake is very similar to that of Normal Baking, aside from one major difference, Normal baking uses raycast from every direction to project the detail of a high poly mesh onto a low-poly asset, Bent Normal baking takes into account the use of the Ambient Occlusion map, this allows the baker to generate a Normal Map based on where the light is most likely to bounce according to the Ambient Occlusion Map. This can then be used in a game engine to determine where occluded reflections are based on view direction, making your object look more correct, a very cheap way of faking better lighting and reflections.
This video provides a perfect example of how this can be used to generate a realsitic effect:
youtube
0 notes
Text
Final Project Blog - Forefront of the Industry - High Poly Floaters
A baking process sent from heaven
One issue that comes to mind when creating high-poly objects with the intent of baking them to a low-poly is clean shading. N-Gons or excessive triangulation can cause shading to appear bad, with noticeable artefacts. This is most noticeable when shapes such as cylinders are added to the middle of curved surfaces, for example, bolts or rivets. Adding these objects into the middle of the mesh can require some serious triangulation to fit into place, and can often deform the surface of the mesh, and create horrible shading.
There is however, a solution. High Poly floaters.
In essence you create whatever shape you need, whether that be a nut or a screw, as a seperate object, you then place this object where you want it to be included in the mesh, but do not connect it to the geometry.
As long as your raycast is set to a high enough distance when baking, this bolt will be projected onto the surface of your low-poly, along with the rest of the high-poly mesh, creating the appearance that it is connected. Fixing the bad shading issues caused previously. A few examples of this are below:
youtube
0 notes
Text
Final Project Blog - Forefront of the Industry - Mid Poly Baking
- Introduction -
As I have continued throughout my Final Project here at UH, I have spent time researching various new techniques which artists are using to push there work to the next level, in these blog posts titles "Forefront of the Industry" I will go over some of the examples I have discovered
Mid Poly Baking
Baking an object, whether it be in substance painter or any other equivalent program is a fine art. Often the low-poly version of the asset has such little geometry that baking can create artifacting, which can result in a poor looking bake. To combat this, a method known as "mid-poly baking" can be used. Essentially, creating a second alternative to your low poly, with a slightly increased edge loop count is created, the high-poly is then baked onto this, creating a nice bake, aftwards, these normals are then projected onto the original low-poly, yielding much better results. An example of this can be found below:
0 notes
Text
Practice 2: Final Project Planning - 12 - Dissemination
As I have mentioned, I will be continually blogging throughout the entirety of this project, this will allow me to keep a public record of my progress, creative decisions, etc. As well as serve as a form of Dissemination, as I will share this blog with any potential employers, as well as on my portfolio. On top of this, I intend to Live-stream my work on the streaming platform Twitch.tv, this is for a variety of reasons, including:
Recordings of the work process – can be processed into time-lapse videos, useful for promotion
Live Dissemination – Industry professionals can join at any point, ask questions, and provide feedback!
A sense of motivation – Sometimes It is difficult to remain focused 100% of the time, streaming will create a sense of ‘accountability’ as the recordings will show whether or not I continued working.
I will not broadcast any sensitive data or anything that has been provided by the University of Hertfordshire. Only common software (Blender, Substance, PS, Unreal Engine, etc.)
0 notes
Text
Practice 2: Final Project Planning - 11 - Time-management & Organisation
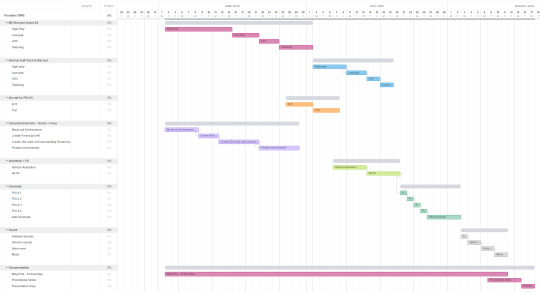
Keeping well organised and on-task is always a struggle, It is difficult to accurately estimate exactly how long particular parts of the process will take. With this in mind, I am using a variety of organisation techniques to keep on track including:
• Trello – To keep track of assets progress and assets remaining • Gantt Chart – To plan as accurately as possible time allocation for each part of the process • File structure – Ensuring a simple and uniform naming convention is used to keep all files organised and easy to sort • Blog – Posting regularly to track progress
Below you can see my Gantt chart as it currently stands:
0 notes
Text
Practice 2: Final Project Planning - 10 - Music & Sound
A variety of sounds will be used in this cinematic, including but not limited to: • Tank engines • Tank tracks on dirt • Ambient sounds (nature, wind, etc.) • Ambient fire sounds from burning wreckage • Flak and Aeroplane sounds • Any other ambient sounds deemed necessary
On top of this, I intend to use a voice-over for the cinematic, a voice actor reading several diary entries from one of the tank crew, as well as the use of subtle music to invoke a cinematic feel. Whilst sound triggers can be added inside Unreal Engine, it is more likely that most if not all of the sounds will be added in post-production.
0 notes
Text
Practice 2: Final Project Planning - 8 - Animation
There will be a few different animations required in order to make this cinematic realistic. Firstly, the tank tracks and suspension will need to move and form over any terrain it passes over. This is a tricky challenge, there are a few ways this could be achieved. Through simulation, using either an existing plugin or creating my own, that calculates how to move the suspension over the terrain.
Or the second option, albeit much simpler, animate each bit of suspension visible to the camera individually. This method would only work for this desired purpose, but may save a huge amount of time, as trying to implement physics to the suspension may be difficult.
Other animations may include:
Any loose parts on the tank moving as the tank moves over terrain (open hatches, bags, etc.)
Ambient character movement, so they aren’t static objects
Aeroplane movement at P.O.I No. 3
Bow gun (likely to move as bow gunner would be holding it)
Hatches and crew, closing toward the end of the scene
Possibly Turret, although unlikely, as they kept them straight whilst driving out of combat It’s hard to tell exactly what animation will be needed, they should, however, be fairly easy to implement, as nothing too complicated is happening.
0 notes