
Don't wanna be here? Send us removal request.
Statistics
We looked inside some of the posts by jeremyburge and here's what we found interesting.
Average Info
Notes Per Post
10
Likes Per Post
7
Reblog Per Post
1
Reply Per Post
2
Time Between Posts
3 months
Number of Posts By Type
Text
6
Photo
11
Last Seen Tumblr Blogs


Fun Fact
Kazakhstan’s Minister of Communications and Informatics has blocked the Tumblr site because it contained 60 sites of terrorism, extremism, and pornography in 2015.
Text

Appearance: Saturday Morning on Radio New Zealand
Talking with Kim Hill on RNZ from my narrowboat in the UK.
We touched on controversial emojis, exploding head horses, and having the longest introduction to any interview I've ever had.
instagram
instagram
instagram
0 notes
Text
Appearance: Ologies with Alie Ward
This was a fun one, recording with Alie Ward in Los Angeles, covering all kinds of interesting circumstances that came up in my time running Emojipedia.
oh and as we recorded in person, Gremmie (🐶) did an excellent job producing / being fluffy.

It's a two-part episode, and also features Jennifer Daniel (head of emoji at Google) and Keith Broni (editor in chief at Emojipedia) released in time for World Emoji Day. Enjoy!
A few clips can be found below.
Thanks to Alie for having me on, and all the dedicated Ologies listeners who got in touch after this was published.
instagram
instagram
0 notes
Text
Appearance: Clockwise
I was on this week's episode of Clockwise ("four tech topics, 30 minutes") with Dan Moren, Mikah Sargent, and Abrar Al-Heeti. Here's the rundown:
Whether we'd be comfortable in a driverless taxi, our thoughts on the U.S. Surgeon General's advisory regarding kids and social media, using Final Cut Pro and Logic Pro on the iPad, and the last time technology blew us away.
For me, the last piece of technology that blew me away was the "Bold Glamour" filter on TikTok. It's not that we haven't had beauty filters improving over time, it's just that seeing these next-level filters working in real time is something that is hard to describe.
...oh and a bonus topic from Mikah broke how my brain works:
instagram
0 notes
Text

Appearance: ABC Melbourne
With Lisa Leong on my sometimes-local station, ostensibly there to discuss the coronation and their PR team's emoji attempt.
But we also covered some other fun stuff like when one of the police forces in the UK reached out to help decipher an intercepted message.
instagram
0 notes
Photo
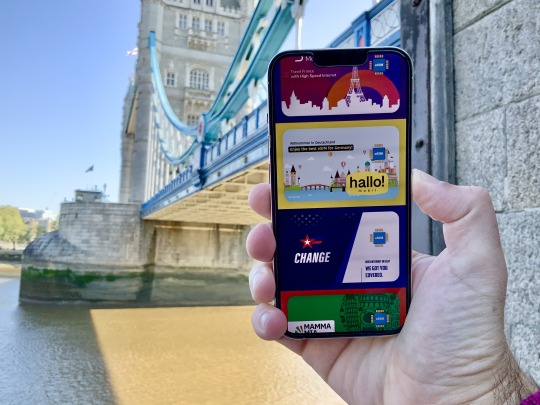
Why eSIM is my new best friend
Data roaming fees are my enemy.
Alternative title: How and why to install an eSIM to save money on data roaming fees when overseas. Especially useful if you have an iPhone 14 with no SIM Tray.
I’ll keep this brief. People travelling overseas often fall into two categories:
1. Pay whatever your phone carrier lots of $$ for data roaming 🤑💸 2. Buy a local SIM card at the airport or downtown after arriving 🤓🏙
The first is easy, but costly. The second is sensible, but can be time consuming.
There’s a much better option that now exists; and middle-ground that is easy enough, and cheap enough, that you should consider.
As of 2022, every new iPhone and lots of medium or high end Android phones support my new best friend:
3. eSIM. Buy data online, in-app, before even arriving at your overseas destination. Keep your SIM in the slot. No payment to my enemy (data roaming fees) 🤩🤳
There’s lots of ways to do this, but if you’re reading now from the departure lounge of an airport or train station and want to dive right in, here’s my recommendation:
Search the App Store or Google Play Store for the Airalo app
Choose your data pack (1GB for $5 USD or 10GB for $18USD)
Follow instructions to install
Activate eSIM when you’ve arrived at your destination
🌟 Optional Bonus: receive a $3 USD sign-up credit by using this link to register, or type my referral code in the app: JEREMY0461
I also get a $3 credit when you use this link, but that’s not why I’m recommending this to you. There are lots of ways to buy eSIMs (in other apps, or in stores using printed QR codes), but personally this is the best I’ve used so far.
If there’s apps or services you find easier or cheaper, do let me know!

Airalo accepts Apple Pay, Google Pay, PayPal or regular credit card payment.
The best part of using an eSIM when travelling? You can leave your regular SIM in your phone, using it for phone calls (if you wish), iMessage, or any other service.
No more forcing your SIM behind your phone case so you don’t lose it when you get back home.

With Airalo’s signup referral credit, you can buy a 1GB pack for $2 USD to test the service out before committing to a larger purchase.
Eventually, every SIM will be an eSIM. But for now, they’re a great option for the efficient traveller, especially when your enemies are after you.
My notes on eSIM use using Airalo
📲 Installing an eSIM takes more steps than a physical SIM, especially as it’s a second line. While apps like Airalo give great instructions, this could be simplified in future.
💵 A rate of $18 USD for 10GB in most countries is much cheaper than many data roaming rates, but won’t beat a local SIM for value in some countries.
🇪🇺 UK residents, having recently lost much of their free EU roaming due to Brexit, still often get up to 20GB free EU roaming on some plans. However once that runs out, this is a nice way to top up.
🛫 I recently visited Turkey and found the ability to buy an eSIM before even landing in the country to be useful. If you start running low on data, you can buy more before the current pack runs out. It is seamless.
🤷 For reasons unknown to me, Apple has a built-in interface to buy eSIM plans on iPad, but not iPhone. I have found Airalo much more reliable than Apple’s iPad option, and non-existent iPhone option.
👽 I haven’t tested Airalo on Android, but see no reason it shouldn’t work the same way.
🪧 You won’t recognise the name of any of these providers. The names and brands are made up, as best as I can tell, by Airalo.
🔄 Tapping any Airalo eSIM option will outline which network it will connect you to. For example, visitors to the UK will be assigned O2, but only on the 4G spectrum. This is normal, where carriers like to keep their latest-and-greatest networks for their own customers, not resellers of their network (known as MVNOs). As such, if you need a specific network for speed or coverage reasons, this might not suit you.
📶 You can leave both your physical SIM and eSIM active at the same time, and even get two status bars showing both lines. It’s the default option, having both lines active.
🪫 I did notice a small amount of additional battery drain from leaving both active. My decision was to simply disable my physical SIM while overseas (who needs phone calls anyway, right?)
------------
Here’s how it looks when you have two active SIMs running at the same time. For instance, your SIM (or eSIM) from home open for SMS, and your local Airalo eSIM for data:

--------
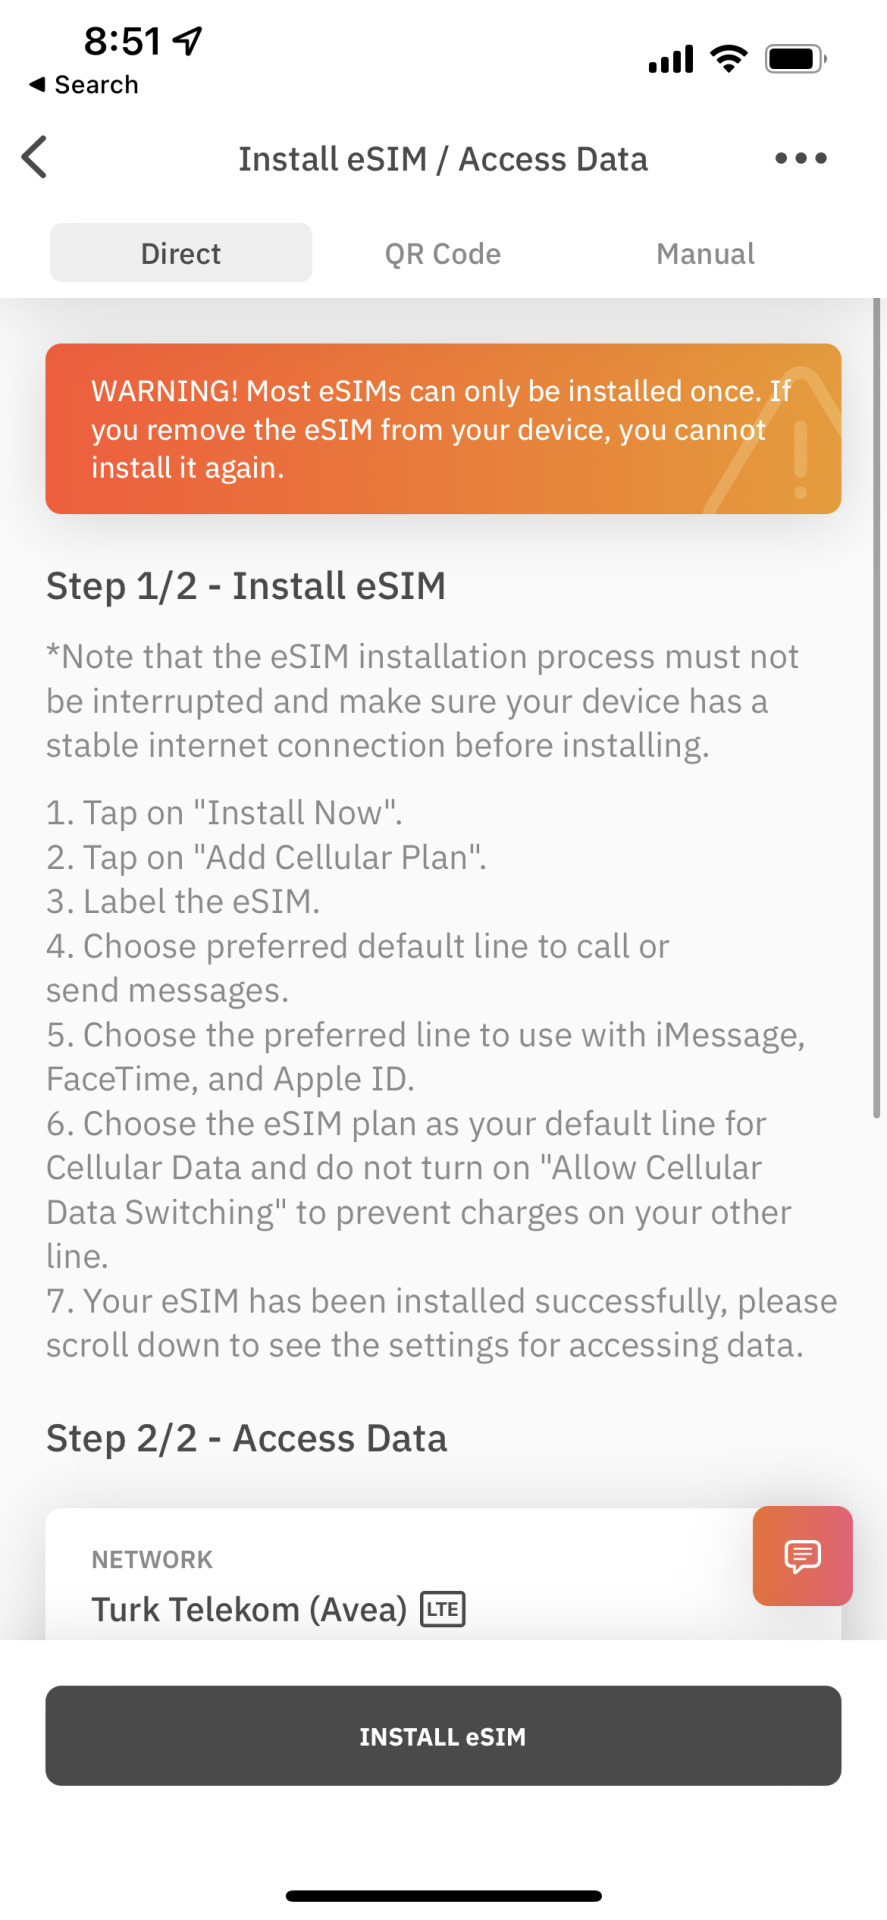
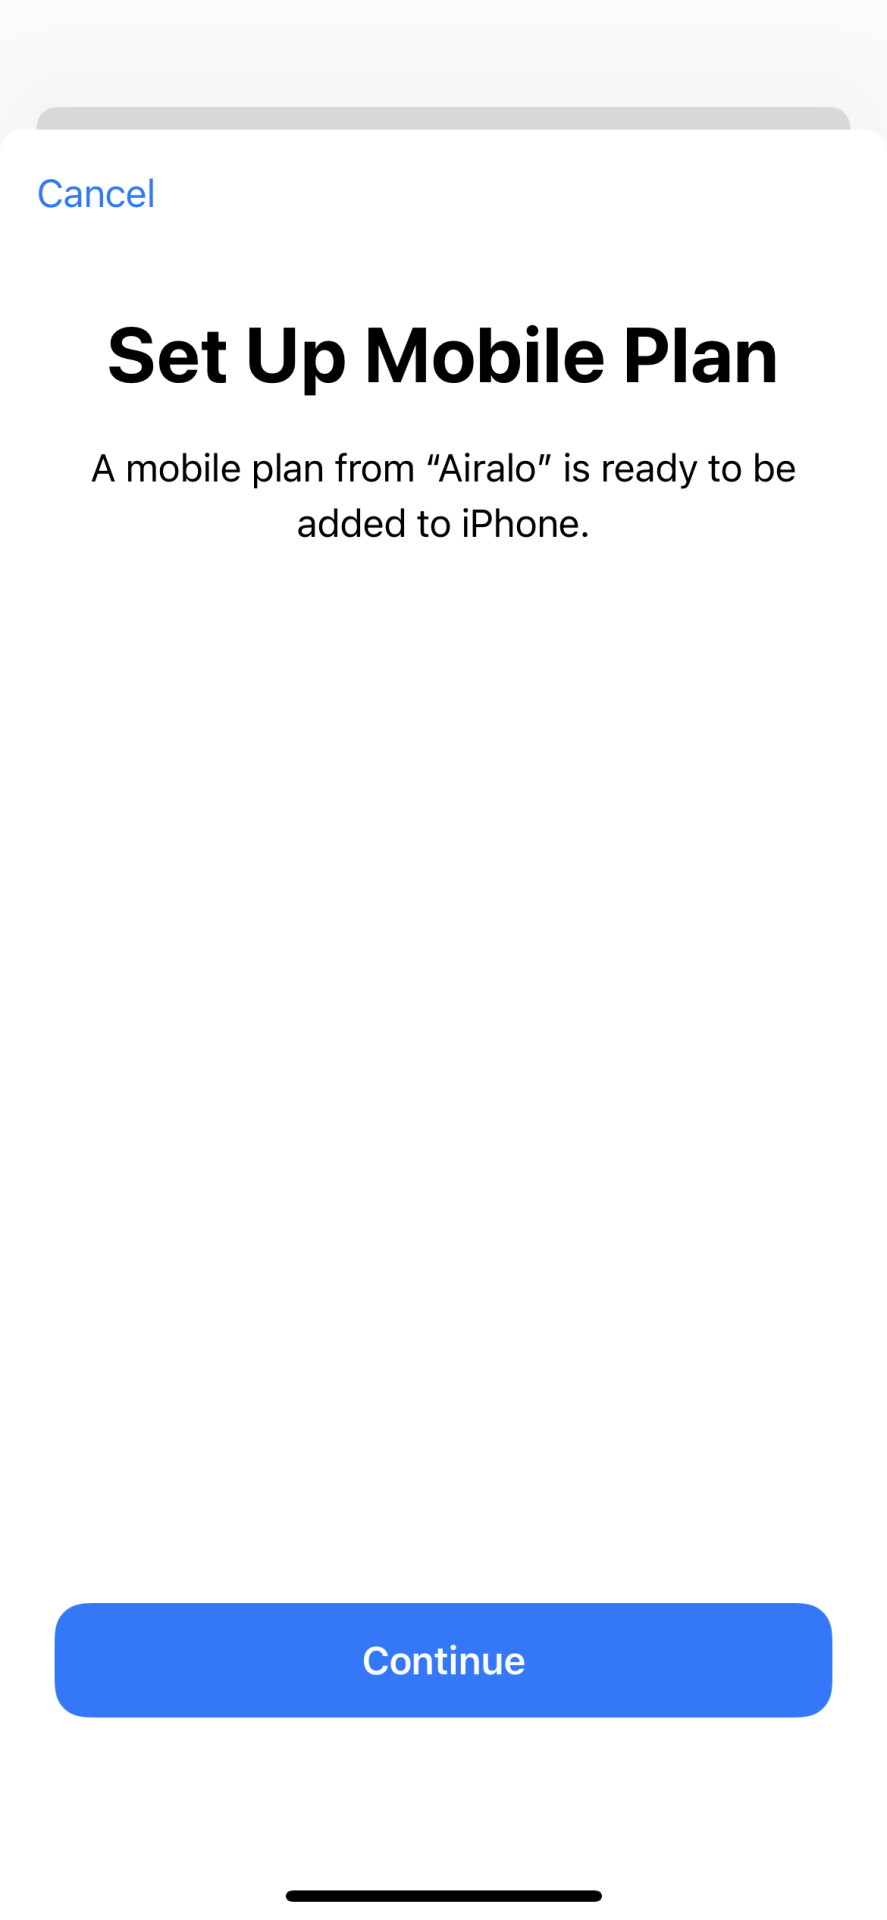
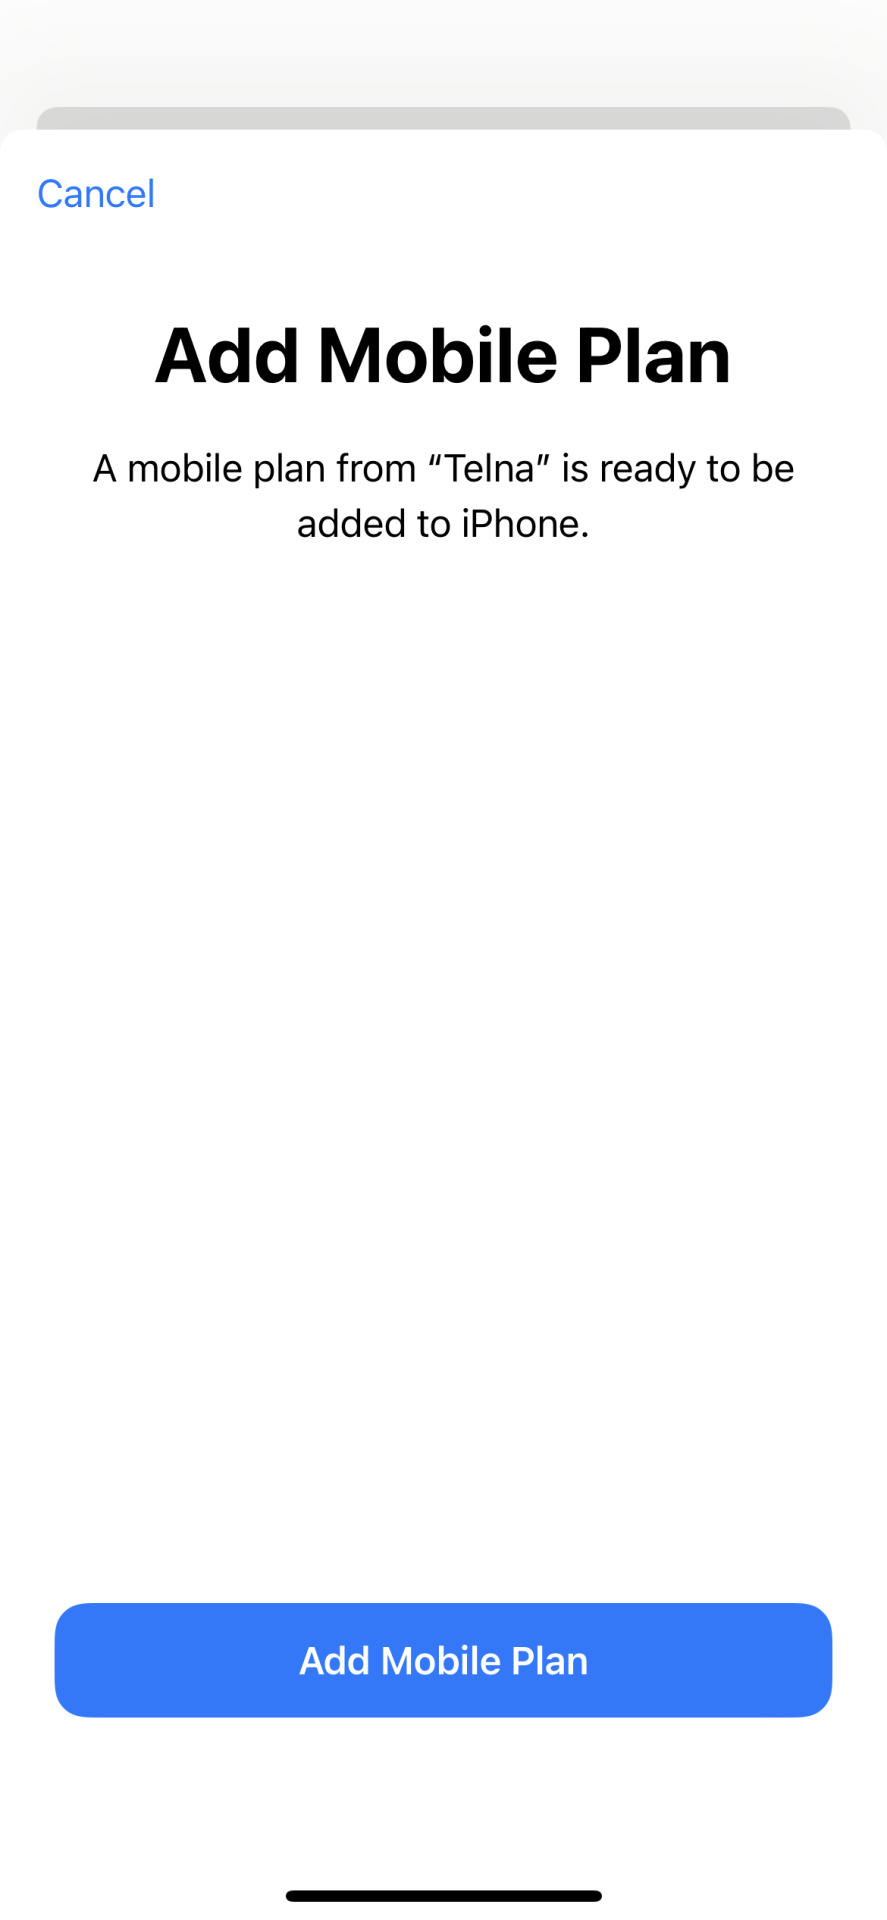
Below is a guide to every step of the Airalo eSIM setup on iPhone.
Step by Step
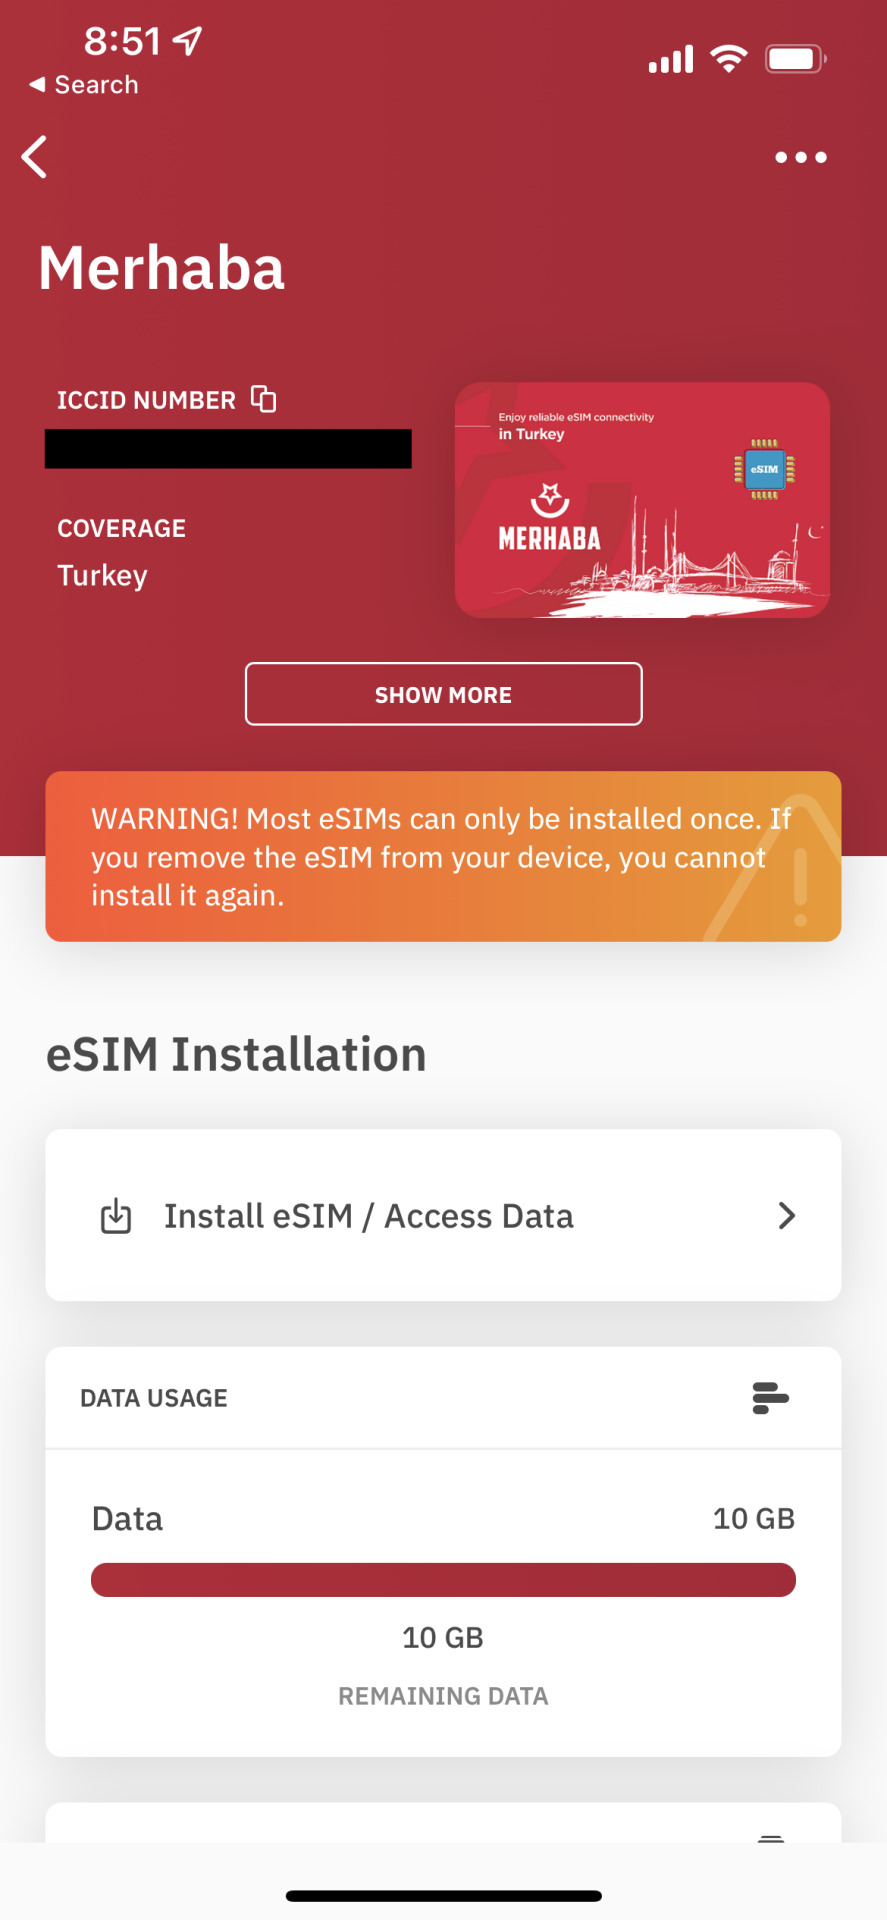
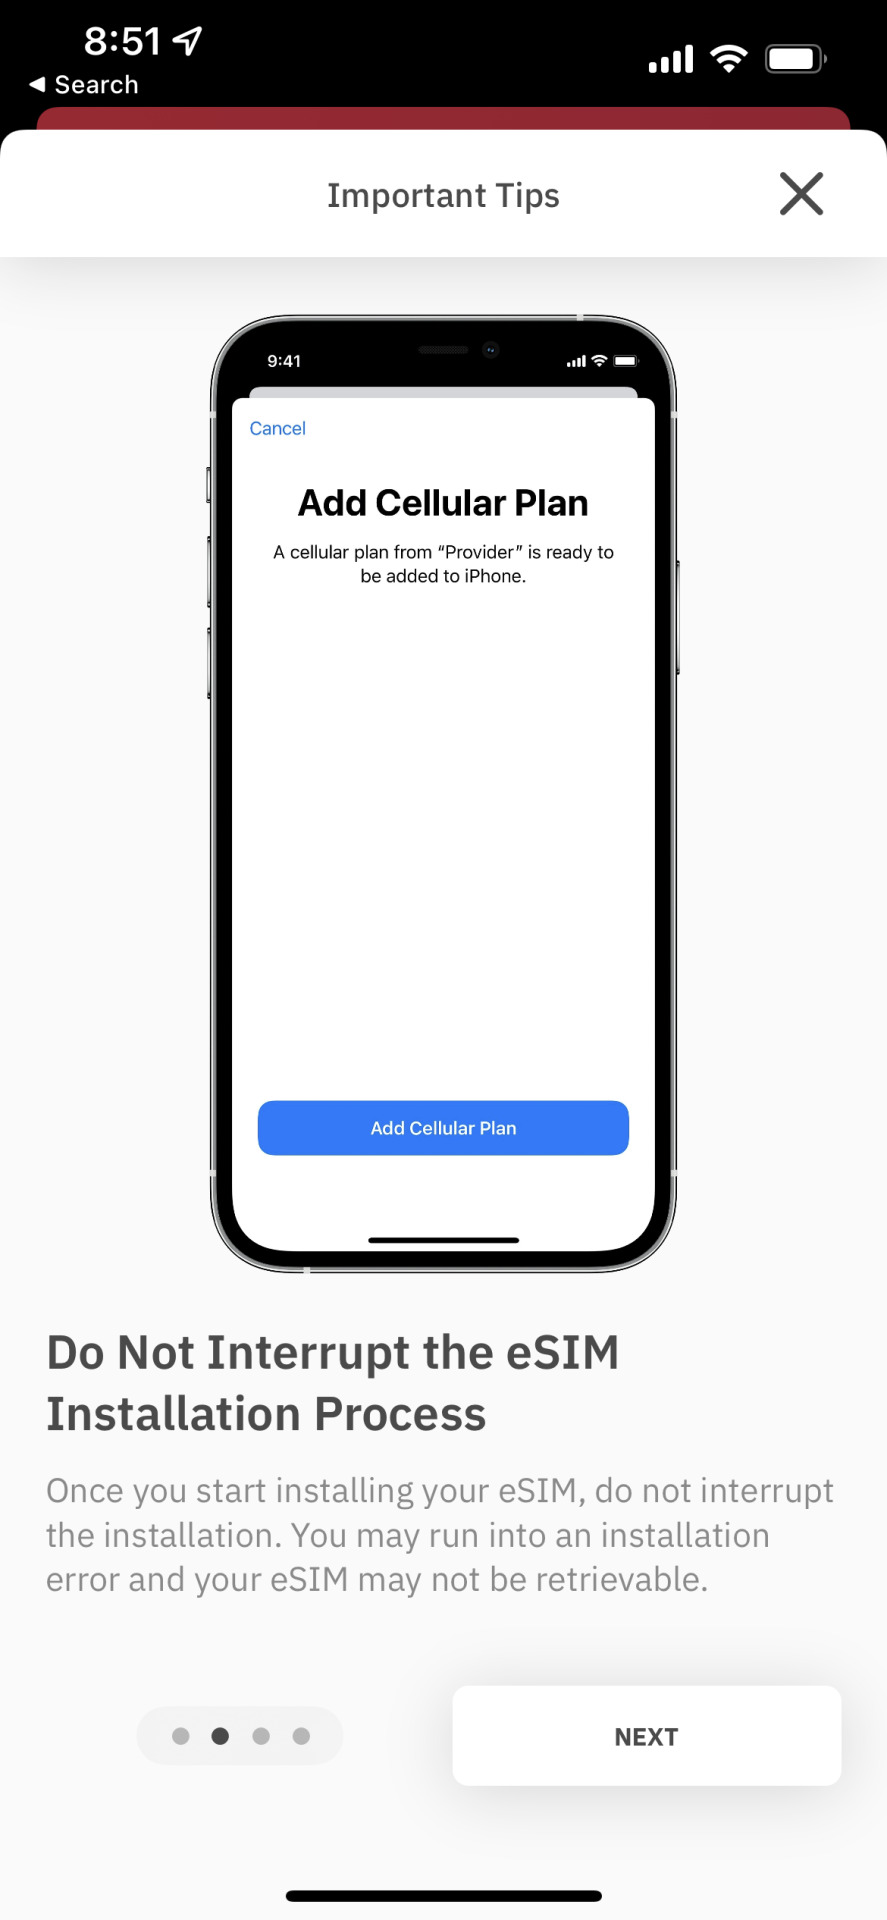
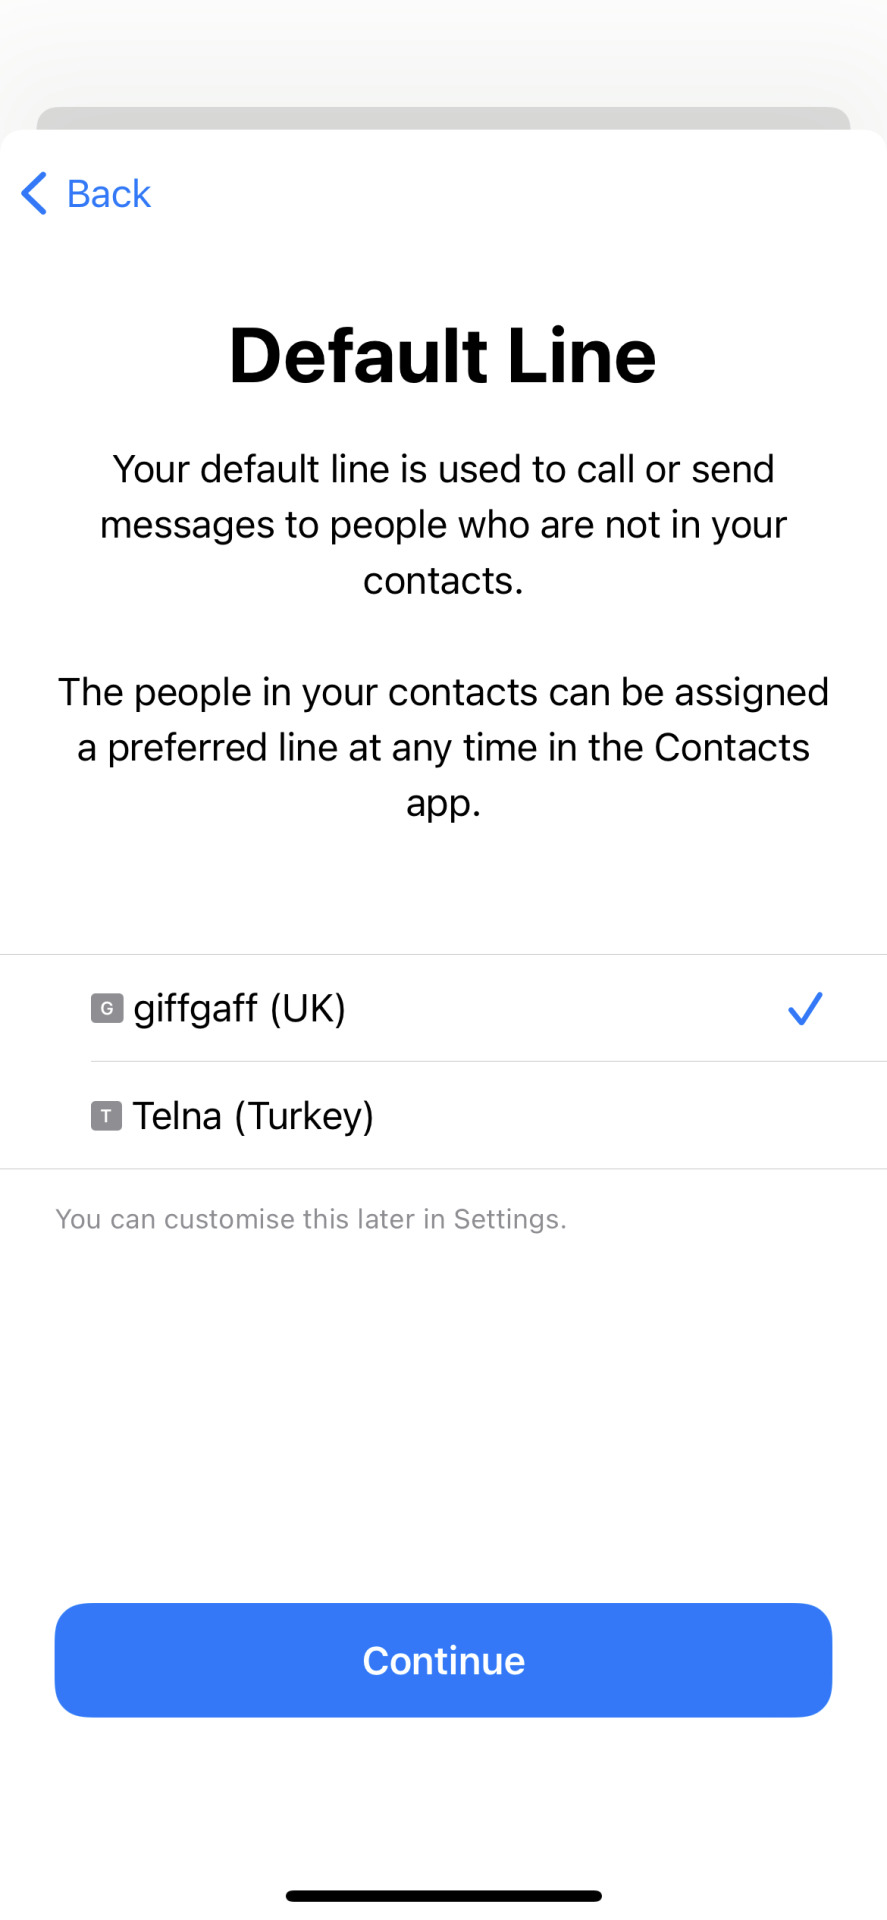
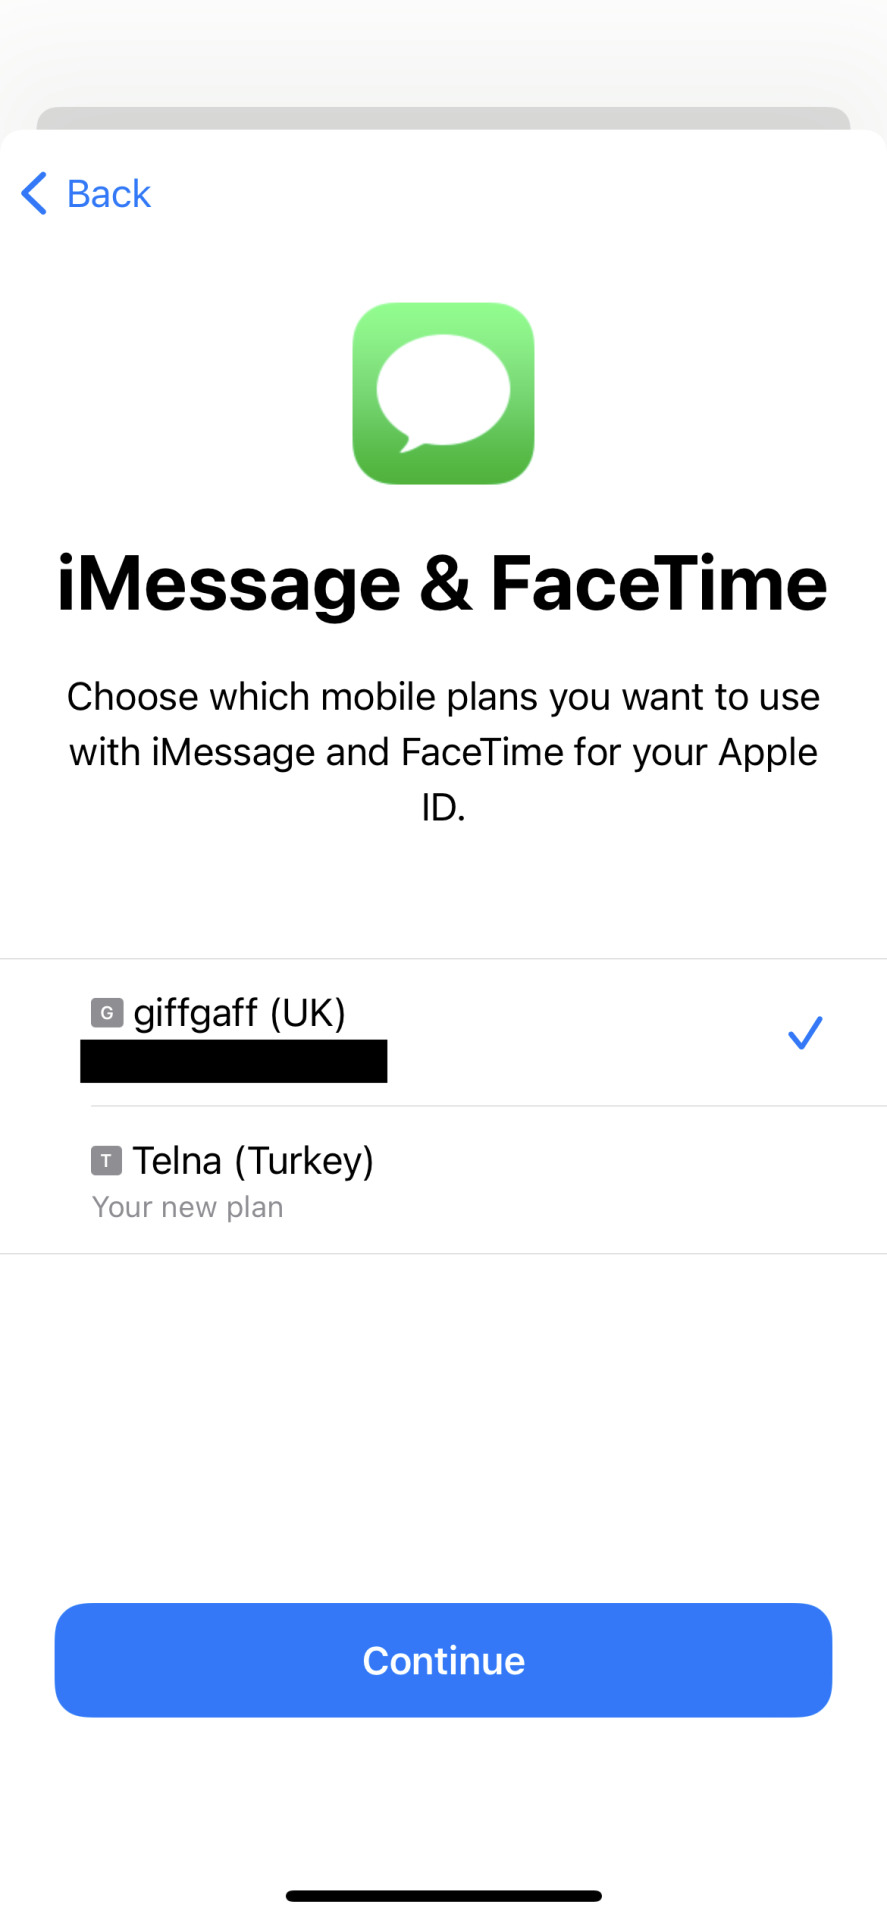
For full context, here are the exact screens I encountered when buying and setting up my Airalo eSIM in Turkey for the first time, with 10GB data.
You’ll note that iOS provides options to choose which line to use for calls, iMessage, or data. The defaults effectively route data over the eSIM, and everything else
---
Step 1: Check out
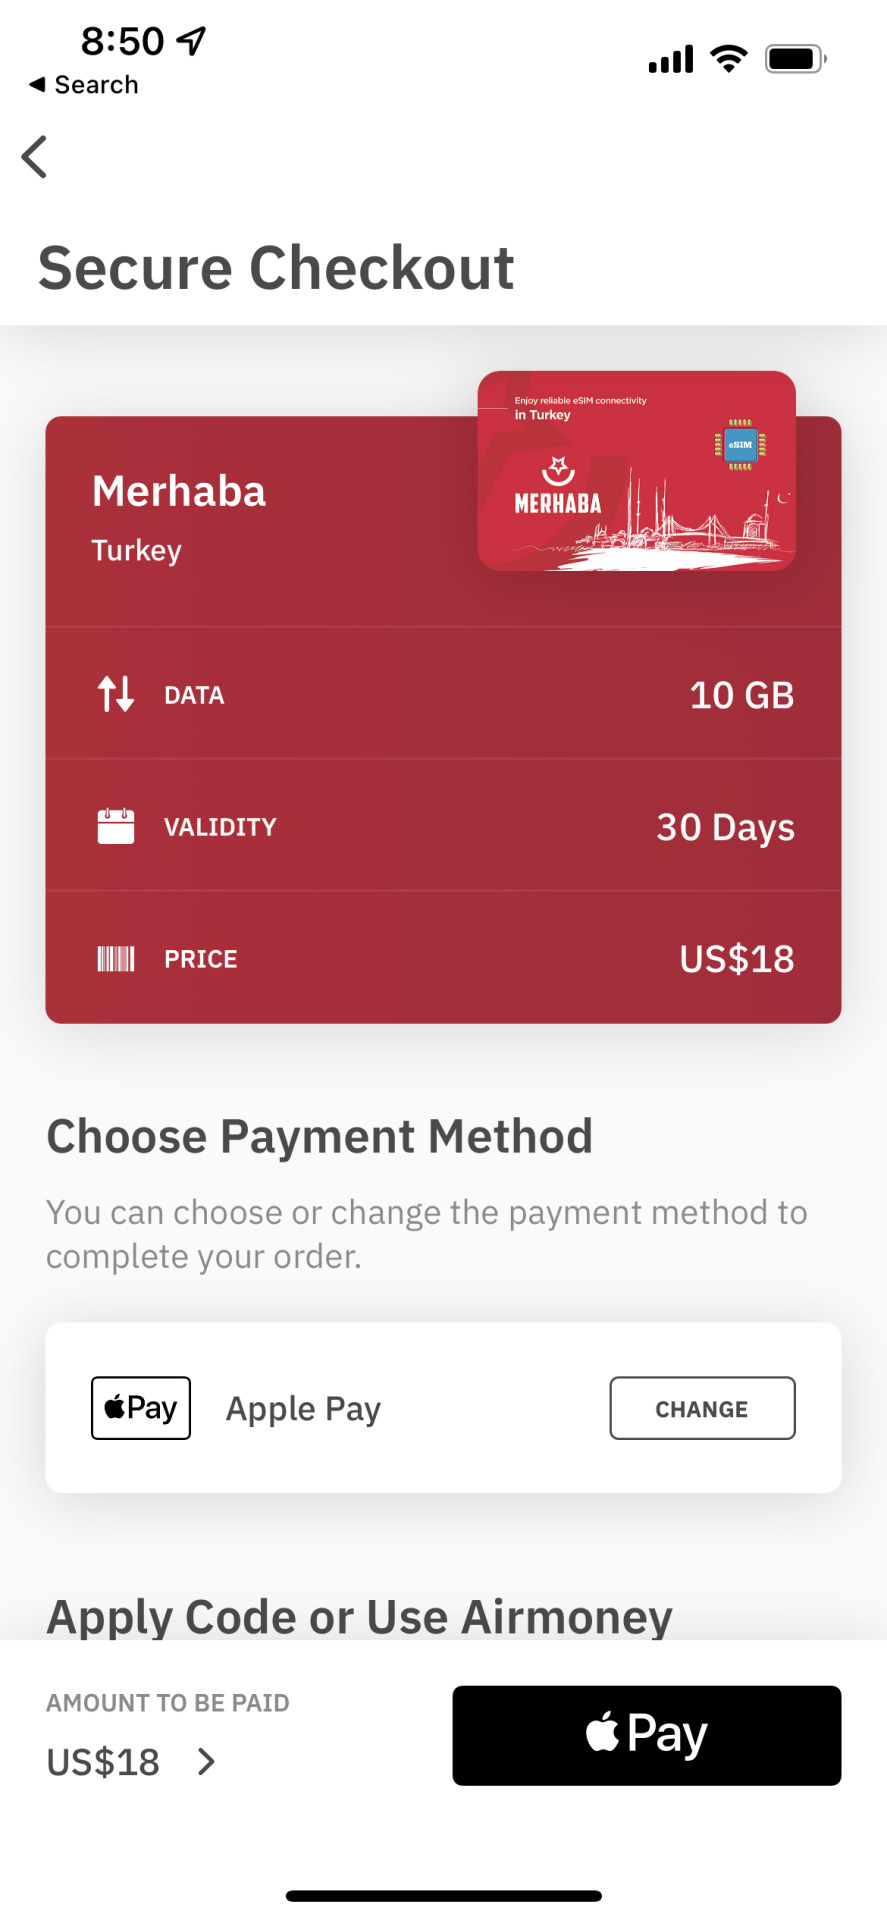
---
Step 2: Order confirmation

---
Step 3: A button appears to install the eSIM after purchase
---
Step 4: a few pages of tips provided by Airalo

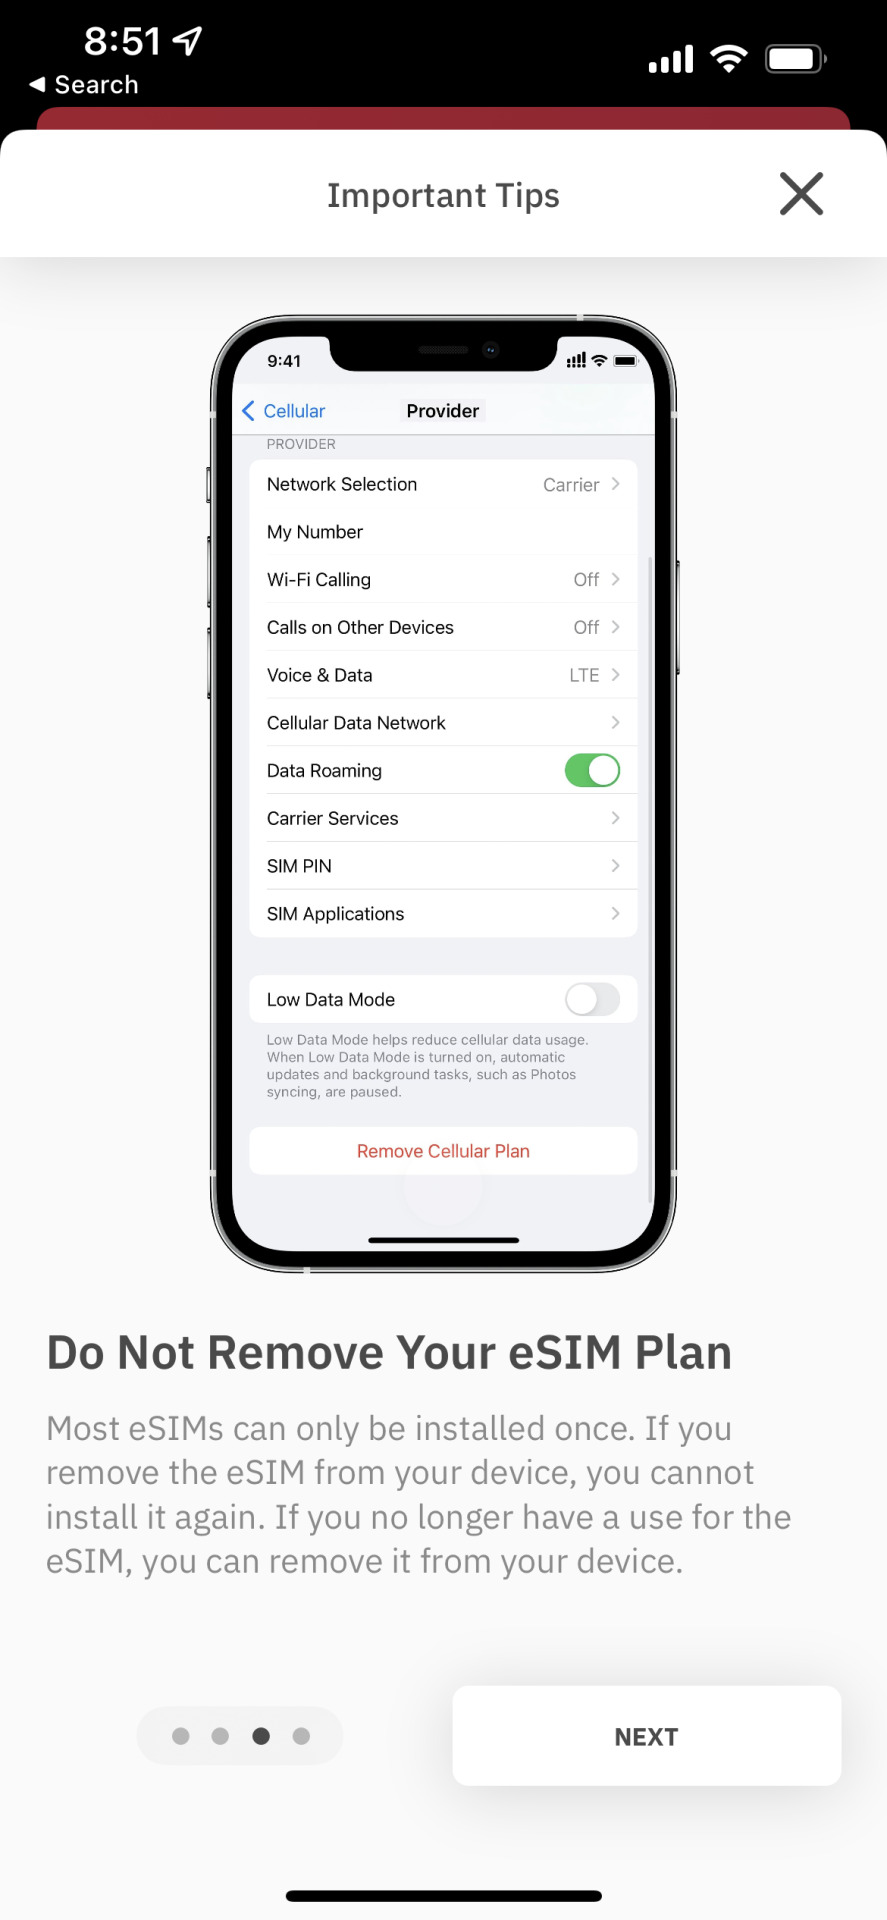

---
Step 5: More instructions reiterating the previous visual guide. Tap “Install eSIM” to continue and actually get this data on the road!
---
Step 6: iOS prompts the eSIM installation
---
Step 7: this screen seems a bit redundant and could be merged with the previous one.
---
Step 8: You could label your SIMS “home” and “away” or anything you’ll remember later on. This would likely be more important if you could install more than on eSIM at a time.
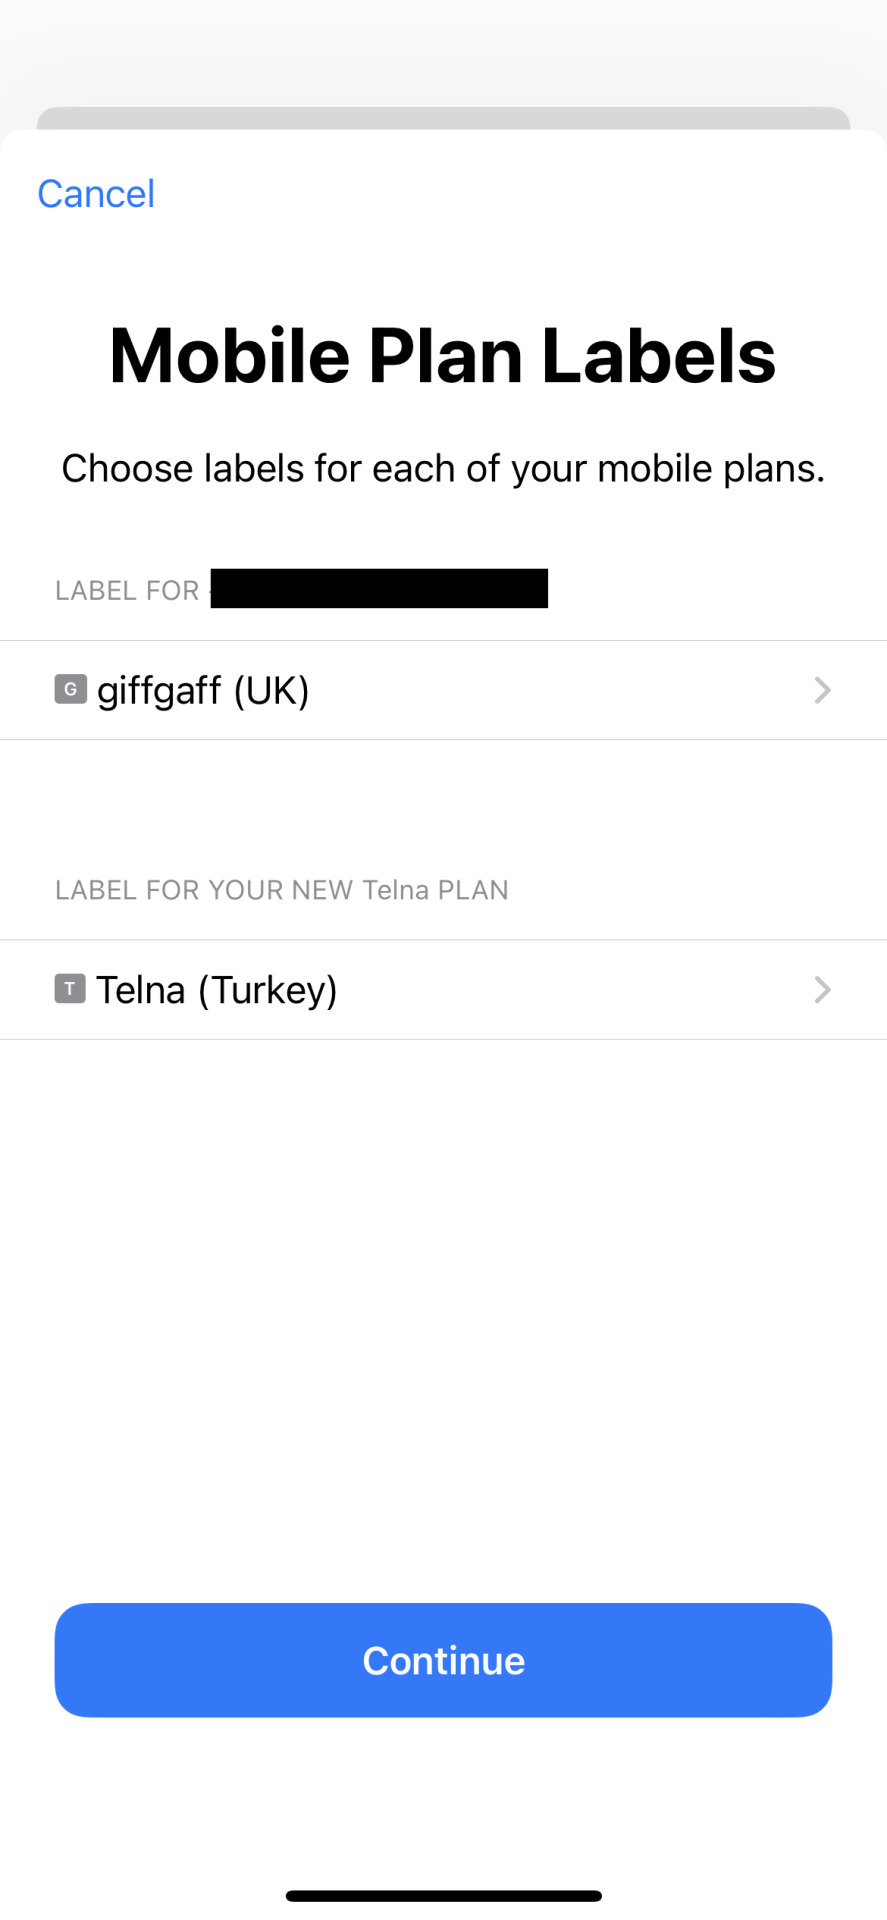
---
Step 9: Which number do you want to use for calls or messages? Defaults to your physical SIM, with it presumed you’ll use the eSIM just for the data
---
Step 10: the important step! You’ll want to use the eSIM for data. If setting up before you arrive in your destination, leave this on your normal SIM, and change in Settings once you land.
These eSIMs will only work in the country specified at purchase.

There’s not much more I can add here. eSIM is great for travel. Airalo is great. There’s likely going to be more good apps and ways to do this in future, but for now it’s my recommendation.
If you use this link to register your account, you will receive a $3 USD sign-up credit, or you can just type my referral code in the app: JEREMY0461. Or if you have a friend using Airalo, ask them for their referral code and they will get the $3 instead!
Happy roaming.
3 notes
·
View notes
Photo


There’s an ongoing narrative of “Gen Z vs Millenials” that seems to have taken over the discourse in early 2021. Some is just reframing any trend to fit a combative story, others may hold some weight.
A common theme of this on TikTok and elsewhere has been that the laughing crying emoji is outdated. Somehow it’s an emoji I’ve now reported on for half a decade and everyone’s love/hate relationship with it.
Anyway, here’s me on Breakfast Television in Toronto discussing this and more.
0 notes
Photo

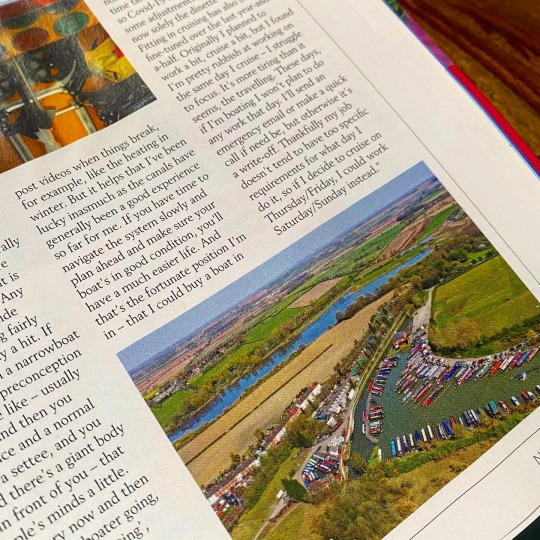
I feel very fortunate to have this life 💕
Photos: November 2020 issue of Waterways World
2 notes
·
View notes
Photo
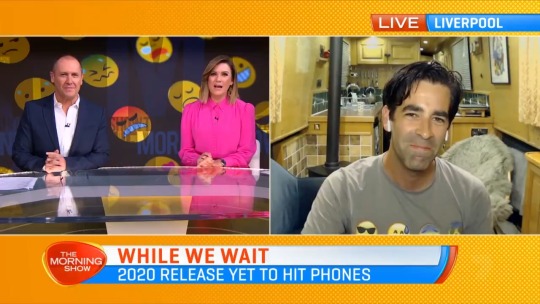

New emojis have been announced with a likely 2021 release. That’s before most people have the 2020 emojis, but such is the change to the schedule.
I went on The Morning Show to talk about it (the Australian TV show from Sydney, not the drama series on Apple TV+), and did an emoji quiz that I usually perform terribly at, but did surprisingly well for a change!
youtube
Incidentally, this is the first TV cross I’ve done from the boat. Plenty of radio has taken place, but TV I usually prefer wait til I can go in-studio to save any lag, but 2020 and all...
1 note
·
View note
Text
What took iPhone emoji search so long?
Every year, the chant gets louder:
oh that’s cool Apple that you added all this stuff but WHERE IS MY EMOJI SEARCH
This year, people are going to have to come up with a new request, because emoji search is coming to iOS 14.

So what the heck took Apple so long?
Emoji search seems so obvious, did Apple just forget to implement it? Did they not know people wanted this?
Here I piece together the most likely reasons this took so long. It’s probably not just one, but a bit of each of them.
(Oh, and if you’re new to my rarely-update-blog here, you can usually find me over at Emojipedia.)

1. 🗓 Timing
The emoji keyboard first came to the iPhone twelve years ago in iPhone OS 2.2.
It took until 2011 for widespread access to this keyboard in iOS, and wasn’t until 2016 that it became clear that frequent emoji updates may be a real thing.

In the early years, there wasn’t much change in the emoji set. iOS 8.3 in 2015 nearly doubled the set, and by the following year it was clear that updates were coming consistently year-on-year.
This isn’t much of an excuse so much as to reframe our minds. It feels like emojis have been huge and growing in number forever but we’re talking more likely 4-5 years here.
2. 🙅 Apple just isn’t good at search
Search isn’t Apple’s forte. Siri and App Store search come to mind as examples that you just don’t have faith when you say or type a phrase, that you’ll get a great result.
You might, but you wouldn’t want to bet your life on it.
It seems reasonable that Apple knows its strengths, and has avoided doing emoji search until it could do a decent job.
Apple has emoji search on the Mac. It’s existed for years. And it has gotten worse over time.
Something happened in 2016 which caused the previously inflexible-yet-consistent emoji search to broaden and accept more terms, but with far less pleasing results.
The good news? Emoji search in macOS Big Sur has improved. It’s also decent in iOS 14 beta.

It felt like in 2016-2019, Apple’s macOS emoji search was either too complex and buggy to fix, and now replaced. Or it has finally been improved.
Whether these tweaks are implemented by hand (by checking the most common search phrases and fixing accordingly), or by natural language processing improvements, I’m not sure.
3. 🔡 Emoji Auto-Suggest
Apple has had emoji auto-suggest for a number of years on iOS.
You start typing a word, and an emoji might be suggested in the list of options. This works relatively well for a small set of results.

Issues with auto-suggest-as-emoji-search:
If you’re already on the emoji keyboard and can’t find an emoji, you need to get back out of the emoji keyboard to try auto-suggest
Only three results are shown at a time. If you have a big group of results like all green emojis, three isn’t enough
If you don’t like the auto-suggest options you have to delete the word you just typed. Or you end up with a random word in your text.
Was emoji auto-suggest intended as the solution, so emoji search wasn’t needed at all? Did this delay the search feature? Maybe, but not necessarily.
Perhaps it was just a good place to get some data on what people are emoji searching for.
4. 😳 Public shaming
The first version of emoji auto-suggest on iOS only suggested one emoji. Damon Beres at Mashable noted the issue this presented, when searching for some terms.
Why should CEO show a man and not a woman?

Having only one auto-suggest option was always short-sighted, as it’s lose-lose no matter which gender is shown.
Apple rectified this in a subsequent release, by showing up to three choices.
Given the public and media interest in emoji, I doubt Apple wanted to roll out emoji search on iOS that was either buggy (ala Mac emoji search until now) or suggested bias (like the CEO auto-suggest option used to).
It’s one thing having bad search results on a relatively hidden feature on the Mac. It’s another to have them on a marquee feature of iOS.
Thankfully the emoji search results on iOS 14 beta are decent. Though they don’t make a particular point of which gender is shown first - it varies considerably, with no specific logic that is clear.

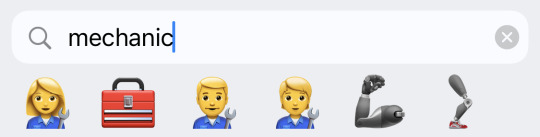
One failing here: you cannot press-and-hold any search result emoji to choose a different skin tone. The same limitation applies to the emoji auto-suggest feature.
5. UI Weirdness
One minor issue that may have deterred Apple from implementing emoji search earlier: it’s sometimes weird having a keyboard shown on screen that doesn’t actually type into your app.

If you accidentally find your way into the emoji search field, there is a new button in the lower-right hand corner to escape back to regular text entry. Or just tap where you want to type.
This same issue exists with third-party keyboards and iMessage apps like any GIF search. It seemed weirder at first, but now I think most users are familiar with a search-within-keyboard option.
As far as I can tell, there is no option to turn the emoji bar off.
Final notes
This is beta software, so I’m not going to review the specific functionality, but my initial notes are:
✅ Emoji search on iOS seems good, shows what an average user would expect.
💻 Compared to Catalina, the Big Sur results are much better. Every issue I raise in this earlier article has been addressed. A general test of other terms seems to show results that are universally better.
🤷 Sometimes the same search shows different results, I don’t know why
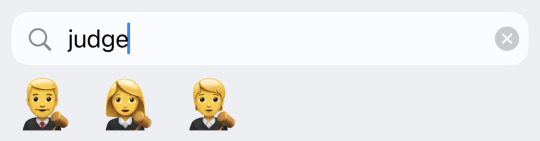
🔄 The search results are different to emoji auto-suggest. Typing ‘woman’ suggests 👩 in the auto-suggest bar, but gives a whole bunch of types of women in the search results, well ahead of the base ‘woman’ emoji.
🇬🇧 I performed my tests in English. I’m not sure how the iPhone emoji search performs in other languages.
Are you running iOS 14 beta and have you noticed any major emoji search issues? I’d be interested to know.
As far as I can tell, what Apple has implemented so far with iOS emoji search passes the ‘good enough to not notice anything special going on’ test.
2 notes
·
View notes
Photo


In January 2020 I visited the TWiT studio (This Week in Tech) to join Mikah Sargent and Jason Howell on Tech News Weekly.
Here’s a couple of photos of me on set, and the show as it went out. If you’d like to watch, here is the episode.
0 notes
Photo


Here is me on Cheddar (which is filmed on the trading floor of the New York Stock Exchange) in January of this year, doing a segment on plans for 2020. Oh how I did not know how much they would change.
Photo: R.W. Lee
0 notes
Photo
Finally! The Volume HUD doesn't block half the content on your screen in iOS
After years of the volume feedback in iOS sitting right on top of the content you want to see, this has been moved to a more discreet interface element in iOS 13.
No more of this:
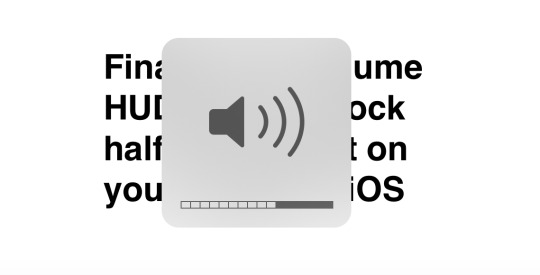
For the past few years I’ve been compiling alternative volume controls on iOS implemented by third party apps.
Most apps placed their custom volume controls across the top of the screen, and then with the advent of iPhone X, the Apollo Reddit client made a small display to show to the left of the notch - a design also now used by Instagram.

Above: volume feedback in Apollo for iOS in 2018
With iOS 13 Apple has designed a smart element that starts at a medium size for approximately one second - and then shrinks to a tiny mini-scrollbar sized pill after that.
If you invoke the volume again quickly - you skip the medium-sized start, and get the tiny control right away.

Not only is the location for this feedback out of the way of content - on the side of the screen - it also works by sitting next to the physical volume controls on iPhone and iPad. A clever touch so it’s clear what is happening, especially if you’re playing to a speaker or cannot hear the audio for any reason.
Given iPad has no notch, this location is more consistent across devices than iPhone-only approaches used by apps in the past.
It’s a small detail, but one of those interactions we do so frequently, I’m pleased to see the problematic old GIANT HERE IS YOUR NEW VOLUME interface put to bed.
0 notes
Photo

How to delete an app in iOS 13
With iOS 13 now here, I’m sure I can’t be the only one who couldn’t figure out how the hell to delete an app on my iPhone.
Coming from an model with 3D Touch (iPhone X), there used to be a distinction whereby:
A light press-and-hold would show ‘wiggle mode’ with X icons to delete apps
A hard press-and-hold (3D Touch) would show a menu with app-specific options
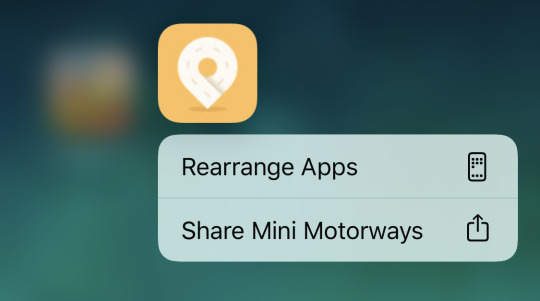
Above: the menu that used to appear with 3D Touch (a hard press) now shows whenever you press-and-hold an app, no matter how hard or soft.
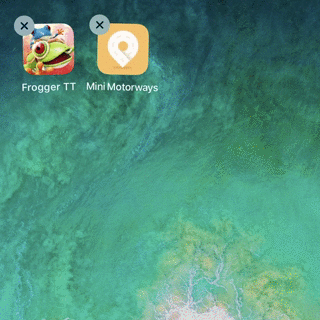
To delete an app in iOS 13 you now have to do either of the following:
Method 1
Press-and-hold on an app until the menu appears
Choose Rearrange apps which causes the apps to wiggle and Xs to appear on each app
Tap the X next to any app you want to delete
Method 2
Press-and-hold on an app until the menu appears
Keep pressing and holding until the menu disappears (don’t stop pressing the icon until the next step)
Just after the menu disappears, ‘wiggle mode’ activates and Xs appear on the apps
Tap the X next to any app you want to delete
Basically - wiggle mode is one further step away now. The option to delete an app is now buried under the confusingly named rearrange apps option, or under a longer press than before on an app icon.
Once you get the wiggle mode to appear, it’s back to how it’s always worked.
This weird inaccessibility of one of the few springboard (home screen) actions seems more like an oversight or lack or priority than a deliberate decision that this is a good implementation.
I’m expecting long-time iOS users will be lost on this.
In the short term, having a ‘Delete app’ option in the menu will go a long way to helping those get from the old method to the new.
Long term, I see 3D Touch menus (now called Haptic Touch) and long-press options merging for a more cohesive experience. At least I hope that’s the direction this takes.
1 note
·
View note
Photo

#BoatLife
I’ve moved onto a boat. A narrowboat that can be moved between villages, towns and cities around the UK.
Everything I own is on the boat. I don't own a whole bunch, so the space isn’t a big issue for me. What’s interesting about it as a newcomer to living on water is having to reconsider everything about how to live in a modern society.
Water supplies, electricity, internet...which night do I put the rubbish out, and where?
For people familiar with the canals and rivers of the UK and particularly living aboard a narrowboat, nothing I post here will likely be notable. But for everyone else wondering about the basics, I’ll hopefully get to a few #boatlife posts as time goes on.
For now: please enjoy this photo taken as I steer my boat (and house!) down the tidal section of the Thames in central London. This isn’t what normal boat life looks like, but it was a very fun (yet daunting) way to leave London and head for the rest of the country.
0 notes
Text
No Response = No
Having been brought up to be polite and follow social norms - I’ve always made an effort to let people know if I can’t do something. And to apologise at the same time.
🚫🥳 No, sorry, I can’t make your party.
🚫🚛 No, sorry, I can’t help you move on that day.
🚫🖨 No, sorry, I can’t fix your printer. I don’t know anything about fixing printers.
Responding with a polite no works most of the time. It seems like a logical and polite thing to do. But there’s heaps of times it doesn’t work at all:
🏃♀�� When you’re very busy, or have things going on that aren’t known to others.
📥 If you’re a public figure, you might simply get more requests across various platforms there is time to respond to.
🤬 People who take ‘no’ as an invitation to continue to make more requests or follow-up questions (how about later? next month? what about...?)
It’s 2019 and about time to rewrite the rules: no response = no.
A lack of response to a request shouldn’t be considered rude, it should be considered a polite decline.
If you request something of someone, perhaps follow up once, and still don’t hear anything in return: assume the answer is a polite no, and we’ll all be better off for it.
0 notes
Photo

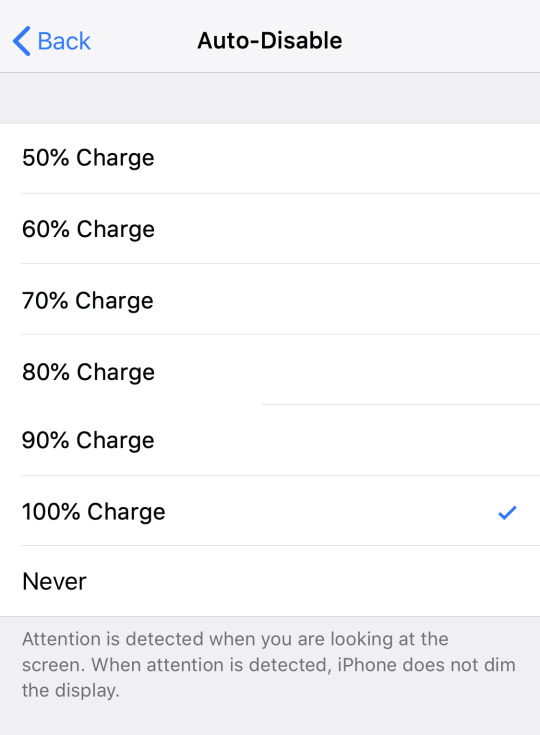
Nobody wants low power mode to turn off at 80%
I ❤️ Low Power Mode.
This setting that disables background tasks on iOS to give a longer battery life is great. I think most people would agree, additional battery life is worth far more than CPU speed or various background tasks.
Low Power Mode is so great that I’d argue it should be the default for iOS (when the phone is not charging).
Speaking of defaults: nobody wants Low Power Mode to turn off at 80% battery level. Nobody. Why was this the chosen level of charge to the setting off? It should be 100%

I’ll tell YOU when you’re sufficiently charged!
Low Power Mode serves all kinds of purposes, and none of those are aided by going back to ‘full power mode’ at 80%.
When using an external battery pack, you literally have to babysit the phone to turn Low Power Mode back on after the phone hits 80%. Should it then drop back to 79% and up to 80%, you’d have to do it again.
If charging at home before heading out - you may need messages to come in (making Airplane mode not suitable) but want to get the best charge before leaving. Again, at 80% the phone will helpfully turn Low Power Mode off again resulting in background photo sync, mail checking and slower charge.
There is no drawback to 100% being the threshold. The mode should turn off sometime, as iOS should get a chance to perform backups, sync photos or check mail. But that can all happen when disabled manually, or when the phone is at a full charge.
If you insist, make it a setting. iOS 13 feature request right here.
🤞


0 notes
Photo


Google’s Night Sight is the new benchmark
Despite being a long-time iPhone user, I often find myself with other phones for testing purposes. Sometimes they have nice features my iPhone doesn’t have, but rarely does any single feature make me even consider changing devices.
The release of Google’s Night Sight feature for the Pixel line in 2018 is a game changing feature.
Having used it for the past month, I now carry both my iPhone and Pixel of an evening. That’s how good it is.

It’s got nothing to do with the hardware. The Pixel 2 camera is decent, but no better than the iPhone X or XS. Until using Night Sight, words alone won’t be sufficient to explain how gratifying it is to take a photo at night, and have all the details still intact.
Decent low-light photos is the feature the next iPhone needs.
Whether its done in hardware, software, or (most likely) both, the weakest point for any phone camera is low-light conditions and Google is nailing it here.
iPhone XS goes some way to handling contrast well, with its Smart HDR configuration. But at night, it’s still producing a dark, blurry mess more often that not. Try taking a photo in a moody bar, and see if it’s worth keeping (it rarely is).
Google Night Sight does three amazing things:
Takes a photo (multiple, actually) over 2-5 seconds, so more light is let in
Detects if it is hand held or on a tripod, to determine a suitable time
Uses AI magic to fix white balance, motion blur, and merge multiple shots into one
The photos above are all taken with the Pixel 2, with Night Sight enabled. Yes, some look a bit fake, over-saturated, too crisp, too bright, too “HDR”, a bit blurry if you zoom. I’m not saying they are perfect.
I have left these photos untouched to demonstrate the feature fairly. If wanting to share, I might dim them a little (much easier to do than “brighten” a dark photo), drop the saturation, crop a little. Some I might not even use.
But you know what? These photos are better than anything the iPhone will provide in the same conditions.
Besides, Night Sight is optional. If you hate the look of these photos and want a the “normal” photo a Pixel or iPhone will take at night, that’s still the default.
Not needing a night “mode” would be great, but is that realistic in 2019 with tiny phone camera sensors? I’m not sure it is.

Since posting about this on Twitter, time and time again people said “just edit the iPhone pictures!”. This misses two points:
Most people don’t have the time or ability to fix their dark and/or blurry iPhone photos taken at night
Some of this cannot be done by editing. That 2-5 second time used to capture more light in the Google camera app isn’t an option provided on iOS.
If Apple came out with this feature a year ago, people would have lost their minds. Even if Apple comes out with this feature this year, people will still lose their minds.
Night Sight is incredible to use, and will only get better. Pointing out small flaws in it today misses the point entirely. Unless we stick giant lenses on all our phones, software is the way forward for phone photography.
Apple is on the right path (Smart HDR on iPhone XS is impressive in many conditions, if a little too flat or low-contrast for my taste), but Google leads on the software front for low-light photography, without a doubt.
If someone at Apple isn’t worried about this feature, they should be.
More of me, a full time iPhone user, banging on about how good this feature:
🕒 Clockwise podcast
♾ The Loop
📑 BGR
💬 More comparisons in the original thread
💬 Today’s Thread #2
1 note
·
View note