
Don't wanna be here? Send us removal request.
Statistics
We looked inside some of the posts by kheerkadam and here's what we found interesting.
Average Info
Notes Per Post
32
Likes Per Post
25
Reblog Per Post
7
Reply Per Post
0
Time Between Posts
1 month
Number of Posts By Type
Text
16
Last Seen Tumblr Blogs


Fun Fact
Tumblr posted its first advertisements in May 2012 and subsequently earned $13M in revenue.
Text
♡gurer narkel naru♡
hi chefs!
if you feel like my previous recipes involved a lot of steps, don’t worry – this one is much simpler! gurer narkel naru is a classic Bengali sweet that’s sweet, coconutty, and oh-so-delicious. it comes together quickly and is perfect for when you want something indulgent without too much effort. let’s jump in!
first, we need good-quality gur (jaggery), the same one we used for the gurer halwa recipe. if you’re using powdered gur like me, just make sure it’s fresh.


grab a packet of finely grated coconut. fresh coconut is always ideal, but who really has the time for that? frozen coconut works perfectly fine, as long as it’s finely grated.
now, heat some ghee in a pan and add a few whole cardamom pods. let them infuse the ghee with their beautiful aroma. once it’s fragrant, add the coconut to the pan and roast it over low heat for about 5 minutes. make sure to break up any clumps so that the coconut roasts evenly.


once the coconut is golden and fragrant, add the powdered gur and mix it well. keep stirring on low heat so that the gur melts and melds with the coconut, but be careful not to burn it or let it lose any moisture – we want to keep that perfect texture.


when the mixture was about halfway done, I decided to add some grated khoya (from the leftover gajorer halwa – yay for not wasting anything!). mix it all in, and let the flavors combine.


here’s the fun part: when the mixture is still warm, you’ll need to roll it into small spheres, or naru. luckily, my dad offered to do this part for me so I wouldn’t have to get my hands messy – thanks, dad!


once they’re all rolled up, let them cool, and then enjoy these little coconut bites. they’re rich, sweet, and so satisfying!
fun fact: gurer narkel naru is a traditional Bengali sweet that dates back centuries. It’s often made during festivals like Makar Sankranti when the harvest season is celebrated. The combination of gur and coconut is not only delicious but also has deep cultural significance, representing prosperity and sweetness in life.
and that’s it! quick, simple, and totally delicious.
happy cooking!
1 note
·
View note
Text
♡gurer halwa♡
hi chefs!
today, we’re making a classic dessert that feels like a warm hug in a bowl – gurer halwa. this rich and fragrant dish, made with jaggery, ghee, and flour, is a favorite in many households (especially mine!). it’s simple, satisfying, and perfect for cozy evenings or festive celebrations. let’s get started!
first, we need good-quality gur (jaggery). i’m using powdered gur, but make sure whatever you have is fresh and flavorful – the better the gur, the better your halwa! add it to a pan with water and stir over medium heat.


you’ll notice the syrup turning a gorgeous amber color, which will deepen as it cooks. little web-like clouds of sugar will form on the surface, and the smell will be heavenly. but don’t drink it (as tempting as it is)!


set the rosh (syrup) aside and prep the dry ingredients. this recipe mainly uses atta (whole wheat flour) but includes a bit of besan and suji for extra texture.


heat 3–4 tablespoons of ghee in a separate pan over medium heat. add the suji first, stirring until it gets bubbly and turns golden. then, mix in the besan and atta. toast everything well, keeping an eye on the color and smell – they’re your best indicators here.


okay, confession time: my halwa started drying out because i didn’t use enough ghee initially (oops!). no worries, though – i added more ghee and used it to toast some almonds, pistachios, and cashews. the nutty aroma was worth the adjustment!


even if your mixture still looks a bit dry, don’t panic – the rosh will fix everything. carefully pour the hot syrup into the pan. be cautious, as it can splatter, and maybe ask someone to help if needed. stir vigorously as the syrup combines with the toasted mixture. it might feel like your arms are getting a workout, but trust me, the result is worth it!


fun fact: the smell of gurer halwa always reminds me of cozy winter evenings with my family, especially my mother, who can’t get enough of anything made with gur.

once it’s thick and smooth like this, garnish with more nuts and serve warm. it’s perfect on its own or with some crispy luchi to complete the experience.
happy cooking!
1 note
·
View note
Text
♡gajorer halwa♡
hi chefs!
today, we’re diving into the rich, creamy world of gajorer halwa – a beloved Indian dessert made with carrots, milk, and spices. (i know, carrots??? but if carrot cake can be normalized, so can this!) this sweet treat is perfect for cozy evenings and family celebrations. let’s get started!
first things first – let’s prep the carrots. you’ll need about 10 large carrots. it's best if you can find red carrots, but i don't have access to them here. peel them, cut off the ends, and use a grater to finely shred them. be careful while grating – it can get messy, haha!


heat 3 tablespoons of ghee (i use homemade brown ghee – so yummy!) in a large pan over medium heat. add the grated carrots and sauté for about 8–10 minutes, stirring frequently to release their natural sweetness. cover the pan with a lid and let the carrots steam for another 3 minutes.


once the carrots are softened, pour in 2 cups of full-fat milk and bring it to a gentle simmer. cover again and cook on medium-low heat until the milk is mostly absorbed, about 20–25 minutes, stirring occasionally to prevent sticking. add 2–3 drops of red food coloring and mix well for that signature red carrot look.


now for the magic touches – grind cardamom pods in a mortar and pestle (my favorite spice!) and add about ½ teaspoon to the halwa. i know it looks like freshly cracked black pepper, but i promise it's not! stir in ¾ to 1 cup of sugar, depending on how sweet you like it. it'll get all syrupy in the middle. continue cooking until the sugar dissolves and the mixture thickens.


next, add ½ cup of grated khoya for richness and let it melt into the halwa. khoya is milk solids, once again, this is not what it looks like, this is most definitely NOT shredded mozzarella! please don't add that lol) mix in chopped almonds, pistachios, cashews, and a handful of raisins. i sometimes like to toast the nuts in a bit of ghee first for extra flavor.


cook everything together until the halwa reaches a thick texture – it should be thick enough that your spatula can make a clear line in the pan.
fun fact: this is my grandfather’s favorite mishti, and i would love to make this for him one day.

serve hot, and enjoy it with your loved ones. for a modern twist, try pairing it with a scoop of vanilla ice cream (though i would not recommend doing this in India lol)– trust me, it’s amazing!
happy cooking!
1 note
·
View note
Text
♡moong dal halwa♡
hi chefs!
today, we're diving into the rich, aromatic world of Indian sweets with a classic favorite: Moong Dal Halwa. This indulgent dessert is perfect for any special occasion, and its delightful texture and flavor are sure to win over anyone's heart. So, let's get started!
Step 1: Preparing the Moong Dal
First, we need to get our moong dal ready. Start by adding a cup of moong dal to a pan and dry roasting it over low to medium heat. Keep stirring to ensure it roasts evenly and doesn't burn. Once the dal turns a lovely golden brown, take it off the heat and let it cool down completely.


After the dal has cooled, transfer it to a blender and pulse until you get a coarse powder. Remember, it should be slightly coarse, not completely fine.


Step 2: Making the Sugar Syrup (Rosh)
Now, let's prepare the sugar syrup that will add sweetness to our halwa. In a pot, combine water, sugar, cardamom powder, and a few strands of saffron. Bring this mixture to a simmer and let it cook for about 10 minutes. Set it aside once done.


Fun Fact:
Moong Dal Halwa is often made during winter months in India because it's believed to provide warmth and energy, thanks to rich ingredients like ghee and nuts.


Step 3: Sifting Sooji and Besan
For an added layer of texture, we'll use some sooji (semolina) and besan (gram flour). Sift these ingredients to get rid of any clumps and ensure a smooth mixture.


Step 4: Cooking the Halwa
Heat a generous amount of ghee in a pan. Add the sifted sooji and besan to the pan, stirring continuously over medium heat. Soon after, add the powdered dal. Cook until the mixture turns a darker shade, which indicates it's well-roasted.


Next, pour in the sugar syrup we made earlier. Keep stirring over low to medium heat for about 30-35 minutes (so sorry, your arms will hurt). The halwa will thicken, and you'll see the ghee start to separate from the mixture, signaling that it's done.


Step 5: Adding the Finishing Touches
Finally, add some chopped nuts for a delightful crunch. I like to use pistachios, almonds, and cashews, but you can choose your favorites.


Fun Fact:
Many people soak the moong dal and make a paste, but dry roasting it with ghee really enhances the flavors, making the extra effort totally worth it.
Enjoy this sweet treat with your loved ones and watch it become a new favorite in your household!
happy cooking!
3 notes
·
View notes
Text
♡chanar payesh♡
hi!
Today, we're exploring the sweet, creamy delight known as Chanar Payesh! This Bengali treat is a must-have for anyone with a penchant for milky desserts and soft chana balls. Let's jump into this culinary adventure!
Step 1: Making the Chana Balls We’re going the convenient route with store-bought paneer, which makes the process quicker and just as delicious.


Crumble the Paneer: Start by crumbling the paneer into a bowl. The finer, the better – get those hands working!
Sweeten It Up: Mix in some sugar with the crumbled paneer. This will give our chana balls that sweet kick.
Shape the Spheres: Roll the sweetened paneer into small spheres. They should be about the size of marbles – just like the ones you lost under the couch as a kid.
Size Matters: Be cautious not to make them too big; they’ll puff up in the milk, and you don't want chana giants in your payesh. To be frank, I made them a bit too big. I didn't think about the fact that they would increase in size in the milk, so be sure not to make the same mistake I did.
Step 2: Preparing the Milk Time to get that creamy, dreamy base ready.

Boil the Milk: Pour whole milk into a pot and bring it to a boil. Rich, full-fat milk is your best friend here.
Spice It Up: Add cardamom seeds to the boiling milk. You could use saffron for a yellow hue, but I wanted to keep my Chanar Payesh pure white, so I skipped it. Your kitchen, your rules!
Reduce the Milk: Let the milk simmer and thicken, stirring occasionally to prevent sticking.
Step 3: Adding the Chana Balls Now for the magic – combining the creamy milk with our sweet chana spheres.


(notice the before and after)
Simmer and Soak: Once the milk has thickened, gently add the chana balls. Let them soak and simmer, absorbing all that creamy goodness and expanding slightly.
Step 4: The Finishing Touches Time to add some flair!
Nutty Crunch: Soak some pistachios and almonds to remove their skins easily, then chop and sprinkle them over the Chanar Payesh. This adds a delightful crunch and a touch of elegance.


Fun Fact: Chanar Payesh is often made during Bengali festivals and special occasions, bringing joy and sweetness to celebrations. It's pretty much a combination of roshogollas and kheer to put it simply.
So there you have it – the ultimate guide to making Chanar Payesh, a dessert that’s as delightful to prepare as it is to eat. Whether you're a kitchen pro or a newbie, this recipe is sure to become a favorite in no time.

Stay tuned for more scrumptious recipes coming your way soon. Until then, happy cooking and even happier indulging!
Dig in and enjoy!
#bengali desserts#healthy sweets#delicious#yummy yum yum#chana#chanar payesh#kheer#roshogolla#pista#pistachios
4 notes
·
View notes
Text
♡kalo jam♡
heyyyy!
today, we’re diving into the world of Bengali sweets with a classic treat that’s bound to make your sweet tooth sing – Kalo Jam! Think of it as the bigger, bolder cousin of the beloved Rosogolla, with a rich, dark exterior and a syrupy surprise inside.
Step 1: Making the Dough
We’re keeping things simple by using store-bought paneer. Yes, you heard that right – we’re taking a shortcut without sacrificing flavor! But feel free to make your own chana (I have instructions and tips listed in my other recipes).


Crumble the Paneer: Start by crumbling the paneer into a large bowl. You want it to be as fine as possible, so get in there with your hands and make it crumbly and soft. No big chunks allowed!
Add the Ingredients: To the crumbled paneer, add milk powder, ghee (clarified butter), sugar, all-purpose flour, and a pinch of baking powder. These ingredients are the dream team that’s going to turn your paneer into delicious Kalo Jam dough.
3. Knead Away: Now, it’s time to knead! Use your knuckles and create a fist to really pound the dough and make it smooth. This part is like a mini workout, but hey, it’s all worth it for dessert, right? Knead until the dough is smooth and holds together without falling apart.
4. Spice It Up: Since cardamom is my favorite spice, I added some whole cardamom seeds to the dough once I was done kneading. It’s like giving your Kalo Jam a little extra love.
Step 2: Shaping and Frying Now that we’ve got our dough ready, it’s time to shape and fry these beauties.


Shape the Balls: Create slightly large balls from the dough. Kalo Jam is typically pretty big, so don’t be shy. Roll them between your palms until they’re smooth and round.
Heat the Oil: Heat some oil in a deep pan. You want it hot enough to fry the dough balls to a beautiful brown on the outside but not so hot that they burn.


3. Fry Until Golden: Gently drop the dough balls into the hot oil and fry them until they turn a rich brown color on the outside. Keep an eye on them and turn them occasionally to ensure they cook evenly. Once they’re done, remove them from the oil and let them drain on a paper towel (which I forgot haha).


Step 3: Making the Sugar Syrup (Rosh) No Bengali sweet is complete without a luscious sugar syrup. Let’s whip up some rosh to soak our Kalo Jams in.


Prepare the Syrup: In a pot, combine water, sugar, saffron, and a splash of rose water. Add some whole cardamom pods for that aromatic touch. Bring it all to a boil and let the sugar dissolve completely.
2. Simmer and Soak: Once the rosh is ready, gently add the fried Kalo Jams into the pot. Let them simmer in the syrup until they’re fully soaked and have absorbed all that sugary goodness. Cover using a lid with a small hole for the air to escape. This is where the magic happens – the Kalo Jams will get soft and juicy on the inside while retaining a good chew on the outside.


Step 4: Presentation Because we eat with our eyes first, let’s make these Kalo Jams look as good as they taste.
Silver Leaf Glam: For a touch of elegance, top your Kalo Jams with silver leaf. It’s like putting a little crown on each one – they deserve it!

2. Serve and Enjoy: Your Kalo Jams are now ready to impress! Serve them warm, and watch as everyone’s eyes light up with delight.
Fun Fact: Kalo Jam gets its name from the dark color it takes on after frying. It literally means "black jamun" in Bengali, named after the fruit that it resembles in color and shape.
And there you have it – a step-by-step guide to making Kalo Jam that’s as fun to make as it is to eat. Whether you’re a seasoned dessert maker or just getting started, this recipe is sure to make you the star of any sweet occasion.
1 note
·
View note
Text
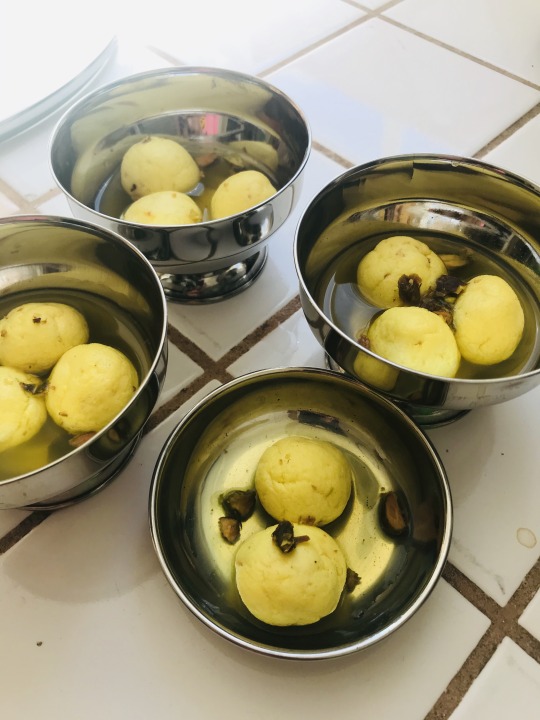
♡kheer kadam♡
hi dessert lovers!
finally! I am posting my kheer kadam recipe, the literal name of my blog. Brace yourselves for a journey into the world of Bengali sweets with a recipe that’s not just a treat for the taste buds, but a delightful surprise in every bite – Kheer Kadam! Imagine biting into a soft, syrupy Rosogolla only to find it wrapped in a layer of luscious Khoya. It’s like finding a hidden treasure, but way tastier!
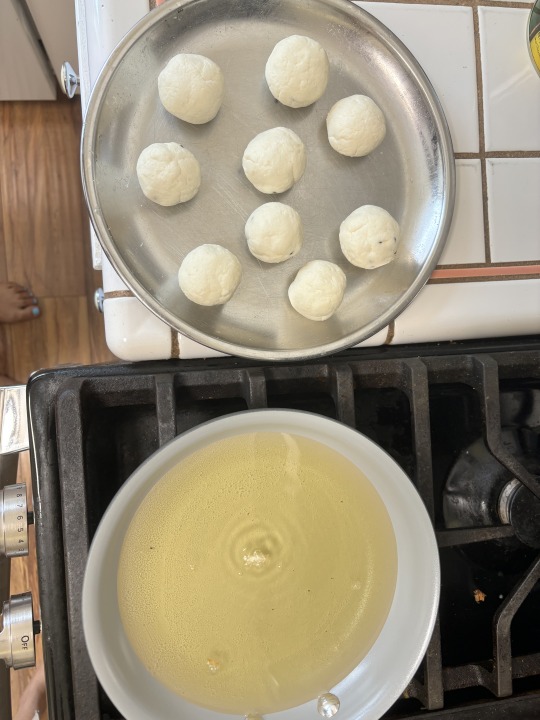
Step 1: Making the Rosogollas First up, let’s make the magic happen with Rosogollas. These little cheese balls soaked in sugar syrup are the heart of our Kheer Kadam. If you want a more in-depth recipe for roshogollas, check out my first post.
Create Chana: Start by bringing whole milk to a boil, then add a splash of lemon juice or vinegar to separate the solids (chana) from the whey. Remember, we’re making Roshogollas, not a science experiment gone wrong!
Knead Away: Drain the chana, then knead it into a smooth dough. This step is crucial – think of it as giving your chana a relaxing massage. You can also use paneer to save yourself some time (if I'm being honest I got lazy)
Shape Up: Roll the chana dough into small, smooth balls.


Sugar, Sugar: Boil a pot of water with sugar to make a syrup, then gently drop in the chana balls. Let them simmer away until they puff up like little pillows of sweetness. Be patient – good things come to those who wait (and stir occasionally).
Add food coloring: I personally chose to make the roshogollas yellow, however, you can also choose virbant colors such as red or pink if you wish.


Step 2: Making the Khoya Casing Remember that amazing Khoya we made in the previous recipe? It’s time to put it to good use. If you’re using the traditional method or the quick fix, just make sure you have enough to wrap around those lovely Rosogollas.


Khoya Ready: Crumble the Khoya in a pan. If you’re feeling fancy, you can add a pinch of cardamom powder for an extra touch of flavor. Add sweetened condensed milk and cook over low/medium heat to ensure the khoya is thick and smooth.
Flatten It Out: Take small portions of the Khoya and flatten them into thin discs. They should be big enough to completely envelop the Rosogollas. Think of it like making tiny, edible blankets.
Step 3: Assembling the Kheer Kadams Now comes the fun part – putting it all together! This is where your inner artist gets to shine.
Wrap It Up: Place a Rosogolla in the center of each Khoya disc, then gently wrap the Khoya around it, sealing it completely. Roll it between your palms to make sure it’s smooth and round. It’s like making little sweet dumplings!


Double Dip (Optional): For an extra layer of decadence, you can roll the Khoya-covered Rosogollas in some grated coconut or powdered milk. This step is totally optional, but who says no to extra sweetness? (I did lol for health purposes)
Pro Tip: Chill your Kheer Kadams in the fridge for a couple of hours before serving. This helps them firm up and makes the flavors meld together beautifully.
Fun Fact: Kheer Kadam is named after the Kadamba flower, which has layers just like our dessert. It’s a perfect example of art imitating nature – and then getting eaten!
Serve and Enjoy: Your Kheer Kadams are now ready to impress! Serve them chilled and watch as your guests' faces light up with delight at the hidden Rosogolla surprise inside.


And there you have it – a sweet, delightful journey from making Rosogollas to wrapping them in creamy Khoya. This recipe is sure to make you the star of any gathering, or just make your dessert time a lot more exciting.
1 note
·
View note
Text
♡khoya♡
hi foodies!
Get ready for a culinary adventure with yet another scrumptious Bengali dessert that’s bound to make your taste buds dance –Khoya! This rich, creamy delight is the backbone of many Indian sweets, and trust me, once you’ve made it, you’ll feel like a dessert-making pro.
Khoya, also known as Mawa, is essentially milk reduced to its thick, magical essence. It’s like milk, but better. Imagine if milk went to the gym and got all buffed up – that’s Khoya for you!
Method 1: The Traditional Way First up, let’s go old school. This method is like the slow cooker of the Indian dessert world – it takes time, but the results are oh-so-worth-it.


Start with Milk: Grab a large pot and pour in some whole milk. The richer the milk, the creamier the Khoya. Now, bring it to a boil, but watch out – milk loves to play Houdini and disappear over the pot’s edge.
Patience is Key: Once it’s boiling, reduce the heat and let it simmer. And simmer. And simmer some more. This process takes a couple of hours, so maybe catch up on your favorite show or practice your Bollywood dance moves (just kidding lol)
Stir, Stir, Stir: Keep stirring the milk occasionally to prevent it from sticking to the bottom of the pot. Think of it as giving your Khoya some love and attention.


4. Voila!: After a couple of hours, the milk will have reduced to a thick, fudge-like consistency. Congrats, you’ve just made Khoya the traditional way! Reward yourself with a break or a cup of cha.
Method 2: The Quick Fix If you’re like me and sometimes need dessert in a hurry (we've all been there), this quick method using milk powder is your savior. It's like the fast-forward button for Khoya-making.
Start with Milk (Again): Pour whole milk into a pot and bring it to a boil. This time, you won’t have to wait forever – promise!
Add Milk Powder: Once the milk is boiling, gradually add milk powder (aka mawa powder). Stir constantly to prevent lumps. We’re aiming for smooth and creamy, not lumpy and bumpy.


Stir and Thicken: Keep stirring until the mixture thickens to that glorious Khoya consistency. This should only take about 5-10 minutes. Yes, you read that right – no more hours of stirring!
Done and Dusted: Your quick Khoya is ready! It’s like the fast food of the dessert world, but way more delicious and without the guilt.


Fun Fact: Khoya is the secret ingredient in many Indian sweets like Gulab Jamun, Burfi, and Peda. It’s like the fairy dust that makes desserts magically delicious. (I also will be using khoya in a recipe I promised to make :) stay tuned!
Pro Tip: Store any leftover Khoya in the fridge for up to a week or freeze it for longer. This way, you’ll always have some on hand for those spontaneous dessert cravings.
There you have it – two ways to make Khoya, each with its own charm. Whether you go the traditional route or opt for the quick fix, you’re in for a treat. So, roll up your sleeves and get ready to impress yourself (and everyone else) with your Khoya-making skills.
happy cooking!
1 note
·
View note
Text
♡simui er payesh♡
hey!
back with a twist on dessert! Ready to shake up your sweet tooth with something unexpected? Imagine noodles reimagined as a delectable treat – this recipe will completely transform your idea of indulgence! This dessert is known as Simui er Payesh.


These are the four main ingredients for simui er payesh: whole milk, vermicelli, sugar, and ghee.
If you've been keeping up with my previous recipes, you'll know that the key to a great dessert is attention to detail. For Simui er Payesh, the star ingredient is roasted vermicelli. You can find it at most Indian grocery stores, or you can roast regular vermicelli at home with a bit of ghee until it's a beautiful golden brown.


Important Tip: When roasting the vermicelli, keep a close eye on it. You want it to be golden brown, not burnt. Trust me, I've had my fair share of 'oops' moments in the kitchen. Once the vermicelli is perfectly roasted, set it aside and get ready for the magic!


Add some whole milk (the richer, the better) to a pot and bring it to a gentle boil. Add the roasted vermicelli and let it cook until it becomes soft and tender. Now, it's time to add the fun flavors! Ground cardamom, saffron, and sugar to taste. The saffron will give the payesh a lovely yellow hue, and the cardamom will fill your kitchen with a heavenly aroma.
Fun Fact: Saffron is one of the most expensive spices in the world! It's often called 'red gold.' So, use it sparingly, but don’t skimp on it. Your Simui er Payesh deserves the best!

Once the payesh has thickened to your desired consistency, it's time to add the finishing touches. Stir in some chopped nuts – I love using pistachios and almonds. They add a delightful crunch and make the dessert look even more enticing.
Simui er payesh can be served hot or cold, but I prefer it hot. There's something about the creamy, warm pudding that just hits the spot.
In Bengali culture, serving sweet dishes like simui er payesh is a way to welcome guests and show hospitality. It's like saying, "Welcome to my home, have a taste of my heart!"
until next time!
1 note
·
View note
Text
♡mishti doi♡
hi!
It's actually shocking that I haven't posted this recipe yet; mishti doi is one of my favorite Bengali desserts in the world! Every Bengali lives off of mishti doi, in fact, some can't go a single day without it!
Mishti doi, or sweet yogurt, is completely different from what you may expect. Only those who've tried this dessert can understand. It is not just some simple yogurt with a bit of sugar and fancy toppings. Mishti doi has a unique earthy taste as it is traditionally prepared in clay pots. The sweetness is not overpowering but rather subtle and balanced, usually coming from caramelized sugar or date palm jaggery (known as khejur gur), which gives it a distinct flavor. In Kolkata, you will find that they go through these pots of mishti doi like no other.
First, you must add whole milk to a pot. The milk needs to be reduced to about 1/2 of its original volume, so it will need to come to a boil. Constantly stir the milk to make sure it doesn't burn on the bottom and scrape in the milk solids from the periphery of the pan.

Pro tip: Use a wooden spoon to stir the milk. This is because the wooden material does not absorb the heat, so it will not alter the temperature of the milk mixture.
Once the milk has reduced and thickened, add some white granulated sugar. Nolen gurer mishti doi replaces the white sugar with jaggery, which adds a sweet and caramelized taste to the mishti doi. However, fresh jaggery is difficult to find, so feel free to use plain sugar. It will taste amazing regardless of what you choose as your sweetener :)
Along with the sugar, add a good pinch of green cardamom powder. You will always see cardamom in my recipes as it is my all-time favorite spice that is commonly used in Bengali sweets.
Since you likely don't have any clay pots lying around your house, you can make this yogurt on the stovetop. However, I always love to use my Instant Pot as it has a yogurt feature that reduces the amount of pans I have to wash :)

Pour the reduced milk into the Instant Pot and select the "Yogurt" function. The amount of time will depend on how much yogurt you would like to make, so I usually leave this on overnight to spare myself the wait. It typically takes around 8-10 hours for the yogurt to set, but this may vary. If you do have clay pots, the temperature of the area the yogurt is resting in will determine the wait time. The optimal temperature is moderately warm, not too hot. Make sure the pots are properly covered with a cloth until ready.
Once your yogurt is complete, serve in small cups/glasses with some saffron strands for a pretty orange and yellow color on top.


Enjoy warm/chilled! I love to savor this dessert and have many beautiful memories of making mishti doi with my family. Share this recipe with your loved ones!
more recipes to come...
1 note
·
View note
Text
♡roshomalai♡
hi!
I'm back with yet another delectable Bengali dessert that will have your mouth watering in no time! Roshomalai, also commonly known as rasmalai, is a sweet made with chana (also used in kacha golla and roshogolla) that is immersed into a creamy milk kheer and topped with crushed pistachios and saffron.
During the pandemic, I spent most of my time gathering information from my family members who grew up in Kolkata, India. My mother has lots of experience when it comes to Bengali sweets, or mishti as we call it, as they always made mishti at home. She says those were the times she bonded with her family the most and appreciated her culture for what it is.
In my cookbook (aka a black wide-ruled spiral notebook from the back of my cabinet), I wrote a simple recipe for roshomalai a couple years ago.


If you've been keeping up with my previous recipes, you'll know that chana is simply the solids of the milk. To make chana, you must separate the solids from the liquids. It is similar to the process of creating butter and buttermilk. As you whip the heavy cream, the butter will slowly begin to separate itself from the milk. Chana is the same, except you must boil the milk and add citrus/vinegar to begin the separation process. Even cooking requires some kind of scientific knowledge :)
Important tip: Once you have your chana nicely drained from the whey (milk liquids), you must put your all into kneading the dough. My mother says the most crucial step to making soft, melt in your mouth, roshomalai is to knead the dough until it becomes smoother than playdough. The best way to break down the dough is to apply pressure using your palms and squeeze with your fingers. Put some love into it, and you'll know by the first bite.
Typically, roshomalai dough is formed into mini spheres which are then flattened on the top just a bit. However, I like to get creative with my mishti, so I made little bowling pins (though I'm actually really bad at bowling if I'm being honest).


Once I finished shaping my bowling pins (let's just call them that), I arranged them on a plate so they'd be ready to go.
The last step to making roshomalai, which in my opinion determines the overall flavor of the dish, is making the kheer. Kheer is just milk boiled down until it becomes thick and creamy plus some fun additions that allow you to instantly recognize it as a Bengali dessert.
Add some whole milk (the more fat, the better) to a pot and bring it to a boil. Add some ground cardamom (my favorite spice!), black cardamom, saffron, and sugar to taste. The saffron will release a vibrant shade of yellow and the spices will give it that mellow aroma that fills up the entire house!
Be especially careful to make sure the milk doesn't rise up and spill out of the pot. I can not even begin to tell you how many horror stories I have heard about boiling milk. Take this as your final warning.
Once the milk has reduced, add the roshomalai from the plate and stir well. Turn the heat down and allow the concoction to simmer for a few minutes. This will ensure that the milk seeps into the chana and pervades the flavor throughout the dish.

If you want an even brighter yellow color, feel free to add some yellow food coloring to your roshomalai.
Finally, add some crushed pistachios and almonds as a garnish. I usually crush them in my mortar and pestle!

Serve hot/cold and enjoy! I almost always enjoy my Bengali mishti warmed up, however, this is one of the few that I prefer chilled.
yum yum yum!
be ready for my next recipe coming asap!
1 note
·
View note
Text
♡doodh cha♡
hi!
I typically post sweet Bengali desserts, however, today's post will be a step-by-step recipe for a commonly consumed sweet drink: doodh cha!
Doodh cha directly translates to milk tea in Bengali (though this is entirely different from the milk tea you order at a boba shop :) This drink is made almost every day in India and many people are unable to function without it. You can think of it as something similar to the coffee addicts in America.
Without further ado, let's get to the recipe!


The ingredients you need to start off with are masala tea bags, whole cardamom, cloves, and cinnamon sticks. These are my favorite spices to add to doodh cha, so don't feel intimidated by the number of spices. Some Bengalis like to add a few balls of black pepper for a kick of spice, however, that is completely up to you.
Usually, Bengali recipes do not call for any specific equipment, but I feel that you must use a mortar and pestle to grind your spices. Grinding the spices by hand allows you to properly smash the spices into smaller pieces. You may feel that it is easier to simply use cardamom powder, clove powder, cinnamon powder, or even better: allspice! (please do not do that) as you will not have to go through the process of grinding whole spices and straining them out.
However, it is essential that you use whole spices because they will be a lot fresher and leave a completely different taste on your tongue. This doodh cha would not be the same without crushing your own spices.


Once the spices are crushed, fill a deep pot with water and grate some ginger into it. The amount of ginger you add can vary; personally, I do not prefer a strong ginger flavor in my cha so I add a minimal amount. But if you like having a strong taste of ginger in your tea, feel free to add more. Add the crushed spice mixture to the pot and allow the water to come to a boil. Over time, the spices will begin to release their flavors into the water.
Looking at the title, you must be expecting to add milk to the tea. Now is the time! Pour in some milk and place the masala tea bags inside the water. I like to tie mine together so they stay in one place.


Throughout this post, I have not mentioned any measurements for the ingredients. This is because the amount of ingredients varies depending on a person's preferences. I like having a moderate to strong flavor of masala tea, so I added 3 tea bags. I also like my doodh cha to be pretty milky as the milk makes the drink smooth and creamy. For this, the water and milk should be 50:50. If you prefer a more watery tea, you can do 70:30.
Unfortunately, the milk can not be substituted with plant-based milk. The addition of cow milk makes the tea creamy and has a higher fat content (which reduces as the milk boils). However, if you are looking to avoid the milk, you can find yourself another recipe :)
Allow the tea to boil for about 5-10 minutes. Make sure to keep a close eye on the pot as the tea will definitely spill if you look away for even a second (speaking from experience).

The final step is to add some white sugar to sweeten the doodh cha. I added a couple teaspoons, though you can choose how much sugar you'd like to consume.
I set aside some very fancy tea cups for this recipe post (but make sure to not make the same mistake as me and spill half of the tea on the counter :(


Strain the tea and pour it into cups! Serve hot with some sweet biscuits if you'd like :)
This is a classic drink that every Bengali is obsessed with; they will make this drink at any time of the day!
Enjoy this creamy milk tea and share it with your friends!
until next time...
5 notes
·
View notes
Text
♡kacha golla♡
hi!
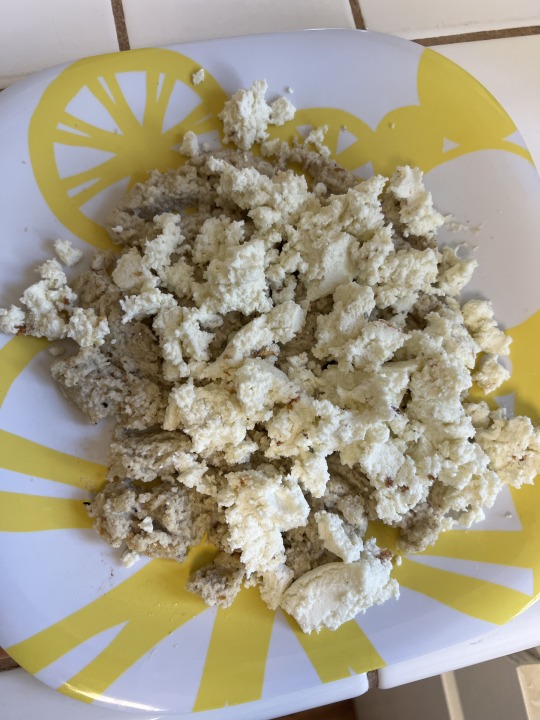
I am back with another delightful Bengali dessert! This sweet is very popular among Bengalis and is a great option for those who wish to hold back on their sugar intake. Kacha golla is a mildly sweet dessert that is made with chana, sugar, cardamom powder, sweetened condensed milk, and rose water. Since golla means round, I'm sure you can guess that these sweets will be round spheres like roshogolla. However, this dessert is entirely different from roshogolla. Once the chana is made, the remaining process is fairly simple.
I have written about the process of making chana in my post about roshogolla, however, I have added some pictures of the process here as chana is a staple in Bengali desserts. I used about 1 full gallon of milk to get this amount of chana.

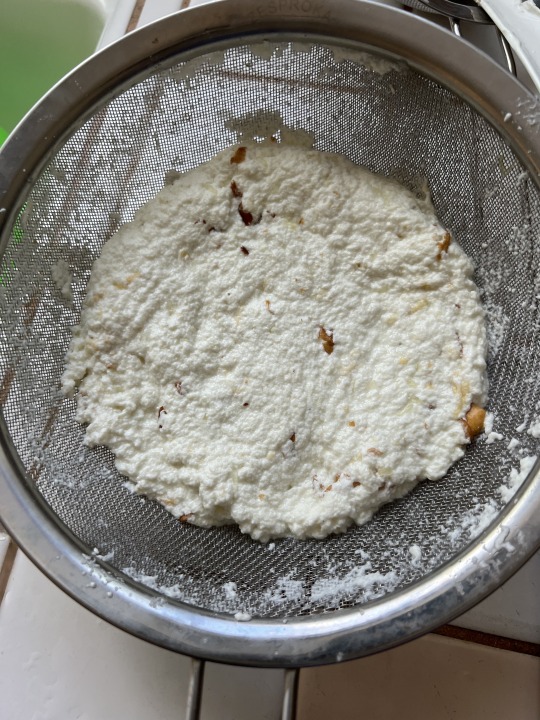


After the chana is formed, a cheesecloth is the quickest and most efficient way to extract all the whey (liquid shown in the glasses) from the solids. However, as many people most likely do not own a cheesecloth, I have shown that you can use a regular strainer and lightly press down on the chana to remove the whey. Once the whey is removed, the chana should look tight and compact.
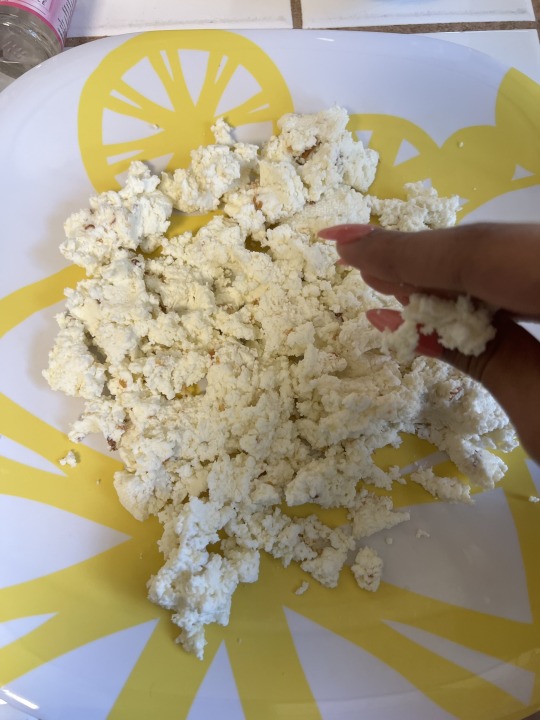
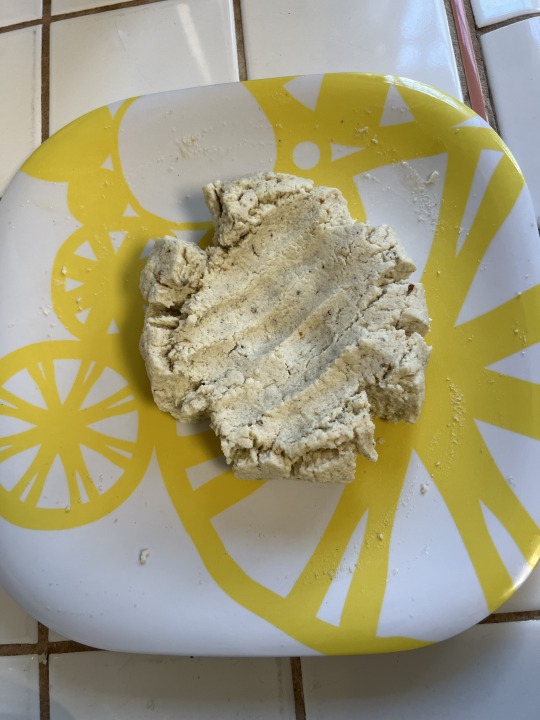
The next step is to split the chana in half. The reason for doing this is because one half of the chana will be sticky and warm, whereas the other half will be tight and cool. This helps ensure that the kacha gollas can be properly formed into mini spheres.
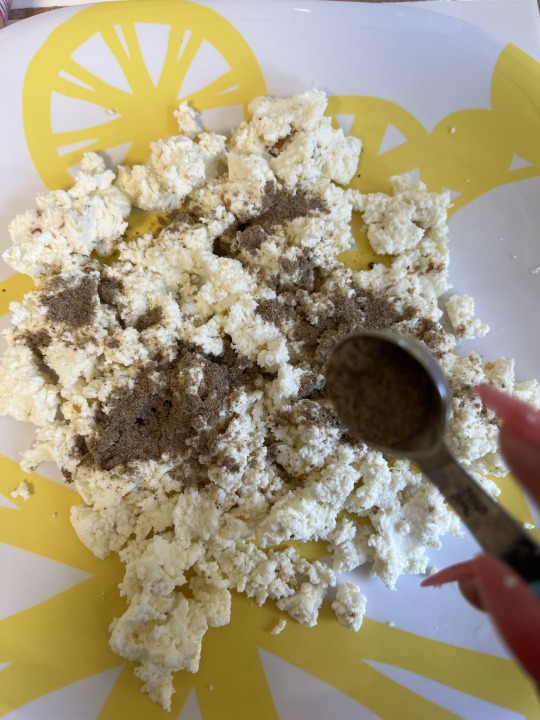
After this step, you can keep half of the chana aside and begin adding the ingredients to the other half. First, you should make sure all of your ingredients are measured and laid out. This helps you maintain mise en place, a French term that simply means "everything in its place". Crumble up the chana with your hands to break up the shape. Always make sure to wash your hands before any of these steps :) Then, add 1 tsp of cardamom powder and 1 tsp of white granulated sugar and knead the dough with your knuckles until it is soft and smooth. If you have read my other recipes, you have probably noticed that a lot of Bengali desserts use the same ingredients, but the end results vary depending on what you choose to make.


Fun fact: Another name for kacha golla is pranohara. This term is very interesting to me because it practically suggests the sweet is so delicious that it feels surreal. Pran means life so I thought this was a descriptive and appropriate name for this sweet :)
When the dough is kneaded, you can add it to a pan on medium heat. Add a few drops of rosewater (less is more). If you do not have rosewater, you can skip it but feel free to make your own rosewater with fresh rose petals. Then, I added one tbsp of sweetened condensed milk. You can definitely add more if you want your kacha gollas to be sweeter, but I have kept mine less sweet in accordance with my dietary goals. Turn the heat up a bit and saute the mixture with a wooden spoon. The reason for using a wooden spoon is that it works well with high heat levels and is more sanitary than other materials. The sweetened condensed milk will release some liquids, so keep stirring the mixture until it becomes slightly sticky and tight again.


This should only take about 5 minutes on a medium-high heat. Once this is completed, you can add this mixture to the chana you kept aside from earlier. Crumble them together and knead them into a warm dough. Now, you are free to make balls by rolling your palms together and placing them on a plate. Traditionally, these balls are then covered in milk powder, though I have not used any as it is difficult to find. This step only changes the appearance of the kacha gollas, but feel free to use it if you have any. I decorated mine with pistachios and a strand of original saffron (more info about saffron in my roshogolla post) and got about 2 dozen kacha gollas. If you make larger balls, you will get about 11-12.
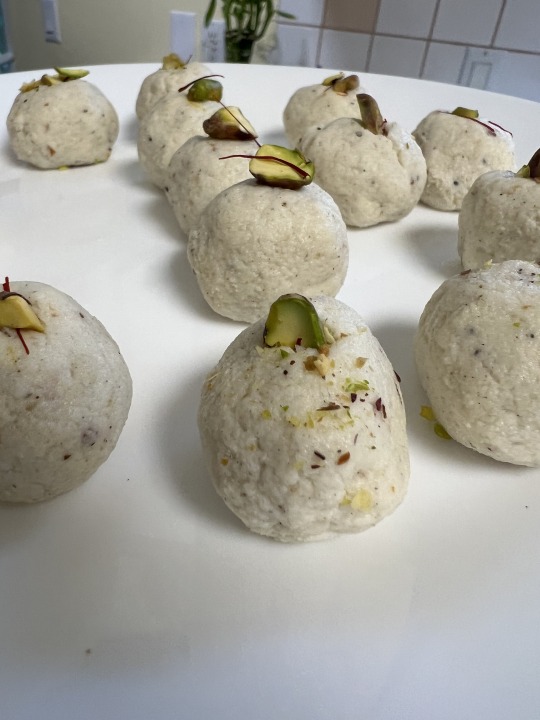

Kacha golla is a scrumptious dessert perfect for anyone with health concerns. The taste is indescribable, but it has a warm touch of saffron and a mellow aroma of rose. If you want more details, try it yourself!
see you next time!
3 notes
·
View notes
Text
♡aamrosh♡
hey!
I'm back for my next post: aamrosh! If you thought the process of making roshogolla was easy, just wait until you see this one. I have simplified the recipe so you can make it in less than 5 minutes.
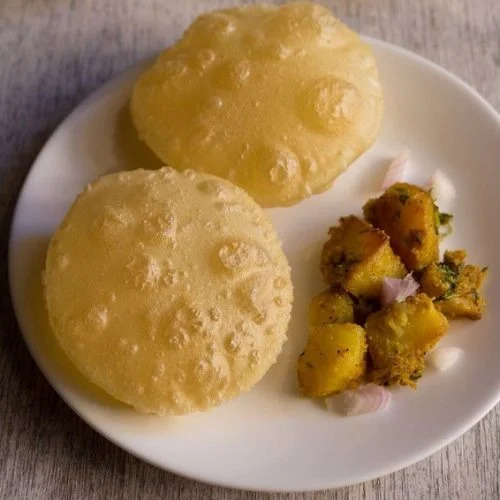
Aamrosh is a simple Bengali dessert that is made up of a sweet mango puree with spices and toppings. This is usually eaten with luchi, which is a fried flatbread made up of maida (flour). The hot and crispy luchi goes perfectly with the sweet aamrosh and the contrast of textures becomes a delightful treat you can make with no cooking experience.
If you read my last post, you would know that rosh means syrup. In Bengali, aam means mango, which is the national fruit of India (also my favorite fruit :). Mangoes are used in almost every Bengali dessert, so we'll start off with a simple and easy recipe.
Aamrosh is traditionally made with fresh mangoes which are blended into a puree. However, most of the time, it can be difficult to find mangoes as they are only in season during the hot summer months. I used 1/2 of a can of mango pulp (15 oz) to substitute the mangoes as I was unable to find any, but use fresh mango puree if possible (~1-2 mangoes + water).
Ingredients:
15 oz mango pulp/puree
1 tsp white granulated sugar (adjust to your taste)
1/2 tsp cardamom powder
saffron (safflower - substitute)
crushed pistachios


For a more in-depth explanation of saffron/safflower, check my post on roshogolla.
I added the mango pulp, sugar, and cardamom powder, and mixed the aamrosh until it was fully dissolved. Pistachios are a heart-healthy and delicious nut (my favorite again!) used in many Bengali desserts. You can also omit the sugar since mangoes are naturally sweet.


The consistency should be thin and smoothly drip off the spoon. Sprinkle some saffron and crushed pistachios and chill in the fridge for 30 minutes. Or, if you're impatient, you can skip the chilling :)

Serve with hot luchi or just eat it with a spoon. This dessert is one the easiest sweets to make out of all of the Bengali desserts, so you don't have to worry about making any mistakes. Although they contain a high amount of natural sugar, mangoes help improve gut health and control blood pressure.
Fun fact: If you have leftover aamrosh, you can freeze it in a freezer-safe container and turn it into homemade sorbet! It tastes like the Talenti mango sorbet, but even better.
If you're ever craving some sweet juicy mangoes on a hot afternoon but have no energy to follow a difficult recipe, try making aamrosh!
posting soon...
2 notes
·
View notes
Text
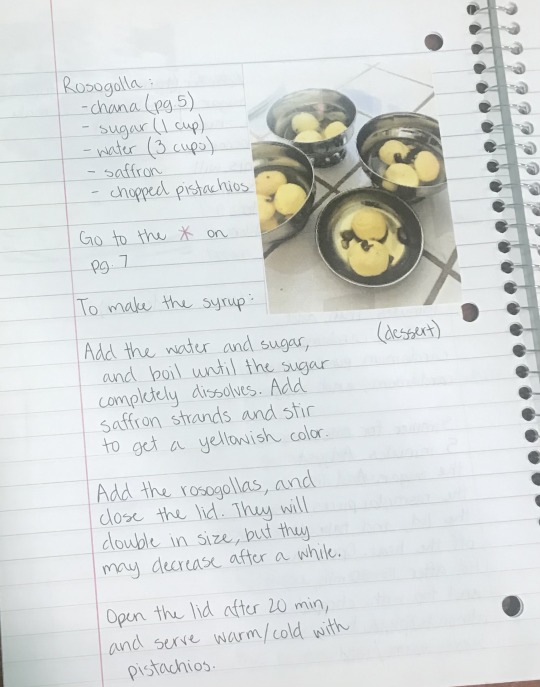
♡roshogolla♡
first post!
To start off my blog, I have decided to post a recipe of a dessert that reminds many Bengalis of home: roshogolla. Roshogolla is a very simple and delicious dessert that everyone loves. It is made up of chana, or milk solids, and is rolled into mini balls that are soaked in an aromatic sugar syrup. I love using elachi (cardamom in Bengali) as it is my favorite spice for Bengali desserts.
Roshogolla is made up of two components; rosh means syrup and golla refers to its round shape. This sweet was one of the earliest desserts made in Kolkata, India which is where my parents are from. It may sound difficult, however, roshogolla is a fool-proof recipe that anyone is capable of making :)
I first made roshogolla at home during the pandemic in 2020. At the time, I had a recipe notebook where I would write down my recipes. I have not invented any of these desserts, but I have put my own twist on them in the hope of making them healthier.
Since many Bengali desserts use chana, I wrote the instructions on how to make the chana dough on other pages.
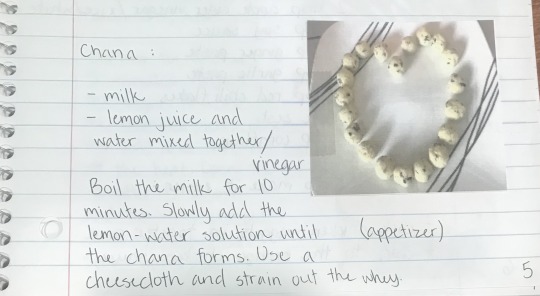
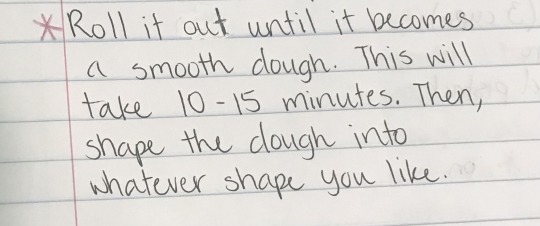
As the recipe states, chana is created by adding an acid such as lemon juice/vinegar to boiling milk to separate the solids from the liquids. This part of making roshogolla is also a science lesson, which was very fun and interesting to see. After the chana is completely strained, it will be separated and chunky. However, if you knead this dough for about 10 minutes, it will come together and turn into a smooth dough. After I kneaded the dough, I rolled it into multiple small balls using the palms of my hands. You can make these into whatever size you want, but I decided to make them smaller to reduce the portion size.

I even ate some of the dough when my mom was preoccupied with something else.
Fun fact: you can actually make homemade cream cheese with this method. If you add the chana to a blender and add some of the whey (the remaining liquid from the milk), you can make a delicious cream cheese to spread on your bagels.
Now that the roshogolla balls are complete, you can begin making your sugar syrup. The ratio of sugar to water (in cups) is 1:3. This syrup is supposed to be thin so the roshogollas can soak up the liquid. I actually added even less than a cup of sugar to make it healthier. After you let the sugar and water simmer, you can add some whole cardamoms and saffron strands to the syrup to bring in some traditional flavors and add a natural yellow color to the dessert. If you don't have cardamom, you can omit it, however, I would definitely recommend it if you can get your hands on it. Saffron is a spice derived from a rare type of flower: Crocus sativus. Saffron has tremendous health benefits such as its suppliance of antioxidants and release of a natural yellow food coloring. However, saffron is also known to be incredibly expensive, so a great substitute for this would be safflower. Safflower also comes from a plant and has a similar ability to color food. Its aroma is slightly mellower than the original saffron, however, it is a much cheaper option that adapts to the budgets people may have.
After a few minutes, you can add in the chana balls.
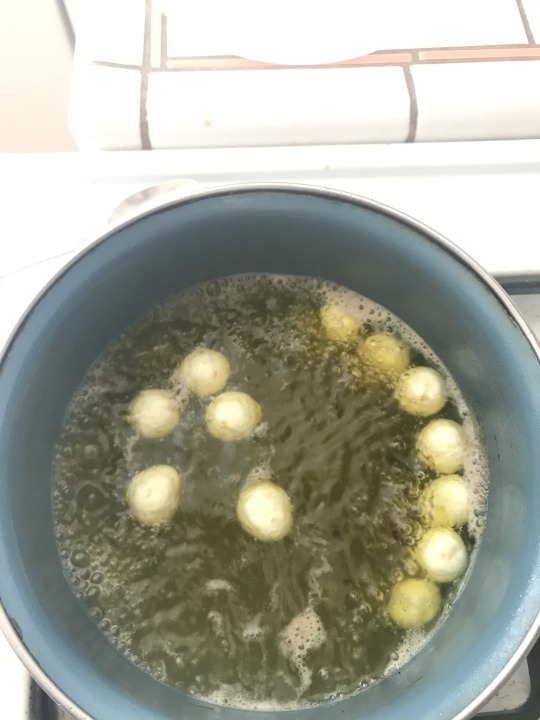
Let it simmer for five minutes, then turn off the gas, close the lid, and wait for 20 minutes. Make sure your lid has a small hole in it so the steam is not trapped along the edge of the lid.
Finally, you can remove the lid and serve the roshogollas with some syrup hot/cold. Add some crushed pistachios if you wish. Something I find interesting about roshogolla is that it is enjoyable when it is hot because it melts in your mouth and allows you to taste the spice of cardamom. Whereas, when you leave it to chill in the fridge/freezer, the roshogolla becomes ice-cold, which feels refreshing and spongy (in a good way I promise!). The versatility of this dish is incredible and the sweetness can overcome any sadness in an instant.
I had lots of fun making this Bengali dessert and hope to post many more on this blog. Now that you're influenced, please make this mouthwatering dessert and give it a try. :)
#roshogolla#bengalisweets#dessert#sweet#yummy#trythisasap#dessertlovers#sweet tooth#easyrecipes#desserttime
1 note
·
View note
Text
Since I was young, I had a huge sweet tooth and would go crazy for sugar. My existence has proven that we do, indeed, have a second stomach for dessert! I have always loved making cultural desserts, sharing my baked goods with my friends, and the satisfaction of hearing how much they enjoyed it. However, if we think of all the foods that a majority eat on a daily basis, every food has its own natural and added sugars. Unfortunately, the world is accustomed to ignoring nutritional labels and not giving much thought about how their choices are impacting their health. If you check how much sugar is actually inside those desserts, you might realize your diet is not as healthy as you thought.
Although everyone should be aware of their sugar consumption, my main inspiration for this blog comes from my father. In 2011, he was diagnosed with type 2 diabetes. Even though this never affected me physically, I have always felt the pain that he goes through to sustain a healthy lifestyle. When you truly care about someone, you put yourself in their shoes. All desserts are strictly prohibited, and the most you can have is one taste. Suddenly those grapes that used to be a healthy source of fruit fall into this unacceptable category. All the portion sizes are reduced to nothingness; leaving you dull and unsatisfied after every meal. Those desserts that made you feel nostalgic about your childhood are now simply memories to reminisce about from time to time. All the foods you love have been snatched away from you, and all you are left with is a bottle of diabetic pills and a depressing mindset.
My father is who keeps me going on days I feel sad. I have grown into the person I am today because of him and wish to repay him in the future. I am forever grateful and pray for his health to improve.
I have created this blog with a set goal in mind: to provide others with healthy versions of Bengali desserts. I hope to teach others about my cultural desserts while providing them with ways to appease their sugar cravings in ways that benefit their diets. Since most of the ingredients can only be found in Indian grocery stores, I will include substitutes as necessary.
The title for this blog, "Kheer Kadam" is a very popular Bengali dessert that has won the hearts of many of my friends! I will upload a recipe for kheer kadam in the near future.
5 notes
·
View notes