Statistics
We looked inside some of the posts by kings-notebook and here's what we found interesting.
Average Info
Notes Per Post
2
Likes Per Post
2
Reblog Per Post
0
Reply Per Post
0
Time Between Posts
9 days
Number of Posts By Type
Photo
15
Text
2
Last Seen Tumblr Blogs


Fun Fact
Tumblr posted its first advertisements in May 2012 and subsequently earned $13M in revenue.
Photo


Lets start this year of with our Storyboard work. We had a lecture and did a little practice work with camera angles and the idea of mapping out the room layout. I found this pretty interesting and helpful late on. I did a little practice work using a wizards tower room from the dnd game im running. With the camera I wanted to try practice angling a little too, With shot A being a uptilt and B being neutral
We then got onto the actual work. We were given a short script involving Hilda as character one. We filled out some blanks then had to story board out the script, starting with a very rough post slip, then moving onto a more detailed, then finaly a animatic
My character 2 ended up being a little dark creature I’m dubbing ‘Shadow’. I dident think to much about his design as it felt unimportant as the story board is the focuse of this lesson, With Delta Rune 2 coming out recently he ended up subconsiously looking like Ralsei...oops. I did want to some mock up sketches of Shadow, as well as a doodle of a very simpled down Hilda and Shadow to work as a guide as im boarding. I also did a layout plan of the cabin. Even though this is a simple story board, i liked the idea of Shadow looking around for where Hilda could be hidding before looking in the chest. For this to work, and knowing i get my lefts and rights mixed up, i knew having this map would help long term
I think I added too many panles for the first mock up. Looking back I think we were meant to do one pannle per scene? and I definatly did more than that. To the point where i was unable to finish. As i only had blunted pencils i used pen only, which i kind of regerent. A few of these pannles show far to much floor. Thoguh since im now cleaning them up digitaly, it might not matter too much?
0 notes
Text
LETS GO YEAR 2
so somehow we passed. Good job me
This is the part where I should say how I’m going to make a effort to keep up to date with my blog and post as i’m working, but I know me, and I know that’ll go out the door within a few months
So instead lets keep our fingers crossed that my attention span is not garbage this year too
0 notes


Photo


I was told by one of the tutors it might be worth writting a post about how the presentation went
I could have been easy and just did a quick written summary...but apparently i like making unnessisery work for myself
1/2
0 notes
Photo


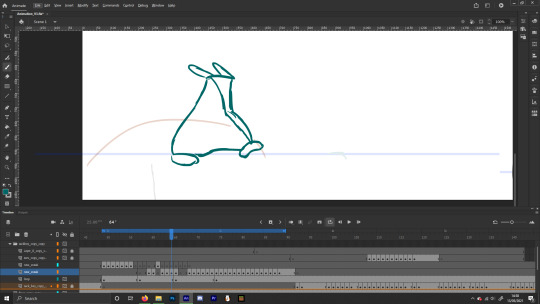
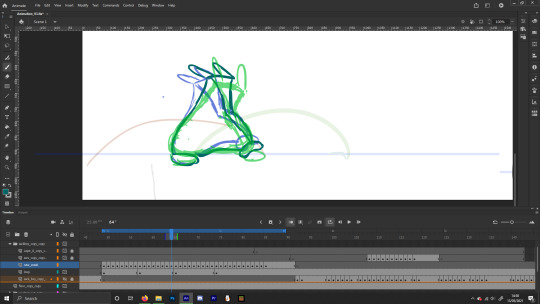
I got to a point with the sack animation that I’ve pushed everything that I’ve wanted to push...because of this, i though i might as well clean up the linework some and play a little with thinking about a background
While I was lining everything a tutor pointed out that the last twist animation looked a bit weird still and made the sacks anatamy feel a bit confusing. I decided to just not twist the sack back to its starting pose. Since the sack dosent have a face, so dosent really have a front side, it would still work okay to not have the sack twist to its starting face. I think this makes the last part of the sneak make more sence
While lining i added little details like crease lines as the sacks bending and lines on the foot to give the idea of the foots being front facing
After lining up I added in the plants by just cell colouring them instead of lining them out. Doing this made adding them in a lot easier and i think it visualry looks a lot nicer
I did a rough plan for a background, due to the plant being like a fly trap i though a warm green house setting would work well. I’m not sure If i’ll clean up the background as that would either involve colouring each of the animation frames in, or key framing the background so the background lines wont overlap with the characters. This will take some time, and i dont know if i have that time. If i did have the time though i think Id do the same cell colouring as the plants. White for the windows, then the same colouring of the pot and tree leaves for the other plants
0 notes
Photo

Whilst waiting for Charlie to come over to teach me Maya (he works graveyard shifts so usaly isent awake till 6pm) I played a little more with the sack animation.
The first thing i knew i wanted to play with was making the pot squash and streach a lot more. So instead of the pot buldging from bace to top as the plant head rose up, i had it squash in a good bit more and make it buldge out by a lot more. Then as the plant head emerged i just had it straight up streach up then snap back into place
I also relised something with the sneak poses. When the sack twists I had been drawing the keyframes wrong. I had his whole body twistsing around, when usaly the top of the sack stays facing forward, creating this triangle effect going across his body. Upon figuring this out I made a new save file and layer and decided to straight up redraw all of the sneak frames. This way i could also exagerate the keyframes a lot more and play about with the timing. I wanted the first few steps to be slow, then have him pause, like hes checking the coast is clear, then speed up.
This cycle looks a lot better than the first one. I think i want to speed up the last part of the sneak a bit more, and i need to agust the last few keyframes where hes twisting back to a front on position, and id like to add more follow through to his ears as he stops. But other than that it’s coming along really nicely
0 notes
Photo


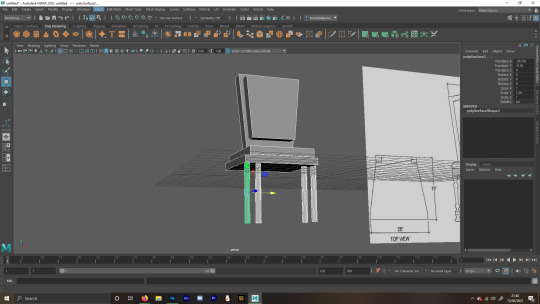
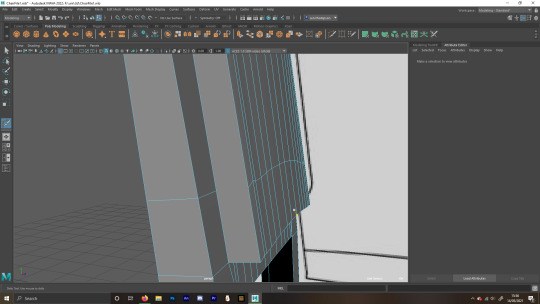
The day after Charlies class I gave modling the chair alone a go. I decided not to use any of the baces I’d left behind from what i was practicing, and wanted to start from fresh.
I’ll be honest, documenting this with screenshots was a little hard. It was a lot of flipping from one view to the other, struggling with selecting the right vectors and making the right edges, till everything lines up right. But I had a better grip on what i was doing this time
I started with the back and seat. I think i messed up the top of the chair a little by shapping the top before making the cosin Iit now has the little tips the chair top does and for the life of me i cant get rid of them. Might just remake the top later on) and making the seat was a little tricky as i had to keep track of which sides the cousion sloped at. What i found was keeping the back nearby was a good visual marker as to what was round im looking at it. But both these pieces cam out fine
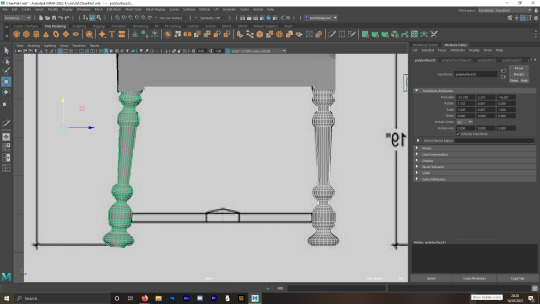
The chair leg was the only part i kept modling from last night, as i was pretty happy with how it came out. The one from last night was rotated slightly, which i think was a flaw in my judgment. When i modled it last night it was straigh and modled only from the front. So when i made the side match and i was modling from a sligh bend, it was a little wobbly. I did a lot of selection only the sectors on one side and pulling them to match the refrence. But i still think it came out okay
Since rotating is still a bit funky for me, i made the front legs from new. Having a fresh chance to make the legs was kind of nice. Oddly its the most relaxing? as since its a thin cylinder its easy to get the vectors you want, and moving the vectors to fit the refrence felt the most paint by numbers, if that makes sence? It also felt good to see, as the leg is the part that ive re done the most, so i get the feeling of how ive grown the most by it
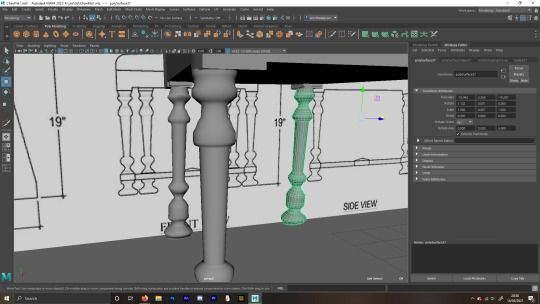
Lining the legs up was a bit funny. I used the ref to figure out where the little connecty bits from the seat and legs go, and then used the ref to line up the legs, but they dident fit exactly onto the connecty bits. I was a little unsure on weather to keep it like that as its following the ref and i wasent fully sure on where i went wrong, bud decided to screw the ref and just make the legs fit the connecty bits by eye
And....it was mostly done. I just have to do the bar between the legs. I’m really happy with this. Honestly on Monday i had no confidence i’d get this done, i felt it would just be a bunch of blog posts documenting me failing at making a chair. But i did it! look! its a whole chair! that i made!!!
i’d sit on that chair
0 notes
Photo


With Maya now on my computer I set about finding myself a tutor. I did think about emailing Anandh for help, however because I find it so hard to put down my issues in writting and genuanly feeling nervous about him being mad that I’d not attended many of the lectures I got to scared too. Have you ever though of something or done something, and in your head you know its irrational, but still gone about thinking or doing it? this very much was this situation. I know my paranoia was unfounded and Im sure Anandh would have happily helped, but thats the thing about irrational worries, even though you know their irrational, it still effects you
This definatly is something I need to work on
Anyway! Tutor! I have a friend, Charlie, whos just graduated the games course of NUA, and so have some experiance with Maya and he vollunterred to give me a hand. Charlie is in my social bubble, so this lesson was very much legal
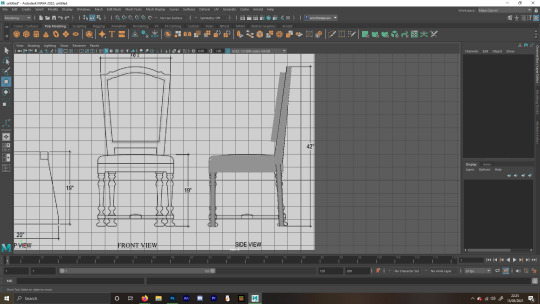
The first thing he had me do was show him the refrence image for the chair. He then gave me a quick run down of the different tabs at the top of the screen and imported said refrence into Maya for us to use properly as a ref. We talkes a little about What i believed would go into making the modle, what i already knew about Maya, and then he had me try and make on of the chair legs so he could properly see what i knew and what i needed to be taught
During the failed teacup exersise on Monday I had learnt how to create the different bace shapes, how to rotate, grow and streach them, and how to make it so i can either select either faces, vectors or edges and streach and grow these elements. Using this knolledes i pretty much remade what i last did on Monday, the tube, but changed to be the right thickness and lenght of the chair refrence, then with some of the vecors changed to kind of make the groves.
In my last post I mentioned needing to ‘‘space these bits out more’‘ I think what i was refrencing their was the edge lines? After getting as far as i did with the leg I explained to Charlie what i felt i needed to know to get the rest of it done. He showd me the Multi Cut tool, which let me make my own edge lines. This was exactly what i needed and with it i was able to make a much better chair leg!
Charlie then explained to me that using the Multi cut tool, alone with what i already knew about shape manipulation, i should be okay to make the chair. He then had me think about how many sepreate elements where needed to make this chair, and to roughly make them.
I believed 9 pieces would be needed (two for the seat (bace and cousion) two for the back (same as seat) 2 legs (as one leans back a bit) two for the bars between the legs and one for the bit between the bars) i then roughly begane modling them (save for the bars and bit between them as both me and Charlie were a little confused on what their meant to be) Charlie made the point to mention that I should flip the refrence image around a bunch and use the different set screens so thinks were shaped as close to the image as possible. I had a bit of issue leaning the back bit back as selecting the right vectors was a little tricky and I kept getting my buttons mixed up. I also kept forgetting to go back to the screen you can freely controll, so a few times i dident notice till too late that the modle may look good on one side, it may buldge or twist oddle on another side.
When I was done Charlie then pointed out that the chair legs, back, and seat only need on piece each. I can rotate the legs to match the bent back ones, and the seat and back i can section a part of it out and use control E to then raise a section up, hance making the cousions. I cant remeber what this tool was called, i just remeber the short cut was control E
After having a go with control E so i could get a hang of it. Charlie then showed me how hed make the seat and back. Talking me though the steps he took. He was a lot faster than i am, but seeing someone else go though it step by step was helpful. He made a second version of the refrence image and mentioned how some people have two of them up but rotaded different ways as it means you can just switch between different views without having to rotate anything. I think this methord is a bit too visualry overwhelming for me though. He then deleted all his work, called me a nerd, and vanished into the night. I saved the file with all my practice pieces on it so i could refrence them while making the final chair, then called it a night
That Charlie is a odd one
0 notes
Text
I did it boys
I beat Maya into submission, its downloading as i...type
This is going to make the rest of 3D catchup week so much easier
0 notes
Photo


3D catch up week gooooooooo!
Today we learnt that i shouldent hold of work for weeks and weeks cos my brain is dumb and i need to work in the moment instead of struggling to do it alone :)
Also a note that 3D catch up week will be skipping out on tuesday and thursday, as tuesday is inperson/next steps day and Thursday im finising of the essay
0 notes
Photo

apparently im blogging backwards with the animation tasks too. I really should plan this out better.
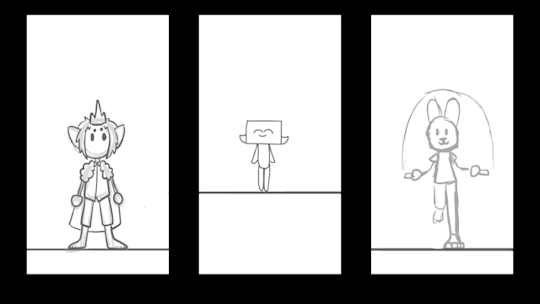
This exersise task was set before the head turn one. We were given the task of animation a character touching their toes, work the inbetweens for the star jump and do a final whatever we want
With the toe touching i made the character my avatar beacuse easy to repeat. Since I personaly can not touch my toes i thought it would be funny to make them unable to touch their toes either. I wanted to make the arms moving down to the toes a really quick motion, then the lean up a slower one, like their really siked out to touch their toes, then defeated when they fail. To add into the speed of the arms moving down i added duel arms in two of the frames, to add a kind of blur effect. In heinsight, i wish i made the hands more smered and added blur lines between the two arms, but as it is with my first time trying something like this i think its alright
Now though doing the walk and sack animation, I’ve found i really enjoy doing inbetweens. Its like a puzzle you have to work out and you can add all sorts of fun flavor to the motion in the inbweteens. That being said, i had the biggest trouble with the star jump. Though, i think this is mostly because i forgot what the motions of a starjump is. Its been a very long time since i’ve done them. Originaly i though as the character went up then down, in midair that when the position changes (eg, character starts in I pose, as they go up they change to X, then on the way down they change back to I) After relising the animation looked very wrong i took a step away from the computer and did some star jumps myself and figured out the right motions (they only change position on the down motion). If i was to do this again Id want to add more squash and streach to them, though their is a little I think i felt i had to keep the key frames 100% as they are. I think now id re drawn them, in the same position, bu squashed and streached more, so i can push that during the inbetweens
Finaly for my own animation i did a little bunny boy doing skip rop. I wanted to do this for the Sen patictable thing of I wanted to play with the ears, but also cos i wanted to see how the rop would be like as it whips towards and away from the character. Learning from the star jumps i did the skip rope motions before trying to animate. This gave me a idea on how the arms move, as well as at what point the character would change leg. I think id like to make the arm movement more snappy, and maybe add some more inbetweens for when the rop is infront of the character, as its hard to really see that part happening, making it look like a off loop. I think again id like to squash and streach more as the character is jumping
1 note
·
View note
Photo

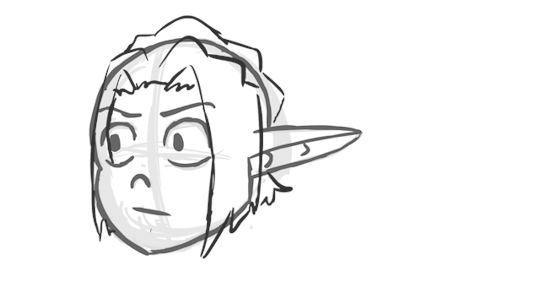


OKay so, my competly out of order blogging at play here. This is a animation task i did before I even started the walk cycle. This was mean to help play with actions that can happen between two keyframes. This example being turning the head. With these a bounce up, bounce down, then a fast smere frame were both played with
I decided to make the subject of the head turns Alen, as hes me defult practice model, i know his face well so i can redraw it easily. The nice thing about using Alen is due to his hair and ears I could play with followthough and a little bit of secondary action (like the ears lowing in the second head spin)
I also wanted to play with expression a little two, since my boy is soooo expressive~
I had a lot of fun with this
0 notes
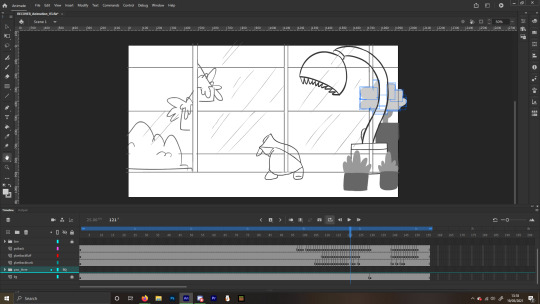
Photo


During a lesson i showed the updated version and asked them about what state of ‘‘finished’‘ this project needs to be by submission. I think i’m still in highschool/college mindset of projects need to be finished absolutly for them to get good grades. The tutor mentioned that this animation does not need to be linked and coloured and made a comment that i should focuse on pushing what i had further, that thinking about the movement and rythm of the animation is far more important
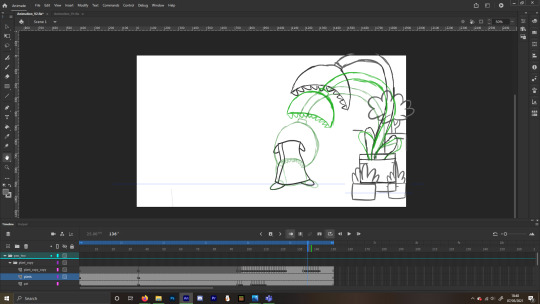
This as well as not having to abide by the original 5s timelimit, i decided to go ham. Firstly i added a ‘‘sackboy notices the plant pots’‘ part before reaction confused. But, obviusly, i pushed the most with the plant pot at the end
First i wanted to make the pot budge and squash a little as the plant is coming out. I started with just the main body bit squashing out as the plant head emerges, but i though some fun antisipation could come from it wave effect coming from bottem to top, as the plant moves up the pot before coming out of the top. I also added streach to go along with the squash as the plant gets out of the pot, making it kind of snap out. As well as squash and streach as it lundges down to bite into the sack. It squashes as it bites down on the sack and the sack squashes as its pressed some into the floor, then both streach as they lift into the air
I took away one of the frames from the head lunging down too. I think this makes that movement faster and more snappy
0 notes
Photo

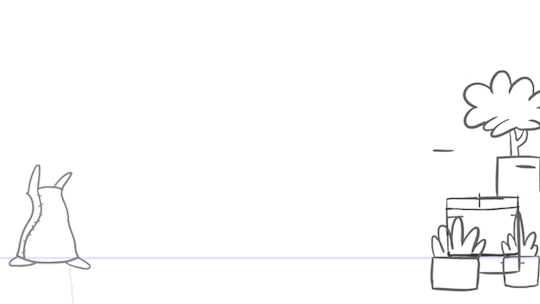
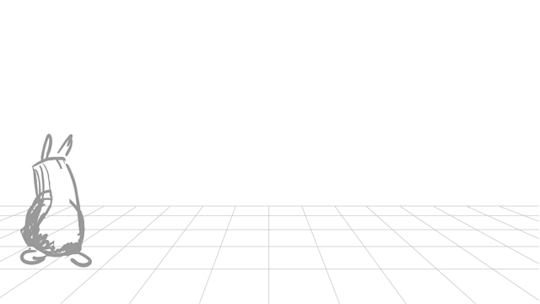
Upon getting my first pass looked over from a tutor it was recomended i don’t do the pan as it makes the staging a little strange. You cant really focuse on any element right untill the sack is infront of the plant.
I was a little worried as the reason i had the pan to begin with was because i dident want to make the sack too small. After a little muddling i did find a size that i think works okay and i manged to rework the end of the walk cycle to work without the pan
0 notes
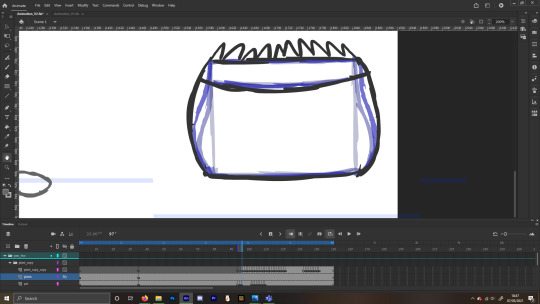
Photo


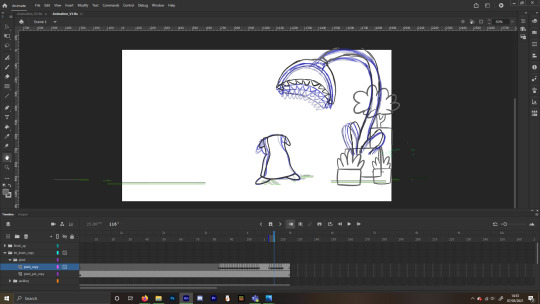
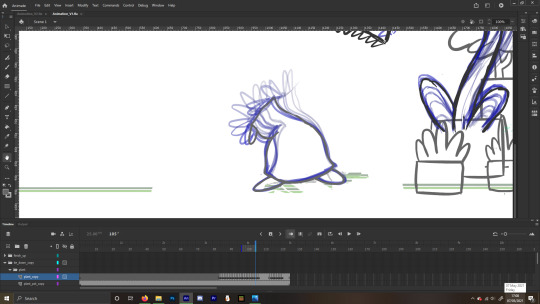
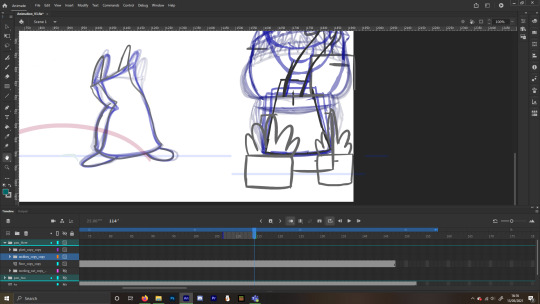
For my first pass on inbetweens i worked on making the sneak cycle better, and focusing on how the plant moves along with the follow though of the sack tassles moving like ears.
With the sneak cycle, i think ive accepted the fact that this is more of a waddle than a sneak. I had a little trouble with the inbetween when the sack kind of twists a little. I was worried about making ‘‘ugly’‘ frames that look wrong, esspecialy when its a side view of the sack. I quickly got over this worry though, as inbetweens are a very small part of the animation and its the frames in motion that matter, not them individualy. I also had a little issue with figuring out where his foot tassles would fall, especialy during the twist where one of the feet isent visible for a while. I fixed this problem by drawing a arc between the two keyframes, so i have a guide to refrence to figure out where they would be. This helped A LOT
I had a LOT of fun with the plant. Starting with the head emerging from the pot. I wanted to emphises the size of this plant by having it feel like its two big to fit though the opening. I did this by using squash. Having the head be a lot more smushed than usual and having its sides muffin topping a bit as it erupt from the pot. As it moves up to its full hight, i wanted to make it move kind of like a snake, leaning the steam back a bit before having the head come forward, so its making a sort of question mark shape. I think this kind of way works as it balances out the weight of its big head by leaning its body back some. I think it also looks more visualy interested, rather it going straight up, it snakes back before snapping forward. The last thing i enjoyed playing with is when it snaps down to bite the sack. I use a little antisipation by having the head lean back for a few frames before going down
Finaly, follow though with the sack tassles. Have you noticed I like playing with ears yet? I really like playing with ears. And I liked playing with these tassles. I think it makes the lean back more dramatic and comical. Like the way Wyly Coyotes ears drop before he plummets down from a high falls. I like it >:3
1 note
·
View note
Photo
Upon thinking more, I decided to go with the pirana plant idea. I chose this one as when having a look at the thumbnail board one of my classmates was confused by what was happening and im worried about my skill not being good enough to make the ball motion clear in the time i have. Then between the mimic and the plant i felt i could have more fun animating the plant, due to its long stem and big mouthed head, i felt it could be more expressive and i could play more with its movement than the static chestlike mimic
I added in the ‘‘reacts to seeing’‘ idea from the minic consept along with making the panning more prevelent. I did more panning as when i did the keyframes for the sneak, making the sack the size i wanted him to be meant he moved very far, to the point that he would pass the plant pot. I had a lot of issues making the keyframes for the sneak in general. I found it hard to get my head around the movement and the sacks body and its twist was strange to me. Since the keyframes were a struggle to begin with, i dident want to mess with what i had to much. So i got around this by having a pan, then having the last frames to the sneak be ‘‘in place’‘ by tracking where his foot is and making sure it dosent move.
I’m still a little iffy about how the sneak looks, but i dont really know how to fix it? Im hoping when i further detail it and add more drames it will go better. I am quiet excited to animate the last part. I think i can have a lot of fun with the plant
0 notes