
Don't wanna be here? Send us removal request.
Statistics
We looked inside some of the posts by lauher and here's what we found interesting.
Average Info
Notes Per Post
15
Likes Per Post
12
Reblog Per Post
3
Reply Per Post
0
Time Between Posts
23 days
Number of Posts By Type
Text
17
Last Seen Tumblr Blogs


Fun Fact
Tumblr has a low social media market share in South America.
Text

Torta di Semolino
This is simple little cake that has a custard like texture. The recipe is based upon one published in Bake from Scratch. The method of preparing the cake is simple, but a bit unusual. It is made from a combination of semolina and almond flours.
You start by heating up 720 grams of milk in a saucepan then adding 90 grams of semolina flour slowly. You need to whisk continuously to avoid lumps. The resulting mixture thickens similar to polenta. Once you have a nice uniform mixture you remove the sauce pan from the heat and add 65 grams of almond flour, 85 grams of sugar, a tablespoon of butter, two teaspoons of vanilla, a half a teaspoon of salt, and the zest of a large orange. Stir thoroughly until everything is nice and smooth. Transfer everything to a bowl and let it cool enough to add two eggs. Beat in the eggs to give a nice smooth batter.
Transfer the batter to an eight inch round cake that has been buttered and lined with parchment paper. Bake the cake in a 350 degree oven for 45 minutes.
Let the cake cool in the pan, then double invert it onto your serving plate.
The cake has soft texture and is quite lite. It's nice.
0 notes
Text

Chocolate Cinnamon Cookies
These are very simple cookies, but they are truly great. Easy to make, even easier to devour.
The dry ingredients include 275 grams of flour, fifty grams of cocoa, two teaspoons of baking powder and a half teaspoon of salt. Whisk them together in a small bowel.
Cream two sticks of room temperature butter with 300 grams of sugar. Add two eggs and a teaspoon of vanilla and beat it until it is all well combined. Stir in the dry ingredients to give a nice stiff dough.
Measure out 50 gram portions of the dough with your hands and roll them into balls. Take each ball and roll them into cinnamon sugar (one tablespoon of cinnamon in two tablespoons of sugar). Flatten each ball and place it on a parchment covered half sheet pan. You should get twenty cookies, which you can place ten each on two pans.
Bake the cookies for 15 minutes in a 350 degree oven. Remove the pans from oven and leave the cookies on the pans to cool down and firm up.
The cookies look rather plain, but they taste great. They do seem to have a very high vapor pressure and sublime away very quickly.
3 notes
·
View notes
Text

Occhi di Santa Lucia - Sicilian Semolina Bread
This is a great recipe taken from Brian Hart Hoffman's Bake from Scratch magazine. Semolina flour is a bit hard to find. My store had Bob's Red Mill Semolina Pasta Flour. It works just fine.
Start by combining 300 grams of the semolina flour with 200 grams of standard bread flour. Add a tablespoon of yeast and table spoon of flour and place it all in the bowl of the stand mixer.
With the mixer running add 300 ml of warm water, a table spoon of honey and two table spoons of olive oil. The dough comes together very easily, but it needs a long kneading of 15 minutes.
Turn out the dough, shape it into a nice ball and place it in a covered bowl. Put the bowl in the proofing oven for an hour.
At the end of the hour divide the dough into two parts. Take each part and roll it into a nine inch wide twenty four inch long rectangle. Roll up the rectangle to give you a twenty four inch rope. Shape the rope into an "S" shape by rolling each end inward in opposite directions. Place the two rolled up "S" shapes on a parchment covered sheet pan and stick the pan back into the proofing oven.
After another forty minutes the dough should be nicely risen. Give it a quick water wash and sprinkle the surface with sesame seeds.
Bake the bread in a 400 degree oven for 17 minutes.
Let the bread cool for a bit before slicing it then eat!
It is a beautiful bread; the Occhi "Eyes" of Santa Lucia will make you smile.
0 notes
Text

Vasilopita, Greek Celebration Bread
Vasilopita is a Greek Celebration Bread very popular for New Year's Celebrations. It is a large enriched milk bread flavored with orange zest. I thought I would give it ago. Here is my recipe, for better or worse.
Start by adding a cup of milk to a two cup measuring cup and warming it in the microwave. Add a couple tablespoons of flour, a teaspoon of sugar and a teaspoon of yeast. Stir it well and let it sit for a half of an hour. In this time it should show lots of activity. Mine nearly doubled in size.
Add 850 grams of flour, 150 grams of sugar, a teaspoon of salt and a two teaspoons of yeast to the bowl of your stand mixer equipped with the dough hook. Run it a bit to combine the dry ingredients. Add the milk mixture, another cup of warm milk, plus the zest of a large orange. With the mixer running add four eggs and two tablespoons of olive oil.
Knead the dough as well as you can in the mixer, then transfer the sticky dough to your counter top for an addition five minute hand kneading.
Place the dough in a large bowel and put it into your (Brand New!) proofing oven at 85 degrees. After and hour and a half the dough should have risen considerably.
Transfer the dough to a preheated Dutch Oven. Give it an egg wash and sprinkle sesame seeds on top. White sesame seeds are the usual choice, but I only had black ones and they are just fine.
Put the lid on the Dutch oven and bake the bread for 30 minutes at 375 degrees for 30 minutes. Remove the lid and continue baking for another 20 minutes.
Remove the pan from the oven and invert the bread onto a wire rack for cooling. The resulting loaf is pretty big, 1.5 kilos.
Enjoy the aroma of the fresh bread, then use it for your own celebration.
0 notes
Text
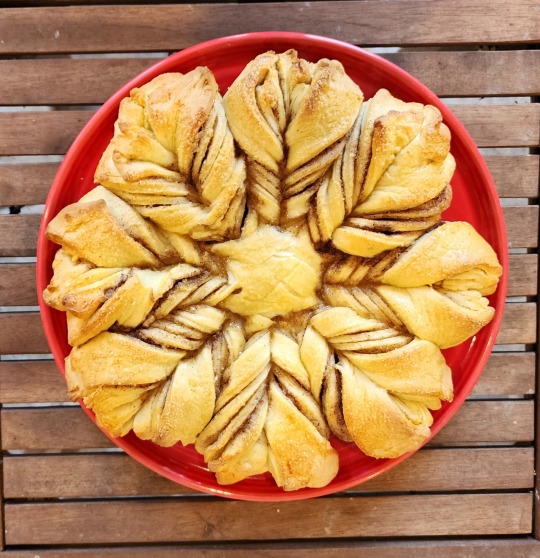
Snowflake Cinnamon Bread
One of my favorite shows is the Great British Baking Show. Not only is the show fun to watch, it is full of great ideas for my own next baking project. This year the Christmas special technical challenge was Snowflake Bread, also known as Star Bread. It is a simple cinnamon bread with a much more interesting shape as compared to your normal cinnamon rolls.
The following recipe is mine based upon things I have done before. It produces a dough that holds together well and is easy to roll out.
Start by weighing out 540 grams of flour and 60 grams of sugar and dumping them into the bowl of your stand mixer. Add a teaspoon of salt and a couple teaspoons of yeast. With the mixer running, pour in 280 ml of warm milk and one egg. Let the mixer to its job until everything comes together, then add six tablespoons of softened butter one table spoon at a time.
Let the mixer knead the dough for about six minutes then transfer the dough to a large clean bowl. Cover the bowl with plastic wrap and place it into your (brand new!) proofing oven for about an hour.
Make up a cinnamon sugar mixture for the filling, using a half cup of sugar and two tablespoons of cinnamon. Also melt a half stick of butter in a small bowl.
At the end of the hour divide the dough into four equal portions, forming each into a nice ball. They should weigh about 250 grams each. Take the first ball and roll it out into a circle about 11 inches in diameter. I used an upside down Fiesta dinner plate as a guide.
Transfer the dough round to a parchment covered half sheet pan. Brush the top with melted butter then cover it with one third of the cinnamon sugar. Leave about a half inch clear border around the perimeter.
Roll out dough ball two in a similar manner. Place it on top of the first round then cover it with melted butter and another third of the cinnamon sugar. Pull and stretch the two rounds to try to maintain the circular shape. Do the same with round three, again stretching the edge to maintain the shape.
Finally roll out the fourth dough ball and use it to top the third. At this point go around the circle pinching the four layers together perfecting the circle as well as you can.
Now comes the fun part. Take a standard ball jar with a two and half inch opening and invert it at the center of your bread to be. Press it in just enough to make a clear impression, a round mark. This mark serves as the starting point for your radial cuts.
Starting at the circular mark use a sharp knife to make four radial cuts at the points of a compass. Make four more cuts to cut each quarter into two eights, then eight more cuts to cut each eight into sixteenths.
At this point you should have a bread with an uncut round center with sixteen triangular pieces pointing outward. Take the ends of two adjacent triangles and twist them outward two times. When you have completed the two full twists then twist them again just a quarter of a turn and pinch the two ends together.
Complete twisting by repeating this process seven more times. When you finish go back around the pastry poking and pulling to make everything as neat as you can. Make sure the ends of each twisted pair are firmly pinched together.
Put the completed snowflake back into the proofing oven for another forty minutes or so. When it is fully proofed give the top of bread a egg wash followed by a thorough covering of turbinado sugar.
Bake the bread in a 375 degree oven for just 25 minutes. Let it cool on a wire rack. Take a picture quickly or you will never have a chance.
Then let everyone grab a arm of the snowflake and watch it disappear.
If you are lucky you will get to eat the center round.
0 notes
Text

Almond Ball Cookies
The New Times Cooking section recently published a group of new holiday cookies. Vaughn Vreeland's Rum-Buttered Almond Cookies looked particularly nice. Here is my version. I used amaretto instead of rum.
The first step is to prepare some spiked butter. Melt a half stick of salted butter and combine it with two teaspoons of powdered sugar, a tablespoon of amaretto and a pinch of salt. You could stop here and just eat the butter, but let us carry on.
Combine three cups of almond flour with a cup and a half of powdered sugar and a teaspoon of salt. In a separate bowl whisk together an egg, two egg whites, a teaspoon of almond extract and two teaspoons of amaretto.
Add the eggs to the dry ingredients and mix it all together. The result will be a sticky dough mass.
Take two cups of sliced almonds and place them on a plate, a portion at a time as needed. Using your hands and your trusty scales weigh out 38 gram portions of the dough and form round dough balls.
Take each ball and roll it in the almonds making sure that the almonds stick. Place the ball on a buttered parchment covered sheet pan in three rows of three. You should get eighteen cookies, filling two pans.
Now using a pastry brush cover the tops of each cookie with the spiked butter.
Make the cookies for 20 minutes in a 350 degree oven. Remove the pans from the oven and let them cool on a wire rack. While they are cooling brush on another dose of the spiked butter and add a few flakes of sea salt to each cookie.
The cookies have a very soft interior and a crunchy top. They are truly an almond lovers delight.
1 note
·
View note
Text

Amarettis
Amarettis are an Italian cookie that features ground almonds and various other nuts. Hazelnuts are are a traditional choice, but in my version I used half almonds and half pecans. They are very easy to make, most of the work is done by the food processor.
Load your food processor with 200 grams of almonds, 200 grams of pecan (or some other nut of your choice), 180 grams of light brown sugar, 80 grams of dark chocolate, a tablespoon of ground ginger, two teaspoons of instant espresso powder, and a teaspoon of sea salt. Give it all a whirl until the nuts are ground to a sand like consistency.
Dump the ground nut mixture into a bowl and stir in four egg whites by hand. Using your hands and your trusty triple-beam, measure out 30 gram portions of the dough and roll each into a ball. Roll the balls in powdered sugar, then place them on a parchment covered half sheet pan. Put about 15 on a pan. Flatten them just a bit.
Bake the cookies for 15 minutes in a 375 degree oven. They will be very soft when removed from the oven, but as they cool down on the still warm pan they will firm up.
The cookies are moist and very tasty. I think they will last a long time, but for some reason I was unable to complete that experiment.
0 notes
Text

Gâteau Breton
If you like butter you will certainly like this rich butter cake from Brittany. It is full of butter and egg yolks and tastes a bit like a short bread cookie. The recipe comes from a delightful book on French cakes written by Aleksandra Crapanza.
I baked mine in my Le Creuset Stoneware Tart Dish and it was thing of beauty.
Start by combining the dry ingredients, a cup of regular flour, a cup of cake flour, a teaspoon of baking powder and a half teaspoon of salt.
Cream two sticks of quality butter (I used Kerrygold) with a cup of granulated sugar. Blend in five egg yolks, one at a time, followed by two tablespoons of rum. Add the dry ingredients and blend well.
Spread the batter into the buttered tart dish and smooth it out. Give it an egg wash, then make a cross-cross pattern with a fork. You have do it. It's a tradition.
Bake the cake for 20 minutes at 350 degrees, then another 15 minutes at 325 degrees.
Cool the cake on a wire rack. It is very rich , so cut the cake into small wedges. It is a very unique cake, everyone likes it and it goes fast.
1 note
·
View note
Text

Cranberry Clove Torte
This is a simple torte based upon the famous New York Times plum torte recipe. It is very easy to make and quite tasty. The cloves are nice addition to the cranberries.
Start by combining the dry ingredients, a cup of flour, a heaping teaspoon of cloves, a teaspoon of baking powder, and a half teaspoon of salt.
Cream a stick of butter with three quarters of a cup of sugar followed by two eggs. Add the dry ingredients and mix well. Take six ounces of cranberries (half a standard bag), coarsely chop them and fold them into the batter.
Spread the batter out evenly in an buttered eight inch spring-form pan. Sprinkle turbinado sugar over the top and bake the torte for one hour in a 350 degree oven.
Make sure to enjoy the aroma of the cloves.
Remove the torte from the oven and cool it on a wire rack. Release it from the spring form pan and enjoy.
The torte in not too sweet, the cranberries and cloves go together well.
0 notes
Text

Peach Cobbler
Peaches are one of summer’s true delights. I bought a beautiful box of Georgia peaches from Costco and they just begged to be put into a nice cobbler.
Cobblers are easy to make. Start by cutting a stick a butter lengthwise into nine square sticks, then crosswise to give a whole bunch of small cubes. Stick the cubes in the freezer for a few minutes while the rest of the prep takes place.
Grease a deep pie plate or a eight inch square pan with butter. Slice the peaches directly into the pie plate. I used five large ones which gave me just under two pounds of peaches. When you are finished add a half cup of sugar and stir the peaches to achieve an even coating.
In a medium bowl combine a cup a flour, a cup of sugar, a teaspoon of baking powder and a half teaspoon of salt. Take the cold butter cubes from the freezer and using a pastry blender cut the butter into the flour mixture. Add two eggs and and two teaspoons of vanilla. Mix it all together with a heavy spoon, then use your hands to pull it apart and dot the top of the peaches with chunks of dough. Try to cover the peaches completely, but don’t try to smooth it out.
Spread the top with fifty grams of sliced almonds and a sprinkle of turbinado sugar.
Bake the cobbler for 40 minutes in a 375 degree oven. Remove from the oven and let it cool on a wire rack. But not completely, start eating it when it is still warm. Ice cream is mandatory.
1 note
·
View note
Text

Snickerdoodles
Snickerdoodles are fun. Just try to say the name three times fast without smiling. They are also delicious and very easy to make.
First combine the dry ingredients consisting of 350 grams of flour, two teaspoons of baking powder and half teaspoon of salt. Cream 300 grams of sugar with two sticks of butter, beat in two eggs, then the dry ingredients.
In a shallow bowl make some cinnamon sugar using what ever ratio you like. I like cinnamon, so I use a 2:1 sugar/cinnamon ratio.
Now the fun part. Using your hand grab some dough and use you scales to measure out 40 gram balls. Roll each ball in the cinnamon sugar making sure it is well covered.
Place the balls on a parchment covered cookie sheet. Bake them for 12 minutes in a 350 degree oven.
Let the cookies cool on the the pan for a few minutes, then transfer them to a wire rack.
The cookies are light and flavorful. Just make sure you say the name three times before you eat one.
0 notes
Text

Baklava
Baklava is something magical. It is a thing of its own and a truly unique dessert.
It turns out it is actually pretty easy to make. It just take a bit of time and the courage to pour a huge amount of syrup over your freshly baked pastry.
The secret to making baklava is buying the phyllo dough. I bought a box of fillo dough form the Fillo Factory. Note the change in spelling. It is a bit hard to fine, most grocery stores do not sell it, but Whole Foods has it. The box says it contains approximately 18 sheets, the one I bought had 16. This is important, because you will want to make four layers.
But before you start layering you need to make the syrup. A cup of water, a cup of honey and three quarters cup of sugar are combined in a sauce pan and brought to a simmer. The zest of two large oranges is added. The syrup is simmered for about twenty minutes loosing about twenty percent of its volume. It is then removed from the heat and allowed to cool. It needs to brought down to room temperature before it is used.
The next step is to prepare the nuts. I used 18 ounces of walnuts, ground in the food processor. They are then mixed with a quarter cup of sugar and a tablespoon of cinnamon. Two sticks of butter are melted in a mall bowl.
The baklava is baked in a 13 x 9 inch metal baking pan. You start by buttering the bottom with some of the melted butter. The fillo dough comes in 13 x 18 inch sheets folded to give a double 13 x 9 inch sheet that just fits the pan.
One double sheet is placed on the bottom of the pan and melted butter is brushed all over the sheet. This is followed by three more double sheets, with butter spread on each one. After the fourth sheet is down one third of the nuts are spread evenly over the layer.
Add four more double sheets with buttering and then another third of the walnuts. Repeat with four more sheets and the last of the walnuts. Finally add the last four double sheets to complete the layering.
Take a sharp knife and trim the edges and corners of the layers to even things out. Then cut the layers into four long strips. Try to cut all the way to the bottom. Then make cross cuts on a diagonal to make the individual pieces. After the cuts are made the bake the pastry in a 350 degree oven for 40 minutes.
Remove the pan from the oven and place it on a wire rack. Now have a bit of courage and pour all of the cooled syrup evenly over the baklava. It will seem like you have way too much syrup, but you do not. All of it will be absorbed.
After the baklava has cooled completely, it is best to wait a full 24 hours for the syrup to be completely absorbed, go over your cuts again freeing up the individual pieces. Transfer them carefully to a serving plate. If any of them fall apart the cook gets to eat them.
The baklava tastes great, keeps very well for a long time. If you tell people you bought it from a Greek bakery, they will believe you.
0 notes
Text

Black Forest Cake
My friend around the corner was looking forward to his twelfth birthday. I asked him what sort of a cake he would like. He replied, "chocolate cake with cherries." That was a call for a Black Forest Cake. So here is the result.
I began by defrosting a 12 ounce bag of sweet cherries. The juice was separated and saved for later.
The dry ingredients consisted of 220 grams of flour, 65 grams of cocoa, a teaspoon and a half of baking powder, a teaspoon of backing soda, and a half teaspoon of salt all whisked together in a small bowl.
In a measuring cup 360 ml of buttermilk were stirred with a teaspoon of vanilla and a teaspoon of instant espresso powder.
In a large bowl 400 grams of sugar were mixed with 165 grams of canola oil. Two eggs and an extra egg white were then added and combined well. This was followed by alternate portions of the dry and wet ingredients.
The batter was beat until it was nice and smooth and then added to two buttered and parchment lined eight inch cake pans.
The cakes were baked for 30 minutes in a 350 degree oven. They were removed from the oven and cooled on wire racks for about ten minutes. The pans were then double inverted to remove the cakes.
Once the cakes were completely cooled, each cake was cut horizontally to give total of four shorter cakes. A large (huge) amount stiff whipped cream was prepared from 600 ml of heavy cream and 120 grams of confectioners' sugar.
One of the two original top cake layers was inverted on to a large plate, the curvature of the plate matching the curvature of the cake top. One quarter of the reserved cheery juice was poured over the cake, which easily absorbed it. This was followed by a layer of the whipped cream. One third of the cherries were embedded into the cream, staying away from the edges of the cake.
This was followed by the second layer, an original bottom layer upside down. It was given the same cherry juice, whipped cream and cherry treatment. The third layer was the second bottom layer right side up. It was given the same treatment using more whipped cream, another quarter of the cheery juice and last of the cherries.
Finally, the fourth layer was added, the remaining top slice right side up. The was given the last of the cherry juice then covered with whipped cream. This was followed by a thick whipped cream coverage of the sides of the cake. (At this point you hope that your huge amount of whipped cream was huge enough.)
For a bit of decoration, a bar of sweet chocolate was shaved with a vegetable peeler and the shavings sprinkled over the top of the cake.
The cake was kept in the frig until the time of the party. A rousing chorus of "Happy Birthday" was sung and the cake was devoured. The cake slices were a bit fragile, but they were moist and tasted great. No one complained!
1 note
·
View note
Text

Chocolate Charlotte Cake
I converted the recipe for my yellow Charlotte cake to chocolate. Because, of course, chocolate makes everything better.
The recipe changes by lowering the flour by 10 grams and then adding 25 grams of cocoa.
The dry ingredients consisted of 110 grams of flour, 25 grams of cocoa, a teaspoon of baking powder and a half teaspoon of salt.
A stick of butter was creamed with a 150 grams of sugar, followed by one egg and an extra yolk plus two teaspoons of vanilla extract. The dry ingredients were then added in alternation with 80 ml of milk.
The batter was then poured into the buttered Charlotte cake pan and baked in a 350 degree oven for 38 minutes.
The cake was cooled for a few minutes then inverted out of the pan and onto a serving plate.
The cake is very simple and quick to make. It can be topped by a simple layer of whipped cream. Garnish with chocolate of course.
4 notes
·
View notes
Text

Yellow Charlotte Cake with Strawberries and Cream
I bought myself a Charlotte cake pan. A traditional Charlotte cake is a cake surrounded by lady finger cookies. This creates a well at the top of the cake to fill with a topping of your choice.
The Charlotte cake pan is a small eight inch pan molded to give an edge that mimics the lady finger cookies. This gives you a nice looking cake that also has a well on top for a topping.
My first cake was a simple yellow cake. The dry ingredients consisted of 120 grams of flour, a teaspoon of baking powder and a half teaspoon of salt.
A stick of butter was creamed with a 150 grams of sugar, followed by one egg and an extra yolk plus two teaspoons of vanilla extract. The dry ingredients were then added in alternation with 80 ml of milk.
The batter was then poured into the buttered Charlotte cake pan and baked in a 350 degree oven for 32 minutes.
The cake was cooled for a few minutes then inverted out of the pan and onto a serving plate.
A simple topping of heavy cream whipped with powdered sugar was spread in the well of the cake and then spotted with cut strawberries.
The cake is very simple and quick to make. Very tasty and nice to look at.
0 notes
Text

Chocolate Espresso Mousse Cake
Today is my neighbor's birthday, so a cake is in order. When I asked what kind, the word "mousse" was mentioned. Here's my version of a mousse cake, inspired by a recipe by David Lebovitz. It's a delightful cake with minimal ingredients, making it easy to prepare.
I began by buttering my spring-form pan, labeled as a 9-inch pan but actually measuring 9.5 inches in diameter. The pan was then wrapped in foil, and a water bath was set up in the oven, preheated to 325 degrees.
I used 375 grams of Valrhona Satilia Dark Couverture (62% cocoa), placing it in a large bowl. I covered it with a mixture of 175 ml of piping hot espresso and 65 ml of hot heavy cream, stirring until the chocolate feves melted completely.
In the stand mixer, five extra-large eggs were combined with 120 grams of sugar and a half teaspoon of salt. Whisking at high speed for about six minutes resulted in a fluffy egg mixture. This was slowly added to the melted chocolate and gently stirred until a uniform color was achieved.
The batter was poured into the prepared springform pan, placed in the water bath, and then into the oven. The mousse was baked for 55 minutes; at this point, it was still jiggly but set. After removing it from the oven, I let it cool. Since it's January, I placed it outside.
The cake rose to the top of the pan in the oven but deflated as it cooled. It's very soft, so I recommend that you leave the outer ring of the spring-form pan on until you're ready to serve the cake.
The cake is delightful on its own, but since it's a celebration cake, whipped cream is an essential addition. Happy birthday!
0 notes
Text

Corn Flour Dinner Rolls
In September I spent a weekend with friends in Portland Maine. The trip was all about food. Trips to the Farmer's market, a cheese festival, and the fish market led to a great meal in the apartment. We had great lobster rolls from a local take out and a wonderful dinner at the restaurant Scales (see my article on Anadama Bread.) But perhaps our most memorable meal was at the restaurant Twelve, a new restaurant listed by the New York Times as one of the best restaurants in the country.
One highlight of the meal were a group of four corn flour rolls brought to the table in the small cast iron pan in which they were baked.
They were wonderful, no mere Parker House roll, these were really special. Thus upon my return from Portland, I vowed to bake my own. After a couple less successful attempts. Here they are.
The first step is an unusual one. Make some polenta. Two cups of whole milk are heated to a simmer in a small sauce pan, then 120 grams of fine ground corn meal is added. The mixture is stirred continuously under gentle heat until it becomes nice and thick. The polenta is cooled in the fridge until it is about 100 degrees then it is transferred to the bowl of the stand mixer.
With the stand mixer on low, 80 grams of sugar, a tablespoon of yeast, a teaspoon of salt and three eggs are added. Once this is all combined 800 grams of flour are added, followed by a stick of butter, one tablespoon at a time.
The dough is kneaded in the stand mixer for a good five minutes. My dough looked a little too sticky so I added another tablespoon of flour to bring it all together. At this point the dough ball is picked up and shaped at bit and placed in a large bowl for a ninety minute rise.
Weigh your dough (you did remember to tare bowl didn't you?) and divide it into 24 equal pieces (should be about 68 grams each.) Roll each piece into a smooth tight ball and place them on a parchment covered half sheet pan. They make a nice 4 x 6 pattern with a couple inches in between them.
Let the rolls rise in a warm place until they double in size and touch each other. This took me about 45 minutes. Bake them in a 375 degree oven for 16 minutes. Remove the pan from the oven and let the rolls cool, but not too much before eating them.
I can't say my rolls are as great as the rolls at Twelve, since the ambiance of Twelve surely makes their rolls extra special.
But these are truly wonderful rolls and you get twenty four of them, not just four. And when shared with friends they will help you to create your own special ambiance.
4 notes
·
View notes