
Statistics
We looked inside some of the posts by liesbethsoeterbroek and here's what we found interesting.
Average Info
Notes Per Post
130
Likes Per Post
96
Reblog Per Post
33
Reply Per Post
1
Time Between Posts
2 months
Number of Posts By Type
Text
17
Last Seen Tumblr Blogs


Fun Fact
130K people were victims of a chain letter scam that affected Tumblr in May 2011.
Text
New Tutorial Site

We are saying goodbye to Tumblr and have built a new improved tutorial blogsite with Weebly.
For the two patterns above please go to https://elizabethsweetwater.weebly.com
Our previous seven Studio dressme tutorials pictured in the website banner will remain on this tumblr blogsite. Just scroll down to find your particular tutorial. Happy sewing!
2 notes
·
View notes
Text
Werkbeschrijving boothals colorblock jurk/ tshirt Tutorial boatneck colorblock dress/tshirt

Met het veelzijdige boothals t-shirt patroon (verkrijgbaar op www.etsy.com/shop/dressme) kun je heerlijk varieëren. In deze werkbeschrijving laat ik je zien hoe je een variatie kunt maken op de hals en hoe je een colorblock jurkje (of shirt) maakt.
With the versatile boatneck t-shirt pattern, (available on www.etsy.com/shop/dressme) you can have loads of fun. In this tutorial, I show you a variation on the neck and a fun way to play with colorblock.

Neem het tshirt patroon over op patroon papier en geef de middenvoor lijn aan.
Trace the shirt pattern on pattern paper and indicate the center line.

Meet de gewenste jurk lengte af. Ik nam 1 meter vanaf de schouder tot de zoom. Ik ben maar 1.60 dus meet bij jezelf af wat je een mooie lengte vindt.
Measure the desired dress length from the top of the shoulder. Mine was 39 3/8 inch but I am only 5 foot 3.

Een eenvoudige manier om de onder-en zijkant van de jurk te tekenen is met behulp van ee rokje waar je de vorm mooi van vindt. vouw het rokje doormidden en leg tegen de middenvoorlijn.
An easy way to draw the bottom and side of the dress is to place a skirt you like the shape of folded in half and place it against the centerline.

Trek de onderkant van het rokje over. Heb je geen voorbeeld, meet dan bij jezelf hoe wijd je de onderkant wil. Zet dan een haakse lijn op middenvoor en teken rond weg. De zijnaad komt straks weer haaks op deze lijn.
Copy the bottom of the skirt. If you don’t have a skirt available, measure the width on yourself. draw a line perpendicular to the centerline and draw in a curve upwards. Later on, the side seam will be perpendicular to this line.

Maak nu de taille iets minder getailleerd (stippellijn) en trek de lijn voor de zijnaad naar de zoom. Vouw het patroon dubbel en copieer de zijnaad en zoom.
Make the waist slightly less tailored (dotted line) and draw the line to connect the hemline. Fold the pattern in half and copy the hemline and sideseam.

Nu kun je een vlakverdeling maken in de jurk. De afmetingen die ik gebruikte
Links: 8cm (vanaf schouder) dan 8,5 cm, dan 34.
Now draw your color block lines in the dress. My measurements are :
left: 3 5/32 inch (from shoulder) then 3 11/32 inch, then 13 1/3 inch.

Rechts: 23.3cm (vanaf schouder) dan 1,5 cm, dan 6.
Nogmaals ik ben een klein persoon dus je zal iets meer moeten afmeten.
Right: 9 1/5 inch (from shoulder) then 2/3 inch, then 21/3 inch.
But again, I am a short person so you probably need to add a bit to that.

Teken zoom aan en kopieer je patroon voor het achterpand (met de halslijn van het tshirt achterpand) Ik tekende ook een lijn voor en achterpasje zodat ik genoeg had aan een meter stof in de hoofdkleur.
Knip de delen uit langs de lijnen speld op de stof. geef naadwaarde aan langs deze lijnen. Ik knipte ook wat extra naadwaarde aan de zijkante van de panden (ondanks dat ze al naadwaarde hadden van het originele patroon). De jurk moet iets minder aangesloten zijn dan het shirt.
Add seam allowance to the hem and copy the pattern for the back pattern part (with the neckline of the back pattern part of the t-shirt pattern) I also drew in a back yoke so I didn’t need more than 1 meter of fabric ( which is often sold per meter in the Netherlands).
Cut the pattern along the drawing lines. Pin to fabric and add seam allowance to the pieces. I also added extra seam allowance (as the shirt pattern already had seam allowance) because to dress should be a little looser than the shirt.

De aangeknipte naden wat dichterbij.
The seam allowance close up.

Naai de delen tegen elkaar met de lockmachine.
Sew the parts together with the overlock machine (serger)

Nu de hals variatie.
Vouw de halsdelen in de breedte om en strijk plat.Leg de twee halsdelen (afmetingen te vinden in de thirt werkbeschrijving) op elkaar zoals op de foto. Ik heb met pen een lijn gezet omdat dat duidelijker was maar het is beter deze te strijken.
Now the variation on the neck.
Fold the neckpiece in half and iron flat. Lay the two neckpieces (measurements in t-shirt tutorial) on top of each other like the on the image. I drew a line with a pen but I advise to use the iron to press in the line.

Teken naadwaarde aan.
Add seam allowance.

Knip ook de armsgat biezen volgens de afmetingen in de werkbeschrijving
Cut the armhole bands as described in the tshirt tutorial.

Werk de schoudernaden af, speld en stik deze dicht. Strijk de naden open.
Speld de halsbiezen tegen elkaar.
Finish the edges of the shoulders, pin and sew together. Iron open seam.
Pin the neckbindings together.

Naai de halsbiezen tegen elkaar. Goede kanten op elkaar.
Sew the neck bindings together. Right sides together.

Keer en strijk plat.
Turn, and press.

Geef het midden van de voor-en achterhalsbies aan en het midden van de voor-en achterhals. Speld deze tegen elkaar, goede kanten op elkaar.
Indicate the midpoint of the front and neck bindings and the midpoint of the front and back part of the neck. Pin neckband to neck connecting these points.

Naai de halsbies met een stretchsteek tegen de hals. Werk het daarna af met de overlockmachine.
Attach the neckband to the neck with a stretch stitch. Then finish with an overlock machine (serger)

Om het mezelf wat makkelijker te maken kocht ik dit kant en klaar tricot band voor de lusjes en de riem. Gewenste lengte afknippen, dubbelvouwen en stikken.
To make life easier I bought this ready-made knit ribbon for the loops and belt. Cut the desired length, fold and stitch.

Werk de zijnaden af met overlockmachine. Stik aan beide zijden in de taille een lusje.
Finish sides with overlock (serger) Place two loops either side of the waistline

Stik nu de zijnaden dicht met een gewone stiksteek. Het is namelijk handig de jurk eerst even te passen en een gewoon stiksel haalt makelijker uit.
Close the sideseams with a regular stitch. I advise trying the dress at this stage and a normal stitch is easier to remove.

Pas de jurk aan en zie of je de jurk nog ergens wil innemen. (in mijn geval was de heup goed maar de bovenwijdte was iets te groot). Stik nu de definitieve zijnaad met een stretch steek, haal de tijdelijke naad uit en strijk open.
Werk de zoom af met een overlock machine, strijk 2 cm naar binnen en stik de zoom vast. Nog even alles netjes persen en klaar!
Try on the dress and see if it needs any alterations. (in my case was the hip o.k but the chest a bit too wide) Stitch the new seam with a stretch stitch, remove the temporary one and iron the seam open.
Finish the bottom of the dress with an overlock stitch, fold in the hem allowance and sew the hem. Give the dress a press and it is ready!

25 notes
·
View notes
Text
Overslag boothals shirt zonder mouw werkbeschrijving. Overlap boatneck sleeveless shirt tutorial.

Nog zo’n shirt waar je er nooit genoeg van kunt hebben, dit exemplaar met boothals. Ik heb de hals zo gemaakt dat het een boothals vorm heeft maar geen bh bandjes laat zien. Super veelzijdig door de vele mouw opties. Het patroon is verkrijgbaar op www.etsy.com/shop/dressme
Veel plezier met maken!
Another wardrobe staple, this boatneck shirt. I have created the neck in a way it looks like a boatneck but without showing your bra-straps.Super versatile because of the various sleeve options. Available on www.etsy.com/shop/dressme
Enjoy making !

! Dit is een zeer aangesloten model. Draag je een tshirt liever iets losser of gebruik je een wat dikkere tricot zoals French Terry teken dan 0.5 tot 1 cm aan bij de zijnaden en de naden van de mouwen. Check voor je gaat knippen of je tevreden bent over de lengte. Als je langer bent dan 1m 75 raad ik aan het shirt te verlengen.
Nodig:
Voor de versie zonder mouwen heb je nodig:
70 cm tot 1 meter zeer rekbare tricot met elasthan of lycra. Afhankelijk van of je wel of geen boorden aan je zoom zet.
! This is a very fitted shirt. If you prefere your shirt a little less tight or if you are using a heavier fabric like French Terry add 1/5 inch up to 1/3 inch to sideseams and sleeves.Check before you start cutting your fabric if you are happy with the length of th shirt, If you are taller than 5 ft. 7 1 recommend adding some length.
You need:
25 1/2 inch up to 40 inches of cotton lycra jersey or cotton elastane jersey depending on adding a band to the bottom or not.
Knippen:
*Voorpand aan vouw 1x
*Achterpand aan vouw 1x
*Boord onder 2x (optioneel)
Ik heb de boorden van het roze shirt wat breder geknipt dan het patroon. Ze zijn 15 cm. Als je dit doet dat moet je het shirt iets korter knippen.
*Halsboordjes zelf knippen: 5 cm hoog (of 4 als je een smaller biesje mooier vindt) en per maat:
Maat 36: bies voor 16 cm breed aan vouw en bies achter 14.5 cm breed aan vouw.
Maat 38: bies voor 16.5 cm breed aan vouw en bies achter 15 cm breed aan vouw.
Maat 40: bies voor 17 cm breed aan vouw en bies achter 15.5 cm breed aan vouw.
Maat 42: bies voor 17.5 cm breed aan vouw en bies achter 16 cm breed aan vouw.
Maat 44: bies voor 18 cm breed aan vouw en bies achter 16.5 cm breed aan vouw.
*Mouwboordjes zelf knippen: 2x 5 cm hoog (of 4 als je een smaller biesje mooier vindt) en per maat:
Maat 36: 15 cm breed
Maat 38: 15.5 cm breed
Maat 40: 16 cm breed
Maat 42: 16.5 cm breed
Maat 44: 17 cm breed
cut:
*Frontpiece on fold 1x
*Backpiece on fold 1x
*Band bottom 2x (optional)
For the pink top I cut the bottom bands a little wider. They are 6 inches. If you cut the band wider make sure you cut the front and back part of the shirt a bit shorter.
Neck binding cut to size: 2 inch high (of 1 1/2 inch if you prefer a thinner binding and per size:
Size 6: binding front 6 1/3 inch wide on fold and binding back 5 3/4 inch wide on fold.
Size 8: binding front 61/2 inch wide on fold and binding back 5 9/10 inch wide on fold.
Size 10: binding front 6 3/4 inch wide on fold and binding back 6 1/10 inch wide on fold.
Size 12: binding front 6 7/8 inch wide on fold and binding back 6 1/3 inch wide on fold.
Size 14: binding front 7 inch wide on fold and binding back 6 1/2 inch wide on fold.
*Armhole binding cut 2x to size: 2 inch high (of 1 1/2 inch if you prefer a thinner binding and per size:
Size 6: 5 9/10 inch wide
Size 8: 6 1/10 inch wide
Size 10: 6 1/3 inch wide
Size 12: 6 1/2 inch wide
Size 14: 6 3/4 inch wide

Werk de schoudernaden af met overlock of zigzag.
Speld de schoudernaad maar laat 0.7 cm open aan de hals.
Finish the edges with overlock or zigzag.
Pin the shoulder seams but leave 1/4 inch open at the neck.
image

Naai de schoudernaden dicht en laat 0.7 cm open aan de hals.
Close the shoulder seams en leave 1/4 inches open at the neck.

Speld en stik de halsbiezen op elkaar zoals zoals op de foto. De achterbies ligt op de voorbies.
Pin and stitch the neckbands as indicated in the photo. The back band goes on top of the front band.

Speld de biezen langs de hals. Het kruispunt van de twee op elkaar gestikte biezen komt op het punt waar je de schoudernaden hebt open gelaten.
Pin de bands along the neckline. The crosspoint of the two neckbands needs to be pinned exactly on the point where you left your shoulder seams open.

Stik de halsbiezen langs de hals met een stretch steek setting op je naaimachine. Eerst de éen, dan de ander.
Sew the neckbands along the neck with the stretch stitch setting on your sewing machine. One at a time

Buitenkant als de voorkant is genaaid.
Outside after having sewn one side

Nu kun je de naden afwerken met overlock of zig-zag
Now you can finish the edges with overlock or zig-zag.
Je kunt ook even kijken bij de tutorial voor de top met mouwen. Daar zijn andere foto’s gebruikt die het misschien nog meer verduidelijken.
You can also check the other tutorial for this top with sleeves. I used different photo’s which might make things clearer.

Pers de hals plat en stik de hals desgewenst door.
Press the neck and topstitch if desired.

Vouw de bies in de breedte om en stik ze vast in de armsgaten. (aangegeven op het patroon met twee stippen.) Gebruik lock steek of zigzag met stretchsteek.
Aan de goede kant kun je de naad nog doorstikken op 0.5 cm van de kant.
Fold the armhole bindings over widthwise and attach to the armholes using a zig-zag stitch or overlock stitch. (indicated on the pattern by two dots).
If desired you can add a topstitch on the right side of the fabric on 1/5 inch from the edge.

Geef een knipje in de naad.
Clip the seam 1/4 inch

Zo ziet de goede kant er uit.
This is what the right side looks like

Speld nu de zijnaden dicht, vanaf de mouwopening.
Pin the sideseams from the sleeveopening.

Sluit de zijnaden.Gebruik hiervoor een overlock of zigzag steek.
Close the sideseams. Use an overlock or zigzag stitch.

Als je een zigzag gebruikt dan moet je er nog een stretch stiksel naast plaatsen. Voor extra strakke lijnen en stevigheid kun je ook naast je overlock nog een stretch stiksel plaatsen.
in case of zig-zag put a stretch stitch next to it. For an extra clean line and strength, you can also put a stretch stitch next to the overlock.

Sluit de boorden met een stretch steek of locksteek.
Close the cuffs with a stretch or overlock stitch

Geef een knipje in het midden zodat de naad minder dik wordt. Vouw in de breedte dubbel, goede kanten naar buiten.
Clip the seam in the middle and fold one half of the seam over to avoid bulk. Fold over widthwise, right sides on the outside.

Speld en stik aan de onderkant van het shirt met overlock of zig-zag steek.
Pin and sew to the bottom of the shirt. Right sides together. Use serger or zig-zag stitch.

Pers de band plat
Press the band.

Je kunt de band eventueel doorstikken zodat het mooi plat blijft op 0,5 cm van de kant.
Topstitch if desired on 1/5 inch from the edge.
Klaar! Op naar de volgende!
Ready! Let’s make another one!
1 note
·
View note
Text
Overslag boothals shirt met mouw. Overlap boatneck shirt with sleeves.

Nog zo’n shirt waar je er nooit genoeg van kunt hebben, dit tshirt met boothals. Ik heb de hals zo gemaakt dat het een boothals vorm heeft maar geen bh bandjes laat zien. Super veelzijdig door de vele mouw opties. Verkrijgbaar via: www.etsy.com/shop/dressme
Veel plezier met maken!
Another wardrobe staple, this boatneck shirt. I have created the neck in a way it looks like a boatneck but without showing your bra-straps.Super versatile because of the various sleeve options. Available at www.etsy.com/shop/dressme
Enjoy making !

! Dit is een zeer aangesloten model. Draag je een tshirt liever iets losser of gebruik je een wat dikkere tricot zoals French Terry teken dan 0.5 tot 1 cm aan bij de zijnaden en de naden van de mouwen. Check voor je gaat knippen of je tevreden bent over de lengte. Als je langer bent dan 1m 75 raad ik aan het shirt te verlengen.
Nodig:
Voor de versie zonder mouwen heb je nodig:
70 cm tot 1 meter zeer rekbare tricot met elasthan of lycra. Afhankelijk van of je wel of geen boorden aan je zoom zet.
! This is a very fitted shirt. If you prefere your shirt a little less tight or if you are using a heavier fabric like French Terry add 1/5 inch up to 1/3 inch to sideseams and sleeves.Check before you start cutting your fabric if you are happy with the length of th shirt, If you are taller than 5 ft. 7 1 recommend adding some length.
You need:
25 1/2 inch up to 40 inches of cotton lycra jersey or cotton elastane jersey depending on adding a band to the bottom or not.
Knippen:
*Voorpand aan vouw 1x
*Achterpand aan vouw 1x
*Mouw 2x (voor en achter zijn gelijk)
Voor korte mouw versies en de de versie met boord onder staan er lijnen op het patroon. Wil je hier een boord aanzetten teken dan 0.7 cm naadwaarde aan. Wil je hier een zoom teken dan 2 cm zoom aan.
*Manchet voor mouw 2x (optioneel)
*Boord onder 2x (optioneel)
Ik heb de boorden van het roze shirt wat breder geknipt dan het patroon. Ze zijn 15 cm. Als je dit doet dat moet je het shirt iets korter knippen.
*Halsboordjes zelf knippen: 5 cm hoog (of 4 als je een smaller biesje mooier vindt) en per maat:
Maat 36: bies voor 16 cm breed aan vouw en bies achter 14.5 cm breed aan vouw.
Maat 38: bies voor 16.5 cm breed aan vouw en bies achter 15 cm breed aan vouw.
Maat 40: bies voor 17 cm breed aan vouw en bies achter 15.5 cm breed aan vouw.
Maat 42: bies voor 17.5 cm breed aan vouw en bies achter 16 cm breed aan vouw.
Maat 44: bies voor 18 cm breed aan vouw en bies achter 16.5 cm breed aan vouw.
cut:
*Frontpiece on fold 1x
*Backpiece on fold 1x
*Sleeve 2x (front and back are identical)
For the shorter sleeve options and the version with a bottom band, you can find cutting lines on the pattern. For cuffs/bands add a 1/4 inch seam allowance, and for hem add 3/4 inch for a hem.
*Sleeve cuff 2x (optional)
*Band bottom 2x (optional)
For the pink top I cut the bottom bands a little wider. They are 6 inches. If you cut the band wider make sure you cut the front and back part of the shirt a bit shorter.
Neck binding cut to size: 2 inch high (of 1 1/2 inch if you prefer a thinner binding and per size:
Size 6: binding front 6 1/3 inch wide on fold and binding back 5 3/4 inch wide on fold.
Size 8: binding front 61/2 inch wide on fold and binding back 5 9/10 inch wide on fold.
Size 10: binding front 6 3/4 inch wide on fold and binding back 6 1/10 inch wide on fold.
Size 12: binding front 6 7/8 inch wide on fold and binding back 6 1/3 inch wide on fold.
Size 14: binding front 7 inch wide on fold and binding back 6 1/2 inch wide on fold.

Werk de schoudernaden af met overlock og zigzag.
Speld de schoudernaad maar laat 0.7 cm open aan de hals.
Finish the edges with overlock or zigzag.
Pin the shoulder seams but leave 1/4 inch open at the neck.

Naai de schoudernaden dicht en laat 0.7 cm open aan de hals.
Close the shoulder seams en leave 1/4 inches open at the neck.

Speld de halsbiezen op elkaar zoals zoals op de foto. De achterbies ligt op de voorbies.
Pin the neckbands as indicated in the photo. The back band goes on top of the front band.

Naai de biezen op elkaar op 0.7 cm vand de rand. Geef een knipje in de hoek.
Sew the neckbands together on 1/4 inch from the edge. Clip the corner.

Speld de biezen langs de hals. Het kruispunt vand de twee op elkaar gestikte biezen komt op het punt waar je de schoudernaden hebt open gelaten.
Pin de bands along the neckline. The crosspoint of the two neckbands needs to be pinned exactly on the point where you left your shoulder seams open.

Stik de halsbiezen langs de hals met een stretch steek setting op je naaimachine.
Sew the neckbands along the neck with the stretch stitch setting on your sewing machine.

Nu kun je de naden afwerken met overlock of zig-zag
Now you can finish the edges with overlock or zig-zag.

Pers de hals plat en stik de hals desgewenst door.
Press the neck and topstitch if desired.

Doorstikken op 0,5 cm van de rand.
Topstitch about 1/5 inches from the edge.

Speld en naai de mouwkop in de mouwopening. gebruik hiervoor een overlock of zigzag steek. Als je een zigzag gebruikt dan moet je er nog een stretch stiksel naast plaatsen. Voor extra strakke lijnen en stevigheid kun je ook naast je overlock nog een stretch stiksel plaatsen.
Pin and sew the top of the sleeve into the sleeve opening. Use an overlock or zigzag stitch. in case of zig-zag put a stretch stitch next to it. For an extra clean line and strength, you can also put a stretch stitch next to the overlock.

Speld de zijnaad in de oksel zo dat de naden van het voor-en achterpand allebei een andere kant op wijzen. Voorpand wijst omhoog, achterpand omlaag. Zo krijg je niet een hele dikke naad. Speld de rest van de zijnaad.
Pin the side seam in the armpit so that the seam of the front-and backpiece each point in a different direction. Front seam up, back seam down. This way you avoid a bulky seam.Pin the rest of the side seam.

Sluit de zijnaden.Gebruik hiervoor een overlock of zigzag steek. Als je een zigzag gebruikt dan moet je er nog een stretch stiksel naast plaatsen. Voor extra strakke lijnen en stevigheid kun je ook naast je overlock nog een stretch stiksel plaatsen.
Close the sideseams. Use an overlock or zigzag stitch. in case of zig-zag put a stretch stitch next to it. For an extra clean line and strength, you can also put a stretch stitch next to the overlock.

Sluit de manchetten met een stretch steek.
Vouw ze in de breedte dubbel, goede kanten naar buiten.
Close the cuffs with a stretch stitch
Fold them over widthwise, right sides on the outside.

Speld de open kanten van de boorden tegen de onderkant van de mouw. Naai de boorden aan de mouwen met een overlock steek of zigzag in combinatie met stretch steek.
Pin the open sides of the cuffs to the edge of the sleeve. Sew the cuff to the sleeve. Again, using overlock or zigzag with an extra stretch stitch.

Meet 2 cm zoom af en strijk naar binnen om. Naai de zoom met een coverlock of tweelingnaald in je naaimachine aan de buitenkant van het shirt.
Measure 3/4 inch hem and press to the inside. Sew the hem with a coverlock stitch or a twin needle in your sewing machine on the outside of your shirt.
Je kunt ook een boord aan je shirt naaien in plaats van een zoom.Volg in dat geval de naai instructies van het shirt met kapmouwtjes.
If you prefer a band instead of a hem, follow the instructions on how to sew a band in the capsleeve shirt tutorial.
Klaar! Op naar de volgende!
Ready! Let’s make another one!
34 notes
·
View notes
Text
Een mooie splitafwerking. A nice way of finishing a skirt slit.

Meet de gewenste breedte van het split af en pers.
Measure the desired width of the slit and press.

Meet de gewenste breedte van de zoom af en pers.
Measure the desired width of the hem and press.
Als je de zoom met een tweelingnaald of een coverlock vastnaait dan hoef je de zoom niet af te locken zoals hier. Wil je de zoom met een enkel stiksel vastnaaien dan moet je de rand overlocken. In de laatste foto van het eindresultaat zie je wel het overlockstiksel.
If you sew the hem with a twin needle or coverlock you don’t have to finish the edge of the hem as you can see in the photo. If you want to sew your hem with a single stitch you do have to finish the edge of the hem.

De ingestreken lijnen kruisen elkaar, met pen heb ik dat extra benadrukt. Zet nu een haakse lijn op deze twee lijnen. (hier aangegeven met een stippellijn.)
The lines that you have just pressed cross one another. With a pen I have emphasised those lines. Now draw a line perpendicular to these lines. (i have dotted this line)

Voeg 0,7 cm naadwaarde toe aan deze lijn en knip langs deze lijn de hoek af.
Add 7 mm./ 1/4 inch seam allowance to this line and cut the corner along this line.

Vouw nu de goede kanten tegen elkaar en speld af op de stippellijn
Fold the right sides together and pin along the (dotted) line.

Stik de hoek af. Knip de overtollige stof in het puntje weg.
Sew along the line and cut away the excess fabric in the corner

Keer om en pers. De split is breder dan de zoom dus de hoek is niet gelijkzijdig.
Turn inside out and press. If your hem and slit is the same width than the inside corner (the overlocked lines) would make a perfect angle.
25 notes
·
View notes
Text
Pencil skirt step by step tutorial Pencil skirt werkbeschrijving

Helemaal hip, deze pencilskirt. Je kunt ‘m formeel of zelfs een beetje chic dragen met met pumps of geef ‘m een sprtief tintje door de gestreepte tailleband en draag ‘m met sneakers. Het rokje is nauwsluitend maar heeft achter een split. Je moet er natuurlijk wel mee kunnen fietsen.
Totally hip, this pencil skirt. Great for the office with high heels or give it a sporty edge with a striped waistband and some sneakers.
The skirt is has a snug fit but the slit in the back makes it easy to move in. Offcourse you should always be able to cycle in it!

Nodig:
*Ongeveer 80 cm tricot. Voor de kortere rok gebruik je 70 cm. Er staat nog een lijn op het patroon om eventueel een kort rokje te maken zonder split. Dan heb je aan 50 cm genoeg. Ik raad aan een stevige tricot te gebruiken voor het beste resultaat. Een goed rekbaar jaquard breisel werkt goed, een Punto di milano of tricot jeans werkt perfect. French terry is ook geschikt mits er elasthan in zit.
*Een strook uni tricot voor de piping en eventueel voor ceintuur en lusjes.
* Een strook plakkkatoen voor de ceintuur.
* Nestelringetjes en tang voor de ceintuur.
* Elastiek 4 cm hoog en breed: voor maat 36: 67 cm voor maat 38: 73 cm voor maat 40: 76 cm voor maat 42: 79 cm voor maat 44: 86 cm
You need:
*About 80 cm/ 31 1/5 inch jersey fabric. For the shorter version about 70 cm/ 27 1/2 and the mini skirt about 50 cm/ 20 inch. On the patterns you will find cutting lines for three different lengths.
I recommend a firm quality with a lot of (two way) stretch. A punto di Milano is perfect, jersey denim works great as well as a French terry with elastane.
* A strip of jersey for piping in the side seam, optional
* A strip of jersey for the belt and loops, optional
* A strip of cotton interfacing for the belt, optional
* Eyelets and pliers for the belt, optional.
* Elastic 4 cm/ 1 1/2 inch wide and length: for size 36/6: 26 1/3 inch for size 38/8: 28 3/4 inch for size 40/10: 30 inch for size 42/12: 31 inch for size 44/14: 33 3/4 inch
Knippen in tricot: Voorpand aan de vouw 1x Achterpand 2x Voor lusjes: een strook stof ongeveer 35 cm hoog en 5,5 cm breed Voor riem: een strook stof van ongeveer 110/120 cm breed en 6,5 cm hoog.
Tailleband: voor maat 36: 67 cm voor maat 38: 73 cm voor maat 40: 76 cm voor maat 42: 79 cm voor maat 44: 86 cm Je kunt de tailleband ook knippen in (gestreepte) boordstof.
Als je piping wil toevoegen in de zijnaad knip je een strook van 2 cm hoog over de gehele stofbreedte.
Cut in jersey Front part on fold1x Back part 2x For loops: a strip of fabric approx. 35 cm/ 13 3/4 inch high en 5,5 cm/ 2 inch wide. For the belt: a strip of fabric of appr. 110 up to 120 cm/ 43 1/3 inch wide en 6,5 cm/ 2,5 inch high.
Waistband: for size 36/6: 26 1/3 inch for size 38/8: 28 3/4 inch for size 40/10: 30 inch for size 42/12: 31 inch for size 44/14: 33 3/4 inch you can also cut the waistband in (striped) ribbed material used for cuffs.
If you want to add piping in the side seam you cut a strip of 2 cm/ 3/4 inch high as long as your skirt length x2.
Knippen in plakkatoen: Voor riem: een strook van ongeveer 110/120 cm breed en 6,5 cm hoog.
Cut in cotton interfacing: For the belt: a strip of approx. 110 up to 120 cm/ 43 1/3 inch wide en 6,5 cm/ 2,5 inch high.

Nu het naaien van de pencilskirt: Neem de figuurnaadjes over van het patroon op de binnenkant van de rok. Ik maak zelf altijd een gaatje in het patroon waar de punt eindigt en zet zo een stipje op de stof. Vervolgens verbind ik die met de kniptekens die ik aan de bovenrand van de rok heb aangegeven.
Now we are going to sew the pencil skirt. Copy the darts from the pattern on the inside of your pattern piece. I always make a little hole on my paper pattern where the dart ends and connect it to the outer ends of the darts.

Leg de lijnen van de figuurnaad op elkaar en speld het figuurnaadje vast.
Lines on top of one another, pin the lines.

Stik de figuurnaadjes in het het voorpand en de twee achterpandjes. Strijk de figuurnaadjes open.
Stitch the darts in the front part and the two back parts.

Nu de split achter: leg de pandjes met de binnenkant boven. Werk de rechte kanten van de spitdelen af met een overlocksteek.Vouw de splitdelen om en strijk plat. Het splitdeel van het linker pand steekt dus uit.
Now the slit in the back: Lay the pattern pieces down with the inside facing up.The outlines of the split parts finished with an overlock stitch. Fold over the slit parts and press. As you can see the slit part of the left part sticks out.

Geef een knipje op de plek waar de achternaad een hoek maakt.
Clip where the line starts to angle.

Leg het linker deel op het rechter deel met de goede kanten op elkaar. Speld de middenachternaad en de schuine kant van de splitdelen op elkaar.
Place the left part on top of the right part, right sides on top of one another. Pin the back seam and the angled part of the slit pieces.

Overlock de naad in een keer. Je kan er eventueel nog een stretchstiksel naast plaatsen voor extra stevigheid.
Overlock/serge the seam in one go. You can add a stretch stitch next to it for extra strength.

Als je het rokpand omdraait ziet het er zo uit.
This is what it looks like once finished.

Als je een pipingrandje in de zijnaad maakt vouw dan de strook uni tricot in de breedte dubbel en speld langs het langs een van de zijnaden van de rok.
If you are making a skirt with piping in the sideseam fold the strip of fabric width ways and pin along the side seams of the from or back parts of your skirt.

Stik de piping op 5 mm van de kant.
Sew the piping 5 mm/ 1/5 inch from the edge

Speld het andere pand er tegen, goede kanten op elkaar en stik de zijnaden met de overlock machine. Als je de piping nog wat smaller wil of voor wat etra stevigheid kun je hiernaast nog een rekbaar stiksel plaatsen.
Pin your skirt parts together, right sides on top of one another and stitch with the overlocker/serger. If you’d like the piping to be a little narrower and/or make the side seams a bit sturdier you can add a stretch stitch next to it.

Ik heb voor deze rok in tricot jeans de achterkant van de stof gebruikt voor de piping. Een rood streepje had ook leuk geweest, of goud..Gebruik wel altijd rekbare stof voor je bies of piping.
For this jersey denim skirt, I used the inside of the fabric for the piping.Red would have been cute too or gold.. Always use stretch fabric for a piping band.

Stik nu het elastiek dicht door de uiteinden op elkaar te leggen en een dubbel stiksel te geven. Stik ook de uiteinden van de tailleband dicht.
Close the elastic band with two lines of stitching as indicated. Also, close the waistband.

Vouw de tailleband om het elastiek heen en geef met spelden aan waar middenvoor komt (middenachter is het naadje) en de zijnaden. Geef ook op de rok aan waar middenvoor komt.
Fold the waistband around the elastic widthwise. Mark mid front with a pin (mid-back is the seam) and the two side points. Also, mark mid front on the skirt

Speld nu de band tegen de bovenkant van de rok en stik vast met de overlock machine. Let op: als je een rokje maakt met ceintuur moet je meteen de lusjes meestikken. Zie bij de werkbeschrijving van de ceintuur onderaan hoe dat moet.
Pin the waistband to the top of the skirt. Attach the waistband with a serger/overlock machine. If you make a skirt with a belt attach the belt loops as well. Scroll down to see the belt/beltloop tutorial.

Als het elastiek niet direct tegen de bovenrant van de rok zit kun je er nog een extra stretch stiksel naast plaatsen. Ook kun je de naad nog een keer doorstikken op 7 mm van de kant aan de goede kant van de rok.
An extra stretch stitching can be placed above the overlock stitch for extra strength. You can also topstitch the top of the skirt appr. 1/4 inch from the edge.

Nu alleen nog de zoom. Vouw de zoom naar binnen op 2 cm. Stik door aan de buitenkant met een tweelingnaald in je naaimachine of een coverlock. Voor de coverlock:omdat dit geen doorlopende zoom is begin ik met stikken op en apart stukje stof en dan naai ik door tot ik bij het begin van de zoom ben. Dit begin stukje haal ik dan uit en de draadjes werk ik weg.
Almost done! Only the hem. Fold in the hem 3/4 inch in and press or pin. On the outside sew the hem with a twin needle or a coverlock machine. When using a coverlock: start on a separate piece of fabric, sew the hem to the end, then take out the first stitches from the separate piece of fabric and neatly finish these threads by hand.

De pencil skirt maak je helemaal compleet met deze ceintuur: Deze gesp kun je zelf overtrekken met stof en is van Prym. Er zit een sjabloontje bij die twee plakkanten heeft. Je verwijderd het papier van een kant en plakt eerst een zijde tegen de binnenkant van de stof.
Complete the pencil skirt with this belt:
This buckle you can cover with fabric. The maker is Prym. It comes with a template with two adhesive sides. You remove one part of the paper en stick it to the inside of a piece of fabric.

Vervolgens knip je langs het sjabloon. Neem ook de knipjes over.
Cut out along the line of the template. Also, copy the cutting lines.

Nu verwijder je de andere laag papier en vouw je de stof om de gesp heen en plak je het vast.
Now remove the other layer of paper and fold the fabric around the clasp.

Zorg dat de stof mooi glad om de gesp heenzit. Knip desnoods nog wat overtollige stof weg.
Smooth out any wrinkles. If needed, cut away some excess fabric.

Nu klik je het achterkantje tegen de gesp. Het pinnetje moet je even vastknijpen met een nijptang.
Now you can click the back part of the clasp in place, The pin needs to be attached with some pliers.

vóila!

Voor de riem strijk je eerst de plakvlieseline tegen de binnenkant van de stof. Vouw de strook in de breedte dubbel (goede kanten op elkaar) en stik op 7 mm van de kant. Vergeet niet het uiteinde in een puntje weg te stikken (hoeft niet). Laat een korte kant open.
For the belt, you first need to iron a layer a cotton interfacing to the inside of the fabric strip you’ve cut to make the belt. Fold the strip widthwise, right sides together and stitch 1/4 inch along the edge. Don’t forget to stitch one end of the belt into a point. Leave one short end open.

Keer om (ik gebruik hiervoor het komme pincetje die je gebruikt om garen in je overlockmachine naalden te rijgen) en strijk plat.
Turn out the belt using a pair of tweezers. (you usually get one with an overlock machine to thread your machine). Once turned, press flat.

Stik de ceintuur rondom door langs de rand. Op 4 a 5 cm van de open kant komt het eerste gaatje. Maak die met een knoopsgaten steek nadat je met een gaatjestang een gaatje hebt gemaakt.
Now topstitch along the edge. Make the first hole 1 1/2 to 2 inch from the open side. You can make this with a buttonhole stitch on your sewing machine after you have made a little hole with a pair of hole puncture pliers

Door dit gaatje gaat het pinnetje zodat je de rand kunt omvouwen naar binnen en vastzetten. Nu even meten om je taille waar je de rest van de gaatjes wil. Deze maak je met de gaatjestang en een pakketje om zelf nestels te maken.
The pin on the clasp will go through the hole and you can fold in the open end of the belt and close it with a topstitch. Now measure on your waist where you want the holes. Puncture the holes with a pair of puncture pliers. Use an eyelet kit for the eyelets and follow the instructions.

Nu nog de lusjes: Vouw het strookje stof voor de lusjes aan beide kanten naar binnen en strijk plat.
For the loops: fold in the strip of fabric towards the middle. press flat.

Nu kun je met de brede tweelingnaald of je coverlock ( ook de setting gebruiken met twee naalden die het verst uit elkaar staan, deze gebruik ik later ook voor de zoom) aan de goede kant doorstikken.
Stich with a (wide) twin needle or a coverlock with the needles in the widest setting ( you can use this setting later on for the hem) on the right side of the loops.

Knip er nu 6 lusjes van.
Now cut it into 6 pieces.

Je speld de ene kant tussen de bovenkant van de rok en de tailleband.
One end will be sewn between the waistband and the top of the skirt.

Vervolgens zet je de tailleband met elastiek aan.
Then you sew your elasticated waistband.

Dan vouw je een randje van het lusje in en stikt het vast aan de bovenkant op de tailleband. Maak het lusje net iets wijder dan de ceintuur.
Fold in the top of the loop and fasten with a topstitch on top of the waistband. The loop should be just a little wider than the belt.

En dit is dan het eindresultaat.
The endresult!
Een superfijn rokje om keer op keer te maken. Veel plezier ervan!
A real wardrobe staple to make and enjoy time and time again!
1 note
·
View note
Text
A-line skirt step by step tutorial A-lijn tricot rokje werkbeschrijving

Onmisbaar in elke retro garderobe dit a-lijn rokje met leuke details!
Je maakt ‘m net zo moeilijk of makkelijk als je zelf wil. Leuk in effen met pipingrandjes of in een print. Een heerlijk zomerrokje of prima met een gekleurde panty en laarzen in de winter.
Unmissable in every retro wardrobe this A-line skirt with great details!
Make it as challenging or easy as you like. Great basic in a plain fabric with piping detail or bold in a print. Breezy in the summer or comfy in the winter with boots and tights.

Nodig: *Ongeveer 80 cm tricot met lycra of elasthan van 150 cm breed. Je kunt eventueel de binnenkant van de heupstukken van een andere stof maken als je tekort komt.Ik raad aan een stevige tricot te gebruiken voor het beste resultaat. Ergens tussen een t-shirt kwaliteit en een french terry in. Als je een dunnere kwaliteit gebruikt voor een zomerrokje dan kun je het beste kiezen voor de eenvoudige methode als laatste beschreven. Deze is helemaal met de lockmachine gemaakt.
*Een strook/stukje uni tricot voor de piping en eventueel voor de binnenkant van de beleg delen en zakjes en voor eventuele stofknoopjes. *Een stukje rekbare plakvlieseline voor de zakjes, zakklepjes, sierklepjes en/of knopenbies.
You need :
*approx. 80 cm / 31 1/2 inch of jersey with lycra or elastane that is 150 cm wide. If you are using up some fabric from your stash you can also use a different fabric for the inside of the waistband.I recommend using a jersey that is not too light/thin. A French terry is also fine.If you do use a light quality then the basic skirt version as described last without details would be the best choice. This one is entirely made with the overlock machine.
* A strip/piece of plain jersey for the piping bands and/or the inside parts of the flaps/ pockets/ waistband/ fabric covered buttons
* A strip/piece of stretch interfacing the inside parts of the flaps/ pockets/ button placket
Knippen in tricot:
Voorpand aan de vouw 1x achterpand aan vouw 1x Heupstukken aan de vouw 4x Sierklepjes 4x Zakjes: 2x Zakvoering: 2x Zakklepjes 4x Knopenbies 1x
De knopenbies knip je op maat:
maat 36: 47 cm lang bij 5 cm breed
maat 38: 47,5 cm lang bij 5 cm breed
maat 40: 48 cm lang bij 5,5 cm breed
maat 42: 48,5 cm lang bij 5,5 cm breed
maat 44: 49 cm lang bij 6 cm breed
Cut in jersey:
Front part on fold 1x (back and front are the same) Back part on fold 1x Hip piece on fold 4x Flaps 4x Pockets 2x Pocket lining 2x Pocket flaps 4x Button placket 1x
Cut the button placket to size:
maat 6: 47 cm/ 18 1/2 inch long 5 cm/ 2 inch wide
maat 8: 47,5 cm/ 18 3/4 inch long 5 cm/ 2 inch wide
maat 10: 48 cm/ 19 inch long 5 cm/ 2 inch wide
maat 12: 48,5 cm/ 19 1/10 inch long/ 2 inch wide
maat 14: 49 cm/ 19 1/3 inch long/ 2 inch wide
Knippen in rekbare vlieseline:
Sierklepjes 2x Zakjes: 2x Zakklepjes 2x Knopenbies 1x
Cut in stretch interfacing:
Flaps 2x Pockets: 2x Pocket flaps 2x Button placket 1x
Knippen in uni tricot:
Een strook van 2 cm hoog over de gehele stofbreedte voor de pipingbiesjes.
Uiteraard maak je een keuze uit de details. Ik leg in onderstaande werkbeschrijving uit hoe je alle details maakt.
Al het stikwerk doe je met een stretchsteek op je naaimachine, doorstikken kan gewoon met een normale steek. Gebruik wel een naald die geschikt is voor tricot. Patroon is inclusief naad waarde.
Cut in plain jersey:
A strip of 3/4 inch the whole width of the fabric for piping.
Offcourse you will make a choice of details. In the following tutorial, I will explain how to make all of them.
All the sewing is done with a stretch stitch on a regular sewing machine, topstitching you can do with a regular, non-stretch stitch. Use a needle suitable for jersey.
The pattern has seam allowance included

Het sierklepje: Strijk de plakvlieseline tegen de verkeerde kant van de stof. Vouw de strook uni tricot in de breedte dubbel, strijk plat en speld langs het klepje. Knip de rest van de strook af. Stik op ongeveer 5 mm langs de kant.
The sideseam flap:
Iron the interfacing on the backside of two flap pieces. Fold the strip of plain fabric in half widthwise, press and pin along the edge of the flap. Cut off the rest of the strip of fabric and keep for other bits that need piping. Sew along the edge.

Speld nu het andere klepdeel ertegen, verkeerde kanten op elkaar en stik op 7 mm van de kant. Laat de korte kant open. Knip tussen de twee stiksels de overtollige stof weg en keer om. ( hier is een geen foto van maar je kunt dit zien bij de werkbeschrijving van het zakklepje en het zakje.)
Pin the other piece against it with the right sides together en sew 7 mm./ 1/4 inch from the edge. Cut in between the two stitching lines and turn inside out. (there is no picture of this step, but you can see it with the pocket tutorial later on :))

Pers het klepje plat en stik door op ongeveer 5 mm langs de rand.
Press the flap and topstitch 1/4 inch from the edge.

Stik het klepje tussen de aangegeven punten op de zijnaad van het rokdeel.
Sew the flap between the indicated points on the skirt.

De knopenbies: Strijk de plakvlieseline tegen de verkeerde kant van de stof.
The button placket: Iron the stretch interfacing to the backside of the placket piece.

Vouw de strook uni tricot in de breedte dubbel en speld langs één kant van de bies. Knip de rest van de strook af en herhaal aan de andere zijde.
Fold the piece of plain fabric widthwise en pin along one edge of the button placket. Cut off the rest of the fabric strip and repeat on the other side.

Stik op ongeveer 7 mm langs de kant. Klap de stroken om naar binnen, alleen het pipingrandje is nu zichtbaar. (de foto is nog voordat het naar binnen werd gevouwen)
Sew the piping on the placket, 7 mm/ 1/4 inch from the edge. Fold to the inside so only the piping is visible. On the photo, you see the stage before folding in.

Strijk een vouw middenvoor op je rokdeel. Dit dient als leidraad voor de op te spelden bies. Speld nu de bies op de rok ( het midden van de bies op de net ingestreken vouw)
Fold the front skirt part in half widthwise and iron flat. The line you created will be used as a guide for the placket. Now pin the placket on the skirt, using the line as a guide.

Stik vast op 5 mm langs de rand.
Topstitch 5mm/ 1/5 inch from the edge.

Verdeel 5 knopen op gelijke afstand op de bies en naai ze aan.
Divide 5 buttons at an equal distance from another and sew them on.

Het zakklepje: Strijk de plakvlieseline tegen de verkeerde kant van 2 zakklepdelen. Vouw de strook uni tricot in de breedte dubbel en speld langs het klepje. Knip de rest van de strook af. Stik op ongeveer 5 mm langs de kant.
The pocket flap:
Iron the stretch interfacing to the inside of two pocket flap pieces. Fold the strip of plain fabric in half widthwise, press and pin along the edge of the flap. Cut off the rest of the strip of fabric and keep for other bits that need piping. Sew along the edge.

Speld nu het andere klepdeel ertegen, verkeerde kanten op elkaar en stik op 7 mm van de kant. Laat de boven (rechte) kant open.
Pin the other piece against it with the right sides together en sew 7 mm./ 1/4 inch from the edge.

Knip tussen de twee stiksels de overtollige stof weg en keer om. Pers het klepje plat en stik door op ongeveer 5 mm langs de rand.
Cut in between the two stitching lines and turn inside out. Press the flap and topstitch 1/4 inch from the edge.

Stik het klepje tussen de aangegeven punten op het rokdeel.
Sew the flap between the indicated points on the top of the skirt.

Het klepje komt uiteindelijk tussen de heupband en het rokdeel. Naai met de hand een knoopje op de klep
Now attach on the hipband to the skirt. Sew on a button by hand.

Het zakje: Strijk de plakvlieseline tegen de verkeerde kant van de stof. Vouw de strook uni tricot in de breedte dubbel en speld langs het klepje. Knip de rest van de strook af. Stik op ongeveer 5 mm langs de kant.
Iron the stretch interfacing to the inside of two pocket pieces. Fold the strip of plain fabric in half widthwise, press and pin along the edge of the pockets. Cut off the rest of the strip of fabric and keep for other bits that need piping. Sew 7 mm./ 1/4 along the edge.

Speld nu het andere zakdeel ertegen, verkeerde kanten op elkaar en stik op 7 mm van de kant. Laat de boven (rechte) kant open.
Pin the other piece against it with the right sides together en sew 7 mm. / 1/4 inch from the edge. Leave the top of the pocket open.

Knip tussen de twee stiksels de overtollige stof weg en keer om.
Cut in between the two stitching lines and turn inside out.

Pers het zakje plat. Naai de bovenkant dicht met de hand.
Press the pocket and close the top of the pocket by hand.

Speld de zak tussen de aangegeven punten op het rokdeel.
Pin the pockets onto the skirt using the guide points on the pattern.

Stik op 7 mm langs de rand op.
Topstitch 7 mm/ 1/4 inch from the edge.

De rok: Als je een pipingrandje wil tussen de rok en het heupdeel vouw dan de strook uni tricot in de breedte dubbel en speld langs het langs de bovenrand van de rok. Stik de piping op de bovenrand. Niet breder dan 5 mm.
The skirt:
If you want to add a piping band to the waistband of the skirt, fold the strip of plain fabric in half widthwise, press and pin along the edge of the top of the skirt. Sew on the piping no further than 5 mm./ 1/5 inch of the edge.

Speld het heupstuk tegen het rokdeel verkeerde kanten op elkaar. Stik op 7 mm van de kant met een stretch steek. Afwerken hoeft niet, er komt een beleg tegen.
Pin the waistband to the skirt with the wrong sides on top of one another. Sew 7 mm./ 1/4 inch from the edge with a stretch stitch. No need to finish the edges, There will be a facing on the inside.

Torn nu het stiksel los waar je de piping mee hebt vastgestikt, dan kun je de naad mooi openpersen.Dit geldt ook voor de versie met zakklepjes, dan torn je de stiksels los waarmee je de klepjes op het rokdeel hebt gestikt.
With a seam ripper undo the stitching you used to fasten the piping. This will allow you to press open the seam. For the variation with the pocket flaps you will do the same.

Strijk nu de naden open.
Press open the seams.

Bij klepjes en/ of knopen bies zorg je ervoor dat de randen van de klepjes omhoog worden geperst.
Make sure with the pocket and/ or button placket variation that the edges are pressed upwards.

Je kunt nu voor en achterpand tegen elkaar spelden, verkeerde kanten op elkaar en dichtstikken met de overlock. je kunt ook eerst de panden aflocken en dan de naden dichtstikken met een stretchsteek. Ik vind dit prettiger omdat dan de naden/piping niet zo gaan schuiven.
Now pin the front part to the back part, right sides on top of one another and close the side seams with an overlock machine. You can also finish the edges first and then close them with a stretch stitch. I prefer this because you can be more precise and you can press open the seams.

Stik nu de zijnaden van de andere twee heupdelen dicht. Dit wordt je beleg. Werk de onderkant van dit beleg af met de overlock. Schuif het beleg heupdeel over het rok heupdeel, goede kanten op elkaar.
Close the side seams of the two facing parts. Finish the edge with an overlock stitch. Slide the facing part over the skirt part, right sides together.

Sik de bovenrand dicht. Strijk deze naad open en vouw naar binnen (op de foto is de naad open gestreken maar het beleg nog niet naar binnen gevouwen)
Sew the facing to the skirt. Iron open the seam and turn inside (on the photo the the seam is pressed open but the facing is not yet folded in.)

Stik de bovenrand door op 7 mm. Speld de onderkant van het beleg vast. Als je een piping hebt gestikt tussen de rok en het heupdeel stik dan het heupstuk door op 7 mm boven de piping.
Topstitch the top of the skirt 7mm./ 1/4 inch from the edge. Pin the bottom of the facing to the skirt on the outside. If you made the piping version, topstitch 7mm./ 1/4 inch from the piping edge.

Zonder piping kun je het beleg mooi vastzetten door in de naad te stikken tusen de rok en het heupdeel.
Without the piping you can place an invisible stitch in the seam in between the waistband and the skirt.

Nu alleen nog de zoom. Vouw de zoom naar binnen op 2 cm. Stik door aan de buitenkant met een tweelingnaald in je naaimachine of een coverlock.
All that is left is the hem. Fold the hem in at 2cm/ 3/4 inch. Stitch on the outside with a twin needle or a coverlock.
Je kunt dit rokje ook helemaal naaien met de lockmachine en een tweelingnaald als je geen details wil en lekker snel klaar wil zijn. Ook fijn als je net begint met naaien. Leg de rokdelen tegen elkaar met de goede kanten op elkaar. Stik de zijnaden. Doe hetzelfde met de heupdelen. Keer een heupdeel om en schuif het andere heupdeel erover. Goede kanten op elkaar. Stik de bovenrand dicht. Je kunt eventueel framilon elastiek meestikken zodat de taille niet teveel uitrekt. (Knip dan de wijdte van je tailleomtrek). Keer de heupband om en stik tegen het rokdeel, goede kanten op elkaar. Nu alleen nog de zoom. Vouw de zoom naar binnen op 2 cm. Stik door aan de buitenkant met een tweelingnaald in je naaimachine of een coverlock.
Need a quick basic skirt? You can sew the skirt without details with the overlock machine.
Pin and sew the skirt parts, right sides together. Pin and sew the waistband, right sides together. Slide one waistband over the other, right sides together. Close the top of the waistband. To stabilize the stretch you can use some silicone tape in the seam. (the width of your waist) Turn the waistband over and pin and sew to the skirt. Right sides together. Fold the hem in at 2cm/ 3/4 inch. Stitch on the outside with a twin needle or a coverlock.
Je rokje is klaar! Op naar de volgende..
Your skirt is done! on to the next one..
1 note
·
View note
Text
Jumper v-neck step by step tutorial Jumper v-hals werkbeschrijving

This retro style jumper with scoop or v-neck with collar is a great wardrobe staple and is super easy to make. Available in long sleeves and short sleeves.
Deze retro stijl jumper met wijde of v-hals met kraag is een geweldige basic en heel eenvoudig te maken. Je kunt ‘m maken met lange mouw of korte mouw.
Fabric advise:
Use a light knit like a cotton/elastane or a knit jaquard fabric. (this is a knitted fabric with a print knitted into the fabric rather than printed on it)
Yardage/ meters needed:
Main fabric: about 19 1/2″/ to 23 1/2″ (50/60 cm (depending on the size) for the short sleeve version and 27 1/2″ to 29 1/2″(70/75cm) for the long sleeve version.
Ribbed knit suitable for cuffs: This knitted fabric is often tubular and 13″ to 14,5″ (33 to 37 cm) wide. Some are more elastic than others so it is hard to give a precise indication. Measure the width on your pattern. If you have fabric that is about 14,5″ (37 cm) wide than you can cut it once for size 6 and 8 . Because it is one piece there will be no side seams. Larger sizes need to cut the band 2x and put side seams in. To cut once (plus cuffs) you will need about 15 3/4″/ 19 1/2″ (40-50 cm) If you need to cut twice you will need an extra 12″(30cm)
Stof advies:
Katoen/lycra of katoen/elasthane tricot.Of gebruik een jaquard tricot. Dit is een tricot waar het patroon ingebreid is i.p.v. er op gedrukt.
Hoeveelheid stof nodig:
Stof body: afhankelijk van de maat 50/70 cm voor de korte mouw versie en 70/85 cm voor de lange mouw versie.
Boordstof: boordstof is vaak rondgebreid en is 33-37 cm breed. Afhankelijk van de wijdte van de boordstof heb je voor maat 36/38 genoeg aan 50 cm.Maak je maat 40/44 dan moet je waarschijnlijk 2x het boord knippen en heb je een extra 25 cm nodig.

Knip alle delen uit als volgt:
Voorpand: 1x aan de vouw
Achterpand: 1x aan de vouw
Kraag: 2x knippen
Geef met een speld aan waar de schouders komen, er staan knip tekens op het patroon
Knip de kraag ook 1x in rekbare plakvlieseline.
Mouw: 2x knippen
! niet alle delen staan op de foto. Het werd anders te moeilijk om alles in een foto te krijgen. Let dus op de beschrijving en niet op de foto voor de aantallen en wel/niet aan vouw.
Beleg: 1X knippen aan de vouw.
Boord zelf knippen: voor maat 36 en 38: knip een stuk boordstof van 24 cm hoog.
De boordstof is rondgebreid dus er hoeven geen naadjes in.
Voor maat 40 t/m 44 zou ik aanraden het boord wat ruimer te knippen, dit betekend dat er dus zijnaden in moeten tenzij het een wat lossere/ wijdere boordstof is. Dus eerst even opmeten.
Voor maat 40 knip je 2x een stuk van 24 cm hoog en 36 cm breed.Dit is inclusief naad.
Voor maat 42 knip je 2x een stuk van 24 cm hoog en 37 cm breed.Dit is inclusief naad.
Voor maat 44 knip je 2x een stuk van 24 cm hoog en 38 cm breed.Dit is inclusief naad.
Mouwbies lange mouw zelf knippen:
Maat 36: 17 cm breed bij 14 cm hoog
Maat 38: 17,5 cm breed bij 14 cm hoog
Maat 40: 18 cm breed bij 14 cm hoog
Maat 42: 18,5 cm breed bij 14 cm hoog
Maat 44: 19 cm breed bij 14 cm hoog
Mouwbies korte mouw zelf knippen:
Maat 36: 23,5 cm breed 9,5 cm hoog
Maat 38: 24 cm breed 9,5 cm hoog
Maat 40: 24,5 cm breed 9,5 cm hoog
Maat 42: 25 cm breed 9,5 cm hoog
Maat 44: 25,5 cm breed 9,5 cm hoog
Heb je afmetingen die afwijken van de maten op de maatspecificatie? (Je kunt de maatspecificatie met het patroon uitprinten)
Als je omlaag scrollt tot je de werkbeschriving van het vestje hebt gevonden dan vind je daar een methode om het patroon aan te passen.

Finish the edges of the shoulder with an overlock/serger or zigzag stitch. Lay the right sides on top of one another. Then sew with a stretch stitch on 1/3″ of the edge.(there is a stretch stitch setting on your sewing machine.
Or sew and finish in one go with the overlock/serger. You wil get a thicker seam.
Werk de randen van de schouders af met een overlock stiksel of zigzag. Stik de naden met de goede kanten op elkaar op 0.7 cm afstand van de rand. Strijk de naad open.
Of werk de naden samen af met de overlockmachine. Je krijgt dan wel een dikkere naad.

Press the seams open en turn over.
Pers de naden open en keer om.

Iron the lining on your facing and on one of you collarparts.
Right sides together sew 0.7 mm along the edge of the collar.
Trim away some excess fabric only of the corners.
Strijk de vlieseline op een van de kraagdelen.
Goede kanten op elkaar, stik de kraag dicht op 0.7 cm van de rand.Laat de hals open.(dit is de korte kant)
Knip de hoekjes weg .

Close up of how to trim away the corners.
Close up van de weggeknipte hoekjes.
(bij tricot stof die niet “rafelt” kun je nog iets meer wegknippen.)

Press the collar and staystitch the edge on 7 mm width.
Pers het kraagje plat en stik door op 0,5/0,7 cm.

Fold the collar width wise, and mark the midback.
Also mark midback on your neckline.
Pin the collar along the neck. Start midback, then shoulder (which you have marked with a pin on the collar previously) the front.
The part without interfacing will be pinned along the neck.
Vouw de kraag in de breedte dubbel en markeer het middenachterpunt. Markeer ook het middenachter punt van de hals.
Speld de kraag langs de hals. Begin middenachter, dan de schouders (het schouderpunt heb je als het goed is al eerder gemarkeerd op de kraag) en dan voor.
Het niet geplakte deel komt tegen de hals.

Once pinned, attach the collar to the neck with a serger or zigzag stitch.
Je kunt nu de kraag aanstikken met lockmachine of zig-zag steek.

Zig-zag or overlock the edges of the facing part.
Zig-zag of lock de randen van het beleg.

Pin the facing along the neckline and stitch along the edge with a stretch stitch.
Speld het beleg tegen de hals en stik vast met een stretch steek.

Along the neckseam you need to clip away some acess fabric like indicated in this drawing.The triangles are cut outs, the (horiontal) marks are one clippings.
Langs de hals de naad wat uitdunnen. Zie tekening. De driehoekjes wegknippen, de (horiontale) streepjes inknippen.

Fold the facing part over to the inside.
Staystitch along the (front and back) neckline about 0,7 mm from the edge.
Vouw het beleg naar binnen.
Stik de halslijn (voor en achter) door op ong. 0,5/0,7 cm van de rand.

And this is what it looks like on the outside.
Zo ziet het er aan de buitenkant uit.

Pin the sleeves into the armholes using the markings on the pattern.
Sew the sleeves into the armhole using a overlock machine/serger or zigzag. If you sew the sleeves in with a zigzag you need to place an additional stretch stitch next to it. For extra strength you can place an additional stretch stitch next to it.The facing will be secured in the sleeveopening.
Speld de mouwen in de armsgaten. Gebruik hierbij de pastekens op het patroon
Stik de mouwen in de armsgaten met een lockmachine of gebruik een zigzag steek op de naaimachine.Voor extra stevigheid kun je er nog een extra stretch stiksel naast plaatsen.Doe dit zowieso als je een zig-zag steek hebt gebruikt. Het beleg wordt ook meteen meegestikt in de mouwopening.

Sew the sleeves and side seams in one go using a overlock machine/serger or zigzag. If you sew the sleeves in with a zigzag you need to place an additional stretch stitch next to it. Fold the front seam up and the back seam down. This way you don’t get two seams on top of one another. For extra strength you can place an additional stretch stitch next to it.
Stik de mouwen en zijnaden in een keer dicht met een lockmachine of gebruik een zigzag steek op de naaimachine. In dat geval moet je er nog een stretchstiksel naastplaatsen. Vouw de naad voor omhoog en de naad achter omlaag. Zo voorkom je dat je twee stoflaagjes op elkaar hebt. Voor extra stevigheid kun je er nog een extra stretch stiksel naast plaatsen.

Now close the cuffs and the waisband (size 10/14 only).
Stik nu de machetten dicht en eventueel de zijnaden van de heupband (maat 40/44)

Fold over de hipband widthwise. Divide into 4 equal parts and mark with a pin. (midfront, midback and sideseams.)
Mark on your shirt where the midfront and midback is.
You can now pin your hipband to the bottom of the shirt, right sides together.
Sew your hipband to the shirt. If you use a zig-zag, place an additional stretch stitch next to it.
Vouw de heupband in de breedte om. Deel de heupband in vieren, en markeer met een speld. (voor-, achter- en zijnaden). Markeer ook het midden van je voor en achterpand.
Je kunt nu met behulp van deze markeerpunten de band gelijkmatig vastspelden.Goede kanten van de stof op elkaar.
Met de lockmachine stik je de heupband rondom aan. Gebruik je zigzag, dan weer even een extra stretch stiksel ernaast paatsen.

Pin the cuff to the edge of the sleeve. Stitch with overlocker or the zig-zag setting on your sewing machine.
Vouw de manchetten in de breedte om, speld en stik ze aan de onderrand van de mouwen.Gebruik je zigzag, dan weer even een extra stretch stiksel ernaast paatsen.

All Done! Enjoy!! (don’t pay attention to the seam midback, I was running out of fabric!:-))
Het is klaar! Veel draagplezier!! (let niet op de middenachternaad, ik had niet genoeg stof!:-))
1 note
·
View note
Text
Jumper step by step tutorial Jumper werkbeschrijving

This retro style jumper with scoop or v-neck with collar is a great wardrobe staple and is super easy to make. Available in long sleeves and short sleeves.
Deze retro stijl jumper met wijde of v-hals met kraag is een geweldige basic en heel eenvoudig te maken. Je kunt ‘m maken met lange mouw of korte mouw.
Fabric advise:
Use a light knit like a cotton/elastane or a knit jaquard fabric. (this is a knitted fabric with a print knitted into the fabric rather than printed on it)
Yardage/ meters needed:
Main fabric: about 19 1/2″/ to 23 1/2″ (50/60 cm (depending on the size) for the short sleeve version and 27 1/2″ to 29 1/2″(70/75cm) for the long sleeve version.
Ribbed knit suitable for cuffs: This knitted fabric is often tubular and 13″ to 14,5″ (33 to 37 cm) wide. Some are more elastic than others so it is hard to give a precise indication. Measure the width on your pattern. If you have fabric that is about 14,5″ (37 cm) wide than you can cut it once for size 6 and 8 . Because it is one piece there will be no side seams. Larger sizes need to cut the band 2x and put side seams in. To cut once (plus cuffs) you will need about 15 3/4″/ 19 1/2″ (40-50 cm) If you need to cut twice you will need an extra 12″(30cm)
Stof advies:
Katoen/lycra of katoen/elasthane tricot.Of gebruik een jaquard tricot. Dit is een tricot waar het patroon ingebreid is i.p.v. er op gedrukt.
Hoeveelheid stof nodig:
Stof body: 50/70 cm voor de korte mouw versie en 70/85 cm voor de lange mouwversie.
Boordstof: boordstof is vaak rondgebreid en is 33-37 cm breed. Afhankelijk van de wijdte van de boordstof heb je voor maat 36/38 genoeg aan 50 cm.Maak je maat 40/44 dan moet je waarschijnlijk 2x het boord knippen en heb je een extra 25 cm nodig.

The neck binding cut to size:
Size 6 /EU36:neck binding: 1 1/4″ or 3 cm wide and 11 1/3″ or 28,7 cm long on fold.
Size 8 /EU38: neckbinding: 1 1/4″ or 3 cm wide and 11 5/8″ or 29,5 cm long on fold.
Size 10 /EU40: neckbinding : 1 1/4″ or 3 cm wide and 11 15/16″ or 30,2 cm long on fold.
Size 12 /EU42: neckbinding : 1 1/4″ or 3 cm wide and 12 1/4″ or 31 cm long on fold.
Size 14 /EU44: neckbinding : 1 1/4″ or 3 cm wide and 12 1/2″ or 31,7 cm long on fold.
Knip alle delen uit als volgt:
Voorpand: 1x aan de vouw
Achterpand: 1x aan de vouw
Mouw: 2x knippen
Boord zelf knippen: voor maat 36 en 38 knip een stuk boordstof van 24 cm hoog.
De boordstof is rondgebreid dus er hoeven geen naadjes in
Voor maat 40 t/m 44 zou ik aanraden het boord wat ruimer te knippen, dit betekend dat er dus zijnaden in moeten Tenzij het een wat lossere/ wijdere boordstof is. Dus eerst even opmeten.
Voor maat 40 knip je 2x een stuk van 24 cm hoog en 36 cm breed.Dit is inclusief naad.
Voor maat 42 knip je 2x een stuk van 24 cm hoog en 37 cm breed.Dit is inclusief naad.
Voor maat 44 knip je 2x een stuk van 24 cm hoog en 38 cm breed.Dit is inclusief naad.
De halsbies knip je zelf:
Maat 36: halsbies : 3 cm breed en 28,7 cm lang aan de vouw.
Maat 38: halsbies : 3 cm breed en 29,5 cm lang aan de vouw.
Maat 40: halsbies : 3 cm breed en 30,2 cm lang aan de vouw.
Maat 42: halsbies : 3 cm breed en 31 cm lang aan de vouw.
Maat 44: halsbies : 3 cm breed en 31,7 cm lang aan de vouw.
Mouwbies lange mouw zelf knippen:
Maat 36: 17 cm breed bij 14 cm hoog
Maat 38: 17,5 cm breed bij 14 cm hoog
Maat 40: 18 cm breed bij 14 cm hoog
Maat 42: 18,5 cm breed bij 14 cm hoog
Maat 44: 19 cm breed bij 14 cm hoog
Mouwbies korte mouw zelf knippen:
Maat 36: 23,5 cm breed 9,5 cm hoog
Maat 38: 24 cm breed 9,5 cm hoog
Maat 40: 24,5 cm breed 9,5 cm hoog
Maat 42: 25 cm breed 9,5 cm hoog
Maat 44: 25,5 cm breed 9,5 cm hoog
Heb je afmetingen die afwijken van de maten op de maatspecificatie? Je kunt deze met het patroon uitprinten)
Als je omlaag scrolled tot je de werkbeschriving van het vestje hebt gevonden dan vindt je daar een methode om het patroon aan te passen.

Finish the edges of the shoulder with an overlock/serger or zigzag stitch. Lay the right sides on top of one another. Then sew with a stretch stitch on 1/3″ of the edge.(there is a stretch stitch setting on your sewing machine.
Or sew and finish in one go with the overlock/serger. You wil get a thicker seam.
Werk de randen van de shouders af met een overlock stiksel of zigzag. Stik de naden met de goede kanten op elkaar op 0.7 cm afstand van de rand. Strijk de naad open.
of werk de naden samen af met de overlockmachine. Je krijgt dan wel een dikkere naad.

Press the seam open.
Pers de naad open

Pin the sleeves into the armholes using the markings on the pattern.
Sew the sleeves into the armhole using a overlock machine/serger or zigzag. If you sew the sleeves in with a zigzag you need to place an additional stretch stitch next to it. For extra strength you can place an additional stretch stitch next to it.
Speld de mouwen in de armsgaten. Gebruik hierbij de pastekens op het patroon
Stik de mouwen in de armsgaten met een lockmachine of gebruik een zigzag steek op de naaimachine. In dat geval moet je er nog een stretchstiksel naastplaatsen.Voor extra stevigheid kun je er nog een extra stretch stiksel naast plaatsen.

Sew the sleeves and side seams in one go using a overlock machine/serger or zigzag. If you sew the sleeves in with a zigzag you need to place an additional stretch stitch next to it. Fold the front seam up and the back seam down. This way you don’t get two seams on top of one another. For extra strength you can place an additional stretch stitch next to it.
Stik de mouwen en zijnaden in een keer dicht met een lockmachine of gebruik een zigzag steek op de naaimachine. In dat geval moet je er nog een stretchstiksel naastplaatsen. Vouw de naad voor omhoog en de naad achter omlaag. Zo voorkom je dat je twee stoflaagjes op elkaar hebt. Voor extra stevigheid kun je er nog een extra stretch stiksel naast plaatsen.

So far so good..
Het schiet al op..

Now close the cuffs and the neckband.
Stik de zijnaadjes dicht van de manchetten en halsbies. Vouw de halsbies in de breedte dubbel.

Pin the neckband along the neckline .You will have to stretch the band a bit.
Once pinned, stitch the neck with a serger or zigzag stitch. To get a nice clean finish, place an aditional stretch stitch next to it. (on the photo you see the neck just before I put the stretch stitch in.)
Speld nu de halsbies aan de hals terwijl je de bies wat uitrekt.
Je kunt nu de halsbies aanstikken met lockmachine of zig-zag steek.
Voor een strakkere halslijn is het mooi om er nog een stretch streek langs te paatsen.

Fold the cuff in half once closed.
Vouw de manchet in de breedte om als het naadje is dichtgestikt.

Pin the cuff to the edge of the sleeve. Stitch with overlocker or the zig-zag setting on your sewing machine.
If you use a zig-zag, place an additional stretch stitch next to it.
Speld de machet aan de rand van de mouw en stik vast met de overlock machine of met een zig-zagsteek.
Gebruik je een zig- zagsteek dan nog een extra stretch stiksel ernaast plaatsen.

For size 10-14: first close the sideseams of the hipband.
Pin the hip band to the edge of the shirt. Stitch with overlocker or the zig-zag setting on your sewing machine.
If you use a zig-zag, place an additional stretch stitch next to it.
Voor maat 40-44: Sluit eerst de zijnaden van de heupband.
Speld de heupband aan de rand van het shirt en stik vast met de overlock machine of met een zig-zagsteek.
Gebruik je een zig- zagsteek dan nog een extra stretch stiksel ernaast plaatsen.

All Done! Enjoy!!
Het is klaar! Veel draagplezier!!
0 notes
Text
Sweetheart top step by step tutorial Sweetheart hemdje werkbeschrijving

This top with sweetheart neckline and ruffles at the front is a real retro classic and is super easy to make !
Dit hemdje met “sweetheart” hals en rimpeltjes voor is een echte retro klassieker en is heel eenvoudig te maken !
Fabric advise:
Use a light knit like a cotton/elastane
Yardage/ meters needed:
About 29 1/2″/ to 39 1/3″ (75cm)
You also need: a thin piece of elastic 2 3/8″ long
Stof advies:
Katoen/lycra of katoen/elasthane tricot.
Hoeveelheid stof nodig:
Ongeveer 75 cm
Verder nodig: Een stukje elastiek van 6 cm.

Once you have downloaded the PDF from Etsy, print out your pattern pieces at 100%. Measure the square on the pattern to check if you have printed out the correct scale. Each page is framed by 4 tick marks. These allow you to align correctly all of the pages. Cut them out and sellotape them together to create all the complete pattern pieces. 1/3 inch or 7 mm seam allowance is indicated on the main pattern pieces. Once a piece is assembled it will look like this. You can now cut out the pattern Or trace it on pattern paper.
Your pattern consists of: one front pieces and a back piece .
The neck and armhole binding cut to size:
Size 6 /EU36:neck binding: 1 1/4″ or 3 cm wide and 11 1/3″ or 28,7 cm long on fold.
Armhole binding: 1 1/4″ or 3 cm wide and 7 1/2″ or 19 cm long on fold.
Size 8 /EU38: neckbinding: 1 1/4″ or 3 cm wide and 11 5/8″ or 29,5 cm long on fold.
Armhole binding: 1 1/4″ or 3 cm wide and 7 7/8″ or 20 cm long on fold.
Size 10 /EU40: neckbinding : 1 1/4″ or 3 cm wide and 11 15/16″ or 30,2 cm long on fold.
Armhole binding: 1 1/4″ or 3 cm wide and 8 1/4″ or 21 cm long on fold.
Size 12 /EU42: neckbinding : 1 1/4″ or 3 cm wide and 12 1/4″ or 31 cm long on fold.
Armhole binding: 1 1/4″ or 3 cm wide and 8 2/3″ or 22 cm long on fold.
Size 14 /EU44: neckbinding : 1 1/4″ or 3 cm wide and 12 1/2″ or 31,7 cm long on fold.
Armhole binding: 1 1/4″ or 3 cm wide and 8 2/3″ or 23 cm long on fold.
Print alle delen van je patroon uit. Meet het vierkantje op het patroon om te controleren of je op 100% hebt geprint.
Knip de patroondelen uit en plak met plakband aan elkaar. De naad is er aan aangetekend. (0,7 cm dat is de breedte van een locksteek)
Als een pandje aan elkaar is geplakt ziet het er zo uit.
Je patroon bestaat uit:
Een voorpand
Een achterpand
De halsbies en de armsgat bies knip je zelf:
Maat 36 halsbies : 3 cm breed en 28,7 cm lang aan de vouw.
Armsgatbies : 3 cm breed en 19 cm lang aan de vouw.
Maat 38: halsbies : 3 cm breed en 29,5 cm lang aan de vouw.
Armsgatbies : 3 cm breed en 20 cm lang aan de vouw.
Maat 40: halsbies : 3 cm breed en 30,2 cm lang aan de vouw.
Armsgatbies : 3 cm breed en 21 cm lang aan de vouw.
Maat 42: halsbies : 3 cm breed en 31 cm lang aan de vouw.
Armsgatbies : 3 cm breed en 22 cm lang aan de vouw.
Maat 44: halsbies : 3 cm breed en 31,7 cm lang aan de vouw.
Armsgatbies : 3 cm breed en 23 cm lang aan de vouw.
Before we start, first some advice about adapting the pattern if your chest, waist or hip measurements are (very) different from the measurement chart.
1. choose the size that is closest to your measurements. If you’re not sure choose the size that has the chest width that is closest to yours.
2. The measurements you can adapt are: chest width, waist width and/or hip width.
3. The measurements in the pattern compared to the body measurements are as follows:
The chest width on the pattern is 100% of the chest width on the measurement chart.
The waist width on the pattern is 110% of the waist width on the measurement chart.
The hip width on the pattern is 97% of the hip width on the measurement chart.
For example: a chestwidth of 38 ½ “/ 98 cm, waist 29 7/8″ / 76 cm and hip 41 ¾ “/ 106 cm. These measurements are most similar to size 12 / size 42 ( chestwidth 37″/ 94cm, Waist 30 3/4″/ 78 cm, hip 41″/ 104 cm.
Your new pattern measurements are going to be:
Chest width: 100% of 38 1/2″/ 98cm = 38 1/2″ /98 cm
Waist width: 110% of 29 7/8″/ 76 cm = 32 15/16″/83,6 cm
Hip width: 97% of 41 3/4″/106 cm = 40 1/2″/102,8 cm
4. Divide these measurements by 4 and measure them from the midback line of your assembled back pattern piece. Mark out your new chest width, waist (in between the two black dots) and hip width.
If your measurements are bigger than the ones on your pattern the mark will be outside the dotted line,if your measurements are smaller than the ones on your pattern the mark will be inside the dotted line.
5. Connect the marking points. Draw een small vertical line at the waist.
6. Now add 1/3″/ 0,7cm seam allowance (This will also give you the opportunity to draw your hip line with a bit of a curve to it). Copy this line on your front pattern piece.
7. If you need to make the pattern longer you need to do this at waist height and bottom height. If you for instance need to add 2 inches you cut the pattern in half at the waist (the narrowest part). Stick a piece of paper to the top part. Measure 1 inch down and stick down the bottom part. Add another inch to the bottom hem.
Your alteration is done!
Voor we beginnen, eerst wat advies over het aanpassen van het patroon als je bovenwijdte, taillewijdte of heupwijdte (sterk) afwijkt van de maattabel.
1. kies de maat die het meest overeenkomt met jouw afmetingen. Ben je niet zeker kies dan de maat die het dichtst bij je bovenwijdte ligt.
2. De afmetingen die je kunt aanpassen zijn bovenwijdte, taillewijdte en/of heupwijdte.
3. De afmetingen in het patroon ten opzichte van de lichaamsmaten zijn als volgt:
De bovenwijdte van het patroon is 100% van de bovenwijdte in de maattabel.
De taillewijdte van het patroon is 110% van de taillewijdte in de maattabel.
De heupwijdte van het patroon is 97% van de heupwijdte in de maattabel.
Stel iemand heeft bovenwijdte 98cm, taille 76 en heup 106. Deze maten hebben het meest overeen met maat 42 ( bovenwijdte 94, taille 78, heup 104).
Dan worden de afmetingen voor het patroon:
Bovenwijdte: 100% van 98cm = 98 cm
Taillewijdte: 110% van 76 cm= 83,6 cm
Heupwijdte: 97% van 106 cm = 102,8 cm
4.Deel deze afmetingen door 4 en meet ze af op het achterpand van je aan elkaar geplakte patroondelen vanaf de middenachter lijn. Zet een stip op je nieuwe bovenwijdte, taillewijdte (tussen de twee zwarte stippen) en heupwijdte. Als je afmetingen groter zijn dan de afmeting op het patroon zal de stip buiten de stippellijn vallen, is de afmeting kleiner dan valt het erbinnen.
5.Verbind nu de stippen met elkaar, het stuk op taillehoogte teken je een stukje vertikaal.
6. Nu nog de 0.7 cm naad aantekenen (je kunt het dan meteen een beetje mooier rond bijtekenen, vooral het stukje tussen taille en heup). Kopieer nu deze lijn op het voorpand.
Als je de bovenwijdte hebt aangepast, dan ook de mouw met eenzelfde aantal cm. aanpaseen. Anders past de mouw niet meer in het armsgat.
7. Om te verlengen is het het mooiste als je de extra lengte verdeeld over de taille (het smalste deel) en de heup (onderaan). Dus wil je het shirt 4 cm langer knip dan het patroon door bij de taille. Plak een stukje papier aan het bovendeel, teken 2cm aan en plak de onderkant daar weer tegen aan. Teken vervolgens nog eens 2 cm bij aan de onderkant.
Het aangepaste patroon is klaar!

Time to cut out our pieces !
Cut on fold: front and back 1x, neckband 1x, armhole band 2x
We gaan knippen!
Leg aan de vouw: voor en achterpand 1x, halsbies 1x armsgat bies 2x
We begin the sewing!
We gaan beginnen met naaien.
Finish the edges with an overlock/serger or zigzag stitch. Lay the right sides on top of one another. Then sew with a stretch stitch on 1/3″ of the edge.(there is a stretch stitch setting on your sewing machine.
Press the seam open.
Or sew and finish in one go with the overlock/serger. You wil get a thicker seam.
Werk de randen af met een overlock stiksel of zigzag. Stik de naden met de goede kanten op elkaar op 0.7 cm afstand van de rand. Strijk de naad open.
Of werk de naden samen af met de overlockmachine. Je krijgt dan wel een dikkere naad.

Now the neckband and the armhole bands.
Close neckband. (ignore the pins in the neckband, this was to stop the neckband from curling up.)
Mark the middle of the armhole band with a pin.
Fold neckband in half, width wise. Pin the neckband to the neck making sure you stretch the band as you’re pinning.
Nu de halsbies en armsgat biezen.
Sluit de halsbies. (let niet op de spelden in de halsbies, deze stak ik er in tegen het omkrullen)
Markeer het midden van de armsgat biezen met een speld.
Vouw de halsbies in de breedte dubbel en speld de halsbies tegen de hals. Let er op dat je het wat uitrekt terwijl je dit doet.

Sew the neckband into the neck using a overlock machine/serger or zigzag. If you sew the neckband with a zigzag you need to place an additional stretch stitch next to it. For extra strength you can place an additional stretch stitch next to it.
Topstitch the edges a few mm. from the edge. (approx. 0.15″)
Stik de halsbies langs de hals met een lockmachine of gebruik een zigzag steek op de naaimachine. In dat geval moet je er nog een stretchstiksel naastplaatsen.Voor extra stevigheid kun je er nog een extra stretch stiksel naast plaatsen.
Stik de hals en armsgat door op een paar mm. van de kant.

With the tip of the iron press a line midfront about 6″ or 15 cm on the inside.
Strijk een vouw middenvoor van ong. 15 cm aan de binnenkant van het shirt.

On the inside : stitch a little diagonal line midfront of the neckband.
Stik je halsbies schuin af middenvoor aan de binnenkant.

Measure 4 3/4″ or 12 cm from the bottom of the neckbinding.
Pin your piece of elastic from the bottom of the neckbinding to the 4 3/4″ or 12 cm point.
Meet 12 cm vanaf de onderkant van de halsbies
Speld het stukje elastiek van de onderkant van de halsbies tot het net gemarkeerde punt op 12 cm.

While stretching the elastic, stitch the elastic on the mid front line (you pressed in earlier) of the t-shirt. When you unstretch the elastic after it is sewn the gathering will appear.
Stik het elastiek op de middenvoorlijn (die je er eerder hebt ingestreken) terwijl je het elastiekje uitrekt. Als je het gestikt hebt en het loslaat verschijnen de rimpeltjes.

Now close the sideseams.When using a serger it is a good idea to lift the foot, move the piece you want to sew as far to the front as possible so the first stitch will get directly in to the fabric. ( so don’t sew a few stitches first without the fabric) The first few stitches I sew using the handwheel instead of the footpedal to have precise control where my first stitches will go.
Nu de zijnaden sluiten.Doe dit met de lockmachine of zigzag. Ik til altijd het voetje op, schuif het te naaien stuk zover mogelijk naar voren tegen de naalden zodat de eerste steek direct in de stof komt. (dus niet eerst een stukje naaien en dan pas de stof invoeren). De eerste steken draai ik even aan het handwiel zodat je het eerst stukje heel precies kunt naaien.

Handstitch the steam in the armhole.
Zet de naad met een paar steekjes vast in het armsgat.
Je kunt er ook voor kiezen om eerst de zijnaden dicht te naaien, de armsgatbies te sluiten en dan het armsgat om te biezen. Je krijgt dan geen dik stuk onder de arm. Deze methode is iets bewerkelijker.

So the overlock seam is not visible under the arm.
Zodat het overlock stiksel niet zichtbaar is onder de arm.

All that’s left to do now is pressing in your bottom hem 3/4″ or 2 cm. Sew on the outside using a twin needle on your sewing machine or a coverlock.
Your top is ready! Make one in every color in the rainbow!
Nu alleen nog de zoom naar binnen persen op 2 cm en aan de buitenkant omzomen met een tweelingnaald in de naaimachine of een coverlock.
Je hemdje is klaar! Naai een heel stapeltje van deze fijne topjes.
2 notes
·
View notes
Text
Sweetheart top step by step tutorial Sweetheart tshirt werkbeschrijving
This t-shirt with sweetheart neckline and gathering at the front is a real retro classic and is super easy to make. Available in long and short sleeves.
Dit t-shirt met “sweetheart” hals en rimpeltjes voor is een echte retro klassieker en is heel eenvoudig te maken. Je kunt ‘m maken met lange en korte mouw.

Fabric advise:
Use a light knit like a cotton/elastane
Yardage/ meters needed:
About 29 1/2″/ to 39 1/3″ (75/100 cm (depending on sleeve length)
You also need: a thin piece of elastic 2 3/8″ long
Stof advies:
Katoen/lycra of katoen/elasthane tricot.
Hoeveelheid stof nodig:
Ongeveer 75/100 cm afhankelijk van mouwlengte
Verder nodig: Een stukje elastiek van 6 cm.

Once you have downloaded the PDF from Etsy, print out your pattern pieces at 100%. Measure the square on the pattern to check if you have printed out the correct scale. Each page is framed by 4 tick marks. These allow you to align correctly all of the pages. Cut them out and sellotape them together to create all the complete pattern pieces. 1/3 inch or 7 mm seam allowance is indicated on the main pattern pieces. Once a piece is assembled it will look like this. You can now cut out the pattern Or trace it on pattern paper.
Your pattern consists of one front piece, a back piece and sleeve with a line indicating the short sleeve.
When making the short sleeve option make sure to add seam allowance.
The neckbinding you have to cut to size:
Size 6 /EU36: Neckbinding : 1 1/4″ or 3 cm wide and 11 1/3″ or 28,7 cm long on fold.
Size 8 /EU38: Neckbinding : 1 1/4″ or 3 cm wide and 11 5/8″ or 29,5 cm long on fold.
Size 10 /EU40: Neckbinding : 1 1/4″ or 3 cm wide and 11 15/16″ or 30,2 cm long on fold.
Size 12 /EU42: Neckbinding : 1 1/4″ or 3 cm wide and 12 1/4″ or 31 cm long on fold.
Size 14 /EU44: Neckbinding : 1 1/4″ or 3 cm wide and 12 1/2″ or 31,7 cm long on the fold.
Print alle delen van je patroon uit. Meet het vierkantje op het patroon om te controleren of je op 100% hebt geprint.
Knip de patroondelen uit en plak met plakband aan elkaar. De naad is er aan aangetekend. (0,7 cm dat is de breedte van een locksteek)
Als een pandje aan elkaar is geplakt ziet het er uit als bovenstaande foto.
Je patroon bestaat uit:
Een voorpand
Een lange mouw met een deelnaad voor korte mouwen. Als je de korte mouw versie maakt, teken dan wel naad aan.
Een achterpand
De halsbies knip je zelf:
Maat 36: halsbies : 3 cm breed en 28,7 cm lang aan de vouw.
Maat 38: halsbies : 3 cm breed en 29,5 cm lang aan de vouw.
Maat 40: halsbies : 3 cm breed en 30,2 cm lang aan de vouw.
Maat 42: halsbies : 3 cm breed en 31 cm lang aan de vouw.
Maat 44: halsbies : 3 cm breed en 31,7 cm lang aan de vouw.
Before we start, first some advice about adapting the pattern if your chest, waist or hip measurements are (very) different from the measurement chart.
1. Choose the size that has the chest measurements closest to your chest measurements.
2. The measurements you can adapt are chest width, waist width and/or hip width.
3. The measurements in the pattern compared to the body measurements are as follows:
The chest width on the pattern is 100% of the chest width on the measurement chart.
The waist width on the pattern is 110% of the waist width on the measurement chart.
The hip width on the pattern is 100% of the the hip width on the measurement chart.
For example: a chestwidth of 38 ½ “/ 98 cm, waist 29 7/8″ / 76 cm and hip 41 ¾ “/ 106 cm. These measurements are most similar to size 12 / size 42 ( chestwidth 37″/ 94cm, Waist 30 3/4″/ 78 cm, hip 41″/ 104 cm.
Your new pattern measurements are going to be:
Chest width: 100% of 38 1/2″/ 98cm = 38 5/8″ /98 cm
Waist width: 110% of 29 7/8″/ 76 cm = 32 15/16″/83,6 cm
Hip width: 100% of 41 3/4″/106 cm = 41 3/4″/106 cm
Voor we beginnen, eerst wat advies over het aanpassen van het patroon als je bovenwijdte, taillewijdte of heupwijdte (sterk) afwijkt van de maattabel.
1. kies de maat waarvan de bovenwijdte afmeting het dichtst ligt bij jouw bovenwijdte
2. De afmetingen die je kunt aanpassen zijn bovenwijdte, taillewijdte en/of heupwijdte.
3. De afmetingen in het patroon ten opzichte van de lichaamsmaten zijn als volgt:
De bovenwijdte van het patroon is 107% van de bovenwijdte in de maattabel.
De taillewijdte van het patroon is 114% van de taillewijdte in de maattabel.
De heupwijdte van het patroon is 100% van de heupwijdte in de maattabel.
Stel iemand heeft bovenwijdte 98cm, taille 76 en heup 106. Deze maten hebben het meest overeen met maat 42 ( bovenwijdte 94, taille 78, heup 104).
Dan worden de afmetingen voor het patroon:
Bovenwijdte: 107% van 98cm = 104,8 cm
Taillewijdte: 114% van 76 cm= 86,6 cm
Heupwijdte: 100% van 106 cm = 106 cm

4. Divide these measurements by 4 and measure them from the midback line of your assembled back pattern piece. Mark out your new chest width, waist (in between the two black dots) and hip width. If your measurements are bigger than the ones on your pattern the mark will be outside the dotted line if your measurements are smaller than the ones on your pattern the mark will be inside the dotted line.
4.Deel deze afmetingen door 4 en meet ze af op het achterpand van je aan elkaar geplakte patroondelen vanaf de middenachter lijn. Zet een stip op je nieuwe bovenwijdte, taillewijdte (tussen de twee zwarte stippen) en heupwijdte. Als je afmetingen groter zijn dan de afmeting op het patroon zal de stip buiten de stippellijn vallen, is de afmeting kleiner dan valt het erbinnen.

5. Connect the marking points. Draw een small vertical line at the waist.
5.Verbind nu de stippen met elkaar, het stuk op taillehoogte teken je een stukje vertikaal.

6. Now add 1/3″/ 0,7cm seam allowance (This will also give you the opportunity to draw your hip line with a bit of a curve to it). Copy this line on your front pattern piece. Because you will add a front binding later the front line is not the mid front line so don’t measure from that line, only on the midback line from your back pattern piece.
If you have altered the chest width, you should also make the sleeves narrower or wider, otherwise it won’t fit in the armhole.
7. If you need to make the pattern longer you need to do this at waist height and bottom height. If you for instance need to add 2 inches you cut the pattern in half at the waist (the narrowest part). Stick a piece of paper to the top part. Measure 1 inch down and stick down the bottom part. Add another inch to the bottom hem.
Your alteration is done!
6. Nu nog de 0.7 cm naad aantekenen (je kunt het dan meteen een beetje mooier rond bijtekenen, vooral het stukje tussen taille en heup). Kopieer nu deze lijn op het voorpand. Omdat er voor een bies aangestikt wordt is de voorlijn niet de midenvoorlijn, dus niet vanaf deze lijn meten, altijd op het achterpand.
Als je de bovenwijdte hebt aangepast, dan ook de mouw met eenzelfde aantal cm. aanpaseen. Anders past de mouw niet meer in het armsgat.
7. Om te verlengen is het het mooiste als je de extra lengte verdeeld over de taille (het smalste deel) en de heup (onderaan). Dus wil je het shirt 4 cm langer knip dan het patroon door bij de taille. Plak een stukje papier aan de bovenkant, teken 2cm aan en plak de onderkant daar weer tegen aan. Teken vervolgens nog eens 2 cm bij aan de onderkant.
Het aangepaste patroon is klaar!

Time to cut out our pieces !
Cut on fold: front and back 1x, neckband 1x
Sleeves 2X
We gaan knippen!
Leg aan de vouw: voor en achterpand 1x, halsbies 1x
mouwen 2x

Finish the edges of the shoulder with an overlock/serger or zigzag stitch. Lay the right sides on top of one another. Then sew with a stretch stitch on 1/3″ of the edge.(there is a stretch stitch setting on your sewing machine.
Press the seam open.
Or sew and finish in one go with the overlock/serger. You wil get a thicker seam.
Werk de randen van de shouders af met een overlock stiksel of zigzag. Stik de naden met de goede kanten op elkaar op 0.7 cm afstand van de rand. Strijk de naad open.
of werk de naden samen af met de overlockmachine. Je krijgt dan wel een dikkere naad.

Pin the sleeves into the armhole.
Speld the mouwen in de armsgaten.

Sew the sleeves into the armhole using a overlock machine/serger or zigzag. If you sew the sleeves in with a zigzag you need to place an additional stretch stitch next to it. For extra strength you can place an additional stretch stitch next to it.
Stik de mouwen in de armsgaten met een lockmachine of gebruik een zigzag steek op de naaimachine. In dat geval moet je er nog een stretchstiksel naastplaatsen.Voor extra stevigheid kun je er nog een extra stretch stiksel naast plaatsen.

Sew the sleeves and sideseams in one go using a overlock machine/serger or zigzag. If you sew the sleeves in with a zigzag you need to place an additional stretch stitch next to it. Fold the front seam up and the back seam down. This way you don’t get two seams on top of one another. For extra strength you can place an additional stretch stitch next to it.
Stik de mouwen en zijnaden in een keer dicht met een lockmachine of gebruik een zigzag steek op de naaimachine. In dat geval moet je er nog een stretchstiksel naastplaatsen. Vouw de naad voor omhoog en de naad achter omlaag. Zo voorkom je dat je twee stoflaagjes op elkaar hebt. Voor extra stevigheid kun je er nog een extra stretch stiksel naast plaatsen.

Now the neckband. Close the neckband and fold over width wise.
Nu de halsbies. Sluit de halsbies en vouw in de breedte om.

Pin the neckband onto the neck, making sure you stretch the band as it goes around the neck.
Speld de halsbies langs de hals. De bies moet wat worden uitgerekt om ‘m er glad in te krijgen.

Sew the neckband into the neck using a overlock machine/serger or zigzag. If you sew the neckband with a zigzag you need to place an additional stretch stitch next to it. For extra strength you can place an additional stretch stitch next to it.
Stik de halsbies langs de hals met een lockmachine of gebruik een zigzag steek op de naaimachine. In dat geval moet je er nog een stretchstiksel naastplaatsen.Voor extra stevigheid kun je er nog een extra stretch stiksel naast plaatsen.

With the tip of the iron press a line midfront about 6″ or 15 cm on the inside.
Strijk een vouw middenvoor van ong. 15 cm aan de binnenkant van het shirt.

On the inside : stitch a little diagonal line midfront of the neckband.
Stik je halsbies schuin af middenvoor aan de binnenkant.

Topstitch the edge a few mm. from the edge. (approx. 0.15″)
Stik de hals door op een paar mm. van de kant.

Measure 4 3/4″ or 12 cm from the bottom of the neckbinding.
Pin your piece of elastic from the bottom of the neckbinding to the 4 3/4″ or 12 cm point.
Meet 12 cm vanaf de onderkant van de halsbies
Speld het stukje elastiek van de onderkant van de halsbies tot het net gemarkeerde punt op 12 cm.

While stretching the elastic, stitch the elastic on the mid front line (you pressed in earlier) of the t-shirt. When you unstretch the elastic after it is sewn the gathering will appear.
Stik het elastiek op de middenvoorlijn (die je er eerder hebt ingeperst) terwijl je het elastiekje uitrekt. Als je het gestikt hebt en het loslaat verschijnen de rimpeltjes.

All that’s left to do now is pressing in your sleeves and bottom hem 3/4″ or 2 cm. Sew on the outside using a twin needle on your sewing machine or a coverlock.
Your t-shirt is ready! I bet you’ll make plenty more...
Nu alleen nog de zoom van het shirt en van de mouwen naar binnen persen op 2 cm en aan de buitenkant omzomen met een tweelingnaald in de naaimachine of een coverlock.
Je shirt is klaar! er zullen er vast nog veel volgen..
7 notes
·
View notes
Text
V-neck cardigan step by step tutorial part 2


To get a nice sharp line place a stretch stitch next to the overlock/zigzag.
De bies ziet er wat strakker uit als je er nog een stretch stiksel langsnaait. Heb je de bies aangezet met zigzag dan moet dit zowieso.

Press and it will look like this.
De bies nu netjes platpersen.

Handsew the bottom of the binding, this will also allow you to tuck away some excess thread from overlocking.
Aan de onderkant zet je het naadje even vast met een paar steekjes en kun je mooi je lockdraden wegwerken.

Close the two cuffs.
Stik nu de twee manchetten dicht.

Fold them width ways.
Vouw ze in de breedte dubbel.

Pin the cuffs to the sleeves. In this case, clips can also be helpful as there are 3 layers of fabric.
Speld de manchetten aan de onderrand van de mouw. (of gebruik clips, soms handig als je veel laagjes stof op elkaar hebt)

Now attach the cuffs to the sleeves using a serger/overlock machine.
Again: If you use a zigzag stitch on a regular sewing machine, place an extra stretch stitch above it.
Nu de manchetten aanstikken met de lockmachine. Ook hier geldt: heb je geen lockmachine, zigzag kan ook maar dan nog een extra stiksel erboven plaatsen met de stretchsteek op je naaiachine

Pin and sew the top edge of the pocket part to the edge of the pocket binding. Do the same with the lining of the pocket but leave a bit open in the middle so the pocket can be turned inside out.
Speld en stik de bovenrand van het zakdeel tegen de rand van de bies. Doe hetzelfde met het voeringzak deel maar laat in het midden een stukje open om het zakje straks te keren.

Right sides together en pin al the way around
Sew the pocket all the way around with a stretch stitch ( is sturdier so it won’t break when you turn it inside out).
Cut away the excess fabric and clip the corners
Leg nu de goede kanten van het zakdeel en het voeringzakdeel op elkaar en speld rondom.
Stik het zakje rondom dicht met een stretch steek ( is steviger dan een gewone steek) Knip de overtollige stof weg van de randen en knip de hoekjes weg.

Turn the pocket inside out and press.
Handsew the opening.
Draai het zakje om via de opening en strijk plat.
Sluit de opening met een paar steekjes.

Pin the pocket onto the carigan.
Approx 3/8″/1 cm from the top of the hipband and approx. 1 1/2″inch/4 cm from the frontbinding.
Speld het zakje op op ongeveer1 cm van de rand van de heupband en 4 cm vanaf de knopenbies.

Topstitch at about 1/3″/0,7 cm of the edge. (about a foot wide).
Naai het zakje op op ongeveer 0,5 tot 0,7 cm van de rand. (voetje breed bijvoorbeeld)

The buttons/buttonholes are divided as follows:
One button is placed on the bottom of the hip band and one on the top. The distance between these buttons is the same distance you use to divide the rest of your 3 buttons on the binding.
The buttons are placed quite far apart. Two buttons on the hip band look visually the best.Off course you can place more buttons so they are closer together.
To avoid gaping of the spaces between the buttons you can hand sew on some little press buttons.
Your cardigan is done!
De knopen/knoopsgaten verdeel je als volgt:
Een knoop wordt geplaatst aan de onderrand van het boord en een aan de bovenrand van het boord. Deze afstand hou je ook aan om de overige 3 knopen te verdelen over het pand.
De knopen staan vrij ver uit elkaar. Ik vind twee knopen op het boord er het best uitzien. Je kunt uiteraard knopen toevoegen en ze dichter op elkaar plaatsen. Om te voorkomen dat de ruimtes tussen de knopen open gaan staan heb ik tussen de knopen (onzichtbare) drukkertjes genaaid.
Het vest is klaar!
1 note
·
View note
Text
V-neck cardigan step by step tutorial part 1

This version of the cardigan is a long sleeved one with a v-neck and pockets. But there are many possibilities. Buttons on the pockets or made in a print or jaquard knit fabric, striped cuffs, short sleeves..
Deze versie van het vestje is met lange mouw, v-hals en zakken. Maar je kunt er ook mee varieëren. Knoopjes op de zakken bijvoorbeeld. Of maak 'm in een leuke print of jaquard tricot, gestreepte boorden, korte mouwen.. heel veelzijdig dus!
Fabric advise:
Use a heavy knit like French terry. (a light, unbrushed sweat fabric). Use a ribbed knit suitable for cuffs and a lighter knit (tshirt weight) for the bindings .
Yardage/ meters needed:
Main fabric: about 19 1/2″/ to 23 1/2″ (50/60 cm (depending on the size) for the short sleeve version and 27 1/2″ to 29 1/2″(70/75cm) for the long sleeve version.
Ribbed knit suitable for cuffs: This knitted fabric is often tubular and 13″ to 14,5″ (33 to 37 cm) wide. Some are more elastic than others so it is hard to give a precise indication. Measure the width on your pattern. If you have fabric that is about 14,5″ (37 cm) wide than you can cut it once for size 6 and 8 . Because it is one piece there will be no side seams. Larger sizes need to cut the band 2x and put side seams in. To cut once (plus cuffs) you will need about 15 3/4″/ 19 1/2″ (40-50 cm) If you need to cut twice you will need an extra 12″(30cm)
Cotton/elastan t-shirt weight: approx. 10″
Lightweight cotton jersey: small piece/ scrap
Stof advies: French terry of een gebreide jaquardstof voor de body, boordstof voor de boorden en katoen lycra of katoen elasthan (tshirt stof) voor de biezen.
Hoeveelheid stof nodig:
Stof body: 50/60 cm voor de korte mouw versie en 70/75 cm voor de lange mouwversie.
Boordstof: boordstof is vaak rondgebreid en is 33-37 cm breed. Sommige boordstof is vrij los, andere weer heel elastisch. Meet op je patroon hoe breed het patroondeel is voor de boordstof. Heb je boordstof van 37 cm die niet te elastisch is dan kun je voor maat 36 en 38 waarschijnlijk het boord 1 x knippen zonder zijnaad.Je hebt dan ong. 40-50 cm nodig. Voor de overige maten moet het boord waarschijnlijk met zijnaadjes. Je knipt dan 2 x het boordpatroon en je hebt 30 cm meer nodig.
Katoen /elastan tshirt kwaliteit: 25 cm.
Tricot voor het voeringzakje : klein stukje.
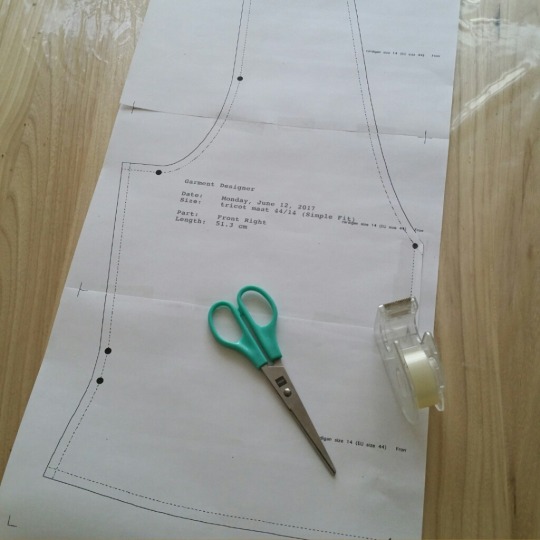
Once you have downloaded the PDF from Etsy, print out your pattern pieces at 100%. Measure the square on the pattern to check if you have printed out the correct scale. Each page is framed by 4 tick marks. These allow you to align correctly all of the pages. Cut them out and sellotape them together to create all the complete pattern pieces. 1/3 inch or 7 mm seam allowance is indicated on the main pattern pieces. Once a piece is assembled it will look like this. You can now cut out the pattern Or trace it on pattern paper.
Your pattern consists of: two front pieces (a round neck one for the bow-style and a v-neck one), a back piece, long sleeve with a short sleeve option, cuff for the short sleeve cuff for the long sleeve and a hip band.
The neck/front binding and pocket binding cut to size:
Size 6 /EU36: Neck/front binding : the whole width of the fabric ( 1,6 yard /1,5 meter) and 2 1/8″/ 5,5 cm wide. pocket binding: 4 3/4″/12 cm long and 2 1/8″/ 5,5 cm wide.
Size 8/EU38: Neck/front binding : the whole width of the fabric ( 1,6 yard /1,5 meter) and 2 1/8″/ 5,5 cm wide. pocket binding: 4 7/8″/12,5 cm long and 2 1/8″/ 5,5 cm wide.
Size 10 /EU40: Neck/front binding : the whole width of the fabric ( 1,6 yard /1,5 meter) and 2 1/8″/ 5,5 cm wide. pocket binding: 4 5″/13 cm long and 2 1/8″/ 5,5 cm wide.
Size 12 /EU42: Neck/front binding : the whole width of the fabric ( 1,6 yard /1,5 meter) and 2 1/8″/ 5,5 cm wide. pocket binding: 5 1/3″/13,5 cm long and 2 1/8″/ 5,5 cm wide.
Size 14 /EU44: Neck/front binding : the whole width of the fabric ( 1,6 yard /1,5 meter) and 2 1/8″/ 5,5 cm wide. pocket binding: 5 1/2″/14 cm long and 2 1/8″/ 5,5 cm wide.
Print alle delen van je patroon uit. Meet het vierkantje op het patroon om te controleren of je op 100% hebt geprint.
Knip de patroondelen uit en plak met plakband aan elkaar. De naad is er aan aangetekend. (0,7 cm dat is de breedte van een locksteek)
Je patroon bestaat uit:
Twee voorpanden (een voor de v-hals versie en een voor de ronde hals versie)
Een lange mouw met een deelnaad voor de korte mouw
Een achterpand
Boord
Mouwboord voor lange mouw
Mouwboord voor korte mouw
De halsbies, de knoopbies en de bies voor de bovenkant van het zakje knip je zelf:
Alle maten: Hals/knoopsgatenbies: 150 cm (de hele stofbreedte) bij 5,5 cm
Bies zakje maat 36: 12 cm breed en 5,5 cm hoog.
Bies zakje maat 38: 12,5 cm breed en 5,5 cm hoog.
Bies zakje maat 40: 13 cm breed en 5,5 cm hoog.
Bies zakje maat 42: 13,5 cm breed en 5,5 cm hoog.
Bies zakje maat 44: 14 cm breed en 5,5 cm hoog.
Before we start, first some advice about adapting the pattern if your chest, waist or hip measurements are (very) different from the measurement chart.
1. choose the size that has a chest measurement that is closest to your chest measurement.
2. The measurements you can adapt are chest width, waist width en/of hip width. Because the cardigan ( without the hip band ) is short, the hip measurement you need to adapt may seem a little narrow.
3. The measurements in the pattern compared to the body measurements are as follows:
The chest width on the pattern is 107% of the chest width in the measurement chart.
The waist width of the pattern is 114% of the waist width in the measurement chart.
The hip width on the pattern is 91% of the hip width in the measurement chart.
Suppose somebody has a chestwidth of 38 ½ “/ 98 cm, waist 29 7/8″ / 76 cm and hip 41 ¾ “/ 106 cm. These measurements are most similar to size 12 / size 42 ( chestwidth 37″/ 94cm, Waist 30 3/4″/ 78 cm, hip 41″/ 104 cm.
Your new pattern measurements are going to be:
Chest width: 107% of 38 1/2″/ 98cm = 41 1/8″/105 cm
Waist width: 114% of 29 7/8″/ 76 cm = 34″/86 cm
Hip width: 91% of 41 3/4″/106 cm = 38″/96,5 cm
Voor we beginnen, eerst wat advies over het aanpassen van het patroon als je bovenwijdte, taillewijdte of heupwijdte (sterk) afwijkt van de maattabel.
1. kies de maat waarvan de bovenwijdte afmeting het dichtst ligt bij jouw bovenwijdte
2. De afmetingen die je kunt aanpassen zijn bovenwijdte, taillewijdte en/of heupwijdte. Omdat het vestje (zonder de heupband) kort is zal de aan te passen heupwijdte wat smal lijken.
3. De afmetingen in het patroon ten opzichte van de lichaamsmaten zijn als volgt:
De bovenwijdte van het patroon is 107% van de bovenwijdte in de maattabel.
De taillewijdte van het patroon is 114% van de taillewijdte in de maattabel.
De heupwijdte van het patroon is 91% van de heupwijdte in de maattabel.
Stel iemand heeft bovenwijdte 98cm, taille 76 en heup 106. Deze maten hebben het meest overeen met maat 42 ( bovenwijdte 94, taille 78, heup 104).
Dan worden de afmetingen voor het patroon:
Bovenwijdte: 107% van 98cm = 105 cm
Taillewijdte: 114% van 76 cm= 86 cm
Heupwijdte: 91% van 106 cm = 96,5cm
4. Divide these measurements by 4 and measure them from the midback line of your assembled back pattern piece. Mark out your new chest width, waist (in between the two black dots) and hip width. The dotted line is the pattern without the seam allowance, the black line is with seam allowance. If your measurements are bigger than the ones on your pattern the mark will be outside the dotted line,if your measurements are smaller than the ones on your pattern the mark will be inside the dotted line.
4.Deel deze afmetingen door 4 en meet ze af op het achterpand van je aan elkaar geplakte patroondelen vanaf de middenachter lijn. Zet een stip op je nieuwe bovenwijdte, taillewijdte (tussen de twee zwarte stippen) en heupwijdte. De stippelijn is het patroon zonder de naad, de zwarte lijn is met de naad. Als je afmetingen groter zijn dan de afmeting op het patroon zal de stip buiten de stippellijn vallen, is de afmeting kleiner dan valt het erbinnen.
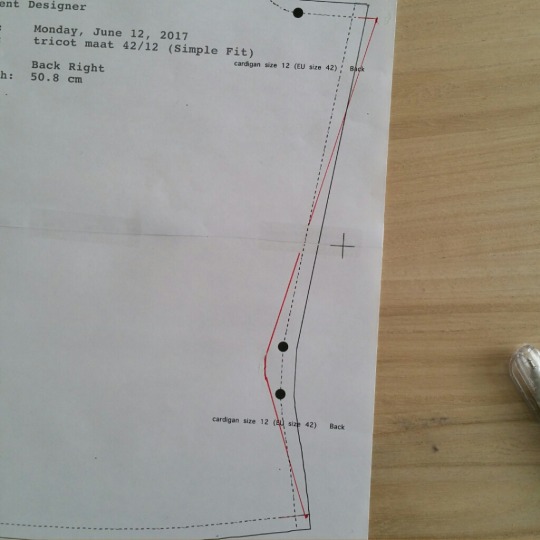
5. Connect the marking points. Draw een small vertical line at the waist.
5.Verbind nu de stippen met elkaar, het stuk op taillehoogte teken je een stukje verticaal.
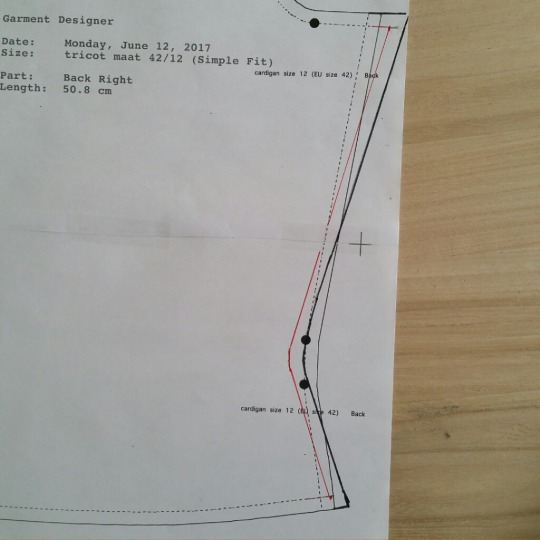
6. Now add 1/3″/ 0,7cm seam allowance (This will also give you the opportunity to draw your hip line with a bit of a curve to it). Copy this line on your front pattern piece. Because you will add a front binding later the front line is not the mid front line so don’t measure from that line, only on the midback line from your back pattern piece.
If you have altered the chest width, you should also make the sleeves narrower or wider, otherwise it won’t fit in the armhole.
Your alteration is done!
6. Nu nog de 0.7 cm naad aantekenen (je kunt het dan meteen een beetje mooier rond bijtekenen, vooral het stukje tussen taille en heup). Kopieer nu deze lijn op het voorpand. Omdat er voor een bies aangestikt wordt is de voorlijn niet de middenvoorlijn, dus niet vanaf deze lijn meten, altijd op het achterpand.
Als je de bovenwijdte hebt aangepast, dan ook de mouw met eenzelfde aantal cm. aanpaseen. Anders past de mouw niet meer in het armsgat.
Het aangepaste patroon is klaar!

Cut in light weight sweat material/ french terry:
The backpiece (on fold) 1x
The frontpiece 2x
sleeve 2x
pocket 2x
Cut in ribbed knit fabric for cuffs:
Bottom border piece (cut on fold) or cut 2x (see above, fabric needed)
cuffs 2x
Cut in cotton lycra, cotton elastane, tshirt weight :
pocketbinding 2x
front/neck binding 2x
Cut in lightweight jersey (the thinner the better, can be a small piece of an old tshirt) :
Lining pocket 2x
You also need:
5 or more buttons or snapbuttons
Liittle sew on snapbuttons
Sewing yarn in the body color
Sewing yarn in the accent color if you are using buttons
Overlock yarn in the body color
Optional : overlock yarn in the accent color
Knippen in French terry of jaquard:
Het achterpand (aan de stofvouw ) 1x
Het voorpand 2X
Mouw 2x
Zakje 2x
Knippen in boordstof:
Boord (aan de stofvouw) 1xof 2x afhankelijk van de maat en stofbreedte van boord.Zie bovenaan bij hoeveelheid stof nodig:
Mouwboordjes 2x
Knippen in katoen/lycra
Boordjes voor zakjes 2x
Halsbies/knopenbies 2x
Knippen in dunne tricot (mag een stukje van een oud tshirt zijn, single jersey hoe dunner hoe beter)
Voeringzakje 2x
Verder nodig:
5 of meer knopen (ik gebruikte stofknopen) of drukkers/camsnaps
Een kaartje aannaaidrukkertjes
Naaigaren in de kleur van het vestje
Naaigaren in de kleur van de biezen voor de knoopsgaten
Lockgaren in de kleur van het vestje.

We can start.
Finish the edges of the shoulders with a zigzag stitch or an overlock/serger stitch. Sew both shoulder parts together with a stretch stitch on 1/3″/0,7mm of the edge.
Press the seams open.
Alternatively, you can finish and sew your seams in one go by using the overlocker/serger. Quicker but resulting in bulkier seams. It is advisable to use some silicon tape or a little strip of fabric to prevent the shoulders from stretching.
We kunnen beginnen.
Lock of zigzag de randen van de schouders af en stik ze op 0.7 cm van de rand met de stretchsteek op je naaimachine.
Strijk naad open.
Je kunt ook de schoudernaden in een keer samen aflocken, de naad wordt dan wel wat dikker. Het is aan te raden in dat geval een smal strookje tricot of siliconenband mee te locken tegen het uitrekken.

Finish the edges of the sleeves and armholes with a zigzag stitch or an overlock/serger stitch. Copy the markings on the pattern with pins. Pin your sleeves in the armholes and sew them at 1/3″/ 0,7 cm of the edge.
Again, you can also finish and sew your seams in one go by using the overlocker/serger
Werk het armsgat en de kop van de mouw af met zigzag of overlock. Zet speldjes op de kniptekentjes. Leg de tekentjes op elkaar met de goede kanten, speld en stik met stretchsteek op 0.7 cm van de rand.
Opnieuw, je kunt ze ook in een keer inzetten met de lockmachine.
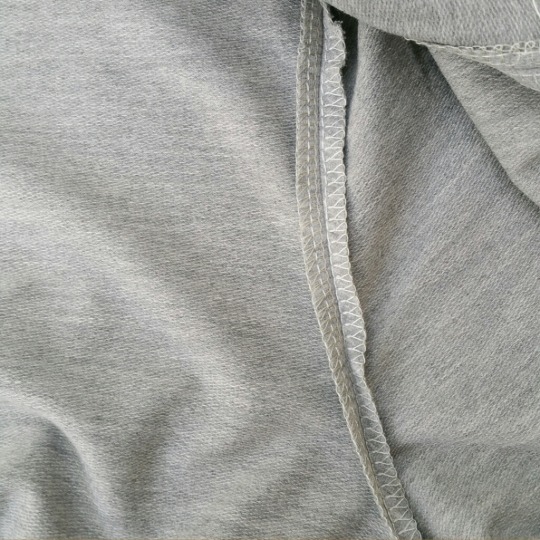
open the seams and press.
Naden openstrijken

And turn inside out.
En omkeren.

Now finish the inner seams of the sleeves and the side seams of the front and back piece with a zigzag stitch or an overlock/serger stitch and sew them together at 1/3″inch/0,7 cm of the edge. Or finish/ sew the seams in one go with a serger/overlock machine.
Open the seams and press. Turn inside out.
Nu de binnenmouwnaden en zijnaden afwerken met lock of zigzag, goede kanten op elkaar en stikken op 0.7 cm van de rand met stretchsteek of naden samen in een keer aflocken.
Naden openstrijken en omkeren.
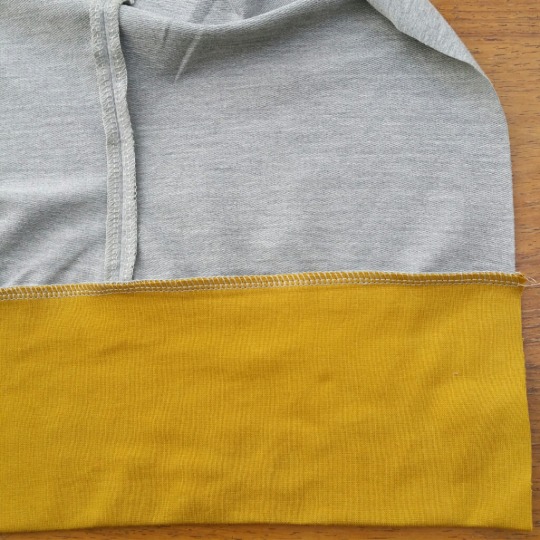
Fold the hip band widthways. Pin to the edge of the cardigan. (it is easiest to pin the middle of the band to the middle of the back piece first, then work to the front) The hip band should be a little tighter than the cardigan.
Now attach the hipband using the serger/overlocker. If you use a zigzag stitch on a regular sewing machine, place an extra stretch stitch above it
Vouw nu het boord dubbel in de breedte en speld aan de onderrand van het vestje. (handig om eerst het midden van het boord en van het achterpand te markeren met een speld, speldjes op elkaar en van daaruit verder spelden) Het boord is dus wat strakker dan het vestje.
Nu de band aanstikken met de lockmachine. Heb je geen lockmachine, zigzag kan ook maar dan nog een extra stiksel erboven plaatsen met de stretchsteek op je naaimachine
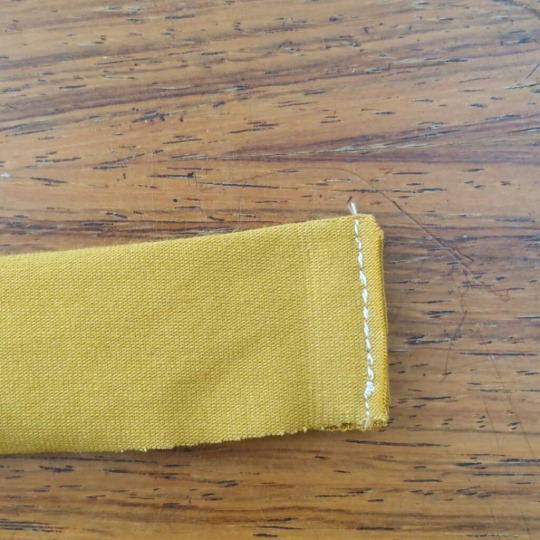
Now we can do the front binding. Fold the binding pieces widthwise, right sides together. Close one of the bottom ends, cut away excess fabric and clip the corners.
Turn inside out and press. The other end of the binding is still open. It is easier to pin it all the way around the edge first them do the other end.
Nu de knoopsgaten bies. Vouw de bies in de breedte dubbel, goede kanten op elkaar. Stik een van de onderkanten dicht, en knip een randje overtollige stof en de hoekjes weg. Keer om. De andere kant is nog open, het is handiger om de bies aan de panden te spelden en dan de rest af te knippen.
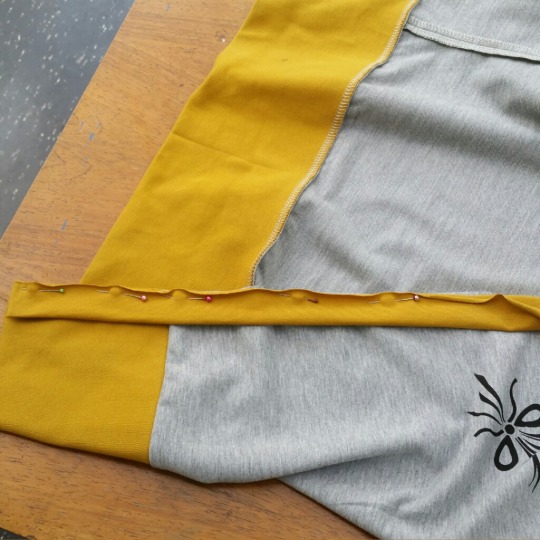
Pin the binding all the way around the edges of the cardigan. Stretch the binding gently, a little more around the neck area. If you don’t it will look a bit baggy.
Speld nu de bies helemaal rondom de voorpanden en hals. Je mag de bies iets uitrekken, vooral langs de hals, dan komt het er strakker op. Doe je dat niet dan gaat het wat lubberen.
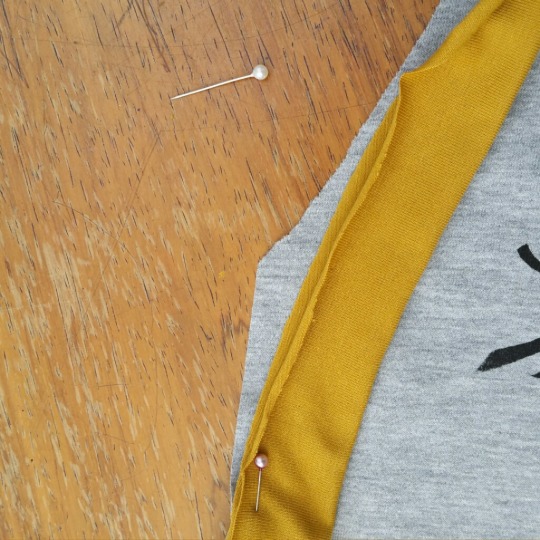
Where the v-neck and mid front cross, there is a corner. You can round this area off by stitching/cutting the corner.
Waar de v-hals en middenvoor elkaar kruisen zit een hoekje. Die mag straks weggestikt worden.
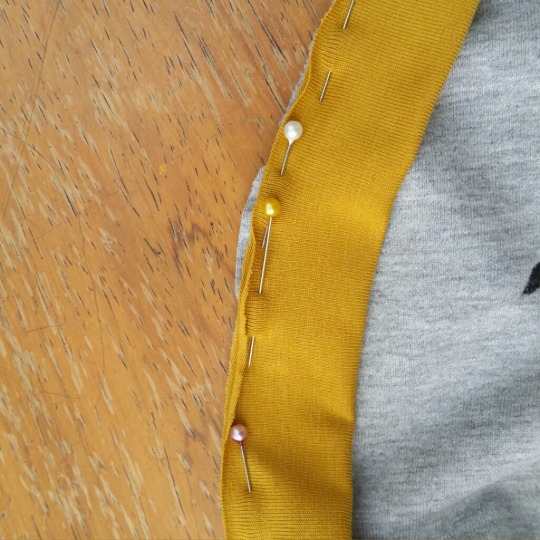
So pin it and follow this round shape with your overlocker. If you are using a zigzag then you can cut away this corner.
Speld dus rond af en laat het hoekje uitsteken, die lock je straks weg. Naai je met zig-zag dan mag je het hoekje wegknippen.

When your binding is pinned all the way around you can finish the other end like you did before.
Als de bies helemaal vast is gespeld kun je ook het andere uiteinde afwerken.
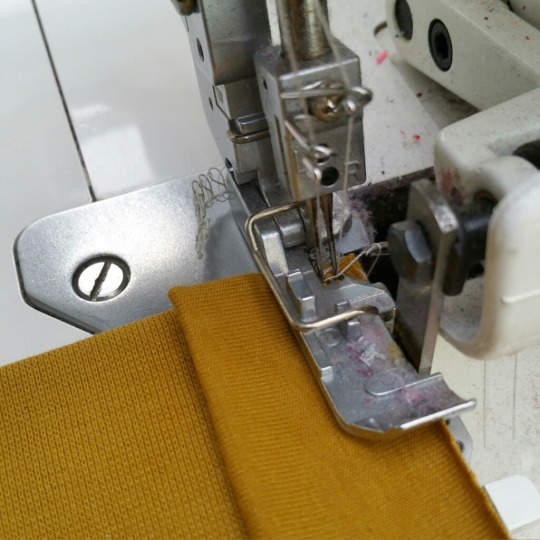
The bindings can now be attached to the front parts of the cardigan. Use an overlocker/serger or zigzag stitch. When using a serger it is a good idea to lift the foot, move the piece you want to sew as far to the front as possible so the first stitch will get directly into the fabric. ( so don’t sew a few stitches first without the fabric) The first few stitches I sew using the handwheel instead of the foot pedal to have precise control where my first stitches will go.
De knoopbies kan nu aan de voorpanden worden gestikt. Doe dit met de lockmachine of zigzag. Ik til altijd het voetje op, schuif het te naaien stuk zover mogelijk naar voren zodat de eerste steek direct in de stof komt. (dus niet eerst een stukje naaien en dan pas de stof invoeren. De eerste steken draai ik even aan het handwiel zodat je het eerst stukje heel precies kunt naaien.
0 notes
Text
Bow cardigan step by step tutorial part 3

All that is left to do now is the pockets and the buttonholes.
Nu nog de (gevoerde) zakjes en de knoopsgaten/drukkers

Pin and sew the top edge of the pocket part to the edge of the pocket binding. Do the same with the lining of the pocket but leave a bit open in the middle so the pocket can be turned inside out.
Speld en stik de bovenrand van het zakdeel tegen de rand van de bies. Doe hetzelfde met het voeringzak deel maar laat in het midden een stukje open om het zakje straks te keren.

Right sides together en pin al the way around.
Leg nu de goede kanten van het zakdeel en het voeringzakdeel op elkaar en speld rondom.

Sew the pocket all the way around with a stretch stitch ( is sturdier so it won’t break when you turn it inside out).
Cut away the excess fabric and clip the corners
Turn the pocket inside out and press.
Handsew the opening.
Stik het zakje rondom dicht met een stretch steek ( is steviger dan een gewone steek) Knip de overtollige stof weg van de randen en knip de hoekjes weg.
Keer het zakje om via de opening en strijk plat.
Naai de opening met de hand met een paar steekjes dicht.

Pin the pocket onto the cardigan
Approx 3/8″/1 cm from the top of the hipband and approx. 1 1/2″inch/4 cm from the front binding.
Speld het zakje op op ongeveer1 cm van de bovenkant van de heupband en 4 cm vanaf de bies.

Topstitch at about 1/3″/0,7 cm of the edge. (about a foot wide).
Naai het zakje op op ongeveer 0,5 tot 0,7 cm van de rand. ( voetje breed bijvoorbeeld)

To make the bows for the pockets:
Fold the fabric strips you cut earlier in half width wise and sew 1/3″ along the edge all around. Leave a bit open to turn inside out later. Fold the small square pieces of fabric in half, right sides together and sew on one edge.
Cut away the excess fabric, turn the pieces inside out. Press flat.
Handsew the opening. Fold the strips as indicated on the photo.Tie the small strip around it and handsew the bow as indicated on the photo.
Als je op het zakje nog een strikje wil dan doe je dat als volgt:
Vouw het strikbiesje dubbel met de goede kanten op elkaar in de breedte en naai rondom dicht, 0,7 cm van de kant. Laat wel een opening open van ong. 3 cm om te keren. Vouw ook het kleine vierkantje dubbel, goede kanten op elkaar en naai aan een kant dicht.
Knip de naden smal af, keer de strookjes om en strijk plat.
Naai met de hand de opening dicht. Kruis dichtgenaaide strook zoals op de foto en vouw dan het kleine strookje eromheen. Vouw de uiteinden van het kleine strookje naar binnen en naai met de hand vast.

You can now sew the bow to the pocket with some sturdy stitches.
Zet nu de strik met een paar stevige steken vast op de bies van het zakje.

The buttons/buttonholes are divided as follows:
One button is placed on the bottom of the hipband and one on the top. The distance between these buttons is the same distance you use to divide the rest of your 4 buttons on the binding. The top buttonhole will be placed 3/8″/5/8″ (1-1,5 cm) from the top.
The buttons are placed quite far apart. Two buttons on the hipband look visually the best.Off course you can place more buttons so they are closer together.
To avoid opening of the spaces between the buttons you can hand sew on some little pressbuttons.
Your cardigan is done!
De knopen/knoopsgaten verdeel je als volgt:
Een knoop wordt geplaatst aan de onderrand van het boord en een aan de bovenrand van het boord. De afstand tussen deze twee knopen is de afstand die je aanhoudt om de overige 4 knopen te verdelen over het pand. De bovenste eindigt 1-1,5 cm van de hals.
De knopen staan vrij ver uit elkaar. Ik vind twee knopen op het boord er het best uitzien. Je kunt uiteraard knopen toevoegen en ze dichter op elkaar plaatsen. Om te voorkomen dat de ruimtes tussen de knopen open gaan staan heb ik tussen de knopen (onzichtbare) drukkertjes genaaid.
Het vestje is klaar!
22 notes
·
View notes
Text
Bow cardigan step by step tutorial part 2 Werkbeschrijving vestje met strik deel 2


The bindings can now be attached to the front parts of the cardigan. Use an overlocker/serger or zigzag stitch. When using a serger it is a good idea to lift the foot, move the piece you want to sew as far to the front as possible so the first stitch will get directly in to the fabric. ( so don’t sew a few stitches first without the fabric) The first few stitches I sew using the hand wheel instead of the footpedal to have precise control where my first stitches will go.
De knoopbiezen kunnen nu aan de voorpanden worden gestikt. Doe dit met de lockmachine of zigzag. Ik til altijd het voetje op, schuif het te naaien stuk zover mogelijk naar voren zodat de eerste steek direct in de stof komt. (dus niet eerst een stukje naaien en dan pas de stof invoeren. De eerste steken draai ik even aan het handwiel zodat je het eerst stukje heel precies kunt naaien.
This is what the binding looks once sewn at the top.
Als de bies is aangenaaid ziet de halskant er zo uit.
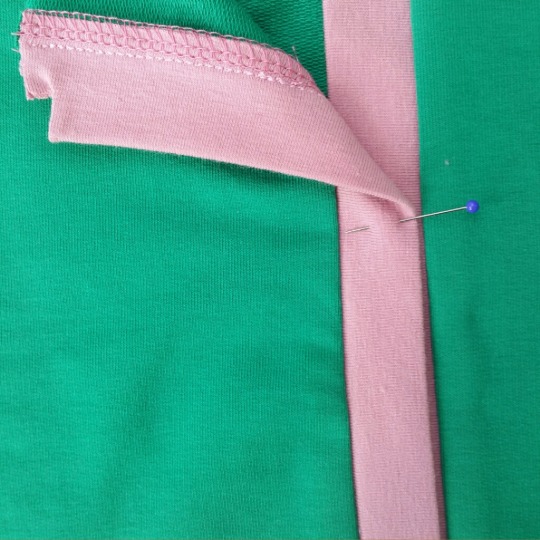
To get a nice sharp line place a stretch stitch next to the overlock/zigzag.
Voor een mooie strakke lijn kun je nog een extra stretch stiksel naast het lockstiksel plaatsen. Als je de zigzag hebt gebruikt moet je dat zowieso doen.

Now the neckbinding/bow.
Sew the two parts of the binding together.
Fold the binding in half width wise and start stitching from the mid front mark you put on the binding earlier. Also close the ends.
Use a stretch stitch as this is sturdy enough to turn the binding inside out without breaking the thread.
The part that is still open will be attached to the neck later. You also marked the shoulder points earlier with a pin.
Cut away the excess fabric and clip the corners.
Nu de halsbies/strik:
Stik de twee delen aan elkaar. Het naadje komt straks middenachter.
Vouw de bies dubbel en stik dicht vanaf het middenvoor teken (het teken dat je eerder op de bies hebt gezet ) De uiteinden ook dichtstikken.
Je kunt hiervoor ook het beste een stretch steek gebruiken dan gaat het naadje niet kapot als je het omkeert.
Het stuk dat open is komt straks langs de hals, je hebt als het goed is ook een tekentje voor het schouder punt aangegeven.
Knip de overtollige stof weg tot je ong. 1 a 2 mm. overhoudt en knip de hoekjes weg.
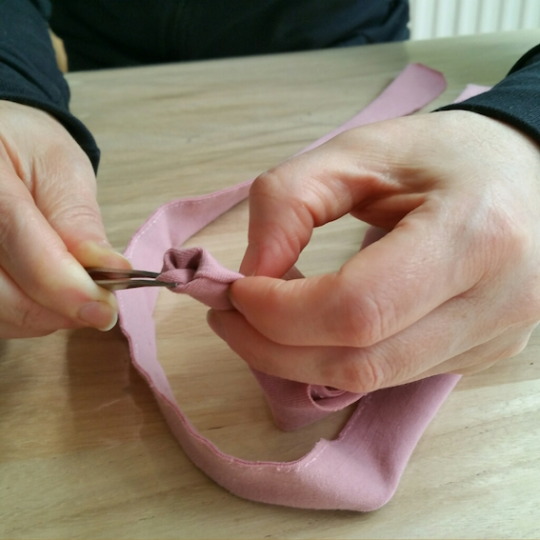
Now turn inside out.
I always use those pointy tweezers you get with your serger/overlocker to thread your needle with.
Nu binnestebuiten keren.
Tip: Ik gebruik hiervoor altijd de kromme, puntige pincet die je bij je lockmachine hebt gekregen.
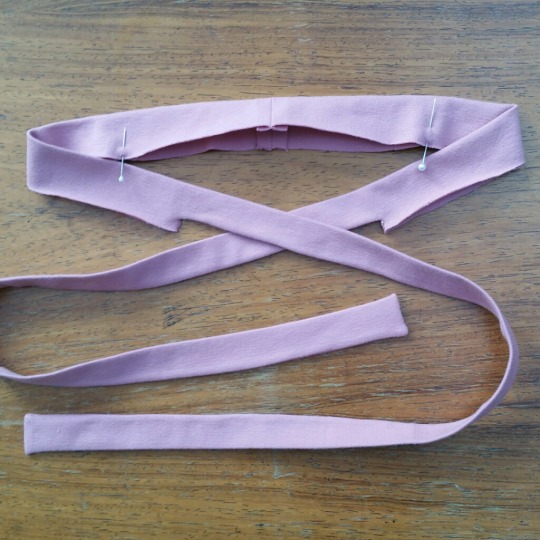
Press and your binding will look like this
Even platpersen en de bies ziet er zo uit.
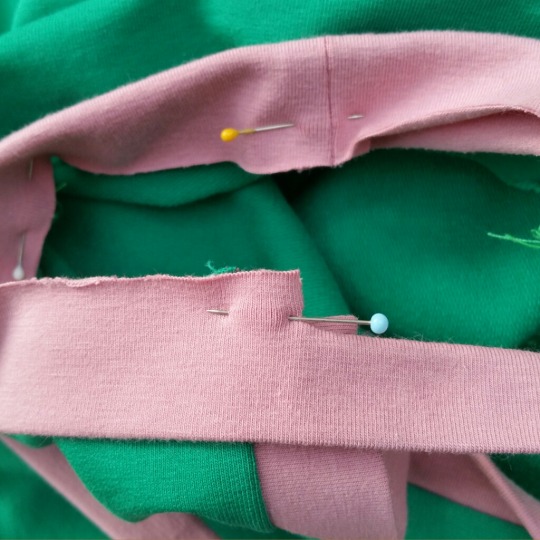
Now pin the binding to the neck. The seam of the binding goes midback of the neck, the markings for the shoulder on the shoulderseams and the midfront mark of the binding goes on the midfront mark of the front binding (see photo).
Speld nu de bies langs de hals. Het naadje op middenachter, het schoudertekentje op de schouder en het middenvoor tekentje op het middenvoor punt van de knopenbies.
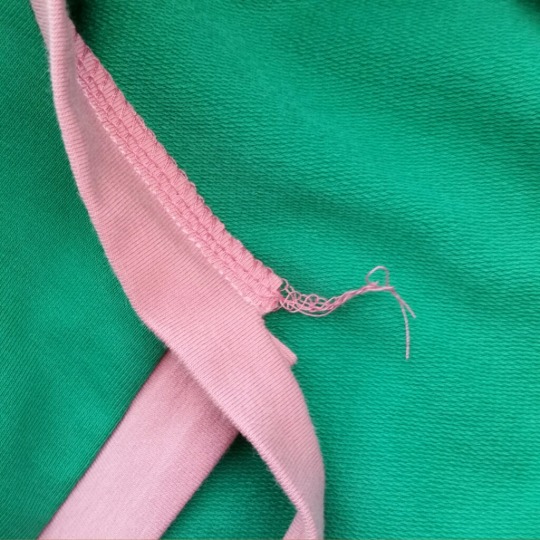
Stitch the binding with a stretch stitch on to the neck. Do this before you finish the edges as this allows you to precisely fit the two midfront points together.
Het is het handigste om eerst de hals te stikken met een stretch stiksel en daarna pas afwerken met lock/zigzag. De middenvoor punten moeten precies op elkaar komen en dat is lastig met de lockmachine.
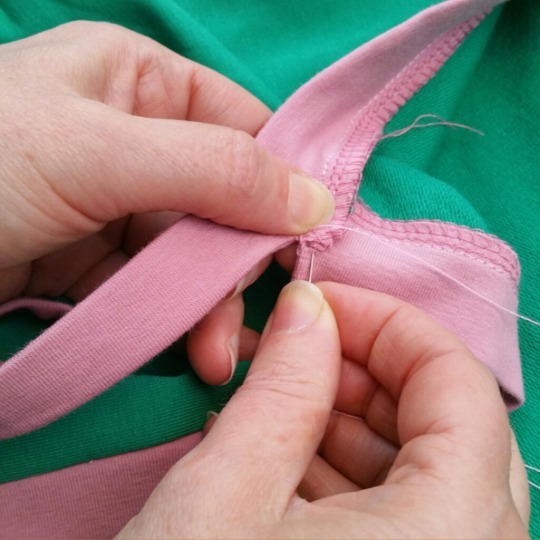
Handsew the corner of the midfront/binding point. This will also allow to hide some loose threads from the overlock seam.
Het beginpunt even vastzetten met een paar steekjes. Kun je ook mooi het lockdraadje wegwerken.
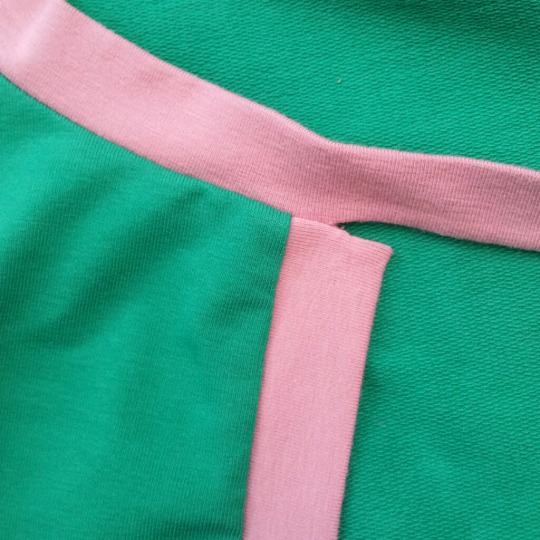
Neat right? Now you can tie the bow right in the middle.
Mooi he? Nu kun je een strik maken precies in het midden!

To secure the neckseam, topstitch the neck.
Om de halsnaad en lockstiksel netjes op z’n plaats te houden kun je de hals nog even doorstikken
3 notes
·
View notes
Text
Bow cardigan step by step tutorial part 1 Werkbeschrijving vestje met strik deel 1

This version of the cardigan is a short sleeved one with bows on the pockets. But there are many possibilities. Buttons on the pockets or made in a print or jacquard knit fabric, striped cuffs, long sleeves...
Deze versie van het vestje is met korte mouw en strikjes op de zakken. Maar je kunt er ook mee varieëren. Knoopjes op de zakken bijvoorbeeld. Of maak 'm in een leuke print of jaquard tricot, gestreepte boorden, lange mouwen.. heel veelzijdig dus!
Fabric advice:
Use a heavy knit like French terry. (a light, unbrushed sweat fabric). Use a ribbed knit suitable for cuffs and a lighter knit ( t-shirt weight) for the bows and binding.
Yardage/ meters needed:
Main fabric: about 19 1/2″/ to 23 1/2″ (50/60 cm (depending on the size) for the short sleeve version and 27 1/2″ to 29 1/2″(70/75cm) for the long sleeve version.
Ribbed knit suitable for cuffs: This knitted fabric is often tubular and 13″ to 14,5″ (33 to 37 cm) wide. Some are more elastic than others so it is hard to give a precise indication. Measure the width on your pattern. If you have fabric that is about 14,5″ (37 cm) wide than you can cut it once for size 6 and 8. Because it is one piece there will be no side seams. Larger sizes need to cut the band 2x and put side seams in. To cut once (plus cuffs) you will need about 15 3/4″/ 19 1/2″ (40-50 cm) If you need to cut twice you will need an extra 12″(30cm)
Cotton/elastan t-shirt weight: approx. 10″
Lightweight cotton jersey: small piece/ scrap
Stof advies: French terry of een gebreide jaquardstof voor de body, boordstof voor de boorden en katoen lycra of katoen elastan (tshirt stof) voor de strikken en biezen.
Hoeveelheid stof nodig:
Stof body: 50/60 cm voor de korte mouw versie en 70/75 cm voor de lange mouwversie.
Boordstof: boordstof is vaak rondgebreid en is 33-37 cm breed. Sommige boordstof is vrij los, andere weer heel elastisch. Meet op je patroon hoe breed het patroondeel is voor de boordstof. Heb je boordstof van 37 cm die niet te elastisch is dan kun je voor maat 36 en 38 waarschijnlijk het boord 1 x knippen zonder zijnaad.Je hebt dan ong. 40-50 cm nodig. Voor de overige maten moet het boord waarschijnlijk met zijnaadjes. Je knipt dan 2 x het boordpatroon en je hebt 30 cm meer nodig.
Katoen /elastan tshirt kwaliteit: 25 cm.
Tricot voor het voeringzakje : klein stukje.

Once you have downloaded the PDF from Etsy, print out your pattern pieces at 100%. Measure the square on the pattern to check if you have printed out the correct scale.
Each page is framed by 4 tick marks. These allow you to align correctly all of the pages. Cut them out and sellotape them together to create all the complete pattern pieces. 1/3 inch or 7 mm seam allowance is indicated on the main pattern pieces. Once a piece is assembled it will look like this. You can now cut out the pattern Or trace it on pattern paper.
Your pattern consists of two front pieces ( a round neck one for the bow-style and a v-neck one), a back piece, long sleeve with a short sleeve option, a cuff for the short sleeve cuff for the long sleeve and a hip band.
The neck binding, the front binding the pocket binding and the bows you can cut to size:
Size 6 /EU36: Neck bindings: 2x 28 1/8″/71,5 cm long and 2 1/8″/ 5,5 cm wide. Mark the shoulder point at 3 1/2″/ 9 cm and the mid front 5 1/2″ /13 cm Front binding : 19 5/8″/50 cm long and 2 1/8″/ 5,5 cm wide. pocket binding: 4 3/4″/12 cm long and 2 1/8″/ 5,5 cm wide. Bow: 11 7/8″/30 cm long and 2 1/8″/ 5,5 cm wide. Plus an extra piece 2 1/8″/ 5,5 cm wide
Size 8/EU38: Neck bindings: 2x 28 1/2″/72,5 cm long and 2 1/8″/ 5,5 cm wide. Mark the shoulderpoint at 3 5/8″/ 9,3 cm and the mid front 5 1/4″ /13,4 cm Front binding : 19 7/8″/50,5 cm long and 2 1/8″/ 5,5 cm wide. pocket binding: 4 7/8″/12,5 cm long and 2 1/8″/ 5,5 cm wide. Bow: 11 7/8″/30 cm long and 2 1/8″/ 5,5 cm wide. Plus an extra piece 2 1/8″/ 5,5 cm wide
Size 10 /EU40: Neck bindings: 2x 28 7/8″/73,5 cm long and 2 1/8″/ 5,5 cm wide. Mark the shoulder point at 3 1/2″/ 9,6 cm and the mid front 5 3/8″ /13,8 cm Front binding : 20″/51 cm long and 2 1/8″/ 5,5 cm wide. pocket binding: 4 5″/13 cm long and 2 1/8″/ 5,5 cm wide. Bow: 11 7/8″/30 cm long and 2 1/8″/ 5,5 cm wide. Plus an extra piece 2 1/8″/ 5,5 cm wide
Size 12 /EU42: Neck bindings: 2x 28 1/8″/74,5 cm long and 2 1/8″/ 5,5 cm wide. Mark the shoulder point at 3 7/8″/ 10 cm and the mid front 5 1/2″ /14,2 cm Front binding : 20 1/4″/51,5 cm long and 2 1/8″/ 5,5 cm wide. pocket binding: 5 1/3″/13,5 cm long and 2 1/8″/ 5,5 cm wide. Bow: 11 7/8″/30 cm long and 2 1/8″/ 5,5 cm wide. Plus an extra piece 2 1/8″/ 5,5 cm wide
Size 14 /EU44: Neck bindings: 2x 29 3/4″/75,5 cm long and 2 1/8″/ 5,5 cm wide. Mark the shoulder point at 4″/ 10,3 cm and the mid front 5 3/4″ /14,6 cm Front binding : 20 1/2″/52 cm long and 2 1/8″/ 5,5 cm wide. pocket binding: 5 1/2″/14 cm long and 2 1/8″/ 5,5 cm wide. Bow: 11 7/8″/30 cm long and 2 1/8″/ 5,5 cm wide. Plus an extra piece 2 1/8″/ 5,5 cm wide
Print alle delen van je patroon uit. Meet het vierkantje op het patroon om te controleren of je op 100% hebt geprint.
Knip de patroondelen uit en plak met plakband aan elkaar. De naad is er aan aangetekend. ( 0,7 cm dat is de breedte van een locksteek)
Je patroon bestaat uit:
Twee voorpanden (een voor de v-hals versie en een voor de ronde hals versie)
Een lange mouw met een deelnaad voor de korte mouw
Een achterpand
Boord
Mouwboord voor lange mouw
Mouwboord voor korte mouw
De halsbiezen, de knoopbies en de bies voor de bovenkant van het zakje en de strikjes knip je zelf:
Maat 36: Halsbiezen: 2x 71,5 cm bij 5,5 cm. Van links naar rechts : zet een kniptekentje op 9 cm (van middenachter tot de schouder) en vanaf dat punt 13 cm (van de schouder tot middenvoor) Knoopsgatenbies : 50 cm lengte en 5,5 cm breed. Bies zakje: 12 cm breed en 5,5 cm hoog. Strik: 30 cm lang en 5,5 cm breed plus een stukje van 5,5 cm bij 5,5 cm
Maat 38: Halsbiezen: 2x 72,5 cm bij 5,5 cm. Van links naar rechts : zet een kniptekentje op 9,3 cm (van middenachter tot de schouder) en vanaf dat punt 13,4 cm (van de schouder tot middenvoor) Knoopsgatenbies : 50,5 cm lengte en 5,5 cm breed. Bies zakje: 12,5 cm breed en 5,5 cm hoog. Strik: 30 cm lang en 5,5 cm breed plus een stukje van 5,5 cm bij 5,5 cm
Maat 40: Halsbiezen: 2x 73,5 cm bij 5,5 cm. Van links naar rechts : zet een kniptekentje op 9,6 cm (van middenachter tot de schouder) en vanaf dat punt 13,8 cm (van de schouder tot middenvoor) 5,5 cm breed.Bies zakje: 13 cm breed en 5,5 cm hoog. Strik: 30 cm lang en 5,5 cm breed plus een stukje van 5,5 cm bij 5,5 cm
Maat 42: Halsbiezen: 2x 74,5 cm bij 5,5 cm. Van links naar rechts : zet een kniptekentje op 10 cm (van middenachter tot de schouder) en vanaf dat punt 14,2 cm (van de schouder tot middenvoor) Knoopsgatenbies : 51,5 cm lengte en 5,5 cm breed. Bies zakje: 13,5 cm breed en 5,5 cm hoog. Strik: 30 cm lang en 5,5 cm breed plus een stukje van 5,5 cm bij 5,5 cm
Maat 44: Halsbiezen: 2x 75,5 cm bij 5,5 cm.Van links naar rechts : zet een kniptekentje op 10,3 cm (van middenachter tot de schouder) en vanaf dat punt 14,6 cm (van de schouder tot middenvoor) : 52 cm lengte en 5,5 cm breed. Bies zakje: 14 cm breed en 5,5 cm hoog. Strik: 30 cm lang en 5,5 cm breed plus een stukje van 5,5 cm bij 5,5 cm
Before we start, first some advice about adapting the pattern if your chest, waist or hip measurements are (very) different from the measurement chart.
1. choose the size that has a chest measurement that is closest to your chest measurement.
2. The measurements you can adapt are chest width, waist width en/of hip width. Because the cardigan ( without the hip band ) is short, the hip measurement you need to adapt may seem a little narrow.
3. The measurements in the pattern compared to the body measurements are as follows:
The chest width on the pattern is 107% of the chest width in the measurement chart.
The waist width of the pattern is 114% of the waist width in the measurement chart.
The hip width on the pattern is 91% of the hip width in the measurement chart.
Suppose somebody has a chestwidth of 38 1/2 “/ 98 cm, waist 29 7/8″ / 76 cm and hip 41 3/4 “/ 106 cm. These measurements are most similar to size 12 / size 42 ( chestwidth 37″/ 94cm, Waist 30 3/4″/ 78 cm, hip 41″/ 104 cm.
Your new pattern measurements are going to be:
Chest width: 107% of 38 1/2″/ 98cm = 41 1/8″/105 cm
Waist width: 114% of 29 7/8″/ 76 cm = 34″/86 cm
Hip width: 91% of 41 3/4″/106 cm = 38″/96,5 cm
Voor we beginnen, eerst wat advies over het aanpassen van het patroon als je bovenwijdte, taillewijdte of heupwijdte (sterk) afwijkt van de maattabel.
1. Kies de maat waarvan de bovenwijdte afmeting het dichtst ligt bij jouw bovenwijdte
2. De afmetingen die je kunt aanpassen zijn bovenwijdte, taillewijdte en/of heupwijdte. Omdat het vestje (zonder de heupband) kort is zal de aan te passen heupwijdte wat smal lijken.
3. De afmetingen in het patroon ten opzichte van de lichaamsmaten zijn als volgt:
De bovenwijdte van het patroon is 107% van de bovenwijdte in de maattabel.
De taillewijdte van het patroon is 114% van de taillewijdte in de maattabel.
De heupwijdte van het patroon is 91% van de heupwijdte in de maattabel.
Stel iemand heeft bovenwijdte 98cm, taille 76 en heup 106. Deze maten hebben het meest overeen met maat 42 ( bovenwijdte 94, taille 78, heup 104).
Dan worden de afmetingen voor het patroon:
Bovenwijdte: 107% van 98cm = 105 cm
Taillewijdte: 114% van 76 cm= 86 cm
Heupwijdte: 91% van 106 cm = 96,5cm

4. Divide these measurements by 4 and measure them from the midback line of your assembled back pattern piece. Mark out your new chest width, waist (in between the two black dots) and hip width. The dotted line is the pattern without the seam allowance, the black line is with seam allowance. If your measurements are bigger than the ones on your pattern the mark will be outside the dotted line,if your measurements are smaller than the ones on your pattern the mark will be inside the dotted line.
4.Deel deze afmetingen door 4 en meet ze af op het achterpand van je aan elkaar geplakte patroondelen vanaf de middenachter lijn. Zet een stip op je nieuwe bovenwijdte, taillewijdte (tussen de twee zwarte stippen) en heupwijdte. De stippelijn is het patroon zonder de naad, de zwarte lijn is met de naad. Als je afmetingen groter zijn dan de afmeting op het patroon zal de stip buiten de stippellijn vallen, is de afmeting kleiner dan valt het erbinnen.

5. Connect the marking points. Draw een small vertical line at the waist.
5.Verbind nu de stippen met elkaar, het stuk op taillehoogte teken je een stukje verticaal.

6. Now add 1/3″/ 0,7cm seam allowance (This will also give you the opportunity to draw your hip line with a bit of a curve to it). Copy this line on your front pattern piece. Because you will add a front binding later the front line is not the mid front line so don’t measure from that line, only on the midback line from your back pattern piece.
Your alteration is done!
6. Nu nog de 0.7 cm naad aantekenen (je kunt het dan meteen een beetje mooier rond bijtekenen, vooral het stukje tussen taille en heup). Kopieer nu deze lijn op het voorpand. Omdat er voor een bies aangestikt wordt is de voorlijn niet de midenvoorlijn, dus niet vanaf deze lijn meten, altijd op het achterpand.Het aangepaste patroon is klaar!

Cut in light weight sweat material/ french terry:
The backpiece (on fold) 1x
The frontpiece 2x
sleeve 2x
pocket 2x
Cut in ribbed knit fabric for cuffs:
Bottom border piece (cut on fold)
cuffs 2x
Cut in cotton lycra, cotton elastane, tshirt weight :
pocketbinding 2x
bow 2x
front binding 2x
neck binding 2x
Cut in lightweight jersey (the thinner the better, can be a small piece of an old tshirt) :
Lining pocket 2x
You also need:
6 or more buttons or snaps
Liittle sew on snap buttons
Sewing yarn in the body color
Sewing yarn in the accent color if you are using buttons
Overlock yarn in the body color
Optional : overlock yarn in the accent color
Knippen in French terry of jaquard:
Het achterpand (aan de stofvouw ) 1x
Het voorpand 2X
Mouw 2x
Zakje 2x
Knippen in boordstof:
Boord (aan de stofvouw) 1x
Mouwboordjes 2x
Knippen in katoen/lycra
Boordjes voor zakjes 2x
Halsbies/strik 2x
Knopenbies 2x
Strik voor op zakje (optioneel) 2x
Knippen in dunne tricot (mag een stukje van een oud tshirt zijn, single jersey hoe dunner hoe beter)
voeringzakje 2x
Verder nodig:
6 of meer knopen (ik gebruikte stofknopen) of drukkers
Een kaartje aannaaidrukkertjes
Naaigaren in de kleur van het vestje
Naaigaren in de kleur van de biezen voor de knoopsgaten
Lockgaren in de kleur van het vestje, eventueel ook in de kleur van de strikbies (optioneel)

We can start.
Finish the edges of the shoulders with a zigzag stitch or an overlock/serger stitch. Sew both shoulder parts together with a stretch stitch on 1/3″/0,7mm of the edge.
Press the seams open.
Alternatively, you can finish and sew your seams in one go by using the overlocker/serger. Quicker but resulting in bulkier seams. It is advisable to use some silicon tape or a little strip of fabric to prevent the shoulders from stretching.
We kunnen beginnen.
Lock of zigzag de randen van de schouders af en stik ze op 0,7 cm van de rand met de stretchsteek op je naaimachine.
Strijk naad open.
Je kunt ook de schoudernaden in een keer samen aflocken, de naad wordt dan wel wat dikker. Het is aan te raden in dat geval een smal strookje tricot of siliconenband mee te locken tegen het uitrekken.

Finish the edges of the sleeves and armholes with a zigzag stitch or an overlock/serger stitch. Copy the markings on the pattern with pins. Pin your sleeves in the armholes and sew them at 1/3″/ 0,7 cm of the edge.
Again, you can also finish and sew your seams in one go by using the overlocker/serger.
Werk het armsgat en de kop van de mouw af met zigzag of overlock. Zet speldjes op de kniptekentjes. Leg de tekentjes op elkaar met de goede kanten, speld en stik met stretchsteek op 0,7 cm van de rand.
Opnieuw, je kunt ze ook in een keer inzetten met de lockmachine.

open the seams and press.
Now finish the inner seams of the sleeves and the side seams of the front and back piece with a zigzag stitch or an overlock/serger stitch and sew them together at 1/3″inch/0,7 cm of the edge. Or finish/ sew the seams in one go with a serger/overlock machine.
Naden openstrijken.
Nu de binnenmouwnaden en zijnaden afwerken met lock of zigzag, goede kanten op elkaar en stikken op 0,7 cm van de rand met stretchsteek of naden samen in een keer aflocken.

Open the seams and press. Turn inside out.
Fold the hipband widthways. Pin to the edge of the cardigan. (it is easiest to pin the middle of the band to the middle of the backpiece first, then work to the front) The hipband should be a little tighter than the cardigan.
Naden openstrijken en omkeren.
Vouw nu het boord dubbel in de breedte en speld aan de onderrand van het vestje. ( handig om eerst het midden van het boord en van het achterpand te markeren met een speld, speldjes op elkaar en van daaruit verder spelden) Het boord is dus wat strakker dan het vestje.

Now attach the hipband using the serger/overlocker. If you use a zigzag stitch on a regular sewing machine, place an extra stretch stitch above it.
Nu de band aanstikken met de lockmachine. Heb je geen lockmachine, zigzag kan ook maar dan nog een extra stiksel erboven plaatsen met de stretchsteek op je naaiachine

Close the two cuffs. Fold them widthways.
Stik nu de twee manchetten dicht en vouw ze in de breedte dubbel.

Pin the cuffs to the bottom of the sleeves.
Speld de manchetten aan de onderrand van de mouw.

Now attach the cuffs to the sleeves using a serger/overlock machine.
Again: If you use a zigzag stitch on a regular sewing machine, place an extra stretch stitch above it.
Nu de manchetten aanstikken met de lockmachine. Ook hier geldt: heb je geen lockmachine, zigzag kan ook maar dan nog een extra stiksel erboven plaatsen met de stretchsteek op je naaiachine

Now we can do the front binding. Fold the binding pieces widthwise, right sides together. Close the bottom seams, cut away excess fabric and clip the corners.
Turn inside out and press.
Nu de knoopsgaten bies. Vouw de bies in de breedte dubbel, goede kanten op elkaar. Stik de onderkant dicht, en knip een randje overtollige stof en de hoekjes weg.
Let op! Als je drukkers gaat gebruiken moet je de stof verstevigen.
Keer om en strijk plat.

The same on the top of the binding but only stitch up to midfront. Fold the binding pieces widthwise, right sides together. Measure 3/8″/1 cm from the fold. Stitch on 1/3″ of the edge up to the 3/8″/1cm point. Be very precise! Cut away access fabric and clip the corner. turn inside out and press. You should have a neat 3/8″/1cm corner and a ‘open’ edge of 5/8″/1,7 cm. (it looks a bit narrower on the photo but it isn’t)
Hetzelfde geldt voor de bovenkant van de knoopsgaten bies maar dan stikken we alleen het stuk af tot middenvoor. Vouw de bies dubbel in de breedte met de goede kanten op elkaar. Meet 1 cm af vanaf de vouw. Stik de op 0.7 cm van de bovenrand tot het afgetekende 1 cm punt. Doe dit heel precies! Knip overtollige stof en hoekje weg. Keer om en strijk plat.Als het goed is heb je nu een hoekje van een cm en een ‘open’ stukje van 1,7 cm (lijkt op de foto wat smaller maar is het niet)
2 notes
·
View notes
Text
Retro knit blouse tutorial part 4:sewing Retro tricot blouse werkbeschrijving deel 4: naaien

All that’s left to do are the sleeves and the buttons/buttonholes
Nu nog de mouwen en de sluiting.

The pattern contains regular sleeves with two options for length. For this blouse I made puffy sleeves, which is an easy pattern adjustment. Add 1 to 1 1/4 inch of height to the top of the sleevecap. Blend gradually to the original line of the sleeve. You can use your front/back markings a a guideline for what area to gather.
Het patroon is voor een glad ingezette mouw maar het is heel eenvoudig om er een patroon voor een pofmouwtje van te maken. Verhoog de kop van de mouw met 3 cm en laat geleidelijk verlopen. het stuk tussen de tekens is het deel wat je gaat inrimpelen.

Finish the edges of the sleeves and the armholes using a zigzag stitch on your machine or a serger/overlocker
This is a handy trick for gathering: Use the zigzag on your sewing machine to stitch on a thick thread (jeans yarn for instance) making sure you don’t sew through the thread. Secure one end.
Lock de rand van de mouw af plus het armsgat.
Dit is een handig inrimpel trucje: Stik een dikke draad (jeansgaren bv.) op het te rimpelen stuk met een zigzag steek. Het ene eind wel even vastzetten. Zorg dat je het draadje niet vastnaait. Als je aan het draadje trekt kun je de stof mooi laten rimpelen.

Pull gently on the other end and check if it fits in the original sleeve cap (so before you added the height). When it does also secure the other end of the thread
Je hebt genoeg ingerimpeld als de mouw weer in het (gladde) mouwpatroon past.

When it does also secure the other end of the thread
Naai nu het draadje vast.

Now you can pin and attach the sleeve caps into the armholes using a stretch stitch on the sewing machine.
Finish the edges of the the front and back of the sleeves and the sides of the front and back piece in one go using a machine zigzag or a serger.
Close the sleeves and the sideseams with a stretchstitch on the sewingmachine. (alternatively, you can use the serger for finishing and stitching in one but you will get a thicker seam.)
Speld en stik de mouwen in de armsgaten met een stretch steek op de naaimachine.
Overlock de randen van mouwen en panden, speld de pandjes aan elkaar en stik met de stretch steek de mouw en zijnaden dicht ( mag dus ook in een keer met de overlock, wat je zelf het fjnst vindt.)

Finish the bottom of the shirt with a machine zigzag or a serger/overlocker
Fold in 3/4 inch and press.
Topstitch the Hem. You can use a regular stitch. It might get a little wavy but this will disappear when you press the shirt.
Overlock de onderrand van de blouse.
Strijk 2 cm om.
Stik de zoom.

For the 3/4 sleeve: close the cuffs. Fold them over (width ways) and attach to the sleeve opening using the zigzag on the sewing machine or a serger/overlocker. If you use zigzag, also add an extra stitch just above it with a machine stretch stitch.
If you like to add piping in between the cuff and the sleeve than first fold the cuffs in half width ways, stitch the piping on the cuffs, close them and sew on the sleeves.
If you are making the long sleeve option: fold in a hemwidth of 3/4 inch and press. hem on the outside using a twin needle or a coverlock. (the reason why I did not use this method for the hem of the shirt is because the hem does not have to be as stretch as the sleeveopening A single stitched hem looks better for a shirt)
Voor de 3/4 mouw: Sluit de mouwboordjes/manchetten. Vouw ze om en stik (met de lockmachine) vast aan de onderrand van de mouwen.
Wil je ook een piping langs de manchetten dan stik je eerst de piping langs de dubbelgevouwen manchetten, dan sluit je ze en stik vast langs de onderrand van de mouwen.
Voor de lange mouw: speld een zoombreedte van 2 cm af en stik aan de buitenkant met een tweelingnaald of met een coverlock door. Je kunt er ook voor kiezen om de zoom af te locken en met een gewone machinesteek door te stikken.

Last but not least: the button holes.
As you have noticed I did not indicate them on the pattern. Not everyone likes the same amount of buttons on their shirt. I usually use 8.
Mark the first buttonhole on the collar stand and indicate where you want the last buttonhole.
Now divide the space between these two buttonholes in 7 equal spaces and indicate with pins.
Nu nog de knoopsgaten. Deze staan niet aangegeven op het patroon. Niet iedereen wil evenveel knopen. Ik gebruik er meestal 8 voor een blouse.
Geef het eerste knoopsgat aan op de staander en waar de laatste komt. Vervolgens deel je de ruimte tussen deze twee knoopsgaten in 7 gelijke delen. Geef met speldjes aan waar de knoopsgaten komen. Maak ze ong 0.5 cm groter dan de knoop.

The buttonhole on the collar stand is horizontal and starts on the same height as the center of the placket. This way the button on the collar stand will line up with the rest of the buttons.
All that is left now is sewing on your buttons and taking a photo to share on our Instagram page ilikedressme
Het knoopsgat op de staander is horizontaal en begint ter hoogte van het midden van de placket. Zo komen de knopen netjes onder elkaar.
Nu nog de knopen aannaaien en de blouse is klaar!
Deel je resultaat op onze Instagram pagina ilikedressme
3 notes
·
View notes