#sewing tutorial
Note
Any tips on learning to make buttonholes? I've been putting it off for.... *checks notes* like three years.... but better late than never and all that. I don't have any fancy machines so I gotta do it by hand but that seems right up your alley.
Thanks!
It IS up my alley, yes, I do most of my buttonholes by hand!
I'm actually part way through filming an 18th century buttonhole tutorial, but I expect it'll be a few more weeks before I finish that and put it on the youtubes, so in the meantime here's the very very short version. (The long version is looking like it'll probably be about 40 minutes maybe, judging by how much script I've written compared to my last video?)
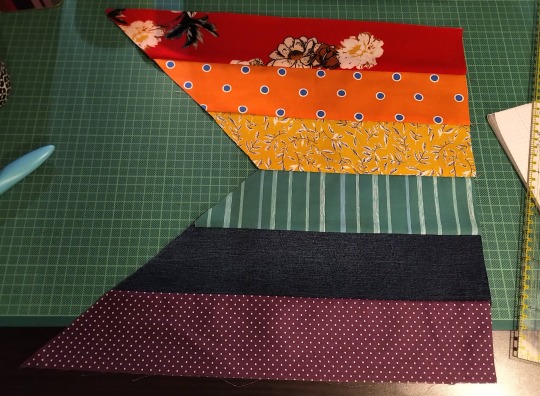
Mark your line, a bit longer than your button is wide. I usually use a graphite mechanical pencil on light fabrics, and a light coloured pencil crayon on dark ones. (I have fabric pencils too, but they're much softer and leave a thicker line.)
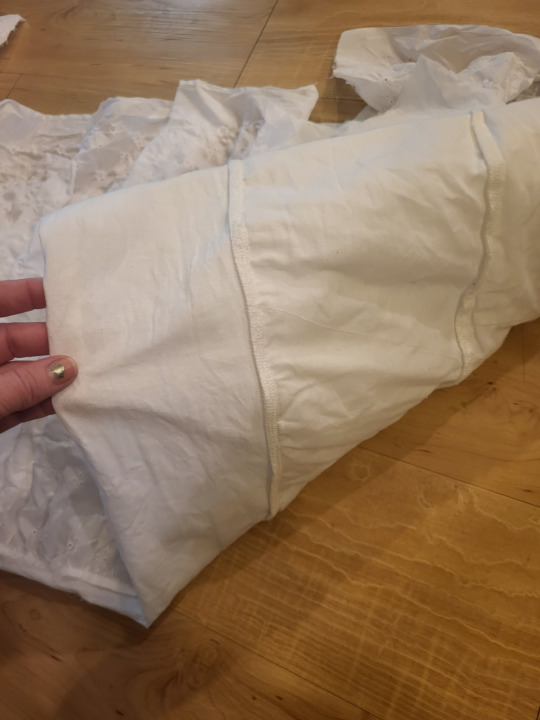
You may want to baste the layers together around all the marked buttonholes if you're working on something big and the layers are shifty and slippery. I'm not basting here because this is just a pants placket.

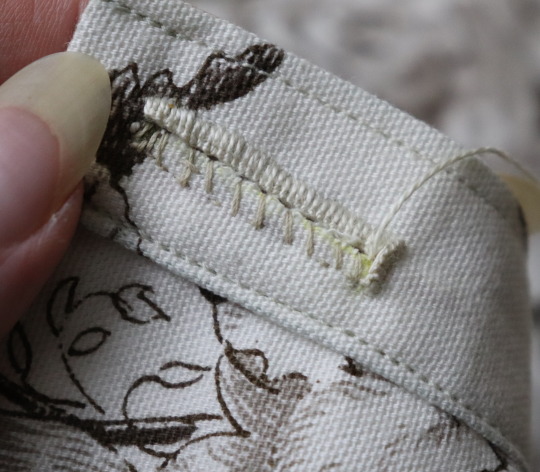
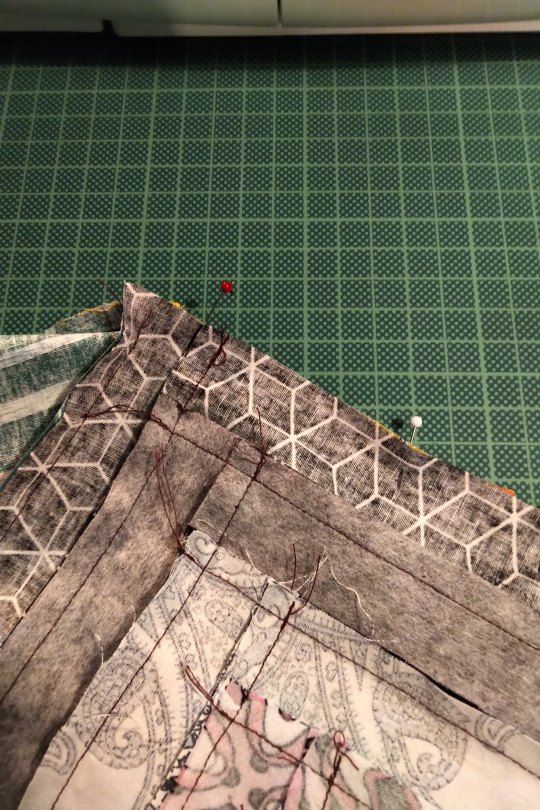
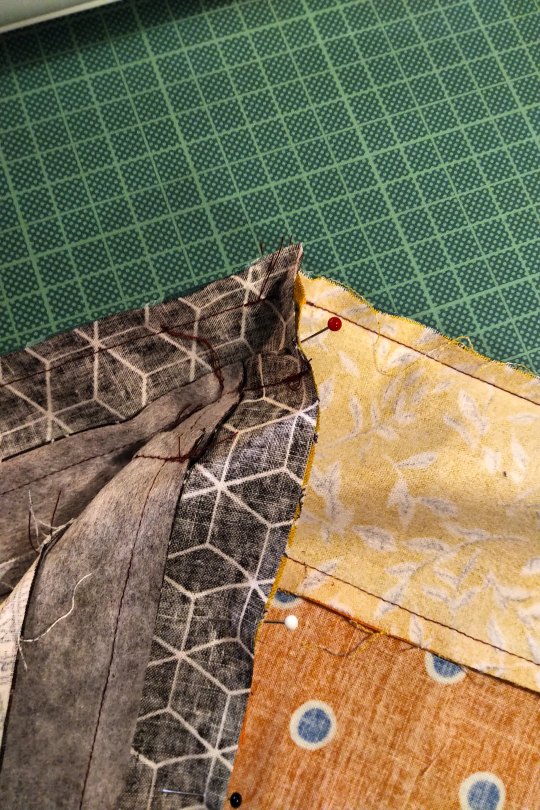
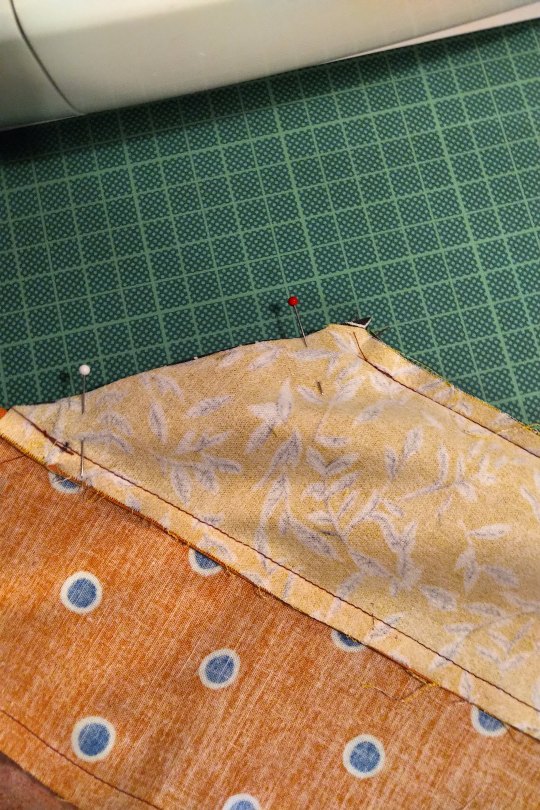
Do a little running stitch (or perhaps a running backstitch) in fine thread around the line at the width you want the finished buttonhole to be. This holds the layers of fabric together and acts as a nice little guide for when you do the buttonhole stitches.

Cut along the marked line using a buttonhole cutter, or a woodworking chisel. Glossy magazines are the best surface to put underneath your work as you push down, and you can give it a little tap with a rubber mallet if it's not going through all the way.

I'm aware that there are some people who cut their buttonholes open using seam rippers, and if any of them are reading this please know that that is abhorrent behaviour and I need you to stop it immediately. Stop it.
Go get a buttonhole cutter for 10 bucks and your life will be better for it. Or go to the nearest hardware store and get a little woodworking chisel. This includes machine buttonholes, use the buttonhole cutter on them too. If you continue to cut open buttonholes with a seam ripper after reading this you are personally responsible for at least 3 of the grey hairs on my head.
Do a whipstitch around the cut edges, to help prevent fraying while you work and to keep all those threads out of the way. (For my everyday shirts I usually do a machine buttonhole instead of this step, and then just hand stitch over it, because it's a bit faster and a lot sturdier on the thin fabrics.)

I like to mark out my button locations at this point, because I can mark them through the holes without the buttonhole stitches getting in the way.
For the actual buttonhole stitches it's really nice if you have silk buttonhole twist, but I usually use those little balls of DMC cotton pearl/perle because it's cheap and a good weight. NOT stranded embroidery floss, no separate strands! It's got to be one smooth twisted thing!
Here's a comparison pic between silk buttonhole twist (left) and cotton pearl (right). Both can make nice looking buttonholes, but the silk is a bit nicer to work with and the knots line up more smoothly.

I've actually only used the silk for one garment ever, but am going to try to do it more often on my nicer things. I find the cotton holds up well enough to daily wear though, despite being not ideal. The buttonholes are never the first part of my garments to wear out.
I cut a piece of about one arm's length more or less, depending on the size of buttonhole. For any hole longer than about 4cm I use 2 threads, one to do each side, because the end gets very frayed and scruffy by the time you've put it through the fabric that many times.
I wax about 2cm of the tip (Not the entire thread. I wax the outlining/overcasting thread but not the buttonhole thread itself.) to make it stick in the fabric better when I start off the thread.
I don't tend to tie it, I just do a couple of stabstitches or backstitches and it holds well. (I'm generally very thorough with tying off my threads when it comes to hand sewing, but a buttonhole is basically a long row of knots, so it's pretty sturdy.)

Put the needle through underneath, with the tip coming up right along that little outline you sewed earlier. And I personally like to take the ends that are already in my hand and wrap them around the tip of the needle like so, but a lot of people loop the other end up around the other way, so here's a link to a buttonhole video with that method. Try both and see which one you prefer, the resulting knot is the same either way.


Sometimes I can pull the thread from the end near the needle and have the stitch look nice, but often I grab it closer to the base and give it a little wiggle to nestle it into place. This is more necessary with the cotton than it is with the silk.
The knot should be on top of the cut edge of the fabric, not in front of it.

You can put your stitches further apart than I do if you want, they'll still work if they've got little gaps in between them.
Keep going up that edge and when you get to the end you can either flip immediately to the other side and start back down again, or you can do a bar tack. (You can also fan out the stitches around the end if you want, but I don't like to anymore because I think the rectangular ends look nicer.)
Here's a bar tack vs. no bar tack sample. They just make it look more sharp, and they reinforce the ends.

For a bar tack do a few long stitches across the entire end.

And then do buttonhole stitches on top of those long stitches. I also like to snag a tiny bit of the fabric underneath.

Then stick the needle down into the fabric right where you ended that last stitch on the corner of the bar tack, so you don't pull that corner out of shape, and then just go back to making buttonhole stitches down the other side.
Then do the second bar tack once you get back to the end.

To finish off my thread I make it sticky with a bit more beeswax, waxing it as close to the fabric as I can get, and then bring it through to the back and pull it underneath the stitches down one side and trim it off.


In my experience it stays put perfectly well this way without tying it off.
Voila! An beautiful buttonholes!


If you want keyhole ones you can clip or punch a little rounded bit at one end of the cut and fan your stitches out around that and only do the bar tack at one end, like I did on my 1830's dressing gown.

(I won't do that style in my video though, because they're not 18th century.)
Do samples before doing them on a garment! Do as many practice ones as you need to, it takes a while for them to get good! Mine did not look this nice 10 years ago.
Your first one will probably look pretty bad, but your hundredth will be much better!
Edit: Video finished!
youtube
And here's the blog post, which is mostly a slightly longer version of this post.
#ask#buttonholes#sewing#hand sewing#sewing tutorial#I've been procrastinating on the video this week#I want it done! I don't want to work on it I want new projects! I want to cut out more gloves!#currently forcing myself to do the last few buttonholes on these pants and then maybe I can cut out new gloves? as a treat?#but I hope I get some filming done tomorrow too
3K notes
·
View notes
Text
Wednesday, November 29.
You reap what you sew.
Never have truer words been spoken. But they come as good news for Tumblr's sewing community, however, who have been sewing some absolute delights. Some real œuvres d'art. Some winner-winner chicken dinners.
As luck would have it, #sewing is trending. And it's trending right now, so we have reaped a selection of these very dinners for your eyes only. We have then asked ourselves just what did we do to deserve y'all, and your resplendent talents.
#today on tumblr#sewing#sew#sewblr#crafts#sewing machine#crafting#sewing project#textile arts#crochet#sewing patterns#sewing tutorial#sewing tag#craftblr#contemporary art#artists#artists on tumblr
1K notes
·
View notes
Text
I made some cute sunflower pillows out of scrap fabrics I had been saving from the dump. I couldn't find the right buttons so I made some out of polymer clay I had in my stash 🌻

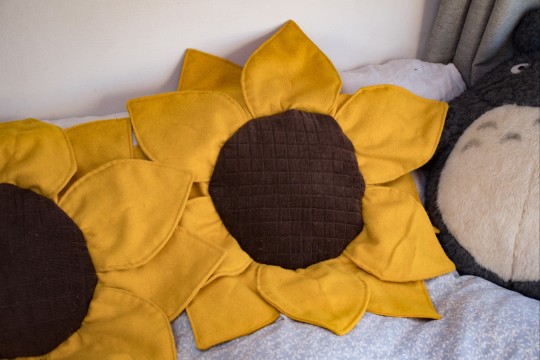
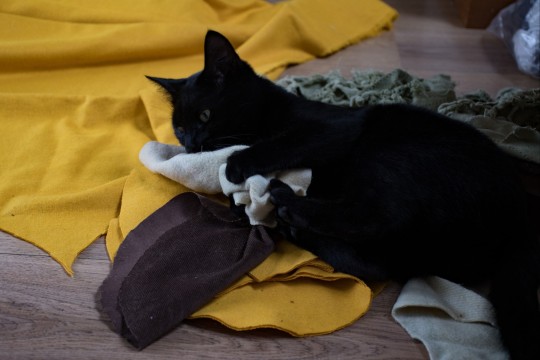
Here's some instructions if you also want to make some 😊
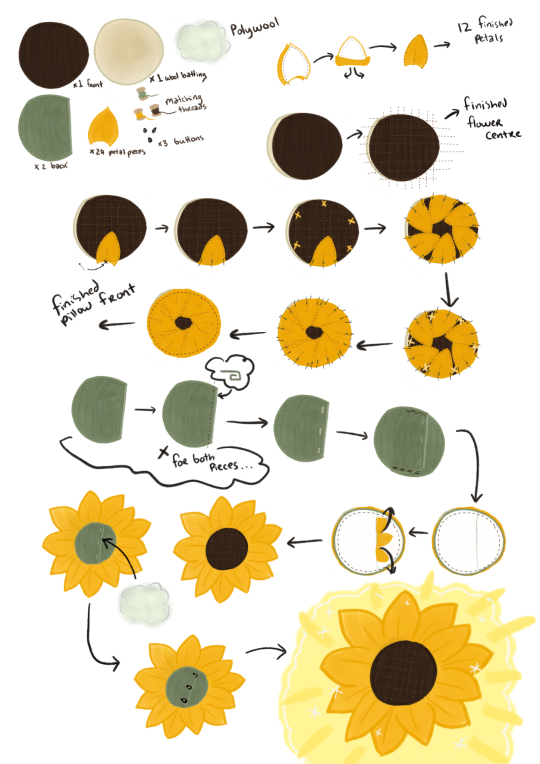
I still need to draw up a sized petal template but I've also made a youtube video (my first one, it's horrible 😂) if you are more of a visual learner.
youtube
1. Cut 1 brown corduroy circle 1 wool batting circle and 2 green 2/3 circles (for the back)
2. Cut 12 pairs of petals (24 pieces total)
3. Sew petal pieces right sides together 1cm away from edges. Turn right sides out and top stitch along the edge. Stitch centre petal seam. Repeat for all petals
4. Quilt your brown centre to the wool. I made lines about 1.5cm apart making a grid.
5 Pin 6 of your petals centre first evenly spaced around the edge. Pin the last 6 over the gaps. Sew 1 cm from the edge
6 Roll hem the straight edge of the 2/3 circle pieces (a rol hem to folding and then folding again)
7 make 3 button holes evenly spaced on one back piece
8 secure the pieces to eachother both having right sides up, creating a pocket
9 fold on your petals and pin your back piece right sides together to your flower front. Sew 1.5cm around the edge and turn out through the pocket.
10 stuff your pillow then add buttons to fit the holes you made earlier. I do the buttons last to make sure they fit nicely when fully puffed.
11 yayyyy pillow!
#cottagecore#slow living#cottagecore aesthetic#hobbitcore#sewityourself#diy#sewing tutorial#free sewing pattern#cottage life#Youtube
332 notes
·
View notes
Text

interested in making your very own YIPPIE? the power is in your hands.
#plush#plushie#daylikescookies#plushies#artists on tumblr#plushcore#kidcore#tbh#tbh creature#yippee#yippie creature#yipeeee#yippy#yipee#yippie#yipppeeee#sewing tutorial#sewing pattern#sewing
251 notes
·
View notes
Text
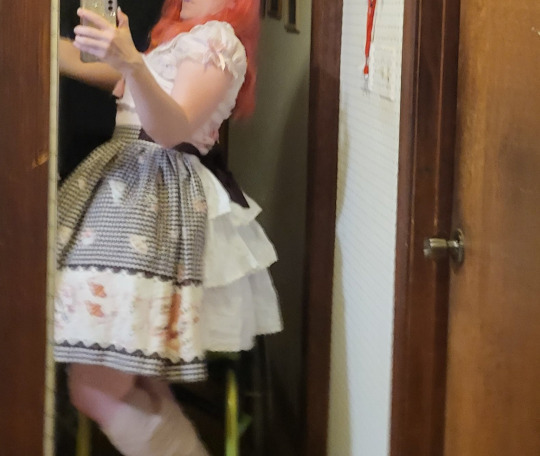
(It's been entirely too long since we've started a tutorial with a very blurry picture, which is a 20dollarlolita tradition. Am I about to fall over and only staying upright because of a death grip on this trim? Stay tuned to find out)
Let's make a skirt.
There's a lot of lolita fashion that doesn't fit most people. It's me. I'm most people. I'm going to wear it anyway, so I'm going to resize that to fit me.
The hardest part of resizing a lolita skirt (or skirt part of a dress) is that you almost never can get the fabric that the skirt was made out of. Lolita prints are usually pretty limited run. While some dresses will let you redistribute the fabric to have a slightly less full skirt, that's usually a major reconstruction that ends up drifting a bit away from the lolita shape.

x
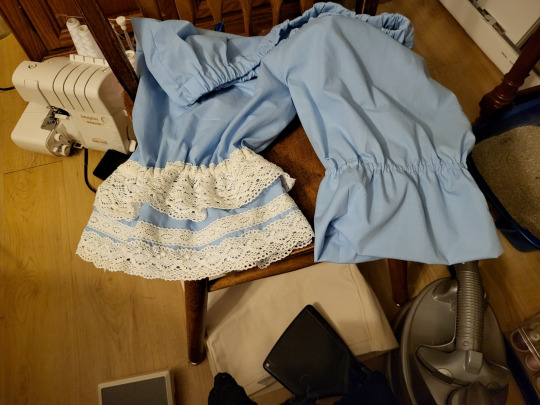
A ruffled bustle bustle, however, is pretty common. Bustles like this are pretty common in lolita fashion and add an additional detail. In addition, you can make the waist of the skirt several inches bigger without a problem, and without compromising skirt fullness. If you ever want to undo the alteration, seaming the skirt back up is not very difficult. It's not a fully seamlessly reversible alteration, but there's far worse things you could do to the garment (ask me about my AP dress with mesh pits).
The problem is that bustles like this take quite a bit of energy and fabric, especially if you want to have details like lace trim. It's one of the more time-consuming alterations to do.
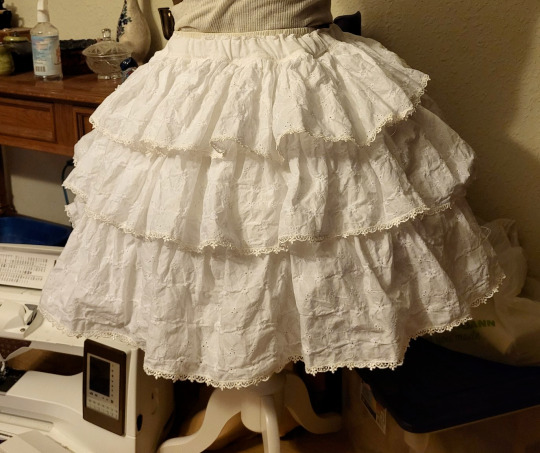
Or you can make one bustle/ruffle underskirt, one time, and wear it with all your skirt and dress modifications. You can splurge and get some nice trim and get some nice fabric, because you only need to buy it once. You can also wear it as a standalone skirt. (Just remember to never, ever steam it before taking pictures. You wouldn't want to look competent)
I put off making one of these for a very long time, because I'd made the process much more complicated in my head than it turned out needing to be. Once I was building this and realized I needed to simplify the fuck down, this became a really easy project.
Materials:
I decided to make the ruffles on my skirt out of eyelet lawn, which is a cotton fabric that has an all-over embroidery. I got this for about $10 a yard on ebay. I don't have a very accurate judgement of how much I used on the skirt. I bought 4 yards and used probably 3.5, but I also wasted a bunch of fabric on an extra tier that I had to chop off. I wanted a fabric with more detail than broadcloth, but that wasn't exclusively going to work with OTT styling.
I got 30 yards of 1/2" Venise lace off cheeptrims.com for $9. I really recommend putting lace on your ruffles if you can. It really adds to the detail level, and you only need to buy it once. You already have to hem all of this so you might as well hem it with lace.
You will also want some fabric for the slip layer (for want of a better term) to attach the ruffles to. My ruffles were a little bit sheer, so I wanted an opaque base fabric for modesty. Depending on the look you're going for, you can also use this layer to add some subtle detailing or changes to the finished look. If you're only wearing it with over-the-top looks, using a base fabric with shine or glitter can stop your ultrabustle from looking too plain. If you're wanting your ruffles to lay flatter, getting a soft fabric with a lot of drape will make the ruffles droopier. I just used some weird cotton plainweave that I got at Green Store for 75% off due to a bolt-long defect.
I used 1" elastic in the waistband here, because this skirt can get a little bit heavy, and then you often have another skirt on top of it adding to the weight.
The other thing that I used that made this much easier was a ruffling attachment for my serger. You don't need to use a serger, but a ruffling or gathering attachment that allows you to ruffle a flat strip of fabric and sew it onto another piece of (not to-be-ruffled) fabric will speed things up considerably. I know a lot of people buy a ruffler or a gathering foot when they start sewing lolita, and then are disappointed when they don't use it very much. There's a very limited number of lolita applications for these attachments, and I'm happy to tell you that this is one of them. If you don't have one, you don't need to go buy one. You can just do the two-step process of gathering the fabric and then sewing it on. But if you wanted an excuse to go buy one, well, you have one.
The Plan:
So I'd previously made a lot of math and calculations for how each tier was going to gather into the previous one, and then realized during the build phase that actually was way too complicated.
What we need is a rectangle with ruffles on it gathered into a waistband. Yes, a rectangle. I know, I was stunned too, but the final result worked the best.
I wanted the tops of the ruffles to be hidden in seams. If you just sew ruffled strips onto a single piece of fabric, it's very difficult to hide all the raw edges and to make sure you're not spreading loose threads all over the place. We're going to make ruffled strips, and sew them to each other. This covers up the raw edges very nicely.
This also will allow you to slightly gather the second and top tiers to each other, if you want to make this skirt in an a-line instead of a bell/cupcake shape.
The Math:

If you know what skirts you're planning on wearing your ultrabustle with, it can help to measure them and get a good guideline.
Generally, you want your ultrabustle to be a number somewhere within these guidelines.
~~Close to the same length of the skirt you're wearing it with
or
~~4"ish longer than the skirt you're wearing it with.
(This depends on if you want the bottom ruffle to stick out. If you're Tallita and all the skirts and dresses you're resizing are also too short, you might want this to double as a ruffled underskirt)
and
~~An acceptable length to wear as a skirt all on its own.
My first run at this ultrabustle was WAY too long, and after chopping off the entire top tier, it ended up being either 1" shorter or 1" longer than the skirts I'm planning on wearing it with, which is a great number for me.
As for the total fullness of the skirt, you have to remember that the ruffles will add visual volume to the skirt. This means that you don't actually need the hemline of your skirt to be super full. All that matters is that your petticoat can comfortably squeeze in there. For this, I measured the hemline of the smallest dress that I had that still fit my petticoat, and used that. It turned out to be about 80" around.
So, what sizes do we cut this at? It's math time.

Here's a worksheet if you want.
You're going to need to know how long you want the finished skirt, how wide you want the hem of the slip (not the ruffle) of the skirt, how many ruffle layers you want, and your waist measurement.
The slip needs to be shorter than the ruffles, so it doesn't show. So total slip length is your skirt length minus 2.5". Divide that by the number of ruffle layers that you have, and you'll have how long to cut each of those. This is slip tier short side.
Each ruffle layer needs to be longer than each slip layer, so that the slip doesn't show. You want each ruffle to overlap the previous one. So, take your slip tier short side and add 2-3" (or more, if you want). This is your ruffle short side.
Your finished slip diameter is your slip tier long side. That one's easy.
If you're a math and planning person, you can determine your ruffle long side measurement. You'll want to take a piece of your fabric, cut to the ruffle short side measurement and also about 45+ inches wide, and a piece of your slip fabric. Run them both through your gathering attachment so that your ruffle fabric is sewn onto your slip fabric. If you like how that looks, you can then measure the finished length of the ruffled fabric and use that to calculate how much fabric you'll need for the ruffles.
There's four places where people mess this up. First of all, if you're using your gathering attachment to sew and gather at the same time (which is the point of that attachment), you want to do all your test runs gathering it onto a fabric. The amount of fabric that goes into a machine ruffle changes depending on if it's onto fabric or just gathering. Second, you want to use your finished fabric, at your finished ruffle length. Different fabrics will ruffle different amounts, and different ruffle widths will look different even at the same gathering amount. Third mistake people make is to not gather a long enough strip. The longer a strip you gather, the more accurately you can measure how much fabric is actually going into your ruffle. And the fourth is to take that measure as an accurate one, and not plan for needing extra fabric. The upside of the gathering attachment is that it will save you so much time. The downside is that you can't be as accurate with knowing how much fabric you'll use. Remember, you can always turn the leftovers into a matching accessory.
Even if you're going to go yolo like I did and not do the math about how many ruffles you need, you will still want to run a check that you like how your ruffling attachment looks. You don't need to measure super accurately, but try to get a feel for how much fabric is going into each ruffle. For example, if your ruffler takes a strip and makes it 1/3 it's flat size, then you'll need more fabric than if your ruffler makes it 1/2 it's flat size.
If you're really on a budget, you can just cut your ruffles at 2.5x your slip long dimension and precisely gather by hand. My time's worth something to me and so it wasn't worth it to do that just to save a yard of $10 fabric.
The last part is just to check that your ruffle long dimension (or it's rough approximation) is still at least 2.75x your waist measure (3.25 is better). If you don't have that, your skirt likely won't look full enough for a lolita silhouette. If that's the case, just add to your skirt dimension until it is.
Actually making it:

Before you forget, cut out a piece for your waistband. You can decide if this looks better in your ruffle fabric or your slip fabric (I used slip). This piece should be 3ish" longer than the distance around the fullest part of your booty. You need this to be longer than your booty distance so that you can get it on your body. If you're using 1" elastic, you want this piece to be a minimum of 3" wide.
I've found that the easiest way to do this is to start out by making the whole skirt as a single, very long strip. So, I take my slip tiers and cut them all out, and sew them into a long strip.
On my specific fabric, I decided that I wanted the pattern on the eyelet to go lengthwise. So, instead of cutting the fabric across the grain (short side, selvedge to selvedge) like I normally would, I cut down the 4 yard length of the fabric. This meant a lot less seaming. Since I didn't really know how much fabric I was going to use (you know that test I described to check how much fabric you're going to use? Yeah, guess who didn't do that), I just cut them one 4-yard strip at a time. I'd ruffle one all the way, stop, and cut the next one. This did actually save me quite a bit of fabric versus cutting them all at once. I had to go back and sew the sides of the ruffle together once the skirt was done. It was a small price to pay for the convenience I experienced.
I knew what size I wanted the finished ruffle length to be, but I cut my ruffles about 2.5" longer than that. I wanted a little bit of wiggle room once the skirt was done, so that I could do the length adjustment once the whole skirt was assembled.
And then, it's just a matter of letting the ruffler do its work. My serger ruffler works by you putting the item to-be-ruffled on the bottom, and the item to attach the ruffle to on the top, and then just hitting go. Some other rufflers work by putting the to-be-ruffled at the top, so you can see it as you go. Like all sewing machine attachments, if you're not sure, just go on youtube and search "HOW SINGER GATHERING FOOT DO THING NOT LOOK LIKE SHIT?" and someone's probably made a video of it.
So, once you've run all your ruffle through your machine, you should have a nice single strip of slip fabric with a ruffle on top of it. Now, some gathering attachments don't actually sew super strong seams, because you have to adjust tension or stitch length pretty severely to get it to ruffle like you want. The other advantage of putting the ruffles in a seam instead of just topstitching them onto a piece of fabric is that it doesn't matter how strong your ruffle attachment is, as long as it's strong enough to hold until you can put the ruffle in the seam. The seam provides the strength.
Once you have your single long ruffle, cut off a section that's the diameter of your bottom tier.
Now you just need to sew them together (and finish your inside edges). I like to start at the bottom tier and go up.
For each tier, you're sewing the bottom of the slip layer to the top (ruffle and slip) of the tier below. Just pull the ruffle of the higher tier out of the way, put right sides together, and sew.
If you aren't using a serger, you can zigzag over your edges and then trim them down, use an overcasting stitch from your sewing machine, or topstitch some seam binding over the seams. The extra line of stitching on the slip layers in front won't be visible.
One of the other nice things about building this in the way we have is that, when you finish the edges of your inside seams, you're putting three layers together and finishing it as one. This is actually a lot less then 1/3 of the work of finishing them separately, because you'd have to finish the ruffle as a flat piece, which would take way more time. Have I convinced you on the greatness of this technique yet?
Continue cutting pieces off your ruffle layer and stacking them until you have as many layers as you decided you were going to have.
Once you have your layers all stacked up on each other, it's time to sew the skirt back seam. I find that it looks best to hold the ruffles out of the way, sew the slip together, and then go back and sew all the ruffle pieces. Basically now is a good time to just check for any ugly spots and to touch them up.
There's like 50 ways to attach a waistband to a skirt. For this one I used this method (what a blast from the 20dollarlolita past we have there. Also please note that the cost of ruffler feet seems to have gone up from $15 to $60-$100 in the past 10 years and despite working in a sewing machine store, I'm not totally sure why).
Once you've got the whole skirt assembled, it's time for the finishing.
The first thing that I did was put it on and try to judge how short I wanted my top ruffle. I'd cut all my ruffles extra long in the short dimension, so that I could shorten them when they were on the skirt. I picked a length that worked, marked it out, and chopped at that point. I then did this for the other two layers. I found that I wanted my bottom ruffle to be a little bit longer than my top ones, and cutting it long allowed me to make that choice.

I then started just zigagging on my lace. If you don't have a serger, you can use the lace as a hem finish, which also saves you an additional step. The lace really added a lot to this, and since I only need to make this once to wear with a lot of different garments, it was an economical use of nice lace.
I started putting the lace on the top layer first. This is because, if I ran out of lace, having a different (wider) lace on the bottom layer wouldn't look strange. As previously mentioned, I did zero measuring of how long my ruffles are, and had no idea if 27 yards would be enough lace. Don't be like me. Do some tests. Or be like me and choose the life of treachery. Anyway, stick lace on this thing, please. You worked hard and your skirts deserve it.
The only other thing that I did was to cut the slip layer down by about 3" on the very bottom. I did this because I made a mistake, but I like how it looks.

You can take this system of ataching ruffles in rectangles or even a trapezoid and stick it in the back of a skirt (or skirt on a dress). I did that here because I knew that I wanted a pink bustle, not a white one.

I'll do a tutorial for the actual skirt resizing sometime after I actually resize a skirt with this. Here, all I did was slice the back, hem those edges, and then button on some waist ties from another dress. This let me easily add several inches to the back of this skirt, without needing to re-distribute pleats, and without sacrificing the fullness of the shape.
This will all sit a little bit better once I've pressed the skirt, as well. Steaming the top layer of this while the garment is on me/a dress form/a hanger will decrease the poof in the top layer a little bit, and honestly, we could benefit from that in this case.
Anyway, if you have this, you have a very fast way to enlarge existing garments.
So, while this has thankfully very much decreased in the past years, there's still some people with weird opinions on MoDiFyInG bUrAnDo, so let's have a talk.
Lolita clothing is not community owned. If someone who was never going to sell a dress to you modifies it, that doesn't take it away from you. This is a mentality that we tend to have in lolita more than other fashion just because of our high resell scene, but it wasn't ever going to be your dress and so you don't need to have an opinion about what happens to a thing you were never going to personally own.
Things have value more than money, and value is often changed rather than destroyed. AP's Halloween Treats OP has no value to me when sold for $500 on Lacemarket. I don't spend that much money on lolita, ever. But a questionably-altered AP's Halloween Treats OP that I can un-alter has value to me if the price is good. But a questionably-altered AP's Halloween Treats OP has very little value to someone who likes the price, but can't undo the alterations. When someone resizes a dress or skirt, true, sometimes the people who are the size it was originally made can't wear it anymore. You've decreased the value to them, but you've made it more valuable to people who are the size that you've made the garment become. This skirt had no value to me when it's waist measure is 7.5" too small, but now I can wear it, so it has functional value to me.
A lot of people who say that modifying the dress ruins it are either ignoring that also the stress of putting a dress not sized large enough for your body can damage it and not look as great while doing so, or else they have a much worse take. People who say that modifying clothes ruins the garment, but also say that wearing a garment that's too small ruins the garment, what they're actually saying is that wearing that garment is a privilege that should not be extended to larger sized people, and if they say that then they can just, you know, go fuck themselves. We don't need that in the community. Everyone deserves to wear lolita, and some people have to work harder to achieve it, and that's not fair, but everyone deserves it.
So yeah, kiddos! Build a skirt! Go cut up some clothes! Wear the skirts you've always wanted to wear! You can do anything!
And to answer the question we opened this with, yes, I was absolutely falling over.
#handmade lolita#20dollarlolita#lolita fashion#resizing clothes#making clothes bigger#tutorial#skirt tutorial#lolita skirt tutorial#sewing tutorial#bustle underskirt#utilibustle#ultrabustle#the one bustle to rule them all#one bustle to find them
212 notes
·
View notes
Text
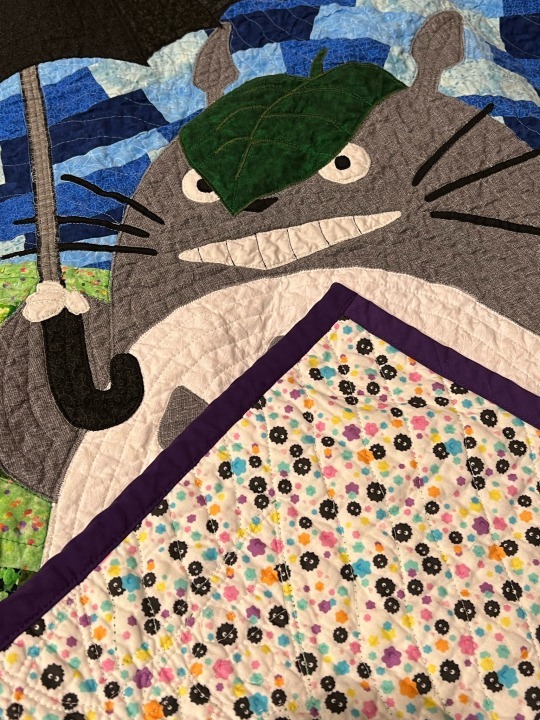
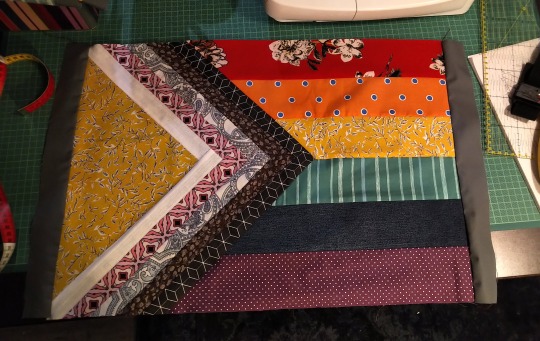
Progress Pride Flag Quilt Block Pattern & Tutorial

Don't you just love the flag of our people? Do you have an inner grandma that years to make stuff? Do you want to combine these two things and make a queer quilt?
Well, I've got you.
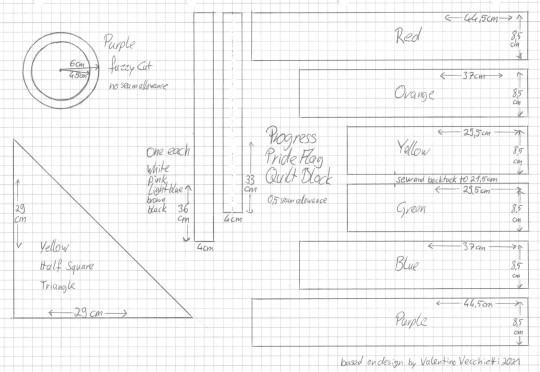
Behold the pattern! And my lack of graphic skills, so I drew it on paper!
Basically it's a bunch of rectangles, one half square triangle and a fuzzy cut circle. I don't know shit about quilting and I was able to come up with it. Why Centimeter, you ask? Because I'm German and that's what I'm familiar with. Why weird measurements and not jelly rolls and layer cakes and stuff? Because I'm German and quilting is not really a thing here.
Onto the tutorial!
You'll need:
A scrap of fabric of red, orange, yellow, green, blue, purple, black, brown, light blue, pink, white each
additional fabric for the border
Cutting mat, quilting ruler, roll cutter
sewing machine
thread
pins
double sided interfacing
iron and ironing board
fabric sheers
compasses
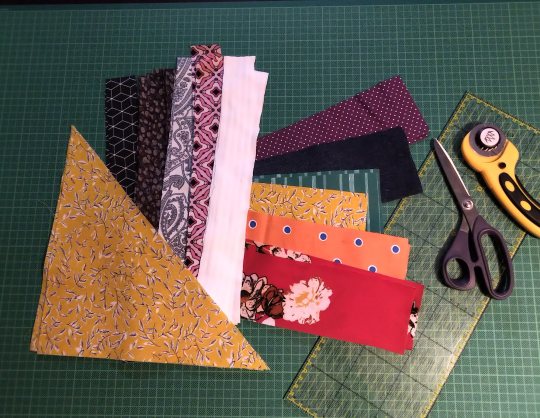
Step 1: Cut everything. Duh. We'll take care of the circle later, don't worry about that now. The half square triangle is exactly what it sounds like. A square and then you cut it diagonally. That's why I didn't give the length of the hypotenuse.
(Note: I'm making two blocks at the same time, that's why there's so much fabric. Also this is a middle of the night project, hence the lighting.)
I'm using all kinds of different fabrics, different weights and drapes, some stretchy, some transparent, so I needed to interface some of them.
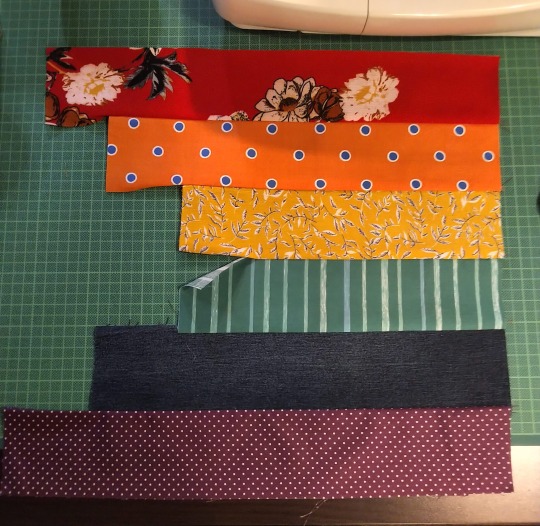
Step 2: Sew the rainbow together. 0,5cm seam allowance on everything, that's exactly the edge of the foot on your machine. Double and triple check that everything is facing the right direction before sewing. The seam of yellow and green does not get sewn fully, only 21,5 cm! That's important later! Also backtack there. Don't forget to iron.
Step 3: Sew the strips to the half square triangle. For this you have to switch between the sewing machine and the ironing board constantly. Attach the shorter strip diretly to one side of the HST, iron it open. The second strip of the same colour gets attatched to the other side of the HST and the first strip. Look at the pictures closely if you're unsure how that works. Also the strips are longer than the triangle. We'll square that up later.
All strips attatched will look like this. See how the two strips meet at the tip!
Step 4: Cut the rainbow part to size. The seam between yellow and green is 22cm long. The shorter seam from before and some seam allowance. The outsides of red and purple are 44,5cm long. You will cut a little triangle from every single colour. Do this slowly and carefully. Maybe your fabrics have stretched a bit (mine did). Don't worry, it will be ok.

Step 5: The Y seam, part one. Y seams are tricky, but there's only one for this block. So put your straps part on your rainbow part and line them up so that the tip of the strip part overhangs the seam between yellow and green. Remember that it's not about the edges of the fabric, but where the seam will be. So position the strap part so that the 0,5cm seam will meet the yellow-green seam.
But don't sew all the way! Leave 0,5cm at the tip!
Step 6: The Y seam, part two. Now, fold both the rainbow part and the strips part in half and if you've done the last step correctly, the remaining two edges will allign. Pin and sew.
I can't explain it better than I've done here, I'm sure there are tutorias out there. Good luck!
Step 7: Square up. Iron your block to that everything is nice and straight and flat. Then use the fabric edges of the red and purple to cut the remaining ends of the strips. Use the HST to cut the white. Be careful, the long side of the triangle is on the bias and likely stretched a bit.
I already added borders here. I'm making a pillow case.
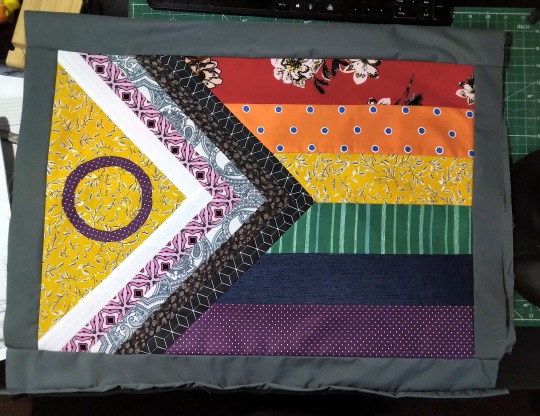
Step 8: Fuzzy cut and raw edge applique. Double sided iron on interfacing is essentially double sided tape. It has two types of glue, one gets activated by 2 seconds of heat, the other by 5 or so (depends on the product). The second side is also covered with a paper that needs to be removed before the second glueing. Read the instructions of the product you are using!
Use your compasses to draw a circle on the protective paper side of the interfacing. Cut it out roughly. Then place it with the rougher side on the backside of your purple fabric and iron for 2 seconds on middle heat. If you've just ironed your fabric before and the ironing board is still hot, wait for it to cool down. Also let the fabric cool down after applying. Then cut out your circle. The interfacing will have stiffened the fabric, so that shouldn't be a problem. Then remove the protective paper, place the circle on the yellow triangle where you want it and iron for 5 seconds. Let cool.
And you're done! The applique at this point is only secured with the interfacing, but it should hold fairly well. The quilting will secure it further.
And that's it. BTW, did you know that this design was made by Valentino Vecchietti for Intersex Equality Rights UK in 2021? Now you do. Happy quilting!
#lgbt+#lgbtq+#lgbtq community#pride flag#progress pride flag#valentino vecchietti#quilting#quilt#quilt block#quilt pattern#quilt tutorial#sewing#sewing machine#sewing tutorial#sewing pattern
107 notes
·
View notes
Text
The Collector's Hat Sewing Pattern and Tutorial
Image of the pattern I made with measurements:

As a little heads up to people with big/small heads and/or more voluminous hair, this was based on measuring my own head which has a circumference of 22 inches which is dead on the average and my hair is completely straight and relatively flat. You may need to do some adjustments of these measurements because the final fit is very fitted, in that it can be easily put on and taken off but does not fall off on it's own under typical circumstances.*
This pattern is meant for knit or other stretch fabrics, I did not make a completed version with woven or stiffer fabrics, so quality may vary depending on the material you select. I recommend knits.

If you are new to sewing or this is one of your first projects you are doing without a physical pattern, I recommend following the given measurements and drawing it out on some type of paper first and then using that as reference for yourself. I am an outlier when it comes to not making patterns and drawing the shape of what I want out onto the fabric directly, and you shouldn't follow my horrible example. This hat is actually the first time I've even made a muslin prototype.
When you are going to cut out the pieces you need to make sure, like double and triple check, that if you were to lay them pattern/top side up, that they would mirror each other like in the above picture. If you don't then you'll have two lefts or two rights.
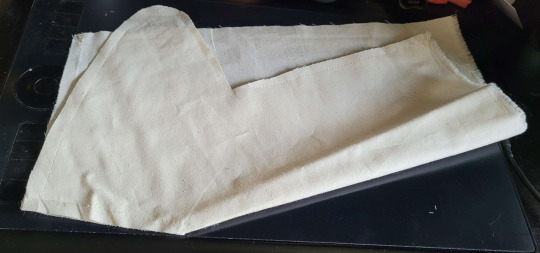
The first actual step for sewing is taking the straight lines from the V shaped notch in the top of the hat, and lining them up by folding the piece in half so the patterned/top of the fabric is on the inside of the fold, like in the picture above. You do this on one half at a time. When they are lined up sew them with a straight line stitch a 1/4 inch (1/2 cm) in from the cut, starting at the fold towards the top of the hat.
After that you want to lay them pattern to pattern, and pin them into place to make sure it's aligned properly on both sides. To reduce bulk I recommend making the excess fabric from the darts (the V cut-out) point in opposite directions, as shown in the above picture.
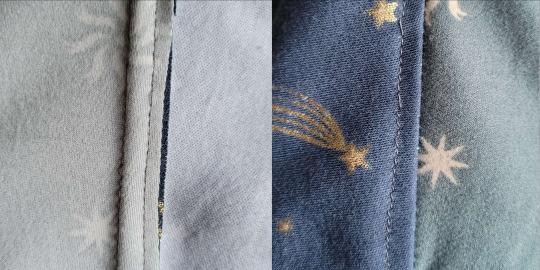
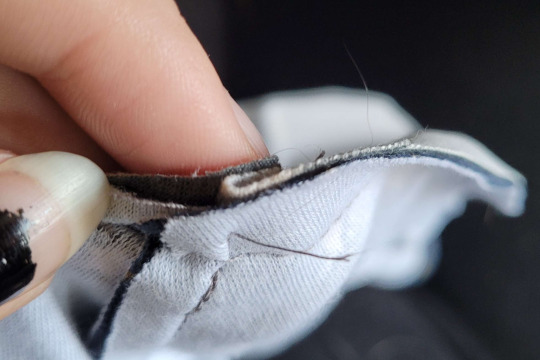
After you've sewn the sides together there is an optional step that I did to make sure the seam lies flat on the top of your head. I opted to sew both sides down onto the blue half of my hat because my machine was being picky and skipping stitches on they grey fabric if there was no blue fabric as well (I got around this on the hem by inserting thin pieces from the blue's selvage into the seam). But if your machine isn't being picky or you are hand sewing this, then you could split the excess and sew them down onto their corresponding half. Example above, as usual.
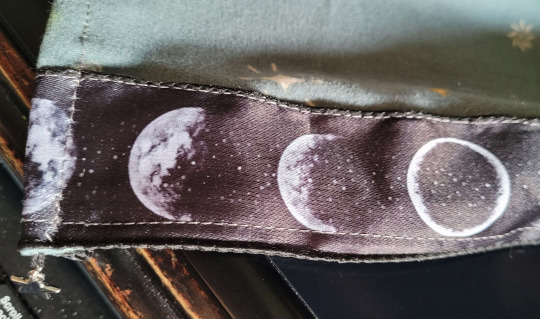
Optional step that MUST go here. If you are attaching a ribbon, or lace for a trim to edge you have to do it now. I do not recommend this step to beginners. I recommend sewing it down while rolling the edge to create the hem, and then securing the other side of the ribbon/lace further into the piece because this guarantees a better placement and straighter lines. If you are doing this step along solely the bottom or front edges then let the lace/ribbon stick out further than the edge of the fabric, so you can fold it under the hem.
The final required step is to hem it, just fold what remains of the raw edge and sew it down.

Final optional step is for adding little trinkets. I added trinkets to the front corners and the floppy bit in the back like the Archivists are depicted as having. I used embroidery thread and slid the needle to go between the seams and tied it off on the inside. If your trinkets are not detachable, like the little stars on my hat, you need to thread the needle through the ring before putting it back into the hat and tying off the thread. Thinner cord or thin ribbon could work as well.
*I actually just did some tests and I have to be tilted further back than lying flat on my back for it to fall off. I was able to bend over and look through my knees and it didn't fall off. I tested it's wind resistance against my two strongest fans and neither could knock it off my head even when I shook it. So I think it will stay in place just shy of someone pointing a leaf blower at you.
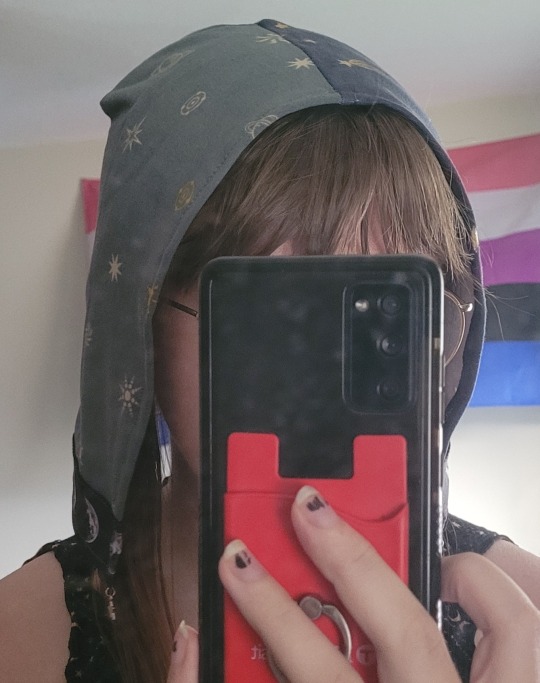
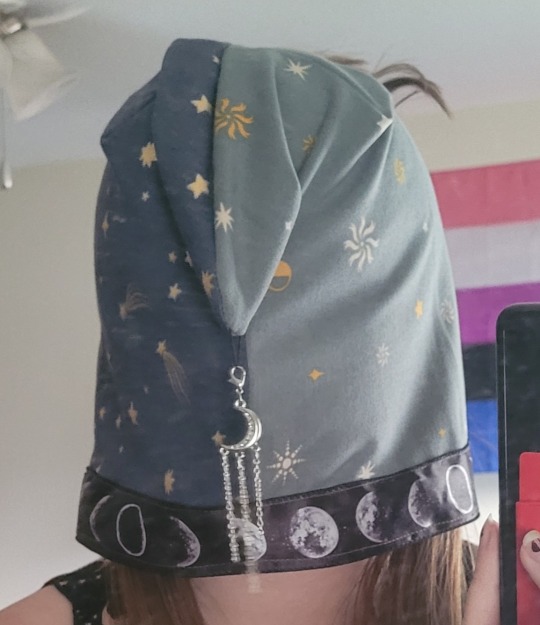
Enjoy these pictures of the finished product, including a glamor shot of me wearing it backwards while I fumble with my phone for a picture.
#the owl house#toh#owl house#the collector#the collecter toh#toh the collector#toh the archivists#the archivists#the archivists toh#cosplay#sewing#sewing tutorial
161 notes
·
View notes
Text
Understanding Seam Allowance in Sewing: A Comprehensive Guide for Beginners and Experts
In this post you learn how to add seam allowance to sewing patterns.
Do you want to learn how to sew garments that look professional and fit well? If so, you need to master the concept of seam allowance. Seam allowance is one of the most important aspects of sewing, yet it is often overlooked or misunderstood by many sewists.
In this guide, we’ll explain everything you need to know about seam…
View On WordPress
#seam allowance#sewing#sewing blog#sewing for beginners#sewing is fun#sewing love#sewing patterns#sewing project#sewing tips#sewing tutorial
102 notes
·
View notes
Text
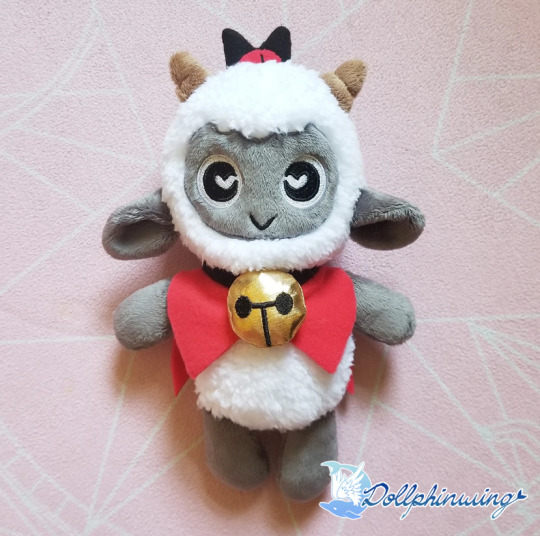

Would you join his cult? 😈
Free sewing pattern with video tutorial on my ko-fi!!
71 notes
·
View notes
Text
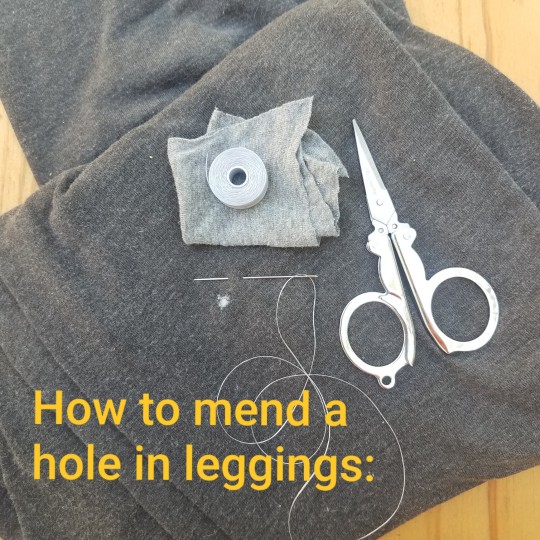
Leggings may be one of the most notorious items of fast fashion but, they don't have to be!
By repairing clothing, and giving garments a longer life, we can keep out of the cycle of buy & die. Because, let's be honest here: giving away clothes is no guarantee that they won't end up in the trash. The only guarantee is to mend & upcycle the garment ourselves!
The key here is to patch a small hole before it grows & grows. Really this is an easy fix and I wanted to share how it is done with just a few basic sewing supplies.

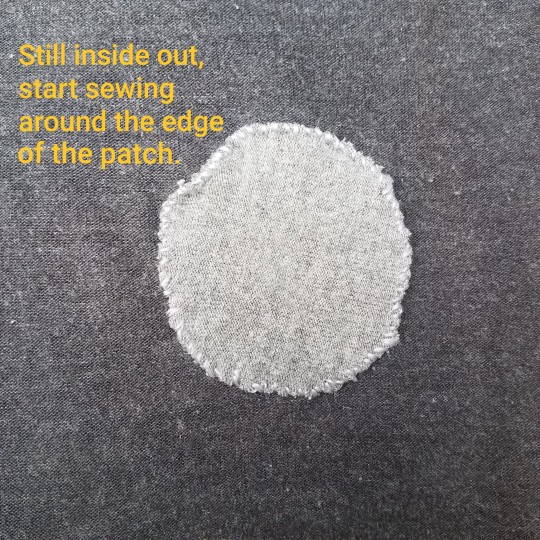

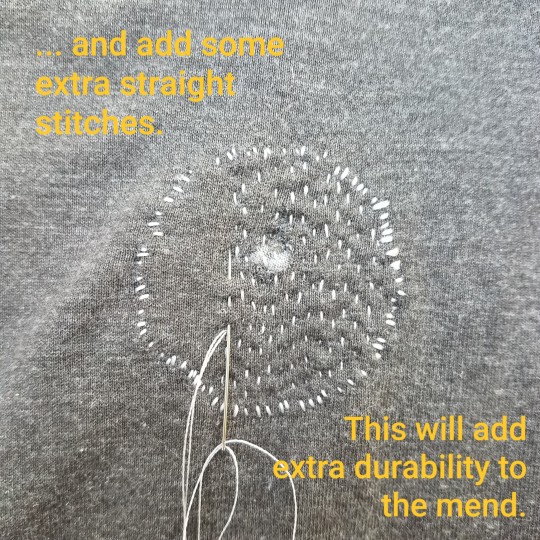
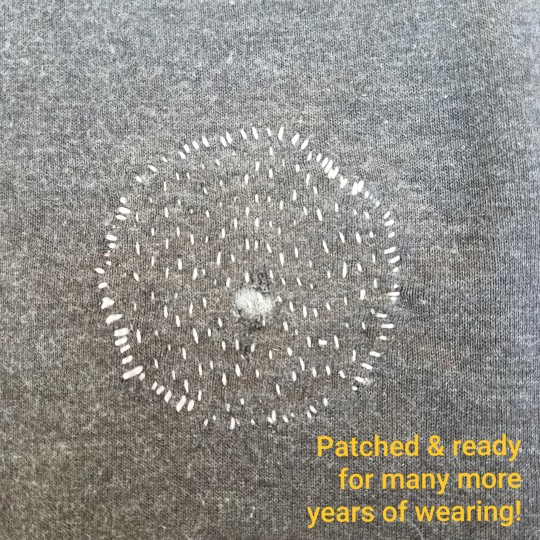
In this tutorial I used a lighter grey patch and silver thread so that the steps would be visible and easy to follow. Here I went with a #visiblemending look but, you may want to use a matching color of patch & thread so that the mend goes unnoticed.
Happy Mending!
#wasteless crafts#zerowaste#low waste#crafting#mending#DIY#ecological fashion#slow fashion#upcycling#sustainable fashion#mending tutorial#sewing tutorial#crafts
343 notes
·
View notes
Text

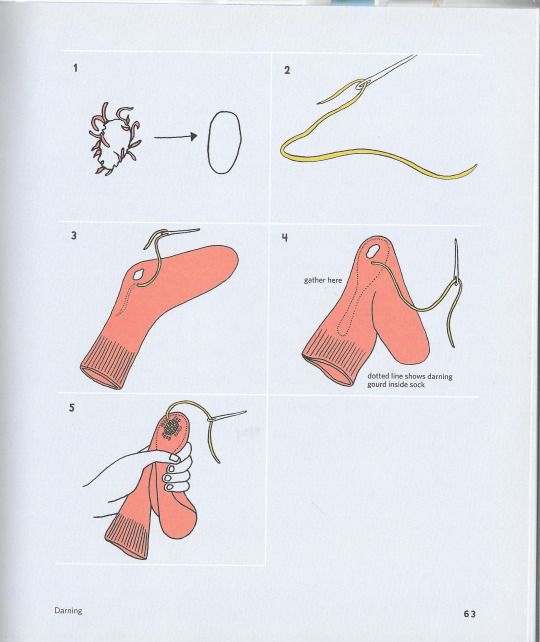
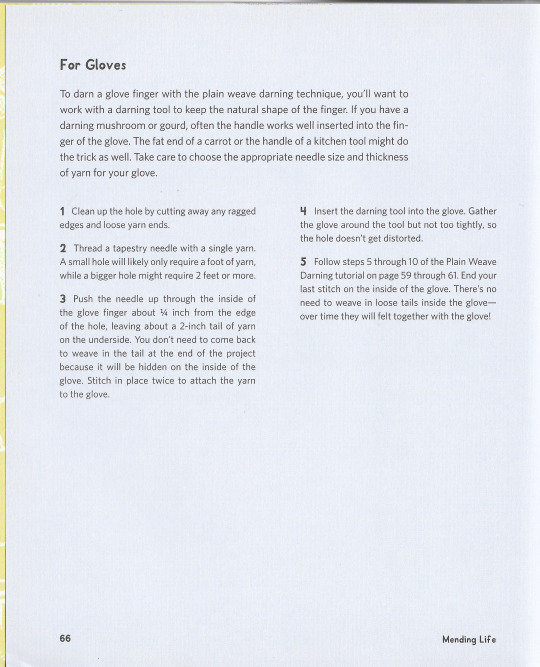

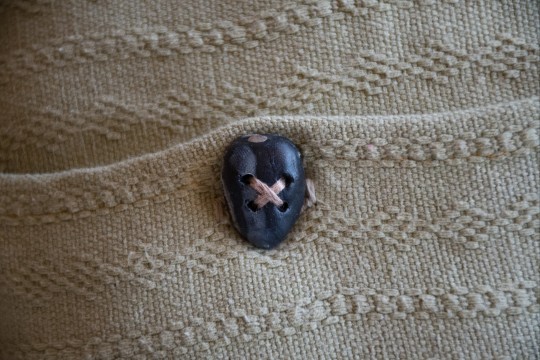
Sock and Glove Darning
from Mending Life: a Handbook for Repairing Clothes and Hearts by Nina and Sonya Montenegro
149 notes
·
View notes
Text
Once i get a sewing machine its over for al of you ( dk how to sew)
#girl blogger#Girlhood#female rage#girl interrupted#this is a girlblog#tumblr#lizzy grant#vibes#life#it girl#Pretty#black swan#Talk#White swan#nina sayers#lana del rey#gaslight gatekeep girlblog#Girl interrupted#girl interrupted syndrome#female hysteria#sewing machine#sewing tutorial#sewing tips#sewing
23 notes
·
View notes
Text
I'm planning on making a little series of sewing tips and tricks, so you can be the best stuffie doctor there is!
In this post: invisible stitching!
youtube
Feel free to ask for specific tips in the comments or rebloggs <3
Btw here here is how the blankie bear I worked on in the video turned out!!
.゚。.・.*.゚☆❗only interact if your blog is SFW❗☆ ゚.*.・. 。゚.
#nates youtube#nates tips#nates advice#sewing#sewing tips#sewing tutorial#tutorial#video post#sfw interaction only#sfw agere#sfw#agere#age regression#agere community#age regression community#age regressor#agere fandom#agere boy#Youtube#nates crafts#nates sewing
25 notes
·
View notes
Text
Can you believe it? 20dollarlolita Pattern School Step 2!
Only took me a year and a half. For people who don't remember a year and a half ago, we've started a project about learning to sew from patterns. The eventual goal is to help people become proficient enough at reading patterns to be able to tell what's going on in a pattern with instructions in another language, taking a pattern that doesn't fit and resizing it so that it does, and taking a pattern that isn't technically lolita and make it work in lolita fashion.
Step 1 was to make a non-fitted item from a commercial pattern. There were two goals of step 1: first to ensure that everyone was familiar with notches, grainlines, and other pattern markings; second was to give people experience with selecting fabric and trims to help give a non-lolita pattern a more lolita feeling.

For step 2, we're modifying a commercial pajama pants pattern into bloomers. In this step, we're going to become familiar with how to prepare a commercial pattern for modification, to compare pattern size to body size and to use your tape measure to judge added fullness, and how to do some basic flat pattern manipulation to add in style ease. Bloomers are a great first manipulation/fitted project due to the loose fit and the fact that, in most lolita applications, the vast majority of it is under your skirt and therefore invisible.
For this specific sample, I'm going to use Gertie's Harlow Pajama Pants pattern for this. I'm doing this because I bought a commercial pattern from Green Store and then promptly lost it, and these pajama pants are a free download. If you are printing the tiled version on your home computer printer, you only need pages 41-52 and 58-71, which will save you about 40 pages of printing.

I highly recommed doing some research and having a good idea of how long the bloomers you want to make should be, as well as how they are decorated. This is my research board.
You can use any pajama pants pattern that has a casing (elastic or drawstring) at the top, and no zipper. In this case, pants with a looser fit are going to be easier to turn into bloomers. If you like wearing your pants at a certain point on your body, I'd check for pajama pants that are at that waistline. The pants that I'm using are designed to sit at your natural waist, which might be too high for some people.

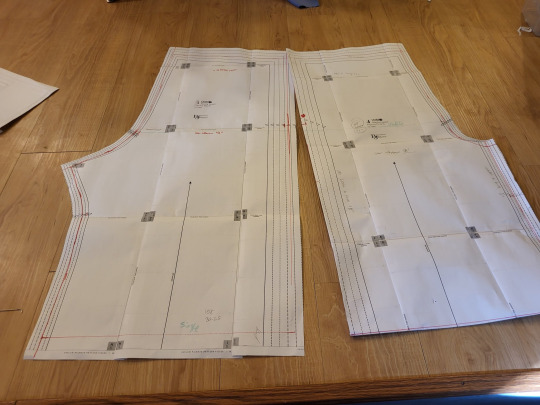
Your first step is to assemble and fortify your pattern. If you're printing this on copy paper, it's going to be strong enough, provided you use enough tape when tiling your pattern. If you're using a tissue paper pattern, like the kind you'd buy at the craft store, it helps to fuse some inexpensive interfacing onto the back of the pattern. We're going to work with these patterns a lot, so it's important to make them a little bit stronger.
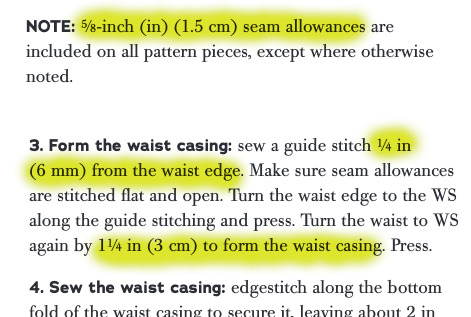
Now, you are going to need to go into your pattern instructions and find two important things. The first is your overall seam allowance. In most commercial patterns, this is 5/8 of an inch. Some other patterns might have different seam allowance.
The second is how big your elastic casing at the top will be. In this case, my seam allowance is 5/8" of an inch. Because my hem casing is .25"+1.25" (the amount you turn up plus them amount you turn up the second time), I know that my elastic casing will take up 1.5".

You're now going to mark on your pattern what the stitching line is. Your pattern has seam allowance included. This is very useful for when you cut out the pattern. However, if we take our pattern measurements with seam allowance, we won't have accurate numbers. So we have to clarify where the seam allowance is.
The first thing that I do (not pictured) is to write how much I'm removing along each line. In this case, I write 5/8" along the side and crotch seams, and "1+1/2" at the top where the casing is. Since we're going to drastically shorten these pants, it doesn't matter what the hem allowance is.
Then, I take my ruler, and I mark my stitching line. I do it in pencil, check that I'm correct, and then go back and re-draw it with a red marker. This helps me make sure that I'm following the correct lines.
Make sure you transfer your notches onto your new stitching line. You can see in the picture above how I'm using the ruler to measure where the notch is going to go.
The next step, walking the pattern, is a little tricky to explain. Here's a post that goes into it in great detail.
Basically, you're going to overlap the seam lines, to make sure they line up. The only problem with doing this is that both seam lines are curved. So, instead of lining it all up at once, you're going to go about an inch at a time, letting the pattern rotate so that it stays flat on the table. At any given point, you're only going to have an inch or so of the line overlapping, but that's all you need. If you run into notches that don't line up, cross one out and re-draw it so that it matches the other notch.
If this seems really complicated, you don't really need to do that on this project. It just is a good practice to have.
So you now should have a pattern with all the commercial markings, but where you've drawn the stitching line.

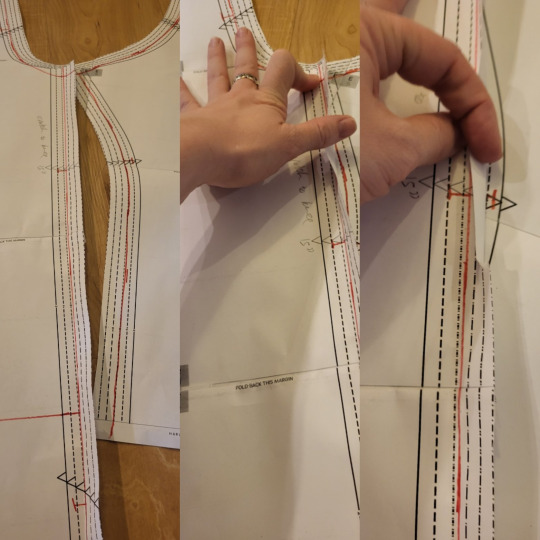
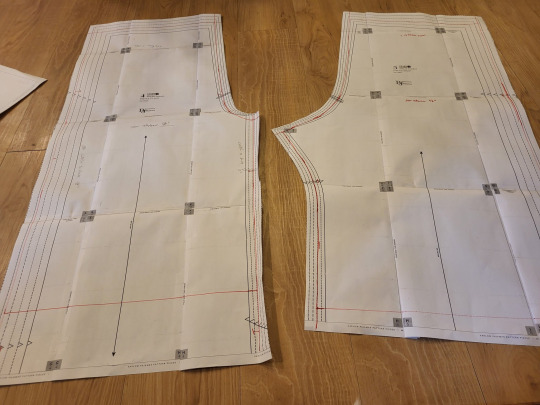
So now, you're going to put your two pieces together along the outseam. Since this is a pretty straight part of a pajama pant, it shouldn't be too difficult to get them to line up. Remember to overlap them on your stitching line, and not on the edge of the pattern.
We're putting them together so that you can measure them both at the same time. it saves us some math.

In bloomers, there are three major measurements to take into consideration. You need to know how big you want the leg to be, how big you want the booty to be, and how long you want the leg of the bloomer to be. In addition, you need to make sure that the waist of your pants will be big enough to fit your waist. In most pajama pants patterns, this isn't a problem, but checking it is good practice.
So, in this picture, you can see that I've measured the cuff of the pants. These two pieces together make up one pant leg, so I just need to measure the two pieces to know how big the pant leg will be.

I then take my tape measure and hold it around my leg at the same size that the pattern is at that point. I just use my eyes and judge if I think that'll be enough room to make my bloomers nice and poofy.
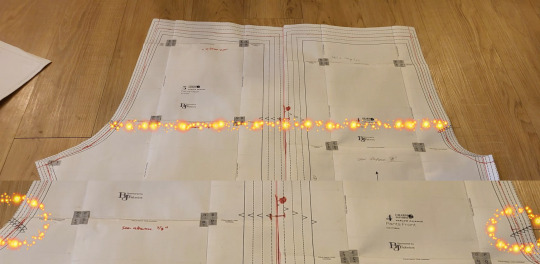
If your pattern doesn't tell you your hip line (mine didn't), it's usually at the point where the two notches on the crotch curve are. One of the reasons why we're doing this on a commercial pattern is that someone did the work for us and put those notches where they should be.
Now, remember, these two pieces are only half of the pant pattern. When we measure the hips of the pattern, we have to multiply this measurement by 2. Half the hip measurement x 2 is the full hip measurement.

Once again, hold this out next to your body and make sure that you like how much fullness you need. Remember that, in addition to having extra fullness because bloomers are poofy, you need room to be able to move and sit down. This measure between the size of my body and the size of the pattern looked pretty good to me. I could definitely have gone a little bit bigger.
The pant leg measurement is okay to be a little bit too long. You can always make it shorter. However, feel free to chop about 18" off the bottom of a full length pant leg. This just makes things a little easier.

Now, we're going to move the two pattern pieces until they're the size we like. If both the hip measurement and the leg measurement are too small, we're going to move both pattern pieces apart. To turn pajama pants into bloomers, this is likely to be the most common adjustment.
If the hip measurement is pretty okay, but the cuff measurement is too small, you're just going to move the bottom part of the pattern apart.
You'll notice that this is still enlarging the hip measurement a little bit. This is fine for bloomers since the style is for a lot of fullness in that area.

And if your cuff is the correct size, but your hip measure is too big, you can keep the cuff size the same and move the hip line apart until it's the size you want.
This technique of lining up the pattern pieces, and then moving them until they're the size you want, is the basics of flat patterning. As long as you follow the philosophy of keeping the measurements you like roughly the same, and moving the areas that you don't like until they measure what you need, you can easily resize a pattern without having to re-draw everything.
If you had to spread your pieces apart, tape some paper underneath the gap. This piece of paper should bridge the gap between the two pieces, turning them into one piece. Really quickly double-check that these pieces measure how you want. Then, mark a line in the middle of the paper bridge. Draw your notches onto the cut line. Cut the two pieces apart on that line. You've now made both pieces bigger. Tape another little piece of paper onto the cut edge of each piece, mark out your seam allowance, and cut that off.
Bonus points: swap the position of the pattern pieces, so that the crotch curve is one continuous line. Measure the length of that. Then, hold your tape measure along where the crotch curve of your pants will fit, and make sure that you have clearance there. I'm not going to photograph that, andi t's not super necessary with most pajama patterns.
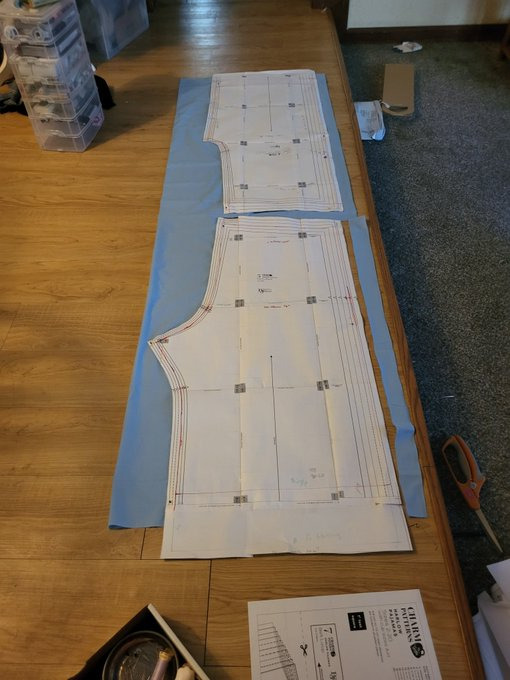
Go ahead and cut your pieces out.Even though I'd shortened the pattern, mine were still too long to fit on a 2-yard cut of fabric. Since I knew that my pants were a little long, I just let the end hang off the edge of the fabric.
Here's the really magical part about this. Even though you've resized your pattern, you still have all your seam allowance, notches, grainlines, and your pattern instructions. Since you kept all your pattern markings consistent, you can now follow the instructions that came with your pattern. Go up until it tells you to hem the pants, and then try them on.
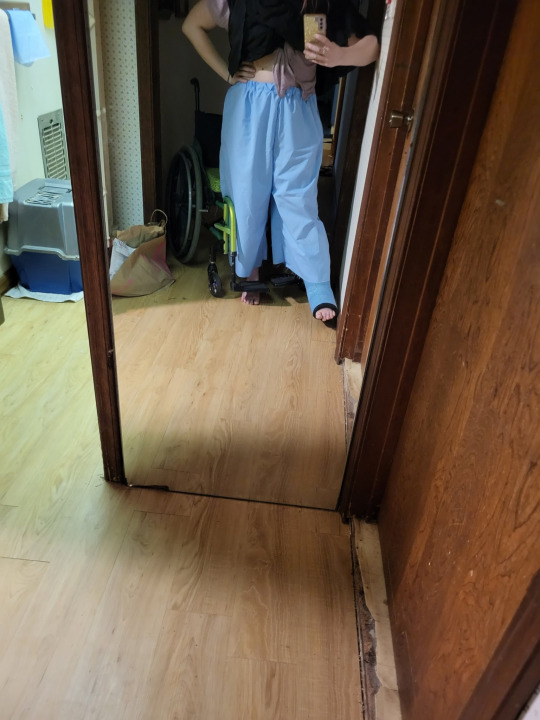
In my case, my pants were way too long to be bloomers. I knew that I wanted to do a casing with a heading, which does use s pretty big hem allowance, but even so, I'd need to shorten them.
Check out your bloomer research board to see how long you want them to be. I wanted some long ones that did the old-school bloomer peek, so I made them on the longer side. I also didn't want them to ride up into my butt when sitting in a wheelchair.
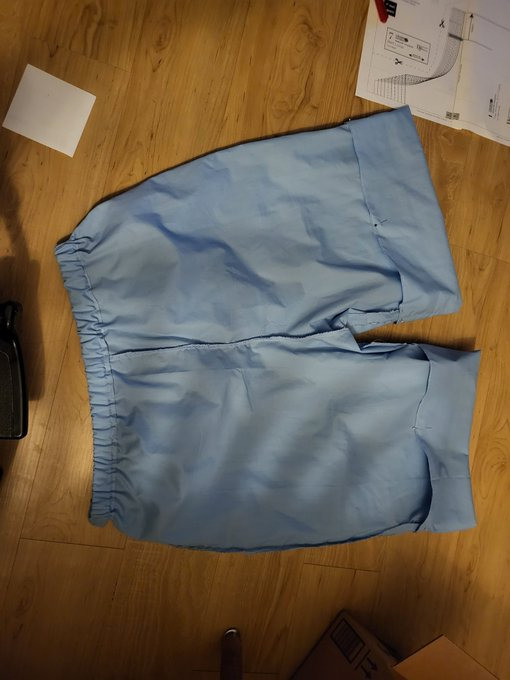
So, time to fold up the bottoms, add my elastic, and call the basic construction finished.
I looked up on my research board to try to find a good way to decorate these. One of the nice things about bloomers is that you can wear them with a wide variety of coords. This makes them one of those items where you can add some extra lace, and then use that lace in multiple coords. I feel like, since these bloomers are a good way of adding detail in multiple coords, it's a good excuse to add a little bit extra lace. You can see how much of a difference it makes in this picture. It really turns them from baggy shorts into real bloomers. I really recommend sometimes investing in a couple of big purchases of lace. If you have lots of lace on hand, you're more likely to include it in your projects, which can really help push a meh project into proper lolita fashion territory. I have a rule that I don't spend more than $1.50 a yard on lace unless it's really fantastic, and I manage to find things at that point on Aliexpress and sites like Cheeptrims.

Now go on and let them peek out of your favorite skirt. And remember, definitely don't press that skirt before putting this picture in your tutorial.
#20dollarlolita#dollar chan's pattern school#step 2#lolita fashion#patternmaking#handmade lolita#lolita bloomers#sewing tutorial#hey guys look i actually made somethign#long post
92 notes
·
View notes
Text
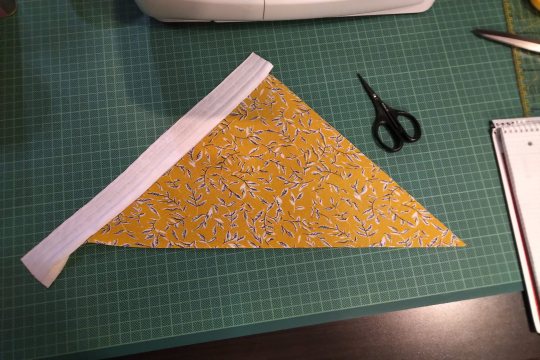
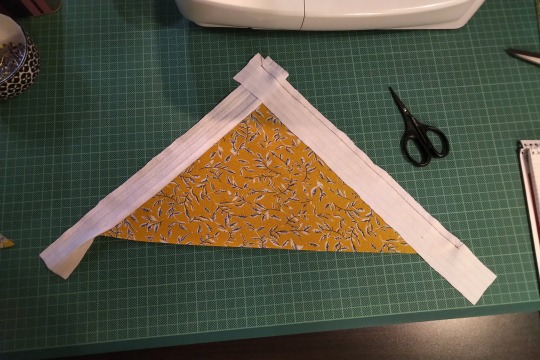
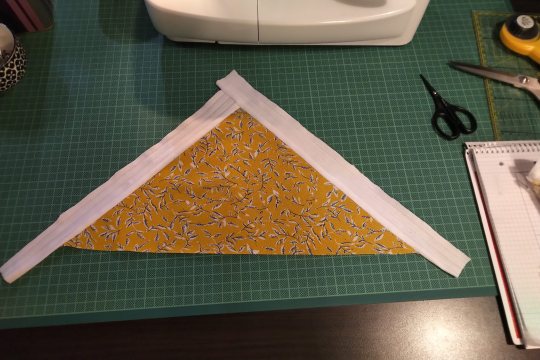
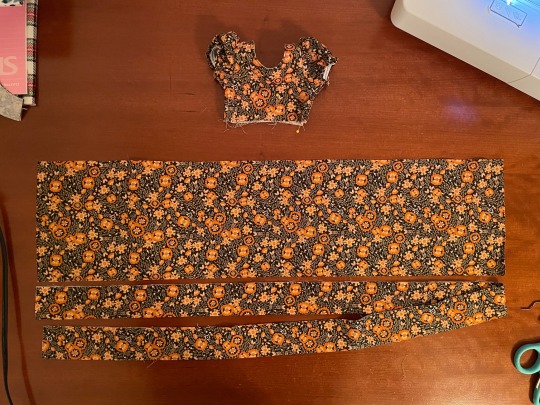
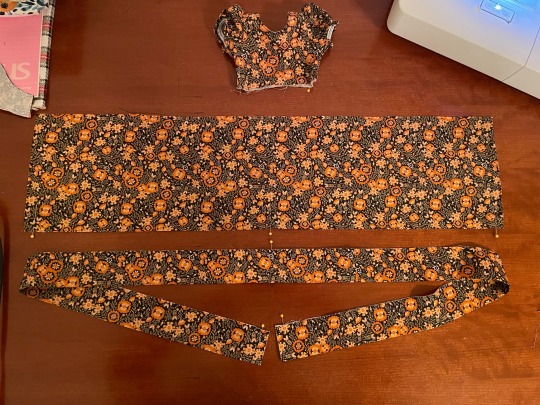
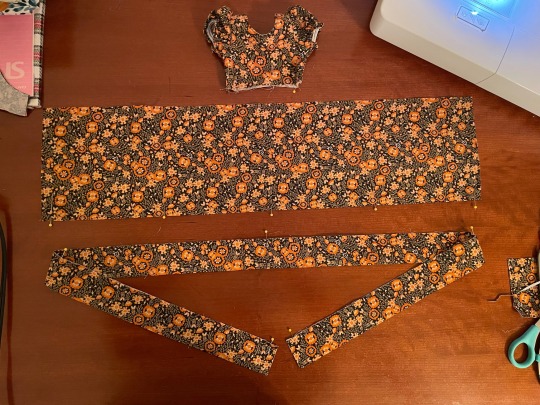
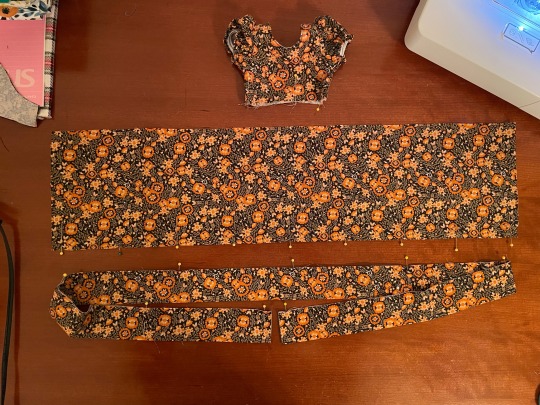
To draft a gathered skirt and ruffles:
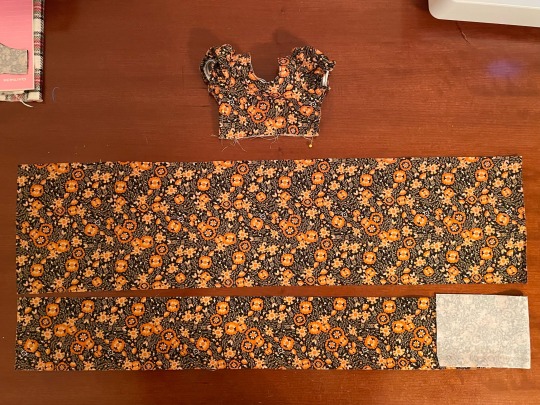
For this skirt, I laid out a strip of fabric 2x as wide as the bodice, 6 1/2” long. This came out to 28”.
For a simple gathered skirt, I use a panel 15 1/2” on fold (31” flat) at minimum, but since this skirt is getting a ruffled tier, I am reducing the fullness just a bit. When I make tiered skirts it is very easy to wind up with a ruffle monster.
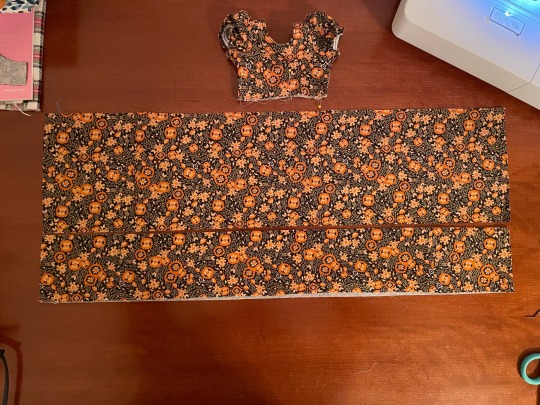
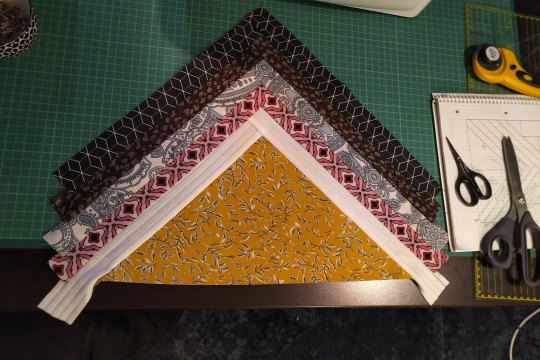
For the ruffle, I pieced together two strips 3 1/2” long to make a piece 2x the fullness of the main skirt panel. You could probably cut this in one piece, but I already had these panels cut out.

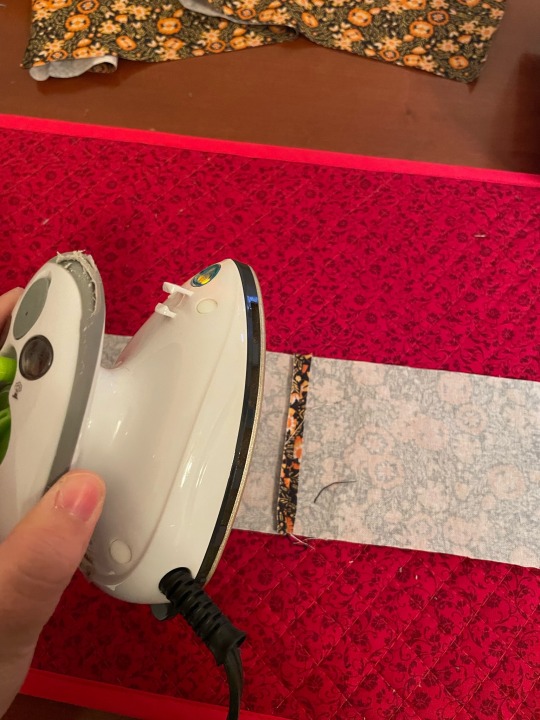
Then I ironed the ruffle panel in half. This makes it so you do not have to make such a narrow hem on a long piece of fabric.
You can do a gathering stitch on a sewing machine or by hand.
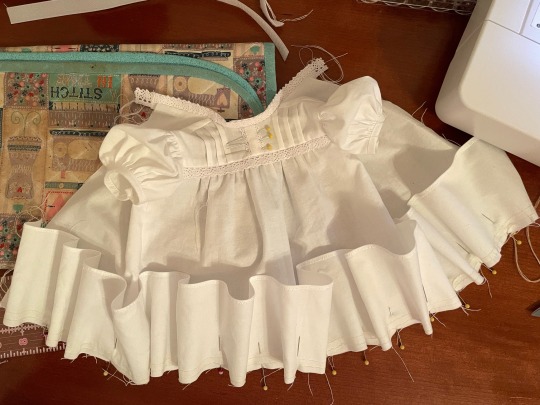
For machine: sew basting stitches, then pin mark.
Make two rows of stitches with your longest stitch length and low tension. Place the fabric pretty side up to get the bobbin thread on the wrong side. This makes it easier to pull the gathers.
I make the first row with my needle all the way to the right of the machine and stitching. The second is made by lining the edge of the foot with the first line of stitch. I move the needle a couple clicks to the left, and stitch.
Then I pin baste as described below, and gently pull the gathers to fit.
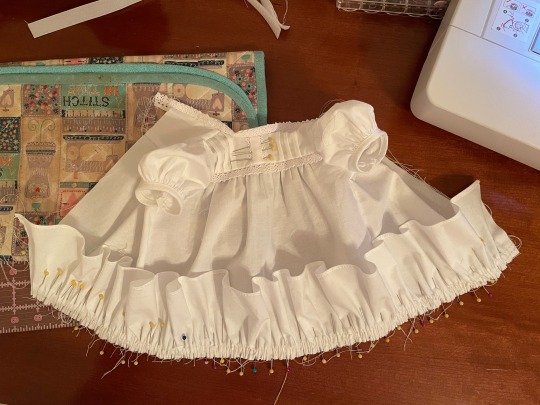
For hand stitching: pin mark first, then gather down.
Pin marking:
Next we will put in pins to make the seam allowance and centers of each panel. This can also be done with safety pins or pen marks.
Next find the mid points between these pins to quarter-mark. Repeat for eighth-marks, then again for sixteenth-marks. This seems like a lot, but there’s a purpose. These marks will help us make even gathers.
Continued in part 2
39 notes
·
View notes
Text
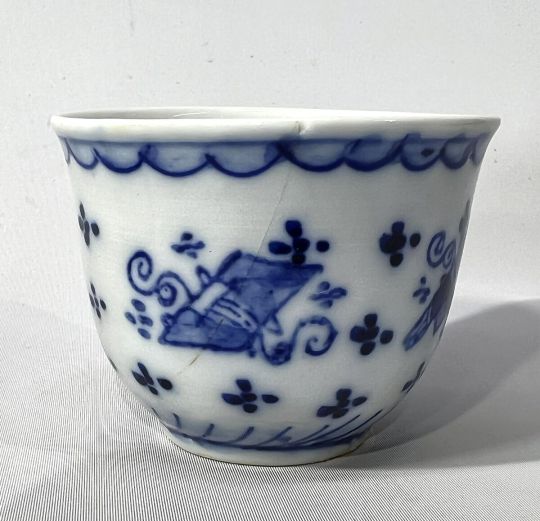
LET'S MAKE AN EMBROIDERY PATCH IN 3 HOURS
(Context this is for a tea class gift exchange)
GRAB URSELF A REFERENCE AND THEN DESIGN THAT SHIT

READY YOUR EMBROIDERY HOOP AND DRAW YOUR EMBROIDERY DESIGN ON WITH PEN (it will be covered)

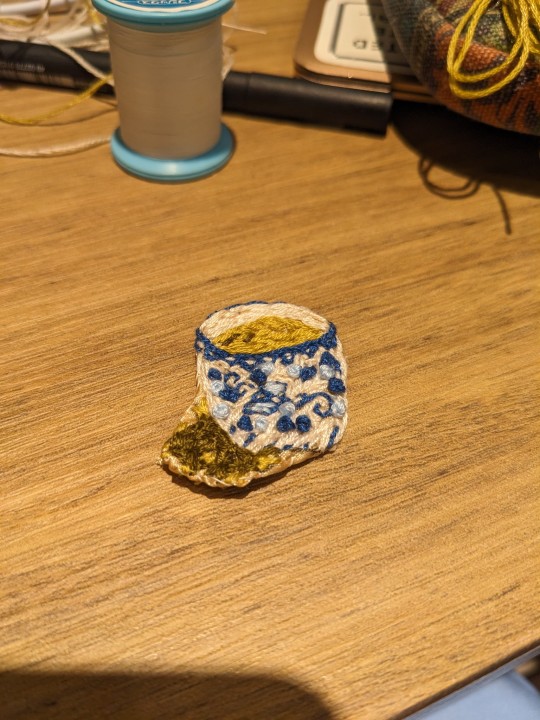
GET SEWING (I use 3 thread embroidery floss)

FINISH


CUT THAT SHIT OUT

USE NORMAL THREAD TO HEM THE EDGES IN WITH A WHIP STITCH.


DONE
Glue or sew it on whatever you want
27 notes
·
View notes
Last Seen Blogs

ranfren-brainrot
moved to ssludgedog

smesho
SMESHO

chrissymunsons
ଘ(੭ˊᵕˋ)੭* ੈ✩‧₊˚

bellaftuniverse
bella

justanothercinemaniac
Just Another Cinemaniac