#retrosewing
Photo

I designed the fabric and now to make the dress. My company will feature mostly designs from the 50’s,60’s, and 70’s and may have some Tudor inspired design and 18th century as well we shall see how it all goes! #retrostyle #retrosewing #designer #stollaettoga #dressmaking #newbrand #etsyseller #discoveryphase #sewingproject #fashiondesigner https://www.instagram.com/p/CoV6ME-MqR6/?igshid=NGJjMDIxMWI=
#retrostyle#retrosewing#designer#stollaettoga#dressmaking#newbrand#etsyseller#discoveryphase#sewingproject#fashiondesigner
0 notes
Photo
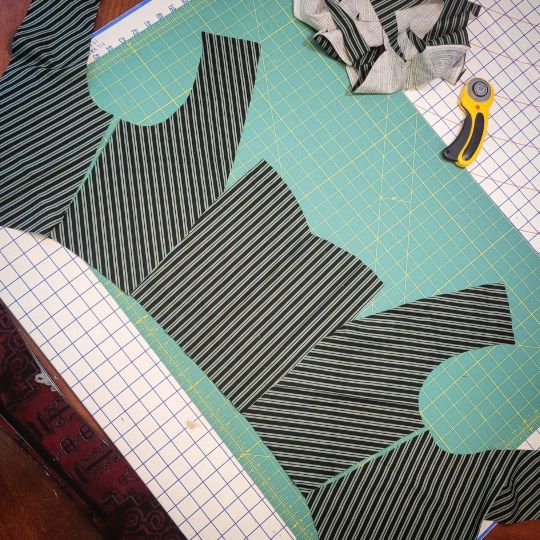
That satisfying moment when you know your side seam stripes will match up 🤌 . . . . . #sewing #sewingproject #retrosewing #vintagesewing #hauntedmansion #spookysewing #patternmatching #chevrons #stripes #satisfying #thisbodicewillbedonetoday #whydoesithavetohavelining https://www.instagram.com/p/CS4dqGVM3F_/?utm_medium=tumblr
#sewing#sewingproject#retrosewing#vintagesewing#hauntedmansion#spookysewing#patternmatching#chevrons#stripes#satisfying#thisbodicewillbedonetoday#whydoesithavetohavelining
4 notes
·
View notes
Photo

Fabulous Original Mid Century Atomic Design 1950’s Sewing Box EBay item number 224675763028 #sewing #vintage #vintageshop #vintagesewing #needleandcotton #retro #atomic #retrosewing #midcentury #midcenturymodern https://www.instagram.com/p/CV3l9m1FUW-/?utm_medium=tumblr
#sewing#vintage#vintageshop#vintagesewing#needleandcotton#retro#atomic#retrosewing#midcentury#midcenturymodern
0 notes
Photo

Making a dress for the pinup meet and greet at @viva.las.vegas.vlv If I get in the contest, I’ll totally make my own dress on the stage. I bought this fabric two years ago - finally put to use! 😋 . ♥️🖤♥️🖤♥️🖤♥️🖤♥️ . #pinup #retro #sewing #sewingretro #retrosewing #diy #dressmaking #dressmaker #pinupgirl #pinupdoll #asianprint #japaneseprint #cherryblossom #cherryblossomprint #viva #pinupcontest #vlv #vlv21
#viva#pinupgirl#vlv21#diy#sewingretro#retro#sewing#asianprint#dressmaking#pinupcontest#japaneseprint#retrosewing#pinupdoll#pinup#cherryblossom#cherryblossomprint#vlv#dressmaker
1 note
·
View note
Text
A-line skirt step by step tutorial A-lijn tricot rokje werkbeschrijving

Onmisbaar in elke retro garderobe dit a-lijn rokje met leuke details!
Je maakt ‘m net zo moeilijk of makkelijk als je zelf wil. Leuk in effen met pipingrandjes of in een print. Een heerlijk zomerrokje of prima met een gekleurde panty en laarzen in de winter.
Unmissable in every retro wardrobe this A-line skirt with great details!
Make it as challenging or easy as you like. Great basic in a plain fabric with piping detail or bold in a print. Breezy in the summer or comfy in the winter with boots and tights.

Nodig:
*Ongeveer 80 cm tricot met lycra of elasthan van 150 cm breed. Je kunt eventueel de binnenkant van de heupstukken van een andere stof maken als je tekort komt.Ik raad aan een stevige tricot te gebruiken voor het beste resultaat. Ergens tussen een t-shirt kwaliteit en een french terry in. Als je een dunnere kwaliteit gebruikt voor een zomerrokje dan kun je het beste kiezen voor de eenvoudige methode als laatste beschreven. Deze is helemaal met de lockmachine gemaakt.
*Een strook/stukje uni tricot voor de piping en eventueel voor de binnenkant van de beleg delen en zakjes en voor eventuele stofknoopjes.
*Een stukje rekbare plakvlieseline voor de zakjes, zakklepjes, sierklepjes en/of knopenbies.
You need :
*approx. 80 cm / 31 1/2 inch of jersey with lycra or elastane that is 150 cm wide.
If you are using up some fabric from your stash you can also use a different fabric for the inside of the waistband.I recommend using a jersey that is not too light/thin. A French terry is also fine.If you do use a light quality then the basic skirt version as described last without details would be the best choice. This one is entirely made with the overlock machine.
* A strip/piece of plain jersey for the piping bands and/or the inside parts of the flaps/ pockets/ waistband/ fabric covered buttons
* A strip/piece of stretch interfacing the inside parts of the flaps/ pockets/ button placket
Knippen in tricot:
Voorpand aan de vouw 1x
achterpand aan vouw 1x
Heupstukken aan de vouw 4x
Sierklepjes 4x
Zakjes: 2x
Zakvoering: 2x
Zakklepjes 4x
Knopenbies 1x
De knopenbies knip je op maat:
maat 36: 47 cm lang bij 5 cm breed
maat 38: 47,5 cm lang bij 5 cm breed
maat 40: 48 cm lang bij 5,5 cm breed
maat 42: 48,5 cm lang bij 5,5 cm breed
maat 44: 49 cm lang bij 6 cm breed
Cut in jersey:
Front part on fold 1x (back and front are the same)
Back part on fold 1x
Hip piece on fold 4x
Flaps 4x
Pockets 2x
Pocket lining 2x
Pocket flaps 4x
Button placket 1x
Cut the button placket to size:
maat 6: 47 cm/ 18 1/2 inch long 5 cm/ 2 inch wide
maat 8: 47,5 cm/ 18 3/4 inch long 5 cm/ 2 inch wide
maat 10: 48 cm/ 19 inch long 5 cm/ 2 inch wide
maat 12: 48,5 cm/ 19 1/10 inch long/ 2 inch wide
maat 14: 49 cm/ 19 1/3 inch long/ 2 inch wide
Knippen in rekbare vlieseline:
Sierklepjes 2x
Zakjes: 2x
Zakklepjes 2x
Knopenbies 1x
Cut in stretch interfacing:
Flaps 2x
Pockets: 2x
Pocket flaps 2x
Button placket 1x
Knippen in uni tricot:
Een strook van 2 cm hoog over de gehele stofbreedte voor de pipingbiesjes.
Uiteraard maak je een keuze uit de details. Ik leg in onderstaande werkbeschrijving uit hoe je alle details maakt.
Al het stikwerk doe je met een stretchsteek op je naaimachine, doorstikken kan gewoon met een normale steek. Gebruik wel een naald die geschikt is voor tricot.
Patroon is inclusief naad waarde.
Cut in plain jersey:
A strip of 3/4 inch the whole width of the fabric for piping.
Offcourse you will make a choice of details. In the following tutorial, I will explain how to make all of them.
All the sewing is done with a stretch stitch on a regular sewing machine, topstitching you can do with a regular, non-stretch stitch. Use a needle suitable for jersey.
The pattern has seam allowance included

Het sierklepje:
Strijk de plakvlieseline tegen de verkeerde kant van de stof. Vouw de strook uni tricot in de breedte dubbel, strijk plat en speld langs het klepje. Knip de rest van de strook af. Stik op ongeveer 5 mm langs de kant.
The sideseam flap:
Iron the interfacing on the backside of two flap pieces. Fold the strip of plain fabric in half widthwise, press and pin along the edge of the flap. Cut off the rest of the strip of fabric and keep for other bits that need piping. Sew along the edge.

Speld nu het andere klepdeel ertegen, verkeerde kanten op elkaar en stik op 7 mm van de kant. Laat de korte kant open. Knip tussen de twee stiksels de overtollige stof weg en keer om. ( hier is een geen foto van maar je kunt dit zien bij de werkbeschrijving van het zakklepje en het zakje.)
Pin the other piece against it with the right sides together en sew 7 mm./ 1/4 inch from the edge. Cut in between the two stitching lines and turn inside out. (there is no picture of this step, but you can see it with the pocket tutorial later on :))

Pers het klepje plat en stik door op ongeveer 5 mm langs de rand.
Press the flap and topstitch 1/4 inch from the edge.

Stik het klepje tussen de aangegeven punten op de zijnaad van het rokdeel.
Sew the flap between the indicated points on the skirt.

De knopenbies:
Strijk de plakvlieseline tegen de verkeerde kant van de stof.
The button placket:
Iron the stretch interfacing to the backside of the placket piece.

Vouw de strook uni tricot in de breedte dubbel en speld langs één kant van de bies. Knip de rest van de strook af en herhaal aan de andere zijde.
Fold the piece of plain fabric widthwise en pin along one edge of the button placket. Cut off the rest of the fabric strip and repeat on the other side.

Stik op ongeveer 7 mm langs de kant. Klap de stroken om naar binnen, alleen het pipingrandje is nu zichtbaar. (de foto is nog voordat het naar binnen werd gevouwen)
Sew the piping on the placket, 7 mm/ 1/4 inch from the edge. Fold to the inside so only the piping is visible. On the photo, you see the stage before folding in.

Strijk een vouw middenvoor op je rokdeel. Dit dient als leidraad voor de op te spelden bies. Speld nu de bies op de rok ( het midden van de bies op de net ingestreken vouw)
Fold the front skirt part in half widthwise and iron flat. The line you created will be used as a guide for the placket. Now pin the placket on the skirt, using the line as a guide.

Stik vast op 5 mm langs de rand.
Topstitch 5mm/ 1/5 inch from the edge.

Verdeel 5 knopen op gelijke afstand op de bies en naai ze aan.
Divide 5 buttons at an equal distance from another and sew them on.

Het zakklepje:
Strijk de plakvlieseline tegen de verkeerde kant van 2 zakklepdelen. Vouw de strook uni tricot in de breedte dubbel en speld langs het klepje. Knip de rest van de strook af. Stik op ongeveer 5 mm langs de kant.
The pocket flap:
Iron the stretch interfacing to the inside of two pocket flap pieces. Fold the strip of plain fabric in half widthwise, press and pin along the edge of the flap. Cut off the rest of the strip of fabric and keep for other bits that need piping. Sew along the edge.

Speld nu het andere klepdeel ertegen, verkeerde kanten op elkaar en stik op 7 mm van de kant. Laat de boven (rechte) kant open.
Pin the other piece against it with the right sides together en sew 7 mm./ 1/4 inch from the edge.

Knip tussen de twee stiksels de overtollige stof weg en keer om. Pers het klepje plat en stik door op ongeveer 5 mm langs de rand.
Cut in between the two stitching lines and turn inside out. Press the flap and topstitch 1/4 inch from the edge.

Stik het klepje tussen de aangegeven punten op het rokdeel.
Sew the flap between the indicated points on the top of the skirt.

Het klepje komt uiteindelijk tussen de heupband en het rokdeel. Naai met de hand een knoopje op de klep
Now attach on the hipband to the skirt. Sew on a button by hand.

Het zakje:
Strijk de plakvlieseline tegen de verkeerde kant van de stof. Vouw de strook uni tricot in de breedte dubbel en speld langs het klepje. Knip de rest van de strook af. Stik op ongeveer 5 mm langs de kant.
Iron the stretch interfacing to the inside of two pocket pieces. Fold the strip of plain fabric in half widthwise, press and pin along the edge of the pockets. Cut off the rest of the strip of fabric and keep for other bits that need piping. Sew 7 mm./ 1/4 along the edge.

Speld nu het andere zakdeel ertegen, verkeerde kanten op elkaar en stik op 7 mm van de kant. Laat de boven (rechte) kant open.
Pin the other piece against it with the right sides together en sew 7 mm. / 1/4 inch from the edge.
Leave the top of the pocket open.

Knip tussen de twee stiksels de overtollige stof weg en keer om.
Cut in between the two stitching lines and turn inside out.

Pers het zakje plat. Naai de bovenkant dicht met de hand.
Press the pocket and close the top of the pocket by hand.

Speld de zak tussen de aangegeven punten op het rokdeel.
Pin the pockets onto the skirt using the guide points on the pattern.

Stik op 7 mm langs de rand op.
Topstitch 7 mm/ 1/4 inch from the edge.

De rok:
Als je een pipingrandje wil tussen de rok en het heupdeel vouw dan de strook uni tricot in de breedte dubbel en speld langs het langs de bovenrand van de rok. Stik de piping op de bovenrand. Niet breder dan 5 mm.
The skirt:
If you want to add a piping band to the waistband of the skirt, fold the strip of plain fabric in half widthwise, press and pin along the edge of the top of the skirt. Sew on the piping no further than 5 mm./ 1/5 inch of the edge.

Speld het heupstuk tegen het rokdeel verkeerde kanten op elkaar. Stik op 7 mm van de kant met een stretch steek. Afwerken hoeft niet, er komt een beleg tegen.
Pin the waistband to the skirt with the wrong sides on top of one another. Sew 7 mm./ 1/4 inch from the edge with a stretch stitch. No need to finish the edges, There will be a facing on the inside.

Torn nu het stiksel los waar je de piping mee hebt vastgestikt, dan kun je de naad mooi openpersen.Dit geldt ook voor de versie met zakklepjes, dan torn je de stiksels los waarmee je de klepjes op het rokdeel hebt gestikt.
With a seam ripper undo the stitching you used to fasten the piping. This will allow you to press open the seam. For the variation with the pocket flaps you will do the same.

Strijk nu de naden open.
Press open the seams.

Bij klepjes en/ of knopen bies zorg je ervoor dat de randen van de klepjes omhoog worden geperst.
Make sure with the pocket and/ or button placket variation that the edges are pressed upwards.

Je kunt nu voor en achterpand tegen elkaar spelden, verkeerde kanten op elkaar en dichtstikken met de overlock. je kunt ook eerst de panden aflocken en dan de naden dichtstikken met een stretchsteek. Ik vind dit prettiger omdat dan de naden/piping niet zo gaan schuiven.
Now pin the front part to the back part, right sides on top of one another and close the side seams with an overlock machine. You can also finish the edges first and then close them with a stretch stitch. I prefer this because you can be more precise and you can press open the seams.

Stik nu de zijnaden van de andere twee heupdelen dicht. Dit wordt je beleg. Werk de onderkant van dit beleg af met de overlock. Schuif het beleg heupdeel over het rok heupdeel, goede kanten op elkaar.
Close the side seams of the two facing parts. Finish the edge with an overlock stitch. Slide the facing part over the skirt part, right sides together.

Sik de bovenrand dicht. Strijk deze naad open en vouw naar binnen (op de foto is de naad open gestreken maar het beleg nog niet naar binnen gevouwen)
Sew the facing to the skirt. Iron open the seam and turn inside (on the photo the the seam is pressed open but the facing is not yet folded in.)

Stik de bovenrand door op 7 mm. Speld de onderkant van het beleg vast. Als je een piping hebt gestikt tussen de rok en het heupdeel stik dan het heupstuk door op 7 mm boven de piping.
Topstitch the top of the skirt 7mm./ 1/4 inch from the edge. Pin the bottom of the facing to the skirt on the outside. If you made the piping version, topstitch 7mm./ 1/4 inch from the piping edge.

Zonder piping kun je het beleg mooi vastzetten door in de naad te stikken tusen de rok en het heupdeel.
Without the piping you can place an invisible stitch in the seam in between the waistband and the skirt.

Nu alleen nog de zoom. Vouw de zoom naar binnen op 2 cm. Stik door aan de buitenkant met een tweelingnaald in je naaimachine of een coverlock.
All that is left is the hem. Fold the hem in at 2cm/ 3/4 inch. Stitch on the outside with a twin needle or a coverlock.
Je kunt dit rokje ook helemaal naaien met de lockmachine en een tweelingnaald als je geen details wil en lekker snel klaar wil zijn. Ook fijn als je net begint met naaien.
Leg de rokdelen tegen elkaar met de goede kanten op elkaar. Stik de zijnaden. Doe hetzelfde met de heupdelen. Keer een heupdeel om en schuif het andere heupdeel erover. Goede kanten op elkaar.
Stik de bovenrand dicht. Je kunt eventueel framilon elastiek meestikken zodat de taille niet teveel uitrekt. (Knip dan de wijdte van je tailleomtrek). Keer de heupband om en stik tegen het rokdeel, goede kanten op elkaar. Nu alleen nog de zoom. Vouw de zoom naar binnen op 2 cm. Stik door aan de buitenkant met een tweelingnaald in je naaimachine of een coverlock.
Need a quick basic skirt? You can sew the skirt without details with the overlock machine.
Pin and sew the skirt parts, right sides together. Pin and sew the waistband, right sides together. Slide one waistband over the other, right sides together. Close the top of the waistband. To stabilize the stretch you can use some silicone tape in the seam. (the width of your waist) Turn the waistband over and pin and sew to the skirt. Right sides together. Fold the hem in at 2cm/ 3/4 inch. Stitch on the outside with a twin needle or a coverlock.
Je rokje is klaar! Op naar de volgende..
Your skirt is done! on to the next one..
1 note
·
View note
Photo

Not to brag but I totally can refold a pattern back in the original folds. Ideally I would press these to fit better it the envelope. #vintagesewing #retrosewing https://www.instagram.com/p/By_drDkj_A2/?igshid=fkvb3rz74qjz
0 notes
Photo

BUTTERICK B5209 Retro 1947 Halter Dress Sewing Pattern UNCUT Size AA 6 8 10 12 Click quickl https://ebay.to/2MIIfT0
0 notes
Photo

Who doesn't look good in a pencil skirt? This silhouette seems to flatter every figure. Learn how to make your own pencil skirt, custom fitted so it fits you just right! Class is 2 session, June 16 & 23. Sign up through the All Classes link in our bio.⠀ ⠀ #learntosew #sewingclasses #sfeastbay #berkeley #sewingberkeley #sewingbayarea #handmadewardrobe #retrosewing #vintagesewing #classicwardrobe #memadeeveryday #memademay⠀ https://www.hellostitchstudio.com/events/garment-sewing-pencil-skirt-2-session-class (at Berkeley, California)
#sewingclasses#handmadewardrobe#classicwardrobe#sfeastbay#berkeley#retrosewing#vintagesewing#memademay#sewingberkeley#memadeeveryday#learntosew#sewingbayarea
0 notes
Photo

20/12/17 - Retro costume makings calls for retro sewing instruction! #retrosewing #vintagesewing #overlocker #singersewinglibrary #singersewing #stretchfabric #90s #90sfashion
0 notes
Photo

Elna Grasshopper Sewing Machine Rare Circa 1950's
0 notes
Photo

Just added today! Super sassy #vintage70s #tennis dress sewing pattern with matching panties and visor 🎾🎾🎾 #vintagetennisdress #etsy #retrosewing #imso70s #vintagepatternarchive
0 notes
Photo

✨Vintage RETRO Flower 🌼Design Pattern Fabric🎀Ribbon✨AVAILABLE✨ ✨SHOP LINK IN BIO @piddlinpixie ✨ 🌼NEW VINTAGE & RETRO ITEMS 🌼 ✨FOLLOW FOR VINTAGE SALES✨ ✨ http://Piddlinpixie.Etsy.com ✨ #vintageribbon #vintagefabric #retrofabric #vintagefabrics #vintagepatterns #vintagefabrics #vintagefabricforsale #flowerpattern #vintagedesign #retrodesign #retroaesthetic #vintagestyle #vintageonline #vintagesewing #vintagematerial #vintageonlineshop #vintageonetsy #vintageoninstagram #etsyvintage #etsyvintageshop #vintageshop #vintageetsyshop #vintageetsy #vintagesale #vintagefindsforsale #vintageetsyseller #retrosewing #vintagefinds #vintageeverything #vintageephemera #vintageflowers @etsy @etsysmallbusinesses @etsy.shops @etsypromoters @etsypromote @etsypinterest @etsyoclock @etsypinterest @etsy.promoshop @etsy.promotions_ @etsyvintageteam @etsyvintagequeen @etsyvintageshops @etsy.vintage.design @etsysellsvintage @etsycollections @etsy.giftguide @etsygifts @_etsygifts_ @etsy.shopgifts @etsyaddict @etsy.ads @etsyhunter @etsyhouse @etsy.business @elite.etsy ✨SHOP LINK IN BIO @piddlinpixie ✨ ✨FOLLOW IF YOU 💖 VINTAGE✨ ✨ http://Piddlinpixie.Etsy.com ✨ https://www.instagram.com/p/CWoTHg7pNfb/?utm_medium=tumblr
#vintageribbon#vintagefabric#retrofabric#vintagefabrics#vintagepatterns#vintagefabricforsale#flowerpattern#vintagedesign#retrodesign#retroaesthetic#vintagestyle#vintageonline#vintagesewing#vintagematerial#vintageonlineshop#vintageonetsy#vintageoninstagram#etsyvintage#etsyvintageshop#vintageshop#vintageetsyshop#vintageetsy#vintagesale#vintagefindsforsale#vintageetsyseller#retrosewing#vintagefinds#vintageeverything#vintageephemera#vintageflowers
0 notes
Photo

I bought this at Wonder Con last month. This is totally me - I love sewing, various shades of red, and pinup...and rave waves The original artist says she was inspired by Amelie. I love that movie! Would love to recreate this with any of you photographers ❤❤❤ . Art by @caseyrobin . ❤️🖤❤️🖤❤️ #pinup #pinupart #retro #artistalley #amelie #sewing #retrosewing #pinupgram #pinupgirl #pinupworship #art
0 notes
Link
1600+ PDF patterns most at $1.05 USD, digitally restored easy download PDFs #vintagecrochet #vintagecrochetpatterns #vintageknitting #vintageknittingpatterns #retrocrochet #retroknitting #retrosewing
0 notes
Photo

The best thing about the 80s is continually moving away from it, the second best were legwarmers. These are toasty and comfy. #retrosewing #retrofashion You bet there will be more made. Not sure what cat this would make me... Mactackity? https://www.instagram.com/p/By_WF4yjp3Y/?igshid=18kyhtb92z8cr
0 notes
Photo

🎶 Juchuh, wird höchste Zeit in Berlin den Sommer zu genießen und zu Tanzen, oder? 🎸🎤💃🕺 #fetedelamusique #berlin Z.B mit dem wunderschönen Kleid Mona von @schnittmuster_berlin Lena @schnaehwittchensews hat es aus einem Melonenstoff von uns gezaubert. Das wäre etwas auf einen Tanz, oder? ❤❤❤ #schnähwittchen #stofflove #schnittmusterberlin #melone #mona #kleidmona #twisted #vintagesewing #retrosewing #pinupsewing #pinupgirl #nähdirdieweltwiesiediegefällt #nähdirdeinenstyle #puffärmel #ausschnitt #2018diydontbuy #2018nofastfashion #sewing #highheels #pencilskirt - #regrann — view on Instagram https://ift.tt/2MPrFl1
0 notes
Last Seen Blogs

gnoopzy
gnoopzy

caswells
i refuse to change my header

verozmente
true love

hopelessworldblog-blog
You can’t go back and change the beginning..

small-red-gem-bfdi
Ruby Juinor