
Hello! You can call me Lobster. I am into a variety of fandoms, and will post fanart here.
Don't wanna be here? Send us removal request.
Statistics
We looked inside some of the posts by lobsterplush and here's what we found interesting.
Average Info
Notes Per Post
16
Likes Per Post
11
Reblog Per Post
3
Reply Per Post
2
Time Between Posts
22 days
Number of Posts By Type
Text
17
Last Seen Tumblr Blogs


Fun Fact
Celebrities use Tumblr as well.
Text
Thus completes Macre-May 2024 AND Macre-May 2025.
I'm gonna
I'm gonna exit tha crab zone now
0 notes
Text
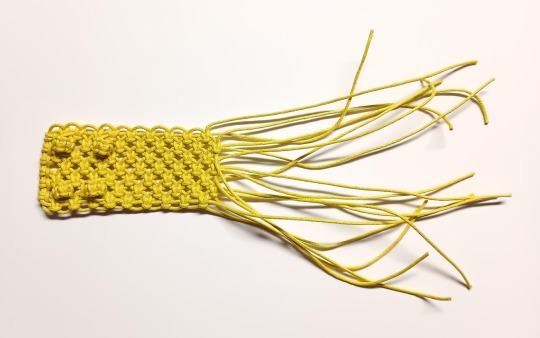
Day 32: Crabbie Baggie Part 4
Part 4 is the final step, the claws!
There's lots of options for making the claws; anything goes if you have the cord cut for it. Here's the design for the claws I made:

^ Not only are the claws symmetrical on both sides of the crab but the claws themselves are symmetrical. Build in multiples of 4.
A) 4 total strings, 12 inches, folded half-ish*
B) 4 total strings, 11 inches, folded half-ish*
C) Optional 4 total strings, 9 inches, folded halfish* (I had some scraps so I made the claws a bit wider)
*Half-ish: Fold in half unevenly with an eyeballed inch difference. This part doesn't need to be as accurate as measuring the cords on the rest of the crab. Longer cords on the outside.

For the claw design above, start by forming a square knot pyramid at the end of the arm:

Then split the cords down the center and treat each side like a separate patch of alternating square knots. Angle the sides away from each other and use the sides of the pyramid as the flat top of that section. Then build the claws until they are claw-sized.
The claws are really open ended. If you want bigger claws, add more cord to the outside or build more rows if the cords are long enough.
/\/\/\/\/\
Claw variations:
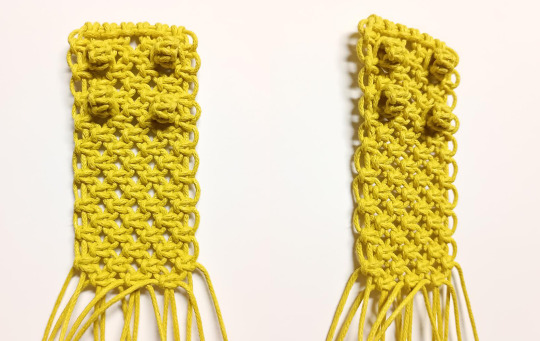
I came up with a bunch of ideas for claw shapes including some asymmetrical claw designs, but couldn't decide whether the thumb would be on the front side or back. In the end the symmetrical claws worked out best and look really good.
But on the above design the overhand knots stood out more than I realized and they were on the claw's outside. Here's a design where the overhand knots are on the inside so they look like claw teeth:

^ In this design you don't have to worry about angling the cords away from a square knot pyramid.
Estimated cord length changes:
Each added cord on the outside: 12 inches, folded half-ish.
Outermost cord: 10 inches, folded 6 and 4. Longer on outside.
**Also in Part 3 step 2, the outer lining would have some changes:
Group A: 22 inches, in half
Group B: 24 inches, in half
Group C would stay the same in both designs
Keep in mind I didn't build this claw and these are estimates.**
Not gonna lie, I did the first design because I really wanted to try the pyramid method. But I think the second design would look better overall and is a lot simpler.
(Macre-May Prompt list) | Part 3
Pictures under the cut:


^ Square knot pyramid on the left; Group A string added on the right.

^ Two new square knots on either side of the claw, angled away from each other.


^ Claws grow bigger


^ Overhand knots tied and cords cut

And with that the crab is complete!!!!!!!!!!


If you make your own crab Please send pics!
#Macre-May#Macre-May 2024#Macre-May 2025#macrame#art challenge#crab#long post#crab acquired#the crustacefriend
1 note
·
View note
Text
Day 31: Crabbie Baggie Part 3
Part 3 we lace up the sides, twice on each side:

^ The inside lining of the side starts at the top and the strings become the legs while the outside starts at the bottom and becomes the claws.
There's 3 steps for making the sides in Part 3:
Make the inner lining from the top to the bottom
Make the outer lining from the bottom to the top
Complete the legs
I recommend doing both sides at the same time in small step increments rather than finishing one side then working on the other.
/\/\/\/\/\
Step 1: Inner lining:

^ Side view of the crab. Knots already built in Parts 1+2 are uncolored except for the 5 knots in green along the bottom, which are the 5 knots in the outer open square sequence in Part 2. Old string in blue, and new string to be cut in orange. This diagram shows one side; the other side is a mirror.
Each pair of cords are uneven lengths- LONGER CORDS are noted with RED MARKERS:

A) From the Front, added in Part 1. They should have 2 inches difference in length.
B) From the Back, added in Part 1. These guys were Group D from Part 1 and back then they were folded in half at their lark's head knot. By this point they should be uneven lengths.
C) From the Back, added in Part 2. This Group has a shorter cord since it has a straight path along the edge. Make sure that the cords don't get switched in the transition.
D) 2 total new strings, one on each side: 15 inches, split 5 and 10.
E) 4 total new strings, two on each side: 21 inches, split 9 and 12.
Start by adding Group D before you tackle the rest.
Then cross Groups A and B over each other and add the Group E lark's head knots over the four cords. Pay attention to the lengths on Group E but Groups A and B can be loose until you tighten them for that first square knot at the top. That first knot will hold those cords in place.
Make sure the longer/shorter cords are positioned correctly and you're good to build what's in the diagram.
/\/\/\/\/\
Step 2: Outer lining:

^ Old string in light green, new string to be cut in orange. String from the inner lining in blue. Red arrow above points to a loop that has already been threaded by the inner lining. Ignore that inner lining cord and thread through that loop twice. Longer cords with red markers:

A) 4 total new strings, two on each side: 24 inches, 11 and 13.
B) 4 total new strings, two on each side: 26 inches, in half.
C) 2 total new strings, one on each side: 20 inches, 8 and 12.
D) From the Front, added in Part 1.
**Cord lengths in this step can vary on claw shape! These measurements are based on the claw shape I built on my crab, so read through Part 4 to check out some variations before you cut.**
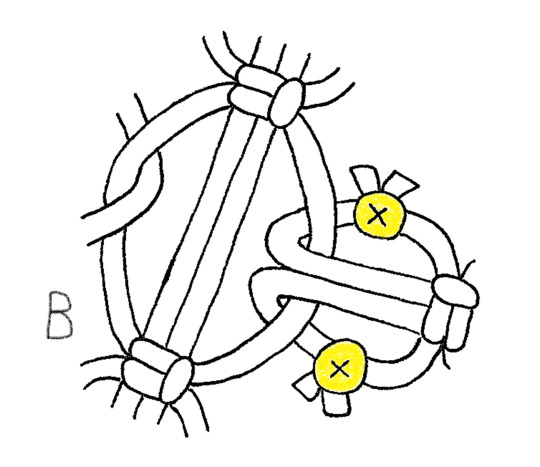
Start step 2 by adding all the new cord to the bottom of the crab. Make a few square knots but be careful: not far into the outer lining you will need to pass the inner lining to the outside.
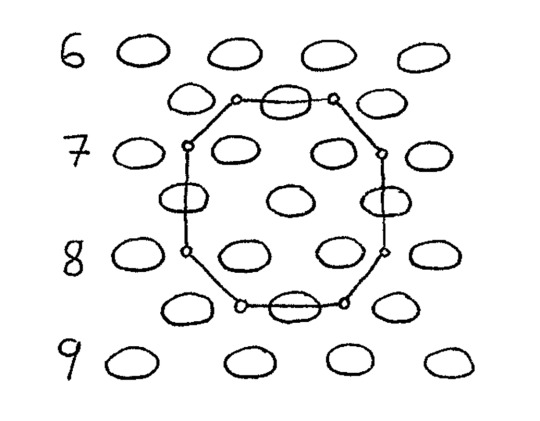
The 5 X's in the center of the diagram above marks where the cords pass through like so:

^ The holes that are passed through are made by a set of four square knots in a circle. When you are about to build the final square knot for a hole, pass the inner lining cords though to the outside. The hole's final square knot will hold the loose cords in place. Give each cord a little tug to make sure they're all the way through.
Here's the view as you're working from the bottom up:

^ Build what's in the diagram and perhaps a row or two further to make that sweet sweet crustacearmpit
/\/\/\/\/\
Step 3: The legs:
The cords from the 5 holes are gathered together to make 3 legs:

^ Each leg is a sequence of 6 square knots. Short cords make the center base cords and longer on the outside. Tie them off with overhand knots and you're done!
(Macre-May Prompt list) | Part 2 |Part 4
Pictures under the cut:

^ Adding the Group E lark's head knots


^ Inner lining complete. Bit of a jump in steps with the pictures I took; I think I was excited and forgot to take pics for a while.

^ But then I took so many yeah I was excited
CRAB CRAB CRAB CRAB CRAB


^ Outer lining started. Also I recommend a loose overhand knot to hold back the strings from the inner lining so they're not in the way

^ All cords added to the bottom and I remembered to take progress pics. On the right is the point where you begin moving inner lining cords to the outside


^ Inner lining cords coming through to make legs. I took a pause in step 2 to complete step 3 first.


^ Overhand knots tied and cords cut

^ CRAB LEGGIES

And the sides are complete!


#Macre-May#Macre-May 2024#Macre-May 2025#macrame#art challenge#crab#long post#red markers are saving you from this wall of text being worse#you would not BELIEVE how much this crab
0 notes
Text
Day 30: Crabbie Baggie Part 2
Part 2 is finishing the crab's bottom and back:


^ The main body of the back is a mirror of the front. Orange and red rectangles are separate rows of open squares, rather than alternating square knots.

Making the bottom:
This part is complicated but it makes the bottom rounded:

^ Light blue outlines where you stopped in Part 1. Light green is the inner open squares and dark green is outer open squares.
You will also need to add two strings, one on each side, as noted by the orange lark's head knots at the bottom. These strings are:
24 inches, folded unequal- 8 and 16. Long cord is on the outside.
/\/\/\/\/\
Let's break this down into steps.
Make the inner open squares, 4 knots on each side. While threading them through the loops from Part 1 like normal, on the other side leave the loops slightly wide like so:

^ (Not that wide though- the diagram is for show)
(Also keep the vertical spacing about the same as the alternate square, perhaps on the tighter side.)
2. Make the outer open squares, 5 knots on each side. Follow the diagram carefully; the wide loops on the inner open square knots are so you have enough room to stitch through them weird.
These ones you want to be a lot tighter in width and vertical spacing- despite there being 5 knots, they should take less vertical space than the other sections. But make sure loops are not too small- you will need to thread through them later.
*also it is here, when making the outer open squares, that you try to coax the crab bottom into a curve. The bottom area should not sit flat. See the photos.*
3. Build 2 rows of the alternating square knot. On the schematic you already have row 11 from Part 1. Build to row 12.
(I numbered the side loops so every other row is numbered.)
4. Add the 2 new strings, minding the lengths, which get added into the alternating square on the next row. Then you're free to build the bulk of the crab's back.
And remember: the crab is left/right symmetrical, so what you do on one side, mirror it on the other.

/\/\/\/\/\
Why go through all this work? Alternating square knots create a rigid sheet that forms nice sharp corners when lacing up the sides. Open squares are a lot more flexible in their connections allowing you to get away with bullshit. In the end, we're trying to skip past those sharp corners on our way from the front to the back of the crab:

Also switching to open squares allows the loops to be closer together than alternate would allow:

This tighter lacing reduces bulging in the corners.
/\/\/\/\/\
Finishing the back:

Follow the schematic and count the rows, and when the time comes, tie off these strings with overhand knots. Don't forget to make two square knot sequences (I did 5 knots) to make crab antennae.
(BTW the antennae tended to angle inwards so make sure that one cord coming from the center-side is loose and not pulled tight.)
Don't tie off the cords I showed loose; they will be used later. Otherwise there's a bit of openness to how you finish, like making longer antennae if you have extra cord. Or, grouping the strings differently:

Upside is the antennae are not angled inward, downside is the last row is not distinguished from the antennae so the ending curve is not as distinct. I like that curve, so I ultimately went with the first method.
(Macre-May Prompt list) | Part 1 | Part 3
Pictures under the cut:


^ Inner open squares added

^ Outer open squares added. They make the bottom curve.

^ Side view

^ Back-side-up; these two pics are at the same step. On the right however, I put a piece of paper between the front and back so you can see the back clearly.

^ Two new strings added and you're set to finish the main body of the back.


^ Antennae added, overhand knots tied and cords trimmed.
And part 2 is complete!


0 notes
Text
Day 29: Crabbie Baggie Part 1
Part 1 is making the crab's front, part of the bottom, and the eyes. This part is the simplest but has the most cord-cutting:

^A simplified schematic of this section. Each blue rectangle is a knot in a basic alternating square knot.
(BTW, using a pixel art drawing program is useful for planning complicated designs or, like here, making large schematics.)
Starting at the top of the front:

^Lark's head knots noted on orange. The main body starts with 20 strings in 5 groups:
A) 2 strings, 24 inches. Unequal lengths- 11 and 13.
B) 8 strings, 38 inches. Fold in half.
C) 6 strings, 34 inches. Fold in half.
D) 2 strings, 44 inches. Fold in half.
E) 2 strings, 26 inches. Fold unequal- 16 and 10.
You're going to need a yardstick. (Sorry metric users. Adding cm will only make this mess of numbers worse.)
The lark's head knots for Groups B C and D are easy as the strings are folded in half with both sides equal.
To get Group A spaced correctly, first add Group B without worrying about the spacing. Then get Group A offset by 2 inches, which will give you a long string and a short string on each side. Then slide the Group B along Group A until the eight lark's head knots are in the middle.
Double check that Group A is still offset by 2 inches, but then you can ignore Group A until the Part 3 update. Once Group C is added they will hold Group A in place without sliding.
Group E has the long cord on the outside.
The bottom of the front:
Keep an eye on which row you're working on, as numbered by the schematic. This part is pretty straightforward.

^Don't tie off any cords; they will be used later.
Making the eyes:
The eyes of the crab are best added early before the project becomes 3D, while you can easily reach both sides. Later on one side will become the 'inside' of the bag.

^The eyes were tied on over these two square knots.
You can also use large beads for the eyes by adding beads in place of the two square knots. They would have to be added as you build the front rather than be added later.
I decided to use two square buttons for the eyes:

Choose cord for the eyes and cut two strings for each eye:
-The inner cord, 8 inches
-The outer cord, 14 inches
You will also need a placeholder string.
Do a square knot starter with no overhand knot onto the inner cord. Make one square knot then add a placeholder string into the loop on top. Then slide the square knot up so the top loop is tight on the placeholder string.
Make 6 square knots total and then feed the inner cords through the placeholder string, then make the button.
Take the cords of one eye and split them into left and right and feed them through the two holes adjacent to the marked square knots above on the crab front. Tie the strings off on the other side and trim the cords.
(Also if you want to add any details to the front of the crab, like stitching on a face, this would be the time to do it.)
/\/\/\/\/\
Photos! For this project I chose multicolored string, so the crab has a mottled-but-not-stripey look:

Starting at the top:

^ Groups B and then C added to Group A

^ Groups D and E added


^Finish the front

^ Making an eye

^ Threading the eyes on the front, on the outside


^Tying the eyes off on the inside


^ Crab eyes complete!
(Macre-May Prompt list) | Intro | Part 2
2 notes
·
View notes
Text
Intro to the Crabby Baggie: finale project!

Makes a crab that's also a tiny pouch! TBH this project was supposed to be really simple but I overthought the process and now it's •°☆▪Complicated•°☆▪
(An extra day has been added to this project; the prompt list now has a day 32. June 1st no longer exists and May grows ever stronger)
The original idea was to build a rectangular body and then stitch up the sides, ending with crab claws:

There were some novel designs for starting and finishing the main body and creating macrame claws in this early concept. But I kept thinking of aspects that were missing that I wanted to add and I kept making improvements until it turned into this:

-Reinforced claw connections (A)
-Rounded crabby bottom (B)
-Little legs! (very worth it) (C)
-And a lot of string-saving techniques that reduced the number of strings that needed to be cut. These techniques are the source of a lot of the crab's complexity, but they smoothed out a lot of corners and turned the crab from like 54 strings to 46.
I built the complicated version and will be reporting those methods over 4 posts, not including this intro.
One last thing: for the duration of these instructions, the sides of the crab will be labelled like so:
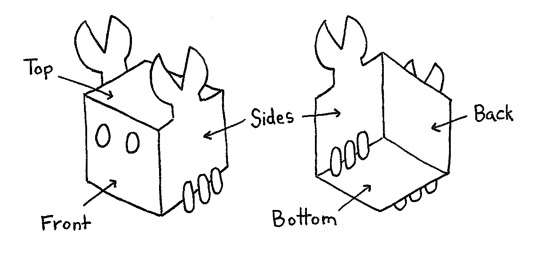
(To avoid confusion over what is top vs front, etc.)
Could I have described this in words? Maybe, but instead we have the squarest crab ever.
(Macre-May Prompt list) | Part 1
#Macre-May#Macre-May 2024#Macre-May 2025#macrame#art challenge#crab#I drew a lot of cool diagrams for this lil guy#check them out even if you're not trying to follow along#you'll see why it gave me burnout lmaooo
3 notes
·
View notes
Text
Macre-May Update
okay so last year I didn't post the last macrame project. I meant to, but the moment I lost my momentum I gots da burnout. Oops.
I'm still kinda getting over it so this year I plan to only post that final project. I accidentally made it Way more complicated than I first expected and I can't say that won't happen again on another project.
So I'm aiming for a few updates mid to late May, and hopefully next year will be more normal.
4 notes
·
View notes
Text

Saw a fantastic fuzzy yellow caterpillar on a walk, they looked like this. ^ Absolutely fuzzzy
#internet says it's the caterpillar of a cottonwood dagger moth#drawn from memory#waay hairier in person tbh#what a guy
4 notes
·
View notes
Text
okay maybe a bit more than 'just a little'
oh boy the last 3D project became WAY more challenging and time consuming than I originally planned. Macre-May's gonna leak a little bit into June, just a little.
#Macre-May#the last project took a full week just to BUILD let alone draw and edit the diagrams#and then the end of May got busy and I wasn't able to work on it at all#ehhh so I'm behind#BUT I'M NOT DEFEATED!!
1 note
·
View note
Text
oh boy the last 3D project became WAY more challenging and time consuming than I originally planned. Macre-May's gonna leak a little bit into June, just a little.
#Macre-May#I was supposed to post the last three days in a row#but I'm going to try for every other day still#Macre-May has got me WIPED
1 note
·
View note
Text
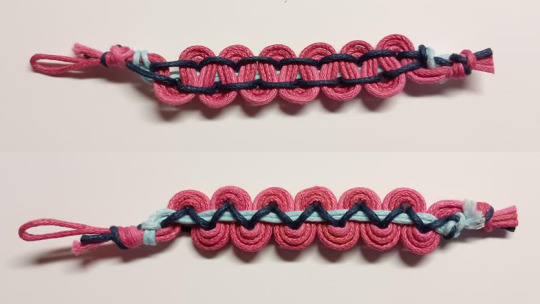
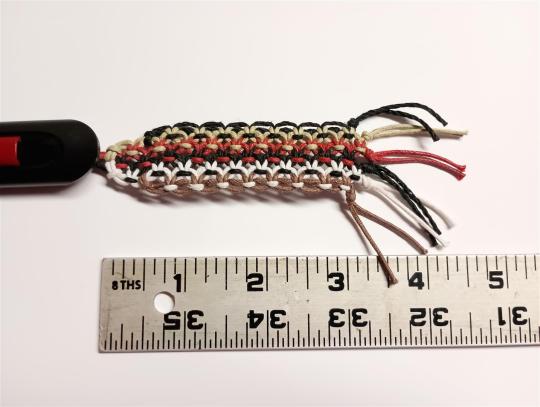
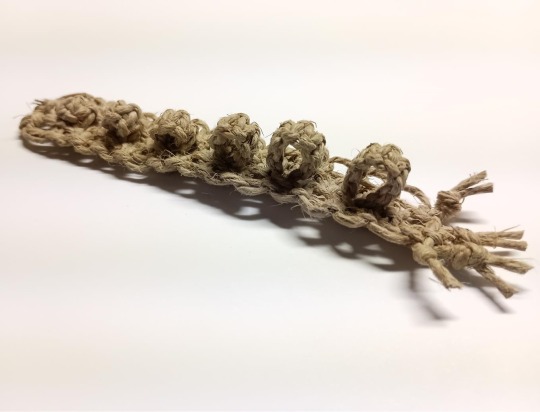
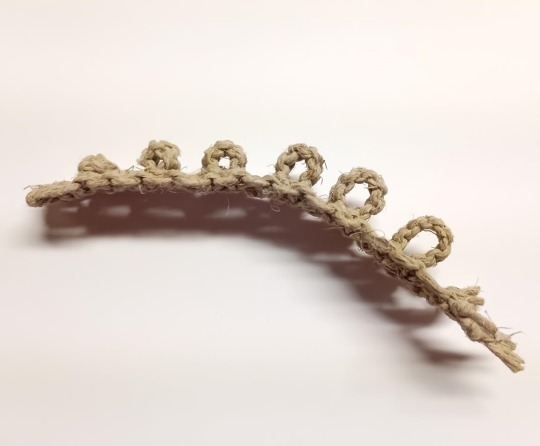
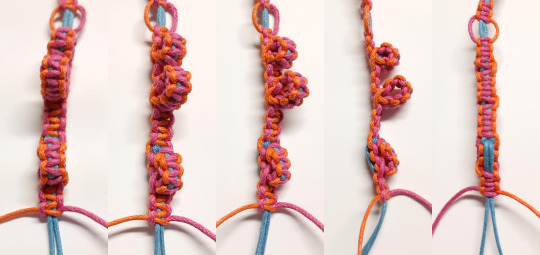
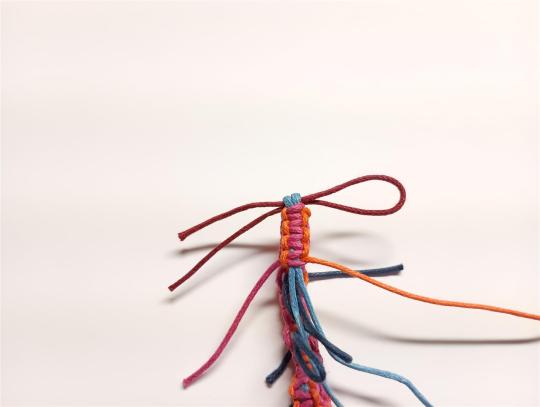
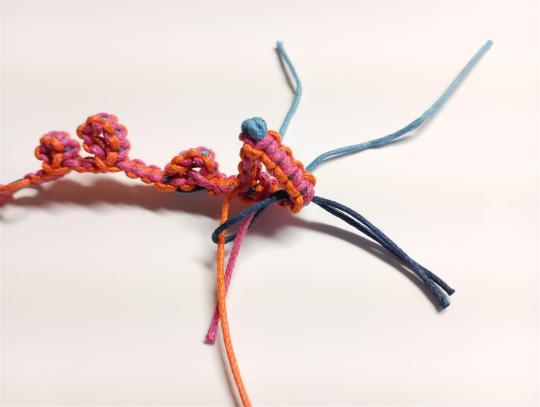
Day 27-28: Spectral line bar
This is a design I've seen online but haven't built before. Because of the shape I can't integrate it into larger projects but it's a fun design on it's own and I wanted to try it out!

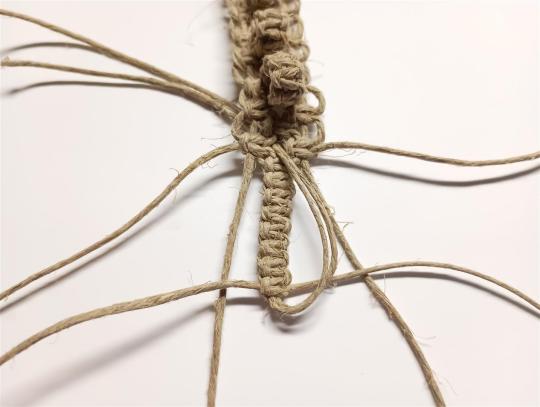
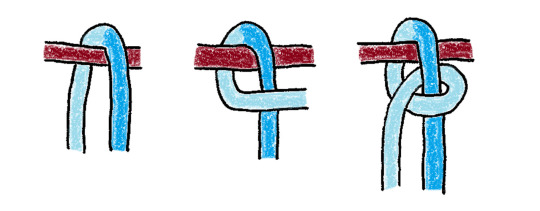
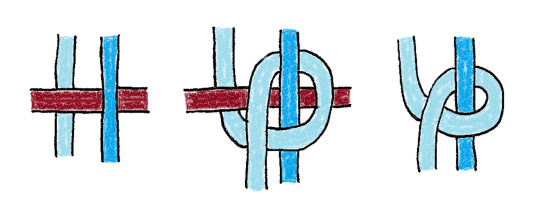
There's two strings that go straight through the center at 1PL each, three strings below that make the wave at 2.5PL each, and one string that weaves them together at 3PL.


The sample I've seen online used flat-shaped synthetic cord but it works just as well with regular round cord. It looks really cool and builds fast!

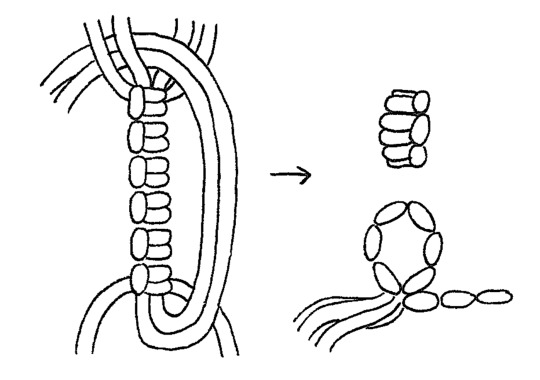
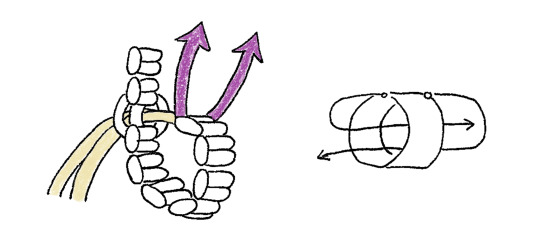
^ Turn the three wave cords beneath the center cords. Then move the weaving cord under the wave cords, over the center and through the armpit. Tighten and adjust.

^ Here's what the back looks like.
/\/\/\/\/\
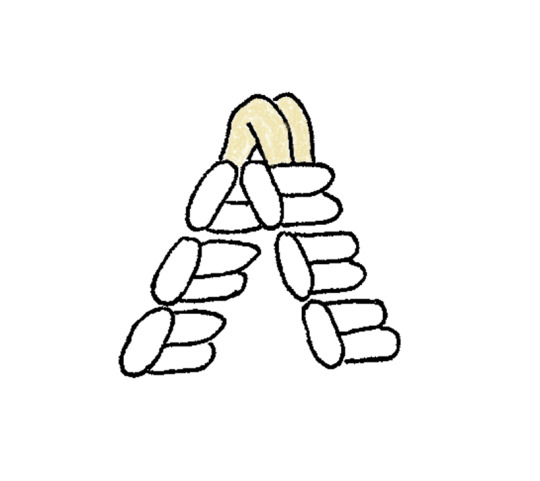
Spectral Line Bar starters:

A) From a row of lark's heads knots, this is the order the cords fall in naturally from left to right. This starter is nice if all cords are the same color, but looks weird if they're different.
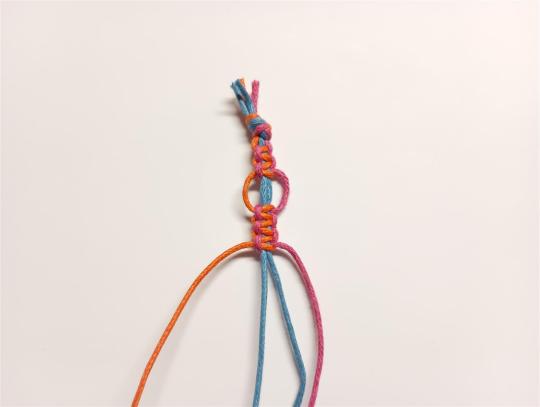
B) This method gets the colors in the correct configuration. Putting all the cords into one overhand knot would make a starter cramped, this spaces them out and puts the colors where they need to go. In the over hand knot, add: 'Wave color' 5PL, folded in half 'Wave color' 2.5PL 'Weaving color' 3PL
After the overhand knot, gather the cords that are 'wave color' and tie a lark's head knot across it made of 'center color' 2PL, folded in half.
Colored, they look like this:

/\/\/\/\/\
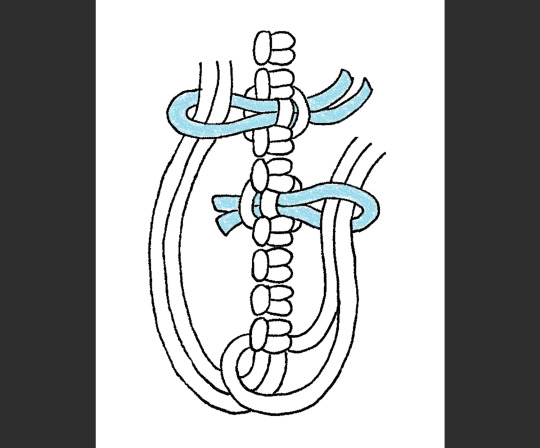
Tying off the end:

(Again, putting everything into one big overhand knot would not only make the ending cramped but would make the overhand knot weak. Larger overhand knots are easier to unravel, and four strings is my limit. So I suggest these finishers.)
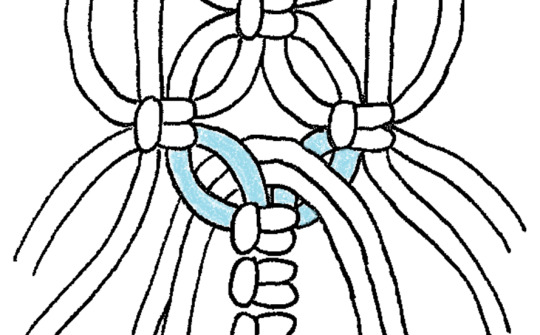
A) In the first overhand knot the weaving and center strings are tied together and the center strings are trimmed. Then the weaving cord continues to an overhand knot with the wave cords. This method maintains a proper wave shape on the wave cords.
B) The first overhand knot includes the weaving and wave cords. Then trim the weaving cord and one of the waves. The other two wave cords become the base cords in a square knot, highlighted in blue. The outer cords for the square knot are the center cords; wrapped around the outside of the overhand. You can even build the square knot over the first overhand knot, to hide it. This method is good for a neat, symmetrical ending, or if you want to finish with a square knot sequence.
Colored, they look like this:

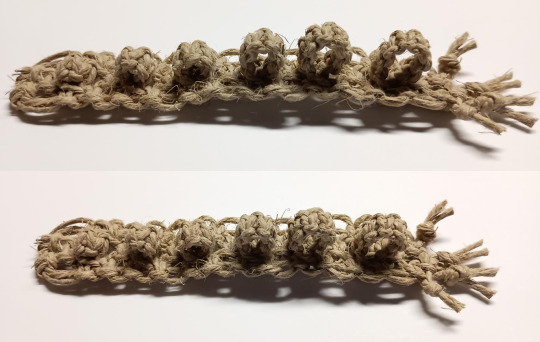
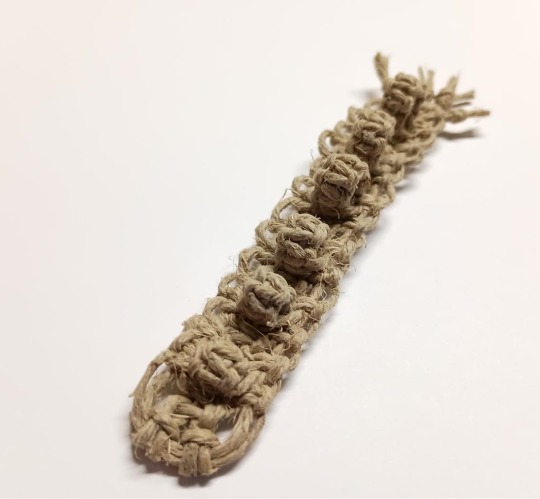
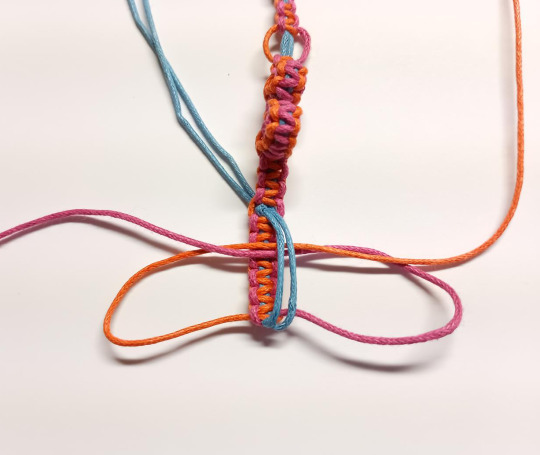
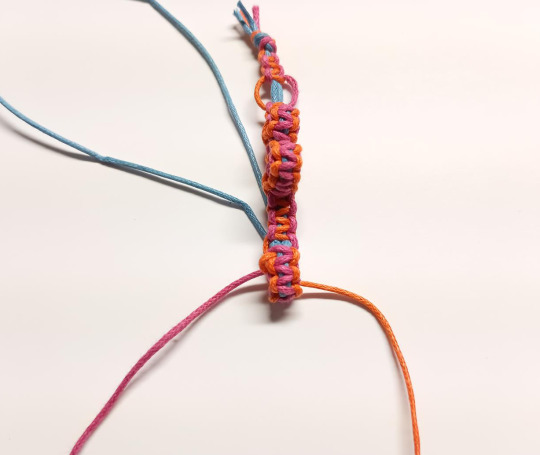
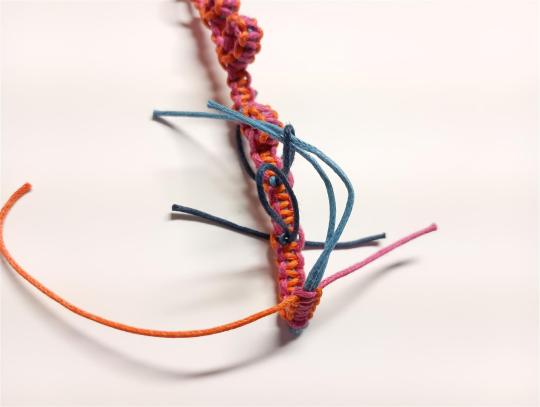
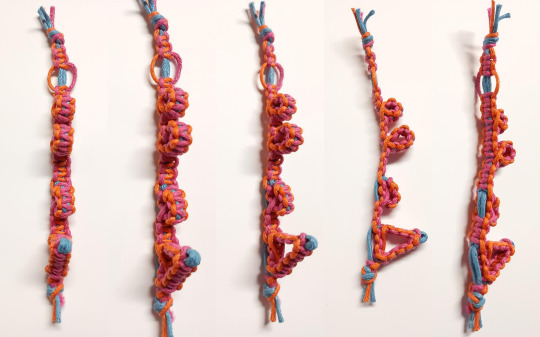
For my sample I used starter type B and finished with type A:
This design looked so cool I immediately made another:

(Macre-May Prompt list)
#Macre-May#Macre-May 2024#macrame#art challenge#structurally it is kinda like a square knot but Thiick
0 notes
Text
Day 25-26: Extending cord
Say you've cut cord for a project and find out, 90% of the way in, that you're going to be an inch short of where you need to be. A necklace too tight to be worn, a bracelet too small. What do you do?
Extending cord doesn't work on all types of knot designs but for those that are compatible it can save the work and cut cord from becoming a waste.
The trick is to recognize the problem early so you have the space to fix it. Every spot where you exchange one cord out for a longer cord lowers the project's structural integrity so the further these spots are from each other, the stronger the project.
Extending the cords on a projects happens at a sequence of square knots, and works better the longer the sequence since you can put more distance between the weak points. There's two methods- extending the outer cords and the base cords.
/\/\/\/\/\
Extending outer cords:

A) Old outer cord is colored light blue, base cords light green.
B) Fold the outer cords down so they are flat against the base cords.
C) Add the new outer cords (dark blue), long enough to last to the end of the project. Place them under the four old cords.
D) Use the new cord to make a square knot starter with the all four old cords as the base cords. This makes the square knot wider than a square knot with two base cords, so pull it very tight not only to make the square knot skinnier but to add friction so the knot doesn't slip.
E) The arrow that goes between D and E points to the new cord that went under the old cords in step C. It forces about half a square knot's length on the project, and creates a visible node.
F) Now that the old outer cords are with the base cords cut them to different lengths. As you work the old outer cords will be hidden under the square knot sequence and the change in square knot width will be gradual as it goes from four back to two base cords.
/\/\/\/\/\
Extending base cords:

A) New base cord is dark green. Place one cord in with the old base cords.
B) Tie square knots over the cord and again, pull it very tight where there's more than two cords as a base. After a few square knots cut one old base cord short.
C) Where that old base cord ends add the second new base cord. This keeps the width of the square knots from fluctuating; a steady 3 base cords.
D) The exchange is fully hidden by the outer cord's square knot sequence and doesn't have a visible node like extending the outer cords.

^ Three points of interest when changing base cords, without the outer cords covering them. The further these points are to each other the stronger the project.
Of the two types, extending the base cords makes a project weaker than extending outer cords. Any open squares or breaks in the square knot sequence near these points also decreases the structural integrity.
/\/\/\/\/\
Things to avoid/watch out for:

^ If you're trying to extend cord on an open square design it will need to have a sequence of square knots between them. There's no space to secure the old cord on a shorter sequence, and no way to hide the fact that there's extra base cords.
Don't add outer cord right after an open square. Build at least one full knot with the old cord before adding the new, otherwise the shape of the open square loop will come out warped.

^ Don't cut the old cords to the same length. Not only is the square knot size change abrupt but the connection isn't as strong. Square knots can slide over base cords and more cords in the base means they slide easier. Plan space for there to be three cords in the base; it really anchors the cord ends.

Don't change the outer and inner cords at the same time. A hard yank and the square knots can slide off the base cords, pulling the whole project in two.
/\/\/\/\/\
Example of a tough cord extension, four square knots between open squares:


If you're running out of base and outer cords around the same time, extend the outer cords first because they run out faster.
A) One square knot of old cord makes the open square loop the correct shape.
B) There's four square knots between each open square, and the square knot starter adds an extra half knot of width. To keep the square sequence four knots in length, the added new outer cord starts with the second half of a square knot.
C) The first old outer cord is cut very short so there's space for both outer cords to run out before the next open square.
D) The second outer cord runs out.
E) First new base cord is added.
F) First old base cord runs out.
G) Second new base cord is added. Unlike the outer cords, the two base cords don't need to be exchanged between the same open square loops.
H) Second old base cord runs out.
/\/\/\/\/\
BTW if you're working on a large project and fighting long cords bothers you more than bumps, you can use cord extension on purpose and cut cord as you go.

^ A necklace with outer cords extended. The necklace is strong and the bump isn't that noticeable!
Another strategy if you're running low on cord is to switch to a different knot that is less cord intensive to reach the last bit of desired length.
(Macre-May Prompt list)
0 notes
Text
Day 23-24: Lego keychain charm Part 2
Time to turn the project 3D by lacing up the sides!

^ The sides will be 1 knot wide by adding 2 cords between the alternating square knot rows 4, 5, and 6. Cut each cord 24in (60cm) and fold them uneven- 10 and 14in (25 and 35cm), with the longer cords on the outsides.

^ You'll be working your way around the outside, stitching up three of the four sides of the Lego.
The hard part is the stretch where you attach the top and bottom of the body, especially tying the securing overhand knots. First lace around the 'top' in between the lark's head's knots, which will be on your right. Then make the square knot, making an open square with an open loop to the left and the lacing on the right. Then tie the ends of the 'bottom' around the open loop, 2 strings per overhand knot, with the knots on the inside.
The 'bottom' strings are wrapped around the open loop in a way that angles them to the inside. Finish tying the overhand knots for one open square loop before you start lacing the next square knot.

^ A diagram of the Hard Part. The two light blue colored square knots are the same knot, as are the two green. On the right, the dark blue dots are where the lacing cord loops between the lark's head knots. On the left are two methods of wrapping strings around the open square loop. Let's take a closer look:

A) For two strings: wrap both ends under and up through the open loop. Then split the strings and wrap them back under, like a backwards lark's head knot. Secure with an overhand knot beneath the backwards lark's head, on the inside of the project.
B) For four strings: wrap the center strings over and down through the open loop. The outer strings don't pass through the open loop but are pulled directly to the inside of the project where they are secured to their respective center strings.
/\/\/\/\/\
Let's try it!

^ Cords attached.


^ Lacing down the first side of the Lego.

^ The square knot is built and I'm about to use the 2-string method to tie off the first 2 strings and go around the corner.

^ Knot tied on the inside! Getting the overhand knot close to the open square loop is tricky.
If you're having trouble try making the overhand knot half-tight. Then try to loosen the knot by only pulling in cord coming from the open loop's direction, and only tightening the knot by pulling cord out to the loose hanging strings. This will move the overhand knot in the direction of the open loop.


^ Once the overhand knot is secure you can trim the strings.
^ As you go it gets harder because as the second side gets laced shut the opening where you can access the inside gets smaller. But at least there's less cords in the way.

When you're done lacing the second side it gets easy again. Tie off the 4 strings with one overhand knot, and trim the two shortest cords. The two longer cords can be tied to make a loop to add it to a keychain, or do whatever you like. I added a bead to the end:

It looks so good!!!

And it killed my yellow cord bundle!
(Macre-May Prompt list) | Part 1
#Macre-May#Macre-May 2024#macrame#art challenge#lego#it is perhaps the tiniest bit flat#but that can be fixed by planning the sides to be 2 square knots wide#but tbh it is still soooooo good
0 notes
Text
Day 21-22: Lego keychain charm Part 1
A little 3D Lego! It matches the sticker on the notebook where I'm putting all my Macre-May drawings. :D
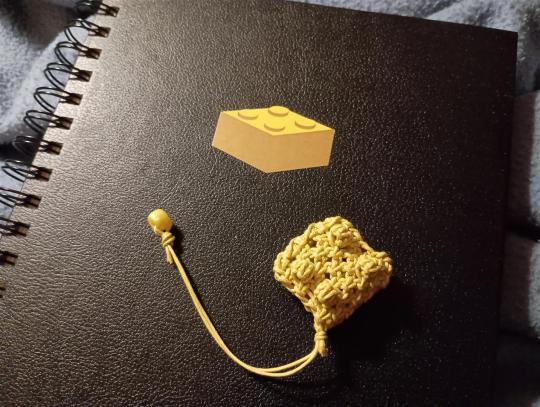
The project is on the simple side and the securing knots are hidden, but it can be tricky at the point where you hide the knots due to the project's small size. But that's in part 2.
First part is you build the main alternating square section of the project:
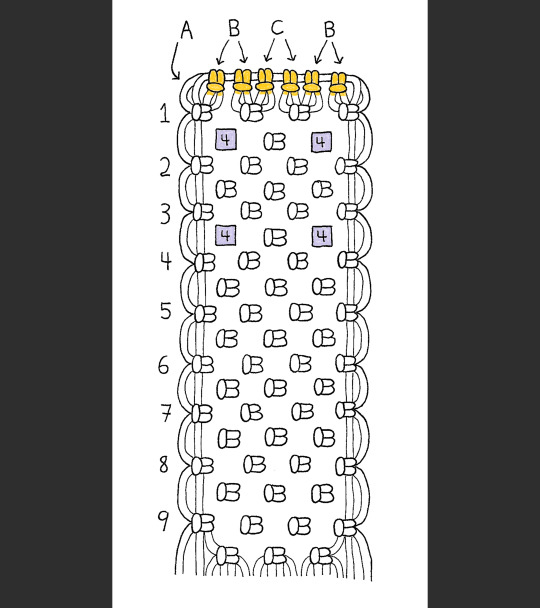
That's a 4 square knot wide alternating square, 8 cords total, with four buttons at the top. Nine rows, counting the rows with four square knots on them. Do Not tie overhand knots at the bottom.
Let's look at the cord lengths:

Cord group A is two cords on which the lark's head's knots are attached. Both cords are 20in (50cm) and will have about 13in (32cm) on one side and 7in (18cm) on the other so the left and right sides have one of each length. The longer cord forms the knots on the outside.
Cord group B is four cords that pass through buttons. They are 32in (80cm) each, folded with unequal sides. The inside cords, colored in tan, are 15in (38cm) and the outside cords, colored in purple, are 17in (42cm).
Cord group C is two cords that do not pass through buttons. They are 26in (65cm) each, folded in half.
I suggest you adjust the lengths of the Group B and C cords, and once their lark's head knots are in place then adjust Group A.
/\/\/\/\/\
I chose a bundle of yellow 1mm cord:
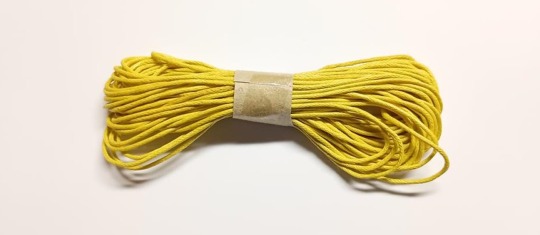
Cut my cord, got the lengths adjusted for the larks heads and secured them to the Group A cords, then adjusted those. The Group A lengths will be slightly shorter than stated because some of the cord length went into crossing the top of the project. It's fine.
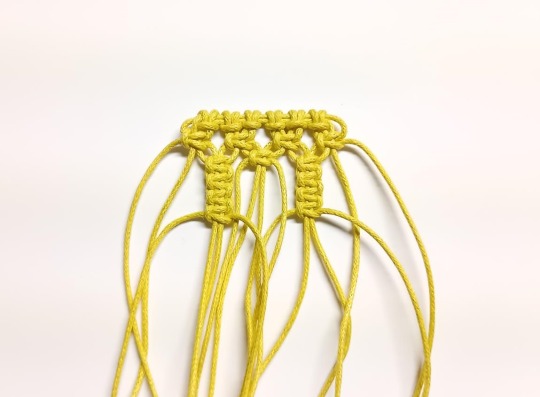
^ Me building the top two buttons
Count the square knot rows so they match the diagram. It will be about 3in (7.5cm) long, not including the leftover cord.
/\/\/\/\/\
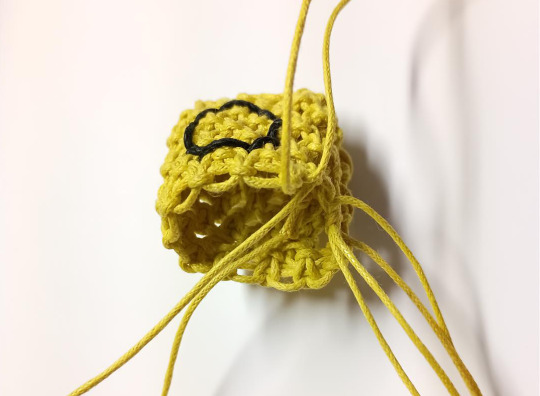
Once the body is built stitch a circle on the bottom:
Use the double sided stitching method. Pick any node as a starter point. Tie the overhand knot on the opposite side of the buttons.
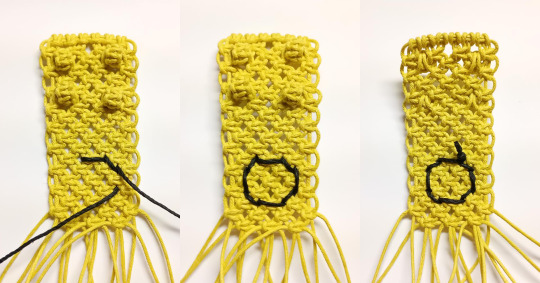
We'll pause there until part 2!
(Macre-May Prompt list) | Part 2
More details on how I figured out the cord lengths below the cut, if you want to follow along.
Wow really? You want to see my math? 😮👀💞
(I calculated everything in inches, and there was plenty of leftover cord when I was done, so the measurements given in centimeters are not exact, but close enough.)
First I drew my project diagram so I knew the number of rows I would have to build. Actually planning out the project aside, it came to 9 rows. Then I checked my sample alternating square knot (flashdrive tag!)...
...and found 9 rows to be about 3 inches. Giving 3 extra inches for bonus cord, I had a working Project Length of 6 inches.
Alternating square knots are 2 PL per string, except the second-to-outer cord, at 1 PL. From there I calculated:
Group A cords 18in (2PL + 1PL) Group C cords 24in (2PL + 2PL)
Group B cords needed to be a little bit longer, for the buttons. Each lark's head knot would have one cord that would act as the base cord and one as the outer cord for a sequence of square knots.
I figured the base cord for a sequence of 8 square knots would be about 2in and the outer cords 4in. I know I said a sequence of squares has a cord length ratio of 1:3 but on an earlier Macre-May I found shorter lengths need less outer cord. Plus I figured the alternating square's 'bonus cord' would cover any problems. So:
Group B cords 30in (2PL + 2PL +2in +4in)
BUT!
I always like to over-estimate, especially since I'm not used to measuring so carefully. I'm used to measuring by feel and I can only cut once. If my calculations ended up wrong, I'd be in trouble.
So I added 2in to each cord length, 1 extra inch per string, just in case. And tbh it came out exactly as I imagined:

The alternating square ended up at 3in and the leftovers were almost all the same length. The shortest cords ended up being the Group A cords, about 3.5in, and the Group B and C cords were all about 4 to 4.5in. Not bad! If each string was 1in shorter I still would have made it.
The leftovers were a bit longer than I personally would have liked, but the longer cord was helpful for the tricky parts in part 2. If I were to make it again I would keep the length of Group A and use the shorter lengths for Groups B and C.
0 notes
Text
Day 19-20: Square knot button
This is a design I saw online but I hadn't built before. So this Macre-May I wanted to try it out. The instructions I saw were like this:
^Build a sequence of square knots and pull the base cords through the cords before the sequence. Pulled tight it forces the sequence into a loop. Secure with square knot.
This is about all I had to work with, and on its own, there's a few problems. It requires the cords before the sequence to be loose enough to make a hole to pull the cords through, and an open square would be too loose. The securing square knot on the one side and loose cords on the other make the button asymmetrical. How would you make a second button?
So I played around with some ideas:
/\/\/\/\/\
Alternating square knot button:
An alternating square knot naturally places a hole above the square knot sequence. The wide base also helps keep the button facing upward. I tried it out and it works pretty well:
One thing I noticed is that the button forces the alternating square knot to be tight. For better spacing I would suggest making the first knot of the square knot sequence loose on the alternating square. Make these cords a bit longer than pictured:
That would place the button closer to where a normal square knot would be on the alternating square.
In my alternating square button sample I tried buttons of different sizes to see how they looked:
^Starting on the left is a button made of a 3 square knot sequence, increased by 1 on each button going to the right, ending at 8. Three is about the limit on how small a button could be.
^ At around button size 6, the size of the button started to bend the alternating square downward.
/\/\/\/\/\
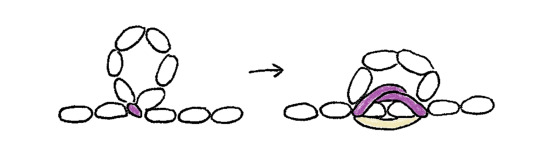
Making a button without an alternating square knot:
^ For this sample I used brightly colored cord for visibility. Orange outside cord on the left, pink on the right, and light blue for the two base cords. You'll also need some short scrap cord for this technique.

A) At the place where you want a button, insert a scrap cord folded in half so the loop is pointed towards you, at the front. When you tighten the square knot the scrap forces a small open square in the middle of the square sequence.
B) Build the number of square knots you plan for the button.
C) Take the base cords and feed them through the scrap cord loop.
D) Pull on the ends of the scrap cord, pulling the base cords through the small open square.
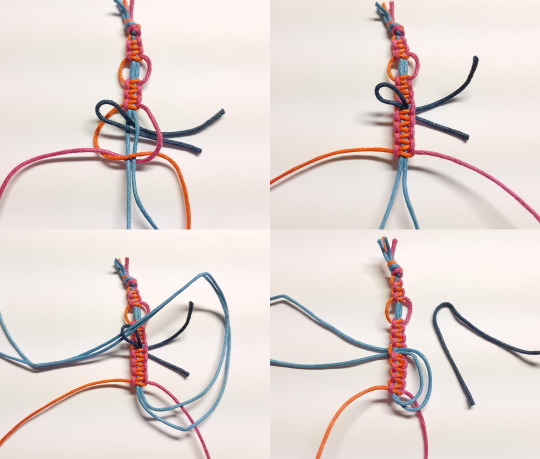
^ Woohoo! It works!
^ Size 4 and 6 buttons.
/\/\/\/\/\
Diagram shorthand:

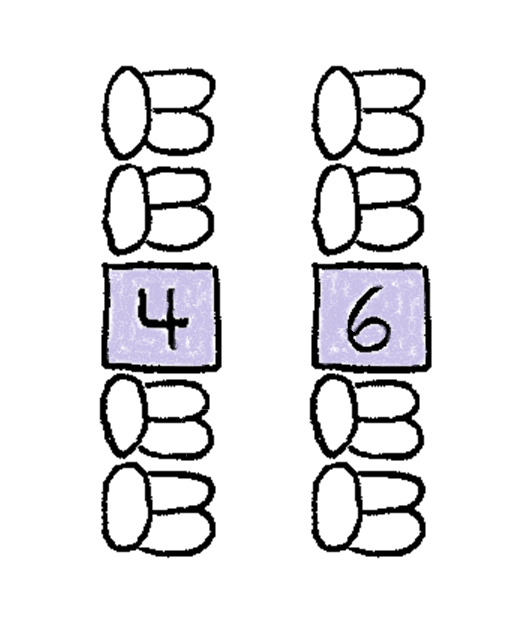
^ I'm going to draw square buttons as a lavender square. Number of square knots is drawn on the button.
/\/\/\/\/\
Calculating cord length
Button cord length can vary widely by project, depending on how big the buttons and the distance between them.
Generally you would calculate the length of the cord needed for the project without the buttons and the length needed for the buttons on their own, then add those numbers together.
Buttons are built with a sequence of square knots and thus the cords lengths needed have similar proportion. (About 3:1, 2:1 if the buttons are small or sparse.) But they don't add any actual length to a project.
On a single knot wide button, like the second sample in this post, this is easy to calculate. The cord length acts like a very long square knot sequence. The fun part is calculating the length on an alternating square:
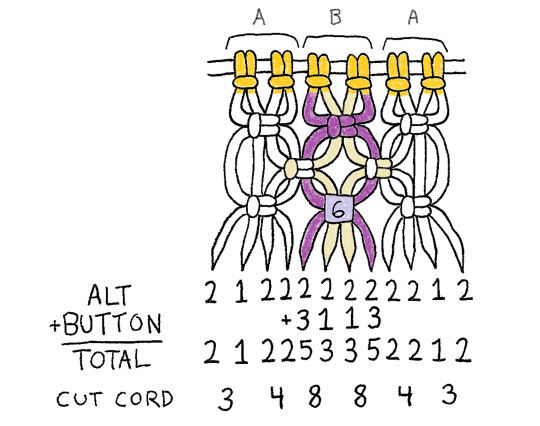
(ALT): For the actual length of the project, all cords pass through the alternating square knots, mostly at 2 PL.
(+BUTTON): Cord group B in the center passes through buttons. If the length of the alternating square is roughly equal the length of the square knot sequences that will make the buttons, then the Project Length of the alternating square can be used for the button too.
(TOTAL): Add the distance that the cords pass through the alternating square and the buttons. Cord groups A don't pass through buttons so they're the same as the alternating square.
(CUT CORD): The actual length of cord you cut, basically you add up both sides of one lark's head knot.
I'm... hoping I didn't just make it more confusing. If I put square knot buttons in a project I'll just calculate the cord lengths myself and give them to you.
(Macre-May Prompt list)
Under the cut is some unofficial button variations!
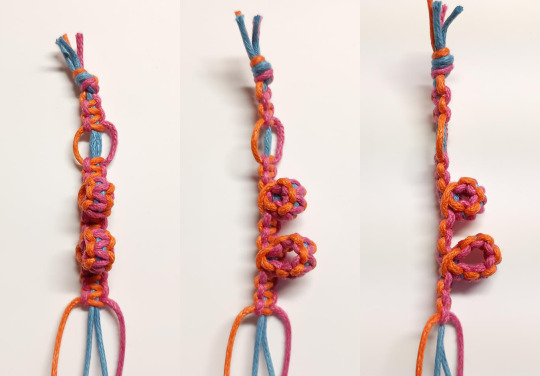
Flat button
For when you want the button to lay flat! Pass the outer cords through the button loop so the securing knot is a few square knots down from the starting open square loop.
This puts the two outer cords on the opposite sides (pink is now on the left and orange on right), so if you want the colors in the square knots to remain the same start your securing knot with the opposite cord.
^ The base cords also are visible on the bottom of the button.
^Flat button below the size 4 and 6 buttons. It's... a little lopsided.
/\/\/\/\/\
Not-lopsided flat button
Make TWO small open squares using two scrap cords, both pointed with loops facing towards you. The base cords get pulled through the first loop and the outer cords go through the second.

The first flat button was lopsided because it had one joint spot that allowed for a tight angle to form. It made a tear-drop shape. With two joint spots the button is now shaped more like a lemon. Symmetrical. You can also control the exact number of square knots that form the bottom and loop of the button.

/\/\/\/\/\
Spike!
Make that button pointy by forming a gap with the base cords outside the square sequence while making no gap with the outer cords. This forces a sharp turn in the square sequence.
It can be kinda tough to build; it helps to place a temporary object (like another scrap cord, lol) between the base cords and the continuing square sequence, as a placeholder so you don't accidentally tighten the base cords and remove the spike as you build it.
^ I put a spike on my not-lopsided flat button. Pls ignore me fighting for my life with running short on outer cords. I survived.
^ The finished sample! In order: open square, size 4 button, size 6 button, flat button and not-lopsided flat button with a spike.
#Macre-May#Macre-May 2024#macrame#art challenge#this one was dense but SO FUN#I'm also hitting up against the tumblr picture limit lol
0 notes
Text
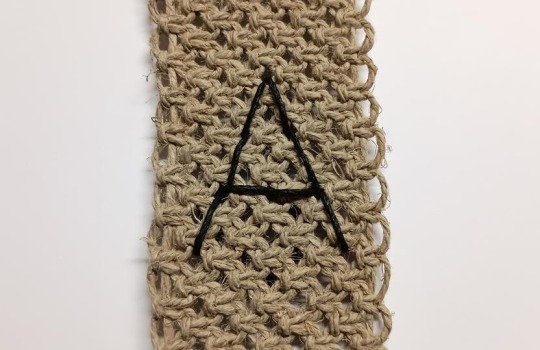
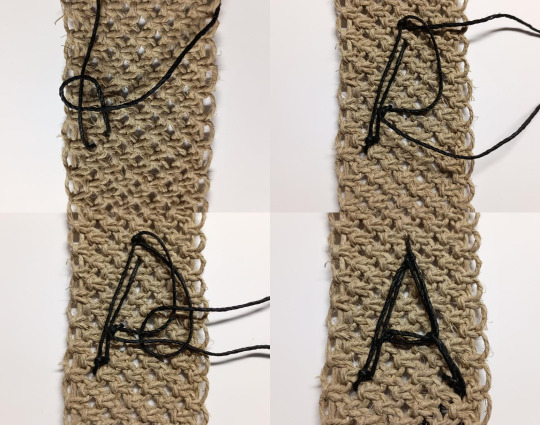
Day 17-18: Stitching
The main difference between stitching a design onto macrame and other crafts is that the string can only pass through specific holes on the alternating square grid:
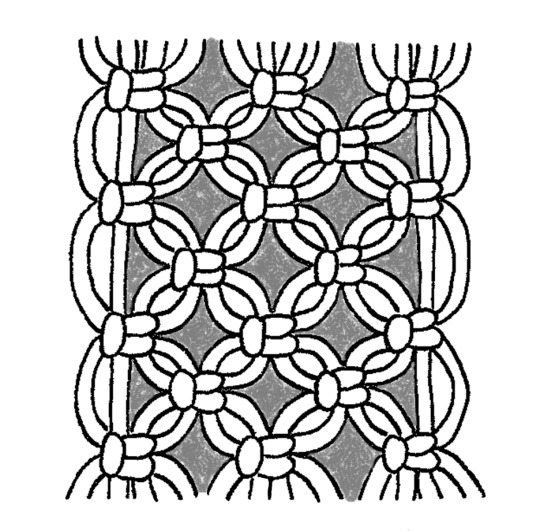
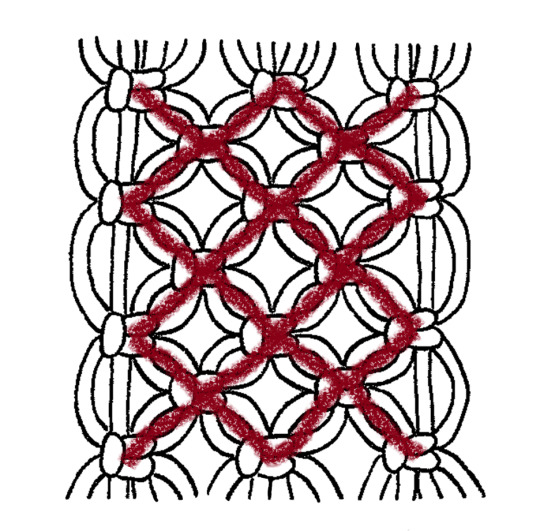
^On the left I shaded the holes that are big enough for string to pass through. I draw these diagrams loose so the space between the two strings between two knots looks big enough, but the grid acts more like the diagram on the right. (And the base alternating square knot cords will be colored similarly in this post.)
So when planning a design to stitch on an alternating square knot, make sure the holes support your design: that there's enough space and it's not forcing a design to be out of proportion.
Stitching cord follows the shortest path. If there's a curve, it will follow the inside of the curve. Holes are kinda diamond shaped, and it can affect the end result.
When cutting cord cut it slightly longer than you may think, especially if the cord is prone to fraying. Then you can trim the ends if the cord starts to unravel as you work.
There's generally two methods to stitching that I'm covering here: One sided and double sided designs
/\/\/\/\/\
Double sided method:
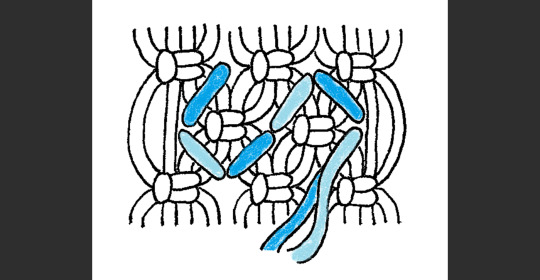
Simple and easy; it puts the same design mirrored on both sides of the alternating square knot. Note that while I colored these diagrams with the stitching string in two shades of blue, it's one cord. But it makes the paths easier to follow.
Choose a starting point and pass the stitching cord through to the halfway point. Then weave the cords over and under, and with the two cords it forms a continuous line on the surface.
^ The little arrows are pointed to the starting points. When you're trying to make a complex design that has forks in the path you can stitch with multiple cords like on the left, or have one cord branch off and come back, like on the right.
Very neat! Secure the cord with an overhand knot on the back, or in an obscure corner if you're really using it two-sided.
You can make the design bold by going over the path a second time but be careful- passing many cords through one hole can make it crowded and difficult to add more.
/\/\/\/\/\
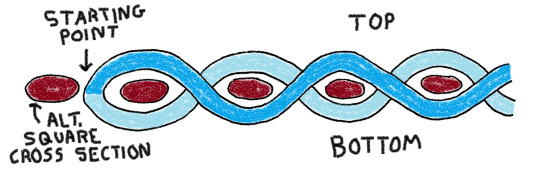
One sided method:
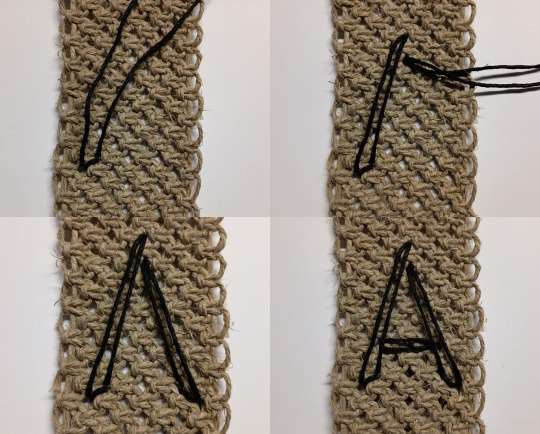
The idea behind a one-sided design is that for the most part both cords are on the front surface and only stitch onto the grid at curve points. I found it's very hard to keep both cords right next to each other, so the cords tend to have a space between them. Play around and find a design path that uses this to its benefit!
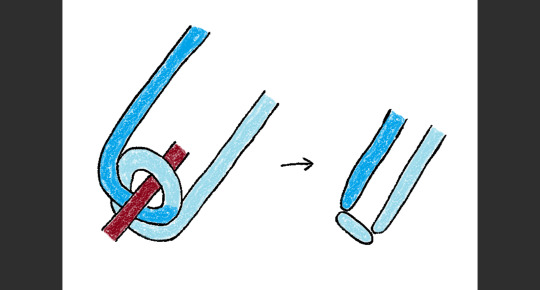
^ In the above sample, the ends are made thicker by looping the stitching cord twice around the starting point.

^ The back of the sample.
/\/\/\/\/\
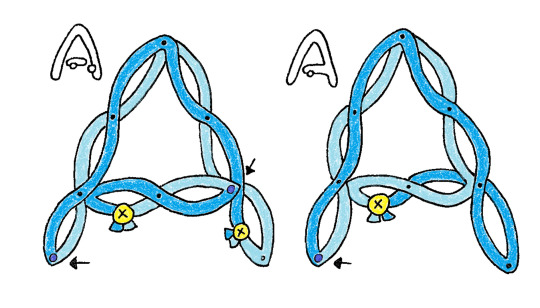
Cursed one sided method:
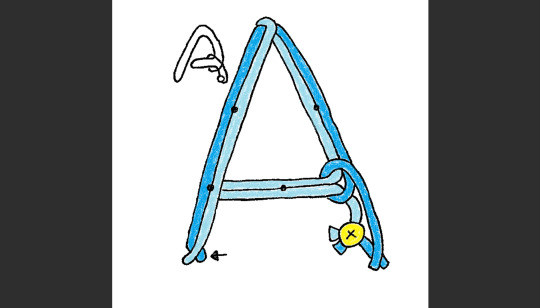
I drew this one and then tested it out and I gotta say, it didn't work as well as I thought it would. The idea was that one cord would hold the other in place at a junction without needing to stitch onto the grid.
Straight up janky. And difficult to get it set just right.
I also used this method to make the ends a bit thicker...
...and this method at curve points...
...but none of these methods really worked out.
I tried it so you don't have to!
(Macre-May Prompt list)
0 notes
Text
Day 15-16: Flashdrive tag
This one's a simple project. You can put it on keychains and bags, but my favorite spot is flashdrives because if you have multiple it can be confusing which is which. I also have had trouble forgetting them in computer labs because they can be small and hard to spot. I haven't had that trouble since I started doing this:
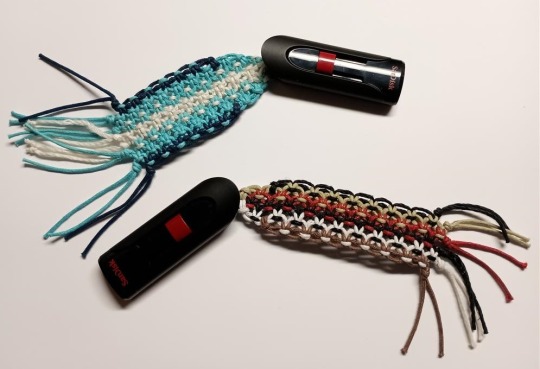
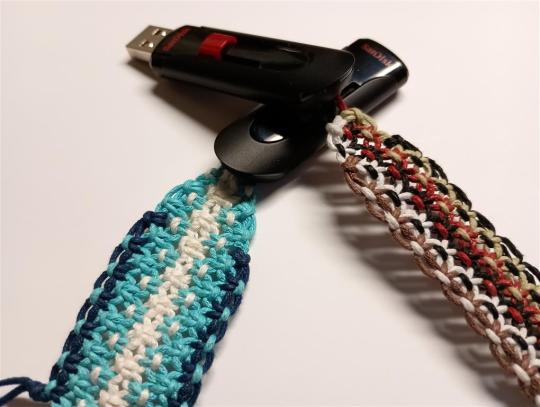
It's a nice beginner project because you don't need to measure exact lengths of cords and it's a nice way to show off colors. Art stores will often sell cord in color palettes and if you're looking for an easy project to apply a favorite mix of color, I totally recommend these.
ALSO these tags allow you to create wide samples of alternating square knots. If you want to plan new 3D projects it's super handy to have a bunch around to compare number of knots to lengths, how alternating squares would fold, etc.
Say I'm planning a project that is 12 rows of alternating square knots, I would reference a tag to see how long 12 rows actually are irl and use that to calculate the Project Length of a 12-row project.
/\/\/\/\/\
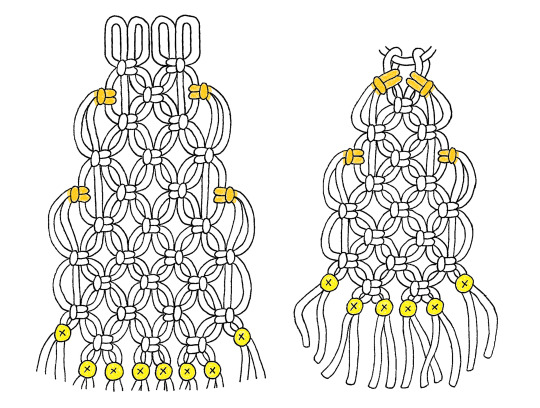
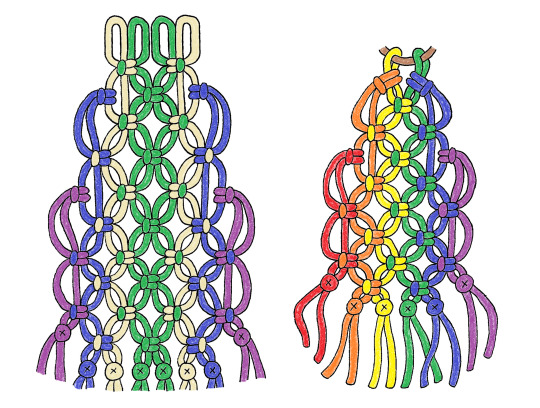
^Diagrams based off above photoed flashdrive tags. I tend to use the slow cord addition method for widening the tags.
Cord lengths are all relative to the center; cut a decent length at about 4PL so they're 2 PL folded in half. Added cords are shorter and measured as you go. When you're done adding cords to the outside just keep making knots until you run out of string, and finish with overhand knots.
Note that on the tag to the left, some of the square knots are in the other direction, built starting with the right string rather than the left. This makes the color stripes more symmetrical, for tags where you want the left and right to match as much as possible.
They're very fun to make; I've made a bunch of flashdrive tags for me and my family:
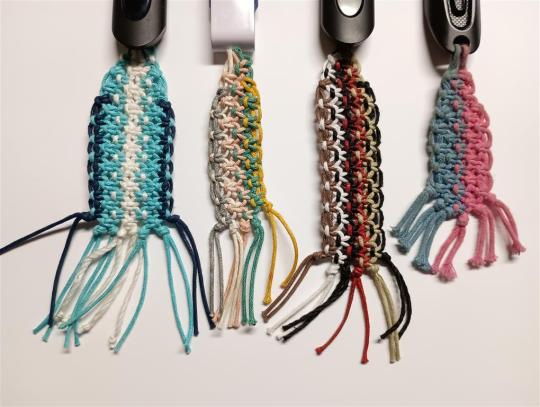
(Macre-May Prompt list)
0 notes