
Hello everyone! I started playing the sims 2 years ago, and I immediately loved it! Recently I started making cc for the sims 4, I still have a lot to learn, but I hope you appreciate my work! You can also find me on TheSimsResource
Don't wanna be here? Send us removal request.
Statistics
We looked inside some of the posts by lollesims4 and here's what we found interesting.
Average Info
Notes Per Post
15K
Likes Per Post
11K
Reblog Per Post
4K
Reply Per Post
122
Time Between Posts
5 months
Number of Posts By Type
Text
10
Photo
6
Video
1
Last Seen Tumblr Blogs


Fun Fact
There are dozens of funny blogs to kill time on Tumblr.
Text

[Dead Site Repository] - Looking for archives!
Hey everyone!
A semi-promotional post, on a feature not many knows about, but meant to be really useful—the Dead Site Repository!
💀What is the Dead Site Repository?
A simpler way to give old content a second chance at life!
Whether the original website is gone, the download links are broken, or the creator has retired and having many broken items, this is a place where those lost treasures can finally rest in peace—or be rediscovered. 😉
Why Simblr.cc's Repository?
I designed this with easier navigation in mind. While we’re all undoubtedly grateful for resources like SFS archives or Archive.org for preserving content, it can sometimes be a challenge to figure out what those items originally looked like.
And let’s not forget how tricky it can be to contribute your own content, especially if you happen to have that missing piece of a set!
One of the features I’m most proud of is that it’s fully collaborative! Meaning that you can add Files and Images to a site yourself too, even if someone else already made said collection.

Now with that out of the way...
🆘Help wanted!
Particularly, TS1, TS2, TS3, TS4, and TSM.
Whether it be sharing the page with other simmers, or your own contribution, any help will do! The mission of course being: Getting as many dead sites a "Rest in peace" they deserve, while also *technically* reviving them again.😉
📓What to do:
Creating a "Dead Site" Repository:
(If the site isn't in the 'dead sites' list yet) - Let me know via commenting on this post, or on the simblr discord the SITE NAME and, if possible, the URL. Optional, but If the site had a banner, or you made one for it, feel free to share that too!
Start a Collection. ... or update an existing collection! 😉
Each repository/dead site can have multiple games! However, make sure to tick the correct game when making a collection...

A Collection is sort of like a "set" or the "folder" of that content. Make sure of the following: If it's a Set, you use the set's name. If it is one item, you can title it that one content (i.e 'Ophelia hair'). If there's too much content to make a collection for, feel free to use “categories” instead. For example, if you have a bunch of hairs, just call them “Hairs” (EXAMPLE REPOSITORY).
However, please do at least attempt to sort them if possible! This will make it easier for people updating that collection! In the end, it's a community effort. 😉
🔍What sites are we looking for:
Sites in this case is a really broad term! But when I say 'Sites' I mean mostly:
Tumblr blogs
Blogspots/Blogs
Livejournals/dreamwidth/etc.
Original websites (Creator's original website)
Forum posts where the post/download is now missing.
...and when in doubt, feel free to ask!
There are a few criteria for the site to be considered 'dead'. I've already briefly mentioned, but for ease will mention here:
Sites of which the site is still online, but the creator is retired and now has broken CC links.
Sites that are no longer online/can't be reached (make sure this has been the case for a minimum of 1-3 months!)
Download/Blog Posts that have been deleted off of a person's blog. (Think: Someone retired as a CC creator and deleted all their CC).
.... And as always, feel free to ask when in doubt!
💬Questions:
❓ "I'm a creator who has already archived my old CC on SFS, but I'm still actively creating. Can I upload my older content here too?"
Of course! If you find the layout much more helpful for your old content, you can always use it too! Just make sure to reach out to me (@greenplumbboblover or message this blog) and I will create the repository for you! 😉
❓ "I don’t have the original images for that content/set. Can I take new screenshots in-game and use those instead?"
Yep! In the end, we only want to know what an item looks like, so any visual idea (as long as it's not a Paint drawing lol) will do! Do note though: Images *are* Optional. So you don't have to upload them with it. Sometimes someone might still have them laying around!
❓ "Am I allowed to cross-post from, let's say, TheSimsGraveyard to here?"
Sure! As long as the original place is totally cool with it, I don't see why not. 😉
❓ "Is NSFW stuff allowed?
It is, but it will have to adhere to the guidelines of the site: https://simblr.cc/tou/
❓ "I have a feature request!"
I always love to hear more about how to improve the website, so if you have any bugs, features, feedback, etc. Totally share it! In fact, I really appreciate it if you have any! ❤️
... and if you have any more questions, feel free to ask them! There are just some from the top of my head.
And if you don't have any of the content, or anything to help: Reblog! Share the post, etc. That way we can really set off this project together!
Thank you all for reading! Especially if you made it till here (hello, cool person!👋🏻)
284 notes
·
View notes
Text
Blowtorch and todays Patch (August 3, 2023)

Today's patch auto-repaired all the game files, and that means that you need to REINSTALL Blowtorch.
Use your copy of the mod in the Blowtorch folder or redownload here:
Due to filesize all the downloads can be found on Patreon (of course for free): Download Blowtorch (Patreon, always free)
Or SimFileShare: Download Blowtorch (SimFileShare)
Read more about the mod, which hides all modern stuff, here.
Detailed instructions how to install here.
54 notes
·
View notes
Photo


[KIKIW]Right-angle shoulder slider
♥Slider used to adjust the size of the sims trapezius muscle
♥Control available on shoulders
♥Female/Male
♥Female: Adjusted the size of the trapezius muscle and the height of the shoulder
Male:Only adjusted the size of the trapezius muscle
♥ DL:Patreon(VIPⅢ)
⭐Reuploading to any forum or website is not permitted. Repacking is not permitted. ⭐
491 notes
·
View notes
Text

The Sims 4 Reflection Emulation For Blender 2.9 and UP
(DOWNLOAD HERE)
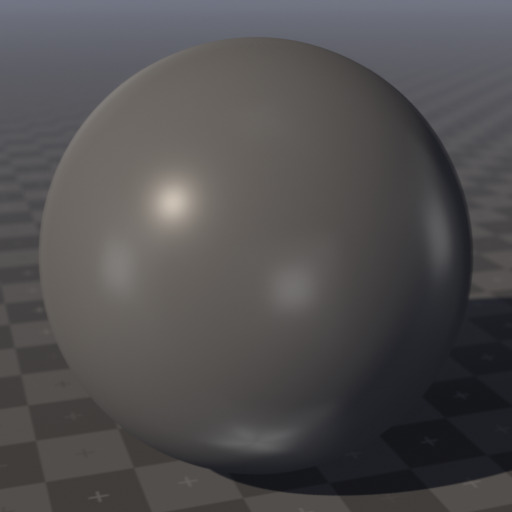
Making a specular texture in The Sims 4 is probably the most misunderstood process of the game's engine. Making a combined map without a guidance from the company that composed it can be a bit of a nuisance!
For a long time, creators would pick the color from EA's objects and go for that, but there's a method to everything!
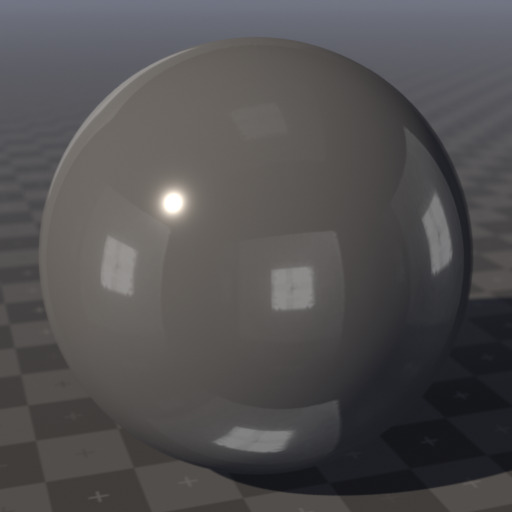
This Blender file i created lets you emulate the reflection system of The Sims 4 FULLY and in real time.

How does this work? Basically, the RED channel of the specular map determines the roughness of the reflection, the GREEN channel determines the opacity of said reflection, the BLUE channel determines the roughness of the sun highlight and the ALPHA channel determines the opacity of the sun highlight.
In the blend file, you can either use the RGB color wheel to pick a shade to use on your specular texture project, or test the specular map itself!
I will provide some useful presets you can pick from for common materials as well!
1: Shiny metal with polished surface: FFFF00 / Alpha 100%
2: Thick rubber with porous surface: 0064FF / Alpha 100%
3: Shiny polished wood: DB9282 / Alpha 50%
4: Shiny plastic: FF84B3 / Alpha 100%
5: Rough plastic: B3C5EB / Alpha 65%
6: Very matte while still realistic: 0B34FF / Alpha 70%


1K notes
·
View notes
Text
How to Add a Single Flame to Your Candle (Base Game) Part 1

A huge thanks to @ravasheencc for teaching me how to do this in the first place!
So far, there is no base game candle that has a single flame that works the way lights do, so in order to make one that is Base Game Compatible, we have to create our own custom tuning. Because I wanted to be very detailed, this tutorial will have a lot of images and will be broken up into multiple parts.
This tutorial assumes you have already created the mesh for your candle. It is best that you go through the steps of this tutorial before you add swatches to your candle, as you will need to edit the Object Definition for each swatch.
This tutorial will not teach you how to give your candle a light source. That requires vertex paint in Blender and you can find a tutorial for that here.
Keep reading
139 notes
·
View notes
Photo

As Slot ressources are broken in newly cloned item in S4S since the last patch update, I made a workaround to fix it. This is a temporary tip while the team is working on it.
This tutorial is for CC creators who already knows how to create custom content and how to use Sims4Studio.
Tutorial is available on my website !
52 notes
·
View notes
Text
Studio updates with Windows & Doors batch fix (Windows, Mac)
Hi all, Studio is updating today with a batch fix for custom windows and doors that were broken by the Star Wars patch. The Windows and Mac versions both have this new feature.

For creators, each version also has a feature that allows you to fix the cutout on any new creation by clicking Tools/Modding/Generate Model Cutout From Wall Cutout Texture after you’re finished importing your new wall cutout texture.
For everyone, please read the notes below.
Select your version of Studio to download HERE
Notes:
When the batch fix runs, it will create a backup folder containing the original version of all files it fixed. Please do not discard this file until you verify that your windows and doors are functioning properly in the game. If you encounter a window or door that did not fix properly, please send us the original and the broken batch-fixed versions so the problem can be investigated.
The game has a small glitch with some round windows that causes a subtle line to appear at the edge of such windows when no wallpaper is on the wall in which the window is placed and the wall is facing a certain direction. EA windows do this too (see pic below), so this is not a problem with the batch fixer, it’s a game issue. You will not notice this line once wallpaper is applied to the wall.

Running the batch fix on a window or door will cause a new resource to appear in the Warehouse view of that file. This resource records the batch fix version that was applied to the file. If you add new broken windows or doors to the same folder in which this file is placed and run the batch fix again, this resource allows Studio to skip over this file instead of fixing it again.
This batch fix took quite awhile to complete because of the immense variety of doors and windows created by our community. Andrew deserves kudos for sticking with this project even when, at times, it seemed impossible to complete.
2K notes
·
View notes
Text
HOW TO FIX YOUR CC DOORS AND WINDOWS by Xineas
**NOTE: This is a tutorial written by my wonderful husband who got tired of hearing me complain about the broken CC windows and figured out how to fix them. Feel free to share this around. I am hoping for a batch fix but in the meanwhile, if you can calculate, you can fix the windows yourself. If you have questions, feel free to send me an ask and we will get back to you.**

The issue:
EA added a “ModelResourceCutout” item for every object that needs to cut out a piece of wall to show up correctly. The actual object is actually there, you can see the door handles in the example picture above. (beautiful doors by @peacemaker-ic )
The Sims4Studio developer is working hard to get a batch fix working so the creators don’t have to manually add the correct values for each item, but it’s unsure when this’ll be ready and if it will fix all windows and doors. Some are quite eccentric from a shape perspective, meaning ROUND, CURVED or otherwise not a rectangle.
All that is needed is a bit of math and a bunch of trial and error. Oh, and patience is useful. I’m warning you, doing this 40 times over is tedious, but once you get the hang of it, it’s easy. You just need to do a bit of basic math and to be able to think in 2 dimensional space.
The math
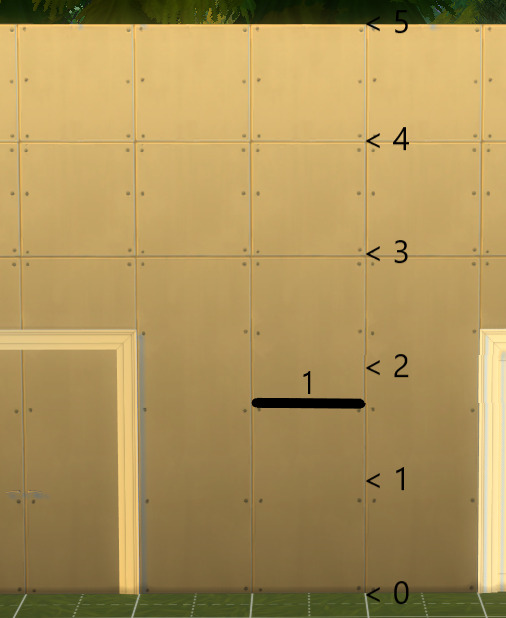
There are three height variants when it comes to walls. Short = 3 units high Medium = 4 units high Tall = 5 units high
Regular walls are 1 unit wide, diagonal walls are Sqrt(2) wide (Pythagorean theorem), which is 1,414. When making these cutouts, 1 decimal place accuracy is generally plenty. The frames of the doors and windows give you a little wiggle room. When you are making more interesting shapes, use 2 or 3 decimal places to give yourself a bit more accuracy.

Let’s apply this magic to a real world example. EA wants you to add an item called “ModelCutoutResource” item to your object, which consists of any given number of lines in a 2D plane. Remember, this is a 2 dimensional cutout, depth is nonexistent, it just cuts out the whole wall, wherever we tell it to by connecting the dots.
Each line consists of two points, a start and an end. I could tell you how to do it all day long, but doing it and getting it are more important. On to the example. This door with it’s entire frame is 2 units wide and about 2.4 units high. You want your cutout to be IN THE FRAME, however. If you put your cutout at the outside edge, you will have an ugly gap on the sides of the frame an nobody wants that. So guesstimate (or extract from Blender, but I have no 3D modeling knowledge so will not go into that) the correct values, place your objects in game on a blank wall, look at them from the side and put a ruler to your screen if that makes your life easier.
With our door here we need to make a rectangular cutout. This is easy, just 4 points to define. The points do in fact have a third value (x,y,z) but the z-value is always 0. Perhaps EA has wild plans with this in the future, but for now every single z-value is 0.

Using our gathered knowledge, we can now define 4 clear edges for our door. I always start bottom left, it’s a habit, it doesn’t matter, as long as you make a loop with your lines.
Your lines will now be as follows:
A to B, B to C, C to D and D to A. Let’s put this into Sims 4 Studio.
Editing the package:
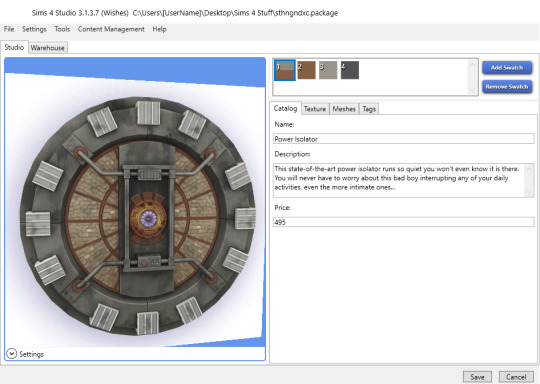
Open your package in Sims 4 Studio.
Select the Warehouse tab.
Select the Model item (don’t do anything with it, just click it, this way S4S knows the “Instance” value and you don’t have to copy-paste it)
>>> projects which have a separate model for diagonal walls will have TWO model items, you will have to make a cutout resource for both, which their respective instance values.
Click the ADD button bottom left.
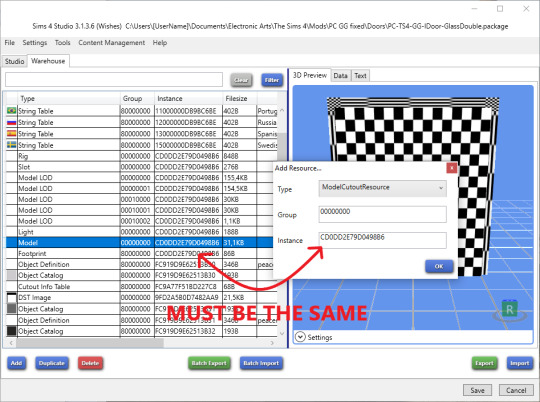
Select the type ModelCutoutResource, check that the Instance is the same as your Model and smash the OK button. You will now have a new Resource called “ModelCutoutResource”, all the way at the bottom. So scroll down and click it. ;) You will see “Edges”, which we’ll be adding soon. But first, very important, your cutout will not work if this is not set correctly….. Set “Version” from 00000000 to 00000001.
Now click the “Edit items…” button so we can add the edges with our previously done math.
For objects that are rectangle, just click the add button 4 times, then we can fill them in.
Each “Edge” has a PointA and PointB, which I’ve shown in the image below for A, B, C and D.
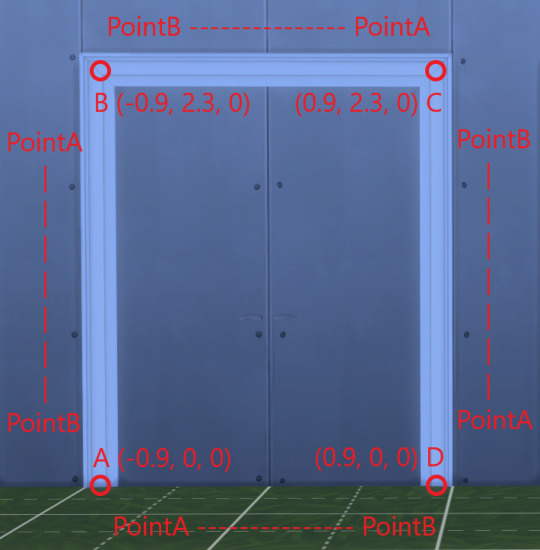
We can now fill in the values.

Make sure to destinguish commas and periods. Very important. Periods are used for decimal values, commas are used to separate values. Click Save. Then click Save again.
If you have multiple doors/windows that are the exact same shape, LUCKY YOU, click the export button to export your “ModelCutoutResource” resource and save it as a binary. This way you don’t have to keep entering tedious coordinates into PointA and PointB. On your next door/window you can then select Model, add the ModelCutoutResource, select it and then click the import button to import your previously exported binary. This way you can skip all the other steps and make your life easy.
CHECK AGAIN: - “Instance” value is the same for Model and ModelCutoutResource - “Version” of your ModelCutoutResource is set to 00000001 and NOT 00000000
Test it in-game:
Did you do it correctly? Check it in game. When I fix a set for my wife’s simblr, I usually first place all items in my game, then scribble some calculations on a piece of paper, then edit the packages and then check in game at the end. Then you can do some minor adjustments if necessary and fix those before doing a final inspection.

Once you get the hang of it, it is easy. You get a feeling quite quickly for which numbers make sense and which don’t. Plus, if you do it wrong, it will just show you a weird cutout in the game and you learn from it.
Now on to the more interesting objects, curves and circles:
Windows, doors and arches which have curves are no different, they just have more points and thus more lines/edges you need to connect to make a loop. You can even make two loops if your window or door needs two cutouts.
For these more ‘advanced’ cutouts, it does help if you have at least some knowledge of Trigonometry. It certainly makes your life easier if you’re going to attempt this. I studied in Uni to become a Maths teacher, so that’s clearly an advantage. You at least need to understand how to find out points on a circle to make arches.
Alternatively, you can export the coordinates from Blender, but that’s not my cup of tea.
I’ll make a separate tutorial on round or arched cutouts.
**So again, all thanks to my husband for this tutorial… please pass it forward. You don’t need meshing knowledge, math will get you through it… oh and also, @peacemaker-ic if the batch fix doesn’t work out, let us know.**
@maxismatchccworld
2K notes
·
View notes
Text
Studio updates for Journey to Batuu
Hi All, Studio is updated for the new game pack (Mac & Windows). Window/door batch fix info below.

Choose your version to download HERE.
Work on a batch-fix for windows and doors continues. It’s looking like a batch-fix will be able to fix most if not all windows and doors.Unfortunately, 9 to 5 work doesn’t allow full-time development, but it will get done asap. Our community has created an extremely varied collection of windows and doors (love it!), so a fix requires addressing that variety to include as many as possible.
1K notes
·
View notes
Text
Renaming Your CC for a Faster Game
I saw a post about this over on GOS and I thought that I’d write a little tutorial on doing this, as I’m awful at following anything but the most simple directions and I know that I’m not the only one haha! I take no credit in finding this out, just for writing this in a very simple way haha!
You need: Bulk Rename Utility CC is a huge part of our game and often the undoing of our much loved saves. It’s very easy to accumulate CC, yet we know that it can cause our game to lag. We’re a hardy (and stubborn) bunch in the Sims Community and lag time of up to an hour is not unheard of. A large part of the lag is often down to the game’s inability to read characters and spaces in file names. It’s pretty common to come across a piece of CC that has some sort of symbol in the name; “[]” and “~” are pretty popular. Did you know that the game can only understand underscores (_) and hyphens (-)? Even a space can spell disaster! By removing all other characters and spaces, the game has an easier time understanding and loading our CC. But imagine having to go through several gigabytes of files to fix this problem This is where the Bulk Rename Utility comes in!! It does the work for us. 1. Download and install the program in the above link. 2. Back up your files (optional but probably a good idea). 3. Load the program and find your CC folder (for your game of choice, this works for TS3 and TS4…and possibly TS2). 4. Select all of the files within that folder. 5. We’re interested in the section with the header “Remove (5)”. 6. Click in the text box marked “Chars” and hit the space bar. This will remove all of the spaces in the file names. 7. Tick the box marked “Sym.” This will remove all symbols. 8. Click “Rename” in the bottom right hand corner. 9. If you have multiple CC sub-folders, repeat for all of them. 10. Play!
4K notes
·
View notes
Video
how to temporarily “fix” cc windows!!
find a base game / expansion window that’s almost the same size
hold alt and line it up on top of your cc window
press [ to make it as small as you can
click to place it :)
it also works for doors too! just put an arch on top of them!
1K notes
·
View notes
Text
Some help to fix windows and doors
Open you package with Sims 4 Studio:
1- In warehouse tab, click on Add button,select “ModelCutoutResource” and click on OK.
2- Copy the instance value of the “Model” and paste it to the Model Cutout.
3- Change the value of the version to 00000001.
4- Slect the Model Cutout and click on “modify elements”, on the right.
5- Click on Add button to add the good number of edges your door/window need.
6- For each edge, you will need to enter coordinates of two points in this format: X,Y,Z.
(see the post of simguy80 to understand how it works :https://sims4studio.com/thread/22110/patch-breaks-rendering-certain-windows?page=1&scrollTo=148369)
Personaly, I export the mesh of the window/door to a 3D editor program and I create a plane in space to delimitate the cutout aera. Then I search the coordinates of the points.
7- Once you have entered all values, save and test the object in game to see if all is good :).
I hope this can help!
611 notes
·
View notes
Text
Tab & Live Mode Camera Mod

I was having a bit of a problem with the previous versions of this mode due to it being near 5 years old. It was causing sims to slightly disappear from the chest up from what I assume was a glitch related to the FPS controls. So I fixed it!
This original mod was created by Buckley and was later updated to a newer version by Szielins. It works exactly the same, I simply up-updated to work correctly with the new camera controls introduced with the FPS (First Person) update. Like other game altering mods, these package files should only be directly in your mods folder, or ONE folder deep. Let me know if there are any problems!!!!
Most recent update: ( 12/12/2019 ) 1.59.73.1020 (Though it should work with any new updates as long as they do not change anything with the camera.)
Made With: S4PE & Atom
Recomended Mods: TwistedMexi’s Build Camera Mod
DOWNLOAD
932 notes
·
View notes
Photo


Cute door mats for TS4!
New Mesh
Basegame
19 swatches
I hope you like it <3
Download:
- Mediafire
- ModTheSims
You can recolor and include the mesh, but please, credit me ^^
#Sims 4#ts4#MYCC#CC#rug#door#mat#cute#tropical#coastal#sunflowers#new mesh#basegame#outdoor#garden#furniture#deco#decoration#3d#pineapple#welcome
39 notes
·
View notes
Photo


After long time, i made another princess dress ^^ There are 2 versions: - V1 the skirt don't move with sim legs (sitting poses don't works with this version); - V2 the skirt move with sim legs (sitting poses works with this version); I prefer the V1, in the V2 the movements aren't so smooth, but i tried my best ^^ -You can have one or both versions at the same time, they not ovverrides!- For any problem, add a comment below and explain, i'll try to fix ^^
-8 swatches -New Mesh -Base game -With Custom Thumbnail
Download: Thesimsresource
You can recolor and include the mesh, but please, credit me ^^
#sims 4#sims4cc#ts4#CC#MYCC#disney#princess#Belle#dress#colors#yellow#beauty and the beast#new mesh#basegame#gown#formal#party#victorian#historical#download
1K notes
·
View notes
Photo

Snow White dress for the sims 4
EA mesh edited by me City Living is required With Custom Thumbnail
Download at: TheSimsResource
You can recolor my CC, but please, don’t include the mesh!
91 notes
·
View notes
Photo

Vintage Paintings
New Mesh, base game compatible, 16 swatches
Download:
Mediafire
You can recolor my CC, but please, don't include the mesh!
24 notes
·
View notes