
Lynn Beck|vector art, 3D art, and sometimes actual drawings (digital and traditional)|they/them|panromantic aegosexual|23
Last active 60 minutes ago
Don't wanna be here? Send us removal request.
Statistics
We looked inside some of the posts by lynnbecksart and here's what we found interesting.
Average Info
Notes Per Post
143K
Likes Per Post
88K
Reblog Per Post
54K
Reply Per Post
172
Time Between Posts
4 days
Number of Posts By Type
Text
16
Note
1
Last Seen Tumblr Blogs


Fun Fact
Tumblr was attacked by a cross-site scripting worm deployed by the Internet troll group GNAA on Dec 3, 2012.
Text

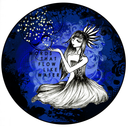
Slapped this together in Xara as part of a sticker-sheet I'm making (for myself; I have no plans on selling it, mostly because the other stuff on it at time of writing are some console logos and a Nintendo logo parody). This one's going to go on my laptop!
For the record, the method I used to get the text to look like the top part of the "modern" Club Penguin logo is this (which will probably only help if you use Xara, and even then it might only work with older versions):

7 notes
·
View notes
Text
Reblog if your art project has not, does not, and never will make use of generative ai at any point in your creative process.
#not art#yep#like the art software i use is. a decade-old professional vector art program. and blender#(and paint.net sometimes)#reblog
13K notes
·
View notes
Text

Messing around with Blender's contrast and colour options. And also some experiments with putting images in front of the camera (alternate view further down to show how that works).
Image rendered in Blender; characters and textbox drawn in Xara Designer Pro.

4 notes
·
View notes
Text
Messing around with Blender's contrast and colour options. And also some experiments with putting images in front of the camera (alternate view further down to show how that works).
Image rendered in Blender; characters and textbox drawn in Xara Designer Pro.
4 notes
·
View notes

Text
More normal map funtimes! A screen-headed lady in an alleyway at night.


Left to right: texture/alpha, normal map, illumination map.
4 notes
·
View notes
Text
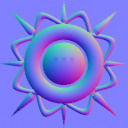
Some kinda lady with a ring for a head!
You might notice that her head is kinda. Pixelly. That's because it's actually a 2D prerendered sprite, enhanced with the magic of normal, specular and emission maps to fake directional lighting and shading!
Head textures below, along with a tutorial explaining how to make normal-mapped images.


(clockwise from top-left; colour/alpha, normal, roughness, emission)
Ok so basically. Here's how you make a normal map from a render:
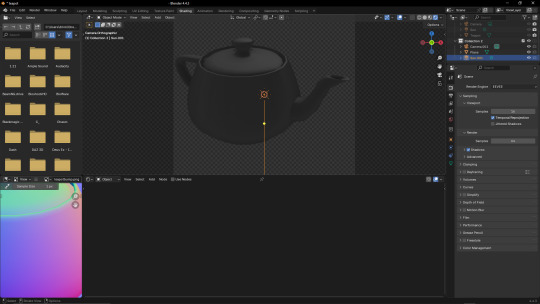
Step 1 - use shift+a to make an object.

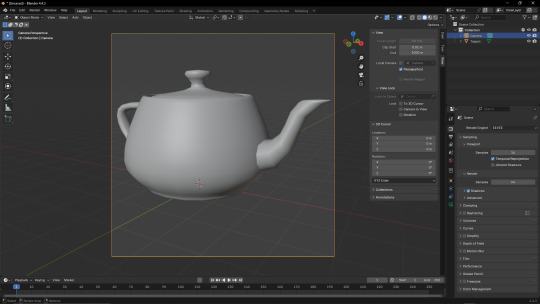
In this case, it's the good old Utah Teapot, a version of which is included in the Extra Mesh Objects extension (which you can download from Blender's Preferences -> Get Extensions menu).
Step 2 - add a camera and set it to your chosen viewpoint
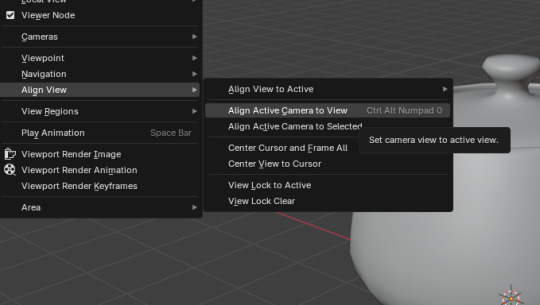
Protip: go to View -> Align View and select Active Camera to View.
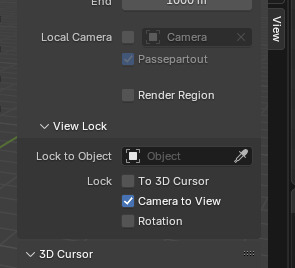
Then, while in the camera view (numpad 0, if you have one), press N and, on the right-side panel, navigate to View, and under "View Lock", click "camera to view". This allows you to move the camera using Blender's normal camera controls. Be sure to turn it off if you want to leave the camera view, otherwise you can mess up your intended viewpoint.
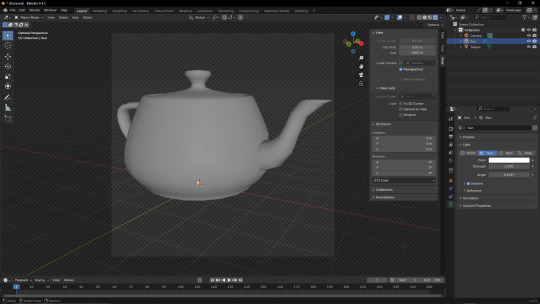
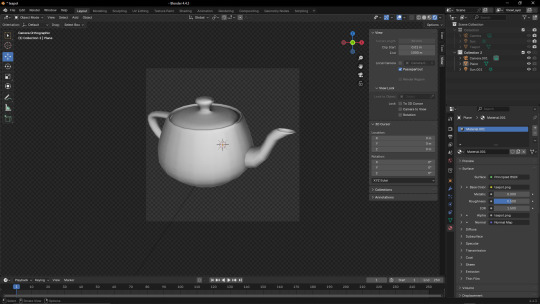
Step 3 - mess around with the camera and image-size settings
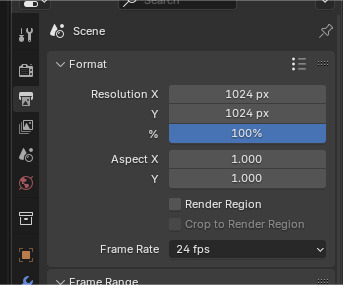
Ok so what you want to do first is change your image's resolution. For this I'm setting it to 1024x1024, but you can make it whatever size you want.
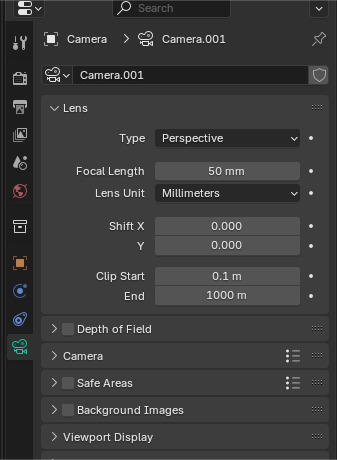
If you want to, you can also fiddle with the camera settings, but I'm keeping them standard because it's easier than explaining what everything does.
If you've been following this properly up to this point, your window should look something like this, and you're ready for the next step;
Step 4 - rendering your image, but also there's some stuff to do before that before that
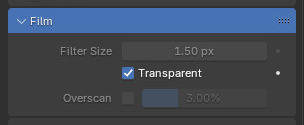
Ok so go to the search-bar on the right and type "transp", then click the "Transparent" box under "Film" on the Render tab. This will make the render's background transparent; remember this, it will come up again later.
Next, add a Sun (shift+a -> Light -> Sun) and point it away from the camera's position (this is easier if you switch to wireframe); the position of the Sun doesn't matter, just its rotation (since it's a sun, and just kinda. Projects directional light at everything that isn't covered by an object. Kinda like the actual sun does). I also recommend fiddling with the Sun's Angle parameter. Just make sure the light is, like, "even"(?) on the object (since having too many prominent shadows or highlights will look weird once you get the Normal Map set up).
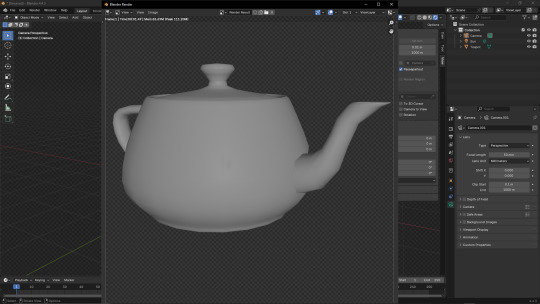
Press F12 to render your base image. I'm using the Eevee renderer because I don't want this post to take longer to make than it probably already will. Save the image somewhere memorable, preferrably a folder dedicated to this project. Save the model there too, while you're at it.
Step 5 - the easy bit
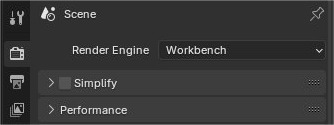
Go to the Render tab and change the Render Engine option to "Workbench".
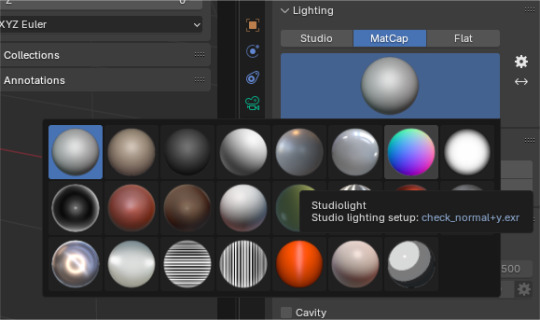
Change the "Lighting" option to MatCap, and select the second-to-last option on the top row.
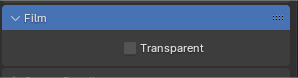
Remember the Film -> Transparent thing from earlier? Told you it'd come back. Uncheck it, the next thing requires it.
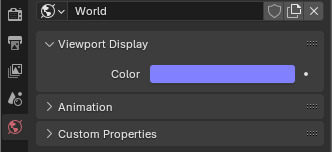
Go to the World tab, go to Viewport Display, and change the Colour thing to the hexcode 8181FF (or, if you're a nerd who manually puts in their RGB values, 129 129 255).

If you try rendering now, you'll notice it looks kinda off; it's all washed out, and maybe even the wrong hue.. That's because there's one more step before you can start messing around with normal maps!
Step 6 - I had to figure this out myself and good gravy do I wish I knew about it before

Fun fact; Blender has colour-correction! And to turn it off. All you have to do is go to the Render tab, scroll all the way down, and under the Colour Management tab, change View Transform from "AgX" to "Standard".
Step 7 - ok back to rendering

Press F12 again, and you should get a beautiful normal map! Save this to the same place as the base image.
Step 8 - hope you like material nodes!!!!
Switch back to Eevee, and hide the Collection all your stuff is in, and make a new one. Hold Alt and rotate your view so that the little angle gizmo on the top-right shows "-Y". Create a camera, right click it and click "set active camera", and then do the "align active camera to view" thing.
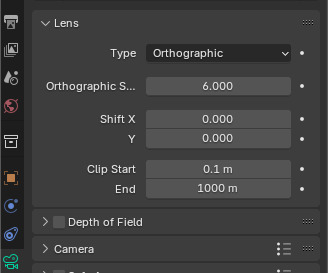
Set the camera to Orthographic. Note that scrolling with Lock -> Camera to View doesn't actually zoom; zooming is instead done via the thing below the Type dropdown.
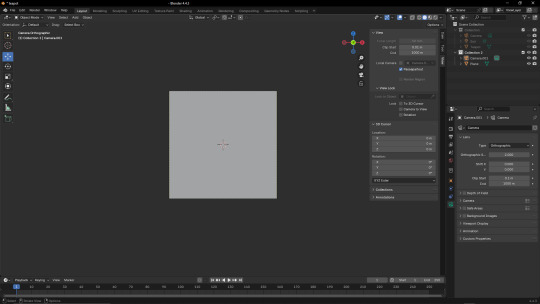
Add a Plane, rotated 90° so it's facing towards the camera, and mess around with the camera controls until it fits into the camera's view.
On the top tabs, switch to "Shading".
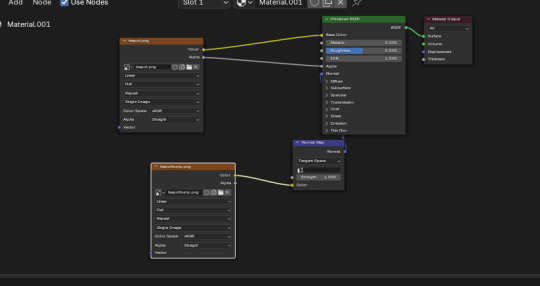
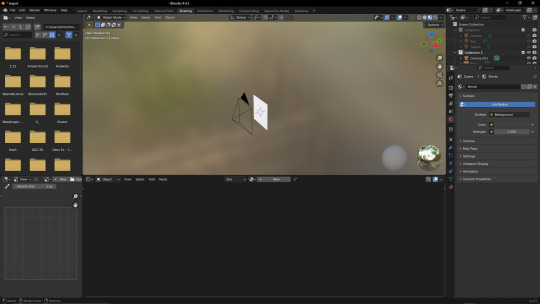
Click "New" on the panel below the viewport to create a new texture (or, if you haven't modified the default texture, use the dropdown next to the "New" button to select that instead). Then, recreate the setup shown in the image.
Add another Sun, and play around with the angle. If you did it properly, the image should appear to have proper shading that changes with the light's position (if it looks weird, play around with the Strength parameter and the dropdown on the Normal Map node).
And you're done! This can be used for a lot of stuff, like I learned about this technique from a YouTube video about Super Mario Bros. Wonder modding.
Anyway I need to sleep. It's nearly 6am in my timezone and I haven't slept. If there are any errors in this post, it's because I was writing this instead of going to bed. Uhhhh good night I guess
Also please ignore that the textures in the bits with the plane don't match the renders I showed earlier; I accidentally messed up the camera's position and forgot to save the normal map, so I had to redo both of them :(
7 notes
·
View notes
Text

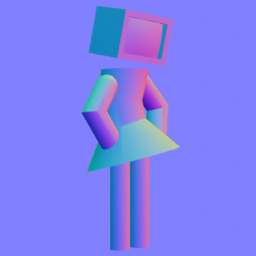
FLOATY: WORMHOLE GUARDIAN GODDESS
An attempt at using Designdoll in conjunction with Xara to draw. A humanoid thing I guess.
This was also posted to Bluesky, which also includes credits for the font. Also the references I made and used.
#lynn beck's art#artists on tumblr#morning reblog#(later than normal because i forgot to schedule the reblog. and then ended up sleeping until like 10am)
6 notes
·
View notes
Text
FLOATY: WORMHOLE GUARDIAN GODDESS
An attempt at using Designdoll in conjunction with Xara to draw. A humanoid thing I guess.
This was also posted to Bluesky, which also includes credits for the font. Also the references I made and used.
6 notes
·
View notes
Text
Okay I JUST realized I never posted these on here—- BUT BASICALLY, about a year and a half ago I started doing these experimental black hairstyle posts that were threads long on Twitter, to give artists a source of inspo for their black ocs whose hair they wanted to try something new with! There’s more to black hair than just the selected styles portrayed in media, and I thought it would be fun to show people how much texture, shape, fades, length, and style can be combined when drawing black hair—-cause it’s a kind of manipulation our hair can do irl! The OG posts were lost with the hacking of my original Twitter account (@/bagels_donuts) but I’ve since reuploaded the whole thread to my new Twitter (@/ItsDonutsFR)! I hope artists on tumblr find these useful, sorry it took me so long to post them here😭🙏🏾 I’ll upload them all in parts!


Part 1: Long masc hairstyles + playing with fades
51K notes
·
View notes
Text


It's done! You can find the Absolutely Ripping It Up pack here.
Tear your artwork. Decay it. Blast a giant hole into it. Go nuts. Note that these are compatible only with Clip Studio!
here’s 200+ freebie brushes | and my brush tag is here ✨
30K notes
·
View notes
Text
Hey guys let me tell you about advance fee scams
I hope y'all are familiar with these in this day and age, especially my artists out there, because they're incredibly common.
About half an hour ago I posted a drawing and tagged it #artists on tumblr, and very quickly received this comment.

My scam radar went off immediately, due to the generic blog name and lack of any emotion in the comment, but I decided it might be an entertaining venture so I dmed them. They asked for a drawing "of these", and sent me a random selfie. I got the details and told them it would be $15, and they promptly offered me $300. At this point I know it's a scam, but I play along for funsies and give them my paypal. Shortly, they send me this image for "confirmation" (I blocked out my email)

And they began to insist that I checked my email. I looked in my spam folder and found the following email.

This is fake. This is not a thing. And the "you're to refund the $200.00 back" is the scam. They send vaguely official-looking emails at you to "prove" that they sent you the money, then have you send them $200 (or however much the scam is for). Then, surprise surprise, you're out $200.
I continued to play along for a bit, and in the second email "Paypal" told me that I had to refund the $200 before they could "credit the $300 to my account", along with these lovely threats.

And yeah, it's silly. But it's not silly if you don't know and get scammed. So. Spread, please! And thank you very much to @mlaurel for the opportunity to get these screenshots.
27K notes
·
View notes
Text

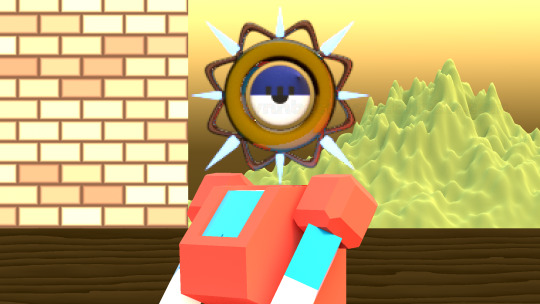
Another Bryce 3D render! This one's some mountains with a few objects thrown in for flavour (including a small wooden table on top of a plateau I guess).
6 notes
·
View notes
Text
Another Bryce 3D render! This one's some mountains with a few objects thrown in for flavour (including a small wooden table on top of a plateau I guess).
6 notes
·
View notes
Text

I have Bryce 3D now. Here's a thing I made while working out the controls!
8 notes
·
View notes
Text
I have Bryce 3D now. Here's a thing I made while working out the controls!
8 notes
·
View notes
Note
any advice for picking fun and vibrant colour palettes that still feel true/recognizable to an object/setting/character's base colours? something about intense lighting?
I've been asked about how I choose my colors by a lot of people and I finally sat down and made a whole ass youtube video about it!
youtube
8K notes
·
View notes