
⚠️ SUGGESTIVE / BLOOD SOMETIMES ⚠️I draw and make costumesInconsistent posting, not very activeI like mecha and masked characters19mechabeetle.carrd.co#my-cosplay, #my-art for filter
Don't wanna be here? Send us removal request.
Statistics
We looked inside some of the posts by mechabeetletmblr and here's what we found interesting.
Average Info
Notes Per Post
787
Likes Per Post
672
Reblog Per Post
108
Reply Per Post
7
Time Between Posts
3 months
Number of Posts By Type
Note
2
Text
4
Last Seen Tumblr Blogs


Fun Fact
BuzzFeed published a report claiming that Tumblr was utilized as a distribution channel for Russian agents to influence American voting habits during the 2016 presidential election in Feb 2018.
Note
Am i allowed to ask how did you make such a majestic Gabriel helmet
Hi, sorry for the late answer, but thank you, and of course!

Disclaimer: most of the times when making cosplays, I just fuck around and find out. Meaning: I won't have templates for most things, exact pictures of the process, or measurements. I included everything I could, and explained everything I can.
Making costumes for me is lots of trial and error, and it still is to this day, as I am by any means NOT a professional. Obviously it'd be easier if I'd invest in sketching things out more and measuring, but that's completely on me.
I hope that nonetheless this somewhat helped, even though it's not a very good "tutorial"...
Please do check out the "Notes:" section at the end of the post for more thoughts, further help, and other stuff!
Tutorial below the line:
𓂃𓂃𓂃𓂃𓂃𓂃𓂃𓂃𓂃𓂃𓂃𓂃𓂃𓂃𓂃𓂃𓂃𓂃𓂃𓂃𓂃𓂃𓂃𓂃𓂃𓂃𓂃𓂃𓂃𓂃𓂃𓂃𓂃𓂃𓂃𓂃𓂃𓂃𓂃
Materials used: ● Paper ● EVA foam ● Pins ● Modeling paste ● Water based prime ● K100 & K40 sandpaper (probably better if you use a mini sander/polisher) ● Hot glue, super glue, white glue ● White and gold acrylic paint ● And of course: scissors, razor blade,

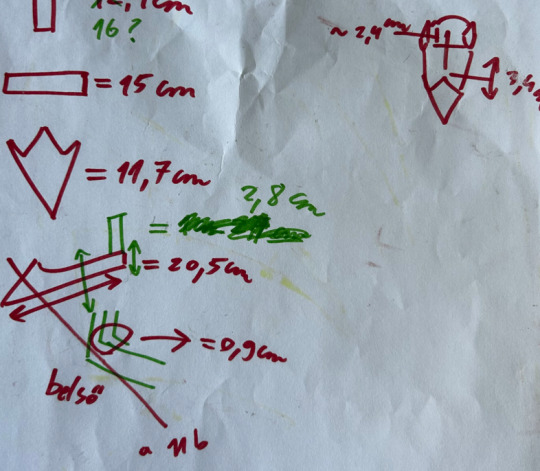
1. Sketching and measuring: One of the first things that is advised to do for anything and everything is to sketch your ideas out. It doesn't have to make sense to other people, if you yourself understand what you're trying to depict. Also make lots of notes, brainstorm, just generally put ideas out so things are more clear for you as you progress. This also includes measuring your head from front, side, and around. When you did, you can then use this very helpful and free template, which you can print out with the measures of your head. Seriously, shoutout to this template, it saved so much time whenever I made most of my masks.
𓂃𓂃𓂃𓂃𓂃𓂃𓂃𓂃𓂃𓂃𓂃𓂃𓂃𓂃𓂃𓂃𓂃𓂃𓂃𓂃𓂃𓂃𓂃𓂃𓂃𓂃𓂃𓂃𓂃𓂃𓂃𓂃𓂃𓂃𓂃𓂃𓂃𓂃
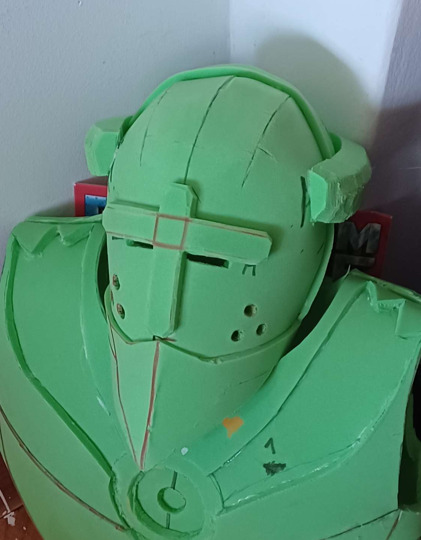
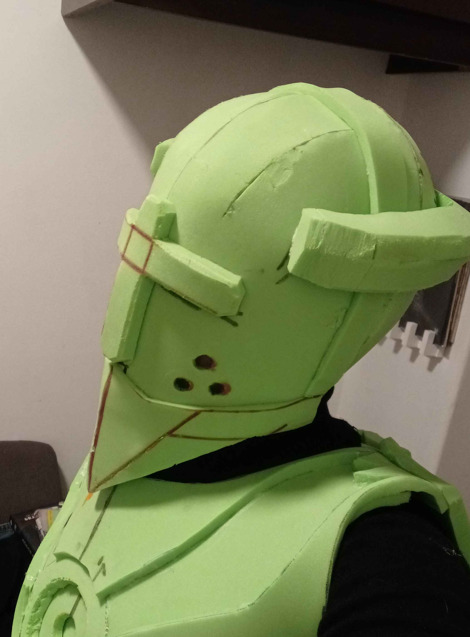
2. Applying the features: The way I put his features on the base template is by using the previous sketches and measurements. But what I do, is I cut them out in paper first, to see if they look good on the base by attaching them on the foam with pins. If it does, I trace it onto the foam, then cut it out a bit longer, to see if by any chance it looks better longer, if not, you can just cut the foam again.
The cross and halo were pretty easy: ● You can just draw a cross and cut it out (if you want to make it "pop out/3D", glue a layer under the shape like how I did in the picture). ● For the halo, it depends on how thick your foam is; ¹you could just cut out three long lines, which are then glued together to make a half circle, then apply it on the head, but I had to do it a bit tricky. Not sure how to explain it exactly, but when I cut a line for the halo, I also had to cut the end a bit "tilted", so I can glue a mini foam triangle shape to it, then cut a line with a tilted cut at the end again, then glued it to the other end of the triangle, and I continued this process as needed. With this, I made a half-circle for the halo. The "beak" is a bit tricky: I had a bit of trouble with this for the first time too, but here is how I did it: ● As you can see on the picture, it's in three seperate parts. The front is a triangle-ish shape with a 'peak' at the bottom of the cross. Under that is another triangle, and then it connects to the part that wraps around the head. ¹: This is because if you just cut out the entire shape of his "beak", and glue it together like that, it'd look like as if he got stung by a bee, because the foam is dense, and it'd pop-out a little. At least for me, it was a reoccuring issue with other parts as well. But again, this depends on the thickness and stretchiness. So tl;dr, you need to make sure that the foam is not "tense", you need to make it "relaxed" by placing multiple parts together to make the desired shape (same case with the base head, halo, etc.). For the cracks in the foam: I used modeling paste to fill those gaps in as much as I could, then used sandpaper to smooth out the edges and excess. For the holes on his cheeks: This is not a recommended idea, as it ruins the foam, but: I literally just grabbed my hot glue gun, and stabbed where the holes would be with the hot tip of it. Not advised, because the foam becomes dense and sticky at that area. It'll also be hard to paint. Mask's vision?: Quote the disclaimer: My peripherial is absolutely terrible in this mask. The front view is okay-ish. What I did for the vision is I cut two thicker lines out of the foam right under the cross, so it's somewhat hidden as well.
𓂃𓂃𓂃𓂃𓂃𓂃𓂃𓂃𓂃𓂃𓂃𓂃𓂃𓂃𓂃𓂃𓂃𓂃𓂃𓂃𓂃𓂃𓂃𓂃𓂃𓂃𓂃𓂃𓂃𓂃𓂃𓂃𓂃𓂃𓂃𓂃𓂃𓂃𓂃
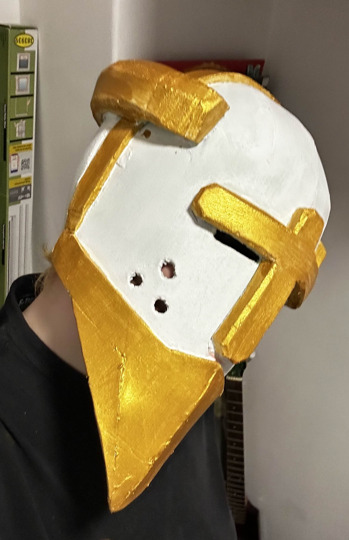

3. Painting and coating: My biggest enemy is the combination of paint and foam. Seriously, I can not begin to explain how much money I have spent on just paint and glue, in attempt for the paint to not chip off, but it still does. (if anyone has better advice for this please let me know!!) Here's what I did so the paint kind of sticks there: Firstly, an advice that I wish I had gotten much, much sooner before starting this project: Coat the area that you want to paint with white glue! This helps so that the paint can stick there longer, and it won't pop-off more easily. You can also try primer, but white glue is better in my opinion, primer just makes it a bit more dense. Then I used a lot of white acrylic paint. If you can just buy white foam, please do so. It'll save so much time and money (and insanity too). I think I had at least 10-15 coats so it looks fully white (the picture is not even the finished one). Note: I don't recommend using spray paint. It dries and chips down faster, also not very stretchy. It's cheaper, easier, but it won't last for long. I unfortunately stumbled into this issue, and it was not a cool thing to see.
I also recommend using a vivid gold color. Previously, I used a more realistic one, but it just looked washed and sad. Give Gabriel some life with that shiny, glittery gold!
𓂃𓂃𓂃𓂃𓂃𓂃𓂃𓂃𓂃𓂃𓂃����𓂃𓂃𓂃𓂃𓂃𓂃𓂃𓂃𓂃𓂃𓂃𓂃𓂃𓂃𓂃𓂃𓂃𓂃𓂃𓂃𓂃𓂃𓂃𓂃𓂃𓂃𓂃

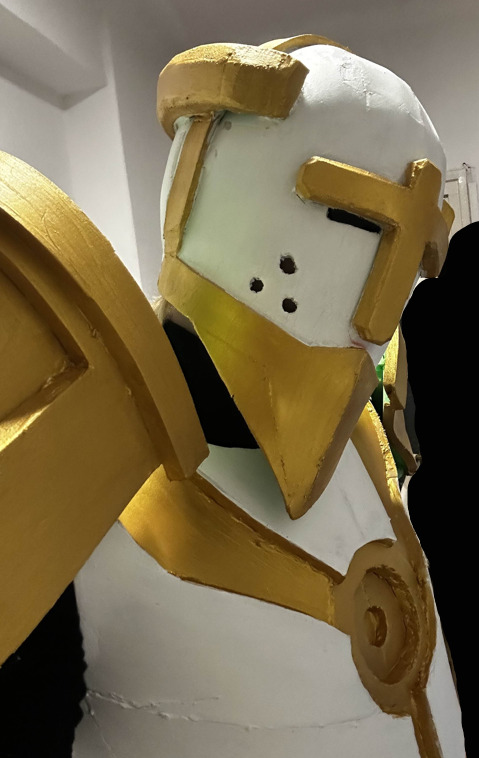
4. After refining edges and making sure that the painting looks nice and sharp, you're done! Again, I hope this somewhat helped. It's a shame that I don't really keep my templates and progress photographed, since it's more just for myself and for fun. I don't really post online anyways.
But, if you have any further questions, or if there's still some confusion, or if something is not exactly clear, let me know!
𓂃𓂃𓂃𓂃𓂃𓂃𓂃𓂃𓂃𓂃𓂃𓂃𓂃𓂃𓂃𓂃𓂃𓂃𓂃𓂃𓂃𓂃𓂃𓂃𓂃𓂃𓂃𓂃𓂃𓂃𓂃𓂃𓂃𓂃𓂃𓂃𓂃𓂃𓂃
Notes: ● I had really thick foam, so I had to manually make it thinner at times. I think foam around 4-5mm. thickness is good for a helmet. The thicker the sturdier; keep that in mind. ○ Again, if you can, please buy foam in the desired colors, so you wouldn't have to deal with a lot of painting. ○ On this topic, breathing is a little hard if the foam is thick, and it also gets warm very quickly. I use a balaclava so my skin doesn't stick to the foam when using it for a long time. If you can endure warmth for a long time, this project especially for you! ● I usually make my helmets smaller in size, so it looks more "accurate". Basically, it's just good for my head, therefore it's not very comfortable. I advise making it a little bigger than your actual head size for comfort. ● The helmet itself took me about 4-8 days max. all-in-all. Unsure about this exactly, because I don't usually look at the time when I make costumes. ● Please be careful with using darker colored sharpies!! It took me a while to hide them with the white paint especially. ● Don't be afraid to put personal creativity into the mask! My previous masked had horns instead of halo, but I just wanted to make this one more accurate. It depends on you! ○ Huge inspiration for the costume was dotflare's Gabriel model, especially for the smaller details. Please check them out, the model is free as well and very beautiful. If you can run blender, it'll help you so much with making the cosplay. ● As mentioned, I usually cut foam a bit longer to see how it'd look. Sometimes, it's actually better than the original measurement, but also, it could save mistakes if the size is not good after-all. ● As mentioned², no spray paints!! It chipped off for me and I thought I was going to cry. However, I'm unsure how spray paint works with white glue covered foam. It could be tried out on a piece of foam, maybe it works. ● Last thought: For the vision: you could try hiding the hole for your eyes with white mesh. ● This post kind of reads like a certain book from Mark Z. Danielewski, which was really not on purpose when I started making this post.
#cosplay#gabriel ultrakill#ultrakill#ultrakill gabriel#gabriel#costume#mask#helmet#help#“tutorial”#my cosplay
30 notes
·
View notes
Text

The trophy wall of the beheaded
Not all my masks, but this is the space I had to work with ATM
63 notes
·
View notes
Text

This is a remake of a meme if someone doesn't get it btw
Also ignore the spelling mistake please 💔
603 notes
·
View notes
Text


I wanted to dress up formally for the release, so here are bonus pics. Sorry that the first pic is so crispy it's a screenshot from a call lol
55 notes
·
View notes
Text


Went to the city for a convention, took a bunch if photos, so here! Gabriel cosplay!
@osteochondraldefect for the FUTURE cosplay!
31 notes
·
View notes