#“tutorial”
Explore tagged Tumblr posts
Visit Tumblr Blog
Explore Tumblr blogs with no restrictions, modern design and the best experience.
Last Seen Tumblr Blogs


Fun Fact
Tumblr posted its first advertisements in May 2012 and subsequently earned $13M in revenue.
Note
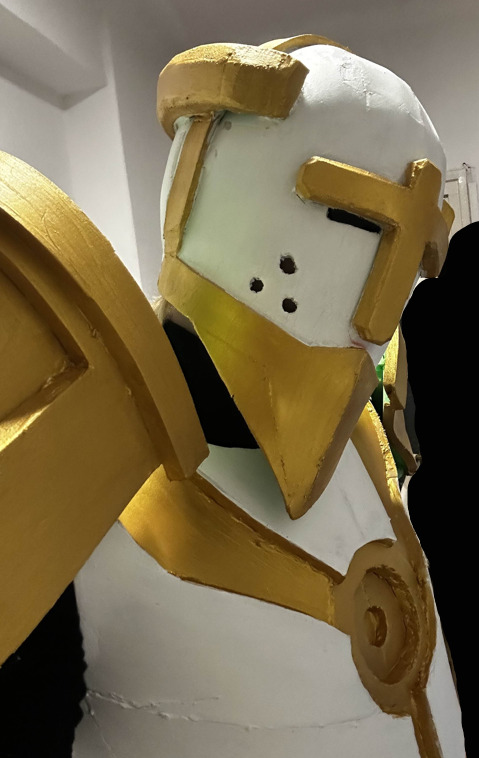
Am i allowed to ask how did you make such a majestic Gabriel helmet
Hi, sorry for the late answer, but thank you, and of course!

Disclaimer: most of the times when making cosplays, I just fuck around and find out. Meaning: I won't have templates for most things, exact pictures of the process, or measurements. I included everything I could, and explained everything I can.
Making costumes for me is lots of trial and error, and it still is to this day, as I am by any means NOT a professional. Obviously it'd be easier if I'd invest in sketching things out more and measuring, but that's completely on me.
I hope that nonetheless this somewhat helped, even though it's not a very good "tutorial"...
Please do check out the "Notes:" section at the end of the post for more thoughts, further help, and other stuff!
Tutorial below the line:
𓂃𓂃𓂃𓂃𓂃𓂃𓂃𓂃𓂃𓂃𓂃𓂃𓂃𓂃𓂃𓂃𓂃𓂃𓂃𓂃𓂃𓂃𓂃𓂃𓂃𓂃𓂃𓂃𓂃𓂃𓂃𓂃𓂃𓂃𓂃𓂃𓂃𓂃𓂃
Materials used: ● Paper ● EVA foam ● Pins ● Modeling paste ● Water based prime ● K100 & K40 sandpaper (probably better if you use a mini sander/polisher) ● Hot glue, super glue, white glue ● White and gold acrylic paint ● And of course: scissors, razor blade,

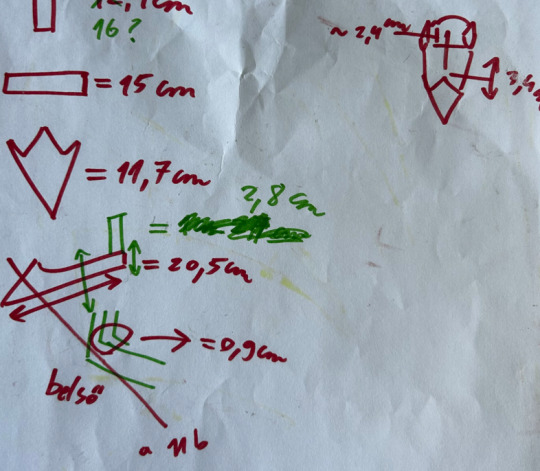
1. Sketching and measuring: One of the first things that is advised to do for anything and everything is to sketch your ideas out. It doesn't have to make sense to other people, if you yourself understand what you're trying to depict. Also make lots of notes, brainstorm, just generally put ideas out so things are more clear for you as you progress. This also includes measuring your head from front, side, and around. When you did, you can then use this very helpful and free template, which you can print out with the measures of your head. Seriously, shoutout to this template, it saved so much time whenever I made most of my masks.
𓂃𓂃𓂃𓂃𓂃𓂃𓂃𓂃𓂃𓂃𓂃𓂃𓂃𓂃𓂃𓂃𓂃𓂃𓂃𓂃𓂃𓂃𓂃𓂃𓂃𓂃𓂃𓂃𓂃𓂃𓂃𓂃𓂃𓂃𓂃𓂃𓂃𓂃
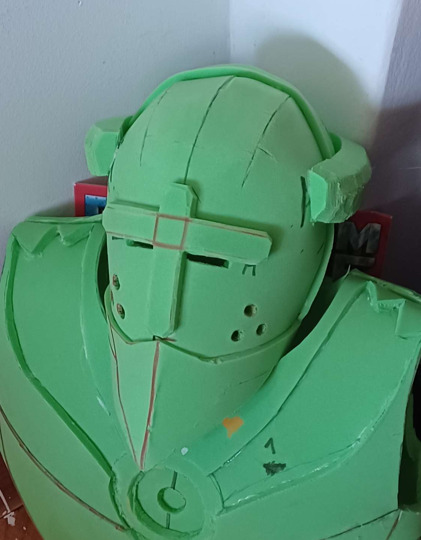
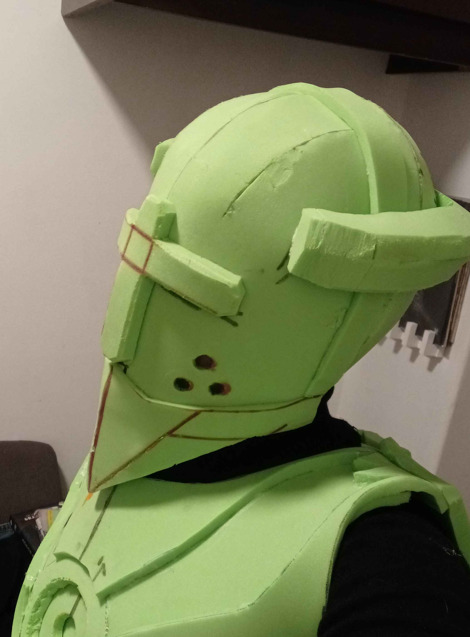
2. Applying the features: The way I put his features on the base template is by using the previous sketches and measurements. But what I do, is I cut them out in paper first, to see if they look good on the base by attaching them on the foam with pins. If it does, I trace it onto the foam, then cut it out a bit longer, to see if by any chance it looks better longer, if not, you can just cut the foam again.
The cross and halo were pretty easy: ● You can just draw a cross and cut it out (if you want to make it "pop out/3D", glue a layer under the shape like how I did in the picture). ● For the halo, it depends on how thick your foam is; ¹you could just cut out three long lines, which are then glued together to make a half circle, then apply it on the head, but I had to do it a bit tricky. Not sure how to explain it exactly, but when I cut a line for the halo, I also had to cut the end a bit "tilted", so I can glue a mini foam triangle shape to it, then cut a line with a tilted cut at the end again, then glued it to the other end of the triangle, and I continued this process as needed. With this, I made a half-circle for the halo. The "beak" is a bit tricky: I had a bit of trouble with this for the first time too, but here is how I did it: ● As you can see on the picture, it's in three seperate parts. The front is a triangle-ish shape with a 'peak' at the bottom of the cross. Under that is another triangle, and then it connects to the part that wraps around the head. ¹: This is because if you just cut out the entire shape of his "beak", and glue it together like that, it'd look like as if he got stung by a bee, because the foam is dense, and it'd pop-out a little. At least for me, it was a reoccuring issue with other parts as well. But again, this depends on the thickness and stretchiness. So tl;dr, you need to make sure that the foam is not "tense", you need to make it "relaxed" by placing multiple parts together to make the desired shape (same case with the base head, halo, etc.). For the cracks in the foam: I used modeling paste to fill those gaps in as much as I could, then used sandpaper to smooth out the edges and excess. For the holes on his cheeks: This is not a recommended idea, as it ruins the foam, but: I literally just grabbed my hot glue gun, and stabbed where the holes would be with the hot tip of it. Not advised, because the foam becomes dense and sticky at that area. It'll also be hard to paint. Mask's vision?: Quote the disclaimer: My peripherial is absolutely terrible in this mask. The front view is okay-ish. What I did for the vision is I cut two thicker lines out of the foam right under the cross, so it's somewhat hidden as well.
𓂃𓂃𓂃𓂃𓂃𓂃𓂃𓂃𓂃𓂃𓂃𓂃𓂃𓂃𓂃𓂃𓂃𓂃𓂃𓂃𓂃𓂃𓂃𓂃𓂃𓂃𓂃𓂃𓂃𓂃𓂃𓂃𓂃𓂃𓂃𓂃𓂃𓂃𓂃
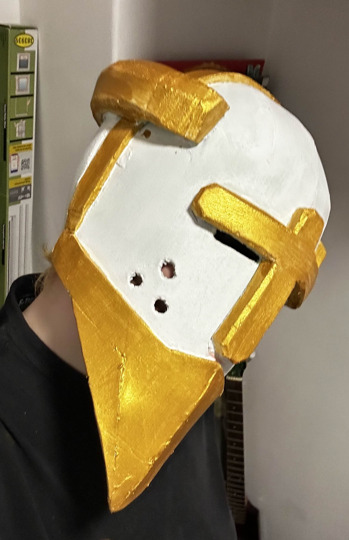

3. Painting and coating: My biggest enemy is the combination of paint and foam. Seriously, I can not begin to explain how much money I have spent on just paint and glue, in attempt for the paint to not chip off, but it still does. (if anyone has better advice for this please let me know!!) Here's what I did so the paint kind of sticks there: Firstly, an advice that I wish I had gotten much, much sooner before starting this project: Coat the area that you want to paint with white glue! This helps so that the paint can stick there longer, and it won't pop-off more easily. You can also try primer, but white glue is better in my opinion, primer just makes it a bit more dense. Then I used a lot of white acrylic paint. If you can just buy white foam, please do so. It'll save so much time and money (and insanity too). I think I had at least 10-15 coats so it looks fully white (the picture is not even the finished one). Note: I don't recommend using spray paint. It dries and chips down faster, also not very stretchy. It's cheaper, easier, but it won't last for long. I unfortunately stumbled into this issue, and it was not a cool thing to see.
I also recommend using a vivid gold color. Previously, I used a more realistic one, but it just looked washed and sad. Give Gabriel some life with that shiny, glittery gold!
𓂃𓂃𓂃𓂃𓂃𓂃𓂃𓂃𓂃𓂃𓂃𓂃𓂃𓂃𓂃𓂃𓂃𓂃𓂃𓂃𓂃𓂃𓂃𓂃𓂃𓂃𓂃𓂃𓂃𓂃𓂃𓂃𓂃𓂃𓂃𓂃𓂃𓂃𓂃

4. After refining edges and making sure that the painting looks nice and sharp, you're done! Again, I hope this somewhat helped. It's a shame that I don't really keep my templates and progress photographed, since it's more just for myself and for fun. I don't really post online anyways.
But, if you have any further questions, or if there's still some confusion, or if something is not exactly clear, let me know!
𓂃𓂃𓂃𓂃𓂃𓂃𓂃𓂃𓂃𓂃𓂃𓂃𓂃𓂃𓂃𓂃𓂃𓂃𓂃𓂃𓂃𓂃𓂃𓂃𓂃𓂃𓂃𓂃𓂃𓂃𓂃𓂃𓂃𓂃𓂃𓂃𓂃𓂃𓂃
Notes: ● I had really thick foam, so I had to manually make it thinner at times. I think foam around 4-5mm. thickness is good for a helmet. The thicker the sturdier; keep that in mind. ○ Again, if you can, please buy foam in the desired colors, so you wouldn't have to deal with a lot of painting. ○ On this topic, breathing is a little hard if the foam is thick, and it also gets warm very quickly. I use a balaclava so my skin doesn't stick to the foam when using it for a long time. If you can endure warmth for a long time, this project especially for you! ● I usually make my helmets smaller in size, so it looks more "accurate". Basically, it's just good for my head, therefore it's not very comfortable. I advise making it a little bigger than your actual head size for comfort. ● The helmet itself took me about 4-8 days max. all-in-all. Unsure about this exactly, because I don't usually look at the time when I make costumes. ● Please be careful with using darker colored sharpies!! It took me a while to hide them with the white paint especially. ● Don't be afraid to put personal creativity into the mask! My previous masked had horns instead of halo, but I just wanted to make this one more accurate. It depends on you! ○ Huge inspiration for the costume was dotflare's Gabriel model, especially for the smaller details. Please check them out, the model is free as well and very beautiful. If you can run blender, it'll help you so much with making the cosplay. ● As mentioned, I usually cut foam a bit longer to see how it'd look. Sometimes, it's actually better than the original measurement, but also, it could save mistakes if the size is not good after-all. ● As mentioned², no spray paints!! It chipped off for me and I thought I was going to cry. However, I'm unsure how spray paint works with white glue covered foam. It could be tried out on a piece of foam, maybe it works. ● Last thought: For the vision: you could try hiding the hole for your eyes with white mesh. ● This post kind of reads like a certain book from Mark Z. Danielewski, which was really not on purpose when I started making this post.
#cosplay#gabriel ultrakill#ultrakill#ultrakill gabriel#gabriel#costume#mask#helmet#help#“tutorial”#my cosplay
30 notes
·
View notes
Text
I want to tell a story to the artists and would-be artists out there.
When I was 19, I made a large oil painting of the nerd I would eventually marry. I poured all my attention and care into this painting. It's the only art I have from back then that still holds up as a work I'm proud of today.
I entered it into a judged show at the local art center. It got an honorable mention. I went to see the show with my beloved model. One of the judges came up to talk to me, and highlighted that all the judges really liked the painting. It would have placed, except, you see, the feet were incorrect. They were too wide and short, and if I just studied a bit more anatomy-
I called over my future wife, and asked her to take off her shoe. Being already very used to humoring me, she did. The judge looked at her very short, very wide little foot. Exactly as I'd lovingly rendered it. I would never edit her appearance in any way.
The judge looked me in the eye, and to his credit, he really looked like he meant it when he said "Oh I'm so sorry."
Anyways the moral of the story is that all of those anatomy books that teach you proportions are either showing you averages, or a very specific idea of an idealized body. Actual bodies are much more varied than that.
So don't forget to draw from observation, and remember that humans aren't mass produced mannequins. Delight in our variation. Because it's supposed to be there.
125K notes
·
View notes
Text

Microsoft Productivity Pack for Windows (1992)
42K notes
·
View notes
Text
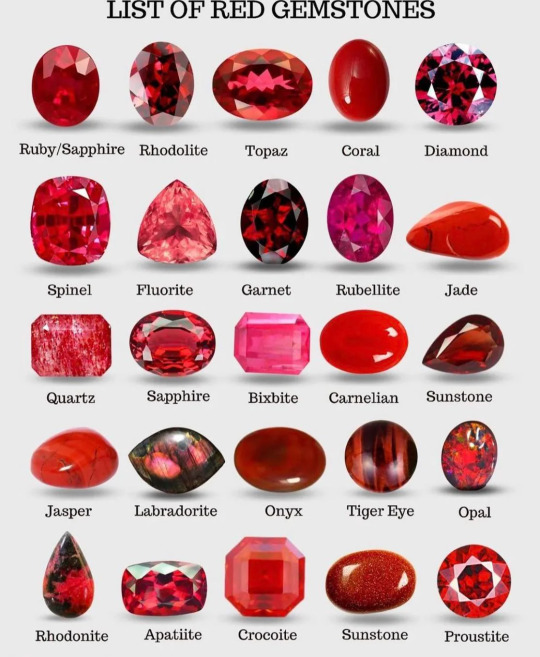
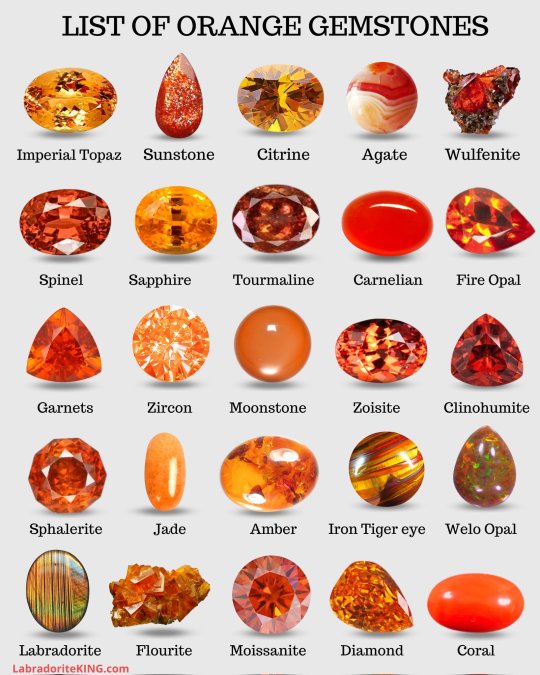
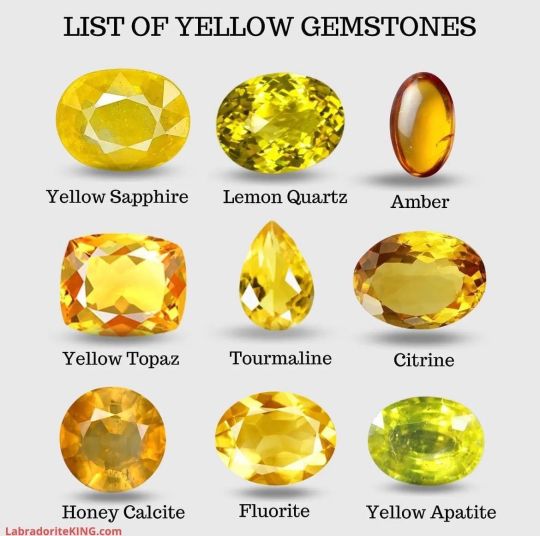
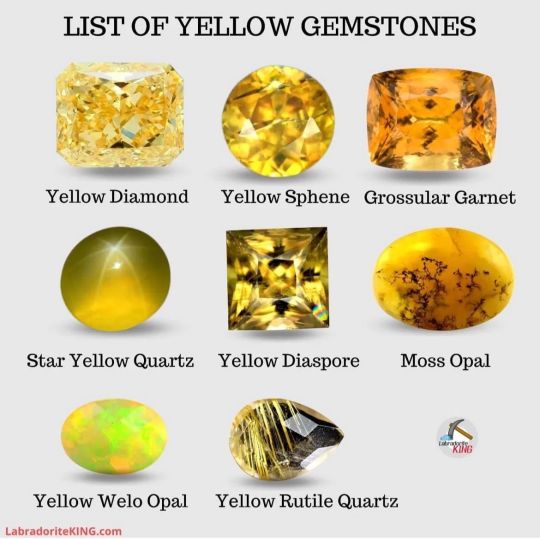

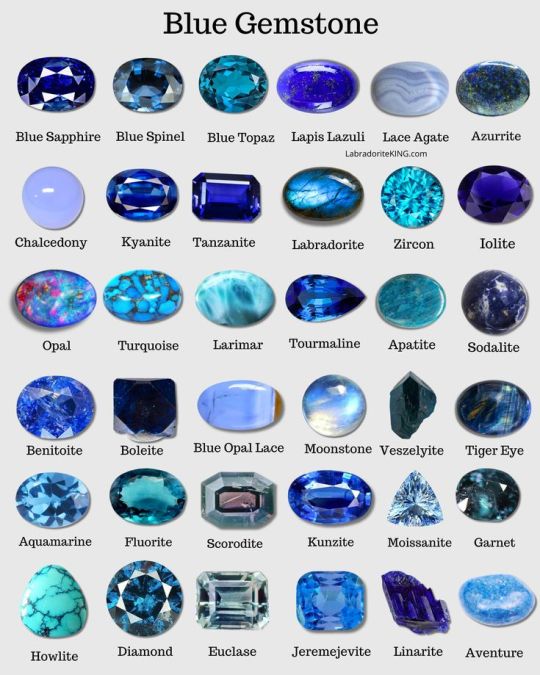
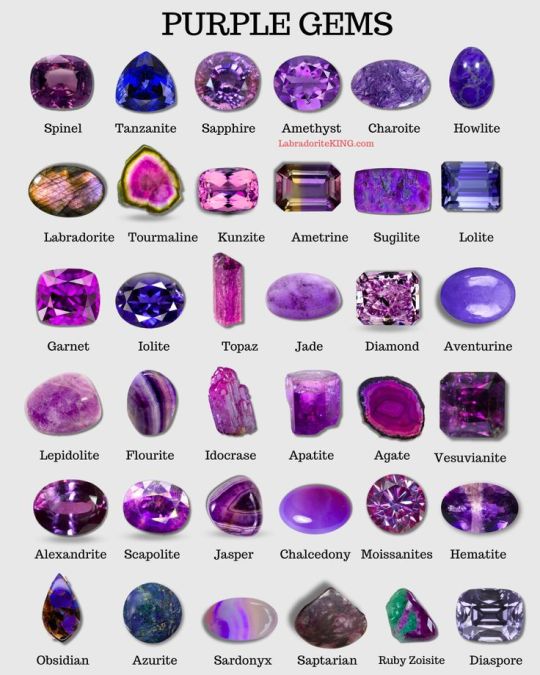
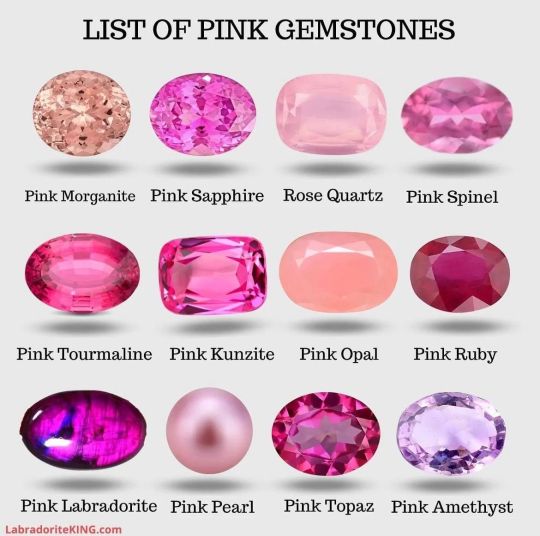
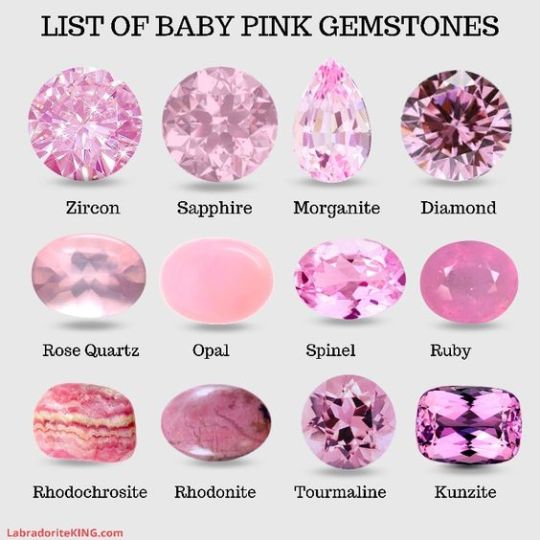
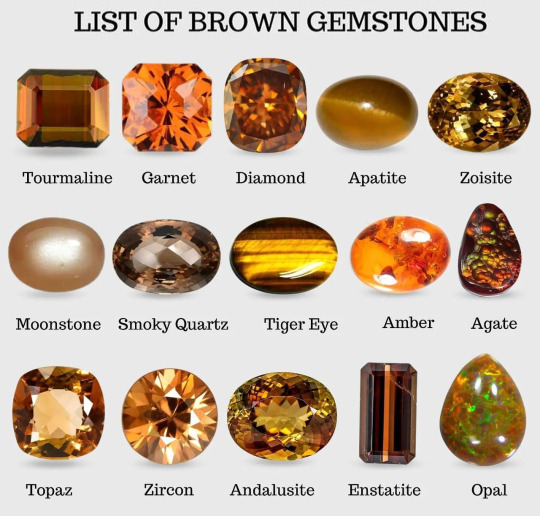


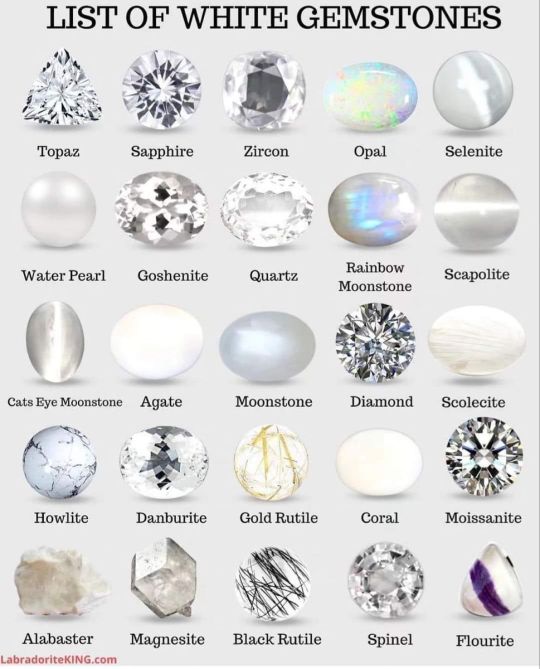
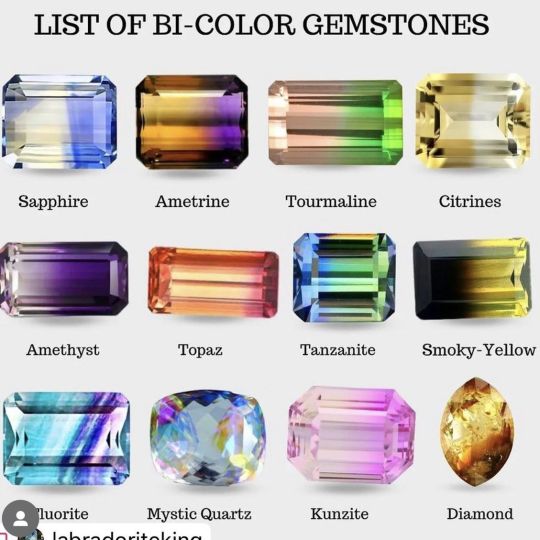
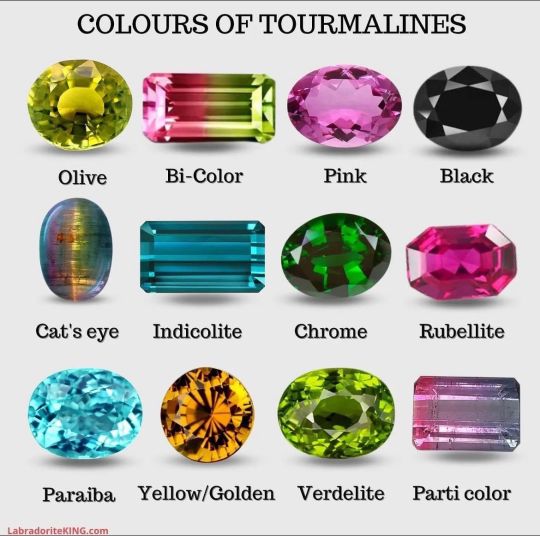
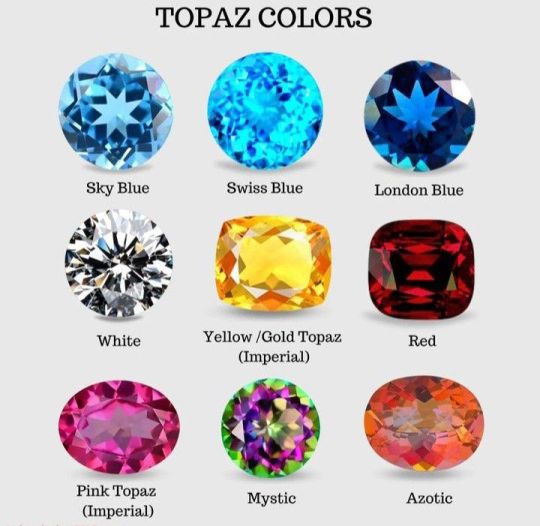

By LabradoriteKing on Pinterest
#Tutorials & References#Gemstones#Jewels#Art Reference#Writing Reference#Gemstones Reference#If the original marker wants me to take this down I will
167K notes
·
View notes
Text


what it says on the tin! I offered to throw together something on drawing raw meat (in a mouthwashing server, naturally) so here it is in case someone finds it useful
23K notes
·
View notes
Text
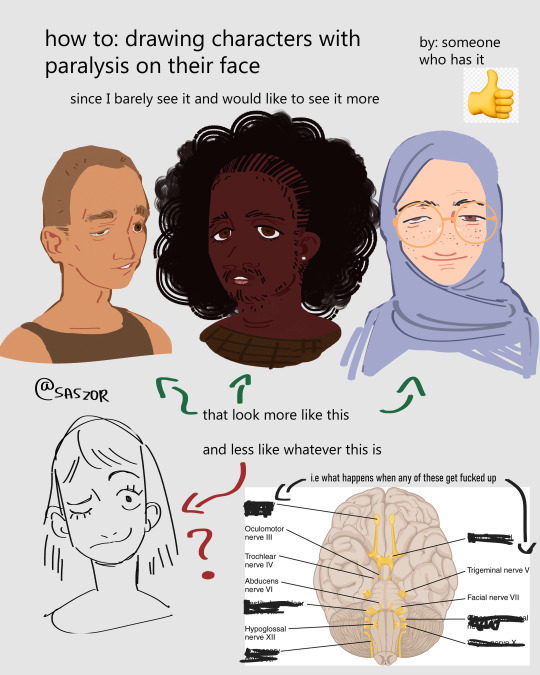

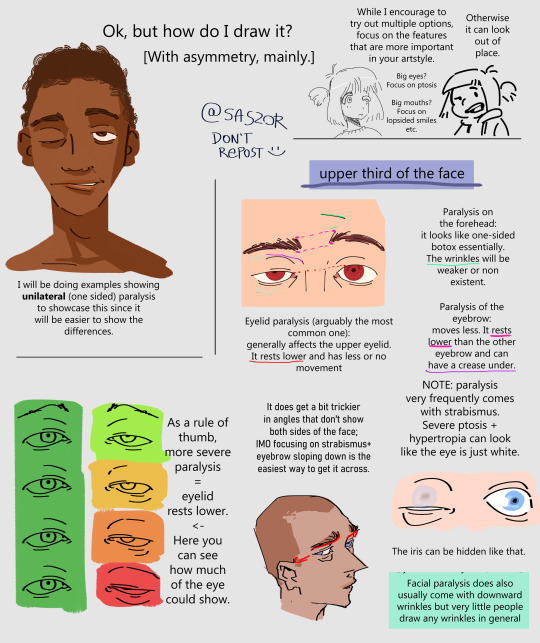
[ID in alt]
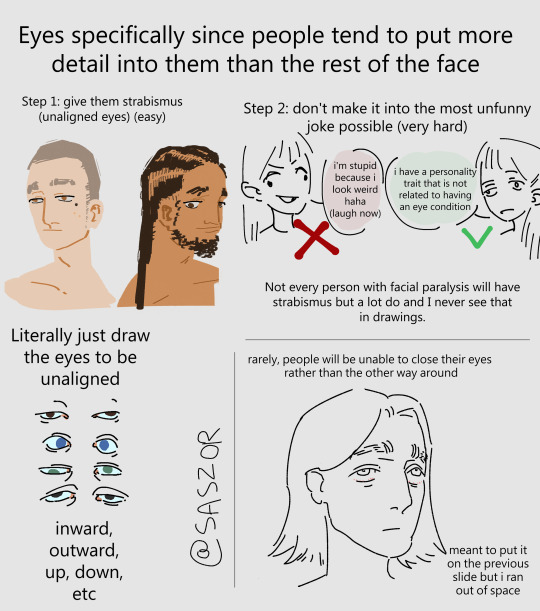
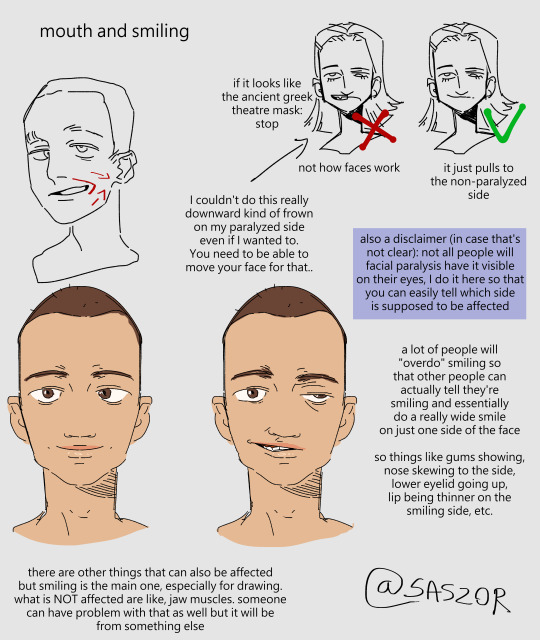
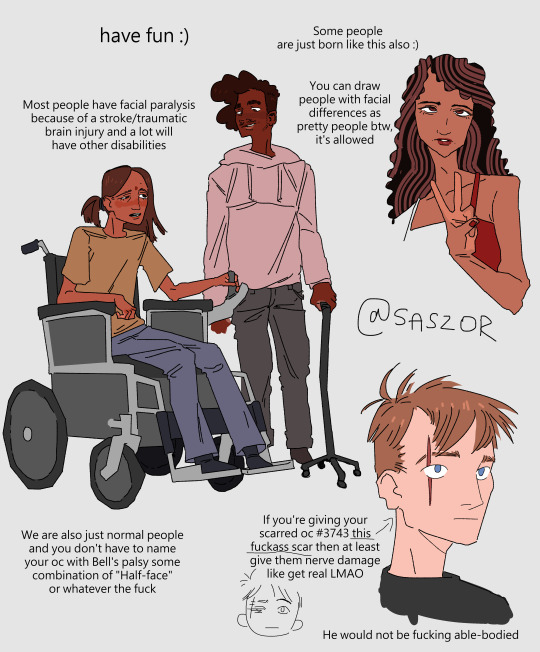
Tutorial on drawing characters/OCs who have some sort of facial paralysis. It doesn't cover all possible variants because I was using mirror as my main reference lawl
Keep in mind that this is an introductory drawing tutorial and has some generalizations in it, so not every “X is Z” statement will be true for Actual People 👍
Consider supporting me on ko-fi if you find this to be helpful.
#No 'omg mithrun dungeon meshi' notes that's not even what he has.#my art#artists on tumblr#disabled artist#digital art#id in alt text#art tutorial#drawing disabled characters#facial difference#disabled representation#disabled characters#digital artist#artwork#art on tumblr#art#body positive art#character art#disabled art#original art#personal art#illustration#drawing
26K notes
·
View notes
Text
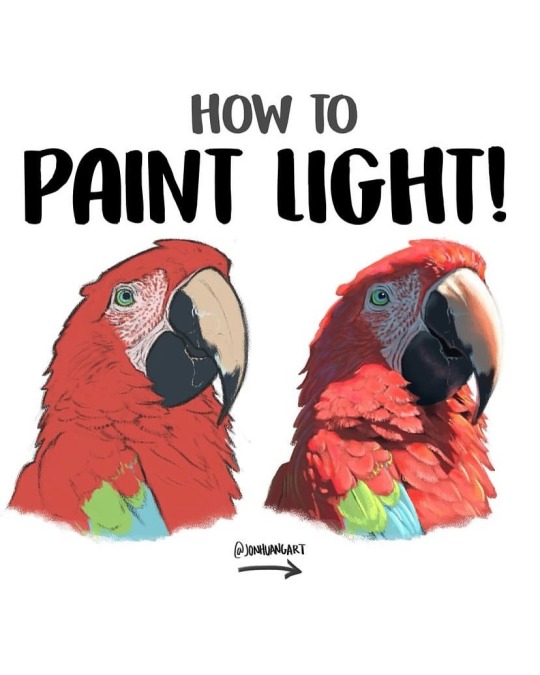

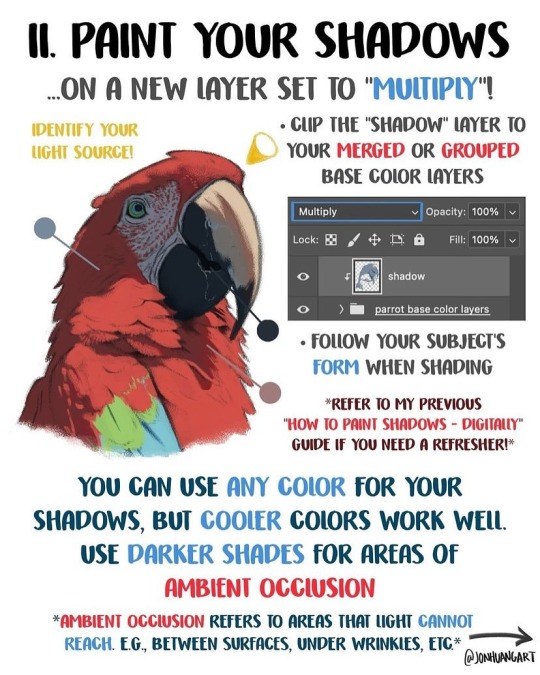
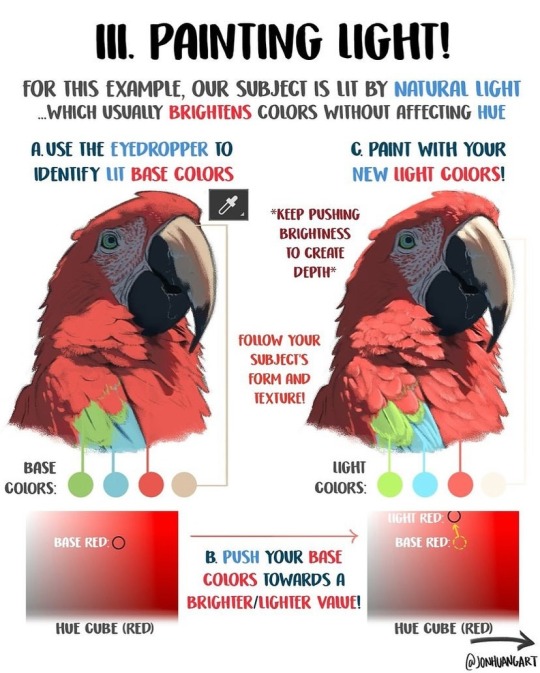
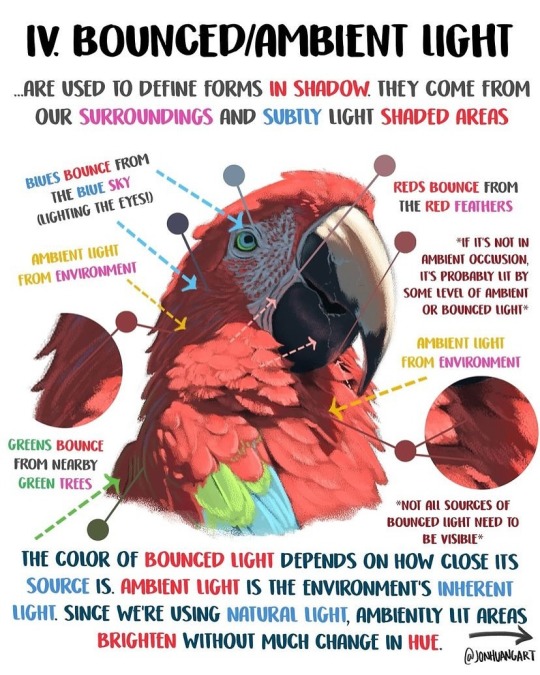
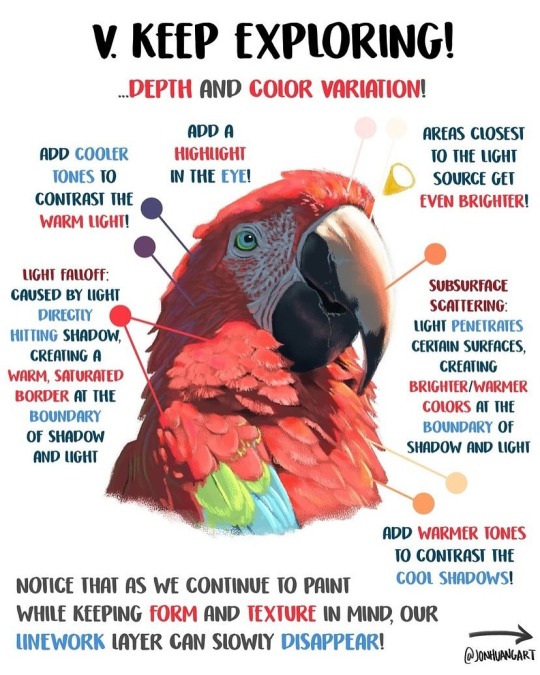
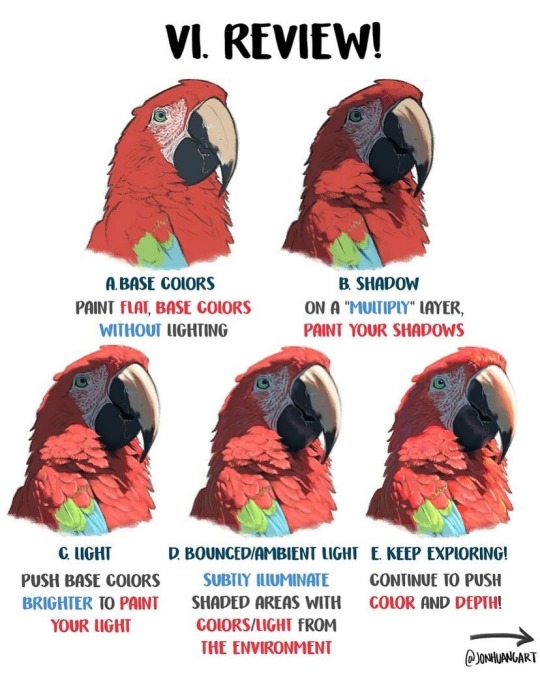
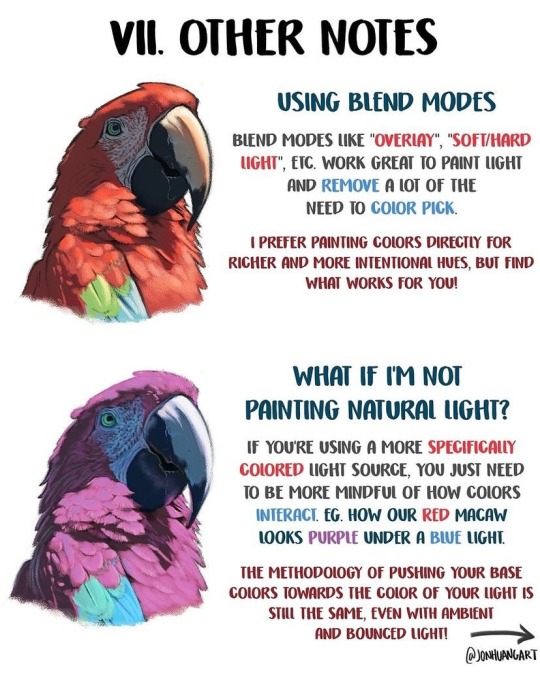

How to Paint Light by jonhuangart
34K notes
·
View notes
Text

It's in the eye of the beholder
#comic#birds#my art#I've had this idea for a while#after a lecture that talked about how traits we consider cute are traits found in babies#I feel like birds would have a very different definition of cute from us#anyway after making the bird tutorial I feel the pressure to draw perfect bird anatomy#but tbh I still just wing it a lot of the time!!#hehe “wing it”
64K notes
·
View notes
Note
could you please do a tutorial on how you do your risograph style drawings? they look so cool 😭😭


14K notes
·
View notes
Text
How to Be The Dominant Male in Any Situation

Let's say you walk into a party.

You are wet and pathetic. Not only are you a worm, but even among worms you are the runt of the litter.
There's a way to fix that. Even you can be the alpha male in every situation you're in. Here's how:
Alpha Male Rule 1: Stand Tall or Very Short
In some things in nature, like rats and giraffes, the biggest creature in is leader.
However, in other things in nature, like the mafia, which has large goons but a small boss, the smallest creature is the leader.
You need to lean into whichever option is closest to you. If you are almost short, try wearing a big suit like a mob boss would wear to also make yourself wider like a mob boss. If are you almost tall, like I am, trying wearing these bad boys:

Now, I know what you're thinking: "High heels?? But isn't that for women???" Women have been hiding them from us men because they are afraid of how powerful we would be with them. But, why do women alone get to augment so much about themselves?? Look at all the eyeliner and mascara they need to even begin to mimic the power and seductiveness of our male eyelashes:

So, let's take a look at how we're doing now having applied just this one piece of advice:

It's a whole new situation. Let's move onto rule 2:
Alpha Male Rule 2: Always Get What You Want But Never Ask For It
I notice the man next to me has cookies. I would like one. Not only that, but there's also a woman next to me, watching. Asking another man for a cookie is extremely un-alpha behavior, so here's how you go about this situation:
1) Point out that someone else has something that you want

2) Cry until they give it to you

If everything has gone according the plan, you now have a cookie, and the woman is thinking something like this:

Let's move onto the last rule.
Alpha Male Rule 3: Always Up the Ante
Whatever you want to do or say, do or say it at least 3 times as hard as a regular person. When your coffee is $3, you should give $9 to show how wealthy you are. When you say "I'll be back in 5 minutes" you should actually be back in 15 minutes -- but really, you should say "I'll be back in 15 minutes" and be back in 45 minutes.
You should also start every task at step 3 rather than step 1. So, a normal (read: beta) guy might tell a girl "I think you're pretty" and then later ask "will you be my girlfriend?' But you should just say this:

99% of women will say yes, but if she needs further convincing, it can be helpful to offer her a small present, like a trinket or snack.

Congratulations. You have now learned how to be the most dominant male in any situation. Here are a few more tips for the road:
Claim to be descended from an ancient king or emperor. You can make a map or your lineage and fold it up to carry it in your pocket, so that you may unfold it whenever it needs to be presented.
If a woman takes a genuine interest in you, do the full body blush animation rising from bottom to top like you're a cup filling up, then run away, leaving behind a small cloud and a few speed lines. The idea that woman can actually like you is a lie perpetuated by Big Women.
If you want to further increase your height, try wearing bunny ears.
16K notes
·
View notes
Text
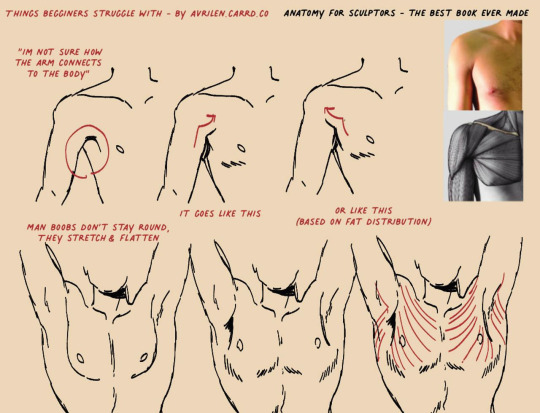
A small guide for people who struggle with this area
26K notes
·
View notes
Text
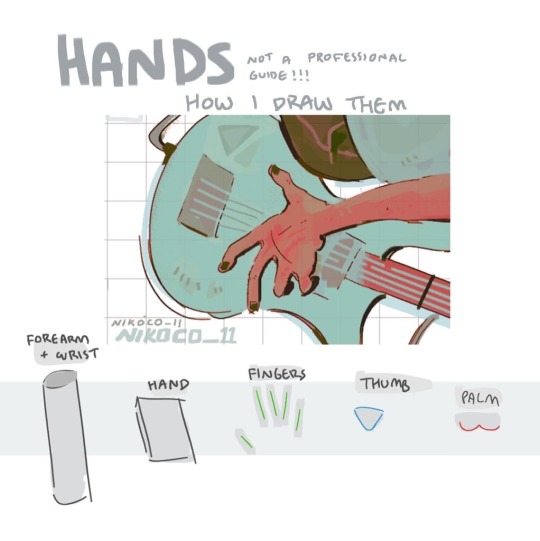


my recipe for drawing hands!
(small note that this is a shortcut that is more abt style and ease than anatomical accuracy. it helps to take time to really properly study hands, makes it easier to bend the rules a bit like this and have it still look good!!)
(learn rules b4 u break them or whatevah)
#qna#tutorial#guide#drawing tutorial#digital art#illustration#drawing#artists on tumblr#my art#clip studio paint
60K notes
·
View notes
Text


i've gotten a lot of very kind feedback about how i draw fat bodies, so i thought id make a little guide showing my thought process!! this is far from comprehensive, but maybe it'll be helpful to anyone who feels intimidated drawing plus size furs :)
if anything is unclear, please feel free to ask questions in the replies or reblogs!! <3
#digital art#artists on tumblr#safe fur work#sfw furry#art tutorial#art help#art tips#drawing reference#fat positive#body positive
14K notes
·
View notes
Note
spec. spec. spec youve changed the game. i never realized your pointer finger and your wrist artery are the same. holy shit. im going to draw hands thank you


aasdjsd its not really an artery but its a useful landmark to facilitate the Flow of a pose imo
#nd then the thumb meat is just kinda tacked on there#u will notice also that i like to use the wrist as a tension point so the hand and forearm kind of drape off it#that has nothing to do with anatomy i am just gay#ask#doodle#tutorial#i gueass.
12K notes
·
View notes
Text
how to wave magic wand by 街头尬术师【魔法披风】
18K notes
·
View notes