mushroomadventures1087
Mushroom Adventures
Here I will document my experiments with growing gourmet mushrooms. From LC and agar to spawn and substrates, as well as personal thoughts and opinions will be recorded here for posterity.My mushroom substrate recipe calculator can be found here:https://edgarpoe.w3spaces.com/
30 posts
Don't wanna be here? Send us removal request.
Last Seen Blogs

sublimitymp3
Girlhood Is A Spectrum

freakedoutshadowhunter
Demigod x Shadowhunter

zhoulingyu123
Untitled

godofthemoss
sage’s story archive

playthisatnight
PLAY THIS AT NIGHT
Text
Here are the plates I poured and inoculated on 04/07. BPO on the left, COTW on the right.

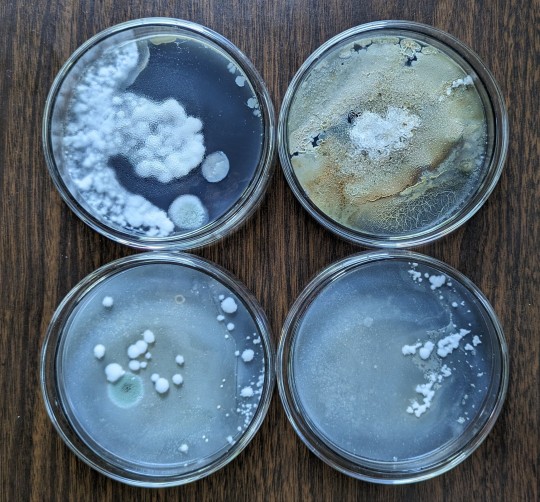
The top-right plate in the COTW picture shows some orange growth all over the plate. The same contam is growing in the bottom-right plate in the BPO picture. When I opened the lid of the container that I had the COTW plates stored in, I was hit by a very foul, rancid smell. It was that orange contam. Funnt enough, the BPO has one plate with that contam on it, but it didn't smell nearly as bad.
As you can see, the COTW is producing some very fluffy white myc. There's a couple other places with some contam, but they're slow growing. I'm gonna leave them there for maybe another week and see what happens.
The BPO plates are the main issue. Nothing on any of those plates resemble myc in any way, shape, or form. Everything looks like some kind of pale contam. I'm not well versed on identifying contam on plates, but I know none of it is myc.
So it would appear that my BPO LC is dead. I have a couple more BPO LCs that I'll eventually test. The only other source I have for this culture is the test tubes I have in cold storage. I'm gonna leave those alone for now. I'll eventually plate those as well, but I think I'll do so on an "as needed" basis instead of plating and making LCs out of every culture all at once. It might be a bit of a hassle, but it'll force me to practice my sterile technique in front of the LFH.
I had to order more plates this past weekend. I got a box of 100 coming this week, so this weekend I may be making up a bunch of BPO plates. I'm also probably gonna test my golden oyster LCs because of the color of the liquid in the syringes. It might be nothing, but I wanna check that I'm not gonna have the same issue with them that I have with the BPO.
#chickenofthewoods#oystermushrooms#myco#mycophile#mushroomfarmer#mushroomfarm#mushroomlove#shrooms#mycology#mushroomporn#mushroomfarming#mushroomgrowing#mushroom#mushroomcultivation#fungi#farming#culinarymushroom#gourmetmushroom#agriculture#mushrooms
1 note
·
View note
Text

I inoculated all these jars a couple days ago. Half are blue oyster and the other half are king oyster. These might be a little slow in taking off, since it's getting warmer by the week down here. Blue oysters like cooler temps, and I've had more failures than successes with king oysters. I can't nail down what I'm doing wrong with them, but I suspect it might be temp related. We'll see.

Here are the plates I inoculated on 04/07. COTW is on the left, BPO on the right. The COTW seems to love that DFA, but the BPO doesn't seem to be colonizing very well. I'm gonna be keeping an eye on them though. FIngers crossed I start to see myc before any contam starts to establish itself.
#chickenofthewoods#oystermushrooms#myco#mycophile#mushroomfarmer#mushroomfarm#mushroomlove#shrooms#mycology#mushroomporn#mushroomfarming#mushroomgrowing#mushroom#mushroomcultivation#fungi#farming#culinarymushroom#gourmetmushroom#agriculture#growyourownfood
1 note
·
View note
Text
Big post...
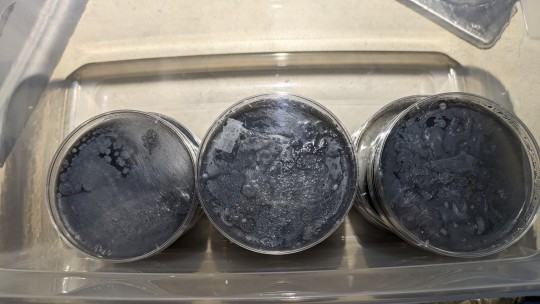
I worked on some agar plates today. The LFH worked beautifully. Fourteen black pearl oyster plates and five COTW plates.

I went with the DFA recipe, since it was successful with the cultures last time: 10g powdered dog food, 10g agar powder, 0.65g honey, and 500mL of water. I also threw in about a gram of finely powdered carbon instead of using food coloring. I figured the white mycelium growing against a black background would contrast much better than the standard blue I always went with. The pic above shows the BPO plates on top of the COTW plates.

The dog food I used was some old, stale kibble that I had left over from months ago. I ground it up a bit and tossed it in the oven to make it bone dry. A little side note for anyone looking to do this: find some way to dry the dog food outside. You don't want that smell in your house. Ask me how I know...
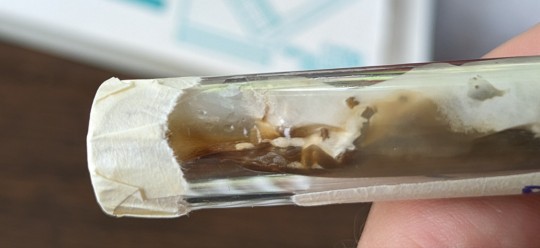
While I was waiting for the agar to cool after PCing, I went through my culture fridge and found a few plates I had forgotten about, as well as the test tube cultures I made last summer.
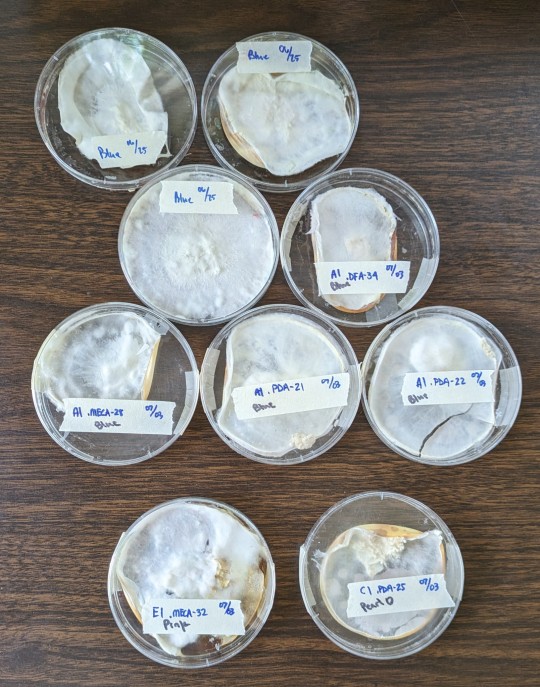
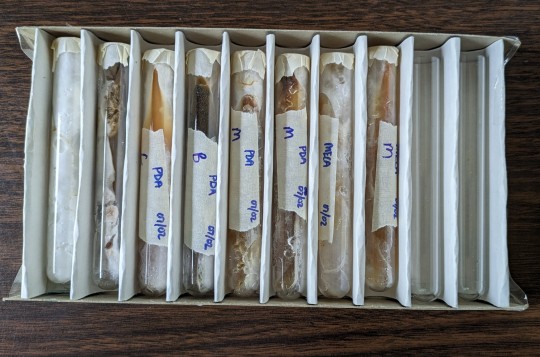

I'm surprised that the plates look so good. You can see a couple of the actually started pinning in the back of the fridge. The pearl oyster plate has some weird looking growth on it as well. Very interesting. I'll have to get some more petri dishes and clone these plates to see if they're still viable.
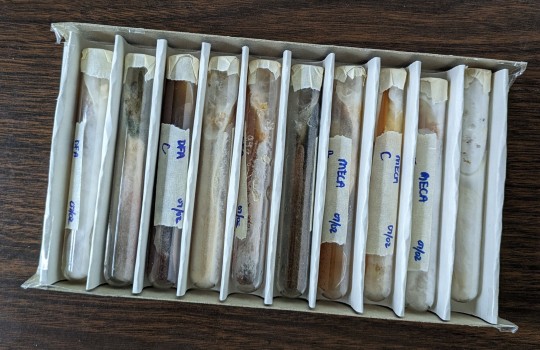
The test tube cultures are another story. Opening those boxes was like opening a pack of Skittles. There's every color of the rainbow growing in those things. Funny enough, the golden oyster tubes were the only ones that showed 100% mycelial growth (see the picture on the left below). I didn't see a lick of contam in any of them. I can't say the same for the other cultures, as you can see from the pic on the right:
Also, more bad news about the BPO spawn jars. Out of eight jars, I have only two left. The rest were contam.

As you can see in that pic, even the myc wasn't strong enough to compete against the contam. This is why I wanted to run some plates of the BPO LC syringe I used. The LC looks clear with bits of myc floating around in it, but there's gotta be something else going on with it. We'll see once those plates start growing out.
#chickenofthewoods#oystermushrooms#myco#mycophile#mushroomfarmer#mushroomfarm#mushroomlove#shrooms#mycology#mushroomporn#mushroomfarming#mushroomgrowing#mushroom#mushroomcultivation#fungi#farming#culinarymushroom#gourmetmushroom#agriculture#agar
1 note
·
View note
Text

Finished my laminar flow hood. It was a lot of work. She ain't much to look at, but damn, can she put out some air. This will help when I work with agar. Instead of dealing with the cramped space of the still-air box, this will allow me to work in a larger space without my hands being constricted by a box. I'll still use the SAB to store my plates when I've finished inoculating them under the LFH, but I won't be doing any more culture work in it. I'll probably work on some cultures tomorrow.
Now I need a beer...
#chickenofthewoods#oystermushrooms#myco#mycophile#mushroomfarmer#mushroomfarm#mushroomlove#shrooms#mycology#mushroomporn#mushroomfarming#mushroomgrowing#mushroom#mushroomcultivation#fungi#farming#culinarymushroom#gourmetmushroom#agriculture#growyourownfood
1 note
·
View note
Text
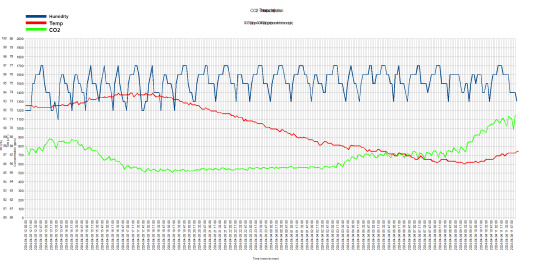
Here's a chart I made up from the data I collected from my fruiting chamber meter. This is from around noon on 03 April to noon on 04 April. Ignore the jumbled up title. I forgot to erase all that. I just opened everything up as layers in GIMP and merged them together.
Anyways, you can see how often the exhaust fan and humidifier turns on by the humidity line. From each peak, the fan turns on and sucks out the moisture. Once it reaches the first "shelf" on the downturn, I believe that's when the humidity probe from the Inkbird controller detects the RH% dropping below 83%, which is the minimum threshold I have it set at. Of course there's a difference in the RH% levels between the Inkbird controller and the humidity meter that I pulled all this data from.
Back to the "shelf"...the fan runs for two minutes before shutting off. As the air is settling from the turbulence, the humidity is also settling. The graph shows the humidity continuing to drop, even after the fan has stopped. The humidifier continues to run until the controller detects an RH% of 95%.
Funny to see no significant drops in CO2 while the fan is running. It's also interesting to see how it drops during the evening and night. Of course, I work at night, so I'm sure having only one breathing organism around the meter at night helps keep the concentration down. I do believe that my meter is to blame for all this broken data. I don't think it's a sensitive-enough CO2 meter. I will be looking into a more high-grade and dedicated meter for this. I will do the same for the RH% meter. It'll be a little more to keep up with, but as long as the data becomes more accurate, I'm more than willing to do it.
#chickenofthewoods#oystermushrooms#myco#mycophile#mushroomfarmer#mushroomfarm#mushroomlove#shrooms#mycology#mushroomporn#mushroomfarming#mushroomgrowing#mushroom#mushroomcultivation#fungi#farming#culinarymushroom#gourmetmushroom#agriculture#growyourownfood
1 note
·
View note
Text


Aaaaaand I have contam. I was looking through the tray of spawn jars, trying to figure out if the BPOs were gonna take off when I noticed these darks spots. When I brought them into the light, they started looking green. I don't usually have contam issues with my spawn jars, but every now and then I run into them. It's no big deal. I have six other BPO jars going with no issues currently. That'll be enough for two subs. If they perform well, I'll clone the culture and start the whole process over again.
#chickenofthewoods#oystermushrooms#myco#mycophile#mushroomfarmer#mushroomfarm#mushroomlove#shrooms#mycology#mushroomporn#mushroomfarming#mushroomgrowing#mushroom#mushroomcultivation#fungi#farming#culinarymushroom#gourmetmushroom#agriculture#growyourownfood
2 notes
·
View notes
Text

The picture above shows a WBS spawn jar inoculated with black pearl oyster LC. It's just a day bhind the COTW jars that I inoculated on the same day (03/30). From the reading I've done on the BPO, they can tolerate temps a bit higher than most other oysters (aside from the pink oysters), which is great for me since the temps in my growing room have been a bit higher than normal this time of year. The forecast shows the temps dipping a bit this week, starting tomorrow. Maybe that'll speed up the spawn.


The pictures above are the three subs I inoculated with the last of my pearl oyster spawn. They were inoculated on 03/27, so I'm pretty pleased with their progress, in spite of the temps. I suppose pearls can tolerate higher temps as the myc colonizes its sub. The pics on the left and middle are 100% HWFP, both 4534g in weight. The pic on the right is a 50:50 grass:HWFP sub, also 4534g in weight. The volume is different only because of the grass. There's much larger air pockets in the 50:50 sub.
I've been posting updates on all the spawn jars and sub buckets a lot lately. Now if I can just get the damn things to fruit! The one sub I have in the fruiting chamber still shows only myc growth, but no pins yet. Ugh...
#chickenofthewoods#oystermushrooms#myco#mycophile#mushroomfarmer#mushroomfarm#mushroomlove#shrooms#mycology#mushroomporn#mushroomfarming#mushroomgrowing#mushroom#mushroomcultivation#fungi#farming#culinarymushroom#gourmetmushroom#agriculture#growyourownfood
1 note
·
View note
Text

A pint WBS spawn jar that I inoculated with COTW two days ago. I also inoculated the other jars with black pearl oyster LC two days ago, but none of them show any signs of growth just yet. I thought this was interesting just how quickly this species started to colonize. It's been a little warmer than usual in my growing room, so I wonder if that played a large role in this growth...
#chickenofthewoods#oystermushrooms#myco#mycophile#mushroomfarmer#mushroomfarm#mushroomlove#shrooms#mycology#mushroomporn#mushroomfarming#mushroomgrowing#mushroom#mushroomcultivation#fungi#farming#culinarymushroom#gourmetmushroom#agriculture#growyourownfood
1 note
·
View note
Text


I got the WBS packed and PCd today. Nothing spectacular. I was cutting it close to the time I needed to leave for work, but I was able to get them all PCd. I'll be inoculating them tomorrow. I have around ten jars done, so I think eight of those will be for the black pearl oysters, and the other two will be for COTW.
Another update on the fruiting chamber. Where do I even begin...I've come home after work to find that the humidifier has been running all night and hasn't been keeping the chamber at the appropriate RH%. I had to make a few minor adjustments to get back in business, so I'm gonna have to figure out how to prevent that from happening again. I like tweaking everything, but I hate being away when things go haywire.
#chickenofthewoods#oystermushrooms#myco#mycophile#mushroomfarmer#mushroomfarm#mushroomlove#shrooms#mycology#mushroomporn#mushroomfarming#mushroomgrowing#mushroom#mushroomcultivation#fungi#farming#culinarymushroom#gourmetmushroom#agriculture#growyourownfood
0 notes
Text


The pictures shown above show the side and top-down view of one of the last 50:50 grass:WBS spawn jars. This is a pearl oyster spawn jar. As you can see, the myc is very thick. It was hard breaking it up to add to the sub. The yellow liquid seen in the top-down picture is metabolites and waste products produced by the myc as it breaks down the material in the jar. It's harmless and pretty common.
I finished using all of the pearl oyster jars, creating three subs. One of them is a 50:50 mix of grass and HWFP, and the other two are 100% HWFP. I didn't have anymore grass chopped up small enough to use. Plus, I'd have to do an MC test on the grass, which I didn't have the time to do. I'll be chopping up a large batch of grass this weekend and storing it away until I get ready to use it.
The picture above shows how I start my WBS spawn jars. The material above is just the cheap, off-brand 20lb bag of WBS from Walmart. $20 for 20lb isn't bad, being that it can go a long ways. Here's some pictures of it, in case anyone reading this may be interested:


I'll let the mix sit in the water for 24hrs, drain, pack into jars, and PC. Once they cool down enough, I'll inoculate with LC. Since I have four pearl oyster subs, I'll give the black pearl oyster mushrooms a shot.
Since I'm info-dumping here, might as well give an update about the fruiting chamber. Since I redesigned it and made it more airtight, I've been having FAE issues. The humidity would stay pretty level at around 93%, but the CO2 concentration would get as high as 1800ppm. I bought a draft blocker used for clothes dryers and placed it on the opposite end of the fan. I also drilled some holes in the shelves to give the entire chamber better airflow from the top down. Now, that's helped a TON with the CO2. I installed that draft blocker on Sunday, and the data shows that the CO2 dropped to an average of 1000ppm. Still a little higher than I'd like it to be, but definitely a huge improvement.
But there's a balancing of the scales going on here. While the CO2 improved, each time the fan turns on, the humidity drops. During the 3min period that the fan runs, the humidity drops around 15%. The Inkbird humidity controller is set to keep the chamber within a threshold of 80% to 95%. So every time the fan turns on, the humidifier has to turn on as well.
I added a tray of perlite on the shelf to see if that would provide any kind of sustained humidity even after the fan turns on. I also changed the fan timer. It was initially set to run for 3min every 20min. I changed it to 1min every 14min. Hopefully that will help keep the humidity high while not allowing the CO2 to build up too much. If that doesn't work, I may have to drill some more holes in the shelves. Either that or I may remove the draft blocker and install a second fan that imports air from outside the chamber to the inside. If that works well enough to force more oxygen into the chamber and drop the CO2 levels even more, I may change the timer to run for 1min every 20 or 30min. I dunno yet. I'm thinking too far ahead.
For now, I'll let the chamber run for a couple days without any kind of interference from me. I have an Inkbird air quality meter running in there which can collect and send data to my phone, which I can the export in .csv format. I'll see about posting it here.
#chickenofthewoods#oystermushrooms#myco#mycophile#mushroomfarmer#mushroomfarm#mushroomlove#shrooms#mycology#mushroomporn#mushroomfarming#mushroomgrowing#mushroom#mushroomcultivation#fungi#farming#culinarymushroom#gourmetmushroom#agriculture#growyourownfood
1 note
·
View note
Text


Update on the sub. Like I said in the last post, when I drilled these holes, the myc had not yet colonized that far down. I placed it in the fruiting chamber anyways.
After checking on it this morning, as you can see in the pictures above, the myc has reached the bottom, though I don't know if it's colonized the center. Regardless, I assume it should start fruiting in the next week or so.
In the meantime, I've been mixing up more subs with the same ratio (60:20:20 water:grass:HWFP). I'll be mixing in more pearl oyster spawn, though not at such a high rate as the sub above. The spawn that I'll be using for these new subs are fully colonized WBS jars.
I've also finished making my steaming pasteurizer. I'll be running some tests on it with a run of sub bags. This will make the mixing of the sub materials and water a lot easier without having to worry about pasteurizing it all at the same time. I'll be able to mix the sub together, divide into bags, pasteurize, spawn, seal, and store. The more "streamlined" I can get the entire process, the better.
#chickenofthewoods#oystermushrooms#myco#mycophile#mushroomfarmer#mushroomfarm#mushroomlove#shrooms#mycology#mushroomporn#mushroomfarming#mushroomgrowing#mushroom#mushroomcultivation#fungi#farming#culinarymushroom#gourmetmushroom#agriculture#growyourownfood
0 notes
Text


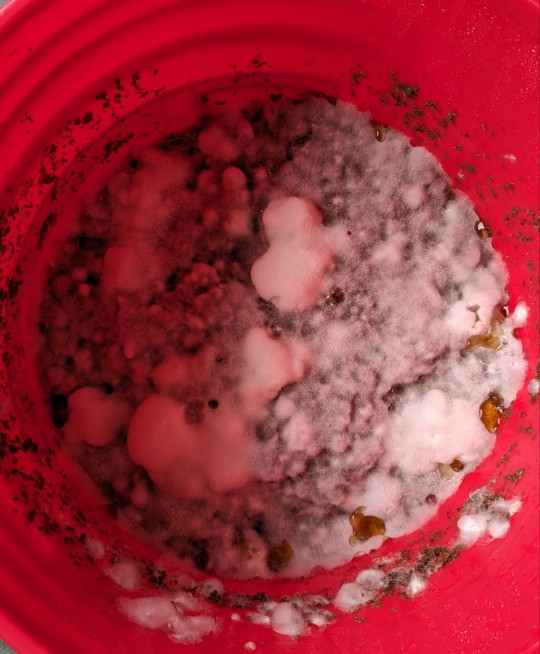
I don't remember how many days it's been since I started this sub. I wrote the date down on a post it note, but now I can't find it. Ugh...anyways, as you can see, the mycelium is happy and thriving. It's very white and thick. The yellow liquid puddles are enzymes that the myc is producing to help break down the sub material. And just like last time, no matter how gross it looks, the scent is wonderful. Very sweet, floral, almost like a light perfume.
I placed it in the fruiting chamber and drilled two holes down at the bottom. However, it didn't look like the myc had fully colonized it yet. I'll still keep it in the fruiting chamber. That way once it's fully colonized, it can go straight to fruiting.
I'm gonna start experimenting a bit with different ratios of grass and HWFP to see what each oyster strain prefers. Of course, the substrate recipe calculator I made is gonna be very useful when I start crunching the numbers.
#chickenofthewoods#oystermushrooms#myco#mycophile#mushroomfarmer#mushroomfarm#mushroomlove#shrooms#mycology#mushroomporn#mushroomfarming#mushroomgrowing#mushroom#mushroomcultivation#fungi#farming#culinarymushroom#gourmetmushroom#agriculture#growyourownfood
1 note
·
View note
Text
Here's the link to the substrate recipe calculator:
#chickenofthewoods#oystermushrooms#myco#mycophile#mushroomfarmer#mushroomfarm#mushroomlove#shrooms#mycology#mushroomporn#mushroomfarming#mushroomgrowing#mushroom#mushroomcultivation#fungi#farming#culinarymushroom#gourmetmushroom#agriculture#growyourownfood
1 note
·
View note
Text
So after 5 days, this is what the sub looks like. The mycelium is very fluffy and looks to be very healthy. There's no signs of contamination, and the scent is very sweet - almost floral and perfumy. I'll give this sub another few days to fully consume the substrate before I put it in the fruiting chamber. I have high hopes for this bucket!
I've also finished turning my spreadsheet substrate calculator into an html document. I'll figure out how to share it in case there are any other mushroom enthusiasts who would benefit from it.
#chickenofthewoods#oystermushrooms#myco#mycophile#mushroomfarmer#mushroomfarm#mushroomlove#shrooms#mycology#mushroomporn#mushroomfarming#mushroomgrowing#mushroom#mushroomcultivation#fungi#farming#culinarymushroom#gourmetmushroom#agriculture#growyourownfood
1 note
·
View note
Text
MC...back on this topic again. When I first started learning about MC, it was a nightmare. I couldn't understand all the math that goes along with it...
That is until now...
I was able to come up with the proper MC by crunching numbers here and there, but I've recently created a spreadsheet "calculator" that I'm sure will help me in getting the MC right each and every time without fail. Here's a screenshot of the spreadsheet:

All you gotta do is plug in the appropriate numbers in the white fields, and the gray fields update automatically. It will tell you all the right amounts of each ingredient and water to add. However, it requires MC testing to be done on your sub material in order to get the MC right.
I'm trying to turn it into a "webpage," but I am in no way a programmer or even a programming hobbyist, so god only knows what it'll look like when I'm done with it. I don't plan on hosting it anywhere on the web, but at least I'll have the code to share with anyone who wants to try to use it.
#chickenofthewoods#oystermushrooms#myco#mycophile#mushroomfarmer#mushroomfarm#mushroomlove#shrooms#mycology#mushroomporn#mushroomfarming#mushroomgrowing#mushroom#mushroomcultivation#fungi#farming#culinarymushroom#gourmetmushroom#agriculture#growyourownfood
0 notes
Text


I've spawned a sub of 50/50 grass and HWFP with a 60% moisture content. I did the math, and judging by the feel of the sub, I think I got the moisture content right. The smaller pieces of the grass made it so much easier when mixing together. The picture on the left is the sub before being pasteurized. The middle is immediately after the water was added and pasteurized. The right picture is just of the makeshift filter I made from micropore tape.
I used 6 jars of pearl oyster spawn, much more than what I would usually use, especially given the small size of this sub. However, as I was mixing the spawn into the bucket, I remembered why I shouldn't use grass in the spawning stage. I always use the spawn as a nutritional supplement in the sub, but with grass spawn, I'm not adding any nutrients that isn't already present since both the spawn and sub contain grass. It's a good idea to use a small portion of your sub material in with your spawn so that the mycelium can better adapt to the material when added to the sub. So because the majority of the pearl oyster jars were 50/50 grass and WBS, I needed to boost the amount of spawn I added. From now on, I won't be adding more than 10% of grass to the spawn by volume.
Here's the numbers on the sub:
Sub ratio: 60:20:20, water:HWFP:grass
Final weight: 2.26kg
Water weight: 1.36kg
HWFP weight: 0.45kg
Grass weight: 0.45kg
Given the previous MC test that I did on the grass, I determined that there was 10% water by weight in the grass. Given that I needed 0.45kg grass, I needed to add 10% to that number to figure out how much of the sampled grass I needed to add.
450g x 10% = 45g water
450g + 45g = 495g sampled grass
I also had to readjust the amount of water needed to bring the sub to 60% MC. For this sub's final weight, I would need to add 1.36kg water. However, given that I've shown that there is already 45g of water present in the grass, I need to subtract that from the required amount, giving me 1.315kg water needed.
#chickenofthewoods#oystermushrooms#myco#mycophile#mushroomfarmer#mushroomfarm#mushroomlove#shrooms#mycology#mushroomporn#mushroomfarming#mushroomgrowing#mushroom#mushroomcultivation#fungi#farming#culinarymushroom#gourmetmushroom#agriculture#growyourownfood
0 notes
Text
I wanna make a quick post about the grass that I use and the moisture content issue I'm having with it.
The grass I'm using is cogongrass (Imperata cylindrica). It's a hell of a nightmare to deal with if you're trying to do some gardening. It's a fire hazard, even when green. When I was in high school, a guy from the area nearly burned down his and all his neighbors' houses because he thought he could keep his burn under control (and without the proper permits or assistance from the forestry commission or fire department). It got so out of control because of the cogongrass everywhere that when the forestry commission came out to contain the fire, the only thing they could do was dig out large ruts around the perimeter of the fire so it couldn't spread any farther. Side note, no one was harmed in that fire, and he was slapped with quite a hefty fine.
While cogongrass is pretty invasive down here, I've had some great success growing oyster mushrooms on it (when I can dial in the right moisture content). The main issue with the moisture content is from a couple different reasons. The biggest issue is the varying amounts of moisture already contained in the grass. I performed several moisture content tests (I'll explain this process in a moment) to determine how much moisture was in each sample, and the moisture varies greatly from one sample to the next. This makes determining the right amount of water to add very difficult.
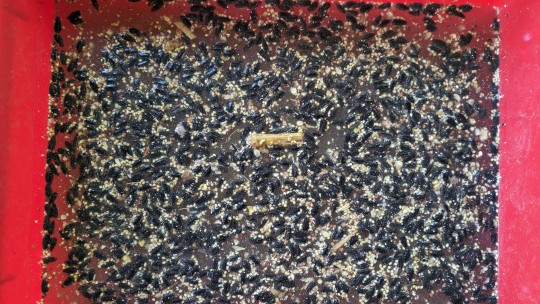
The second issue is the size of the grass. Even after the cogongrass has dried, it can be 6-8" long. Using grass or straw that's too long makes the substrate too airy. Mushrooms "breathe" oxygen, just like us, so while providing the mycelium with enough oxygen to breathe is a great thing, too many air pockets in the substrate will force the mycelium to struggle as it tries to grow across such large spaces. I used a weedeater today to chop everything up into much smaller pieces. I was able to condense four 5-gallon buckets of unprocessed grass down to 1.5 buckets of chopped grass. That will make getting the moisture just right a hell of a lot easier.
Because of the issues I've been having with the grass, I haven't been able to collect a lot of data on how well it does for mushrooms. I don't think I'll have a very high biological efficiency using this grass, but I have a shit ton of it, and it's all free. Before I do any 100% grass subs, I'm gonna be mixing the grass with HWFP so I don't keep killing subs over incorrect moisture content.
As for the moisture content test, it's a way to tell how much water is contained within a substrate material (in this case, cogongrass). I took 100g of grass and put it into a small toaster oven. I heated the sample at 250F for around 30 minutes, took it out, and reweighed the grass.I wrote this new number down and put the sample back in the oven. I let it cook for another 30 minutes before taking it out and reweighing it. I repeat these steps until the new weight doesn't change. Subtract this new number from the original 100g, and the resulting number is the amount of water contained in the substrate material.
Here's some numbers from a moisture test I performed on a sample of grass a couple years ago:
Original weight: 100g
New weight (1): 97.3g
New weight (2): 94.7g
New weight (3): 93.1g
New weight (4): 93g
MC in sample: 7g (7%)
That's about all I got for this post. Just wanted to make a note on the current issue I'm facing right now.
Edit (08 March 2024):

I did another MC test on a bucket of grass that I'm gonna be prepping for my next subs. Here's the results of the test:
Initial weight: 100g
Final weight: 90g
MC: 10%
I put a 100g sample of grass (pictured above) into the toaster oven at 200F for a couple hours. Periodically I would remove the sample and weigh it to see how much water was left. I didn't record those numbers however. Once the last two weighs didn't show any significant reduction in weight, I ended the test. So this particular sample of grass contains 10% moisture by weight, which means I'll need to add another 50% water (50g water per 100g grass) to bring the grass to 60% MC.
While all this looks good on paper, it's another thing to get it right. Who knows? I might even be getting the math all wrong, too. I'm keeping my fingers crossed though.
#chickenofthewoods#oystermushrooms#myco#mycophile#mushroomfarmer#mushroomfarm#mushroomlove#shrooms#mycology#mushroomporn#mushroomfarming#mushroomgrowing#mushroom#mushroomcultivation#fungi#farming#culinarymushroom#gourmetmushroom#agriculture#growyourownfood
1 note
·
View note