
Don't wanna be here? Send us removal request.
Statistics
We looked inside some of the posts by mybrilliantart and here's what we found interesting.
Average Info
Notes Per Post
14
Likes Per Post
14
Reblog Per Post
0
Reply Per Post
0
Time Between Posts
17 hours
Number of Posts By Type
Text
4
Last Seen Tumblr Blogs


Fun Fact
Tumblr was attacked by a cross-site scripting worm deployed by the Internet troll group GNAA on Dec 3, 2012.
Text
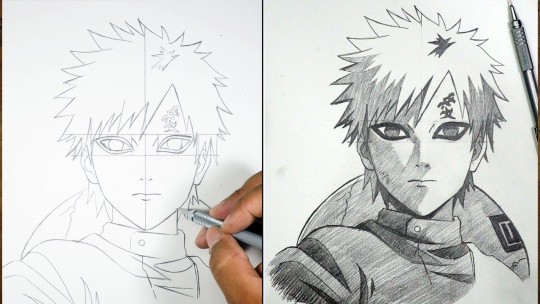
How to Draw Gaara Step by Step Easy - Tutorial
Gaara, the enigmatic and powerful shinobi from the "Naruto" series, is a fan favorite due to his complex personality and unique abilities. Drawing Gaara can be a rewarding experience for fans and artists alike. In this easy step-by-step tutorial, we'll guide you through the process of drawing Gaara, ensuring that you capture his distinctive look with confidence.
Materials Needed:
Pencil Eraser Drawing paper Fine-tip black pen (optional for inking) Colored pencils or markers (optional for coloring)
Step 1: Reference Gathering
Start by collecting reference images of Gaara from "Naruto." Focus on details like his facial features, hairstyle, and the gourd he carries. Understanding these details will help you create a more accurate drawing.
Step 2: Basic Shapes
Begin with basic shapes to outline Gaara's head and body. Draw an oval for the head and a simple line for the neck and torso. Add circles for the shoulders and joints to establish the pose and proportions. Gaara is often depicted with a serious and contemplative posture, so keep that in mind as you sketch the basic framework.
Step 3: Facial Features
Refine the shape of Gaara's head and start adding his facial features. Place his eyes slightly above the center of the head, with the nose and mouth below. Gaara's eyes are distinctive with their dark outlines and lack of eyebrows. Add the kanji symbol for "love" on his forehead, a critical feature of his character.
Step 4: Hair
Sketch Gaara's spiky hair using jagged lines to depict its texture and style. His hair is often tousled and appears somewhat wild, so use short, sharp strokes to create this effect.
Step 5: Clothing and Gourd
Draw Gaara's clothing, focusing on his ninja outfit. Outline the folds and details of his attire to convey the fabric's texture. Next, sketch the large gourd he carries on his back, adding details like the straps that secure it.
Step 6: Arms and Hands
Flesh out Gaara's arms and hands, keeping his relaxed yet alert demeanor in mind. Position his arms naturally, with one arm perhaps resting on the gourd. Pay attention to the fingers and thumbs, ensuring they are proportionate and natural-looking.
Step 7: Finalize the Outline
Go over your sketch, refining the lines and adding any additional details. Erase any unnecessary guidelines and ensure that the proportions are accurate. Take your time to make any necessary adjustments to capture Gaara's likeness faithfully.
Step 8: Inking (Optional)
If you prefer a clean and defined look, use a fine-tip black pen to outline the final drawing. Be patient and steady as you trace over the pencil lines, making sure to follow the contours of Gaara's features and clothing accurately.
Step 9: Coloring (Optional)
For those who wish to add color, use colored pencils or markers to bring Gaara to life. Choose appropriate shades for his hair, clothing, and the gourd. Add shading and highlights to create depth and dimension, enhancing the realism of your drawing.
Step 10: Final Touches
Add any final touches, such as additional shading, highlights, or intricate details, to enhance the overall appearance of your Gaara drawing. Step back and admire your creation, appreciating the effort you've put into capturing the essence of this unique character.
Conclusion:
Drawing Gaara from "Naruto" can be a fun and rewarding experience for artists of all skill levels. By following these easy steps and paying close attention to his unique characteristics, you can create a compelling and accurate representation of Gaara. Remember to practice regularly and enjoy the process of bringing one of your favorite characters to life on paper. Happy drawing!
► Video Tutorial https://www.youtube.com/watch?v=4ilO9KmgJqc
► All Video Anime Drawing https://www.youtube.com/watch?v=tnvtlj-D5Lw&list=PL6VVByiPPRdizIp94lmW_nK1RQ7iHB8ut
► Play Lists Anime Drawing https://www.youtube.com/playlist?list=PL6VVByiPPRdizIp94lmW_nK1RQ7iHB8ut
3 notes
·
View notes
Text
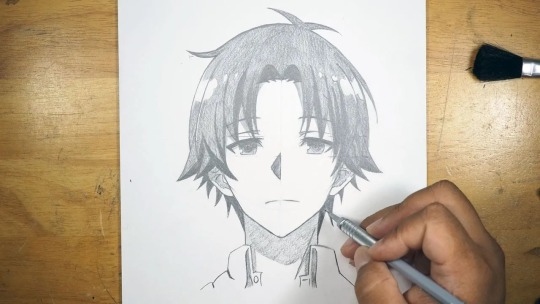
How to Draw Ayanokouji Kiyotaka - Classroom of the Elite
Learn to draw Ayanokouji Kiyotaka from "Classroom of the Elite" using only a pencil! This step-by-step guide covers everything from basic outlines to detailed features, capturing his distinct look and calm demeanor. Perfect for fans and budding anime artists looking to improve their skills.
► Video Tutorial https://www.youtube.com/watch?v=Jc-yBYG5UKo
► All Video Anime Drawing https://www.youtube.com/watch?v=tnvtlj-D5Lw&list=PL6VVByiPPRdizIp94lmW_nK1RQ7iHB8ut
► Play Lists Anime Drawing https://www.youtube.com/playlist?list=PL6VVByiPPRdizIp94lmW_nK1RQ7iHB8ut
#how to draw ayanokouji#how to draw ayanokoji easy#how to draw ayanokouji kiyotaka#anime drawing#anime fanart#classroom of the elite
4 notes
·
View notes
Text
How to Draw Megumi Fushiguro Step-by-Step - Jujutsu Kaisen
Megumi Fushiguro, one of the main characters in Gege Akutami's popular manga and anime series "Jujutsu Kaisen," is known for his calm demeanor and powerful shikigami techniques. Drawing Megumi can be a fun and rewarding challenge for artists. This step-by-step guide will help you draw Megumi Fushiguro with confidence, capturing his unique features and enigmatic presence.

Materials Needed:
Pencil Eraser Drawing paper Fine-tip black pen (optional for inking) Colored pencils or markers (optional for coloring)
Step 1: Reference Gathering
Start by collecting reference images of Megumi Fushiguro from "Jujutsu Kaisen." Pay attention to his facial features, hairstyle, and clothing. Understanding his character design will help you create a more accurate and detailed drawing.
Step 2: Basic Shapes
Begin by sketching the basic shapes that make up Megumi's head and body. Draw an oval or a circle for his head. Add guidelines for the facial features: a vertical line down the middle of the face and a horizontal line to mark the eye level. Sketch a simple outline for the neck and shoulders to establish the proportions.
Step 3: Facial Features
Refine the shape of Megumi's head and start adding his facial features. Position his eyes along the horizontal guideline, with enough space between them to fit another eye. Draw his sharp, almond-shaped eyes, slightly angled for a serious expression. Add his eyebrows, slightly furrowed to convey his focused demeanor. Place his nose and mouth below the eyes, keeping his mouth in a neutral or slight frown.
Step 4: Hair
Sketch Megumi's distinctive spiky hair. His hair is a key part of his appearance, so pay attention to its shape and direction. Use quick, jagged lines to create the spiky texture, making sure the hair extends outwards from his head in various directions. Add layers to give it volume and a dynamic feel.
Step 5: Clothing
Draw Megumi's school uniform, starting with the collar of his jacket. Outline the jacket's shape, adding the folds and creases to give it a natural look. Draw his shoulders and the sleeves of his jacket, paying attention to the way the fabric drapes and folds. Sketch the details of the uniform, such as buttons and seams, to make it more realistic.
Step 6: Hands and Accessories
Add Megumi's hands, which can be a bit challenging. If he's in a specific pose, like summoning a shikigami, make sure to capture the correct hand positioning. Pay attention to the proportions and details of the fingers. If you're drawing him with his Divine Dog shikigami, sketch the outline of the dogs in the background, making sure they complement the composition.
Step 7: Finalize the Outline
Go over your sketch, refining the lines and adding any additional details. Erase any unnecessary guidelines and ensure that the proportions are accurate. Take your time to make any necessary adjustments to capture Megumi's likeness faithfully.
Step 8: Inking (Optional)
For a clean and defined look, use a fine-tip black pen to outline the final drawing. Be patient and steady as you trace over the pencil lines, taking care to follow the contours of Megumi's features, hair, and clothing.
Step 9: Coloring (Optional)
If you wish to add color, use colored pencils or markers to bring Megumi to life. His uniform is typically dark blue or black, with his hair being a shade of black or very dark blue. Use lighter colors for highlights and shading to create depth and dimension.
Step 10: Final Touches
Add any final touches, such as additional shading, highlights, or background elements, to enhance the overall appearance of your Megumi Fushiguro drawing. Step back and admire your creation, making any final adjustments as needed.
Conclusion:
Drawing Megumi Fushiguro from "Jujutsu Kaisen" can be an enjoyable and rewarding experience for artists of all levels. By following these step-by-step instructions and paying attention to his unique characteristics, you can capture the essence of this powerful and enigmatic character. Remember to practice regularly, experiment with different techniques, and most importantly, have fun expressing your creativity through your artwork!
► Video Drawing Tutorial https://www.youtube.com/watch?v=4DB2s1sw1_E
► View Playlist All How to Draw Jujutsu Kaisen Characters https://www.youtube.com/playlist?list=PL6VVByiPPRdg9pInPMLuMgWyCpW4-1bZJ
► View Playlist All Jujutsu Kaisen Characters Drawing https://www.youtube.com/playlist?list=PL6VVByiPPRdg5OHriH5oo5BcTWCWdVixU
5 notes
·
View notes
Text
Cute Gojo Satoru - Easy Drawing Tutorial
Gojo Satoru, the charismatic and powerful sorcerer from the hit manga and anime series "Jujutsu Kaisen," is a fan favorite known for his striking appearance and playful personality. Drawing a cute version of Gojo Satoru can be a fun and rewarding experience, even for beginners. This step-by-step guide will help you capture his charm in an easy and approachable way.
Materials Needed:
Pencil
Eraser
Drawing paper
Fine-tip black pen (optional for inking)
Colored pencils or markers (optional for coloring)
Step 1: Basic Head Shape
Start by drawing a simple circle for Gojo's head. This will be the foundation of his cute, chibi-style appearance. Lightly sketch a vertical and horizontal line across the circle to help place the facial features symmetrically.
Step 2: Facial Features
Begin by drawing large, expressive eyes slightly below the horizontal guideline. Chibi characters often have oversized eyes to enhance their cuteness. Draw a small curved line for the nose just below the eyes, and a simple curved line for the mouth to give Gojo a cheerful expression.
Step 3: Hair Outline
Sketch the outline of Gojo's iconic spiky hair. Start by drawing the hairline, which follows the curve of the top of the head. Then, add large, pointed spikes that extend outward. Keep the spikes slightly exaggerated to maintain the chibi style.
Step 4: Body Shape
Draw a small, simple body below the head. Chibi characters have proportionally larger heads and smaller bodies. Use basic shapes like rectangles and ovals to outline the torso, arms, and legs. Position the arms and legs in a relaxed or playful pose to enhance the cute appearance.
Step 5: Clothing Details
Add details to Gojo's outfit. Draw the collar of his high-necked jacket, and add simple lines to indicate the folds and seams. Keep the details minimal to maintain the chibi style. You can add his blindfold or his sunglasses on top of his head for extra character.
Step 6: Hands and Feet
Sketch small, simple hands and feet. Chibi hands can be drawn with just a few curved lines to suggest fingers, and the feet can be simple ovals or rectangles. Keep the proportions small and cute.
Step 7: Finalize the Outline
Go over your sketch, refining the lines and adding any additional details. Make sure the proportions are accurate and the lines are clean. Erase any unnecessary guidelines and adjust any elements to perfect the overall appearance.
Step 8: Inking (Optional)
For a polished look, use a fine-tip black pen to outline your drawing. Carefully trace over the pencil lines, making sure to follow the contours of Gojo's features and clothing. Allow the ink to dry before erasing any remaining pencil marks.
Step 9: Coloring (Optional)
Add color to your drawing using colored pencils or markers. Choose appropriate colors for Gojo's hair, eyes, and outfit. Use light, pastel shades to enhance the cute, chibi appearance. Add shading and highlights to create depth and dimension.
Step 10: Final Touches
Add any final touches, such as additional shading, highlights, or small details, to enhance the overall look of your drawing. Step back and admire your cute version of Gojo Satoru, appreciating the effort you've put into capturing his charm.
Conclusion:
Drawing a cute version of Gojo Satoru from "Jujutsu Kaisen" can be an enjoyable and accessible project for artists of all levels. By following these simple steps and embracing the chibi style, you can capture the playful and endearing side of this beloved character. Remember to practice regularly and have fun expressing your creativity through your artwork!
► Video Drawing Tutorial
► All Video Cute Drawing
► All Video How to Draw Chibi Characters
2 notes
·
View notes