
Statistics
We looked inside some of the posts by myrakhannyu and here's what we found interesting.
Average Info
Notes Per Post
1
Likes Per Post
1
Reblog Per Post
0
Reply Per Post
0
Time Between Posts
1 month
Number of Posts By Type
Text
10
Photo
1
Last Seen Tumblr Blogs


Fun Fact
Tumblr has a low social media market share in South America.
Text
Clay pots process images
https://drive.google.com/drive/u/2/folders/1M1gH1eEq0vCn915i2D9KzrJZTx9ndT1o
0 notes
Photo


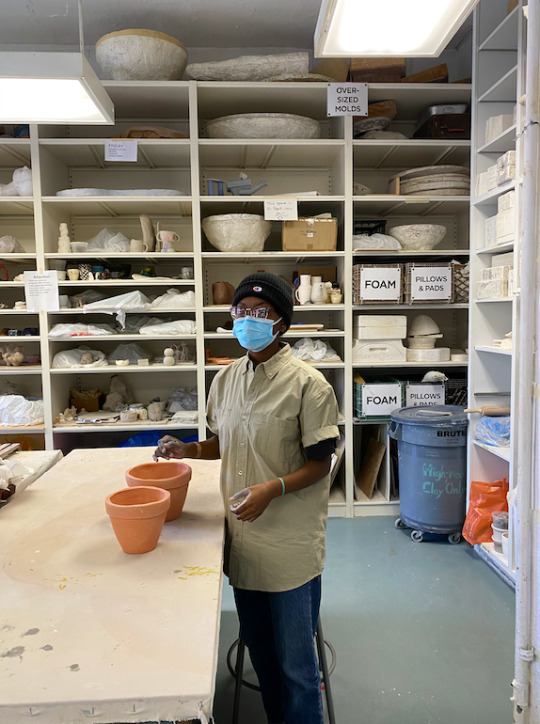
Collaborating with NYU Ceramics studio student Ebony to prototype clay pots. Firing clay pots to begin water testing.
0 notes
Text
Week 13 - Water Levels

These are the standards set by the US government and are a good reference point when testing water.
What are some harmful bacteria in water?
Coli and fecal coliform are bacteria whose presence can indicate water contaminated by human or animal wastes , causing short-term health effects, including: Cramps, nausea, diarrhea, headaches and more; they may also pose a greater risk for people with severely weak immune systems, elderly, young children and infants. -- CLAY POTS - um = micrometer

Lack of clean water for use by rural communities in developing countries is of great concern globally. Contaminated water causes water-borne diseases such as diarrhea, which often lead to deaths, children being the most vulnerable.
Therefore, the need to intensify research on point-of-use (POU) water purification techniques cannot be overemphasized. In this work, clay pot water filters (CPWFs) were fabricated using terracotta clay and sawdust. The sawdust was ground and sieved using 300, 600 and 900 μιη sieves. The clay and sawdust were mixed in the ratios 1:1 and 1:2, by volume.
Pots were then made, dried and fired in a furnace at 850oC. Raw water collected from nearby rivers was filtered using the pots. The raw and filtered water samples were then tested for E. coli,total coliforms, total hardness, turbidity, electrical conductivity, cations and anions. The 600 μιη pot had the capacity to destroy E. coli completely from the raw water, whereas the 900 μm pot reduced it by 99.4%.
The 600 μm and 900 μm pots could reduce the total coliform concentration by 99.3% and 98.3%, respectively. An attempt was also made to investigate the germicidal action of copper on the coliforms in raw water, with a view to utilising it in the CPWFs. Results showed that 10 g of copper, in the form of mesh made of thin wire of diameter 0.65 mm, had the capacity to completely eliminate E. coli, by immersing it in 300 ml of raw water for 5 h, and total coliforms, by immersing it for 10 h.
Subsequently, copper was added to the CPWF by placing the mesh in the receptacle of the CPWF. Tests showed that copper could destroy any remaining E. coli in the filtered water, rendering the CPWF a completely viable POU technique for producing clean water.
All other critical parameters such as total hardness, turbidity, electrical conductivity and ions in the filtered water were also within acceptable levels for drinking water quality. The filtration rate of the pot was also measured as a function of grain size of the sawdust and height of the water column in it. The filtration rate was found to increase with grain size and height in all of the pots.
0 notes
Text
WEEK 12
Sent Green Grant Draft(below) to Vanessa. She sent me the Green Grant guidelines that I need to fill out and send back to her for review.
-------
INITIAL DRAFT
Green Grant
Draft
My name is Myra Khan and I am a first year Graduate Student at the Integrated Digital Media Program at NYU. I am in the process of designing a water filtration system using natural materials for the Ndor Eco Village in Ghana and believe that the Green Grant would be highly beneficial for the purposes of furthering that project through testing on site and in the NYU labs.
During my first semester(Fall 2019) I had the privilege of working with the Ndor Eco Village through a class project for the Special Topics Course ‘Developing Technologies for Urban Gardens’ taught by Prof.Vanessa Harden. The Village is a grass root non-governmental organization in Aklobortonu, Ando, in the Have district of the Volta Region. The Eco-village educates and provides the local community with developmental agricultural practices and environmental consciousness. Through this I was introduced to Foli, the man who heads the Ndor Eco Village project in Ghana. My immense interest in the class led me to do an Independent Study with Prof. Harden this semester (Spring 2020) through which I am in the process of designing and testing a water filtration system using natural materials that can hopefully be implemented in villages throughout Ghana.
Ndor Eco-village is a grass root non-governmental organization in Aklobortonu, Ando, in the Have district of the Volta Region. The Eco-village educates and provides the local community with developmental agricultural practices and environmental consciousness. Their mission is to promote rural education and educate the community on sustainable methods of cultivating the land, managing, harvesting, storing, conservation, preservation and environmentally sound practices that benefit the whole ecosystem.
In addition to me designing the water filtration system, I am also designing educational posters for the village to educate villagers on cleaner recycling practices and fight against water contamination. Through my initial research for the Special Topics Class I found one topic that I was particularly interested in and wanted to tackle - water usage.
There were 3 main water related issues that I wanted to touch upon during the Independent study.
-1. The villagers complain about water contamination and pollution in their wells caused by people in the village and neighboring villagers trying to sabotage their wells due to competition. To tackle this I felt that educational posters and well coverings would be an effective solution to combat the problem.
-2. They also don’t have access to clean drinking water anywhere near the village and have to travel to the city and bring it to the village in bulk which is not practical. This is where the water filtration system designed through local materials would help everyone have access to clean drinking water.
-3. The last issue is the issue of lack of moisture retention in soil during dry months. So I designed a cistern to collect rain water which the village can use during dry months and Foli implemented that design and has even started building it.
I believe there is an NYU campus in Accra, Ghana which is a 3 hour car ride to Ndor Eco Village. I would love to have the opportunity to go there and physically test out my designs on site and not just delegate remotely from New York City. This would help me get a better understanding and solve problems more accurately for the village. I would also like to take Prof. Vanessa Harden who has worked so closely with me since the beginning of this project and understands the complexities of the experiments being done.
For this I would like to request $5000 for 2 trips; Flight, Car cost from Accra to Ndor Eco-Village and Accommodation. This would help me take my project to a bigger scale throughout Africa. I would also like to bring to your attention that I was also part of the team responsible for designing and initiating the IDM Grow Lab which received a Green Grant earlier in the Spring Semester.
0 notes
Text
WEEK 11 --- Steps Foli is expected to follow in the coming week.
Steps Foli Needs to take for testing
First collect 3 substantial amounts of samples of water from contaminated sources like Rain, Natural body of water, Wells etc.
FIRST SAMPLE
First Sample should be marked Clay Pot Testing - which is when the water is passed through a clay pot which is NOT glazed or has holes.
The water must pass naturally through the microscopic holes at the bottom of the clay pot and land in a clean plastic bottle/bucket.
Once the cleaner water is collected please test it through a testing kit.
Then make sure to mark the cleaner water sample with the results and write the name of the test on the cleaner sample as well.

SECOND SAMPLE
Mark second sample of water - Bamboo testing
Run the Bamboo test as per the instructions provided and place test the new water.
Write results on the new water container and also write the test that was done on it.

THIRD SAMPLE
Mark the third container of water sample - Clay and Bamboo.
Run the Clay test on that water.
Once it is cleaned, use the new sample to run the bamboo test on it.
The end result - write water testing kit results on the container of new water and write Clay and Bamboo(so we know what sample it is).
-----------------
SENT FOLI VIDEO EXPLAINING THE ABOVE STEPS.
0 notes
Text
WEEK 10 ------------------- Educational Posters

Initial style approval of drawings. Idea is to encourage kids of the village to take it upon themselves to save the village. This will be extremely encouraging for children who will feel important due to the responsibility given to them.
Second Draft is:

Might change the words around. Might even change the background to make it more visually appealing.
In addition to this had a 3-way Conference call with Vanessa and Foli, explained all the testing procedures that need to be done and sent him a PDF of testing procedure.
0 notes
Text
WEEK 9 DIY NATURAL FILTERS Charcoal water filters can be used to remove suspended material and harmful bacteria in polluted water to a level satisfactory for human consumption. Water-filter pot Materials - Gravel and sand for filtration. - Charcoal to remove colour, odour, taste, and certain dissolved impurities Construction 1 Make a number of small holes in the bottom of a galvanized iron or steel drum, clay pitcher, or ordinary steel drum. This will be the water-filter container. 2 Fill the pitcher or drum with a 25-cm layer of gravel. 3 Place a layer of coarse sand on top of the gravel, up to a height of about 25 cm. 4 Cover with charcoal. 5 Cover the charcoal with a 510-cm thick layer of gravel to prevent the charcoal pieces from floating in the water. ————————————————————————— HOW TO MAKE BAMBOO CHARCOAL AT HOME Before you can activate charcoal and use it in a variety of recipes, you need to first make the charcoal itself. Good news is it’s easy and something you can do in your own backyard – great for avid DIYers! The first step is to gather all of your ingredients so that you have everything on hand when it’s time to start making the charcoal. In addition to bamboo to burn, you also need a fire pit with a cover. Traditionally, charcoal can be made in pits in the ground, kilns, or even old tubs. Start by breaking up your bamboo stalks to fit them into your burning area. Once the wood has turned into coals, you’ll need to remove them from the pit and pile them onto the ground. Cover them with some sort of top, such as one from an old grill, and pour sand around the bottom to make the lid airtight. This allows the coals to cook away their moisture. It also ensures all volatile gases are removed and that your charcoal is going to be high quality. After about an hour, you’ll find your coals have all but burned out. There will be a small pile of black coals with a thin layer of dust scattered over the top. Allow the coals to cool completely so you don’t burn yourself before breaking them into smaller pieces. It’s easy to use a hammer or mallet to break the black coals into smaller pieces and then rinse them in running water. Some people stop here, as this charcoal is perfect for water filters or for feeding to a flock of chickens. However, if you want a powder, then use an old blender to carefully grind up the bits of charcoal into a fine dust. HOW TO MAKE ACTIVATED BAMBOO CHARCOAL Once you’ve made your own charcoal, then it is time to activate it so that you can enjoy all of the benefits it offers. While it’s more time consuming to make and activate your own charcoal, you can end up saving a lot of money. The first step is to carefully mix calcium chloride with water in a ratio of 1:3. This can be dangerous and needs to be completed by an adult, as this produces an exothermic reaction and the solution will get very hot. Make enough of this mixture to wet all of the charcoal. If you can’t get your hands on calcium chloride or simply don’t feel comfortable using it, then you can use lemon juice or bleach instead. Use 1.3 cups of lemon juice or bleach in place of the calcium chloride for the same results. Next, carefully stir together your water mixture and your charcoal. Only use a glass or stainless steel mixing bowl so as to avoid any dangerous reactions with other materials in the bowl. Slowly begin adding the water mixture to the charcoal, stirring constantly, until you have a spreadable paste. At this point, make sure to discard any unused water solution. Cover the bowl and let the charcoal dry out for 24 hours without being touched. When the 24 hours are up, carefully pour out the remaining liquid. Some people like to rinse the charcoal with fresh water and filter it through a coffee filter to ensure that the charcoal is very high quality. Now, the charcoal needs to be heated. It can either be baked in an oven at 250 degrees for half an hour until the moisture has evaporated or heated over the stove. The stove needs to be kept hot enough to boil water to activate the charcoal. It can take around three hours to dry up the charcoal when it is heated this way on the stove. Now that you know how to both make and activate your own charcoal, let’s look at some sweet ways to use it! HOW TO MAKE A BAMBOO CHARCOAL WATER FILTER A water filter is a great use for activated charcoal, and one of the most popular options for people who make their own at home. These filters can be used both in aquariums and for filtering drinking water. The great thing about using activated charcoal in a water filter is that it easily removes any impurities in the water, letting only clean water pass through. Using charcoal sticks makes this easy, as they can simply be boiled, cooled and dried, then placed into a bottle or pitcher to remove impurities. However, making a filter with crushed or powdered charcoal is almost just as easy. You need to begin by sanitizing a glass pitcher – one with a spout at the bottom. Once the pitcher is clean, simply place a coffee filter on the bottom, ensuring that it covers the bottom spout so it can catch any charcoal. Begin by soaking the activated charcoal for around 25 minutes to ensure that it is fully saturated, then pour it into the pitcher, leaving about ¼ of the top free. Fill the pitcher with water, making sure that it is never more than half full. By allowing the water to filter out of the bottom spout, you can rest easy knowing that it will be filtered through the charcoal and free from impurities.
0 notes
Text
Week 8
Discuss with Vanessa how to proceed on the project after being remote.
Research on the kind of virus/bacteria you are hoping to filter because that would change the nature of the filtration system.
------
The Secret to Successful Rainwater Harvesting: Floating Filter Intakes
by Doug Pushard
Why worry about where the water in the tank is pulled from? Isn't it all the same? The simple answer is NO. No matter how good your first flush system, if you have one at all, some particulates are going to enter the tank. Eventually, this material will settle on the bottom of the tank. So taking water off the bottom picks up these particulates. Some may be caught by an outgoing filter but this water may also contain heavy metals or chemicals which, at worst, may not always be filtered out and at best, will clog the intake filter faster.
Some of these incoming materials will float when they first enter, the tank so taking water straight off the top is not a good idea either. This is where a device commonly called either a "floating extractor" or a "floating intaker" comes in.
It is an often overlooked part of most rainwater catchment systems. With all rainwater systems, some particulates will enter the storage tank and either settle to the bottom or float.
As the name implies, a floating extractor floats in the water in the tank and its sole purpose is to intake water from the calm, clean water that is in the middle of the tank. It connects to the pipe outlet, typically near the very bottom of the cistern, where water is drawn for household and irrigation use. On most systems, this intake pipe is normally left uncovered.
To illustrate the difference in water quality, water samples were drawn from the same cistern at the same time. The results of hese tests are shown in the chart.
As is visible from the tests, the cleanest water is from the middle of the tank. These water quality tests were performed at a nationally certified test laboratory ( i.e. Related Topics) with the top water (T) being sampled first, followed by the center (C) and then the very bottom (B). The bottom of the tank was not scraped, which would have given a more extreme result.

Water from the top of the tank has significantly more particulates than the other two tests.
Tests Explained
pH - The measure of the water's relative acidity or alkalinity. A pH of 7 is neutral while higher numbers indicate acidity and lower alkalinity.
Turbidity - Measures the impedance of light through water. The particles which cause turbidity can interfere with disinfection by sheltering microbes.
Hardness - inhibits the cleaning action of soaps and detergents. It can also cause deposits of scale on the inside of hot water pipes and cooking utensils. Hardness is caused by calcium and or high levels of magnesium salts.
Additionally, either the top or bottom had the higher mineral and metal content (i.e. Calcium 16% higher, Copper 7.1% higher, Iron 11.6% higher, Magnesium 7.1% higher, and Manganese 16% higher) than the water in the middle. Water from the very bottom and the very top of the tank are clearly the worst. The tested cistern has only been in use for 2 years and it is reasonable to expect that over time the metals, minerals and solids will continue to build up, and as this "stuff" builds up, it will get closer and closer to the intake pipe and will become part of the everyday incoming water supply.
It is critical to note that particulates in the water can also decrease the effectiveness of UV lamps by potentially blocking harmful bacteria from sterilization.
The pH and hardness do not vary much with the depth of the water; however, these readings are lower, and in some cases vastly lower, than nearby well and city water.
So taking water from the middle of the tank is clearly the best solution. Floating extractors are a quick and inexpensive way of getting to this water; providing access to the best water, filters will last longer due to having less to filter, and best of all, they are simple and inexpensive.
You can purchase one for $75-$100 or build a simple one yourself for around $30. Either way they are a great investment and should be included in every system.
Filters and Disinfection
Filters are measured in microns. One micron is about 1/25,000th of an inch. For comparison, sand is about 100 – 1,000 microns, a human hair is about 100 microns, a particle of dust is about 1 micron and a virus can be smaller than .01 micron.
The first filters in a system are cartridge filters. They range widely in what they are capable of removing and are used in a series (e.g., a 20 micron followed immediately by a 5 micron filter).
Filters are rated by the smallest size of particle they are capable of filtering. The smaller the micron size the better the filter. However, the finer the filter, the higher its cost and the slower its process. Filters have to be changed regularly, as an old, used filter is an excellent environment for microorganisms and potentially harmful pathogens.
For wells and rainwater systems a larger (e.g., a 50 micron) filter or equivalent screen (e.g., 300 mesh) should be used first to eliminate sand and large particles. This screen should be easily accessible and cleaned quarterly. Next is a 20 or 10 micron filter, followed immediately by a 10 or 5 micron filter. These are cleaned less frequently, but at least annually.
Filters will not eliminate all substances in the water. To create drinking quality water, filtration is always followed by disinfection. The EPA requires surface and ground water to be disinfected before it is consumed. Consequently, public water systems add disinfectants to destroy microorganisms that can cause disease in people and animals.
This is also necessary for rainwater, as the natural environment contains many microorganisms. Most are not harmful to us. Some, however, such as Giardia lamblia, can be deadly. These need to be eliminated from water before it is consumed.
Kinds of disinfection include chlorinization, ozonization, ultraviolet (UV) light, and membrane filtration. In evaluating disinfection methods, be aware that some actually create unhealthy byproducts that need to be treated.
The effectiveness of disinfection is judged by looking for an indicator organism that, if present, indicates other more harmful pathogens may be present. In getting a water test, this indicator organism is Total Coliform Bacteria that, if present, indicates other pathogens may be present as well.
Chlorine has been used as a disinfectant in public water systems for most of the past century. The introduction of chlorine to disinfect water has virtually eliminated waterborne diseases such as cholera, typhoid, dysentery and hepatitis, saving thousands of lives. However, it is often maligned due to suspected side effects.
For disinfection purposes, 2.3 fluid ounces of household bleach must be added per 1,000 gallons of water. Chlorine dosage rate will vary depending on quantity of water to be treated, pH and temperature.
A major downside of chlorine is that it is very reactive and easily combines with naturally occurring organic material to create harmful trihalomethanes (THMs) like chloroform. Chloroform is formed when chlorine reacts with either humic and/or fulvic acids, which are commonly found in water.
Because chlorine is reactive, it quickly dissipates. Keeping the dosage rate correct is critical when using this method of disinfection. THMs should be tested for in the water source if you are going to use Chlorine.
To reduce the possibility of harmful byproducts with the use of Chlorine, do the following:
Remove the byproducts after they have been created. This is costly, typically meaning other purification systems must be employed (e.g., Reverse Osmosis or other purifcation systems) or
The concentration of particulates/organics in the water before it is treated. This is accomplished by using filters to remove these substances from the water prior to chlorine treatment.
The Chlorine smell and taste can be removed with an activated carbon filter, often referred to as a charcoal filter. Granulated activated carbon filters are sometimes made from coconut shells and can be considered a “green” solution. Carbon block filters are compressed activated carbon, fused with a binding substance into a solid block.
0 notes
Text
WEEK 5 - 7
How to Use Bamboo Charcoal

Week 5 - Week 7
Collect water and start testing.
Method:
Bamboo charcoal, you’ve heard of it, you’ve heard of the great things it can do. But really, does it work? I think so. I’m not 100% sure, but I allowed several people to try my “bamboo water” and tea brewed with it alongside normal Chicago tap water and the results were positive. I have no scientific evidence, and I don’t need any – I like it, it tastes good, and I’m going to use it — and that’s enough for me (want technical? read this).
If you are interested in making bamboo charcoal, Pyro Energen has put together this pretty neat guide to making your own at home, with bamboo chopsticks at that!: http://www.pyroenergen.com/articles/how-to-make-bamboo-charcoal.htm
The idea behind bamboo charcoal, and any charcoal for that matter is the fact that it is extremely porous and will absorb impurities in water. It really isn’t “filtering” water if you set a stick in the water, in order to filter the water, the water must pass through granulated charcoal or some other medium (this is how Brita filters work).
Once you have obtained bamboo charcoal, follow these steps:
1. Sterilize the bamboo charcoal by boiling it for 10 minutes in water.
2. Allow the charcoal to dry for 24 hours.
3. Soak it in your tea water for 24 hours, then use the water to brew tea.
4. After about a month or so, reboil the charcoal, dry it, then use it again.
How Foli can do this on his own:
How to Make Bamboo Charcoal in a Simple Way
This time, a small part of the bamboo branch will be used instead for charcoal making.
Materials to prepare:
Few sticks of dried bamboo branch
Aluminum foil
Spirit (alcohol) lamp
Bamboo charcoal procedures:
Wrap the small bamboo branches with aluminum foil as seen below.
Probably, wrap the bamboo several times with aluminum foil to seal and protect it (air intact).
You can use an ice pick to make a tiny hole to the wrapped aluminum foil, to prevent it from bursting when the trapped air in it is expanded by the heat.
Bamboo Charcoal
Place a wire mesh on top of the spirit lamp and position the aluminum-wrapped bamboo on top of it.
Light up the lamp, this is done to dry the bamboo inside the foil. White smoke will come out from the tiny hole, and will turn to yellow. This might produce an unpleasant smell, so you will need to open your windows or do it outdoors.

Bamboo Charcoal
When the color of aluminum foil turns yellow, it means the job is done. The yellowish color is caused by the bamboo tar. Do not open the aluminum foil until it's cooled. Heat can break the charcoal easily.
Another Simple Way in Making Bamboo Charcoal
Bamboo Charcoal 1
Prepare an aluminum foil and a few bamboo sticks (I used bamboo chopsticks).
Bamboo Charcoal 2
Bamboo sticks, aluminum foil, wire mesh, and stove are the only thing you need.
Bamboo Charcoal 3
Wrap the bamboo sticks with aluminum foil. Make sure the wrapping has no holes.
Bamboo Charcoal 4
At the end of the wrapping, make a small hole. This is to let the accumulated gas to escape and not to blast.
Bamboo Charcoal 5
Place the wire mesh on the gas stove. Place the bamboo sticks on top of it.

Bamboo Charcoal 6
First, put up a small and weak flame. Soon, white steam-like gases will come out. Increase the flame after few minutes (steam will turn bluish). If it turns into a whitish smoke, then turn off the gas stove.
Bamboo Charcoal 7
Sink the aluminum foil into a water basin for few minutes.
Bamboo Charcoal 8
Now, open the aluminum foil and you'll see hard bamboo charcoals.
Hard and good charcoals do not make your hands dirty black.
Soft charcoals are caused by oxygen present during processing. These are poor charcoals and we can't use them for our purposes.
Another Procedure in Making Bamboo Charcoal
Bamboo carbonization can be divided into four stages according to temperature and products situation in a kiln.
First stage drying: the temperature is below 120°C and the speed of carbonization is slow. Heat is used to evaporate the water in bamboo, and the chemical composition of the bamboo is still intact.
Second stage precarbonization: the temperature is in the range of 120°C to 260°C and there is a distinct chemical reaction in bamboo. The unstable chemical compounds begin to decompose and carbon dioxide and carbon monoxide are released.
Third stage carbonization: the temperature is in the range of 260°C to 450°C, and the bamboo is decomposed into liquid and gas products. Liquid products contain much acetic acid, methanol and bamboo tar. Flammable methane and ethylene in gas products are increasing while carbon dioxide production is reduced.
Fourth stage calcinations (refining stage): the temperature is over 450°C. The bamboo becomes charcoal by providing a mass of heat, emitting the volatile substances and to enhance nonvolatile carbon. Based on the temperature in this stage, the bamboo charcoal can be divided into three groups (low-temperature, middle-temperature and high-temperature charcoal). The quality and properties of bamboo charcoal differs with different temperatures during the refining stage.
Lastly the bamboo is left to cool down and depending on the weather; this process may take from five to eight days in big volume.
During the above process, you can extract alcohol, tar, vinegar, medicinal liquid (water form), and many other products. Products from bamboo charcoal have countless uses - from skin diseases, allergies, influenza, heart diseases, stomachaches, insecticides, pesticides, germicides, bactericides, deodorants, disinfectants, gardening, cosmetics, cooking, washing, and hundreds of others.
Start small prototype - testing
0 notes
Text
WEEk 3-4
Research on additional materials.
Progress:
Researched a number of techniques that are used to filter water without electricity or expensive filtration systems.
Number of options found:
Bamboo Charcoal - this is created through heating bamboo and creating a charcoal of the plant, which when placed in water is able to absorb most of the bacteria in the water. This is extremely helpful and sustainable for a place like NDOR eco village.
Second option was the inside gel of a cactus plant which can be put inside the contaminated water and once boiled is able to absorb most of the bacteria. The only problem with this is you need cactus plants for this and they are not natives to the region.
Last method I thought would be a good match for the village was clay pots. Clay pots have perforations of about 0.2 ml in them so once water is poured in them, it slowly starts to leak from the bottom. The water that leakes is clean from almost any bacteria and is healthy and drinkable for infants and adults.
I have decided to do a combination of both points 1 and 3. I will create a funnel which will be attached to an underground cistern. In the underground cistern I will place bamboo charcoal to first put the water through initial filtration.
Secondly, whatever water is extracted from the cistern for drinking use will go through pots into a plastic/or any other material container they have present.
Polycarbonate corrugated roofing - Foli needs me to use.

0 notes
Text
WEEK 1 - 2
Syllabus
Research on Water Contamination and ways to prevent it. Research Materials - Get in touch with Foli.
Progress:
Spoke to Foli and there are two priorities:
Temporary and/or Permanent covering for the well to prevent contamination and pollution.
Collection of rainwater for future use.
The idea that we discussed was to create a funnel through which water can be collected in a cistern. Foli initially preferred Aluminium and bamboo in the making of the funnel but after research on materials I came to realise how Aluminium might not be the safest way to transport water and pose a health risk.
Week 3- Week 4
Research on additional materials.
Progress:
Researched a number of techniques that are used to filter water without electricity or expensive filtration systems.
Number of options found:
Bamboo Charcoal - this is created through heating bamboo and creating a charcoal of the plant, which when placed in water is able to absorb most of the bacteria in the water. This is extremely helpful and sustainable for a place like NDOR eco village.
Second option was the inside gel of a cactus plant which can be put inside the contaminated water and once boiled is able to absorb most of the bacteria. The only problem with this is you need cactus plants for this and they are not natives to the region.
Last method I thought would be a good match for the village was clay pots. Clay pots have perforations of about 0.2 ml in them so once water is poured in them, it slowly starts to leak from the bottom. The water that leakes is clean from almost any bacteria and is healthy and drinkable for infants and adults.
I have decided to do a combination of both points 1 and 3. I will create a funnel which will be attached to an underground cistern. In the underground cistern I will place bamboo charcoal to first put the water through initial filtration.
Secondly, whatever water is extracted from the cistern for drinking use will go through pots into a plastic/or any other material container they have present.
Polycarbonate corrugated roofing - Foli needs me to use.
Week 5 - Week 7
Collect water and start testing.
Method:
Bamboo charcoal, you’ve heard of it, you’ve heard of the great things it can do. But really, does it work? I think so. I’m not 100% sure, but I allowed several people to try my “bamboo water” and tea brewed with it alongside normal Chicago tap water and the results were positive. I have no scientific evidence, and I don’t need any – I like it, it tastes good, and I’m going to use it — and that’s enough for me (want technical? read this).
If you are interested in making bamboo charcoal, Pyro Energen has put together this pretty neat guide to making your own at home, with bamboo chopsticks at that!: http://www.pyroenergen.com/articles/how-to-make-bamboo-charcoal.htm
The idea behind bamboo charcoal, and any charcoal for that matter is the fact that it is extremely porous and will absorb impurities in water. It really isn’t “filtering” water if you set a stick in the water, in order to filter the water, the water must pass through granulated charcoal or some other medium (this is how Brita filters work).
Once you have obtained bamboo charcoal, follow these steps:
Sterilize the bamboo charcoal by boiling it for 10 minutes in water.
Allow the charcoal to dry for 24 hours.
Soak it in your tea water for 24 hours, then use the water to brew tea.
After about a month or so, reboil the charcoal, dry it, then use it again.
How Foli can do this on his own:
How to Make Bamboo Charcoal in a Simple Way
This time, a small part of the bamboo branch will be used instead for charcoal making.
Materials to prepare:
Few sticks of dried bamboo branch
Aluminum foil
Spirit (alcohol) lamp
Bamboo charcoal procedures:
Wrap the small bamboo branches with aluminum foil as seen below.
Probably, wrap the bamboo several times with aluminum foil to seal and protect it (air intact).
You can use an ice pick to make a tiny hole to the wrapped aluminum foil, to prevent it from bursting when the trapped air in it is expanded by the heat.
Bamboo Charcoal
Place a wire mesh on top of the spirit lamp and position the aluminum-wrapped bamboo on top of it.
Light up the lamp, this is done to dry the bamboo inside the foil. White smoke will come out from the tiny hole, and will turn to yellow. This might produce an unpleasant smell, so you will need to open your windows or do it outdoors.
Bamboo Charcoal
When the color of aluminum foil turns yellow, it means the job is done. The yellowish color is caused by the bamboo tar. Do not open the aluminum foil until it's cooled. Heat can break the charcoal easily.
Another Simple Way in Making Bamboo Charcoal
Bamboo Charcoal 1
Prepare an aluminum foil and a few bamboo sticks (I used bamboo chopsticks).
Bamboo Charcoal 2
Bamboo sticks, aluminum foil, wire mesh, and stove are the only thing you need.
Bamboo Charcoal 3
Wrap the bamboo sticks with aluminum foil. Make sure the wrapping has no holes.
Bamboo Charcoal 4
At the end of the wrapping, make a small hole. This is to let the accumulated gas to escape and not to blast.
Bamboo Charcoal 5
Place the wire mesh on the gas stove. Place the bamboo sticks on top of it.
Bamboo Charcoal 6
First, put up a small and weak flame. Soon, white steam-like gases will come out. Increase the flame after few minutes (steam will turn bluish). If it turns into a whitish smoke, then turn off the gas stove.
Bamboo Charcoal 7
Sink the aluminum foil into a water basin for few minutes.
Bamboo Charcoal 8
Now, open the aluminum foil and you'll see hard bamboo charcoals.
Hard and good charcoals do not make your hands dirty black.
Soft charcoals are caused by oxygen present during processing. These are poor charcoals and we can't use them for our purposes.
Another Procedure in Making Bamboo Charcoal
Bamboo carbonization can be divided into four stages according to temperature and products situation in a kiln.
First stage drying: the temperature is below 120°C and the speed of carbonization is slow. Heat is used to evaporate the water in bamboo, and the chemical composition of the bamboo is still intact.
Second stage precarbonization: the temperature is in the range of 120°C to 260°C and there is a distinct chemical reaction in bamboo. The unstable chemical compounds begin to decompose and carbon dioxide and carbon monoxide are released.
Third stage carbonization: the temperature is in the range of 260°C to 450°C, and the bamboo is decomposed into liquid and gas products. Liquid products contain much acetic acid, methanol and bamboo tar. Flammable methane and ethylene in gas products are increasing while carbon dioxide production is reduced.
Fourth stage calcinations (refining stage): the temperature is over 450°C. The bamboo becomes charcoal by providing a mass of heat, emitting the volatile substances and to enhance nonvolatile carbon. Based on the temperature in this stage, the bamboo charcoal can be divided into three groups (low-temperature, middle-temperature and high-temperature charcoal). The quality and properties of bamboo charcoal differs with different temperatures during the refining stage.
Lastly the bamboo is left to cool down and depending on the weather; this process may take from five to eight days in big volume.
During the above process, you can extract alcohol, tar, vinegar, medicinal liquid (water form), and many other products. Products from bamboo charcoal have countless uses - from skin diseases, allergies, influenza, heart diseases, stomachaches, insecticides, pesticides, germicides, bactericides, deodorants, disinfectants, gardening, cosmetics, cooking, washing, and hundreds of others.
Start small prototype - testing
Week 8
Necessary changes / revisions
Week 9 - Week 10
Start Filteration Research
Week 11 and 12
Make initial prototype
Week 13
Texting prototype / water testing
Week 14
Revisions/feedback
Project Assessment and next steps:
As with any project, the best way to test the success of your design and to ensure it works is through physically visiting the actual site, so my hope is to get the opportunity to actually go visit and test out the design on site and make necessary changes if required. Through the feedback that Foli provides I would like to continue to finesse the design till it works flawlessly for their system. I would also hope to continue to expand on the LifeStraw concept ,if it works for the Ndor Eco-Village and create bigger products that last longer for families in need of drinkable water.
Research on Water Contamination and ways to prevent it. Research Materials - Get in touch with Foli.
Progress:
Spoke to Foli and there are two priorities:
Temporary and/or Permanent covering for the well to prevent contamination and pollution.
Collection of rainwater for future use.
The idea that we discussed was to create a funnel through which water can be collected in a cistern. Foli initially preferred Aluminium and bamboo in the making of the funnel but after research on materials I came to realise how Aluminium might not be the safest way to transport water and pose a health risk.
1 note
·
View note