
Statistics
We looked inside some of the posts by nervousandroidroot and here's what we found interesting.
Average Info
Notes Per Post
1
Likes Per Post
1
Reblog Per Post
0
Reply Per Post
0
Time Between Posts
2 days
Number of Posts By Type
Text
6
Last Seen Tumblr Blogs


Fun Fact
Tumblr was named as a finalist in Lead411’s New York City Hot 125 in Aug 2010.
Text
How To Root Android - Su Command Is Explained

"How To Root Android" question is always combined with "Su" command as the whole rooting process is about executing "Su" command on An Android device. So I thought to explain about Su command in deep to give you an accurate picture of Android rooting process. So, if you still don't have a clear idea about Su command, keep reading.
Su command
"Su" stands for "Switch User" as it is used to switch to another user (change user ID during a normal login session) in Linux operating system. If you executed this command like this $ su without a username, you can login to the system as root user (Super user) by default. The root user can access every file and command in the system without any restrictions even if another user has logged in to the system. An Android user can use the same mechanism to become the root user on his Android device since Android is based on a modified version of the Linux kernel. In general, the device manufacturer is the root user by default on your Android device and that's why you cannot access/ modify some Android files. For example, the inability to delete some Android apps (system apps/pre-installed apps) can be presented here.
As regular Android users, we have to use rooting solutions to execute Su command on our Android devices. There are several rooting solutions currently being used for the purpose. Each solution has different features but performs the same mechanism. Anyway, choosing an appropriate rooting solution mainly depend on the Android version, device model, and bootloader status.

Negative Effect of Android Rooting
Once, you've executed Su command on your Android, your device is open to thousand of hackers and viruses. It's just like an invitation to malware, viruses, and hacker attacks. Because they are looking forward to a chance to access Android devices to steal personal data and other sensitive data which is restricted by device manufacturers through not giving root access. These enemies are able to access into rooted devices secretly as a part of another app as you have granted access to any app/any user by running SU. You can avoid this condition to some extent using root access management application which has been designed to prompt when an app tries to install on the device.
Final Word
I hope now you know how Android rooting works. If you have an intention to root your Android, learn more, and explore more before deploy it. Because wrong attempts may harm your device badly.
0 notes
Text
How To Root Android With Samsung Odin

You might be amazed to hear the above topic if you already know what is Samsung Odin. If you aren't aware, I'll first explain what is Samsung Odin before proceeding. Odin is the official flashing utility (Windows-Based) that is used by Samsung internally to flash stock firmware on Samsung Galaxy devices. Though this program is officially used, Samsung never announced it publicly or advised regular users to use it individually. Suddenly, Odin was available to download for regular Samsung users in 2016, at XDA and the available binaries were believed to be the result of leaks. Let's see how Samsung Odin can be used as a rooting solution though it's a firmware flashing utility.
Samsung Odin As A Rooting Solution
The credit for helping users to use Samsung Odin as a rooting solution straightly goes to Chainfire, a well-known retired XDA developer. Technically, Odin has been designed to flash .tar or .tar.MD5 file extensions. So, it isn't compatible with any other file formats. Taking this unique feature as an advantage, Chainfire developed his CF-Auto-Root root binary package to be able to flash via Samsung Odin. As mentioned, the program is only for Samsung devices and only those devices can be rooted using this Odin method.
CF-Auto-Root
CF-Auto-Root is available as packages (.Zip file) and each package is unique and only compatible with specific devices. You can never use one package for two devices which may brick your device if you do so. The other special point is the CF-Auto-Root version. Available versions are,
CF-Auto-Root for Odin flashable devices - All the packages under this version are only can be flashed via Samsung Odin and only Samsung Galaxy devices can be rooted
CF-Auto-Root for fastboot flashable devices - All the packages under this version are only can be flashed via PC when compatible devices are in fastboot mode
How To Root Android With Samsung Odin
First, arrange a Windows PC/Laptop
Install or update the existing USB drivers on the PC/Laptop
Backup of your Samsung Galaxy device
Unlock the bootloader
Download Odin flashable CF-Auto-Root package for your device on your PC based on the device model, Android version and Build ID
Unzip the root package

Switch off your smartphone
Press and hold the volume down + Home, and Power buttons at once and press volume up button when prompted and enter "Download/Odin" Mode
Next, connect your device to the computer over a USB cable
Install the Odin application inside the previously extracted folder
Launch the program and wait until the "ID: COM" area turns in to light blue (It indicates that the attached device is detected successfully)
Next, click on the "AP" button and select the CF-Auto-Root-XXX-XXX-XXX.tar.md5 file
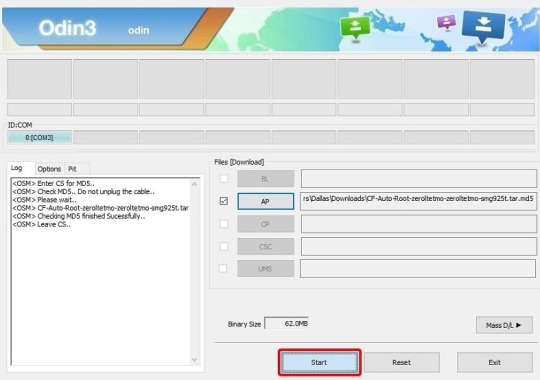
Click on "Open" to load it on Odin and wait until you see the "Leave CS" in the log box
Finally, click on the "Start" button to begin the rooting process
The whole rooting process is automated and your device will automatically reboot into normal Android mode when the process is complete
0 notes
Text
How To Use VirtualXposed On Your Android

Android users are very keen on Android rooting and most of the users have already gained root access on their devices now. But, some of the users still hesitate to root their Android devices due to some of the misconceptions and incomplete knowledge. VirtualXposed is the ideal solution for Android users who are facing such issues. It allows users to run the APKs as plugins and use some of Xposed modules for the purpose of customizing Android OS without requiring unlocked bootloader/root access or modified system image. Let's explore it and its capabilities, features, and characteristics.
VirtualXposed
VirtualXposed is available as an Android application and it's a combination of VirtualApp + epic (Epic is the continuation of Dexposed which is a powerful yet non-invasive runtime AOP (Aspect-oriented Programming) framework for Android app development). Primarily, VirtualXposed APK makes the target app run in the Virtual app while allowing the virtual app to run in the Android system making hooks in the app to load the Xposed module. If you are interested in exploring more about the VirtualXposed mechanism, refer to virtualxposed.org for more details.
How To Install VirtualXposed APK
Note: The app only supports Android 5.0 to Android 10.0
Enable "Unknown Sources” on your device
Download and Install VirtualXposed APK
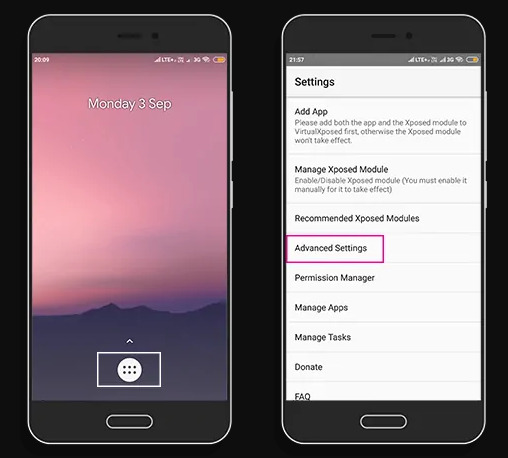
Launch the application > Settings > Advanced Settings >Tap on Install/Uninstall Google services (You need to perform this step to install MicroG and Yalp store to manage apps you are going to install in the future)
Confirm to install when prompt
Now, your device ready to run apps that needs Google Mobile Services (GMS)
How To Install Xposed Modules
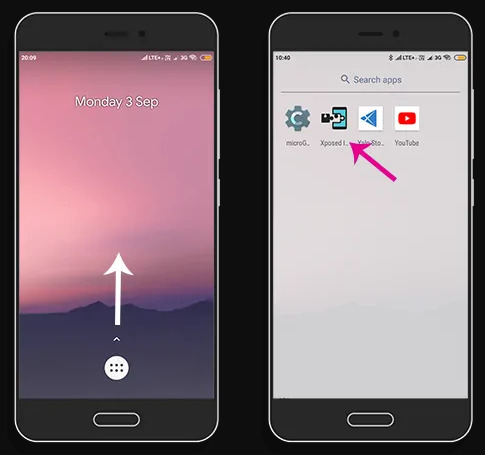
Open the apps drawer by swiping up and you will see Xposed Installer on it
Run it and go to the Menu
Navigate to "Download" section and search for the module you prefer
Download the module and enable it via the "Module" section
Get back to Settings of VirtualXposed APK > tap on Reboot (No need to restart your device) to enable the module
I hope now, you can have a good knowledge of this application and how you can use it to have Xposed modules. But, be informed that you cannot use Xposed modules that modify Android along with this app. Because you are using this app without root access. Meantime, EXposed/TaiChi is available avoiding some weakness of VirtualXposed which is more stable than VirtualXposed. In case you are unable to proceed with the app, you can try EXposed/TaiChi.
Final Word
VirtualXposed is developed by a Chinese developer named Weishu. All the thanks go to him for his great idea and the effort put on this project.
0 notes
Text
How To Root Android - Try Framaroot APK

I have explained about Android rooting in a simple way in my previous post. I hope now you have a clear idea about Android rooting. Perhaps you may not understand the concept completely as of now. If so, you have to read more and more before navigating to root your device. Here I am going to make you aware of the very popular one-click rooting tool which was developed by alephzain XDA developers. The name of the one-click rooting tool we are going to talk about is Framaroot. Framaroot is a very simple one-click rooting tool and any root newbie can use it.
How Does Framaroot Work
Framaroot is a one-click rooting tool. Technically, all the one-click rooting tools are based on Android vulnerabilities and use them (exploit) to access the system partition of the device. Likewise, Framaroot also uses a number of exploits. Each exploit is specific to each chipset and Framaroot automatically chose the compatible exploit when rooting the device.
Compatibility
Officially, Framaroot works on Android Eclair to Android Ice Cream Sandwich. But according to the developer, recent versions of Framaroot would be compatible with Android 4.1.2 and updates. However, as the developer has frozen the updates for the Framaroot, no Framaroot version for the higher Android version. Basically, Framaroot works exploiting Android vulnerabilities and they disappear when they are patched in Android updates. So, Framaroot is not a permanent rooting solution.
Framaroot Features
Available for free
compatible with a number of smartphone models from popular smartphone manufacturers
Exploits based on the Chipsets of the devices
Simple Unroot facility
Execute script for advanced users to execute custom scripts
How To Root With Framaroot
Download latest version of the Framaroot APK on your Android smartphone
Install it on your device
Launch the app and select the "Install SuperSu" clicking the arrowhead

Most probably, Framaroot shows the most compatible exploit and select it to root your device
If you got multiple choices, select the exploit according to your device chipset
Samsung devices - Argon and Legolas exploits
Mediatek devices - Faramir, Boromir, and Barahir exploits
Huawei K3V2 devices - Pippin exploit
AMLogic devices - Gollum exploit
Omap36XX devices - Gimli exploit
Exynos devices - Sam, Frodo, Legolas and Aragorn exploits
Qualcomm devices - Gandalf exploit
As soon as you select the exploit, Framaroot starts to root your device and finally it will show you a message "Sucess"
Final Word
If you have an older Android smartphone without having any usage. You can have it rooted using Framaroot and give it a bit nice look and make it more useful than abandoned in vain.
0 notes
Text
How To Root Android With KingRoot

I hope you've have read my previous post and gained some knowledge about rooting, rooting solutions, and the mechanism of rooting solutions. Here, I'm going to discuss Kingroot, one of free, popular, and successful one-click rooting solutions. Remarkably, KingRoot became the first one-click rooting tool for Android Nougat in the year 2016 breaking the traditional opinion of one-click rooting tools which said to be weak on higher Android versions. Usually, one-click tools are simple and fast in nature and suitable for users who don't have much knowledge of rooting. So, if you are a root newbie, Kingroot is here for you.
Available KingRoot Versions
KingRoot is available in dual versions as KingRoot PC and KingRoot APK. Fortunately, both versions are available for free. According to the official sources, Kingroot PC has a higher success rate than the APK version, especially on Samsung devices. So, users are recommended to try the PC version if the APK version failed to root a certain device.
Supported Android Versions & Devices
Generally, this software supports Android 2.2 to Android 7.0. But, the success rate may vary upon the device model. For Instance, Nexus 5X and Nexus 9 devices are highly compatible with the software than other Nougat devices. In total, the program supports over 104136 models and your device might be one of this list. Meanwhile, Android 6.0 users would be very happy to hear that 100% success rate of Kingroot on 11 models such as Micromax Canvas A1 AQ4501, Google nexus 4, Xiaomi mi4, etc.

How To Root Android With KingRoot APK
Get a complete backup of your Android
Go To Setting > Security > Tick the “Unknown sources” box to avoid installation block
Download and Install KingRoot APK from XDA developers
Launch the APK file and tap on "Try To Root" button to start the root access
If your smartphone is compatible with the program, it will start the process and "Root Successfully" message will appear on the screen
Voila!!!!!! Now, you are a root user and you have full authority to customize your device
In case you need to unroot your device, simply uninstall the application.
Note: You can check if your device is truly rooted using the "Root Checker" app available in the Google Play store. You may see app named "Purify" on your device after the rooting process. Don't get nervous. It's installed by default and you can remove it easily if you aren’t interested in it
Final Word
I hope now you have complete idea about Kingroot. All the credit for this awesome tool goes Kingxteam and all of other volunteers and partners for developing and supporting KingRoot.
0 notes
Text
How To Root Android & Why Android Rooting

"How To Root Android" is one of the frequent questions wide-spreaded among the Android community though it's dangerous in nature. Perhaps you maybe someone who is aware of Android rooting or maybe not aware of it. Whoever you are and whatever you don't know, it's okay. I'm going to explain Android rooting in the simplest way before stepping forward. I hope everything I mentioned here will be useful for someone who is interested in rooting and related stuff. Anyway, I would like to state here that rooting or any other rooting related task isn't officially accepted and recommended. So, everything I've presented here is only for personal and educational purposes.
What Is Android Rooting
Simply, Android rooting can be explained as the process of getting administrative privileges to access the deepest level of the Android file system which is officially restricted by the device manufacturer from third-party access. Executing Linux command named "Su" is the core of this process. The key purpose of rooting is to modify the file system according to user preferences using PC commands, Root apps, or other techniques.
Why Android Rooting
Once the root access is gained, the Android device owner can handle the device more conveniently than it used to be. Basically, a rooted Android device is capable of following things.
Support root apps in the play store and third party sources (Adblock Plus, Bouncer, FK Kernel Manager, Greenify are some of the popular root apps in the Google Play Store)
All the System apps and pre-installed apps can be removed to gain more device space
Support custom recovery and custom kernel effectively and smoothly (Technically, installing custom recovery and custom kernel don't require root access. But, you need root access to tweak the device using the custom kernel)

How To Root Android
I hope now you have a clear understanding of rooting. Let's see what are the available method to root an Android device. Fundamentally, there are two ways to root an Android and all the available rooting solutions (tools) are based on these two ways.
Rooting tools based on Android vulnerabilities - This type of rooting tools are also called one-click rooting tools and grant root access within a few seconds. One-click rooting tools are based on security holes on Android OS and execute Su command exploiting those security holes Ex. KingoRoot, FramaRoot APK, OneclickRoot
Rooting tools based on the Recovery method - In this method, Su command is executed on an Android after flashing a custom recovery. The recovery method is a bit advanced method and offers advanced features than the one-click method. Ex.Magisk
Final Word
I hope now you have sound knowledge related to the topic I started to discuss. I hope to provide more details about Android rooting continuously and update my post with new information.
1 note
·
View note