
fiber arts fanatic she/her 🏳️🌈 crafts and books goes here everything else: @everything-else-from-noxx
Last active 60 minutes ago
Don't wanna be here? Send us removal request.
Statistics
We looked inside some of the posts by noxx-notions and here's what we found interesting.
Average Info
Notes Per Post
4K
Likes Per Post
2K
Reblog Per Post
1K
Reply Per Post
25
Time Between Posts
13 hours
Number of Posts By Type
Text
17
Last Seen Tumblr Blogs


Fun Fact
Tumblr was attacked by a cross-site scripting worm deployed by the Internet troll group GNAA on Dec 3, 2012.
Text
Day 1 of the lace cape project! I’ve begun patterning, and my bobbins are all wound for the first part of the yoke— my plan is to do a half stitch ground with a couple spiders and use. Tatting to make a neat edging


9 notes
·
View notes
Text
I feel like every fiber artist has a craft that to them is unexplainable witchcraft
For example. Mine is card weaving. How do they manage all those cards? How do the cool designs just appear? Also crochet. How do you make some loops of yarn and then it becomes a piece of fabric
However, I spin, and my friends who crochet are always like “howwww????”. But to me, spinning makes perfect sense, and the crocheters and the witches
I just feel like all crafters have some other craft that to them in unexplainable despite doing a craft that is someone else’s unexplainable craft
307 notes
·
View notes
Text


1 day
1 working hour
DMC 898 - 157/1629 stitches
157/14846 total stitches
2 notes
·
View notes
Text


The hut of Baba Yaga. One year of work and finally!
82 notes
·
View notes
Text

Kitty cat!!
58 notes
·
View notes
Text

making a choker
46 notes
·
View notes
Text

Mat I made for a friend's birthday, they're a huge fan of Omori so I themed it around the game. I was inspired by @tacit-semantics (definitely give the blog a check out) post about making, "fanart in the most obscure way I can manage." So, that sparked me to actually attempt this
All of the characters (Aubrey, Hero, Mewo, Something, Kel, and Sunny) in the squares and 3/4 (Violin, Knife, and Lightbulb) other squares are entirely my own design. The bottom right one is an edit of a Christmas light pattern by Liliantatlace here. The edging around the characters are the fluerette edging pattern by frivole here, and finally the outer edging is the vandyke scallop in Lindsay Rogers' Mastering Tatting book
though if I were to do it again I would do parts differently, definitely very proud of this, took me about a month.
38 notes
·
View notes
Text
Absolute score at the thrift shop today

21 notes
·
View notes
Text
If anyone has ever told you that yarn isn't sentient they're LYING because not only is it sentient it's EVIL and it CHOSES TO TANGLE ITSELF SO IT'S HARDER TO WORK WITH
265 notes
·
View notes
Text


Here's another quilt I made for Desert Bus for Hope, this would've been 2021's contribution.
I love Labyrinth so much, so why not make a quilt of the movie poster?
Here are some stats for the Labyrinth Quilt:
Measured roughly 37 x 54.5 inches, about 1600 individual pieces, I believe the smallest one was slightly smaller than a cm. I ended up hand sewing a lot of the crystal ball portion. Also no black was used in the quilt, the dark values were a deep espresso brown.
In retrospect I wish I quilted it better, but meh, what's a girl to do? I still love this one to bits. I should post so of the making of pics too hehe.
955 notes
·
View notes
Text
Currently tatting and crying to an audiobook. Can't imagine what other people on this train are thinking.
#im also dressed in all black work clothes and have a hard hat with me.#what a sight#tatting#trains#books#noxx makes#noxx reads#noxx commutes to work by train sometimes woohoo
10 notes
·
View notes
Text
i'd like to share a small collection of portraits of tatting ladies


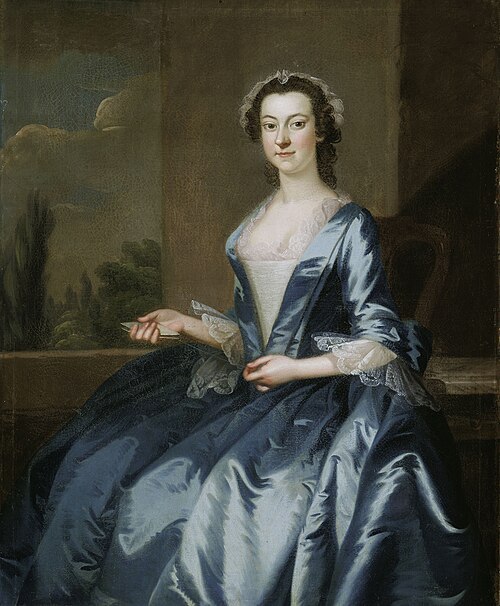


French school, 18th century, Elegant Young Woman Holding a Tatting Shuttle
Louis Tocqué, 1753, Madame Dangé faisant des noeuds
Charles Antoine Coypel, 1743, François de Jullienne (1722–1754) and Marie Elisabeth de Jullienne (Marie Elisabeth de Séré de Rieux, 1724–1795)
Pierre Allais, 1751, Portrait of an elegant lady, holding a fly-shuttle
Carle van Loo (1705-1765), Portrait of a woman holding a thread
Renoir, 1906, Girl tatting
Heinsius Johann Ernst Jules (1740-1812) Portrait de femme
Rotari (1755) Maria Kunigunde of Saxony
Francis Wheatley, 1786, Mrs Pierce
Johann Heinrich Tischbein (attr), 18th century, Sophie Charlotte zu Solms-Hohensolms-Lich
John Wollaston, 18th century, Portrait of a woman
John Singleton Copley, 1778, Mrs Seymour Fort
Angelica Kauffmann, 1770, Elizabeth Kerr, née Fortecue, Marchioness of Lothian
Michel Pierre Hubert Descours, 1771, Portrait of Elizabeth de la Vallée de la Roche
22 notes
·
View notes
Text
i loosely followed thedimelions’s tutorial for naturally dyeing a pride flag, with a lot of added research about natural dyes, stains, mordants, sewing, etc, and i wanted to share my results!!

process, notes, and more pics under the read more🌱
starting off i soaked my fabric (100% cotton acquired from joann's during their closing sale, rip joann's ;-;) in a 1:5 mixture of soy milk and water for 12 hours, then let dry on a clothesline in the sun, then dipped and dried two more times (the proteins in the soy milk help the natural dyes adhere to the fabric, creating darker colors and better colorfastness)

while that was happening i started making my dyes, which involved simmering my chosen dyestuffs in some water for 30-60 minutes. i didnt time it, just went until the color developed to a point i was happy with


as far as ratios i didn’t measure, but the more dyestuff = stronger color so err on the side of more
red: turmeric + baking soda, paprika, and yellow onion skin dye as the liquid base
orange: yellow onion skins
yellow: turmeric
green: red cabbage + baking powder (LOTS), turmeric
blue: red cabbage + baking powder
purple: red cabbage
for the red cabbage dyes, i added the baking powders and soda after simmering and just kept adding and stirring till i got the color i wanted. ((BIG NOTE red cabbage, and debatably most of the others that I used, are fugitive dyes, meaning its not a true dye and more of a stain that will fade with time and wash out more easily, especially without mordanting on additives like iron. keep this in mind if you end up doing this project or transfering these methods to cloth you will be using for clothes, ie washing and wearing more frequently))
i also tried to make a pink with avocado skins and pits, which did come out a lovely rosy color, but i didn’t end up using in the final flag, which i might use beet or red cabbage + lemon juice or another acidified for next time to get a more bright pink

now with my dyes ready and my cloth dried out from its previous soy milk dip i cut it into strips and stuck it in the jars, which were placed in the sun for the day (alternatively, you could simmer the cloth in the pot) and then left to sit overnight
the next day i squeezed out the excess dye and gave the ones with turmeric a light rinse to get the grit out, then hung them to dry
((small note i reused the dyes baths to see what would happen since they still looked just as pigmented, but the colors are much much much more faded on the second go around. all in all its doable, but I wouldn't recommend it.))
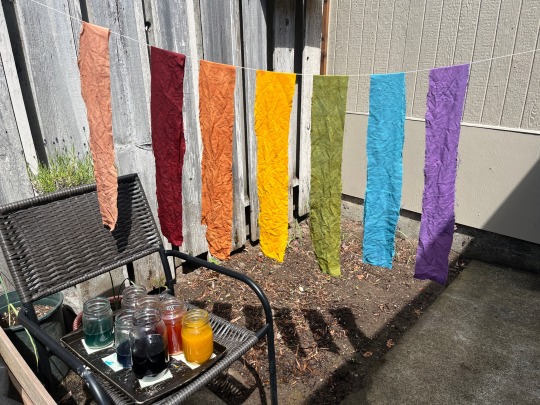

now time to sew! i procured a second hand sewing machine specifically for this project and had never sewed before, but thankfully this required the easiest stitch in the game (a straight stitch in a straight line). i looked up how to sew a flag specifically to get those clean lines rather than just overlapping, and this video was great (shoutout Suffolk Public Library)


as you can see my flag ended up quite long cause I left a lot of wiggle room, so I just look up flag ratios, trimmed it up (and used the extra strip of rainbow as decoration) then added a white strip folded over to make a way for me to hang it on a stick if I ever so desire.
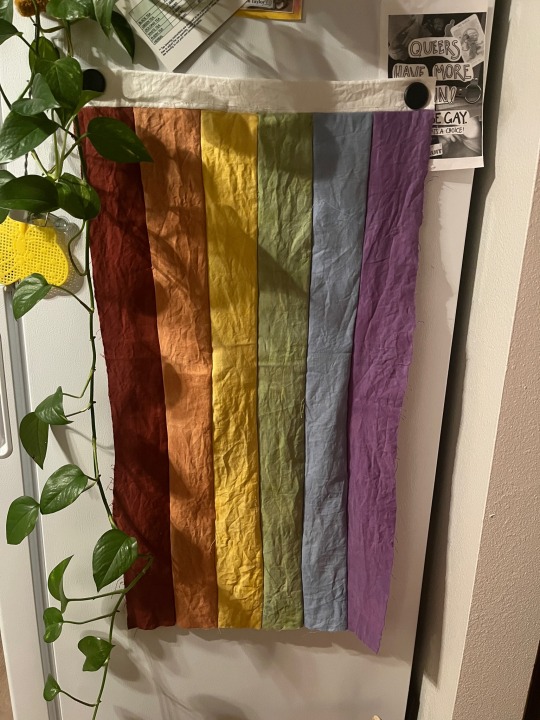
and ta daaa! i would still like to clean it up a bit, and do a zig zag stitch around the outside to stop the cloth from fraying further, but im happy with the unpolished look of it. once i figure out how to get a pink I like, and how to get browns and blacks, i want to make a progress flag and trans flag. also just started growing some indigo, so excited to see if I can get some blue dyes out of that.
2K notes
·
View notes
Text
I also took this off the pillow today

My first piece of Ipswich lace!! This was a surprisingly big mental challenge to do. I haven't done a ton of work with gimp threads so it took a lot of concentration to figure it out. Also my first time using a full working diagram like this so that was also a learning curve. The biggest issue with this though was the thread. I just don't like silk. It's so slippery and unravels so easily. I've had this much done for a couple of months I think and finally today decided that one full repeat of the pattern was enough and we are calling it done 😂 I did enjoy the pattern and plan to make more Ipswich lace in the future! But it will definitely be with cotton thread and maybe with a bolster pillow. Also I need to wait until I have more bobbins lol. This was the pattern in the book that required the least number and I was using a mix of square and Midlands which was kind of terrible 😅
Pattern # 8 in Lace Samples from Ipswich, Massachusetts, 1789-1790 by Karen H Thompson
37 notes
·
View notes
Text

Newest finished piece!! Pretty happy with this! The leaves look a bit funky, I think I'm still using too much tension and maybe not enough bobbins for them. Super happy with the stems and the petals! And hey look! My square lead works are becoming more square! The new technique learned in this one was crossing over a braid. So for example the two bottom leaves use the same bobbins and are not sewn on separately.
Pattern 7 in the Technique of Honiton Lace by Elsie Luxton
87 notes
·
View notes
Text
Hey look I tat now 👀👀👀

It's pretty wonky especially at the end when I wasn't looking at the pattern anymore and kept forgetting to reverse the work but a valiant first effort. Or 100th. It took me two days to get a ring right. But it's definitely tatting!!
13 notes
·
View notes
Text
Lace along is coming to the Lace Coven ✨🌙
Our server is still young, but doesn’t mean we’re not already brewing stuff!
There are various events in the making, and the first one that will see the light is lace along - and that’s a great opportunity to join us ✨
We’ll choose a free pattern for each technique of interest and then make it together and share our progress and results! Whether you do tatted lace, bobbin lace, needle lace, knitted lace or crochet lace, you’ll find something for you to make and a group of people cheering for you as you progress!
More info on the server and invite link: here!
17 notes
·
View notes