
Don't wanna be here? Send us removal request.
Statistics
We looked inside some of the posts by pheonixsolutions and here's what we found interesting.
Average Info
Notes Per Post
0
Likes Per Post
0
Reblog Per Post
0
Reply Per Post
0
Time Between Posts
1 month
Number of Posts By Type
Text
17
Last Seen Tumblr Blogs


Fun Fact
70% of Tumblr users say the Dashboard is their favorite place to spend time online.
Text
How to Add a CNAME Record in cPanel
Introduction: CNAME records are referred to as alias records since they map an alias to its canonical name. You can add a CNAME record using the cPanel’s Zone Editor option. Prerequisites: - WHM login root credentials. Step 1: Using the destination server URL login to the cPanel account.

Step 2: Go to the search bar and enter DNS Zone Manager. After the click, go to DNS Zone Manager and click on +CNAME Record.

Step 3: After clicking on CNAME Record, a popup box will open. Please, enter the required details in it. 1. Name: Enter the name you wish to add, such as www, and the cPanel will automatically add a domain name like www.example.com 2. CNAME: Enter the domain name. 3. Now, click on Add a CNAME Record. If the record is added successfully, you will see a success message.

Conclusion: Now by following the above steps, you can Add a CNAME Record in cPanel. Read the full article
0 notes
Text
How to deny access from a specific IP address
Introduction Denying access from a specific IP address will not allow to access the applications even if originating legitimate requests Prerequisite - cPanel credentials - IP address/domain that needs to be blocked Implementation Step 1: Login to cPanel
Step 2: Click on IP Blocker from the security section

Step 3: Enter the domain name or IP address that needs to be blocked

Step 4: Click on “ADD” and it will resolve the domain name to IP and enter in the blocked list Read the full article
0 notes
Text
How to Install and Use PHP Composer on CentOS 7
Introduction Composer is an application for tracking the dependencies of a project. It pulls in all the required PHP packages. It allows to specify a set of libraries for a specific project. With the libraries established, it identifies the versions and dependencies and installs them to the corresponding project. Prerequisites - SSH access with sudo privileges - Required PHP (>=5.3.2) version should be installed Implementation Step 1: Update the Local Repository $sudo yum -y update Step 2: Install PHP Dependencies $ yum install php-cli php-zip wget unzip

Step 3: Download Composer Installer Script $ php -r "copy('https://getcomposer.org/installer', 'composer-setup.php');" Step 4: Download the authorized signature from Composer’s Github page in the HASH variable $HASH="$(wget -q -O - https://composer.github.io/installer.sig)" Step 5: Compare the official hash against the one which we downloaded $ php -r "if (hash_file('SHA384', 'composer-setup.php') === '$HASH') { echo 'Installer verified'; } else { echo 'Installer corrupt'; unlink('composer-setup.php'); } echo PHP_EOL;" ======== Output: Installer verified ========== Step 6: Install Composer $ php composer-setup.php --install-dir=/usr/local/bin --filename=composer

Step 7: Check the installation $composer

Step 8: To modify the composer version $ composer self-update Read the full article
0 notes
Text
How to enable Disk quota usage warnings via WHM
Introduction The disk space quota is the total hard drive space allocated on the server for an account Prerequisite - WHM credentials Implementation Step 1: Log in to the WHM
Step 2: Navigate Home >> Tools >> Server Configuration >> Tweak Settings

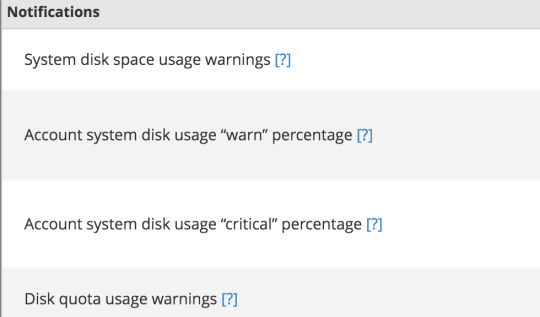
Step 3: Under All >> Notifications, locate the option Disk quota usage warnings
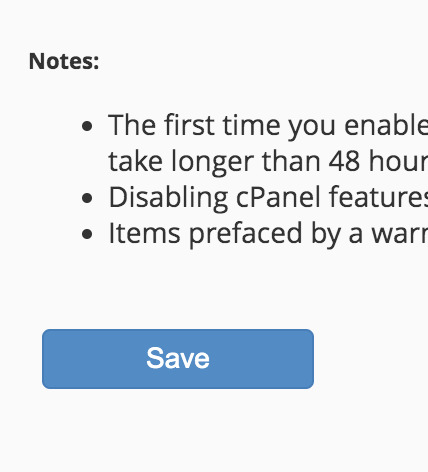
Step 4: Click on ON to enable

Step 5: Click on Save
Read the full article
0 notes
Text
How to Mount Wasabi Storage Bucket on CentOS and Ubuntu 20 using S3FS
Introduction In this article, we will be using S3FS to mount cloud storage services locally on a CentOS or Ubuntu box. Mounting them locally will allow us to interact with the cloud providers as a local file system. We will be covering three cloud storage providers namely, AWS S3, Wasabi Hot Storage and Digital Ocean Spaces. What makes this interesting is that all three providers use the same api, which is the S3 API. S3FS is a FUSE (File System in User Space) based solution used to mount an Amazon S3 or compatible storage solutions, Just as mentioned above, we can use system commands with this drive just like as another Hard Disk in the system. On s3fs mounted files systems we can simply use cp, mv and ls the basic Unix commands similar to run on locally attached disks. Prerequisite - Sudo access for the remote server - Credentials for the Wasabi bucket to know the bucket name and region
Step 1 – Update Packages
First, we will update the system to make sure we have the latest packages. We will then check if we have any existing s3fs or fuse package installed on your system. We will remove any existing packages and install everything anew. ### CentOS and RedHat Systems ### $ yum update $ yum remove fuse fuse-s3fs ### Ubuntu Systems ### $ sudo apt-get update $ sudo apt-get remove fuse
Step 2 – Install Dependencies
Once you have successfully removed the packages. We will install all dependencies for the fuse. Install the required packages to the system using following command. ### CentOS and RedHat Systems ### yum install gcc libstdc++-devel gcc-c++ curl-devel libxml2-devel openssl-devel mailcap ### Ubuntu Systems ### sudo apt-get install build-essential libcurl4-openssl-dev libxml2-dev mime-support
Step 3 – Download and Compile Latest S3FS
In this step we will download and compile the latest version of s3fs from GitHub. For this article we are using s3fs version 1.74. After downloading extract the archive and compile source code in system using the commands below. Debian 9 and Ubuntu 16.04 or newer: sudo apt install s3fs RHEL and CentOS 7 or newer through via EPEL: sudo yum install epel-release sudo yum install s3fs-fuse
Step 4 – Configuring Access Key
In order to configure s3fs, we would require Access Key and Secret Key of your S3 Amazon account, Wasabi or Digital Ocean. You can access these keys from you account dashboard of the respective services. Once you have these keys, create a file, for the purpose of this tutorial we will be naming the file pwd-s3fs. echo AWS_ACCESS_KEY_ID:AWS_SECRET_ACCESS_KEY > ${HOME}/.passwd-s3fs ### Note: Change AWS_ACCESS_KEY_ID and AWS_SECRET_ACCESS_KEY with your actual key values. After creating the password file we will change the permission on the file for security reasons. chmod 600 ${HOME}/.passwd-s3fs
Step 5 – Mount S3 Bucket
Finally, we can mount the s3 bucket using following set of commands. For this example, we are using s3 bucket name as test-bucket and the mount point as /s3mnt. mkdir /tmp/cache /s3mnt chmod 777 /tmp/cache /s3mnt s3fs -o use_cache=/tmp/cache mybucket /s3mnt -o passwd_file=${HOME}/.passwd-s3fs Once this has been successfully run, you will be able to access all files within the test-bucket by just changing directories into /s3mnt.
Step 6 – Mounting a Wasabi Hot Storage Bucket
If you are not familiar with Wasabi, It’s a S3 compatible storage which is 1/5th the price and 6x faster than Amazon S3, according to their website. Since it supports the S3 API the same command works, you only need to change the endpoint as describe below: s3fs test-bucket /s3mnt -o passwd_file=/etc/pwd-s3fs -o url=https://s3.wasabisys.com s3fs#test-bucket /s3mnt fuse allow_other,use_cache=/tmp/cache,use_path_request_style,url=https://s3wasabisys.com 0 0 Note: In order to unmount the folders, follow the below commands umount -l /tmp/cache umount -l /s3mnt Read the full article
0 notes
Text
How to install and configure PHP with Nginx on centos7
This blog will help you to install and configure PHP with Nginx on centos7 Prerequisite Centos version 7, User with Sudo privileges Procedure Step 1: Install the EPEL repository $ sudo yum install epel-release Step 2: Install and start Nginx Run the following command to install nginx, $ sudo yum install nginx To start and enable the service using the below command, $ sudo systemctl enable --now nginx Step 3: Install PHP $ sudo yum install PHP Step 4: Configure the php Edit the php.ini file, $ sudo vim /etc/php.ini Find the line & uncomment it and change it to 0 cgi.fix_pathinfo=0 Then, edit the php-fpm configuration file, $ sudo vim /etc/php-fpm.d/www.conf Modify the following lines, - listen = /var/run/php-fpm/php-fpm.sock - listen.owner = nginx - listen.group = nginx - user = nginx - group = nginx Next, start and enable the PHP processor by running the command, $ sudo systemctl enable --now php-fpm Step 5: Nginx configuration to process PHP pages $ sudo vim /etc/nginx/conf.d/default.conf Change the file as seen as below,
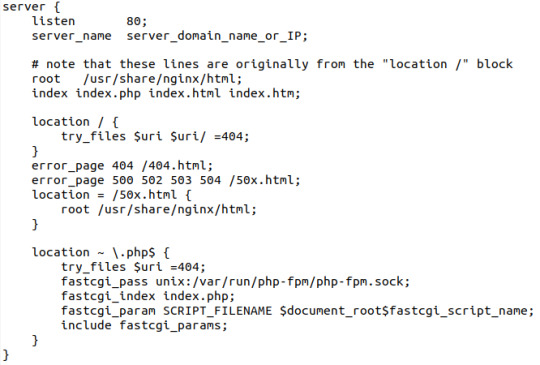
Restart the Nginx service to reload the configuration file changes. $ sudo systemctl restart nginx Then you can test the PHP process on the web server by creating the info.php page on /usr/share/nginx/html. And check whether the PHP is processing on the web browser by visiting the following page in a browser http://your-server-IP-address/info.php Read the full article
0 notes
Text
How To Change Reseller Account Password in WHM
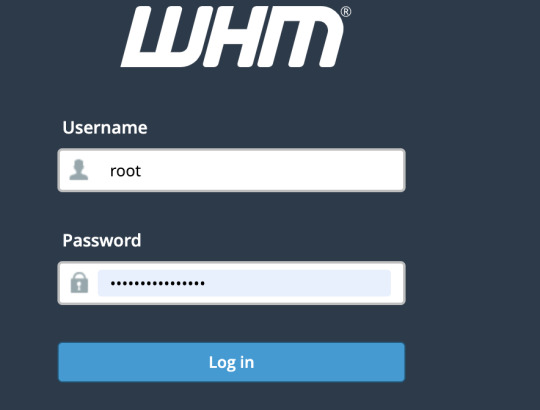
Prequistise Root access to the WHM account Implementation Step 1: Log in to the WHM with root credentials
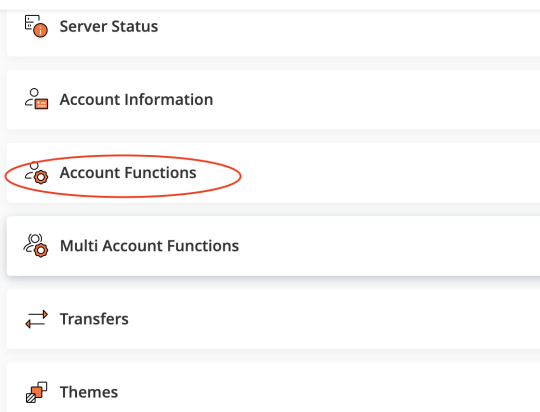
Step 2: Click on the Account Functions icon
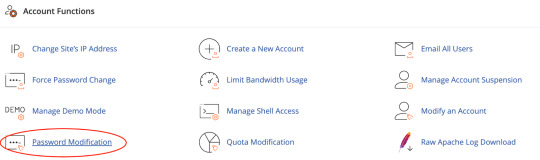
Step 3: Click on the Password Modification link in the left navigation
Step 4: Select the account that needs a new password

Step 5: Enter a new password & confirm the new password again

Step 6: Click the Change Password button. The password was changed successfully.

Read the full article
0 notes
Text
How to install Sphinx packages on Debian and Ubuntu
There are two ways of getting Sphinx for Ubuntu: regular deb packages and the Launchpad PPA repository. Deb packages - Sphinx requires a few libraries to be installed on Debian/Ubuntu. Use apt-get to download and install these dependencies: $ sudo apt-get install mysql-client unixodbc libpq5 - Now you can install Sphinx: $ sudo dpkg -i sphinxsearch_2.2.11-dev-0ubuntu12~trusty_amd64.deb PPA repository (Ubuntu only) Installing Sphinx is much easier from Sphinxsearch PPA repository, because you will get all dependencies and can also update Sphinx to the latest version with the same command. - First, add Sphinxsearch repository and update the list of packages: $ sudo add-apt-repository ppa:builds/sphinxsearch-rel22 $ sudo apt-get update - Install/update sphinxsearch package: $ sudo apt-get install sphinxsearch 3. Sphinx searchd daemon can be started/stopped using service command: $ sudo service sphinxsearch start Read the full article
0 notes
Text
How To Install Zabbix Agent on Ubuntu
Zabbix is a monitoring solution for IT infrastructure. We can monitor most of the devices in the network and most of the services on the servers. To monitor applications, we must have a Zabbix server installed in the network. Zabbix Agent is required on the systems, we need to monitor through the Zabbix server. Prerequisite (i) Zabbix server’s IP (ii) sudo privileged account access to Ubuntu 20.04 LTS system Implementation Step 1 – Configure Zabbix Repository The Zabbix team provides apt repositories for the installation of Zabbix packages. Then add the repository to the system, which is required packages for the Zabbix agent For Ubuntu 20.04 $ wget https://repo.zabbix.com/zabbix/5.0/ubuntu/pool/main/z/zabbix-release/zabbix-release_5.0-1+focal_all.deb $ sudo dpkg -i zabbix-release_5.0-1+focal For Ubuntu 18.04 (Bionic): $ wget https://repo.zabbix.com/zabbix/4.0/ubuntu/pool/main/z/zabbix-release/zabbix-release_4.0-3+bionic_all.deb $ sudo dpkg -i zabbix-release_4.0-3+bionic_all.deb For Ubuntu 16.04 (Xenial) $ wget https://repo.zabbix.com/zabbix/4.0/ubuntu/pool/main/z/zabbix-release/zabbix-release_4.0-3+xenial_all.deb$ sudo dpkg -i zabbix-release_4.0-3+xenial_all.deb Step 2 – Install Zabbix Agent on Ubuntu Before installing zabbix agent we need to update the system $ sudo apt update $ sudo apt install zabbix-agent Step 3 - Configuration of Zabbix Agent We need to configure Zabbix agent to allow connection from your Zabbix server. Edit Zabbix agent configuration file /etc/zabbix/zabbix_agentd.conf $ sudo nano /etc/zabbix/zabbix_agentd.conf And update the below settings then save and exit the file #Server= #Hostname= Step 4 – Manage Zabbix Service Now, restart the Zabbix service to apply changes. Also, enable service to auto-start on system boot $ sudo systemctl restart zabbix-agent $ sudo systemctl enable zabbix-agent Read the full article
0 notes
Text
How To Install Zabbix Agent on Ubuntu
Zabbix is a monitoring solution for IT infrastructure. We can monitor most of the devices in the network and most of the services on the servers. To monitor applications, we must have a Zabbix server installed in the network.Zabbix Agent is required on the systems, we need to monitor through the Zabbix server.Prerequisite (i) Zabbix server’s IP (ii) sudo privileged account access to Ubuntu 20.04 LTS systemImplementationStep 1 – Configure Zabbix RepositoryThe Zabbix team provides apt repositories for the installation of Zabbix packages. Then add the repository to the system, which is required packages for the Zabbix agentFor Ubuntu 20.04$ wget https://repo.zabbix.com/zabbix/5.0/ubuntu/pool/main/z/zabbix-release/zabbix-release_5.0-1+focal_all.deb$ sudo dpkg -i zabbix-release_5.0-1+focal For Ubuntu 18.04 (Bionic):$ wget https://repo.zabbix.com/zabbix/4.0/ubuntu/pool/main/z/zabbix-release/zabbix-release_4.0-3+bionic_all.deb$ sudo dpkg -i zabbix-release_4.0-3+bionic_all.debFor Ubuntu 16.04 (Xenial)$ wget https://repo.zabbix.com/zabbix/4.0/ubuntu/pool/main/z/zabbix-release/zabbix-release_4.0-3+xenial_all.deb$ sudo dpkg -i zabbix-release_4.0-3+xenial_all.deb Step 2 – Install Zabbix Agent on UbuntuBefore installing zabbix agent we need to update the system $ sudo apt update$ sudo apt install zabbix-agentStep 3 - Configuration of Zabbix AgentWe need to configure Zabbix agent to allow connection from your Zabbix server. Edit Zabbix agent configuration file /etc/zabbix/zabbix_agentd.conf$ sudo nano /etc/zabbix/zabbix_agentd.confAnd update the below settings then save and exit the file#Server=#Hostname=Step 4 – Manage Zabbix ServiceNow, restart the Zabbix service to apply changes. Also, enable service to auto-start on system boot$ sudo systemctl restart zabbix-agent$ sudo systemctl enable zabbix-agent Read the full article
0 notes
Text
How to change the log level of Apache in cPanel
When you are reviewing the Apache logs and see errors similar to the following instructing you to change the LogLevel and then restart Apache In order to get more info about fail reason try to change LogLevel to Info in httpd. conf and restart ApachePrerequisite- WHM root access- Apache Implementation1. Log into WHM as a root user2. Navigate to Service configuration >> Apache Configuration >> Global Configuration3. locate 'LogLevel' and change from its current value to the intended value.4. Scroll to the bottom and hit the blue 'Save.'5. Click the blue 'Rebuild Configuration and Restart Apache'6. Replicate the error again and check the more verbose logs. Read the full article
0 notes
Text
How to Install WordPress on a subdomain using cPanel
Steps to install WordPress on a subdomainStep-1: Login to the Cpanel accountStep-2: Click on WordPress Step-3: Click on install this applicationStep-4: Enter all the information required in the different text boxes. Step-5- In the Domain tab please select the subdomain. If the subdomain has SSL select HTTPS or else select HTTP continued with the subdomain name.Step 6: Please leave the Directory text box empty.Step -7: Enter the administrator username, password, and mail id and make a note of it.Step- 8: Click install to install WordPress.Step -9: WordPress will be installed for your subdomain. Now you can log in to your WordPress using https://subdomain/wp-admin Read the full article
0 notes
Text
How to Install Latest Node.js on Ubuntu with PPA
Node.js is a platform built on Chrome’s JavaScript runtime for easily building fast, scalable network applications. Latest version��node.js ppa is maintaining by its official website. We can add this PPA to your Ubuntu 21.10, 20.04 LTS, 18.04 LTS, 16.04 LTS (Trusty Tahr) and 14.04 LTS (Xenial Xerus) systems and install node.js on Linux VPS with easy commands.
Step 1 – Add Node.js PPA
Node.js package is available in the LTS release and the current release. It’s your choice to select which version you want to install on the system as per your requirements. Let’s add the PPA to your system to install Nodejs on Ubuntu. Use Current Release - During the last update of this tutorial, Node.js 16 is the current Node.js version available.

Use LTS Release - Instead of current release, its good idea to use stable version. During the last update of this tutorial, Node.js 14 is the latest LTS release available.

For this tutorial, I am using the latest current release and added their PPA to my system. Step 2 – Install Node.js on Ubuntu You can successfully add Node.js PPA to the Ubuntu system. Now execute the below command install Node on and Ubuntu using apt-get. This will also install NPM with node.js. This command also installs many other dependent packages on your system.

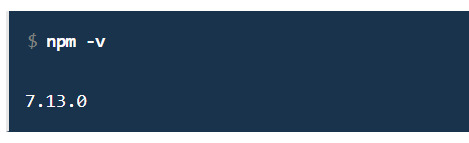
That’s it. This will install Node.js on your Ubuntu system. Step 3 – Check Node.js and NPM Version After installing node.js verify and check the installed version. You can find more details about current version on node.js official website.
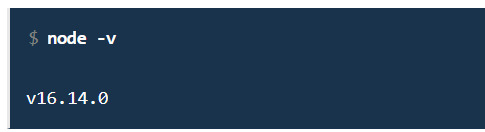
Also, check the npm version
Step 4 – Create Demo Web Server (Optional)
This is an optional step. If you want to test your node.js install. Let’s create a web server with “Hello World!” text. Create a file server.js

and add the following content server.js
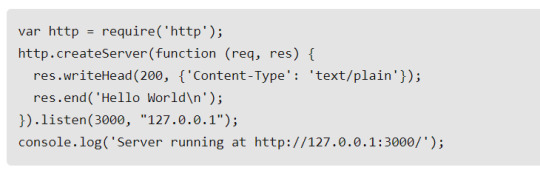
Save the file and close. Then start the Node application using the following command.
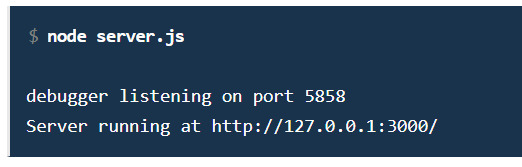
You can also start the application with debugging enabled with the following commands.

The web server has been started on port 3000. Now access http://127.0.0.1:3000/ URL in browser. Now you will need to configure a front-end server for your app.
Conclusion
This tutorial helped you to install the Latest Node.js version on an Ubuntu system. Also provides you instructions to install the Latest stable Node.js version on Ubuntu. Read the full article
0 notes
Text
How to create a container in OpenVZ server
In this article we are going to create a container in OpenVZ server Prerequisites - OS template - Hostname - IP address - Name servers Implementation: Step:1 Create a container with an os template. Note : (i) We take the container ID as 104 (ii) OS template as ubuntu-18.04-x86_64 $vzctl create 104 --ostemplate ubuntu-18.04-x86_64 Step 2: Save the container $ vzctl set 104 --save --onboot yes Step 3: Specify the hostname as per your requirement $vzctl set 104 --save --hostname your_hostname Step 4: Specify the IP address $vzctl set 104 --save --ipadd your_IP Step 5: Mention the name servers. $vzctl set 104 --save --nameserver IP --nameserver IP Step 6: Save the Number of CPU’s for the particular container as per your requirement $vzctl set 104 --save --cpus 2 Step 7: Save the RAM for the particular container as per your requirement $vzctl set 104 --save --ram 4G Step 8: Save the diskspace as per your requirement $ vzctl set 104 --save --diskspace 50G Step 9: Start the container which we have created $vzctl start 104 Step 10: Provide the strong password for the container $vzctl exec 104 passwd Step 11: Check the status of the container which we have created on OpenVZ server $vzlist -a Read the full article
0 notes
Text
How To Install the Apache Web Server on Ubuntu 18.04
How To Install the Apache Web Server on Ubuntu 18.04 Date-31-05-2020 STEP 1: Update and Upgrade the apt tool to ensure we are working with the latest. sudo apt update STEP 2: Install Apache and select Y when prompted. sudo apt install apache2 STEP 3: Before testing Apache, it’s necessary to modify the firewall settings to allow outside access to the default web ports. Assuming that you followed the instructions in the prerequisites, you should have a UFW firewall configured to restrict access to your server. During installation, Apache registers itself with UFW to provide a few application profiles that can be used to enable or disable access to Apache through the firewall. List the ufw application profiles by typing: sudo ufw app list As you can see, there are three profiles available for Apache: - Apache: This profile opens only port 80 (normal, unencrypted web traffic) - Apache Full: This profile opens both port 80 (normal, unencrypted web traffic) and port 443 (TLS/SSL encrypted traffic) - Apache Secure: This profile opens only port 443 (TLS/SSL encrypted traffic) It is recommended that you enable the most restrictive profile that will still allow the traffic you’ve configured. Since we haven’t configured SSL for our server yet in this guide, we will only need to allow traffic on port 80, sudo ufw allow 'Apache' STEP 3: Then check status of apache by, sudo systemctl status apache2 STEP 4: http://server ip You will see the apache default page, it shows that the apache installed successfully.
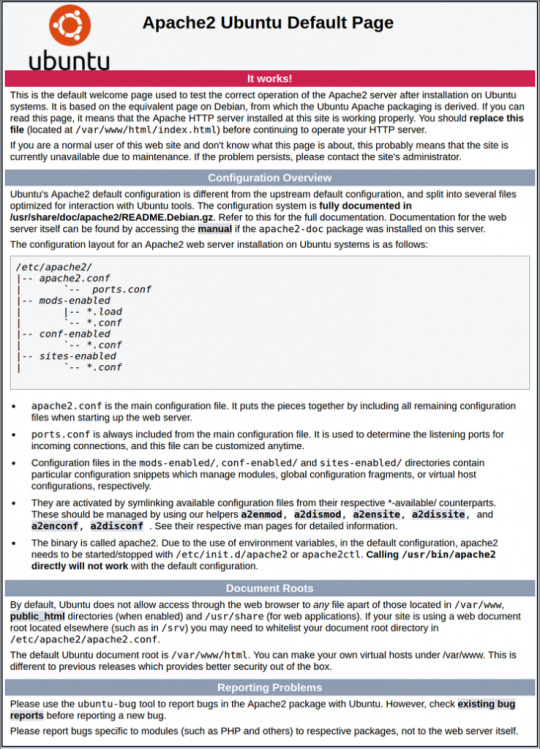
Thank you. Read the full article
0 notes
Text
How to configure skeleton directory in WHM
How to configure skeleton directory in WHM
Date Posted: 25-10-2018 In this tutorial ,we will explain about the skeleton directory feature in WHM panel. But if you want to add some welcome page or documentation page for all the new accounts then you have to use skeleton directory in WHM. What is Skelton Directory? - Basically,skeleton directory is a place where a hosting resellers puts a temporary home page,documentation or tutorial for all the new web hosting user accounts that are created in the WHM panel. Why we need skeleton Directory? - To create a default placeholder home page for your cPanel accounts. The ‘skeleton directory’ on linux based systems is a directory where default files and folders can be placed, upon creation of a new account these files will be duplicated into the new users folders. - By default all the new accounts will be open with “403 error ” which means there is no file or directory available in cpanel. How to setup skeleton directory ? Step1: Login to WHM as a reseller cpanel account. Step2: choose skeleton directory under “Account functions” tab.

Step 3: A new window will open and you can see the path where you have to add files or folder according to your need. Here you can also find short description about skeleton directory.
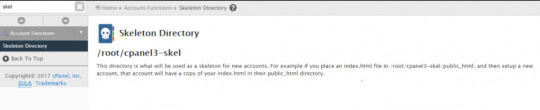
Step 4: In most of the WHM version the default skeleton directory is at /root/cpanel3-skel, but sometimes it will differ when version changes.

Step 5: You have to upload all the files and folders in this directory via FTP. You can also check it by creating new account. Now the users will not have to face problem like 403 forbidden errors. Thank you! for using PHEONIX SOLUTIONS. You find this tutorial helpful? Share with your friends to keep it alive.Be the first to comment, we value your suggestions. For further queries please comment below. Read the full article
0 notes