
Statistics
We looked inside some of the posts by philduckworth and here's what we found interesting.
Average Info
Notes Per Post
360K
Likes Per Post
210K
Reblog Per Post
149K
Reply Per Post
123
Time Between Posts
2 months
Number of Posts By Type
Photo
14
Text
3
Last Seen Tumblr Blogs


Fun Fact
Tumblr’s website traffic is steadily declining.
Photo

Meerian Memories (on Wattpad) https://my.w.tt/N29AgaLkE5 Seventeen year old Alessia has been on the run with her mum for the last ten years since the King's men murdered her father. But being an Elemental in the human world has its challenges. Pretending to be human and someone she's not has turned her into a loner. When she unexpectedly meets someone from her past her world is thrown back into chaos an…
5 notes
·
View notes
Text
10 outline techniques for writers
With this post I listed 10 outline techniques to help writes move their story from a basic idea to a complete set of arcs, plots, sequences and/or scenes. Or to simply expand whatever you have in hands right now.
If you have a vague story idea or a detailed one, this post is for you to both discover and organize. A few technique will work perfectly. A few won’t. Your mission is to find the one that works best for you. That said, I advice you to try out as many techniques as possible.
So, are you ready? Open your notebook, or your digital document, and let’s start.

1. Snowflake method: Start with a one-sentence description of the novel. Then, develop this simple phrase into a paragraph. Your next step is to write a one-page summary based on the paragraph, you can write about characters, motivations, goals, plots, options, whatever you feel like. From this point on, you can either start your book or expand the one-page summary into four pages. And, at last, four pages into a brief description of known sequences of scenes. Your goal is to make the story more and more complex as you add information, much like a forming snowflake.

2. Chapter by chapter: List ten to twenty chapters, give each chapter a tittle and a brief description of what should happen. Then, break each chapter into three to five basic sequences of scenes. Give each sequence a title, a brief description and a short list of possibilities (possibilities of dialogues, scenarios, outcomes, moods, feelings… just play around with possibilities). From this point on, you can either create the scenes of sequences with a one-sentence description for each or jump straight to writing. Your goal is to shift from the big picture to a detail-oriented point of view.
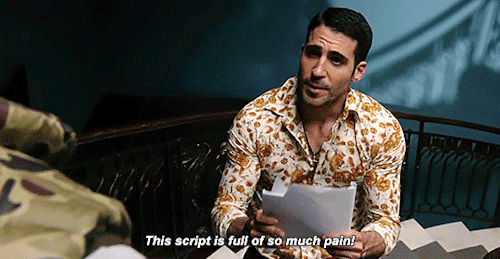
3. Script: This might sound crazy, but, with this technique, you will write the screenplay of your story as if it’s a movie. No strings attached to creative writing, just plain actions and dialogues with basic information. Writing a script will take time, maybe months, but it will also enlighten your project like no other technique. Your goal is to create a cinematic view of your story. How to write a script here.
4. Free writing: No rules, no format, no step, just grab a pen or prepare your fingers to write down whatever idea that comes up. Think of possibilities, characters, places, quests, journeys, evolutions, symbolisms, fears, good moments, bad moments, clothing, appearances. Complete five to ten pages. Or even more. The more you write, the more you will unravel. You can even doodle, or paste images. Your mission is to explore freely.
5. Tag: This technique is ideal if you have just a vague idea of the story. Start by listing ten to fifteen tags related to the story. Under each tag, create possible plots. And, under each plot, create possible scenes. Grab a red felt pen and circle plots and scenes that sparkle your interest.
6. Eight-point arc: With this technique you will divide your story into eight stages. They are Stasis, Trigger, Quest, Surprise, Critical Choice, Climax, Reversal and Resolution. The Stasis is the every-day-life of your main character. Trigger is an event that will change the every-day-life of your character (for better or for worse). Quest is a period of your main characters trying to find a new balance, a new every-day-life (because we all love a good routine). Surprise will take your character away from their new found every-day-life. Critical Choice is a point of no return, a dilemma, your character will have to make the hardest decision out of two outcomes, both equally important. Climax is the critical choice put to practice. Reversal is the consequence of the climax, or how the characters evolved. Resolution is the return to a new (or old) every-day-life, a (maybe everlasting) balance.
7. Reverse: Write down a description of how your story ends, what happens to your characters and to those around them. Make it as detailed as possible. Then, move up to the climax, write a short scenario for the highest point of your story. From there, build all the way back to the beginning.
8. Zigzag: Draw a zigzag with as many up and downs as you want. Every up represents your main character moving closer to their goal. Every down represents your main character moving further from their goal. Fill in your zigzag with sequences that will take your character closer and farther from the goal.
9. Listing: The focus of this technique is exploring new ideas when your story feels empty, short or stagnated. You’ll, basically make lists. Make a long list of plot ideas. Make another list of places and settings. Make a list of elements. And a list of possible characters. Maybe a list of book titles. Or a list of interesting scenes. A list of bad things that could happen inside this universe. A list of good things. A list of symbolism. A list of visual inspiration. A list of absurd ideas you’ll probably never use. Then, gather all this material and circle the good items. Try to organize them into a timeline.

10. Character-driven: Create a character. Don’t worry about anything else. Just think of a character, their appearance and style. Give them a name. Give them a basic personality. Give them a backstory. Develop their personality based on the backstory. Now, give this character a story that mirrors their backstory (maybe a way to overcome the past, or to grow, or to revenge, or to restore). Based on your character’s personality, come up with a few scenes to drive their story from beginning to end. Now, do the same thing for the antagonist and secondary characters.
So, when is it time to stop outlining and start writing?
This is your call. Some writers need as many details as they can get, some need just an basic plot to use as a North. Just remember, an outline is not a strict format, you can and you will improvise along the way. The most important is being comfortable with your story, exploring new ideas, expanding old concepts and, maybe, changing your mind many times. There’s no right or wrong, just follow your intuition.
55K notes
·
View notes
Photo

[Homemade] Star Wars Birthday Cake [OC] [1230 x 1600]
59 notes
·
View notes
Photo

CARAMEL BROWNIES FROM SCRATCH
Follow for recipes
Get your FoodFfs stuff here
2K notes
·
View notes
Text
Writing Body Language
How to Improve your writing
This is something that happens every day in your life. A shift of your eyebrow in skepticism, or the way your lip may twitch to a half smile cause you’re trying not to laugh. These behaviors are vital for writing in character, because not only do the allow you to visually see what is happening but it is also reaffirming whatever emotion your character is showing.
So why should you write it?
Much of human communication is non-verbal which means you need to also translate this non-verbal reaction in a post. It allows you to greatly enhance the emotions of another character and always another person to ‘visually’ see how they feel in a post. Most of all, this will add depth and volume to your post to make it feel more real. IT will make your character feel like a human instead of just another fictional person you look at from above.
Below you will find a list different type of emotions and what sort of body language can be exhibited to them.


Three ways to accent an action.
When writing about emotions, there are different ways to verbally write them out. Each one is unique in their own way, allowing you to show more about the emotion.
Emphasize the Emotion. But doing this, you are expressing both the emotion and the body language. We’ll use a simple example. It’s short and simple yet you can sense he is happy. John felt so happy that he was humming a tune while walking down the hall.
Complicate the Emotion. Sometimes, even when you are feeling one emotion, deep down rooted underneath the facade of it all, there is actually an underlining emotion they feel. This is something you have to truly express otherwise no one will know. John felt so happy that he was humming a tune while walking down the hall. However, it was obvious by the way his nose crinkled that he was disgusted by the actions beforehand. Instead, John covered it up by appearing pleased today.
Contradict the Emotion. This is a little different than complicate. Contradicting means that you are claiming one thing when in fact its the other. In many ways, this has a variety of uses, from inner depth of the truth to what you see in person, or someone creating a wall. It could be considered a lie, but when is anything that easy? John felt so happy that he was humming a tune while walking down the hall. In truth, once he was in the classroom, his shoulders slumped and a pout crossed his lips when no one was around, showing just how displeased he was with the situation.
Remember that you do not always have to contradict or complicate anything. Sometimes all you need to do is emphasize and that will be just fine. You don’t always have to have an underlining complicated for an emotion to make it more enhanced.
Do be afraid to use the Thesaurus to also improve an emotion. Such things as “happy” is a nice emotional word, but think of how much more powerful it is when you heard some is “overjoyed” or “content.” She how these emotions matched up with a body language can give two different styles of happiness? Mix and match to find what works best for your character at the time.
More In Depth Information
What I’ve stated above is more of a simplistic overview. IF you truly want to improve yourself, go to this
LINK HERE
To see just how much body language can reveal about a person. You will find things such as how a person lies, how the eyes reaction, the positioning of a person in personal space, mouth, and head body language and so much more.
Use these resources to greatly increase the reactions of your character to another and create a more life-like world.
78K notes
·
View notes
Photo

Did a couple bookbinding classes at the end of last year. These are some of the books I've made since then. Of course, a couple had to have Harry Potter quotes on😁 #bookbinding #handstitched #handbound #blockprintedpaper #handdyedpaper #harrypotter #harrypotterquote #books
#handbound#handdyedpaper#harrypotterquote#harrypotter#blockprintedpaper#books#bookbinding#handstitched
0 notes
Photo

A mandala done while rewatching some Supernatural with my cousin
0 notes
Photo

Today's mandala. Starting to get into Halloween colours. Can't promise I'll do a mandala tomorrow. Having my last 2 wisdom teeth out in the afternoon after work, so might not be up to it. #mandala #mandalaaday #doodles #circles #orange #purple #green
1 note
·
View note
Text
NaNoWriMo Prep: How to Write 2000 Words a Day
Two thousand is a big number. Sitting down to write 2000 words can be extremely intimidating, so the first thing you should do is make that number friendlier.
Write 500 words in 4 writing sessions.
Chop up that big, intimidating number. Start with a goal of 500 words. In one session, with no breaks, write them all. Take a break, then write the next 500. Repeat until you reach at least 2000.
If you write 650 words in one session, don’t aim for 350 in the next. Let those extra words add up. A few hundred extra words each day will get you to 50k quicker than you could imagine.
I recommend timing your sessions, aiming for 20 minutes each time. The deadline will help you get the words out, With 10 minute breaks between each session, you can reach your 2000 word goal in two hours. Which brings me to the next point:
Write fast.
Don’t stop and think about your words. Don’t go back and improve a previous sentence. Save all of your edits for later. Focus on writing as quickly as possible, throwing everything you have at that blank page. This will actually help boost your creativity. Make your brain work so fast, be so focused, that it doesn’t have any space to doubt itself and you’ll be amazed at what you can come up with.
But don’t worry if you can’t write 500 words in 20 minutes on day one. Writing quickly is a skill and it will take a few days of training.
Let the words suck.
This is absolutely key if you want a high word count. When you’re writing an entire chapter in a day, you shouldn’t expect the words to be beautiful. You’re not aiming at lyrical prose. You’re mining raw material that you can work into art later.
Letting the words suck can include:
Writing [something happens here] in place of a scene.
Letting yourself use cliches as shorthand.
Dialog that is really exposition.
Long descriptions of things that don’t matter.
Letting your characters ramble until you discover what it is they actually need to say.
As long as there are 2000 words and they relate to your story, they’re exactly what you need. And if you hate having bad words on a page, once you have your 2000 for a day, you can go back and fix all of it. Take all the time you need. Just reach that word count first.
Tip: if you do edit at the end of each day, make that a separate document from your official NaNo doc. This way, you can trim scenes, descriptions, and dialog without worrying about its effect on your word count. (If you make a scene/description/sentence longer, feel free to include that in your NaNo doc.)
Don’t know what to write next?
So you’ve written 1200 words, completed a scene, and you have no idea where the story is going next. Here are some things you can do to get those 800 words in anyway:
Go to writeordie.com and FORCE the words out.
If that doesn’t work, reread the scene you’ve just written and see if you’re missing some obvious foreshadowing, some clue as to where the story’s headed. (You can also add a few lines to bulk up your wc.)
If that fails, take a walk and let the fresh air usher a solution to you.
If that fails, skip the next section. Write another scene. Go where the story is waiting for you. Come back to the other scene at a later time.
Helpful tip:
Instead of breaking your writing session into four parts, break it into five. Use your first writing session to sketch out an entire chapter, like an outline, but with bits and pieces of dialog and description. Figure out where you’re headed and a couple of key stops along the way. Knowing what you’re writing towards will make doing the actual, fleshed-out writing much easier and quicker.
You can also do an outline for the next day’s writing after you’ve gotten your 2000 words for the day in. Future you will be extremely pleased.
9K notes
·
View notes
Photo

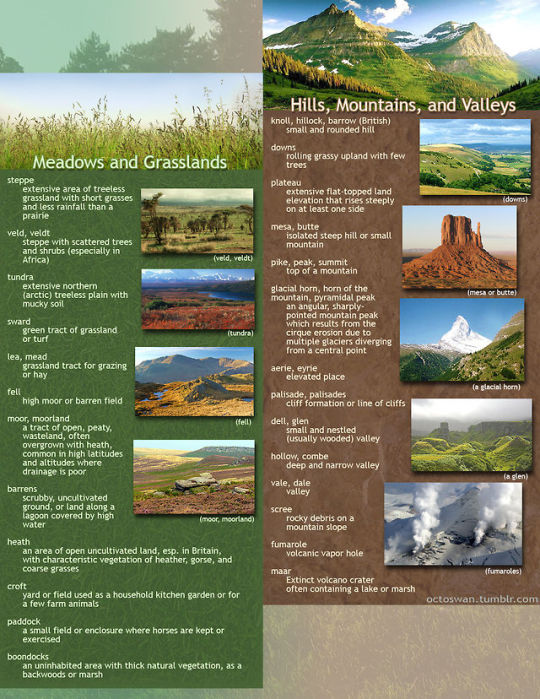

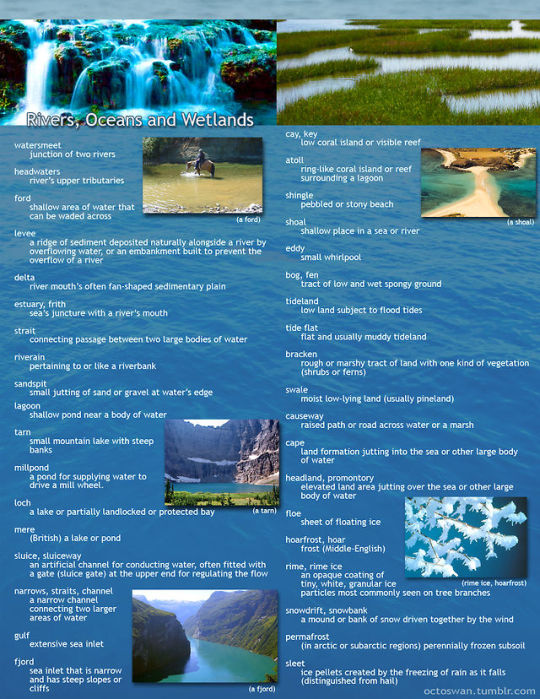

I made these as a way to compile all the geographical vocabulary that I thought was useful and interesting for writers. Some descriptors share categories, and some are simplified, but for the most part everything is in its proper place. Not all the words are as useable as others, and some might take tricky wording to pull off, but I hope these prove useful to all you writers out there!
(save the images to zoom in on the pics)
216K notes
·
View notes
Photo

Yesterday's mandala. Didn't get around to doing one on Saturday, too busy... #mandala #mandalaaday #circles #orange #doodles
1 note
·
View note
Photo

Today's mandala, played around with purples. #mandalamonday #mandala #mandalaaday #purple #doodles #circles
1 note
·
View note
Photo

Made some sketch books to do my mandalas and doodles in. #handbound #handmade #handdyedpaper #doodles #sketchbooks
0 notes
Photo

Today's mandala. So far I'm actually doing one a day, we'll see how long it lasts... #mandala #mandalaaday #doodle #doodleaday #green #blue #watercolours
0 notes
Photo

Today's Mandala- purples and pinks. Purple Days- title of pretty cool Locnville song.
0 notes
Photo

Mandalas I've done the last few days. I'm trying to do one a day. #mandala #oneaday #doodleaday #doodles #zendala #watercolour #fineliner
0 notes
Photo

September 26 - October 2
The Project:
So this project is basically just to help get people’s works out there. Get them seen, get views to stories and blogs that may not have had them before. Most, if not all of us, have felt before like we have a story but no audience, and i’m hoping to change that!
I’m so excited for this! I’m excited to share all your stories (and read them too)!
How To Join:
Very very simple, my dears, very easy peasy.
1. Take a look at these SUBMISSION GUIDELINES. Sorry for the all caps, but they’re important.
2. Use this handy STORY SUBMISSION TEMPLATE and submit your story to my blog (as long as it fits this week’s theme)!
It’s as easy as that!
Some things to remember:
- This week’s theme is HALLOWEEN/SPOOKY ROMANCE Your story must be Halloween romance, or have those themes. Any kind of spooky romance you want!
- Your story must already be posted somewhere. I want the link to it, not the entire story.
- It doesn’t have to be a long story! Can be whatever length!
- I will stop accepting submissions at midnight on the 2nd of October, CENTRAL TIME.
- The list of stories will go up the next day, on the third.
- WIPS are welcome
I’d love to see if anyone has any spooky romances! And even if you don’t, I hope you’ll reblog this so that other writers will see it!
If you want to see what future themes are, check out this handy dandy STORY SHARE CALENDAR!
37 notes
·
View notes