
simblr, sims lover, creator and converter. Doing/Converting content for sims 2 only.
Don't wanna be here? Send us removal request.
Statistics
We looked inside some of the posts by rdshop and here's what we found interesting.
Average Info
Notes Per Post
9K
Likes Per Post
7K
Reblog Per Post
2K
Reply Per Post
121
Time Between Posts
4 months
Number of Posts By Type
Text
11
Photo
5
Link
1
Last Seen Tumblr Blogs


Fun Fact
Hackers stole 65M passwords from Tumblr in 2013.
Text
I FIXED IT!
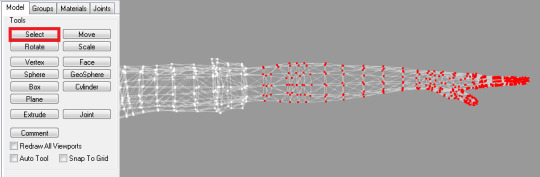
Apparently, having this option makes the "Set Keyframe" option not work on some bones.

So, it creates this. The full skeleton isn't yellow as supposed to, and so the sim isn't fully locked into the pose.
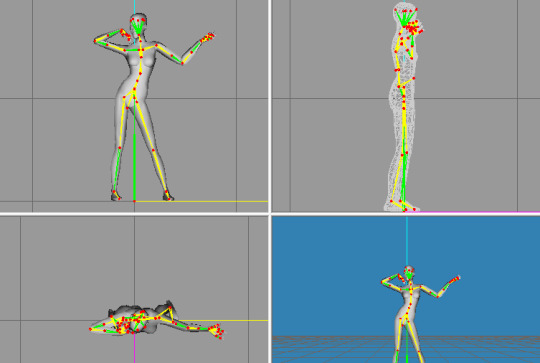
Since the leg bone wasn't locked, the sim could walk, and the pose overall would be a bit weird in game.

So, before exporting, make sure that the bones are all yellow.
Hello everyone, missed me?
Well, let's just say that I may have made a new posebox, but I'm facing an issue. I have some poses where the sim can walk mid-pose and it's not supposed to. I tried to search online but found nothing, it's like as if I'm the only one who had this issue. I'm testing it on a completely Maxis sim but I don't think that's the problem since a few poses work just fine :(
If someone knows how to fix it, I would love it, I need to finish this posebox, it's been on process for too long.
10 notes
·
View notes
Text
[TS2] Reneissance: Mugler's Queen Bee Look


Ugh, finally i'm posting this... Really proud of this one! Baked textures from scratch, as well as custom meshes, from head to toe! Although there might be some minor issues in the crotch area oop- but i was so over it, so yeah...
This download includes:
3 verions of an outfit (chrystlal/leather/clear)
3 verions of fully animated helmet + hair (full/hair/helmet)
Credits to @wingssims for the original hair that i converted and edited to fit the helmet
DOWNLOAD
94 notes
·
View notes
Text

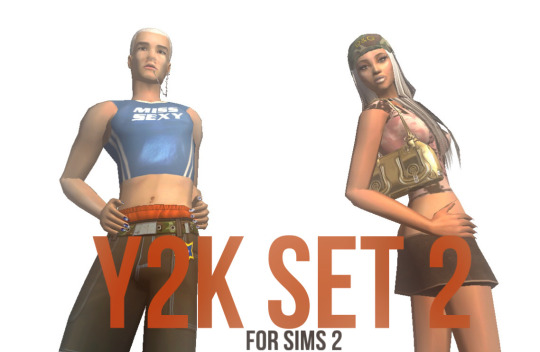
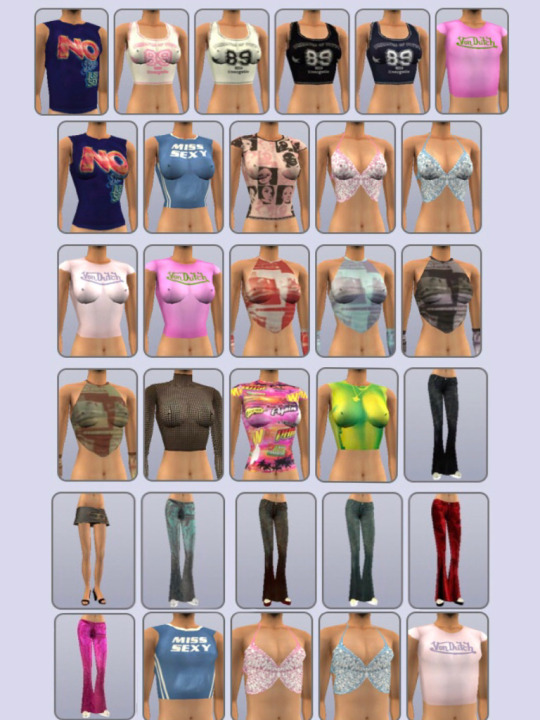
CC COLLECTION #18
1 Sweater & Shirt + Denim Skirt
2 Flounce Tee
3 Alexa Skirt
4 Chopstick Set
5 Leonore Puffer Jacket
6 Y2K Wide Jeans
7 Fur Jacket
8 Miu Low-Rise Mini Skirt
9 Sheera Knit Top
10 Sheera Denim Skirt
11 Magic Hour Top
12 Magic Hour Skirt
DOWNLOAD (SFS | PATREON)
Credits:
Smooth Hands made by Tenshii~Akari
Flounce Tee made by ridgeport (textures by SIMUKO)
Alexa Skirt made by Arethabee
Chopstick Set made by Savage-sims
Y2K Wide Jeans made by eunosims
Leonore Puffer Jacket made by Belaloallure
Fur Jacket made by RIMINGS
Miu Low-Rise Mini Skirt made by eunosims
Sweater & Shirt made by gorillax3
Denim Skirt made by ALGU
Magic Hour Top made by Joliebean
Magic Hour Skirt made by Joliebean
Sheera Knit Top made by Belaloallure
Sheera Denim Skirt made by Belaloallure
Armwarmers made by B0T0XBRAT
Kiara Boots made by trillyke
Low Top Sneakers made by Jius
Faux Leather Ankle Boots made by chisimi
Boots made by Madlen (converted to sims 2 by marja87)
Heels with socks made by Arltos
645 notes
·
View notes
Text
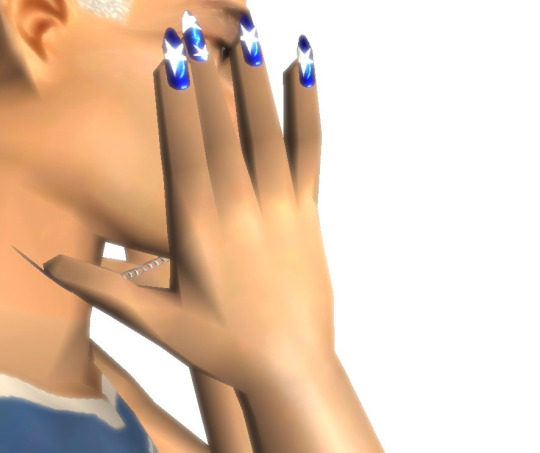

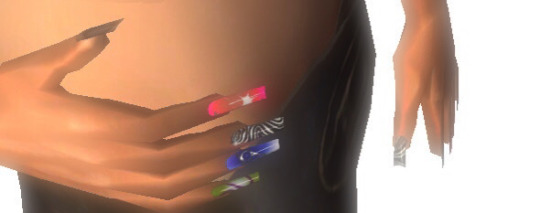

Hello everyone! Did you miss me?💅Well, I came back to you with a new set of clothes and nails, I hope you like it!💋
Enjoy!
DOWNLOAD: SFS
778 notes
·
View notes
Text
OMG, SO GORGEOUS!

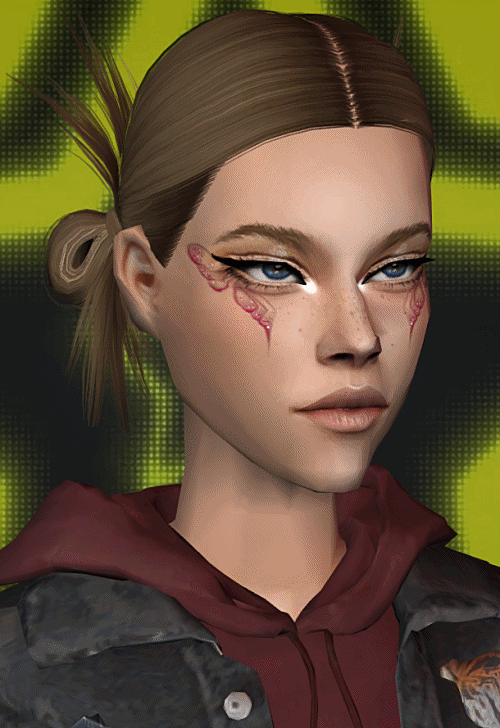

🦋cosimetic eyeliner n224 v1 converted to ts2🦋
so, the sims tattooer was updated, and apparently makeup looks a bit better than it did and honestly @paluding wasn't wrong! on a sim with exaggerated features, this eyeliner i converted genuinely looks good so im pleased to share it today :)
also, say hello to @fdicaprio's gorgeous ceres!!! i love her so much ^.^
i've merged it into a single package file, tooltipped them and compressed them. get it below :D
dl @ sfs
credits - paluding, cosimetic
170 notes
·
View notes
Photo
feels so good to see this again...
some photos that I’ve edited are here :)


From galleries to boutiques to the bedroom, come choose from a wide array of fabulous sims fashion art! Now available at MTS! Credits to: Jack Turner Jack Jones Janiero Kopp Joseph Gankovic Ludolf RD JuSa SNTM Fan SNTM God
39 notes
·
View notes
Text
TS2 Reshade
Hi all!
I’m sorry to bother but does someone have a tutorial for me to follow on how to activate Reshade on Sims 2? I tried to have Xenos but it didn’t open on my pc, and I tried to install things, so I’m confused. What tutorial would be the best for me to follow in that topic?
7 notes
·
View notes
Text
4t2 Clothing Tutorial
Several users requested that I make a 4t2 Clothing Tutorial, as they found other ones to be confusing or unclear. I can’t promise that this one will be any better, but this is the process I use to convert clothing from The Sims 4 to The Sims 2. I am always still learning myself, so if I get anything wrong or you have any suggestions to make the process better or the tutorial clearer feel free to chime in. I recommend using this tutorial in conjunction with Serenity’s 3t2 Tutorial which covers a lot of the same principals.
In order to follow this tutorial you will already need to be fairly competent in using SimPE and Milkshape - If you haven’t already had a look I recommend taking a look at MTS Tutorial pages which should help get you more familiar with these programs.
Tools/Programs Required:
Sims 4 Studio
Sims Meshing Toolkit
Blender
Milkshape
SimPE
Sims 2/Bodyshop
Photoshop/GIMP (or other image editing programs)
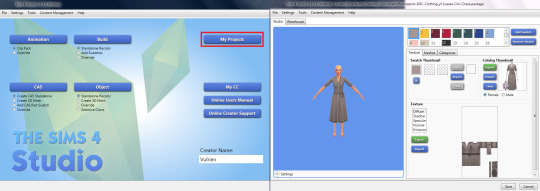
1. First of all you need to pick an outfit to convert to TS2. In this tutorial I am going to be converting Renora-Sims’ Sussex Chic Dress. I recommend creating a folder on your desktop for keeping all your files while converting. 2. Open Sims 4 Studio and select ‘My Projects’. Navigate to your chosen outfit file and open it. This will open the file and allow you to access the Mesh and Textures.
3. You can now use the ‘Texture’ and ‘Mesh’ tabs to export the required texture and mesh files. Make sure that you export the LOD0 Mesh as this is the best quality one. You can navigate the textures using the swatches that are shown at the top. Save these files to the folder you created.

4. Next you’re going to open the mesh file which you extracted. Double click the Blender file you extracted, this will open up the file in Blender.

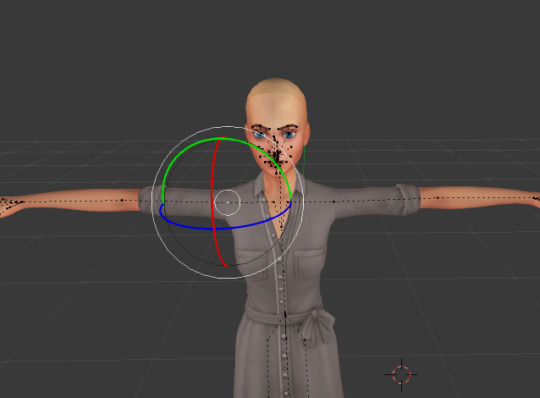
6. Now select the Eye and Cursor icons on the rig; this will allow you to pose the rig. Then at the bottom of the page select the curved icon (Transformation Manipulator).

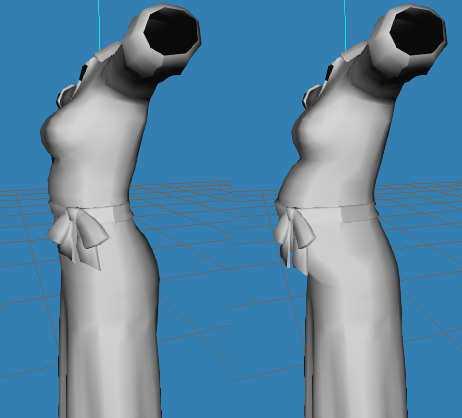
7. Right click on the shoulder joint and drag upwards, this will cause the arm to change angle. Notice the angle in the bottom left-hand corner; you are going to want to change the angle of the arms to 45 degrees (as sims 2 models have their arms stretched out at 45 degree angles).

7. Modify both of the shoulder joints to be at 45 degree angles (and the elbows to 20 degrees, if your outfit is long sleeved).
8. Now you need to delete the extra bits of the rig that we don’t need (bottom, feet, head etc.) so right click on them and select Delete. This will leave you with just the outfit mesh and a few extra bits of body - but don’t worry we can get rid of them in Milkshape.

9. Now we need to extract the model to an obj. file. Go to the top left-hand corner of Blender; select File > Export > Wavefront (.obj). Next you need to make sure that the Smooth Groups and Write Normals boxes are checked. Then Export the obj. file to the conversion folder you created. You can now close Blender.

10. Open Milkshape. Select File > Import > Wavefront OBJ. Select the obj. file that you exported from Blender and open it.

11. Use the Select tool to select the extra bits of body that you don’t need and press the delete key. Once you’ve removed all the extra bits that you don’t need, you will be left with just the outfit mesh.
12. Now we need to import the Sims 2 Body (you can download them here). Select File > Import > Sims2 UniMesh Import V.4.09. Then select the AF Body Base. You’ll get a pop-up asking if you want to import another model - Select Yes. Another pop-up will appear asking if you want to include Additional Bone Assignments - Select Yes. You will then be asked if you want to create Blend Groups - Select No. Now the Sims 2 Body will be added over the outfit as a separate layer.

13. Now we need to edit the shape of the Sims 4 outfit mesh to fit with the sims 2 body and cut away the excess bits of sims 2 body that we do not require. After this import whatever footwear you want to combine with your dress, deleting any part of the legs you don’t require. Serenity’s tutorial has a good section covering exporting sims 2 meshes. Use the groups tab to select the body base and the legs/shoes you’ve imported and then regroup them into one group.

You will now have 2 groups: the body base and the outfit.
14. Now we need to remap the textures to work with sims 2 texture files. Open Photoshop, create a new image 1024x1024 pixels (this is the image size of clothing in TS2). Copy and paste the Sims 4 outfit textures you extracted earlier in Sims 4 Studio; rescale the textures to fit the image. Save the file as a BMP.
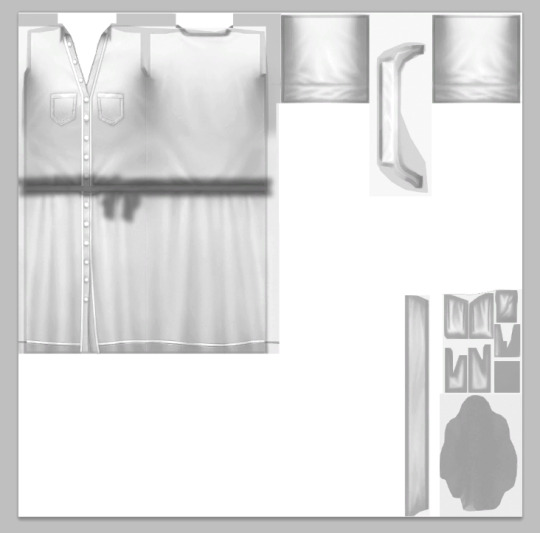
15. Back in Milkshape, go to the groups tab, select the outfit mesh. Then go to the Materials tab, select New, Select None, now select the texture file that you just saved and open it. Then select Assign. You should now see that the textures have been added to the mesh, but the mesh isn’t mapped properly, so they appear in the wrong places. To fix this select Window > Texture Coordinator Editor.
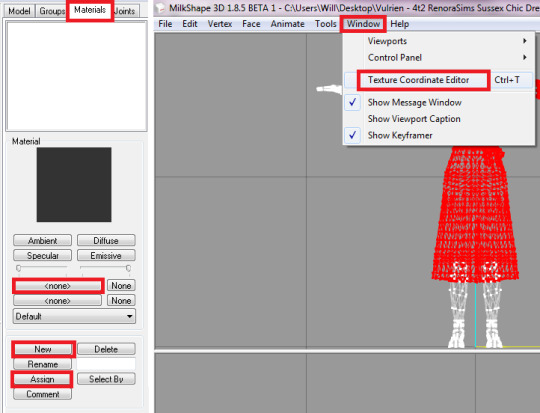
16. This tool allows us to alter how the mesh is mapped. Use the scale, move and rotate tools on the right-hand side of the tool to move the UV-Map around to fit TS2 textures. Generally for 4t2 outfits you will want to scale the UV-Map by a scale of 2.0 along the y-axis. Keeping checking back in the 3D view to see how the textures look on the mesh.

Once you’ve rescaled and UV-Map and repositioned it, the texture should fit the mesh properly.

17. Now we need to assign bones to the outfit mesh. To do this we need a reference mesh from which to copy the bone assignments; Check out the Default Database if you need to find an outfit to use as a reference (look for something which has the same shape and if you’re converting a skirt roughly the same length). For this tutorial I am using my Josephine Dress Mashup as a reference. Extract the mesh from the reference outfit, then import it into a new Milkshape window. Merge all the layers and rename it ‘group_base’. Then export the mesh as a ‘TSRW Object’ - Name it ‘Reference for Bones’. Now close the reference mesh Milkshape window.

18. Now do the exact same thing with the outfit mesh that you are converting. Export the outfit mesh as a TSRW Object with the group name ‘group_base’ (you may have to temporarily delete the body mesh to do this, but just undo this after you have extracted). You should name this file ‘Needs Bone Assignments.

19. Open the Mesh Toolkit listed in the resources above. Navigate to the ‘Auto Tools for WSO’ tab, in the mesh to modify box select your sims 4 mesh which needs bone assignments, in the reference mesh box select your reference mesh. Then select ‘Do Assignments and Save’ - Save the WSO file, I have saved it as ‘Bones Assigned’.

20. Back in Milkshape, delete the sims 4 mesh group, this will leave just the sims 2 body base and shoes. Then go file > import > TSRW Object and select the file you just saved from the mesh toolkit. This will then import a copy of your sims 4 outfit mesh with bone assignments ready for TS2. You will now have 2 layers in Milkshape, the Sims 2 body base and shoes, and your converted TS4 mesh with new bone assignments. You can check the bone assignments have been correctly done by ticking the ‘Draw Vertices with Bone Colours’ box, as you van see it shoes the bone assignments in pretty colours.

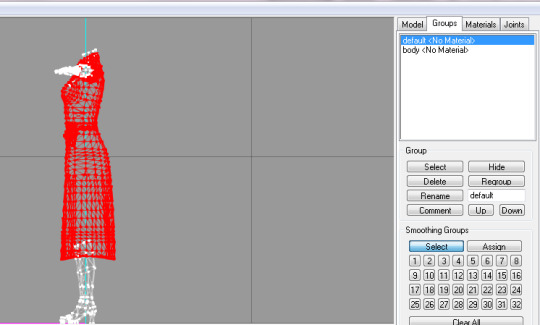
21. Now we are going to rename the groups. Click on the groups tab, type the new name of the group into the box shown below, then click the rename button next to it. The body base should be called ‘body’ whereas the clothing mesh should be called ‘body2′.

22. Next we need to edit the comments of each group. Select the group, then select comments. Copy the following and then select ok: ModelName: body Opacity: -1 HasTangentArray: NumSkinWgts: 3 Do the same for the body2 group, except this time copy the following and select ok: ModelName: body2 Opacity: -1 HasTangentArray: NumSkinWgts: 3 MorphRefNum: 1

23. Now we are going to create the morphs. Select the body2 group and press ‘Ctrl + D’ twice, this will duplicate the layer twice. Select the 2 duplicate groups and go to the Joints tab, here you want to assign all of the bones to none. To do this select ‘— none —’ from the drop down menu and type 100 into the box below it, then click Assign.

24. Select the first duplicate clothing mesh. Rename it ‘~01MORPHMOD.1′ and the comments should be ‘MorphNames: botmorphs fatbot’ (this is your fat morph). Do the same for the second duplicate group, except it needs to be named ‘ ~01MORPHMOD.2′ and the comments should be ‘MorphNames: botmorphs pregbot’ (this is your pregancy morph).
25. Now use the move/scale tools on the right-hand side of Milkshape to alter the shape of the meshes to look like fat/preg morphs (you may want to use another mesh as a reference for the shape). Once you used these tools to alter the shape of the mesh your 2 morphs are completed.
26. Extract the mesh, by going to File > Export > Sims 2 Unimesh Exporter V 4.09. Save the mesh to your conversion folder. You can now close Milkshape.
27. Open TS2 Bodyshop. Create a new project and select an outfit to use as a base for your conversion. I have used my Josephine dress because it has the correct group names already assigned for the mesh. Export the textures, I named the project ‘Renora Conversion’. Then import the project to the game. You can now close Bodyshop.

28. Open SimPE. Select File > New. Now select Tools > PJSE > Body Mesh Tool > Extracting Stage. Then select Browse. Now navigate to your Saved Sims folder (EA Games/The Sims 2 Ultimate Collection/ Saved Sims) and select the file you just imported to Bodyshop. Mine was called ‘5f0712be_RenoraConversion’. This will then extract the mesh that we will be using as a base for our own mesh.

29. Select all of the files that are extracted (GMDC, GMND etc.) and then select Tools > Fix Integrity.

30. Type in the new name of your mesh, for me it was ‘4t2VulrienRenoraSimsSussexChicAFMESH’. Select Update and then OK.
31. Select the GMDC file that you just renamed. Then go down to the Filename box and copy the contents of it.

32. Right-click on the GMDC file and select ‘Replace’. Then select the mesh file that you exported from Milkshape and select Open. Now go back to the Filename box and paste the filename that you just copied. Then select Fix TGI and Commit.
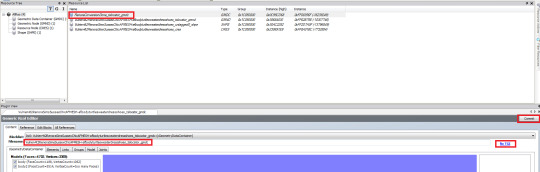
33. Save the file to your downloads folder; I have saved it as ‘Vulrien4t2RenoraSimsSussexChicAFMESH’.
34. Now go to your Saved Sims folder (EA Games>The Sims 2 Ultimate Collection>Saved Sims) and open up the project you imported in Bodyshop earlier ( 5f0712be_RenoraConversion) in SimPE.
35. Once the file is open in SimPE select the 3D Referencing File. Then Click Tools > PJSE > Body Mesh Tool > Linking Stage. Now select the mesh file that you just saved in your downloads folder (Vulrien4t2RenoraSimsSussexChicAFMESH). Now save this file.

36. Open Bodyshop back up. Create a new project, select clothing, you will notice that the project you imported earlier has been replaced with the newly converted mesh, as you have linked it with this file. Export the meshes by creating a new project, I have named it ‘Chic1′.
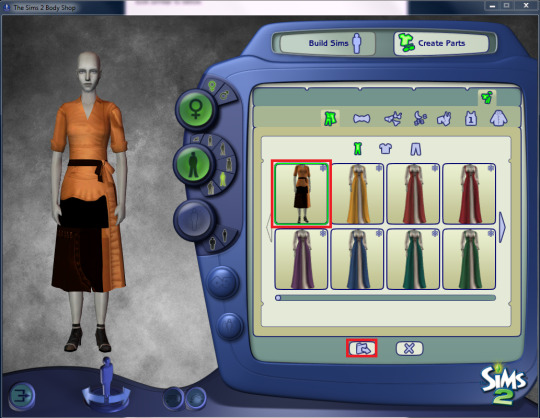
37. Now replace the textures as you would a regular clothing project. The clothing texture you created earlier on the 1024x1024 base should be saved as the body2 texture, whereas the texture for the shoes should be saved as the body texture. Create whatever alphas are needed for the textures to show correctly on the mesh. Once you have completed this, press the refresh button. The textures should now be in the correct places. Select the outfit categories you want the outfit to use and then type your tool tip in the tool tip box. Then import the outfit to the game by selecting the import button.

38. You are now finished! Feel free to make your recolours, either using the textures you extracted from Sims 4 Studio, or by using colour actions on the base textures. After you’ve made your recolours, I suggest going in-game and testing out the outfit in various animations to see if it animates well. If there is a lot of clipping or weird animations you may have to go back and re-edit the mesh/adjust the bone assignments until you get them just right!
(At some point when writing this tutorial I exited without saving and lost quite a lot of screenshots, so if some processes are a bit unclear because of this I do apologize - if you have any questions, feel free to ask).
615 notes
·
View notes
Photo
How can people do this? this is immaculate talent


The Sims 2 + Reshade: Nightcity
Yep, this is all raw footage from the game!
921 notes
·
View notes
Text
500 followers
I’ve been inactive, so I repaired now only, I’m sorry for that.
Anyway, I just got to hit 500 followers and it’s all thanks to each of you.
I’m really really happy. Love you all.
15 notes
·
View notes
Text
TS4 Hair Conversion Tips
Okay, so I’ve been seeing this quite a bit with 4 to 2 hair conversions lately…
If you are converting a hair from TS4, please - remember to remove the hat hair groups!

All TS4 hairs come with extra groups for the beanies and hats; custom hairs may vary depending if the creator added them or not (but generally most TS4 creators add hat groups to their hairs). Not removing these groups not only make the hair look odd at some angles, it also increases the polycount.
———
Another tip involves the UV, but this is more of a personal quirk, so feel free to ignore this. I know some people look at UV mapping to be a little intimidating, but it’s really simple.

In Photoshop, you can crop the canvas to TS2 size – the lower half of TS4 hair textures is literally empty, so nothing will get cut off (most of the time).
Now you may notice that the texture ends up distorted on the mesh - this is very easy to fix. Open up the texture editor in milkshape: Windows -> Texture Coordinate Editor (or Ctrl + T)

1. Click on the “Scale” button
2. Under Factor, type “2″ in the second box ( x ; y coordinates)
3: Hit the little “S” button and the UV will stretch down

And tada! The UV map now properly aligns with the mesh!

Sorry if this all sounds a little scatterbrain - my brain is a little fuzzy rn, but I just wanted to share these…
221 notes
·
View notes
Text
So much work and it looks so good, I’ll definitely test it and I think I will like it
DOWNLOAD: Clean UI
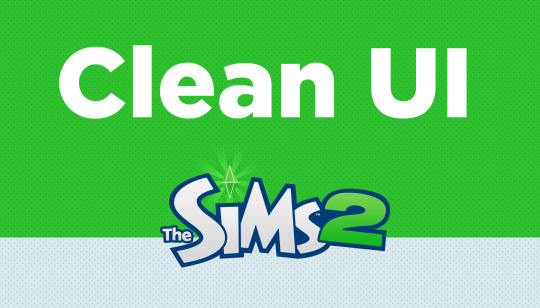
The wait is finally over! After almost two and a half years in development with more than 2.800 images and 180 script files edited, you can now experience the first ever, modern and completely overhauled user interface for Sims 2 across all expansion packs! Please note that because of this, you need every expansion pack and possible also Mansion & Garden stuff.


You can find many more images in the flickr gallery.
Features: - completely overhauled user interface - various fixes and removed flaws - removed deprecated buttons or ones that corrupt the game (delete family…) - popular CC included to avoid incompatibility (Chris Hatch widescreen mods…) - three new startup loading screens - optional (new) Sims (and pets) in the menus - cursors (inspired) from Sims 4
Continuar a ler
5K notes
·
View notes
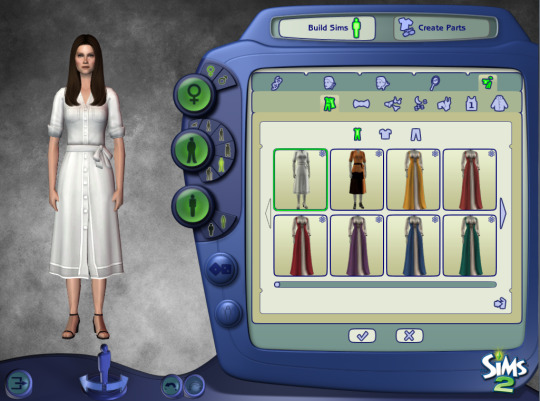
Photo
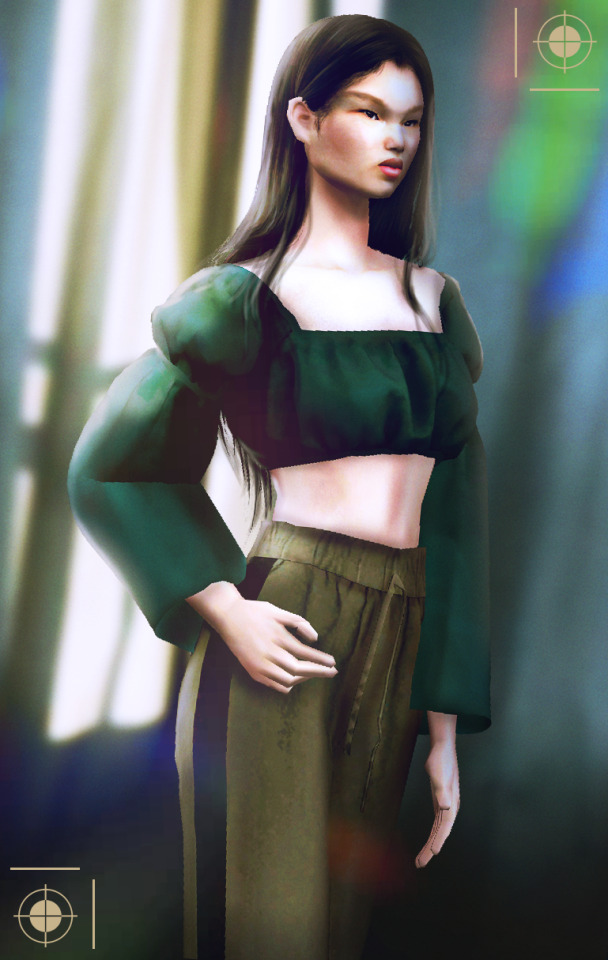

TSLOK PRINCESA TOP - 4T2 CONVERSION BY RDSHOP
Conversion description:
- More or less 25k polys (sorry but I had to, even in duplicate mesh I couldn’t erase the whole arms of the shirt so I am sorry for a high conversion.
- AF only / Everyday top
- 9 recolours: beige, black, dark blue, esmerald, magenta, olive green, pastel blue, red and white
- A few holes (possibly transparency issues)
- In some animations/poses, the arms can show just a bit but since the shirt is open in the back I couldn’t remove the arms
- Thank you TSLOK for mesh and textures (if you find a link to the original post or download file comment because I lost it and it’s not easy to find)
DOWNLOAD
189 notes
·
View notes
Photo
Can we talk about QUALITY?? Teach me like this is amazing.

Riley I would never thought that one sim could make me create a whole tumblr, but I don’t regret this decision. I have a lot of sims sitting in the basement, so the time to give them freedom has finally come!
80 notes
·
View notes
Link
Hair WSO Tutorial for those who do hair conversions
129 notes
·
View notes
Photo

Hello,
I had this done for so much time and I felt like I needed to release it.
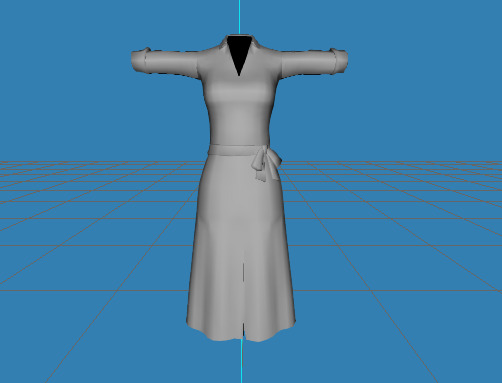
This is the Trillyke’s Fever Jacket Dress, converted from Sims 4 to 2. It has 10 recolours which also include different belt/pocket colours but always the same boot recolour.
The boots mesh are from gothplague, meaning that the credits for texture and mesh will go to @trillyke.
From YA to AF I believe.
DOWNLOAD
397 notes
·
View notes