
Don't wanna be here? Send us removal request.
Statistics
We looked inside some of the posts by rikraft and here's what we found interesting.
Average Info
Notes Per Post
2M
Likes Per Post
775K
Reblog Per Post
804K
Reply Per Post
1K
Time Between Posts
3 hours
Number of Posts By Type
Text
16
Photo
1
Last Seen Tumblr Blogs


Fun Fact
Tumblr was named as a finalist in Lead411’s New York City Hot 125 in Aug 2010.
Text
Those who don't study history are doomed to repeat it; those who do are doomed to scream into the void and then cry themselves to sleep
3K notes
·
View notes
Text
it's not mentioned in the song but in the corner of the piano man bar there is a mouse hole and inside that hole is a smaller replica of the bar staffed and patronized by mice who perfectly mirror all of the characters and they all say squeak us a song you're the piano mouse and mouse what are you doing here while they put cheese in his tiny jar
15K notes
·
View notes
Text
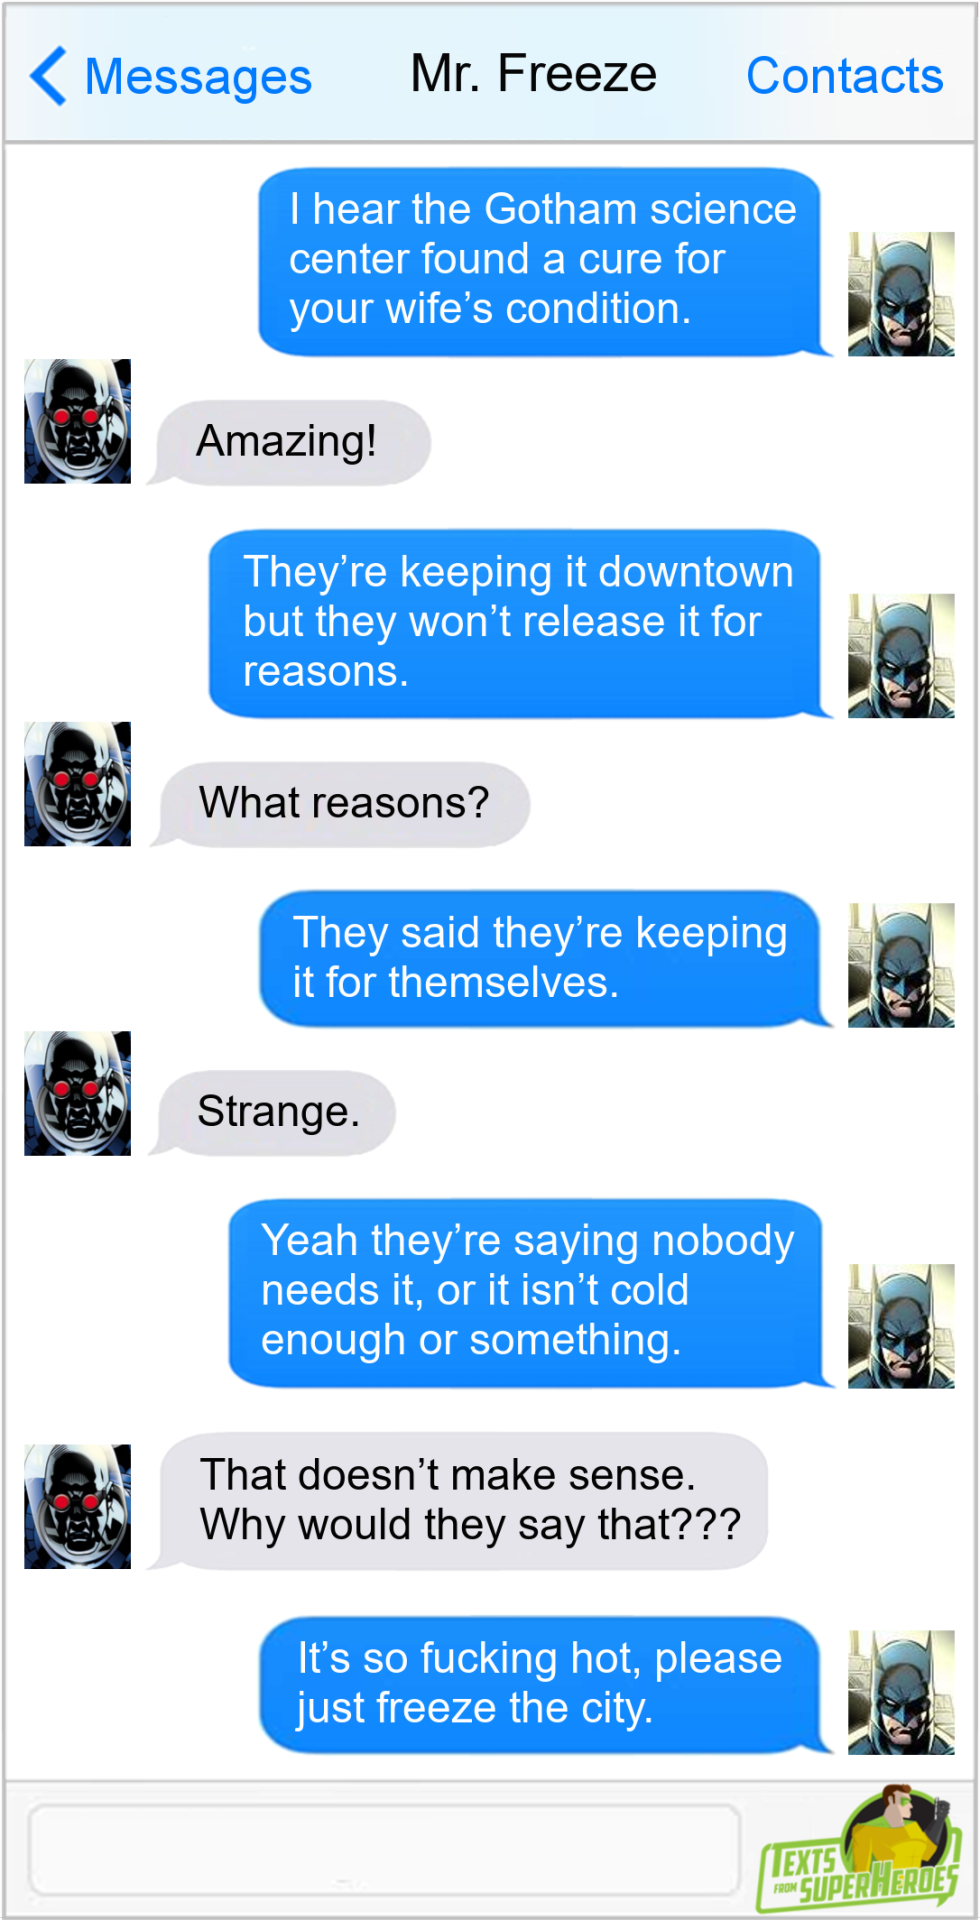
Texts From Superheroes
Facebook | Threads | Patreon | Instagram | BlueSky
96 notes
·
View notes
Text
What possible thing is causing you such concern, you unemployed illiterate ball of lint?

4K notes
·
View notes
Text
This is your regularly scheduled reminder that "Life finds a way" is about the dinosaurs becoming transgender
3K notes
·
View notes

Text


I made shoes!
I started with soles from sneakerkit (they're not paying me). They come with stitch holes pre-marked, and the website has downloadable patterns/templates for the uppers with the stitch holes marked which makes all the assembly easy.
I wanted converse clones so I started with the "classic 3 in 1" design and adjusted it a bit. I made the ankles a bit higher (although not higher enough, in retrospect). And made the tongue piece extend further along the foot so that it overlaps the side piece without risk of gaps.
The examples on their website are all with single-layer leather, but I used two layers of canvas for each piece. Sew right sides together, grade seams, flip, and topstitch to secure.


Followed by a frankly unnecessary amount of extra top stitching.

I used Prym vario pliers to punch the holes and add the eyelets. It was physically quite hard work, but not complicated (and very satisfying).

I'm pleased with myself for remembering to wash the chalk marks off before I started assembling them with the soles.
I poked holes through the stitch marks on my paper pattern pieces, then used them as a template to mark pen dots on the fabric. I did the same on both sides so that I could easily see what I was stitching from both directions, but because the fabric pieces had strayed a bit from the pattern shape during assembly the dots ended up a few mm misaligned in some places. It seemed to work out fine though.
Assembly was a simple running stitch going all the way around the sole, and then back again to complete the stitch, using thick waxed cotton thread and a giant needle. The hardest parts were sewing through the tongue and side pieces together where they overlapped, and getting the needle through from the inside at the very end of the toe.


I was too scared to burn the ends of the thread even though that's apparently the proper way, so I just tied them off and tucked the ends back through a stitch.

Just add laces!

The stitching and raw edges are exposed on the inside with no lining, but the insoles pretty much cover up the actual raw edges so hopefully that will stop too much fraying. I could have turned in the bottom edges and topstitched them down to make it more secure but I didn't want it to be too lumpy inside the shoe.


Some more close-ups:


It was so scary trying them on, because they're such a complicated 3D shape there is absolutely no possible way to tell whether they'll fit until they're 100% assembled. But they do!


There's a couple of tweaks I'd make for next time though. Although I brought the ankle up a bit higher, it still wasn't as high as I like it. And I didn't bring the tongue up enough so the laces knot sits right at the top edge of the tongue instead of comfortable in front of it.
I also don't like how many eyelets there are. I just went with the sneakerkit template and used eight, but I realised afterwards that converse high tops only have seven, and the ankle goes up higher. They just seem unnecessarily closely packed to me.
Plus, the heel shape is a bit off. The sneakerkit recommended pattern has the pieces joined along the top of the heel, and then notched at the bottom to allow them to splay out, with the notch hidden under the tab sticking up from the back of the sole. But it was hard to get the angle of the pieces just right along the join, and the heel has ended up with too sharp an inward angle which doesn't feel quite right. Next time I'll try the converse construction style, with the sides as two separate pieces, and a strip down the back covering the seam.
If these end up too uncomfortable I might just cut a slit down the back, let it out, and cover it with a strip. Or disassemble them completely and try again with the two-piece construction method - because even though all the top stitching was laborious, they use such a tiny amount of fabric that I have loads leftover.
This is the closest I've ever come to Just Following A Pattern - because it was the only way to get the stitch template that matched the sole. And basically I've learned that I was right all along to mistrust patterns and I will always end up with something I like more if I draft it from scratch. Good to know for sure!
26 notes
·
View notes


Text
11K notes
·
View notes


Text
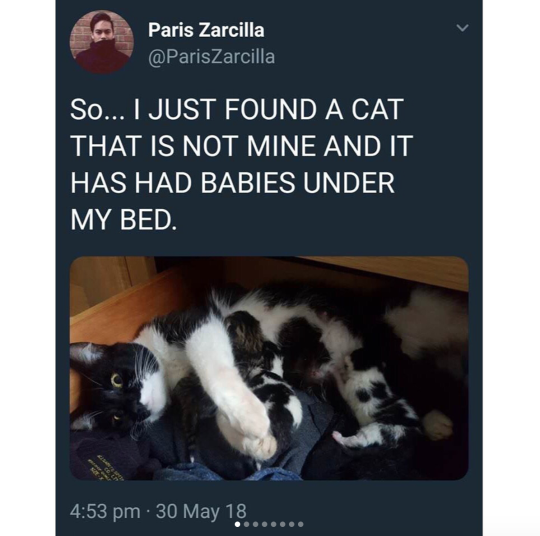
I love that I share my house with one of the most efficient apex predators millions of years of evolution could produce. I love that two of nature’s most prolific machines met and were like “hmmm. We should lay around and do nothing together”. Now we’re both fat and happy and full of meat. The hedonism of it all
59K notes
·
View notes
Text
My dog's really a study in Buddhism. He can see my muffin wrapper and he's miserable. Crying. He needs to eat my muffin wrapper so bad.
I get up and throw it away. He forgets about it immediately and happily goes to sleep.
You are not sad because you do not have a muffin wrapper, my beautiful boy, you are sad because you want the muffin wrapper.
24K notes
·
View notes

