Etsy Shop Owner || Twitch Streamer/Artist || Creator of "In Her Heart" on Webtoons || COMMISSIONS OPEN!
Don't wanna be here? Send us removal request.
Statistics
We looked inside some of the posts by rquerdo and here's what we found interesting.
Average Info
Notes Per Post
30K
Likes Per Post
17K
Reblog Per Post
13K
Reply Per Post
10
Time Between Posts
1 month
Number of Posts By Type
Text
17
Last Seen Tumblr Blogs


Fun Fact
69% of Tumblr users are millennials.
Text
I'm pretty sure people in heaven don't listen to bimbocore.
1 note
·
View note

Text

Royal Margarine Cookie from Cookie Run Kingdom
#twitch#art#twitchstreamer#twitchartist#digitalart#smallartist#commissions#commissionsopen#digital art#digitalillustration#fanart#cookierun#crk fanart#cookie run art#cookie run#royal margarine cookie#cookie run kingdom
6 notes
·
View notes
Text
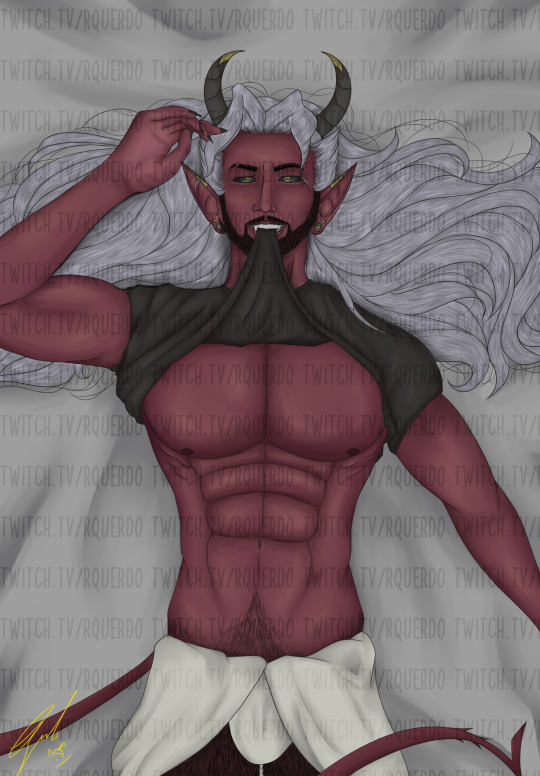
"I can be your angle to yuor demin" Gotta draw more of my boy Lust. This took a lot longer than I thought so no body hair. I am doing a small contest where if I get 100 likes of this drawing's post on twitter, I'll make this into a booba mouse pad because why not!
#oc#digitialart#thirsttrap#muscle#incubus#demon#thirsttrapart#digitalillustration#clipstudiopaint#muscleoriginalcharacter#art#twitch#twitchstreamer#twitchartist#smallartist#commissions#digitalart#commissionsopen#digital art#lust
3 notes
·
View notes
Text
Vorag the Kaitogen Sculpture Process
Hey guys!
I just finished this badboy yesterday and wanted to go through the process of making him. This isn't really a tutorial, but more of a walk through.I do want to mention, before you give a critique, I ask that you please read through the entire thing before commenting, I'll be giving self-critiques and most likely I cover what needs to be critiqued. That aside, I'll be more than happy to take on critiques!

To start things off, here's the drawn version of Vorag. I started this drawing in the beginning of this year and worked on it a week after the drawing was finished.
Backstory: The Kaitogon species are cursed humans who sold their souls for strength and power to the Elder Dragon. Each Kaitogon are assigned new names from their reborning and their memories of their past lives are completely vanished.
Time for the process:
So this is what I'm starting off with. As you can see, not really much for this custom/sculpture.
Originally, I was going to use the body and arms for another sculpture (Tyvesses-who's also apart of this series. Click here to check out that process on twitter) however the body got way too bulky for Ty. I ended up using a spiderman action figure for the rest of the body which then leaves us with spiderman's head and hands (I ended up not using the legs). I will have to make the rest of the body from scratch.

I was debating on how I want to display Vorag until I decided to give him a platform to be on. This helps with the posing since I don't have to rely on him standing on his own. I used old casting mold to create the shape of the platform. and from there, I used plaster wraps to obtain the shape and make it all uniform together.
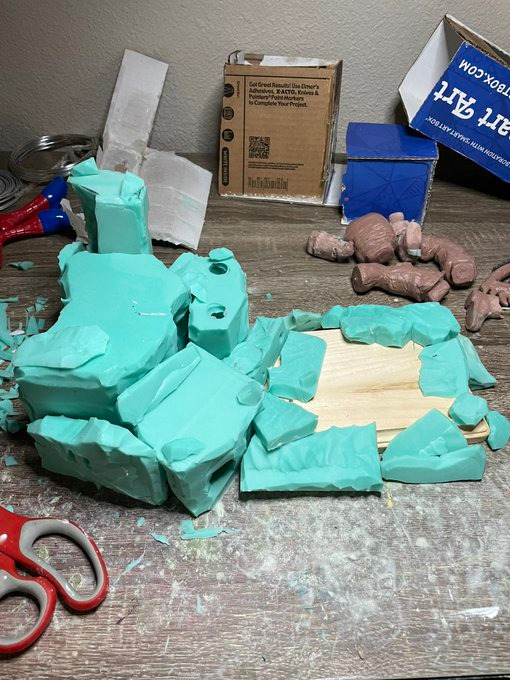

So here's the controversial side. The moldings made the platform too heavy and I knew that would be an issue for the long run. If I were to just remove the molds, the plaster by itself would collapse; not strong enough. So here's what I come up with...
Foam Spray
It's lightweight and it's pretty durable. Reason why it's controversial is because it's not eco-friendly. I try my best to reuse items that I have laying around my home. That or I'll buy items that are used or pre-owned (with the exception of supplies). I don't want to seem like I'm an eco-friendly sculptor when I'm using something that could potentially harm the environment. With that being said, I won't call myself an eco-friendly sculptor, but I have good intentions.
The foam spray does foam up rather quickly and regardless on how careful you spray, I find that you will have to cut off an excessive amount

Taking a step back from the platform and onto the character himself. I thought it would be a cool idea for the armor's eyes to glow-so why not play with some LED's?!
I wish I had my diagram sketch on how I made the parallel circuit but it's quite simple. I found an image from Adobe Stock that explains it pretty well. I soddered two red LED's with a built in resistor. I like to make sure that my LED's have a built in resistor to prevent any burnouts.
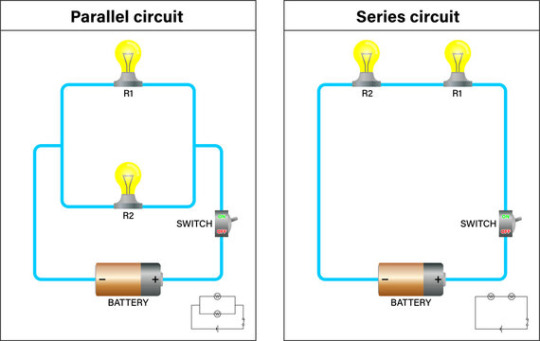
Click here to see a video of the LED's light up. You can faintly hear me say "It works!"
The head was an interesting process. So I wanted to make the head out of monster clay for a few reasons. 1) I'm making the head from skratch so I needed as much time as I needed. I usually use Apoxy but if you've used it before, after 10 minutes or so, it starts curing, making it tacky and hard to sculpt. 2) I was hoping to cast it and possibly make multiple heads for future sculptures.
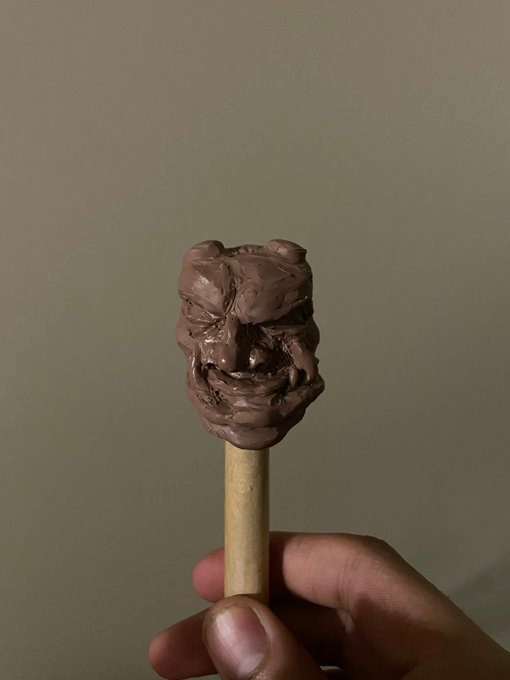
I wasn't mad at what I constructed but I've noticed that the head looks so far off from the original concept design. I figured once it's casted, I can sand it down and fix it with apoxy. I used Mold Star 15 Slow for the mold.

Fun fact: I’ve actually had the molding stuff for a while now. I tried to cast my first sculpture but ended up scrapping it since I found myself spending too much on the materials. Since it’s just the head-I had more than enough to cast :)
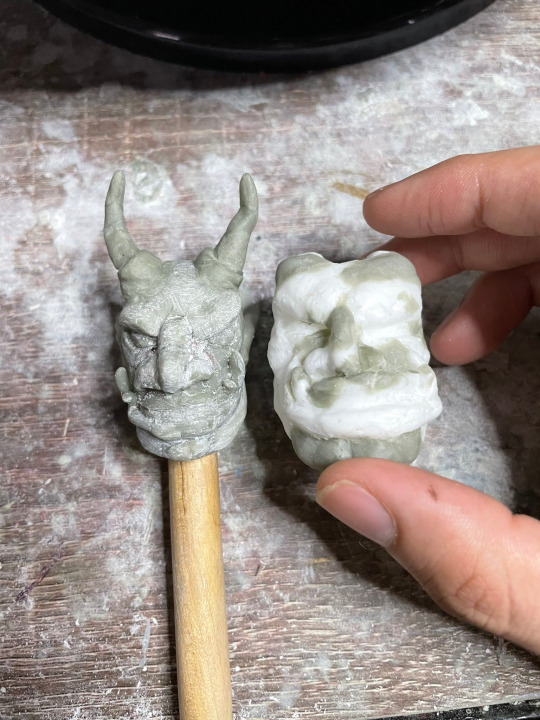
Overall, this is what I got:

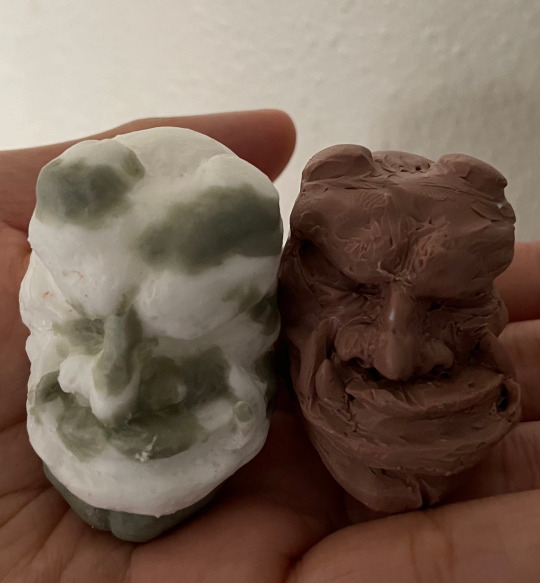
Yea... no. I knew this wouldn't work. Comparing the two, looks like the casting expanded and I needed the head to be quite small inorder to exaggerate Vorag's muscular body. I have no other choice but to scrap it. I removed the monster clay (by applying heat directly to it) from the spiderman head and started over.
I've also sanded down some eye sockets and an indent from nose to mouth. I tried sanding down the entire head for the apoxy to stick onto it better and to remove the pattern. Is it necessary? not really in my opinion.

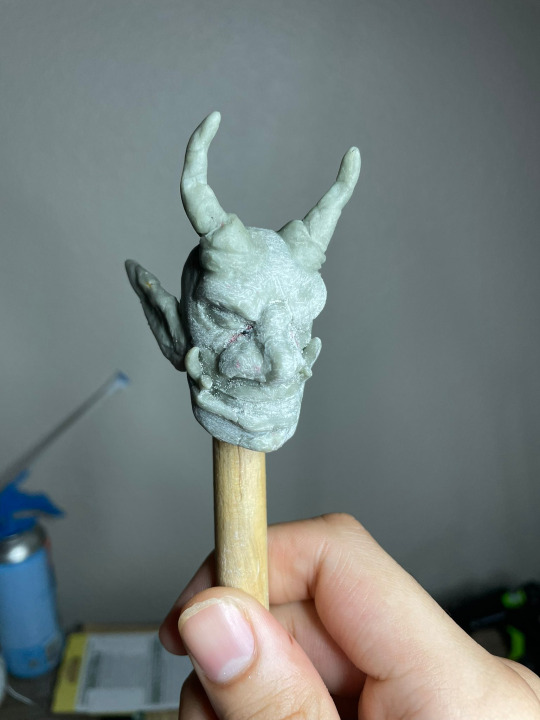
Either way, I'm really happy with the results. Kinda hard to see the detail but the head's smaller and it looks more like the concept art. I know the horns aren't going the right direction when looking at the concept art, but I wasn't too particular with the horn placement.
Time for the body:


I used Aluminum foil and some scrap paper to create the base of the dragon part. If I did this process again, I would've sculpted the body separately and not make it permanent to the platform so soon. Sculpting and paining under the belly was a nightmare and it shows too.
I've also installed the led's into the chest. I used cheap plastic nails to wall the apoxy and the led's. I wish I had some sort of red clear plastic packaging instead but the curvature of the nail sits nicely. I used red UV resin to paint the eyes. The LED wires are embedded in the body so you won't be able to see it. The eyes look a little "yikes" in this photo but I did end up fixing it multiple times.
Placing the head onto the body:

I've also added on the arms as well. I should mention that the arms and chest was originally a monster high doll (I don't know which character though). As I was putting on the arms, I've also widen the upper chest. Like mentioned previously, I wanted to exaggerate his musculature figure.
Slowly but surely it's starting to come together! I used apoxy sculpt for filling the entire body and air drying clay for the platform.

Adding on some additional details like the spikes and and the upper teeth of the armor.
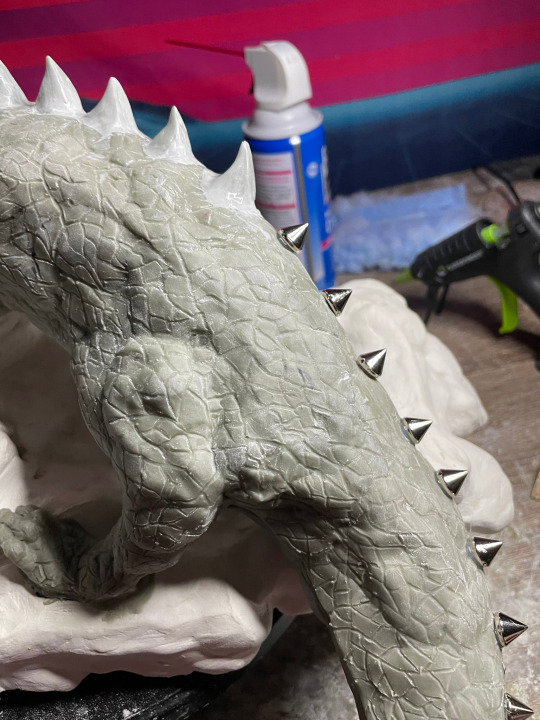


The spikes on the dragon part has these sewn-in plastic spikes, like what you would use on an outfit, acting as a base for each spike. I figured this would keep the structure of the spike and keep them more uniform than me just making them with clay.
Wings:

This was rather tricky for me. So I didn't use Worbla, but a cheaper alternative. I find this specific brand trickier to use since, when heated, likes to permanently bond onto any surface. With Worbla, I can still remove it when warm, but with this brand, a slight pull will get it to rip like putty. Ultimately, I would've done more with the wings if I didn't struggle so hard with it. You can also see with Vorag's belt.
I sanded the crap out of the wings, heck-the entire sculpture. I made sure to also roughen up the Worbla knock-off so that the Apoxy and it can blend out when painted. I learned that the hard way when I made the K'ril Tsuroth a few years back.

Here's the entire sculpture primed. Well, I didn't really have a primer, so I used a satin white paint. It gives off a pearly white finish which I find to be really pretty and gives a marble statue effect.

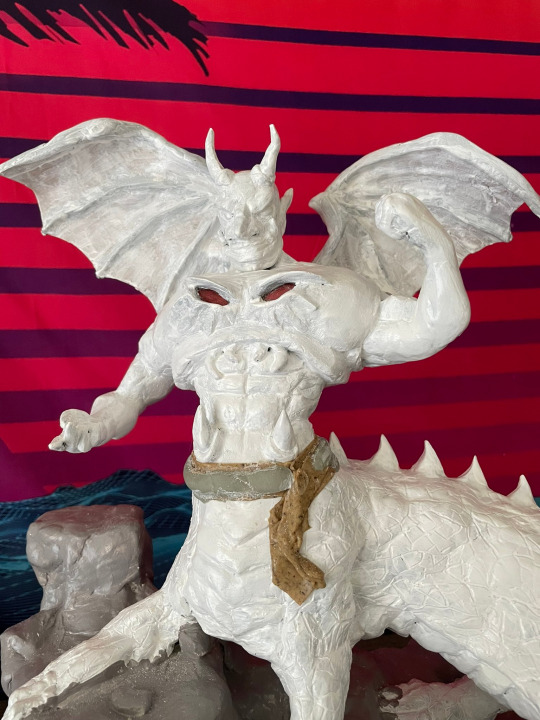
Here's when I installed the wings. I used armature wire as a staple and hot glue to keep the wings in place. I think overall, they turned out quite nicely. I had to fix the back with more apoxy which was a bit tricky, but manageable.
For the belt, not gonna lie, not the strongest look of the entire sculpture.I wanted to give Vorag his belt as seen on the concept, but again, the Worbla knock-off was ripping apart. It was to the point that I had to use apoxy to fix the ripped parts. I could've restarted, but I was so eager to finish this before the end of the month. Also, I'm training myself on not over focusing on specific areas since it would drive me crazy.
Painting time:

Overall, I like the color choices with the exception of the claws and the horns, I wish they weren't as vibrant and more white but I gave it a pass since it makes him a bit more cartoony and I needed a break from seeing earthy/muted tones.
Here's me making an attempt to make the face on the center of the belt.

yea...it's not good.
Instead, I bought a used John Cena action figure on eBay and the difference between the two is no comparison on which one's better.

I cut off the back of the head and hot glued it on to a piece of cardboard. From there I just used apoxy to blend it all in.
Vorag's hair was a mess.

I know, I should've used yarn. But I found such a great deal on hair extensions and little did I realize, it was cheap for a reason. The hair is synthetic so I had to be careful on how heat is applied. If you look at the hair, it's frizzy and hard to control. The hair didn't like to separate which made the glue from the wefts exposed. It was really weird and I don't know how else to explain it. When I was about to remove the hair and give into using yarn, I just said "screw it" and teased the hair. I figured, I'm already going to throw away the hair, what do I got to loose?
Actually, it fixed the problem. Yea the hair is extremely frizzy and I'm not a fan of it still, but it took care of the awkward, open gaps. We was suppose to have an undercut hairstyle, but the top hair was so unmanageable, that I had to anchor down the ponytail part to his back neck with hot glue.
Face up and overall review:
I've exceeded the amount of images used in a post but if you'd like to see more photos, check out my twitter thread here. I think the faceup turned out to be alright, not the best-but alright. The face looks a bit derpy but I think that's because of the way the eyes were sculpted; something I should work on for future projects-symmetry.
I did use the soft pastels and watercolor pencils for the detailing and acrylic paint for the overall base colors. I've used maybe 3 or 4 layers of Mr. Super Clear.
Overall, I'm happy with the outcome. I think for next time I work on something big like this, I should work on it in pieces than work on the entire thing all at once. There are some areas that are just "yuck" (mostly on the belly area). Maybe later on, I'll fix those areas in the future but for now, I'm marking this as complete!
Let me know what you guys think!
While you're at it, check out my social medias:
Twitter
Twitch
Discord
AO3 (Writing a Novel: Chapters come out on the 1st and 15th of each month)
Wattpad
Kofi
Thanks and I hope you find this inspiring of some sort! Feel free to ask me any questions regarding this project.
#sculpting#twitch#art#twitchstreamer#twitchartist#digitalart#smallartist#commissions#commissionsopen#digitalillustration#ooak#doll customization#sculpture#oc#orc#original art#vorag#half orc#half dragon#muscle#muscle sculpture#walkthrough#painting#crafting#arts and crafts#led#light art#light sculpture
4 notes
·
View notes
Text


Emote time again! For @rquerdo uwu
4 notes
·
View notes
Text
twitch_live
Now Live!
twitch.tv/rquerdo
#live#streaming#artstream#commission open#digital art#twitch#twitchstreamer#twitch artist#small streamer#twitch streamer
1 note
·
View note
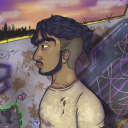
Text
New Profile Pic (Mar 2023) I want to change my stream layout and everything to match with the short story (theme: dystopian world). A critique from my last pfp, I wasn't a fan of the mask part. Something about it was hard to visually see; both close up and far away. Figured a simple side view would do.
Check out my Short Story here:
#drawing#selfportrait#illustrationartists#twitch#twitchstreamer#twitchartist#smallstreamer#profilepic#shortstory#moodyart#side view#digital drawing#digital artist#digital commisions#commissions open#twitch streamer#AO3
1 note
·
View note
Text
First Chapter is now available!
3 notes
·
View notes
Text
Valkyrie Commission!
Character belongs to @rifter-remembers-rockets , drawn by yours truly.
Check out Rifter's Twitch: https://www.twitch.tv/rifter8rocks
In the meantime, if you'd like a commission from me, check out my Ko-fi page! https://ko-fi.com/rquerdo/commissions
#commissions#art#artcommissions#open#commissionsopen#digitalart#oc#drawing#kofi#twitch#smallstreamer#artstreamer#artistoninstagram#artistontwitch#artists on tumblr
4 notes
·
View notes
Text

Concept Art for In Her Heart: Cheeky v.s. Xana: The Failed Experiment
This drawing took some time. Ultimately, I tried to get the perspective down and had a completely different setting for this drawing. Glad that I've decided to redo and went this route instead.
Fun Fact: Xana was an original concept art I made back in college for a horror game a collegue and I wanted to make. It didn't go far and to really make things worse, I didn't know how to digitally draw at that time. I'm glad to see Xana comeback to life after all these years-and it's cool to see them interact with Cheeky as well.
In case you didn't know, In Her Heart is a short story I'm creating which each chapter will be published each month. The first chapter is already out on my Ko-Fi page and on the 15th, the first chapter will be out on AO3.
Check out my Ko-Fi and Twitch!
Ko-Fi: https://ko-fi.com/rquerdo
Twitch: https://www.twitch.tv/rquerdo
#concept art#in her heart#twitch#art#twitchstreamer#twitchartist#smallartist#digitalart#digitalillustration#commissions#commissionsopen#perspective#fight#fight scene#fight scene drawing
3 notes
·
View notes
Text

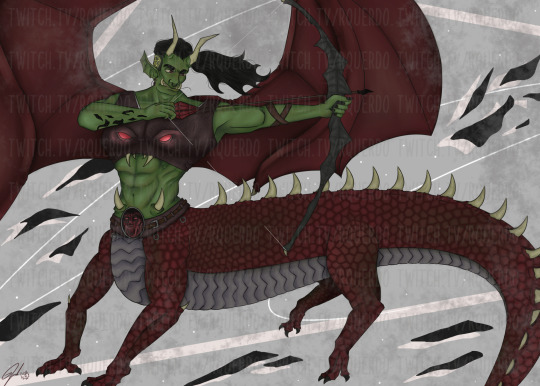
Part 2 of my Thirst Trap Monsters Series!
Meet: Vorag the Kaitogon
In my non-existant fantasy world of where the thirst trap monsters live, the Kaitogon species are cursed humans who sold their souls for strength and power to the Elder Dragon. Each Kaitogon are assigned new names from their reborning and their memories of their past lives are completely vanished.
As for Vorag, not much is known about his past however he's well known to be arrogant and self-assured with a craving for more power. Due to his traits, the Elder Dragon took that as an opportunity to recruit a new henchman with not much convincing.
Notable areas of the curse: A symbol of the Elder Dragon's clan around the Kaitogon's temple and black markings on around their bodies (for Vorag, it's on his forearm)
In case you're wondering what consists of the Thirst Trap Monster Series, I create a digital illustration of the OC, and use that to help construct a sculpture out of them. I have already finished one character; which is Tyvesses the Naga.
~Tyvesses~
Digital Art: https://at.tumblr.com/rquerdo/when-you-make-that-one-decent-drawing-and-you/g8scivtub312
Sculpture: https://at.tumblr.com/rquerdo/ooak-monster-high-tyvesses-the-naga-etsy/wdby9z4luk1m
Both the art print and sculpture are available for purchase at my Etsy Shop
Let me know what you guys think about this OC :D . He was quite the challenge to make since I usually don't draw dragons-but overall fun :)
He will eventually be an art print available at my etsy shop. Check out my shop here: https://www.etsy.com/shop/GoGoMikey
#etsy#oc#originalcharacter#thirst#thirst trap#thirst trap monsters#thirst trap original characters#orc#orc art#orc dragon#dragon art#henchman#vorag#twitch artist#twitch affiliate#twitchstreamer#twitch#support small shops#small artist#support small artists#smallshop#small shop#muscleart#muscle#muscle original character#digital art#digital artist#digitalart#digital painting#digital drawing
1 note
·
View note
Text
GOAL: Reach at least 10 Sales for new prints
Hey everyone!
Selling some art prints +more over at my etsy shop. Check it out and support a small Etsy Shop!
Reblogging helps as well!
#etsy#etsyshop#etsysculptures#etsyseller#etsyhandmade#etsyfinds#shop#smallshop#support small shops#support small artists#art prints#art prints for sale#ooak doll#ooak doll for sale#etsystore
2 notes
·
View notes
Text

Last drawing of 2022
#last drawing of the year#digital drawing#art#twitch#twitchartist#smallartist#twitchstreamer#digitalart#digitalillustration#etsy#commissions#commissionsopen#floral#flowers#mural#artists on tumblr#my art#art style#illustration
1 note
·
View note
Text
OOAK Kingdom Hearts Chest
Hey party people!
So a while back, I had two boxes that were from a DIY Thanksgiving kit and thought, "wouldn't it be cool to make a Kingdom Hearts Chest?" As a kid, I've always wanted one-and now that I'm old enough to buy the materials, now's the perfect opportunity. Funny yet, later on the process, I've decided that it wasn't going to be for me but for my nephew in his upcoming baby shower. I bought a lot of gifts for him so I thought this would be a cool add-on.
Here I will send you screenshots as well as my thought process/encounters; First off, materials.
I have used the following (Quantity depends on the sizing of the box):
Cardboard (I recommend stiff boards), Acrylic Paint (Warm Yellow, Blue, and Black), Door Hinges, Paint Varnish, Modeling Foam*, Foam Rolls*, fabric, Spackling, scissors, x-acto knife, plaster rolls. Sanding paper or blocks.
*I recommend using Worbla instead of both the modeling foam and foam rolls, I explain why further down.
DISCLAIMER: I'm no professional. I will be pointing out the flaws that I've encountered throughout the process-it is up to you if you want to follow along or find a better alternative.
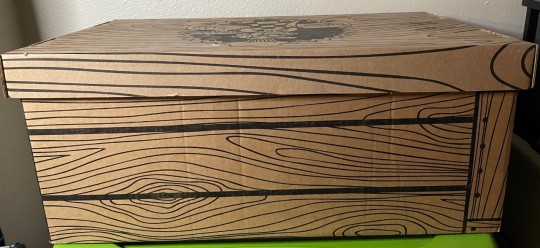
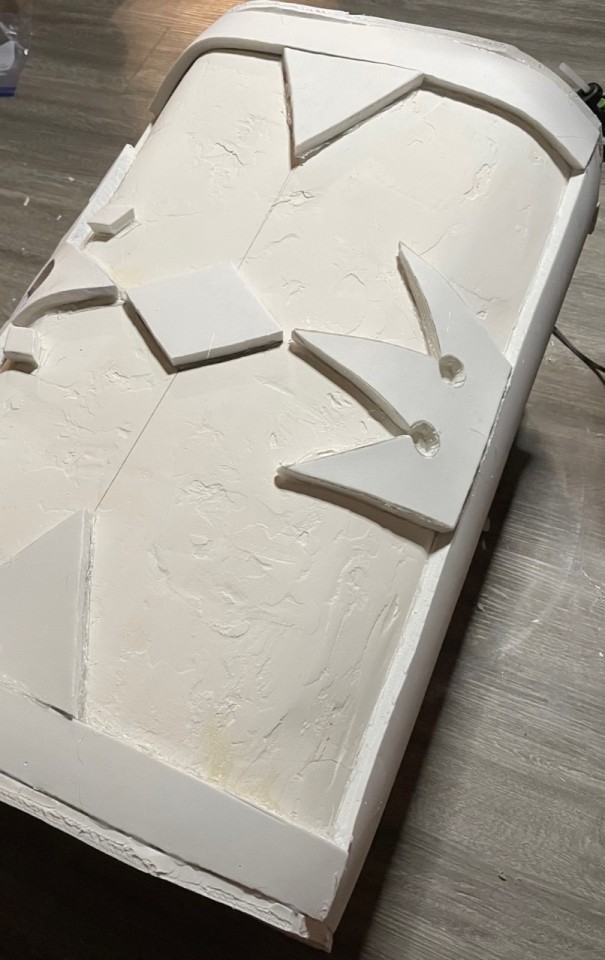
First off, here's what we are working with. Ideally the shape is more rounded I bought about 3 to 4 stiff boards to act as my foundation. After I've placed the stiff boards down in place, I then placed some plaster rolls to hide the seams from each stiff board planks.
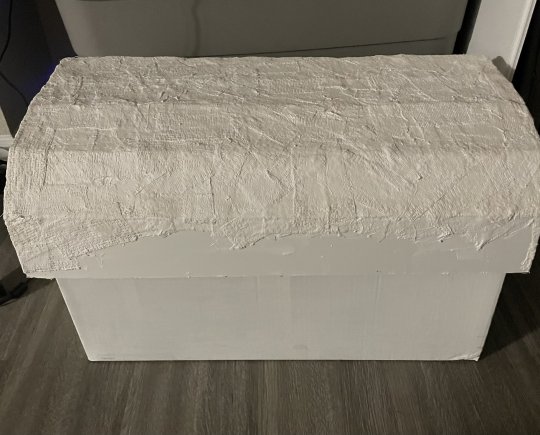
At this point, I figured the bottom looked weird. So I did the same process for what I've done on the top.
I'm glad that I ended up doing this because I knew the cardboard base was not going to hold for a while. I've made some supports (don't know what these would actually be called) so that I don't have to stack the stiff boards two or three times. If this was regular cardboard, I wouldn't do it since cardboard's weak when it comes to carrying weight, but luckily this held up throughout the process of making it.
Time for the speckling.
Overall, this process was overwhelming. At this point, I thought I messed up since the speckling didn't want to adhere to the chest at first. However, with lots of patience and elbow grease, I've managed to get it done! I had to do this in multiple layers since soft speckling tends to go everywhere. When it's harden, it's easier to work with.
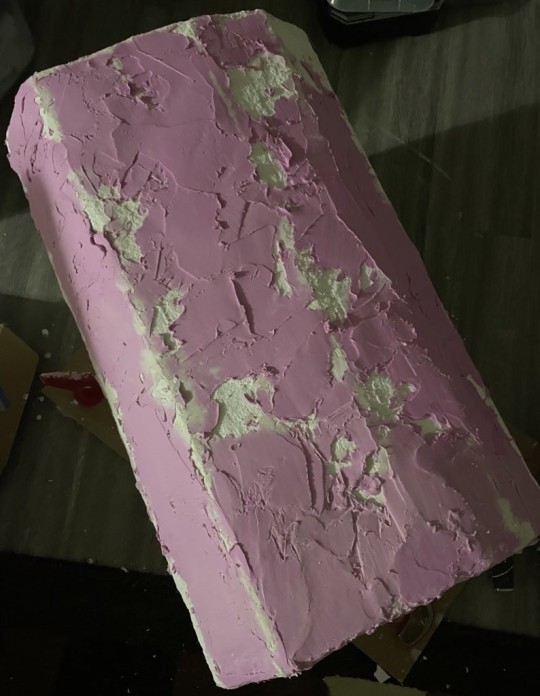
Oh, and yes this step was very messy. Especially when it came to sanding.
Overall, the chest ended two of my sanding block's lives and created a huge mess. Please sand with caution; don't inhale the dust! I know that there are methods to reducing the dust flying everywhere (like using water), but I was afraid to do since I've never used speckling for a project before; not sure if it would affect the cure process of some sort.
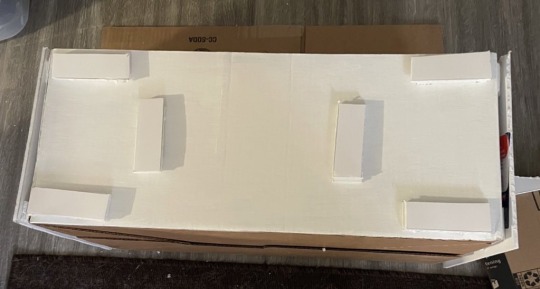
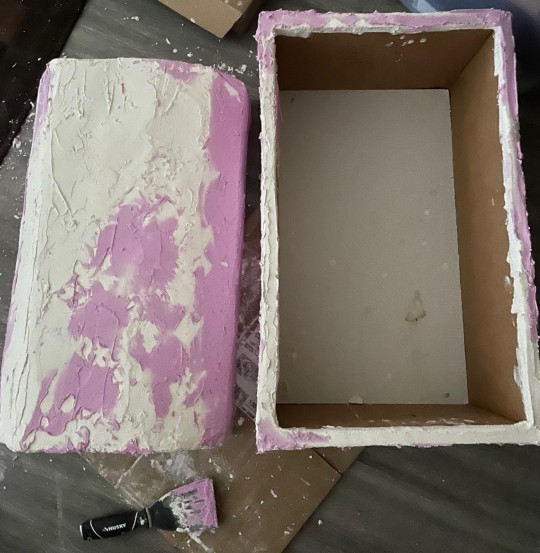
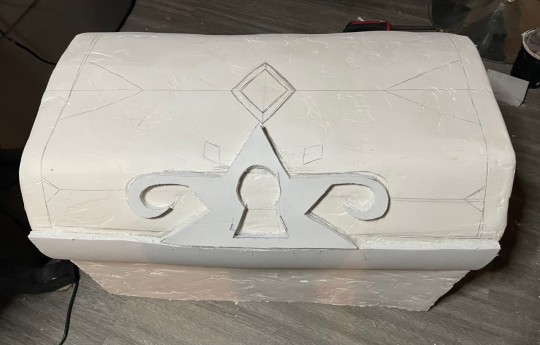
Once sanded, I then made a sketch of where everything will be going and how I want the pattern to be. I knew I wanted to make my own version of the chest instead of trying to make it a carbon copy of it, so I've implemented some key parts (like the keyhole and crown), but everything else was loosely altered.

Just cutting the keyhole alone took me about 2 hours. I wanted to make sure that it was symmetrical and stayed in place nicely. I used Foam Rolls to create the trimming however I highly recommend using worbla instead. My local art store did not have any more worbla so I figured that this was another alternative. I found it difficult to work with and when gluing it in place, it would want to come out. Worbla tends to get sticky when heat is applied so glue might not even be necessary if you plan on applying a lacquer on the entire chest.
To hide the foam seams, I decided to use modeling foam. This...was another medium that I found interesting. Applying it is not as difficult but when it's exposed to air for about 10 minutes, the foam gets extremely sticky. Imagine slime without the activator, or imagine playing with a melted marshmallow. Again, it would just be easier to use worbla.
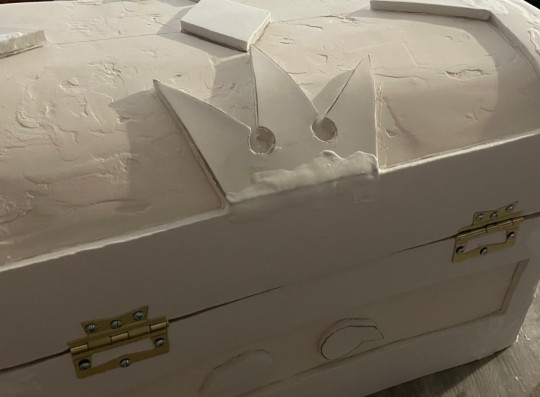
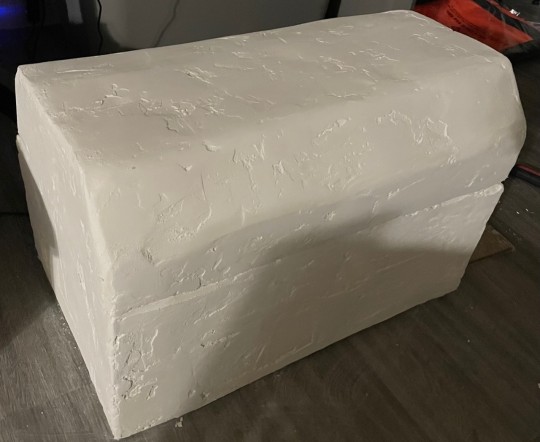
I knew I wanted the chest to open...like a chest so I got some door hinges. So the screws provided were too small for the chest so I ended up buying longer screws. Overall, I wish I had a drill to better secure the screws and bolts together, but not the worst thing ever. Still stays in place.
The paint job was fun, but difficult..my goodness...
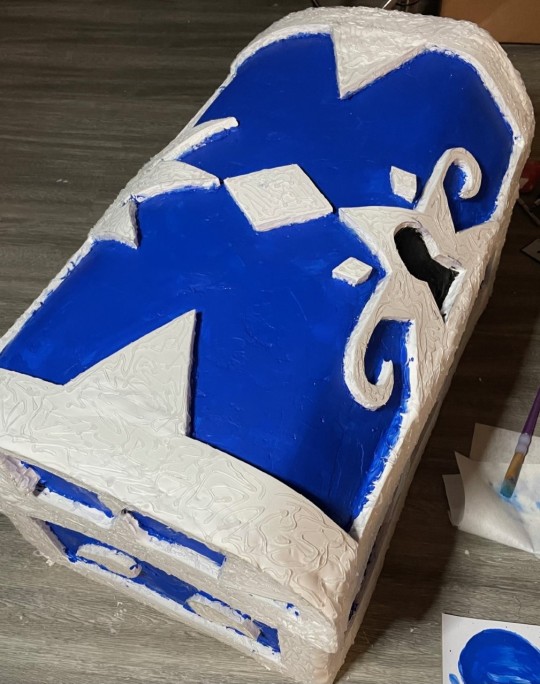
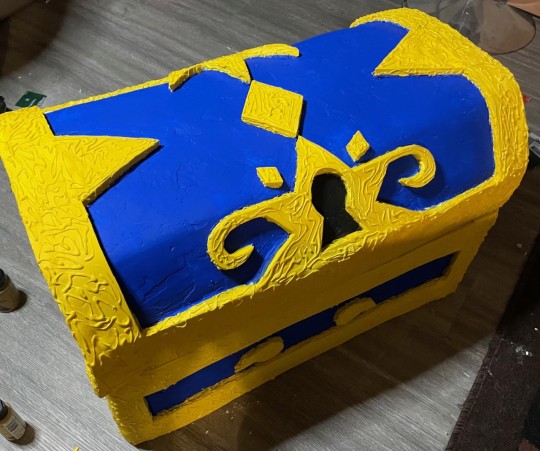
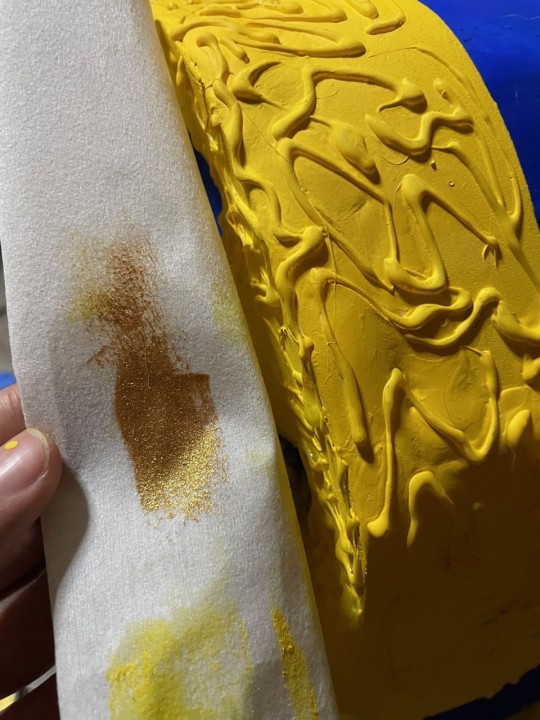
I knew the modeling foam would stick out like a sore thumb and unlike other clay or pastes, you can't sand it. So I got my hot glue and created some texture which I think did a well-good job on hiding the foam. While contemplating about the overall design, I thought it would be cool to give the yellow a metallic, gold sheen to it. I thought it was a good move. I love how the hot glue sticks out with the gold compared to just using the yellow paints.
Oh the inside... It's a hot mess.
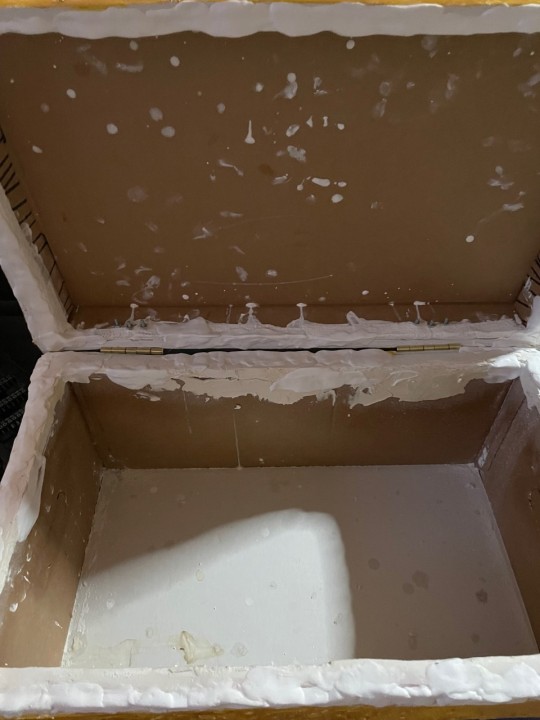
Instead of trying to paint, sand and use even more modeling foam. I've decided to hide this ugly mess with some fabrics that I have around from previous projects.
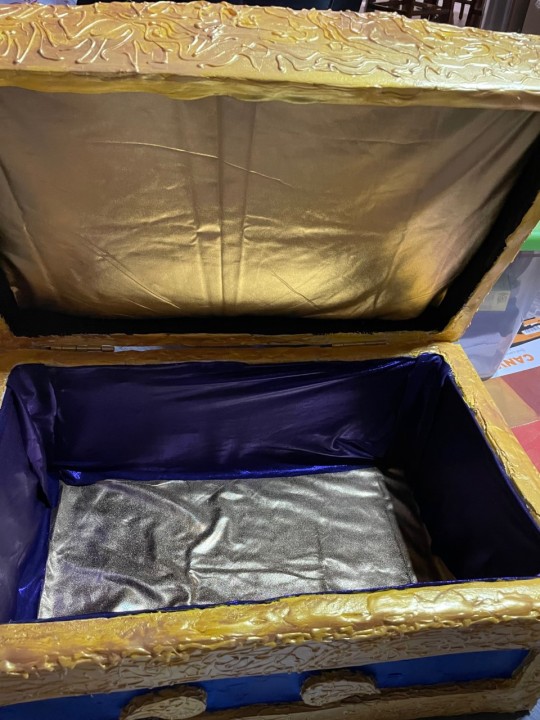
I've glued some gold fabric onto some felt (not necessary to be honest). and applied it on the base and the roof of the chest. I didn't have any blue fabric but I did have some shiny purple fabric. I think it works well with the gold.
(I know the base looks like silver but I guarantee you that it's gold)
After applying two layers of lacquer to prevent the paint from chipping, I'm finally done!
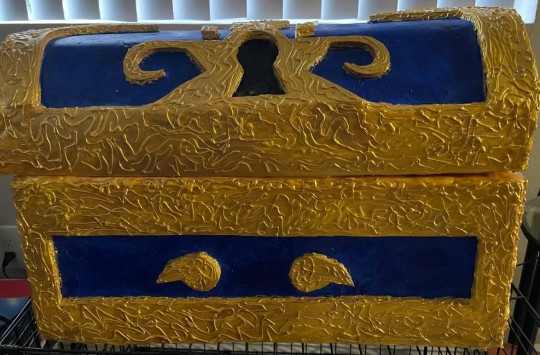
So happy with how this turned out! To be quite honest, this project took forever to finish. I think I spent about 15 hours on it? I know for some people, that sounds ridiculous but let me remind you that this is the first time for me and this entire project had a lot of trial and error.
I know there's a lot of flaws with it but one thing about me, I like to cherish my artwork-even if it's a hot mess.
Self Critiques:
Not use foam rolls/ modeling foam but rather worbla.
Pay more attention to how the chest looks opened and closed
Be more patient when applying the fabrics inside the chest. It looks messy in my opinion and I know I could've been more patient when cutting and folding the seam allowance.
Invest in a drill. the latch is not exactly the most secured when opening.
#ooak#kingdom hearts#instructions#chest#treasure chest#kingdom hearts treasure chest#kh#life size#life size chest#twitchartist#twitchstreamer#art#smallartist#digitalart#etsy#commissions#commissionsopen#twitch#crafting#smallcrafter#blue#gold
48 notes
·
View notes
Text

Thank you @precureedfan and everyone who got me to 5 reblogs!

Quaquaval on the Vogue magazine (Drawn by me) Had a lot of fun drawing this fabulous Pokemon :D Social media: Twitter: https://twitter.com/Rquerd Twitch: Twitch.tv/rquerdo Discord: https://discord.com/invite/HF6FRT2 Tumblr: https://www.tumblr.com/rquerdo Also Taking commissions and selling some art prints: Ko-Fi: https://ko-fi.com/rquerdo/commissions Etsy: https://www.etsy.com/shop/GoGoMikey
11 notes
·
View notes
Text
Price Drop on my Tyvesses Sculpture!
Goal is to reach 10 sales of anything in my shop. Once reached, I’ll start printing new art prints!
#art#small artist#digital artist#twitch#twitch streamer#twitch affiliate#etsy#etsyshop#etsyseller#etsyhandmade#etsysculptures#smallshop#support small artists#support small shops
2 notes
·
View notes