
Just a place to collect my creations(Avatar courtesy of Vivek Doshi on Unsplash)
Don't wanna be here? Send us removal request.
Statistics
We looked inside some of the posts by scratchmakes and here's what we found interesting.
Average Info
Notes Per Post
179K
Likes Per Post
96K
Reblog Per Post
83K
Reply Per Post
252
Time Between Posts
9 days
Number of Posts By Type
Text
10
Last Seen Tumblr Blogs


Fun Fact
The Tumblr office adopted Tommy, an 11-year-old Pomeranian.
Text


I am so bad at posting here consistently but I feel like Tumblr would appreciate my best friend Fishbag (and the various creatures that live within her)
7K notes
·
View notes
Text
No but seriously, one of the best parts of playing Scrabble in German is being able to keep compounding the words
Honestly, as a German I can not quite understand the obsession of the English speaking world with the question whether a word exists or not. If you have to express something for which there is no word, you have to make a new one, preferably by combining well-known words, and in the very same moment it starts to exist. Agree?
157K notes
·
View notes

Text
Proof of concept for a simple, cheap, flatpack lantern!
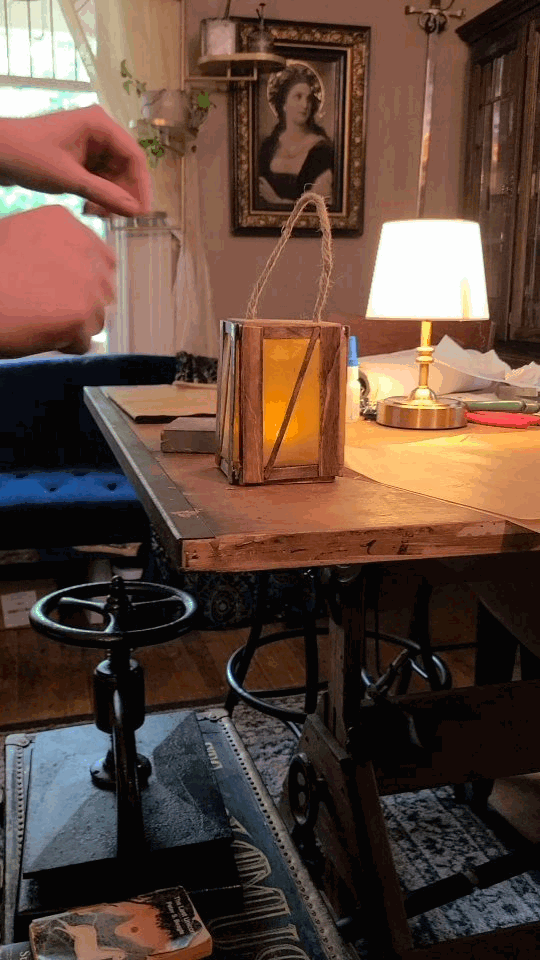

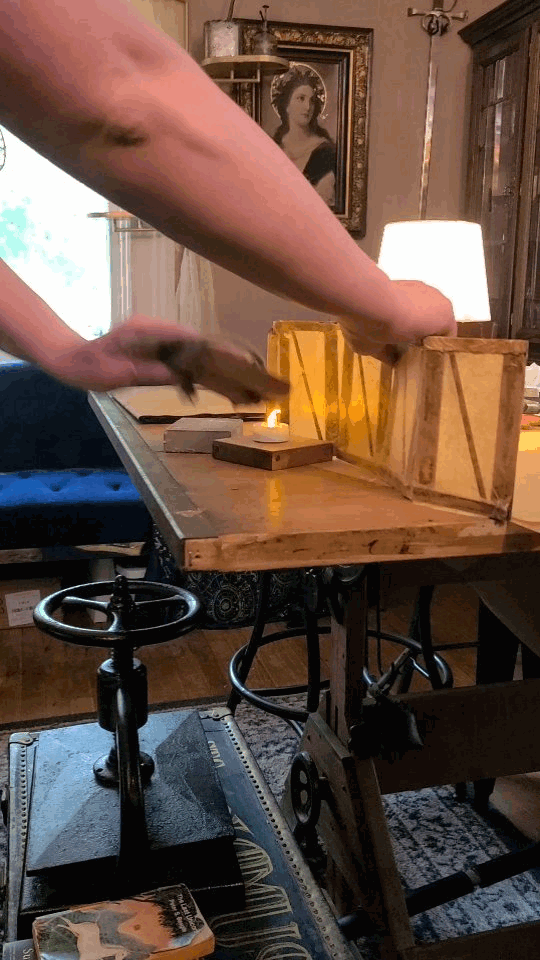
Two squares off a 1x4, holes drilled in the top piece for a rope handle; popsicle sticks for the sides, stuck together with woodglue (and stained beforehand) with magnets in the corners. Cicada wing paper glued to the frames. The magnets attach to little tack nails hammered into the squares of wood.


I think on the next ones I'll make the rope handle go though both the top and bottom for extra strength. But this can be held up with just the magnets holding it together, which is pretty good!

2K notes
·
View notes
Text


Bargello-inspired embroidery on the spouse's bike basket. The yarn was taken completely from my stash so I'm glad the colour combination worked out. (The red from the progress pictures was a little to bright though.)
Because the mesh and available space is obviously very different from what you'd normal use bargello on, I adapted the design a little and it ended up very wide, bit I still like it. And so does the spouse, which is the most important bit!
#bargello#needlepoint#embroidery#fibre crafts#sewing#sewblr#I do kind of like the version without the outline#looks kinda like a bird in flight
16 notes
·
View notes
Text

HE’S GAY AND FRIENDLY!
From: ‘Home-made Toys’ The Australian Women’s Weekly, 1960s approx.
#accidentally reblogged to the wrong blog#but you know what#it's now a#project idea#wanna fill this blog with more than just my stuff#but also tag organization~
10K notes
·
View notes
Text
Making simple pouches from scraps
This started as a comment about simple projects for beginner sewists, but it got a bit out of hand, so I decided to drop it on this blog with illustrations for easier reference!
The result are pouches that I use to organize small things like the items in my daily carry bag (e.g. pens, medicine/toiletries) or regularly packed items that I would like to be able to grab quickly to bring to certain outings (e.g. dice bag for roleplay).
Generally, there are four kinds of pouches I have made from scraps:
A flat, rectangular drawstring bag, good for small items like e.g. tampons, band aids, pill blisters. We're going to discuss two variations, one of which is a little easier (a) and one that IMHO looks a little better (b).
A flat, equally rectangular zipper bag, good for pens or makeup.
A circle drawstring bag, good as a smaller dice bag or as a gift bag, imho.
A circle drawstring bag with a flat bottom. A bit more complicated, but better for bigger dice collections. Because we greedy gremlins need space for all our shiny click-clacks, don't we ;)
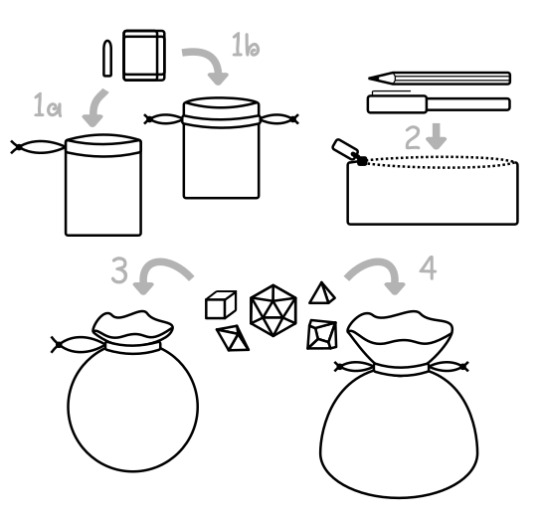
1. Flat Drawstring Pouch
These are super easy in my opinion. You’ll need either a single piece that is significantly wider than it is high, which I usually make into version a or two scraps in about the same size, which I like to use for version b.
For version a, to make it a drawstring, we fold over the top edge (about 1,5cm/half an inch is usually enough) to the inside and sew that down close to that folded down fabric edge.
For version b, do the same for both pieces, but the fold over needs to be a bit bigger (about 3cm/an inch) as you need a little more space. Sew this down the same as version a, but add a second seam above, with a distance of about 1cm (~3/8th inch). If you have a twin needle, this might also be a use for it.

Then, for version a, you fold the wide piece in half and for version b you lay the two pieces on top of each other, outsides together in both cases. And then you sew shut all the sides you want to be closed.
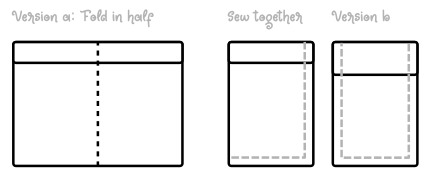
Turn it inside out and – using a seam ripper or pair of snips – cut holes into the outer layer of fabric on each side of each side seam.
This means two holes for version a between the seam and top edge and four holes for version b, between the two seams.

(Only one side each depicted here, do the same on the back.)
Then you can thread a string or ribbon into one of the holes and through the channels you have sewn. I tie the string to a small safety pin as it is easier to push through the channel from the outside.
For version b you can either use two strings (one for each side) or one long one to go all the way around (by going out the hole on one side of the side seam and going into the one on the other side of the side seam).
Tie up the ends of your strings and you’ve got your drawstring bag!
2. Flat Zipper Bag
As a note: The zipper might prove challenging. However, it does present a great opportunity to try your hand on this dreaded piece of haberdashery. To make things easier on yourself I would recommend to avoid invisible or separating zippers and to make sure they’re not shorter than the longest item (e.g. the longest pen) you would like to fit through it.
Aside from the zipper you will need a roughly square piece of fabric. I usually just use the zipper as a ruler for one side, making sure that the whole scrap (so including seam allowance) is the same length as the tape. If you don’t quite have that, take e.g. the noted longest pen as reference and, as illustrated below, make sure that (in addition to seam allowance) one side of the square is the length of the pencil (L) and two of its heights (H).
The other side determines how much space we have in the pouch. So for our example we want it to be at least three pencil heights plus one extra for wiggle room (so 4*H). But we need this measure twice because a pouch generally has at least two sides, so all in all we’re at 8*H. Or you use whatever you have as long as it’s bigger than that. ;)

First of all we sew the zipper in. We determine the outside of both the zipper and the fabric and put them against each other, with one of the outer edges of the zipper tape aligned with the side that is supposed to be the opening. Pin it, then you sew it on with a straight stitch. If you’re using a normal foot (in contrast to a zipper foot, which should come with its own instructions), you can usually let it run along the teeth, as that will provide a great ruler to not get any wobbliness in your seam.

Tip: Make sure you’re not sewing too close to the zipper’s slider. I usually push it all the way to the opposing end of the zipper when I start sewing and when I’m halfway, I sink my needle into the fabric, lift the sewing foot and pull the slider all the way to the already sewn end before I lower the foot again and proceed to sew the other half.
You’ve attached one side of the zipper! Great! Now do the same thing on the other side, still making sure to lay outsides onto each other. You will end up with what looks like a zippable tube with the slider on the inside. Flatten the tube, pin it closed if necessary (the zipper tape might be a bit stubborn) and sew it close on both ends. (Careful to move the slider away from your needle!)
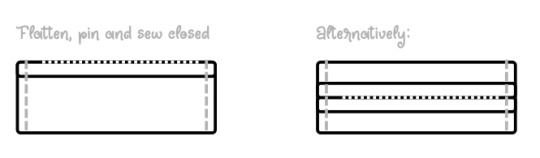
I like my zipper on one edge, but you can just as well flatten the tube so the zipper is centered on one of the sides.
Turn the whole thing inside out and TADA! Zipper pouch!
3. Circular Drawstring Pouch
This pouch is probably the easiest of the pouches as you only have to sew a channel around the edge and draw a string through. That channel, however, is basically a hem on a small circle. Which will prepare you for the pain of hemming circle skirts ;)
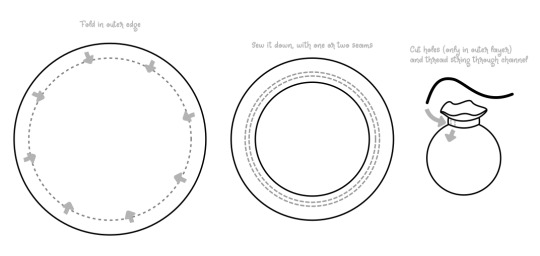
Once again you will have to cut holes for the drawstring to go in and it is fully a matter of taste if you do more than two holes, but they should be an even number.
4. Drawstring Pouch With Flat Bottom
This pouch has similarities with the other draw string pouch, but because of the flat bottom it is the only one that will stand on its own, which makes it a good shape for a bigger pouch. Nevertheless, it is still a good scrap project!
You will need a circular piece and a strip that is the length of the circle’s circumference and at least the height of the circle’s radius 6 cm / 2 inches.
(If you struggle to find the circle’s circumference and radius, I included the equations for both in the illustration below. The Diameter can be measured by folding the circle in half and measuring the fold.)
Fold over one of the long (top) edges and sew drawstring channels as described for the flat pouches. Then lay the bottom edge along the edge of the circle, pin and sew them together. You will hate it, as flats sewn to curves is the point of this, but it’s worth the effort.

Finally, sew the two short edges of the strip together and turn the bag inside out.
Once again, you will have to add a drawstring, but it is up to you how many holes you cut for it, 2 or more, buit an even number.
8 notes
·
View notes
Text
Why "Universal" means "Equally bad."
So you go to the store to buy needles for your sewing machine. You are going to find one of two things: a few "Universal" needles, or a large section with dozens of needle types.
"None of these say my machine brand on them," you think. "What do these numbers mean?"
I'm here to help you out!
It turns out that needles for sewing machines have amazing specialties to help make the work easier.
Ball point/Jersey: these needles have a rounded 'ball' point so that they don't accidentally cut the threads in a knit fabric. Ever cut a thread in a sweater? We don't want that to happen in a knit fabric either. Knits are used for t-shirts, Sweatshirts and the like.
Sharp/Microtex Sharp: My Beloved. If you sew on any woven fabric, and see "puckers" along your seam, you're not using a Sharp needle. Developed for micro-textiles, these are brilliant for printed quilting cotton, satin, woven silk, and the like.
Jeans/Denim: larger eye, bladed tip. The Sharp is a stiletto; a Denim needle is a sword. The bladed tip makes it easier for your machine to power through densely woven fabrics like canvas, upholstery fabrics, brocade, and old-fashioned denim.
Stretch: this needle is designed to sew on Elastic fabrics with minimal skipped stitches. Spandex and Lycra can stretch so well that they're carried by the needle into the bobbin area of the machine, preventing the stitch from completing. Stretch needles pass through the fabric easier without punching holes.
Quilting: Yep! There's a needle for this! Great for piecing, these really shine while sewing through the layers of fabric and batting. They make free lotion quilting a lot easier, and you won't have to fiddle with the tensions as much!
Leather: perfect for Vinyl, pleather 'vegan' leather, actual leather, and suede, this needle is like a Denim needle with a twist; a twisted blade, that is. It makes a perfectly round hole to prevent the dreaded "Tear along the dotted line" effect.
Metallic: yes, all needles are made of metal, but this type is gentle to metallic threads for decorative work.
Topstitch: this needle has an extra large eye and groove to accommodate heavier threads. Great for high-contrast visible topstitching with heavier threads.
There are others, but this is a good place to start. "Universal" needles don't have any of the specialized features listed above. They aren't sharp, aren't ball-pointed either. They have an average sized eye and groove.
They will sew. They will form a stitch, and they can be a lifesaver when you're not sure what kind of needle to use because you're sewing with more than one challenging fabric simultaneously. However, they aren't "good at" anything. They're kind of "equally bad" at everything.
Do yourself and your sewing machine a favor: Use the right needle for the right project.
One final pro tip: change your needle every 8 hours or so of actual sewing, or at the beginning of every major project.
2K notes
·
View notes
Text
The netting on my knee pad was ripped. So I sewed it down round the edges and hid the ugly fix behind a cute fabric scrap.


My goodness it's Saturday already! Welcome back to Show and Tell Saturday - your favorite moderator is unfortunately dealing with some tight deadlines so this will be a nice reprieve. What's new in your world this week?
174 notes
·
View notes
Text
This fabric I ordered to make a shirt with turned out to be stiffer than I thought so I pivoted and used it for a pair of improvised split side pants. The construction is based on a tiktok I saw a year or so ago and really only uses one crotch seam (and lots and lots of hemming + waistband ties).


The pleats should probably have been darts, but pleating is my favorite way to fit flats (fabric) to rounds (like e.g. my hips & butt).
Oh and have I mentioned the pockets?
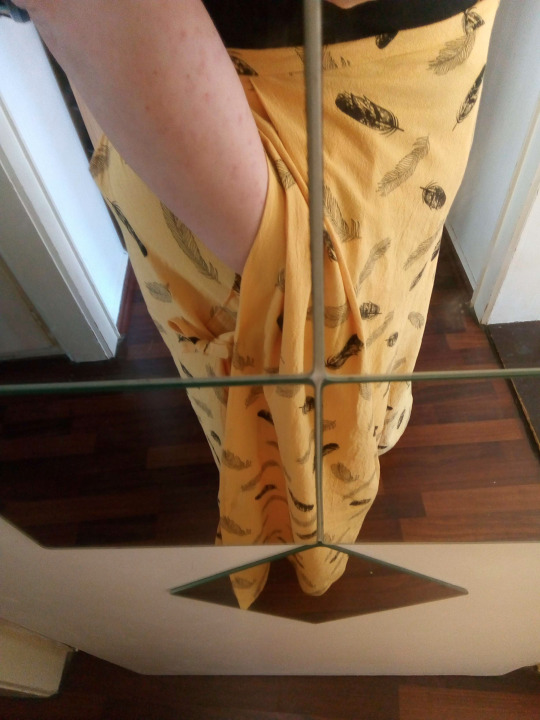
Cost: 9 € (for fabric, thread's from the stash) Work time: ~8-10h
I have a few notes in case I do these again in future but for now I'm really happy with how fast and easily it came together and how well they turned out.
#handmade#selfmade#sewing#sewblr#pants#split side#cotton#stonewashed#feathers#diy#In future I might put the top ties at the sides too#and move the crotch a little further to the front#it would make the sides overlap further front too#and make the pockets a little easier to sew and more accessible to get into#it would also eliminate the need for the front pleats probably#also how fitting that the first thing I post here#has feathers on it#scratch makes
8 notes
·
View notes