
CC finds + inspo, and occasionally my own CC lookbooks. I post vids on TikTok and Instagram!
Don't wanna be here? Send us removal request.
Statistics
We looked inside some of the posts by seadsims and here's what we found interesting.
Average Info
Notes Per Post
47K
Likes Per Post
36K
Reblog Per Post
11K
Reply Per Post
52
Time Between Posts
6 days
Number of Posts By Type
Photo
4
Text
13
Last Seen Tumblr Blogs


Fun Fact
If you dial 1-866-584-6757, you can leave an audio post for your followers.
Photo


Juoo
CAS: Geek
Download
CAS
In-Game
Zip Folder
JUOO DROPBOX / FOLDER II
104 notes
·
View notes
Text

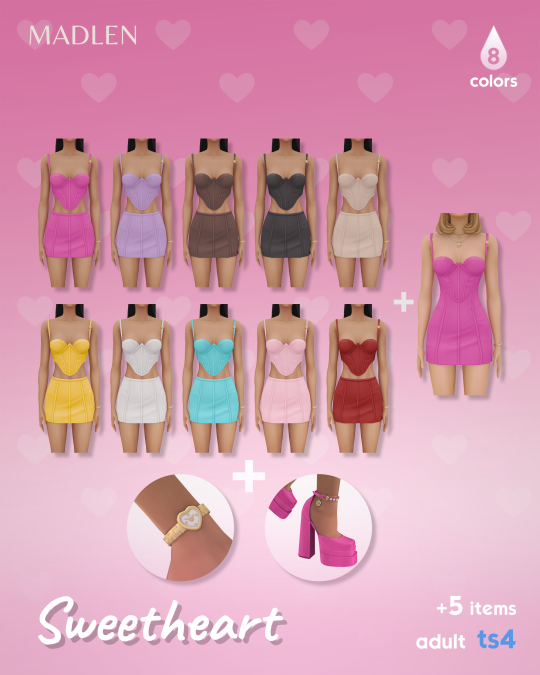
Sweetheart Set
For a date night that’s unforgettable! 💖🌟
This lovely set offers two variations of the same design! Choose between a stunning dress or a chic top and skirt combo. Plus, you'll get an adorable heart-shaped watch!
I've also updated Valeria shoes to come in matching shades 👠😍
So 5 items in total!
inspired by Versace 🍓
🍓DOWNLOAD (Public 7/Sep/24) 🍓
3K notes
·
View notes


Photo


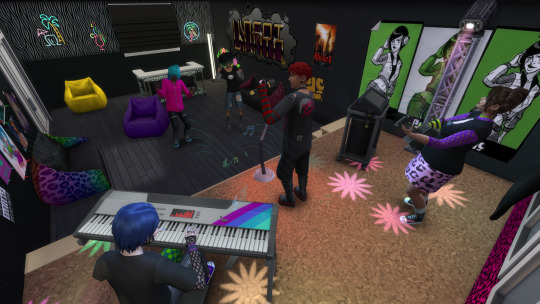
The Crypt O’ Club presents: Angsty Adolescence!
It’s time to re-discover your discovery phase with the fourth collab by The Crypt O’ Club! Experience growing pains in style as you hang out in your favorite store at the mall or skate your heart out. We got checkers, stripes and more for all your teens to sport this season! From new trends to old classics, your teenage dreams will be brought back to life with the help of all our talented creators!
Happy Simblreen!
With the release of Highschool Years earlier this year, we thought it would be fitting to choose this theme for our collab this year. With a whopping 46 items and 2 lots, we are excited to finally release this after working on it for months. Thank you again to everyone who stopped by during Simblreen and we hope everyone enjoys the full release
Under the cut will be the download links, as well as, all special acknowledgements and credits.
Keep reading
2K notes
·
View notes
Photo

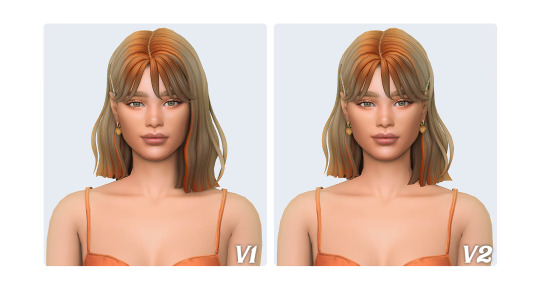
Mirela Hairstyle (2 Versions) by simstrouble
Base Game Compatible
24 Swatches
All LODs, Hat Compatible, All Maps
Ombre Accessory found in Face Paint: 24 swatches + Color Wheel Enabled
Two versions are shown below 👇🏼
Update 14th February 2025: Improved meshes & textures. More info on Patreon.

Download (Patreon, Free) | Instagram | Pinterest
16K notes
·
View notes
Photo

Seona Hairstyle by simstrouble
A long bob with messy bangs, with flowers clips and roots/highlights accessory
Base Game Compatible
24 Swatches
All LODs, Hat Compatible, All Maps, 7k poly
Flower Clips found in Cat Category, 10 swatches
Roots/Highlights found in Face Paint, Color Wheel Enabled
Two Versions showed below! 👇🏼
Download (Patreon, Free) | Instagram | Pinterest
9K notes
·
View notes
Text
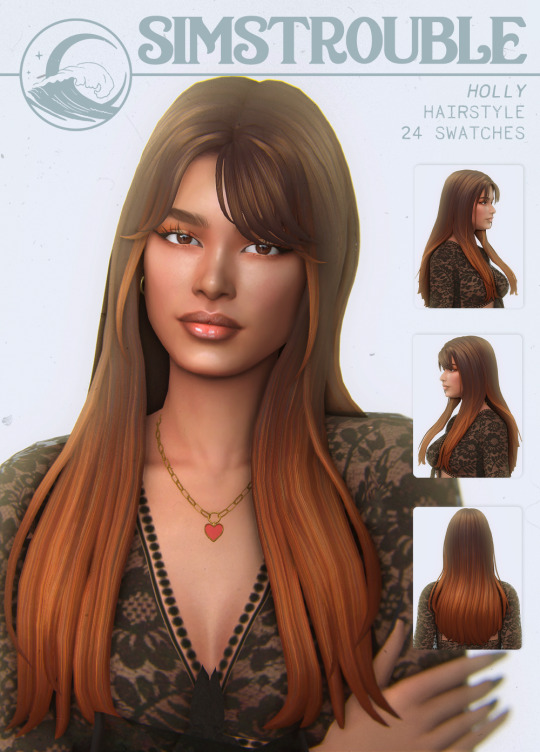
Holly Hairstyles (Bangs and Braids) by simstrouble
Because my catalog lacks straight hairstyles 🔮
Base Game Compatible
24 Swatches
All LODs, Hat Compatible, All Maps
Ombre Accessory from this hairstyle
4 Versions shown below 👇🏼
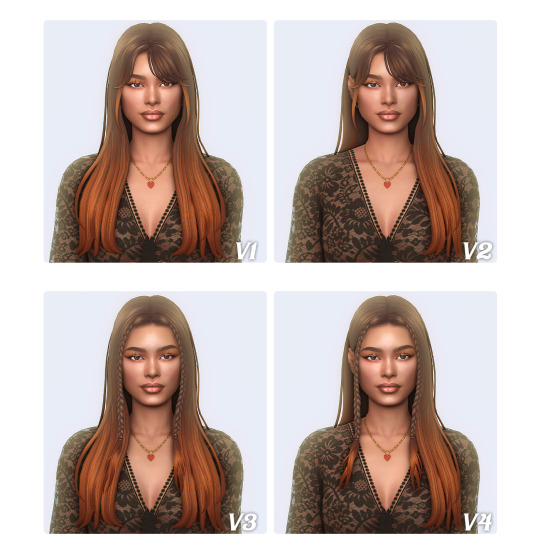
Download (Patreon, Free) | Instagram | Pinterest
9K notes
·
View notes
Text

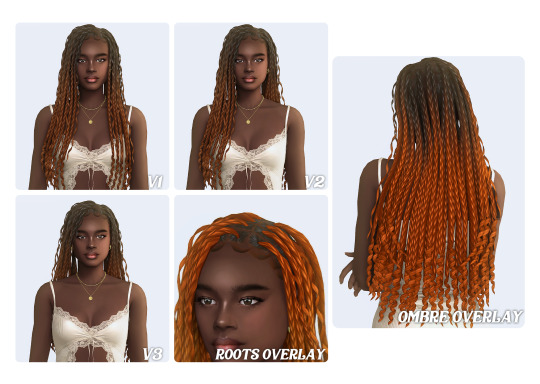
Robyn Hairstyle (3 Versions) by simstrouble
Box braids with curled ends, and strands added in at various points of the braids for a carefree and chic look 🧴
Base Game Compatible
24 Swatches
Mesh and Texture are made from scratch
All LODs, Hat Compatible, All Maps
Ombre Overlay found in Face Paint
Roots Overlay found in Piercing Category
3 Versions are shown below
If you can't support me, consider using my Creator Code provided by EA Creator Network: SIMSTROUBLE
Download (Patreon, Free) | Instagram | Pinterest
6K notes
·
View notes
Text

Create your own custom tattoos
Create custom brushes to use in-game in paint mode or modify tattoos directly in your photo editing software, without having them classified as custom content.
Create your own custom brushes: step by step
Ready to download custom brushes & edited existing brushes
Create your own custom tattoos using your photo editing software
🍵 If you’ve been enjoying my content, your support would mean so much! A small donation here could go a long way, especially as I navigate my career change. Thank you!
1. Create your own custom brushes: step by step
In this tutorial, I assume you are comfortable enough with using Sims 4 Studio for creating content, and know how to use DDS export plugins in Photoshop or any other software.
To help you, I have here some sample files you can use to see how the images are made.
Required:
Sims 4 Studio
Photoshop and the Nvidia DDS export plugins. I'm sure you can use other software but that's the one I'm familiar with.
Brushes are really simple to create as they consist of only 3 elements: the Pelt Brush which contains all the informations related to the brush, and two images, which are the brush thumbnail, and the brush texture.
There are two types of brushes: black brushes (1) for which you can edit the color and the opacity in paint mode, and colored brushes (2) for which the color cannot be edited.

1- Prepare your textures
The brush thumbnail: prepare a 64x64 PNG image of your brush with a transparent background
The brush texture: depending on what type of brush you cant to create, the image format is not the same. I recommend starting from the sample files I've provided above to have the right formats.
Black Brush: prepare a 128x128 DDS image of your brush, with a grayscale channel with the alpha of the brush (white is visible, black is transparency), and a fully white alpha channel. When exporting, select the "8 L 8 bpp | luma only" format and check "Generate Minimaps"


Colored Brush: prepare a 64x64 DDS image of your brush, with a RGB channel with the picture of your brush (if you are starting from an existing image, I recommend making it darker and less saturated) and an alpha channel with the alpha of your brush. When exporting, select the "8.8.8.8 RGBA 32 bpp | unsigned" format and uncheck "Generate Minimaps"


2- Create your brush
In Sims4Studio, select Tools and Create Empty Package.
Go in Tools again, and select Hash Generator to generate unique ID for the three elements of your brush (Pelt Brush, Brush Texture, Brush Thumbnail): input a unique name in the Text box for each element, and copy the ID in the FNV64 box for each element.
In your package, click on Add to add each of the three elements: select the Type (DST Image for the brush texture and the brush thumbnail, Pelt Brush for the brush itdelf) and use the ID you generated for each element in the Instance box.


For both the brush texture and thumbnail, right click on the DST Image and select Import, and import the texture you prepared.
For the Pelt Brush, click on it and fill in the different fields displayed on the left (they seem obscure so don't worry, I will help you there, and not everything has to be filled in, I only listed the fields you need to modify 🤭)

B1: brush type, that determine how the brush is sorted. For basic brushes that can also be used on pet, you can put "2" here, for other brush types that are more for tattoing, I put "3"
BrushImageKey: the Instance ID of your brush texture
F1: spacing, if you are making a basic brush for painting, put 0, if you are doing a motif, put 5
F2: default size multiplier, I don't understand how it works, it seems to be a multiplier, so just put 1.5 as most default brushes use
F3: minimum size, for this one, I put 0.15
F4: maximum size, for this one I put 7
F5: the random rotation, this one is mostly useful for basic brushes used for painting to give more variety, in this case put something like 10, in other cases it doesn't matter (i put 10 all the same)
ThumbnailKey: the Instance ID of your brush thumbnail
With all of that filled in, you can Save your package and test in-game to see if your brush works. You can add other brushes to this same package if you want to create a pack of brushes 🤗

2. Ready to download custom brushes & edited existing brushes


New Brushes: Using this method, I created a small sample of new brushes using pictures from the game! The possibilities are kind of endless, so It's just a first small selection to get started (DISL_TattooBrush_NewBrushes)
Edited Brushes: one of the thing that really annoyed me with painting mode is that some brushes were still very big at their minimal size. I edited all the existing brushes to allow using them at a smaller size. Note that the quality of the paint is still limited by the skin texture size in game, so really painting really small won't look that good (DISL_TattooBrush_AdjustedSize_BG for base game brushes - also used for painting pets and werewolves, DISL_TattooBrush_AdjustedSize_BH for Business & Hobbies new brushes)
Download: SimFileShare
3. Create your own custom tattoos using your photo editing software
As for my existing tutorial for editing photos in-game, this method can also be used to edit tattoos in-game directly through a photo editing software. It can make it easier to import your own designs into the game without having to paint them from scratch in paint mode!
Start a new save file, to make sure of not messing up with your own save file - there are potential issues with hollidays when editing a save sile using Sims 4 Studio, and make picures easier to find - as you might already have taken some pictures in your own save.
In this new save file, Create a Sim and while in cas, go in paint mode to mark down where you want to apply your future custom tattoos (it will be helpful later). Validate the Sim creation and save the game.

Open you savefile using the Sims 4 Studio. In the Filter bow, type "Texture" then click on Filter to filter the files in the save file. You can now see your tattoos listed as textures. For each of them, right click on the line and select Export, to export them as PNG images (if you are comfortable working with DDS images, you can also work this way).

Go into your photo editing software and edit your textures. you can use the marking from the texture to know exactly where to place the tattoo. If you are doing colorful tattoos, I recommend making the images darker and less saturated as they appear brighter and more saturated in-game.

When you are done, you can right click on the line and select Import, to import your modified textures. Click on Save at the bottom roght to save your changes.


Go in-game and check out your Sim in CAS: you should see your new tattoos applied. You can now go back and make some changes if required, or save them to your gallery for future use in your regular save-file 🤩
If you are interested, I already shared some designs made this way on the gallery under my EA ID "Down-In-Simsland". If you plan to share yours to other players, make sure to use your own images or stuff from the game, don't steal from other people 🤗

361 notes
·
View notes
Text
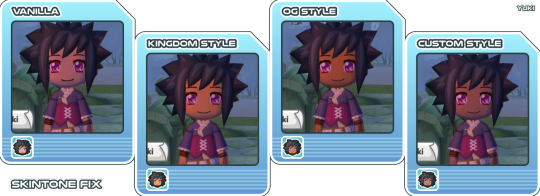
Skintone Fixes for MySims Kingdom
Cozy Bundle

In the original MySims; Dr. F, Liberty, Morcubus, Rosalyn, and Yuki all had tan skin, but were whitewashed and given pale skin in MySims Kingdom. Even now, 17 years later, with the release of the Cozy Bundle, all five of them are still whitewashed.
The Cozy Bundle makes it very easy to make and install texture mods, so I have created a mod to fix this problem.
Previews and download below the cut
This mod comes in 2-3 different flavors depending on the sim.
All sims come with 'Kingdom Style', matching the vanilla tan skin in MySims Kingdom, as well as 'OG Style' based off the tan skin from the original MySims.
I also made a 'Custom Style' for Morcubus and Yuki, with a cooler skin tone to match the gloomy vibes of Spookane.
This mod will replace their in-game textures as well as their profile icons.


Installation instructions are included in the 'READ ME' file in the download zip.
• Download •
SimFileShare
Please note this is not compatible with the Nintendo Switch version of the Cozy Bundle!
39 notes
·
View notes
Text

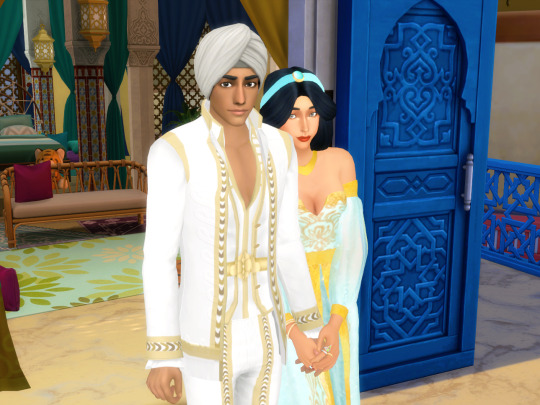
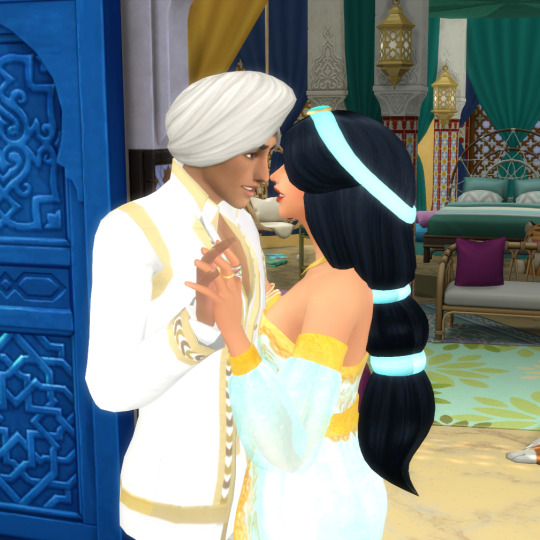
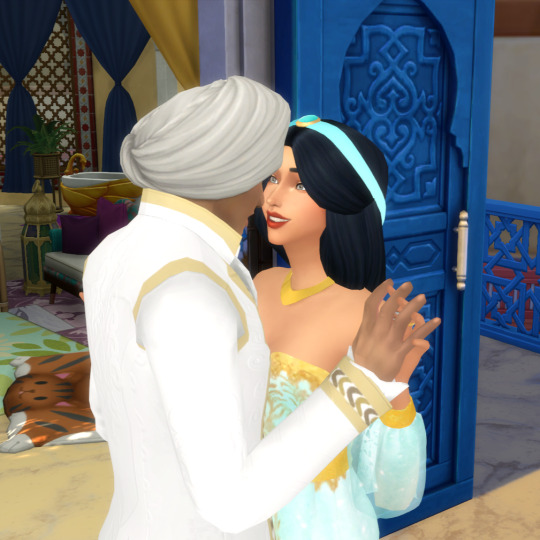
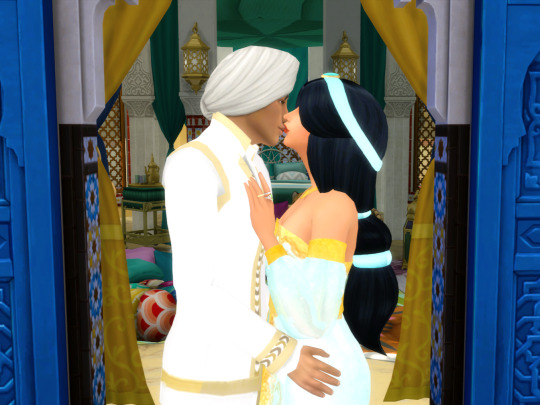
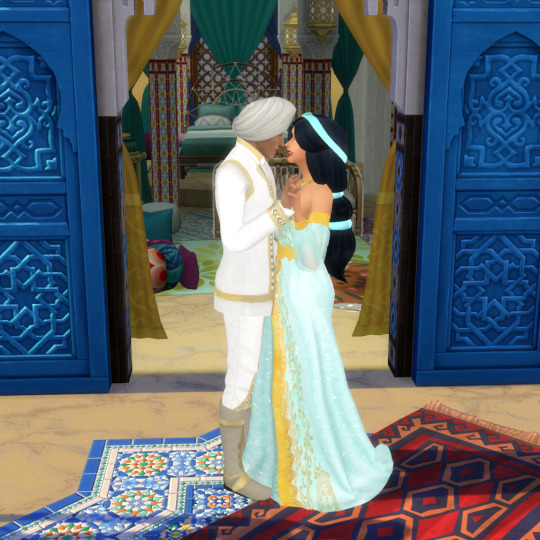


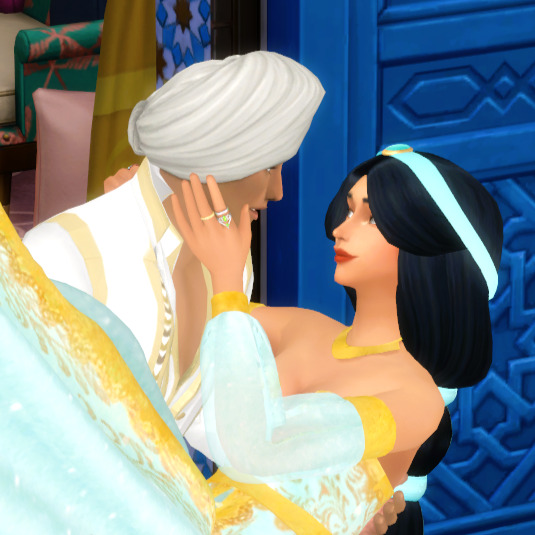
They're not getting a full wedding, but I wanted to take couple photos of what they would have worn... and how their honeymoon would have started if they hadn't rushed into marriage and gotten exiled. Instead, their honeymoon will have a very different trajectory.
@stardustsims4 Jasmine formal dress@makesims Prince Ali Outfit @katverse beloved @tekri Jasmine hair
<< < -
29 notes
·
View notes
Text
The Sims 4 Facial Hair set1 !! No CC :)

So I got quite obsessed with the new tattoo system in TS4 that came with the Business and Hobbies pack, and made this little set of 5 (+1) facial hair tattoos ♥


The set includes
one light stubble (fh1)
one black beard (fh2)
two brown beards (fh3, fh4)
one blonde beard/goatee (f5).
As a bonus, I also made a black/dark stubble (fh0) for darker skin tones and/or darker hair colors.
All vanilla as I'm literally just using a feature that's already in the game, they just require the B&H pack.


The EA stubble compliments my stubble tattoos very well and adds wider variety of color to the stubble tattoo texture.
DOWNLOAD
Official in-game Gallery! ID: lipanek553 SFS
INSTALL
These are NOT MODS and don't go into the Packages folder, instead please put the files into your Tray folder. You'll find the items in your library and apply them on your sim from there.
warning: the tattoos will override any existing "hand drawn" tattoos your sim already has on that area (head in this case), it's not possible to combine/layer hand drawn tattoos at this time as far as I know
for default replacements cc used in images above, please check my mods+cc list
29 notes
·
View notes
Text


back the fuck up (please and thank you)
quick little mod to not have your sims be so fucking close when you zoom in all the way. this is a perfect game
teens - elder only. i think infants toddlers and children were mostly spared from this update so i left them alone
download
2K notes
·
View notes
Text
How to fix the newest update bug with modded tattoos (SFS Batch Fix Walkthrough)
Hey everyone! I just updated my game, so I got to test out some of my work through the newest tattoo update. As of right now, there is a bug that makes it so that you cannot remove modded tattoos from your sims while in CAS (as in, if you pick it, clicking the X to remove it no longer works). While you can fix this by selecting an EA tattoo and then removing, Sims 4 Studio has now updated to include a fix for this, so let me walk you through it!
1. If you can, try and have your tattoos all grouped up in a folder for batch fix.
While this is not a MANDATORY step, it'll definitely make your batch fix faster, because sims 4 studio will only run through the tattoos folder, rather than your whole sims mods folder. If your tattoos arent categorized in your mods folder and you're fine with waiting, you can skip this step
2. Make sure you have sims4studio's most recent download.
Download link here!
3. Look for "Content Management" and go under Batch Fixes -> CAS -> "Update Tattoos for Business & Hobbies"

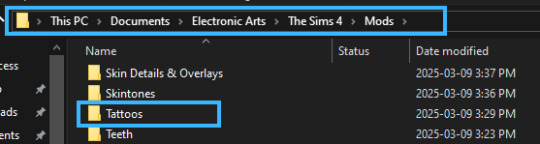
4. When you get this popup, go ahead and browse your files to select your tattoos folder.

If you have everything uncategorized in your mods folder, just leave it as Documents/Electronic Arts/The Sims4/Mods. If I'm not mistaken, it should default to your mods folder already. Browsing is only if you want it to only batch fix a specific folder (Tattoos, in my case)
5. Click run, and you're done!
Please note that some occult or skin detail cc is sometimes categorized as tattoos, so you may need to batch fix some other folders as well!
394 notes
·
View notes
Text

Sir Ratto in Nordhaven😁...


the first encounter with the gangster Antonio...
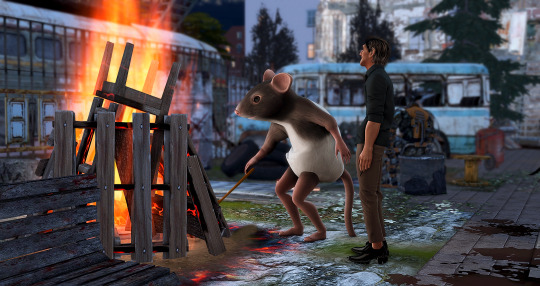

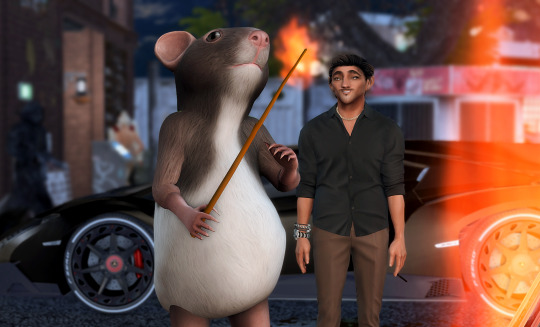
dubious characters are hanging around on the property..😎


85 notes
·
View notes
Text
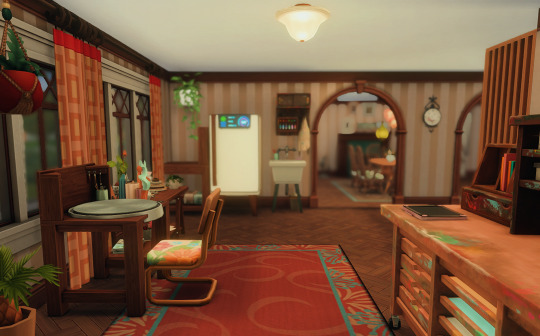
mary-sue's pottery corner.

and daniel's man cave.
32 notes
·
View notes
Text


My Pretty (Hat)
Hello! I was commissioned to create the OG Elphaba hat & had so much fun bringing it to life! The hat is bgc, has 13 swatches in my Thrifty Finds Palette, can be used on feminine + masculine frames, & comes in 2 versions: transparent or opaque ribbons. Enjoy!
Download | Donate | Socials 💚
689 notes
·
View notes