
Statistics
We looked inside some of the posts by shareandopen and here's what we found interesting.
Average Info
Notes Per Post
2
Likes Per Post
2
Reblog Per Post
0
Reply Per Post
0
Time Between Posts
1 month
Number of Posts By Type
Photo
1
Link
11
Text
5
Last Seen Tumblr Blogs


Fun Fact
1,644 Tumblr posts in 1 second.

Link
一般來說android的預設radio button樣式長這樣
資料來源:Android Developer
當然在設計時可以有很多的變形,像是不顯示文字,只顯示按鈕,或是將按鈕圖示改為自己設計的美工圖檔…有很多的變形,但是其唯一不變的就是Radio Button的對齊方式,固定為靠左對齊,所以當不顯示文字時,按鈕依舊在左邊,無法置中。
如果想要在讓按鈕置中的話,就必須改寫一下程式碼,讓radio button在繪製時可以讓button置中。
當然網路上依舊是神人不斷~已經有開發者解決了這個問題,有興趣的開發者可以連結標題參考解決方式。
1 note
·
View note
Text
解決android:imeOptions="actionDone"在中文輸入法時無回應的問題
若有開發android app的愛好者們,應該會很常用到EditText這一個widget
其中有個屬性為android:imeOptions,主要用於當使用者輸入完成後,按下某一個按鍵後,觸發OnEditorActionListener事件來處理一些東西。
例如設定android:imeOptions="actionDone",代表按下"done"或"enter"按鍵時,會觸發。
然而就在一切都���美好的狀況下,這玩意兒在中文輸入法時(以htc的手機為例),按下"enter"鍵都無回應。看來在中文輸入法的"enter"鍵沒有對應到actionDone。

那該怎麼解決呢?
分為兩部分,一部分是xml的描述,一部分是程式碼
在layout xml描述部分,將android:imeOptions設定為"actionDone|actionUnspecified"
程式碼部分,在OnEditorActionListener實現下列判斷式
private OnEditorActionListener mInputOnEditorActionListener = new OnEditorActionListener() { @Override public boolean onEditorAction(TextView v, int actionId, KeyEvent event) { boolean handled = false; // 若是按下Done or Enter都可輸入 if (actionId == EditorInfo.IME_ACTION_DONE || (actionId == EditorInfo.IME_ACTION_UNSPECIFIED && event.getKeyCode() == KeyEvent.KEYCODE_ENTER)) { // 流程處理 handled = true; } /* end of if */ return handled; } };
0 notes
Link
請參考標題連結的作法
比較特別要注意的一點是
監控手機是否進入休眠,不能放在 Android Manifest
需要要註冊receiver時,要加入兩個filter
Intent.ACTION_SCREEN_OFF
Intent.ACTION_SCREEN_ON
0 notes
Text
[Android]讓ListView item被選擇時可以變換背景
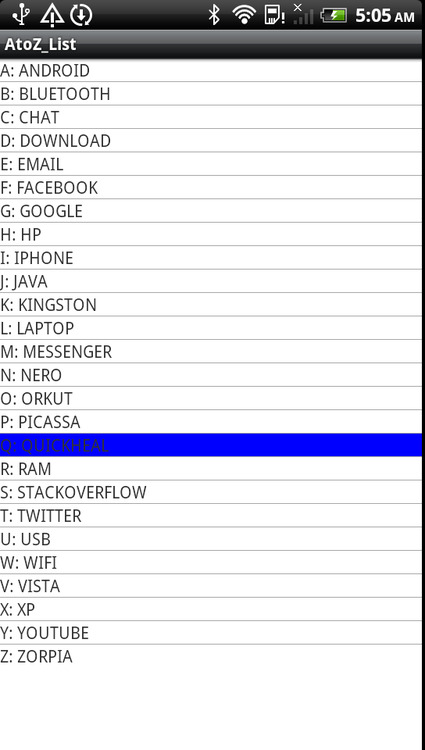
看到標題時,一開始以為是個很簡單的問題,結果搞了我一、兩天試了n種方法,都無法解決。後來看了一些文章後,得到了一些解答,首先要明白一點,在觸碰模式下(Touch Mode)下是沒有selection state的,這是android developer blog的說明
In touch mode, there is no focus and no selection.
所以必須想一下有哪些作法,可以騙過android以達到selected的效果,想了想,可能還是要從自訂的layout來下手,果然神人vimalrajpara2006 有解答啦!就是自訂一個CheckAbleLayout來達到ListView有單選的效果,以下是我參考其原始碼修改而來
首先自訂一個CheckAbleLayout
package com.example.listview.selected.row; import android.content.Context; import android.graphics.drawable.ColorDrawable; import android.util.AttributeSet; import android.widget.Checkable; import android.widget.LinearLayout; public class CheckableLayout extends LinearLayout implements Checkable { private boolean mChecked; public CheckableLayout(Context context) { super(context); } public CheckableLayout(Context context, AttributeSet attrs) { super(context, attrs); } public void setChecked(boolean checked) { mChecked = checked; // Use this code for setting custom color in background of this layout // 當item被點選後,將其背景色改為藍色 setBackgroundDrawable(checked ? new ColorDrawable(android.graphics.Color.BLUE) : null); // Use this code for setting custom image in background of this layout /*setBackgroundResource(checked ? R.drawable.ic_action_search : R.drawable.ic_launcher);*/ } public boolean isChecked() { return mChecked; } public void toggle() { setChecked(!mChecked); } }
再來要將ListView的choiseMode設定為singleChoise
最後設定相關的listener
這樣子就大功告成啦!
範例原始檔下載
0 notes
Text
[Android]偵測軟體鍵盤是否已經隱藏
眾所皆知,android的手機五花八門,其輸入法的型態也是一樣,像Sony的手機會有這個隱藏鍵盤的圖示,紅色框框處。

那該如何偵測鍵盤是否已經按下了隱藏鍵盤圖示呢?找了一些論譠和資源,發現並沒有提供,唯一的線索就是顯示軟體鍵盤時,整理的View的配置會有改變,看來是得從這邊下手了。
做法很簡單,只要Activity或Fragment所繫結的Root view layout動個手腳就可以了。假如App的畫面是佔滿螢幕畫面的話,可以參考下列的作法。
實作一個Custom View,假設Root view layout是RelativeLayout
/** * Input {@link RelativeLayout} * <p> * 為了能夠偵測鍵盤在顯示時,被按下隱藏鍵盤圖示(EX: sony的手機, htc sensation, etc....)後,做一些處理的自訂RelativeLayout * * @author Jay Lee * */ public class KeyboardAwareRelativeLayout extends RelativeLayout { private OnKeyboardHiddenListener mCallBack; /** * 鍵盤被隱藏的Listener * */ public interface OnKeyboardHiddenListener { /** * 當鍵盤被點選穩藏時要執行的動作 */ public void onKeyboardHidden(); } private boolean mKeyboardVisible = false; /** * Construct a KeyboardAwareRelativeLayout object. * * @param context * Context */ public KeyboardAwareRelativeLayout(Context context) { super(context); } /** * Construct a KeyboardAwareRelativeLayout object. * * @param context * Context * @param attrs * AttributeSet */ public KeyboardAwareRelativeLayout(Context context, AttributeSet attrs) { super(context, attrs); } /** * Construct a KeyboardAwareRelativeLayout object. * * @param context * Context * @param attrs * AttributeSet * @param defStyle * Default style */ public KeyboardAwareRelativeLayout(Context context, AttributeSet attrs, int defStyle) { super(context, attrs, defStyle); } public boolean isKeyboardVisible() { return mKeyboardVisible; } /** * 定義當隱藏鍵盤的Listener * * @param listener * OnKeyboardHiddenListener */ public void setOnKeyboardHiddenListener(OnKeyboardHiddenListener listener) { mCallBack = listener; } private void updateKeyboardVisible() { // 取得此View的高度 int viewHeight = getHeight(); // 取得手機螢幕實際高度 int displayHeight = getDisplayHeight(); // 計算時,需要包含Status Bar,而Status Bar的高度為25dp // 需要利用程式動態計算出來 Resources r = getResources(); int maxStatusBarHeight = Math.round(TypedValue.applyDimension(TypedValue.COMPLEX_UNIT_DIP, 25f, r.getDisplayMetrics())); // 當View的高度加上Status Bar的高度比螢幕小時,代表軟體鍵盤目前顯示在畫面上 boolean oldValue = mKeyboardVisible; mKeyboardVisible = (viewHeight + maxStatusBarHeight < displayHeight); if (oldValue != mKeyboardVisible && !mKeyboardVisible && mCallBack != null) { mCallBack.onKeyboardHidden(); } } private int getDisplayHeight() { WindowManager windowManager = (WindowManager) getContext().getSystemService(Context.WINDOW_SERVICE); Display display = windowManager.getDefaultDisplay(); return display.getHeight(); } /** * 如果在onLayout時無法辨識鍵盤被關閉時,也可以透過設定mKeyboardVisible的屬性 * 並且在mKeyboardVisible為false時,執行mCallBack的動作 */ public void setKeyboardVisible(boolean mKeyboardVisible) { this.mKeyboardVisible = mKeyboardVisible; if (!mKeyboardVisible && mCallBack != null ) { mCallBack.onKeyboardHidden(); } } @Override protected void onLayout(boolean changed, int l, int t, int r, int b) { super.onLayout(changed, l, t, r, b); if (!this.isInEditMode()) { updateKeyboardVisible(); } } }
在Activity或Fragment裡面,將此View實作OnKeyboardHiddenListener
public class MyActivity extends Activity { // Views private KeyboardAwareRelativeLayout mRootLayout; // Listeners private KeyboardAwareRelativeLayout.OnKeyboardHiddenListener mRootLayoutOnKeyboardHiddenListener = new KeyboardAwareRelativeLayout.OnKeyboardHiddenListener() { @Override public void onKeyboardHidden() { // TODO 在這邊撰寫當軟體鍵盤隱藏時,要做的處理 } }; @Override public void onCreate(Bundle savedInstanceState) { super.onCreate(savedInstanceState); setContentView(R.layout.main); mRootLayout = (KeyboardAwareRelativeLayout) view.findViewById(R.id.root); mRootLayout.setOnKeyboardHiddenListener(mRootLayoutOnKeyboardHiddenListener); } }
最後在AndroidManifest.xml裡面的<activity>節點裡面,加入android:windowSoftInputMode="adjustResize"
如此一來,就能在軟體鍵盤被隱藏時來處理一些事情。
參考資源:
Canned Coding
http://stackoverflow.com/q/3425932/1004367
1 note
·
View note
Link
如果有需要透過程式碼來模擬按下back鍵來移除巢狀Preference Screen時,可以參考這個方法。
此方法主要的原則是,巢狀Preference Screen在顯示時,是以 Dialog 來顯示。以下是Android Developer的說明
When it appears inside another preference hierarchy, it is shown and serves as the gateway to another screen of preferences (either by showing another screen of preferences as a Dialog or via a startActivity(android.content.Intent) from the getIntent()). The children of this PreferenceScreen are NOT shown in the screen that this PreferenceScreen is shown in. Instead, a separate screen will be shown when this preference is clicked.
所以要移除Preference Screen的話,只要取得該Preference Screen的Dialog將其移除,就可以移除掉Preference Screen
yourPreferenceScreen.getDialog().dismiss();
0 notes
Link
最近安裝了Office 2013之後,之前寫程式喜歡用的Console字型不見了!
本來想說換別的字型來看看會不會看得順眼
最後還是覺得這個字型順用
可以點選標題去下載囉!
只限用於Windows OS
0 notes
Text
如果移除FragmentManger裡的BackStack entry
在android版本時常的更新的現今,許多程式的寫程也開始有些轉變,之前就有提到目前官方已經開始希望開發者用fragment來取代activity。
所以在所難免常常會有在fragment之間切換來切換去,並且加入到FragmentManager的backstack,以方便按下back按鍵時,可以返回前一個fragemnt。
但是如果為了好的使用者體驗,希望在程式運作到某一個情境時,清除所有的back stack entry,讓使用者不要在按下back按鍵時,發生一些悲劇體驗的話,你可以利用程式碼來清除back stack entry
// In your FragmentActivity use getSupprotFragmentManager() to get the FragmentManager. // Clear all back stack. int backStackCount = getSupportFragmentManager().getBackStackEntryCount(); for (int i = 0; i < backStackCount; i++) { // Get the back stack fragment id. int backStackId = getSupportFragmentManager().getBackStackEntryAt(i).getId(); fm.popBackStack(backStackId, FragmentManager.POP_BACK_STACK_INCLUSIVE); } /* end of for */
只要服用上述程式碼,就可以透過程式碼來移除back stack 如果想要看更多的參考的話,可以參考stackoverFlew的這份帖子……
0 notes
Link
現在Android已經開始建議大家都用Fragment來建立寫程式,主要是為了讓你的Fragment可以重複在手機或平板上一起使用,相關的說明可以參考Android Developer
而我最近在使用Fragment時,常常一個頭兩個大
如果單獨在FragmentActivity下使用Fragement View Pager沒啥問題
但是只要我在Fragment下再建立Fragment View Pager時,每次都會發生
「java.lang.IllegalStateException: Recursive entry to executePendingTransactions」
看字面上的意思,大概是遞迴不知遞到哪邊去了XDDDD
好加在有神人解決了我的疑問,主要是例用非同步的AsyncTask來解決此問題
0 notes
Link
一般來說Android的Dialog都會有一個白色的邊框
會有邊框的原因主要是dialog的theme設定所致
如果要產生沒有邊框的dialog,就必須客製化theme style
實作方法請參考這裡囉!
0 notes
Link
引用自ithome
重構的本質其實就是對軟體結構的重整,講更白一點,就是對物件給於明確的責任分派 (responsibility asssign),使得物件之間能具高內聚力 (high-cohesion)與低耦合性 (low-coupling)
0 notes
Link
我必須要再一次的讚揚Stakeoverflow真的是程式設計師的好朋友呀!~
想說找一下我遇到的問題,沒想到還真的也有人也有相同的疑問
我的疑問是:「官方的Compatibility套件當中的PreferenceFragment是從3.0版本才開始支援,而compatibility的套件也無法使用PreferenceFragment,那我有什麼方法可以在3.0以下的版本,也使用PreferenceFragment呢?」
好加在有神人現身啦~可以參考來自XDA的原始碼
主要改寫的原則就是利用繼承ListFragment以及引用一些declared method來完成。
讓你可以用原來PreferenceActivity的習慣來使用。
0 notes
Link
網路上有神人把android水平progress bar改成垂直啦~
該名作者是參考Progress bar原先使用的drawable描述檔「@android:drawable/progress_horizontal」來修改
一般來說
android的progress bar只有支援水平樣式
那如果要使用垂直樣式呢?
那就得動點手機做做drawable與style描述檔,將其改成垂直樣式
0 notes
Link
第一次與JNI見面,透過此篇文章,可能稍稍了解運作方式。
另外一些文章:
[java] Java Native Interface(JNI) 簡介與教學
Java Native Interface with C tutorial
也可以參考參考
0 notes
Text
如何從網路下載圖片到Android的app裡
相信有不少開發者一定會需要將app與Server端結合
所以假如有需要從網路下載圖片、文件或是其他檔案到手機裡處理時
一般來說,會使用背景服務或是AsyncTask來處理,來讓app在執行時不會因為佔用UI Thread卡住或頓頓的
以下簡單列出網路上的參考資源,大家可以連過去看看,並嘗試實作一下,就可以知道運作的道理了
How to download file/image from url to your device
Download an HTTP file to SDcard with progress notification
0 notes
Link
一般網路上都有對於Java List的排序說介紹
那如果要針對Map排序呢?
主要精神就是
先將Map轉成List
再利用Collections.sort來排序
以下程式碼,參考自符號記憶
// 先把想排序的HashMap轉換成的entry放入List // transcript為一HashMap List<Map.Entry> list_Data = new ArrayList<Map.Entry>(transcript.entrySet()); // 針對Key進行排序 Collections.sort(list_Data, new Comparator<Map.Entry>(){ public int compare(Map.Entry entry1, Map.Entry entry2){ return (entry1.getKey().compareTo(entry2.getKey())); } });
0 notes