
Do not repost my art without permission Other accounts: VK: https://vk.com/shimerka Instagram: @/shimeraart Twitter: @/shimera12
Don't wanna be here? Send us removal request.
Statistics
We looked inside some of the posts by shimera and here's what we found interesting.
Average Info
Notes Per Post
2K
Likes Per Post
1K
Reblog Per Post
271
Reply Per Post
6
Time Between Posts
13 days
Number of Posts By Type
Text
16
Note
1
Last Seen Tumblr Blogs


Fun Fact
Tumblr has been banned in Indonesia for providing people with access to pornographic content.
Text

so I saw an accord with an interesting body kit a couple days ago and my brain was braining since then
there are so much opportunities for body modifications in cars world...... especially for some body horror(?)
#yea idk what to do with him now feel free to use the idea#i just wanted to draw this bud#some experimental rendering as well ig#oc#pixar cars oc#cars oc#pixar cars#cars#honda torneo#honda accord
53 notes
·
View notes
Text

did this one for the "oc without their trauma" thing or something, got lazy with the second bg but idc i wanted to sleep
yea if gudok and vasily didn't get traumatized as fuck by the mafia and shit they would've never met
#i needed a reason to draw vasily laughing alright blud's too serious all the time#i wanted to say something but forgot it whatever#oc#pixar cars#cars oc#pixar cars oc#cars fanart#cars fandom#cars
45 notes
·
View notes
Text


ah yes another day for traumatizing my ocs
gudok's backstory in a nutshell or "don't join random mafia groups if you don't know what you're dealing with"
#loved this one sm that I even translated it#why my ocs randomly finn&leland themed (both are evil tho)#gudok (2106) not so evil here but gets progressively more evil okay#pixar cars oc#pixar cars#cars oc#cars#cars fandom#disney cars#oc
53 notes
·
View notes
Text

That one toy that has been in store for 30+ years
#THIS IS SO CUTE#i would absolutely buy it if it was real#now i need an army of tiny pizza hugos what are you doing with me#love your designs and colors so much
84 notes
·
View notes
Text

"this was all my fault"
#finn can't stop blaming himself for leland's death and now this#blud was already fucked up why did they do him this dirty#poor beb aww#first time drawing redline and he's already ded#do I even need to tag leland here like--#pixar cars#pixar cars 2#cars 2#finn mcmissle#finn mcmissile#rod redline#leland turbo
396 notes
·
View notes
Text
alright alright heres a lil sneak peek of what I'm working on rn because I can't keep my mouth (hands?) shut
UPDATE: art posted here

this one is less of a finnland and more of a finn can't stop getting traumatized tho still emotional
#the second one is a lil comic and y'all are gonna cry#I'm already crying because I don't have enough time to draw this shit#pixar cars#pixar cars 2#finn mcmissle#finn mcmissile#cars 2#cars
99 notes
·
View notes
Text

I wanna draw so badly but I CAN'T
also there are two of these on the way so uh pray for my sleep schedule ig
#how do y'all manage to do stuff when you're working 90% of your life#like I have to sleep sometimes#why do people have to work to get food this is stupid#crying#cars 2#pixar cars#pixar cars 2
25 notes
·
View notes
Note
What’s the difference between a tattoo and paint job in WoC?
Oooh that's a good question! Also it took me way too long to answer so uh sorry-- Sorta very long post ahead yea
I think, cars do have a different meanings to the word tattoo since, well, they're cars and they can just repaint whatever they want kind of any time they want to (if they have the money and time, of course). These things won't be just as permanent as tattoos on people, so cars do have more acceptance for the drawings on theirs bodies too (and that's one of the few ways for them to decorate themselves in comparison to humans)
The paint job is basically when the car needs some scratches/dents fixed, or gets a new part, or just wants to change the color of the overall paint, and the thing includes sanding the part down, fixing stuff if necessary and painting it again with plain color.
The "tattoos", though, are much more interesting, so I'll ramble a bit under a cut (no graphics descriptions of human tattooing process there, don't worry, it's just long af)
Now there are different ways to get a "tattoo" on a car: you can get a bunch of decals, you can use stickers or you can have someone do some airbrush painting on you.
Airbrushing, I think, is the most permanent one of the three since to cover THAT up you'll need to sand it all down and most likely get a new paint job for that part because it goes under a layer of varnish just like a regular paint job (I guess, this is the closest to a tattoo thing a car can get). To get the airbrushing done the original layer of varnish is sanded, so the paint could stick to the surface. Next, the picture is painted, and now the new layer of varnish has to be applied on top - so everything stays in place and is all shiny again.
Decals and stickers are the less permanent ones as they can wear down more easily and can be removed without damaging the paint job, also they are much easier to get applied, though, if I remember correctly, you can put a layer of varnish on top of a decal to make it more permanent.
Also there probably are ways for cars to get some bad tattoos like they do in prisons or low quality underground shops in human world, and for that permanent markers, spray paint and regular paint can be used. Even though they are not as permanent as human tattoos made in similar circumstances these methods definitely take place (just as we can see people decorate their cars in real world with markers and spray paint).
Spray paint tattoos are more likely to be associated with an Inexperienced and poor artists who may be making these even for free or for a small fee just to practice or maybe save for a better equipment. Regular paint (like with a brush idk) goes in a similar category, I think.
Also, spray paint would be hard to find in prisons, so most likely the permanent marker "tattoos" will be strongly associated with prison, just like the tattoos with pen ink are in real world (idk how relevant are pen ink tats nowadays but a lot of people live in communities where any low quality tattoo is associated with prisons and criminal stuff). So yea I think it's a fun little detail to add to your car ocs who may have been criminals or have whatever other reason they decided to get themselves "tattooed" this way.
The other method I want to mention is purposely scratching the paint job. This one is the most dangerous for the car because the layers of varnish, paint and primer are protecting the metal from rusting (this is why even with a smallest scratch that managed to make it's way through all the layers the car could rust really bad if you're unlucky enough). Still, I think, this one could take place in some extreme car communities, maybe they could even fill up the scratches with some sort of paint or other materials to make it more visible (like the tattoos in some human cultures where they put the pigments directly into the freshly made wounds, or maybe like scarring). This is probably the least used method, still, it could take place in Cars world.
Uhh well that's what I personally think, and if you maybe have other ideas feel free to add!
#pixar cars#i talk a lot please listen to me#I need to see more cars ocs with tattoos IM BEGGING#got a bunch of mine but too busy to draw rn im crying#cars headcanons#disney cars#cars fandom#cars
10 notes
·
View notes
Text


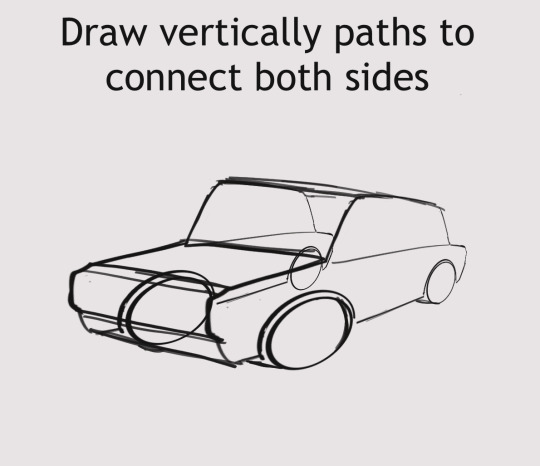

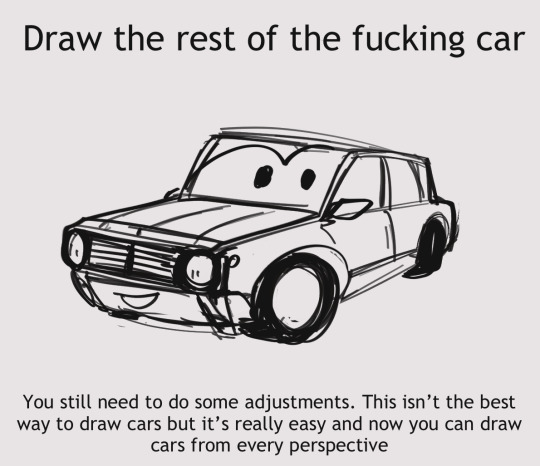
Car drawing tutorial I put together super fast, apparently a lot of people didn’t know about this but that’s ok. Because now you do! Have fun drawing cars.
#holy shit that's genius#especially with blocky cars like most my ocs are#love myself some blocky cars#anyways THANK YOU SO MUCH?? this wil 100% save me a couple hours reference searching
361 notes
·
View notes
Text
I am screaming I am crying I completely agree with your hc just as much as I lovehate it oh GOD. this is so fitting in my own angsty finnland hcs how did I never acknowledge the part between capturing and Big Ben scene!! this is canon now btw. I will cry more.
Oh shit you guys I woke up this morning with another headcanon. Ughhhhhhhh this one really fucked me up. I’m gonna post it under a cut cause theres discussion about death and su*cidal ideation and it’s just super depressing. So please don’t read if you’re not in a good headspace.
I think this is the worst one yet. It's just pain.
So I always noticed that Finn is really quiet in Big Ben when they're tied up. Mater is talking back to the lemons and engaging with them but Finn is COMPLETELY silent.
Now maybe it's cause he's an experienced agent and knows not to open his big mouth. But when has Finn ever not been on the spot with these jokers? Why is he so quiet and resigned here?
He's resigned! He doesn't even try to escape. He's glad that Mater makes it out (maybe??) but after that, he's just like oh well guess I'll die?
Finn is incredibly crafty with cheating death. I mean just look at the oil rig scene. Even after the extreme shock of seeing Leland dead, he's still able to make split second decisions to save himself and make it out. And that was when it was just his life on the line! He doesn't even seem to care about Holley's life at all in this scene! And this is the same car who seemed genuinely gutted by seeing the wgp racers getting their engines blown in the second race, these random strangers he doesn't know. You can't tell me he doesn't care about others!
So what the FUCK did they do to him to break him that much??
Well. They had him prisoner and while they kept Mater gassed the whole time in between races, we don't know what happened to Finn or Holley. We don't know that they were unconscious the entire time. But we do know certain among the lemons are complete sadists. I've wondered for a while if they filmed what they did to Leland. Zündapp wasn't there for it and he seemed to take personal satisfaction in the aftermath. It's completely plausible that Grem recorded the whole thing even to just show the professor later.
But you know who they would take particular delight in showing a snuff tape of Leland Turbo to?
Finn.
And that would be enough to keep him quiet in Big Ben, to want nothing more than to die there, crushed to death just like Leland, because he deserved it after not getting there in time to save him. He wanted to die there so bad that even Holley's life didn't matter. And when he did get out of that situation (thanks to Holley), the only thing on his mind was going after Zündapp.
They just found out there is an actual bomb attached to Mater and he's heading for a highly populated civilian area IN LONDON FOR CRYING OUT LOUD; this is likely Finn's home town. You'd think he'd stop at nothing to go take care of that situation and not leave it to the total newbie.
But no. He is out for BLOOD against Zündapp. Holley can save London—who CARES about London or any of these cars he's gotten close to over the past two weeks—Zündapp is on the loose and Finn is not going to let that slide. He puts himself in deaths door yet again to catch this motherfucker. He barely flinches while getting heavy artillery shot at him. And his grand solution at the end is to blow them all the fuck up.
The size of that explosion SHOULD have killed them all. Finn was more than willing to kill himself if it meant Zündapp died with him, plus Tony Trihull who at this point he probably knows is the location of Leland's death. They can all just get blown to hell.
But he and Zündapp survive somehow—I don't think the same can be said for Trihull—and we see them later, finally pulling up to the races. We also see that Zündapp is completely tangled in Finn's grapple lines in ways that could only be possible if he was flipped around multiple times in all directions. Finn got him to the bomb site but not before beating the ever loving shit out of him. He is FURIOUS and doesn't bat an eye when Holley tases a car in full custody. Because it's Zündapp, and Finn only just stopped short of killing him.
Finn is a hot mess throughout the movie. He takes unbelievable risks and pulls ridiculous stunts. BUT he always has it pretty under control and above all, he shows genuine care for those around him. But there is a definite shift in his values and goals after Big Ben. There's a real possibility that it's because he had to watch Leland die in that window of time.
I hate this headcanon so much but I had to write it out this morning
This was all just off the top of my head a few minutes after waking up, haunted by this headcanon, so I’ll go back and rewatch the scene to see if anything sticks out to me. I’ve combed over the opening of the movie so many times to analyse it but I want to go over the Big Ben scene again to comb over it too cause it’s got a lot packed into it.
But yeah. Happy Valentine’s Day y’all!
#the energy#the sexiness of your brain for bringing up that thought#i am devouring#and crying#and in need to return to my finnland fic right now oh my god#the EMOTION#the FEEL that I felt reading this#it's just so perfect
73 notes
·
View notes
Text

pink baby
ini d zine posting 3/3
#initial d#shingo shoji#shoji shingo#initial d shingo#takeshi nakazato#nakazato takeshi#initial d nakazato#takeshin#nakashin
23 notes
·
View notes
Text

just a chill summer day we all wish we had (they're on a date)
ini d zine posting 2/3
#initial d#initial d shingo#shoji shingo#shingo shoji#initial d nakazato#nakazato takeshi#takeshi nakazato#takeshin#nakashin
40 notes
·
View notes
Text

who is it here finally posting stuff from ini d zine🤔
1/3
I'll be returning slowly but no promises to post often haha (screams)
#initial d#initial d shingo#shoji shingo#shingo shoji#initial d nakazato#takeshi nakazato#nakazato takeshi#initial d zine#takeshin#nakashin
49 notes
·
View notes
Text


Talking to a random animal and pretending to have a full conversation with them
#oh my god#i love your art style i love your ocs i love your art🛐🛐🛐#this is amazing gorgeous and the colors and everything#not my art
139 notes
·
View notes
Text
guys if anyone's wondering I'm not dead & I remember about everything I have to answer(•́ ‿ ,•̀) I'm in the middle of something irl right now, but I'll post everything I planned as soon as possible
#bla bla#it was quite a month (or more I'm completely lost in time rn)#moving out and yeeting myself to another city is a bit harder then I expected haha
3 notes
·
View notes
Text

when they first met
46 notes
·
View notes
Text
Ooh I guess I'm doing it... The post about car paint job from the worker's point of view.
Tiny disclaimer: I'm not an overly experienced professional (even tho I've been doing all this almost every day rn) and some things I'll mention may vary from workshop to workshop so yeah I'mma explain the way I've personally experienced this kind of job
Also I'm not talking about small touch-ups like a scratch or a small ship of some sort, this post is about going BIG starting from repainting a rusted corner of a door and to a fully new paint job like if you want to change the color of a whole car.
Don't feel obliged to follow all this in your fics and other works tho, I completely understand that sometimes you simplify stuff for the sake of the plot, and to be honest I do that too.
I also sincerely apologize if some of the terms aren't completely correct as english is not my first language
Warning: long post ahead
So, where do I start... Well, the whole process is in fact REALLY time consuming. You can do all the steps as fast as you can, yes, but still you'll be stuck with drying all the layers of the primer, base coat and clear coat anyway (this can be sped up with some infrared lamps and stuff but if you don't have these... Well, it is what it is). Also it usually takes at least 2-4 people to get the parts ready. Depending on your skills you can do it by yourself as well but for that you'd need to know how to disassemble and assemble a car, the process of preparing the parts you're gonna paint and master your painting skills to get the result you're looking for (plus sometimes you'll need to know how to weld and fix some big dents too). At my workplace all these jobs (except preparing the parts and painting them) are done by separate people, but as I said earlier, it may vary.
DEMOLISHING
First, you decide what are you going to take off the car and how much of it has to go. I'm not really involved in the process of it as I'm not a mechanic (fitter?), but yea usually you need to take off bumpers (especially if they're a part that's getting fixed and repainted), doors, hood, trunk and front&rear window glass are optional most of the time; if the hood or a door is getting painted we usually take it off. The trunk is also taken off to repaint but sometimes it can stay if there are parts close enough to it that get painted as well (for example, I've prepared a trunk and both of the rear fenders, so the trunk stayed on the car). Also most of the time the inner door panels are taken off when the door is painted, the window glass is optional but to avoid damaging it if something goes wrong we keep it in closed position or take it off; door handles always have to go separately. Oh and sometimes you'll have to take the wheels off too if they're gonna get in the way later on.
PROTECT ANYTHING THAT'S LEFT
So, the first step was successful: you figured out what, how and how much to disassemble and may think now you can start preparing the parts-- Oop, not so fast. Now you have to protect anything that you didn't take off and don't want to accidentally damage/get dirty. If the part is still on the car and any door opening is gonna be involved (and believe me, it most likely will) or they were taken off - you better cover the doorways with paper and masking tape, because you don't want the interior to get all dusty and filled with sand!! And the absolute best thing will be to cover all the remaining parts too (there are covers made for that but technically any overly huge plastic bag thingy will do) because you don't want the primer to leave any residue on them. Also you absolutely don't want to damage anything that's close to the repainted part so it's gets covered with some masking tape and/or reinforced tape - the more, the better, you can never be too careful, but remember that it's also kind of a time consuming process (sometimes it takes up to half a day to cover everything up if you're doing it alone, but most of the time it's from about twenty minutes to an hour or so)
REPAIRING AND SANDING
Finally you made it through this step too, congrats! Now the action begins: you need to get that baby ready to get a new paint job.
In my workplace the cars we paint almost every time have some chips (these can rust really well quite fast so it's important not to miss out any), scratches (they can show through the new paint if you don't sand them down completely) and of course some amount of rust, so first thing you want to do is to make sure none of it stays where it was. Most of the time you don't need to take all the paint amd primer off, so that's when you take an eccentric machine and start sanding away everything you want gone. Sometimes if the paint peels off by itself at some spots you have to sand all of it or it might start doing the same in the other spots. Sometimes you'll find out the car was already repaired and there are layers of putty there - if there's no signs of rusting underneath, you want to sand it as little as possible because the other option is to put it all back on by yourself AND make the shape of a part look like it's never been repaired, and it's not a simple task if you don't have years of experience behind your back.
The dents are treated depending on their size: if it's small enough you sand it until bare metal shows up and then cover up with some putty - make sure to really press it in so it won't sag after you finished everything. If it's big you grab some tools and fix it or call someone who knows how to fix those (that's my option at the moment sadly) and get them to fix it. Some putty still will be applied on top to make sure the detail is smooth just as new.
Sometimes it's necessary to wield parts that were too damaged. Sadly, I don't know much of it, but it's most likely a job for a couple hours or so (but there was a really fucked up extremely rusted car that's been in work for almost HALF A YEAR- yeah our wielder quit right after finishing the poor thing😭 and the car itself was released into the wild just a couple days ago). The thing I know tho is that even after sanding down everything you welded, you most likely still will have to cover it all up with putty because it won't be looking good without it. And make sure to use the right grit sandpaper because if it's too harsh it Will Absolutely Show Through after you paint it. Even if you did put some putty on top.
The rust itself may be treated a couple ways. If it's light enough that there are just some spots sitting on top of the metal then you just sand it down and call it a day. If it's so bad that chunks of metal are falling off by themselves or there are holes in it you call your wielder to cut the thing off and put a new piece of metal to cover the hole up. And if it's something in between, you go grab a sandblasting gun and all the protective gear you can find because it's about to get DIRTY. The process is quite simple: all you need to do is to connect the thing to a compressor, get yourself some clean fine sand (or else you'll be REALLY annoyed when you'll need to adjust it every ten seconds because some shit got stuck in it TRUST ME I KNOW (and also it can damage the equipment)) and start blasting the rust with it. But it's also really slow as the range of where the sand is hitting the metal is small, and you'll have to go over the same spot a couple times from different angles to really get all that rust removed. And if you blast a spot for too long it also may develop a bulge. After all this you also clean it all up and (optionally) add some putty on top. If you really want to get it extra protected you can first apply a layer of epoxy primer to the area you just relieved of rust and only after it's cured you can add the putty.
If you're working with bumpers tho it's best if you put as little putty on it as possible. These things are made to be flexible and the putty is not so it can and will fall off if any accidents that involve the bumper being squished happen. If you can sand that chip off - you do it. Also the fact of them being kind of flexible leads to paint developing some cracks that go deep through the layers and sometimes into the plastic as well. This mostly happens when it developed too many layers of paint over the years of repainting the thing, what leads to losing a lot of flexibility of the said paint, so while the bumper gets a hit and bounces back - the layers crack. And yeah if you see it you sand it down COMPLETELY or it will show through.
Last step is to make sure everything is smooth, the layers (top coat, base coat, primer and sometimes additional coats of paint from previous jobs) are stretched while sanding those (so there are no bumps there) and the grit of the sandpaper Was Small Enough because otherwise It Will Show Through.
PRIMER AND SANDING AGAIN
Now that you've got through the first round of sanding you need to put a coat of epoxy primer if there was bare metal involved and 2-5 coats of acrylic primer on top (both preferably two-component and applied with a spray gun). There's not much to say about this except that you most likely will need to do some additional masking. And if you do fuck up on this step (like overflow the paint at some spots that it starts dripping) it's still fixable: the second round of sanding is waiting for you just as finishes drying. The time of curing for the primer depends on it's type, manufacturer and the temperature you're working in, but mostl likely it's gonna take around 8 hours at the room temperature or around half an hour with the lamps.
Now that it's all cured the parts are ready to sand yet again - even if it was all perfect before you still need to make sure it's smooth, looks like it's supposed to look and has enough sandpaper scratches because the paint won't stick to a shiny-smooth surface. So sanding down it is - finer grit this time, but it is still necessary, especially if there were any repairs. The area you're going to sand this time (if just a part of a detail is going to be repainted) also is a lot bigger than you prepared at this point because to make it look as if there were no repaints at all the base coat and the top coat both need to be applied in a way that will not look bumpy. Also there are some steps to take if you've repaired some stuff there: first you sand the thing with your hands and a sanding block, and after that you get a finer grit sandpaper and - again - an eccentric machine and make sure you got all the previous scratches out or else It Will Show Through.
Finally, it's all ready - now you need just to rip most of the previous covers off, tape on some new ones adjusted to the new sanded area (takes a shit ton of time again and you better not miss this step) and you're ready to degrease the thing and FINALLY paint it. At this point depending on the equipment you've already spent around 1-3 days on the thing (including all the waiting and stuff. You absolutely can and will prepare other parts while you wait).
WOW YOU DID IT! NOW PAINT AND NOT DIE
I'm not really involved in the painting process yet (oh the lack of skill), but what I know about it is the fact that the white paint is the one which lets you get away with the biggest amount of mistakes of all. And if the paint has any shimmer/glitter in it... Well, it takes some skills to make it lay flat and not become a spotty mess (if you do fuck up at this point you'll have to repeat some sanding). Also the base coat is usually really thin as it only gives the color to a piece. The clear top coat is the one that's both the heaviest and the thickest because it's supposed to protect everything else. After applying all this you leave it to dry for around 17-24 hours (the more the better), assemble everything back together and technically you're done. Or are you?
MAKE IT SHINY
Now we've come to the additional step. Polishing. Some workshop do it, some don't. In my workplace we don't go an extra mile for it, but we still do polish the parts we painted to give it some extra shine and get rid of occasional dust that landed before painting process was finished and small drips of the top coat. First you sand these - and only these - down with a really fine grit sandpaper (preferably also wet) by hand and polish it until shiny again using different compounds and fur/foam discs and the machine almost like you've used before but this one has even more speed and power. Finding all the dust pieces especially on the big surfaces like a hood or a roof is quite a challenge - sometimes you will miss a couple and will have to go back a few steps back to sand them off. You should also rinse the car after the polishing because it gets quite dirty from time to time and these compounds are not very easy to get off when they dry.
Finally, everything is nice, smooth, shiny amd clean, and you can finally say you're done! Thanks for reading everyone, I hope you learned something useful today! If I missed out on something, feel free to ask any questions, I'll do my best to clear all that up for you!
#I did not expect it'll be THAT long#safe to say before I've started to work here I thought yeah what it takes to paint a car?#a couple of hours?#and now I'm like DAMN if it was in the real world half the cars in the movies I've watched would be running around in primer at best#people do simplify this shit for the sake of plot a lot and I can't blame them for it#cars#pixar cars#pixar cars 2#cars 2#cars 3#disney cars#initial d
12 notes
·
View notes