
shittysquiggles
Shitty Squiggles
Kittywiggles' art side blog. 1/2 overachiever, 1/2 lazy af
45 posts
Don't wanna be here? Send us removal request.
Last Seen Blogs

binhnio
Bình Nio

theendofthepub
Closing Pubs of Hampshire

palabraspoeticas
Palabras Poéticas

bibbleboo
kero kero bonitos death grips cover

spookibatmyotis-blog
Myotis
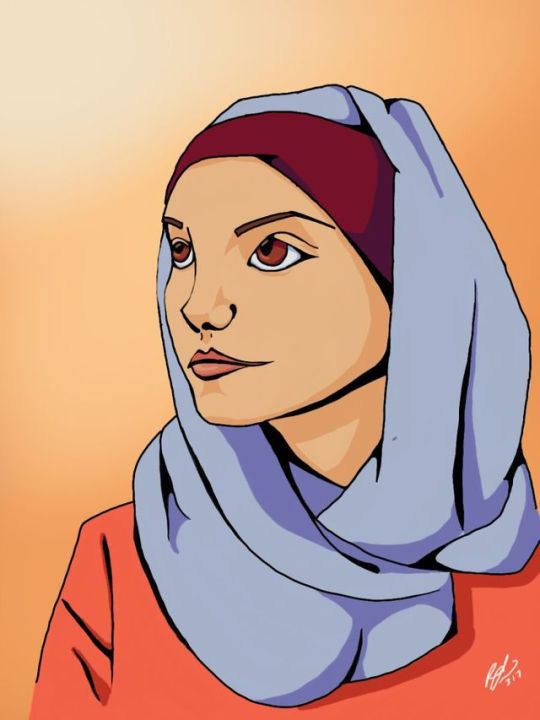
Photo

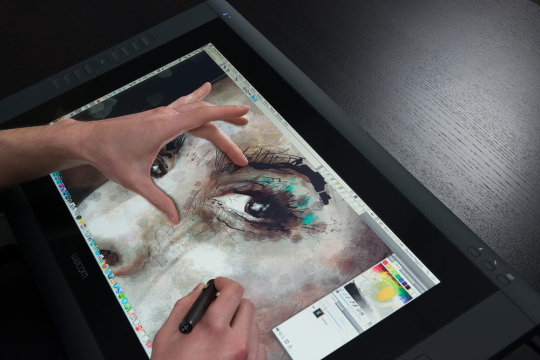
after being gently scolded by one of my coworkers for using my tablet as if I were still using traditional media, he showed me a few secrets of layers and was incredibly patient through my “oh duh” moments
it’s not perfect by a long shot but i’m proud
#also what is lineart#my coloring/shading and lines don't match stylistically and it bothers me#but I'm not sure how to fix it because I really prefer a more painterly shading#but sketchy lines are ????#help please#my art
2 notes
·
View notes
Photo
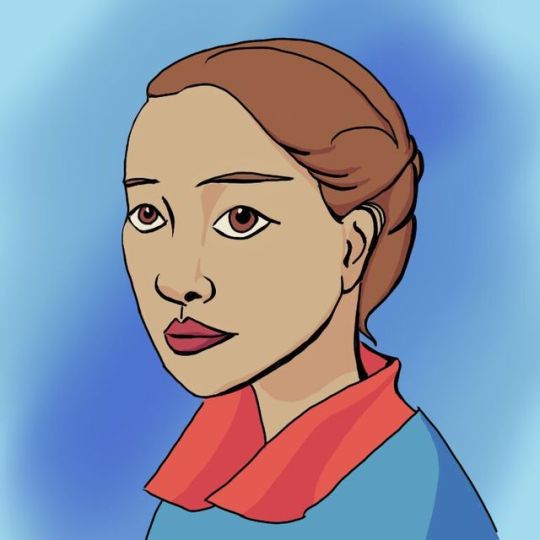
tablet drawing is fun
3 notes
·
View notes
Video
So I’ve started fooling around with the tablet I got a few months ago and a drawing program I downloaded. It has the ability to do timelapses and it’s really mesmerizing to watch so here u go
1 note
·
View note


Photo
i have some more tips but i have to get back to homework!!! i hope this was helpful anon
148K notes
·
View notes
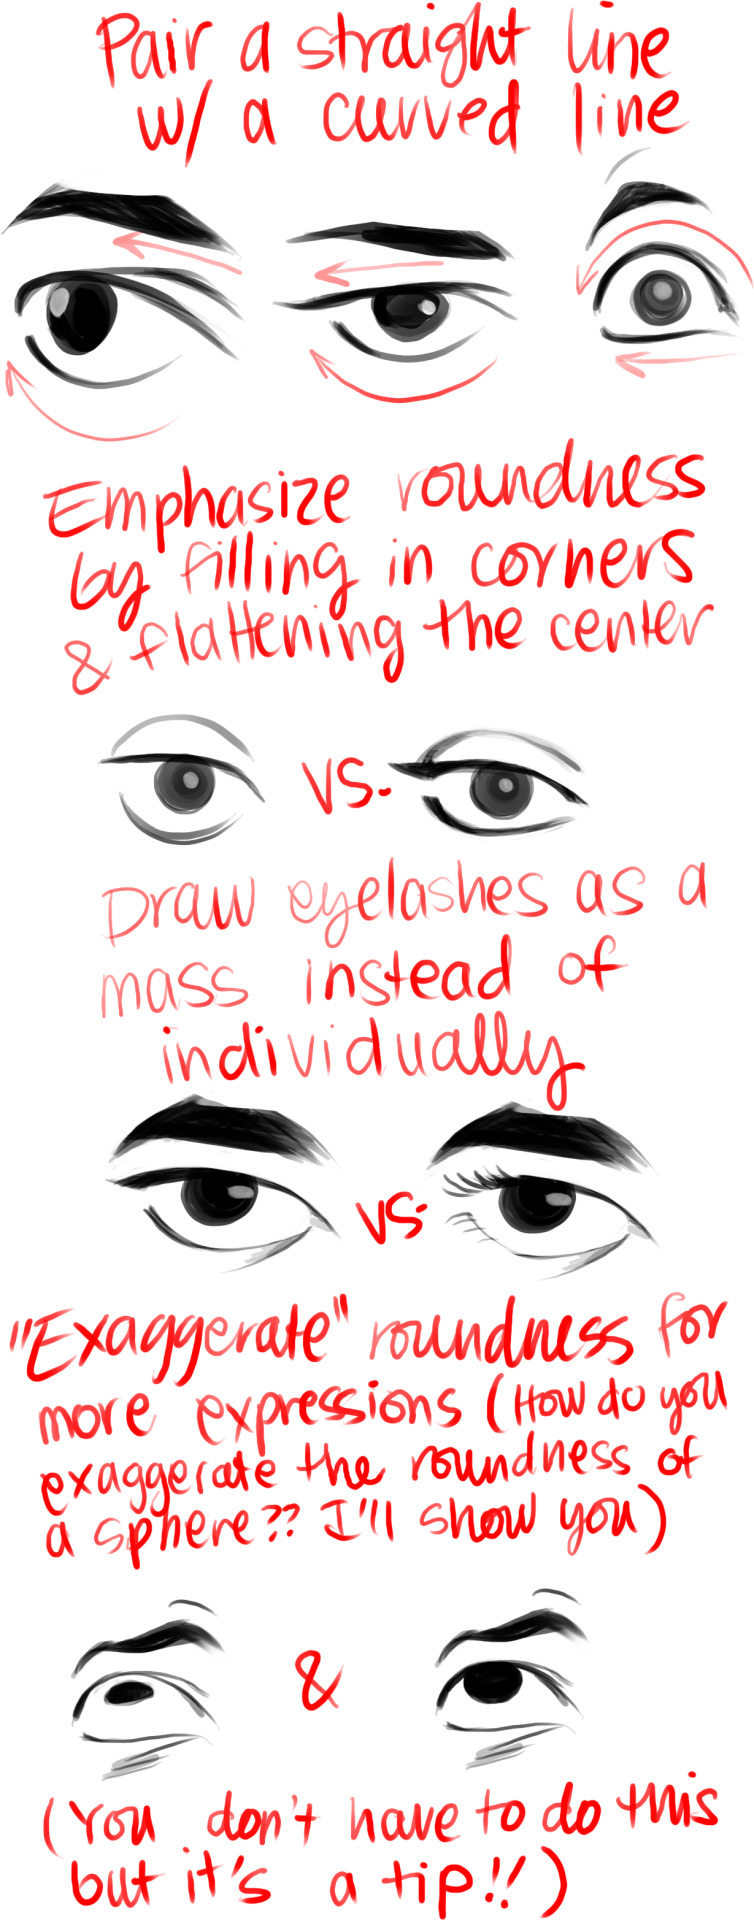
Photo

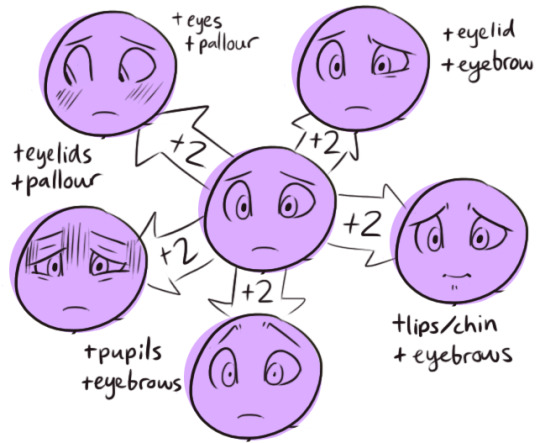
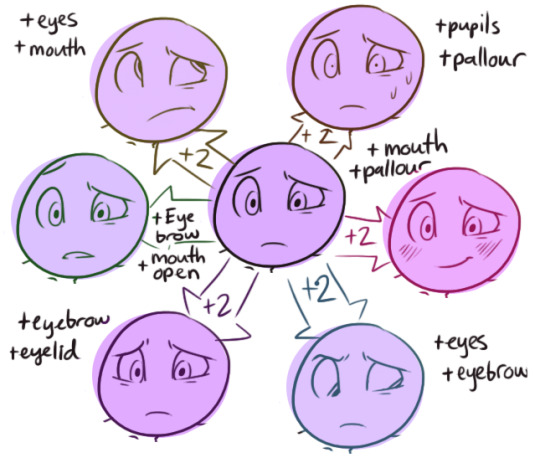
How to, step-by-step, make expressions mean different things by changing just one facial feature at a time. *shrug* I’m not very good at explaining how I do expressions, I just…feel out what kinds of muscles seem to fit and tweak those. And sometimes, ever so slightly, little adjustments could mean the difference between fury and euphoria.
201K notes
·
View notes
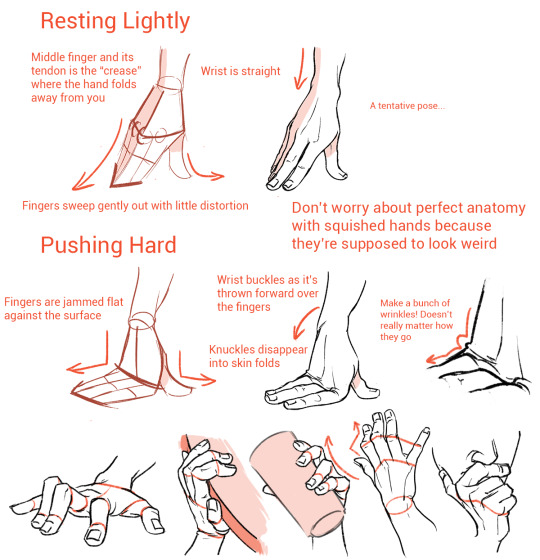
Note
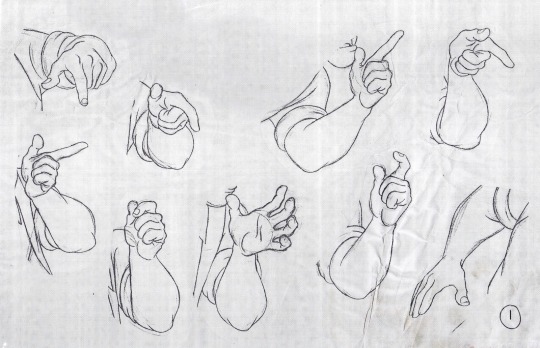
how did you figure out how to do hands
well when I do hands I tend to break them into 3 big shapes
starting with the wrist then palm, thumb then the fingers
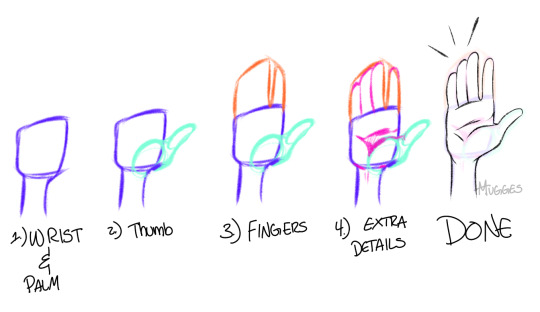
once I have the big shapes in I separate the fingers
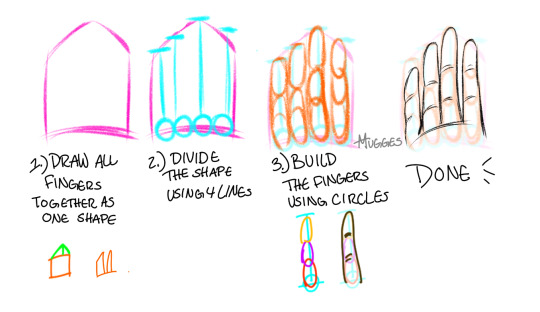
here are some more examples of the different parts
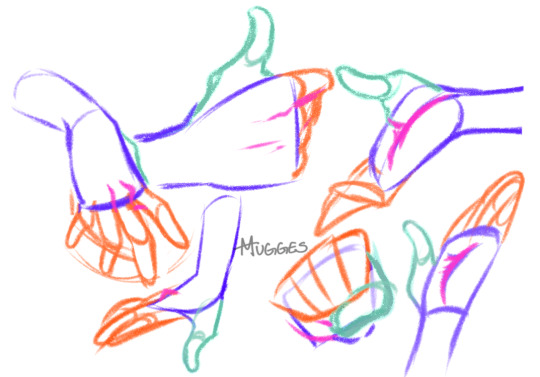
one of the best ways that I learned how to draw hands was to draw a LOT of them, in different poses, while looking at a reference. This is a site that I found useful,
it has 3D models of hands that you can change the view so you can see the same pose from different angles. p.s. this site i linked to does contain nude figures just a heads up
78K notes
·
View notes
Photo

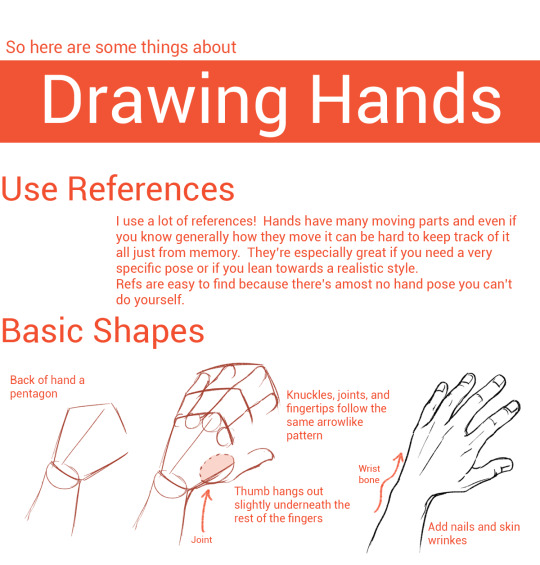


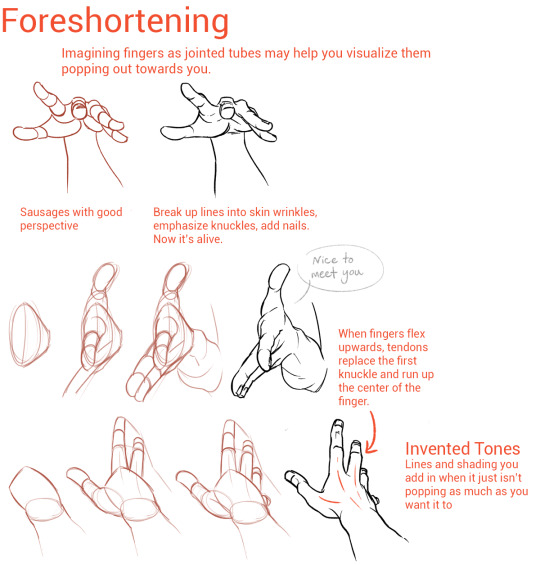
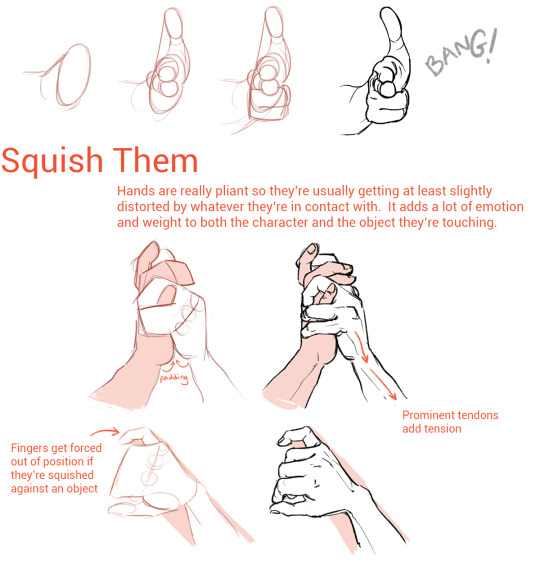
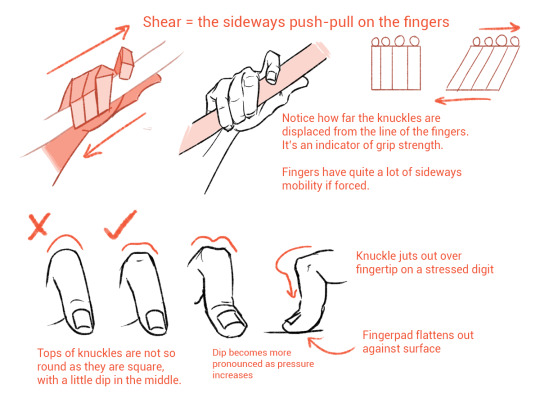
I’m not an expert but I like hands a lot so hopefully some of this was helpful!
224K notes
·
View notes
Note
could you please give tips on how to differenciate age when drawing?
Well, this is just from my own experience and keep in mind that I’m just some rando on the internet who draws anime, but i’ll try. Here you go, just a quick tip, I guess.
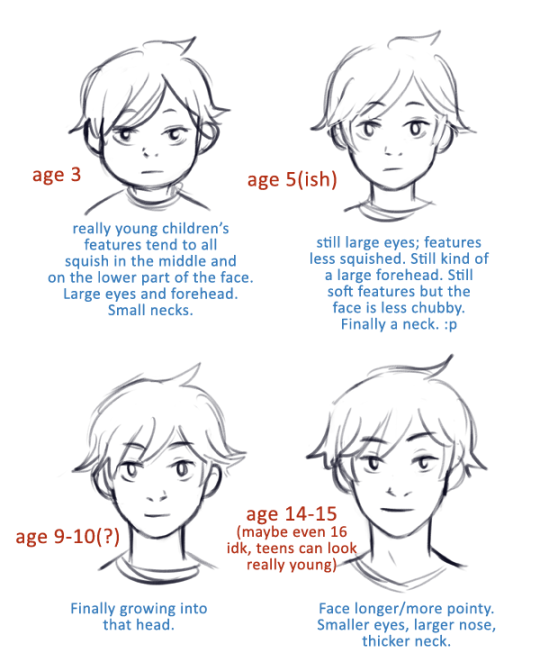
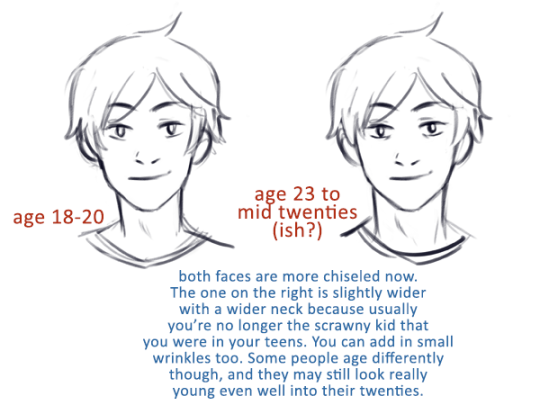
As for someone older than twenties, well that’s not my strong point, I have to admit. But I did find THIS which seems like a good tip on drawing older characters.
There’s also this website called 101 men which gives you portraits of men and women from age 0 to 100. It doesn’t represent all types of people, but it might be worth looking at just to practice drawing older characters, particularly from mid-30s and onwards. Hope it helps a little.
3K notes
·
View notes
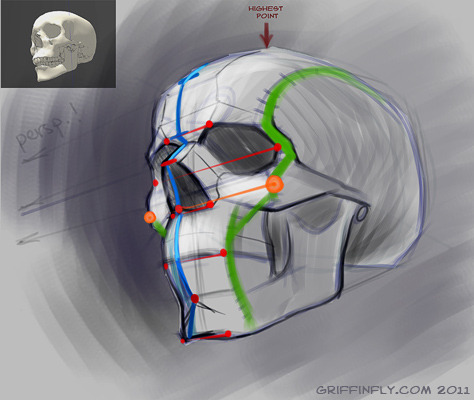
Photo


624 notes
·
View notes
Video
youtube
Okay so I followed this video about foreshortening and…

Sycra. I love you so much for making this video.
511K notes
·
View notes
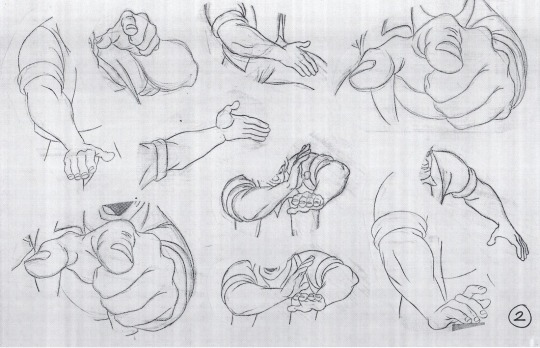
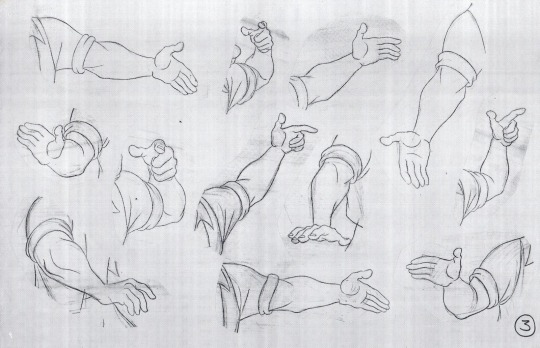
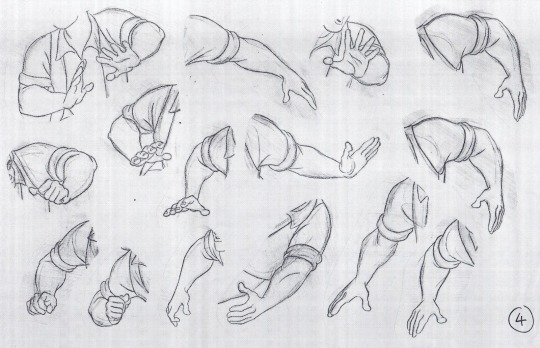
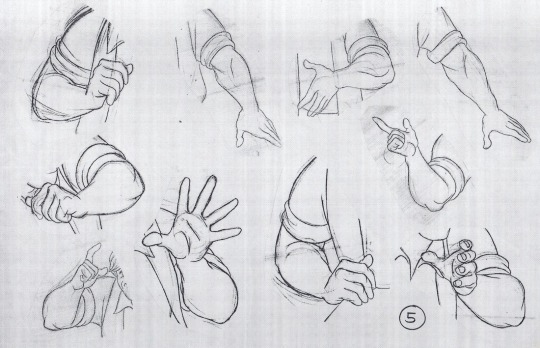
Photo
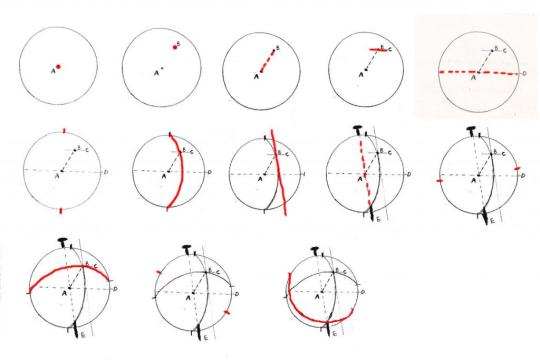
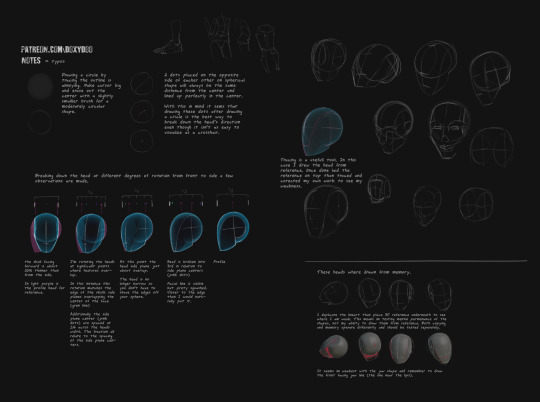
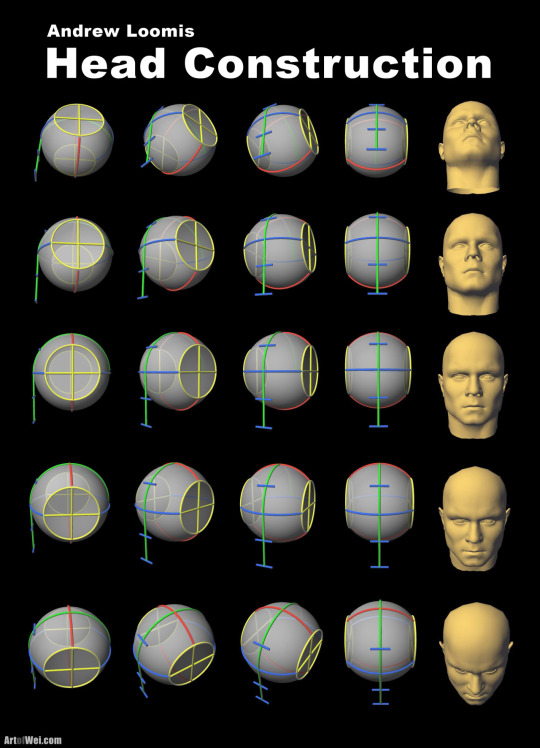
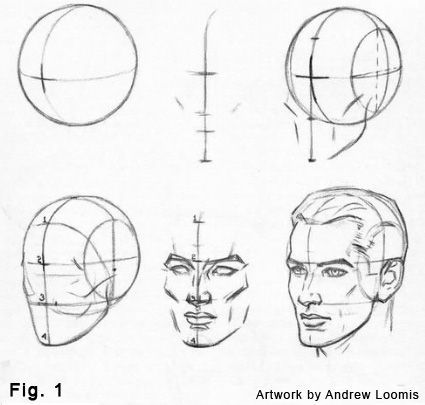
The Loomis Method
Top Image
Row 2: Left, Right
Row 3 & 6(Left)
Row 4 (Left)
Row 4 (Right) & 7: by Andrew Loomis
Row 5
Row 6 (Right)
4K notes
·
View notes
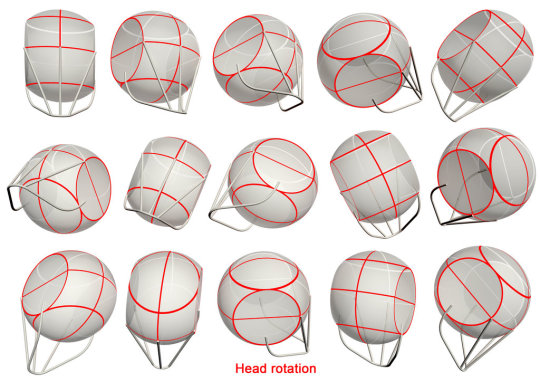
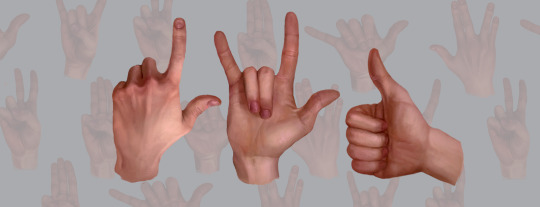
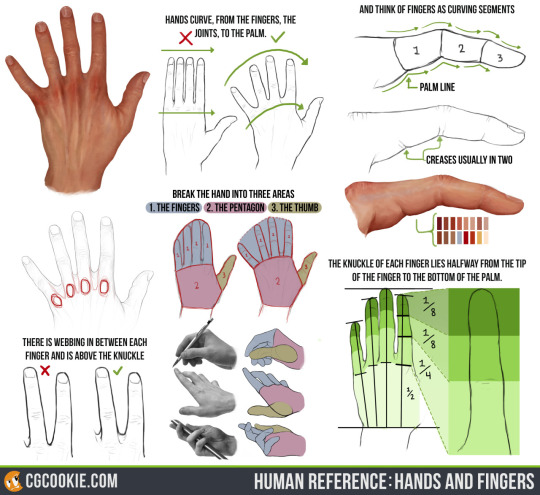
Photo
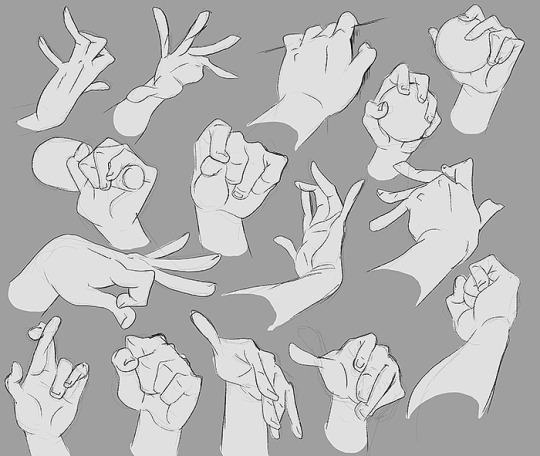
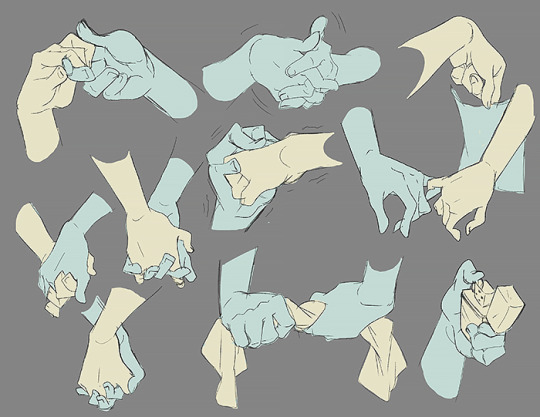

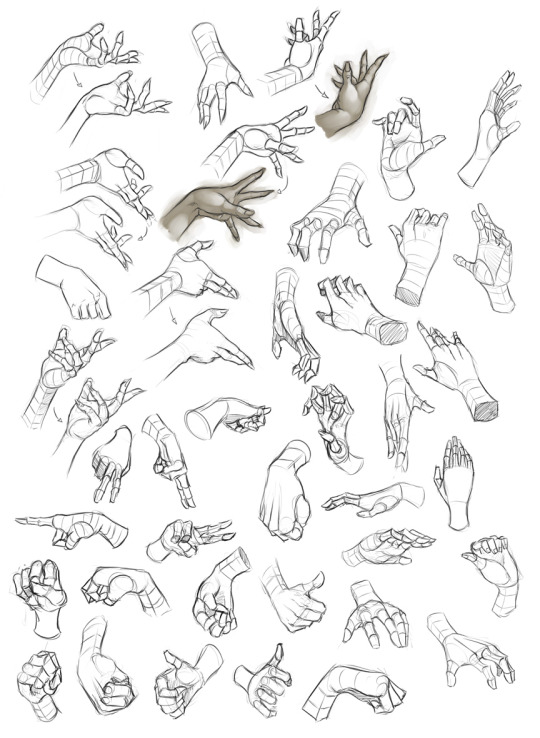
Hands
Row 1 & 2
Row 3 - 5
Row 6
31K notes
·
View notes
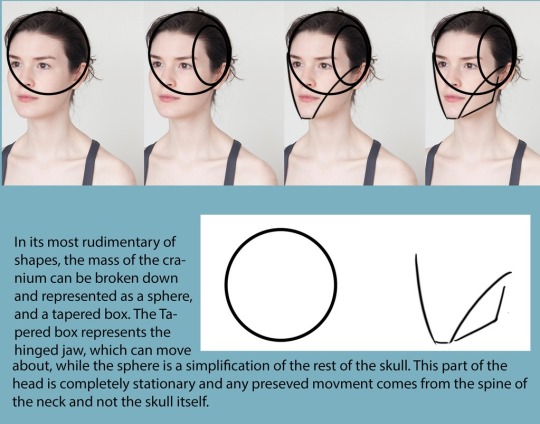
Photo
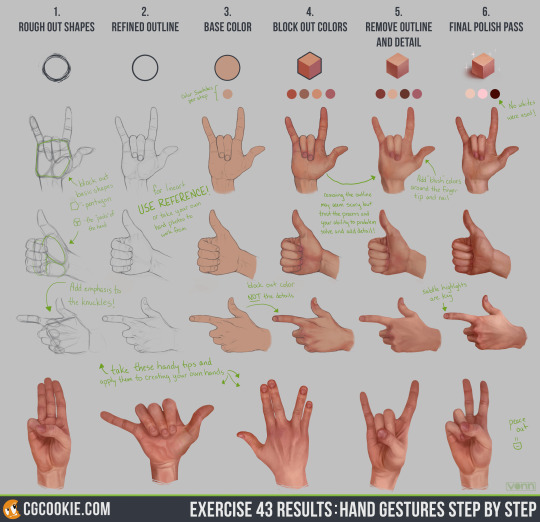
Exercise 43: Hand Gestures and Step by Step!
Check out the Exercise and Download the Practice Sheet HERE.
Hands are perceived as being tough to draw, and initially they are. Don’t psych yourself out, take your time to understand the forms that hands are composed of and then analyze the details. Once you get into the habit of drawing them again and again, you begin “seeing” subtle details such as webbing in between the fingers, how fingertips and knuckles are typically a more flush color, or the proportions between each finger.
This takes time and practice, there is no way around it. And don’t expect your first attempts at hands to be near the reference or close to it looking realistic. Just know it will take multiple, multiple attempts until you start noticing how to fix areas and improve the overall look of the hand!
494 notes
·
View notes
Photo


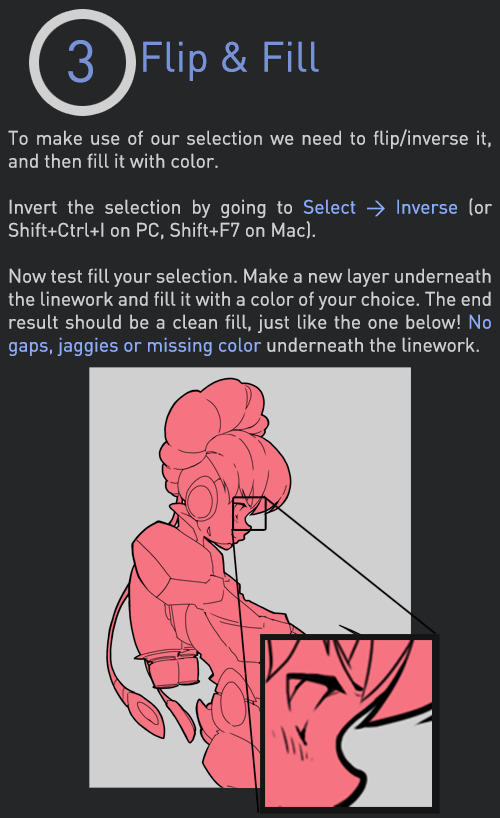
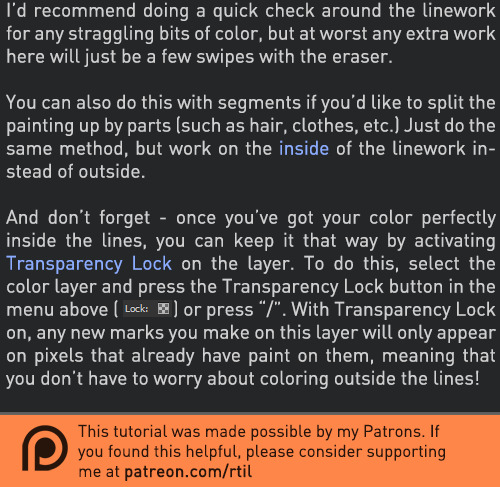
Late last year I wanted to start a series of short tutorials called Tip Jar, as a way of saying thanks to my fans and giving back to my patrons. This is the first of the series I have made, showing my technique on quickly filling in lineart so you can get to painting without coloring outside the lines faster.
Someday I hope to turn these into video tutorials when I have the income and the time, but for now I hope that I will be able to share useful tips in this infographic format.
Full tutorial image
Support me on Patreon
83K notes
·
View notes
Photo


GUYS. GUYS.
GUYS.
HOLY FUCK.
GOOD GUY ADOBE releases the ENTIRE CS2 SUITE. FOR FREE.
That means free access to Photoshop CS2 - and that already has most of what you could ask for, really.
All you have to do is create a FREE ADOBE ID.
I am not sure about commercial use, but MAN. FUCKIN’ SWEET DUDE
501K notes
·
View notes
Text
What you need to know to be a digital artist - for beginners
Hello dear followers!
We receive many messages asking how the artists we share can be so amazing and how beginners can become as great as those masters.
So, if our previous posts on the topic weren’t enough, here we are with a new list of links, steps and advice.
Today, one of our admin-artists, dear Gabrielle, helps us creating this list.

(Sketch study by Alifann)
Patience is a virtue and you have to cultivate it.
Van Gogh and Feng Zhu use different tools: one worked on canvas and the other works on a graphic tablet, but the amount of study and exercises behind their paintings is a daily product. What I mean is that artists study every day, 24/7. They dedicate so much time to art. So, just watching a few videos on YouTube and reading a book on anatomy won’t make you become the next Caravaggio.
Be patient, observe everything around you, copy it on your sketchbook, be it with a pencil or a digital pen, but copy copy copy. Look at the lights of your room, at the shadows and the colours. Observe people and if you have the possibility, copy them in sessions of one or two hours. If not, then take a photo reference and study with that.
There are many websites that offer references poses. One of those that I particulary like is QuickPoses. You can access to a large library of references and you can even upload your studies and participate in something that can be considered as a contest. Why? Well, because a bit of competition always helps.
Ready to paint with digital tools?
There are many software for digital art such as Paint tool SAI, Corel Painter, Anime Studio etc, but the most famous and used in the industry is Photoshop.
If you want to use it, first you have to understand how the program works because it’s full of functions and at first it can be a bit confusing.
Ctrl+Paint offers free video tutorials about digital art in Photoshop for beginners and it can be very helpful.
There are a bunch of videos and written tutorials for beginner artists around the web and it would be impossible to link them all; so here’s a link to Pinterest – the biggest place where you can find painting processes, tutorials, photo references etc, really – and a link to LevelUp, a YouTube channel that offers sessions with the best artists. In these sessions you can see demos, so entire video processes, from zero to the complete painting. It’s very inspirational and helpful. And there’s a “little” article about all the steps of digital painting for articles’ lovers.
https://it.pinterest.com/explore/digital-art-tutorial/
https://www.youtube.com/user/levelupsessions/playlists
http://www.instructables.com/id/Digital-Painting-Lesson-1-The-basics-of-using-a-gr/?ALLSTEPS
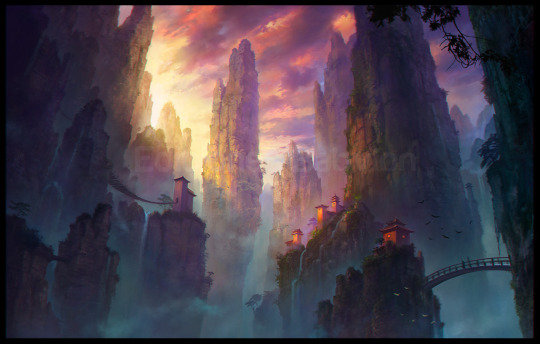
(China Mountains by Marta Nael)
Becoming a master
So, now you are good but you want to become a master. Okay, but don’t think you can quit doing the studies and the exercises. You may have a visual library now but your brain should always be stimulated, so even if you can’t spend two hours drawing your pretty neighbor, you can always do a quick warm up of 10/20 minutes studying anything you have before your eyes.
The most common question is: how do they add all those textures?
Artists love to experiment with brushes and textures! They use anything, from the brushes you can download from deviantART and many other websites to photos they take themselves. But many other artists create their own custom brushes because they want to set the texture amount, the opacity, the dynamics etc
Here’s a nice tutorial if you want to create your own brushes: http://www.photoshopessentials.com/basics/photoshop-brushes/make-brushes/
And here’s an amazing tutorial about textures:
https://www.smashingmagazine.com/2014/07/creating-custom-textures-photoshop-techniques/
Again, how many times have you thought “Woah, those trees look so realistic!”
Now I’ll talk about something that many consider “cheating”, but it’s actually a technique well used by professional artists – not all, but many. This technique helps to complete the painting faster without the need of painting all the details and spend ages on them.
I’m talking about the photobashing.
Photobashing consists in taking parts of photos and merging them in your illustration. It’s a sort of photo-manipulation but commonly used for concept designs and landscape paintings. So, yes, those trees may be photos and not painted. This technique is the base of matte paintings.
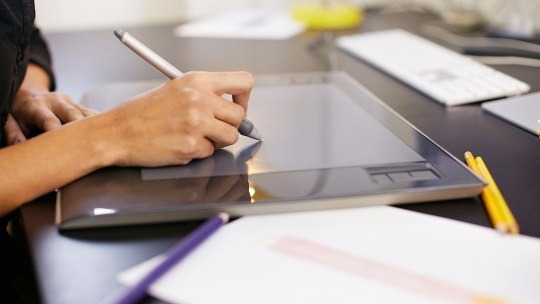
Now let’s talk about products, graphic tablets and all those nerdy things.
First, as many artists say, you don’t need a super-computer to be a digital artist. The most common computers can do (if they have at least 2GB of RAM, because Photoshop is a memory-eater!).
And of course you don’t need the last Wacom product to paint. Wacom graphic tablets like Intuos and Cintiqs are used by most of artists, but others prefer to use cheaper graphic tablets.
Actually, a nice graphic tablet that costs less than a Wacom but is highly underestimated is the Huion. I use a Huion and I’m very comfortable with it, I can’t even find the difference with its pressure levels and those of the Wacom.
So, if you want you can check out both - I’ve linked the most popular products:
Huion H610PRO
Wacom Intuos Pro Pen and Touch Tablet
I suggest to read a couple of reviews about these graphic tablets before purchasing them so you can have an idea of your own (:
Another great tool to paint digitally is the Microsoft Surface Pro: it’s more than a laptop and more than a simple graphic tablet, but I know this only by reviews since I’ve never personally tried it.
Health and hand exercises
You have been painting for hours and your wrist hurts. Stop painting. No, seriously, stop. Overdoing it will take you nowhere but to problems we don’t want, such as tendinitis… and it’s horrible.
Here’s a video about exercises to prevent or cure the inflammation.
What about your health? You have been sitting on that chair for hours and you have been staring at the empty mug on your desk. There’s no more coffee in the house. Okay, so, stand up and go for a walk, go buy coffee (for me it’s always tea), stay out more than 15 minutes, please, because you need it. If you keep your butt on the chair, your spine will hate you… and it will hurt.
If it’s raining outside you can always pace like a mental - like I do - but do something that’s not sitting at the desk and staring at the monitor. And since I’m talking about monitors, be sure to not stare at the monitor the whole day. Your eyes will hurt and your eyesight will decrease faster than normal. And here I say normal because for digital artists it’s sadly normal to have these problems.
Take breaks, when you are sitting keep your spine straight, when you are doing nothing remember to keep your wrist in a neutral position. Don’t spend the night awake, painting: have your beauty sleep because I assure you it’s needed.
And, finally, stay positive and be happy, because being an artist is wonderful!
Of course we couldn’t talk about everything, so if you have other questions, feel free to send a message and we’ll try to answer the best we can!
Hope this post helps you (:
Our previous articles:
8 helpful guides for digital artists
10 inspiring and helpful YouTube channels for digital artists
808 notes
·
View notes