
I love to code and find out what I can do with my ideas. My name is Carlos Araujo, a web developer that has worked with Sitecore since version 6.5. I will share tips, tutorials and more related to Sitecore CMS. Please leave a comment or reach out to me on twitter (@caraujo)
Don't wanna be here? Send us removal request.
Statistics
We looked inside some of the posts by sitecoreuio and here's what we found interesting.
Average Info
Notes Per Post
1
Likes Per Post
0
Reblog Per Post
1
Reply Per Post
0
Time Between Posts
1 month
Number of Posts By Type
Text
13
Last Seen Tumblr Blogs


Fun Fact
In Q3 of 2020, 31% of US users access the Tumblr app daily.
Text
Handy Sitecore Powershell scripts
Useful Sitecore Powershell scripts
On this post I am going to list to very useful scripts when we are trying to move/copy items from one location to another and also when we want to change the item template using a powershell script.
Change item template
As Sitecore developers some times we are in the need to change the template of a large number of items.
For me the best approach to accomplish this requirement is by using a powershell script. The script will read the root node where it needs to look for items, and then it will iterate through its childs to change the template. For this blog post pourpose lets call this items articles.
Let´s see how the script looks like.
$rootItem = Get-Item master:/sitecore/content/Home/ArticlePages/Articles; $sourceTemplate = Get-Item "{162CBBF5-7064-4775-A70E-50536DB00484}"; $targetTemplate = Get-Item "{A0C65C02-E50D-411A-89A8-5190D204CBF7}"; Get-ChildItem $rootItem.FullPath -recurse | Where-Object { $_.TemplateName -eq $sourceTemplate.Name } | ForEach-Object { Set-ItemTemplate -Item $_ -TemplateItem $targetTemplate } Write-Host "Changing Items template process is complete.";
The code above reads the nodes below a root node, then based on the GUIDs of the original template and on the new template it iterates through the nodes and sets the new template.
Copy items from one location to another
The following powershell script is in charge of moving items from one location to another. The filter that we use is the item template.
$rootOfitemsToMove = Get-Item "/sitecore/content/articleItems/Articles"; $destinationItem = Get-Item "/sitecore/content/Home/ArticlePages/Articles"; $templateNameToMatch = "Article"; Write-Host "Moving items from: " $rootOfitemsToMove.Paths.FullPath " to: " $destinationItem.Paths.FullPath "…"; Get-ChildItem $rootOfitemsToMove.Paths.FullPath | Where-Object { $_.TemplateName -match $templateNameToMatch } | ForEach-Object { $name = $_.Name if(![string]::IsNullOrEmpty($name)) { Copy-Item -Path $_.ItemPath -Destination $destinationItem.Paths.FullPath; Write-Host "Item moved from: "$_.ItemPath " to: "$destinationItem.Paths.FullPath; } else { Write-Host "Couldn’t move Item: " $name; } } Write-Host "Moving items complete.";
In the above script we are reading a root node path, a destination path and the source template that we need to match.
The below likes are in charge of iterating the root node to get elements and move them into a different location. The command Copy-Item is the one in charge of copying the item from source to destination, if you just want to move the items then Move-Item is the command to use.
0 notes
Text
Sitecore for University Students
For two times in a row I have had the luck to be a guest speaker in a Senior year Computer Science class.
I was invited to talk about web content management systems, and Sitecore was the chosen one to talk about in detail.
On this post I just want to cover my experience while talking to young soon to be engineers.

First Impression
The students are aware of a few concepts and understand and are familiar with a couple of open source CMS.
When I start my presentation I usually show them a few core concepts inside the technology and I list a few top content management systems.
This is when it is clear to me that these attendees are eager to learn and they are just waiting for the opportunities to come their way.
The details
I usually notice really quickly how the students pick up the concepts and the ideas behind the core elements of the Sitecore platform. They get excited when they hear about metrics, personas, personalization, commerce and xDB. Experience editor is another feature that really catches their eye, because they can see how easy a content author can start creating and setting up content.
The most common question that I get during my presentation is about how to learn the tool and which companies look for this type of experience platforms.
Conclusion
My feeling is that big companies inside the Experience Content Management world, should try more to get into this type of people. Allow them to access the platforms and allow them to learn what is needed. Every day companies are trying to find well trained candidates, but a lot of times is hard to get young people that has had some exposure to the tools.
Sitecore is doing a better job, last year they exposed a new training which is free, this allows young engineers to get some exposure into what the platform offers.
0 notes
Text
Add a facet to a bucket
On this post I am going to expose how to enhance a very handy feature for buckets.
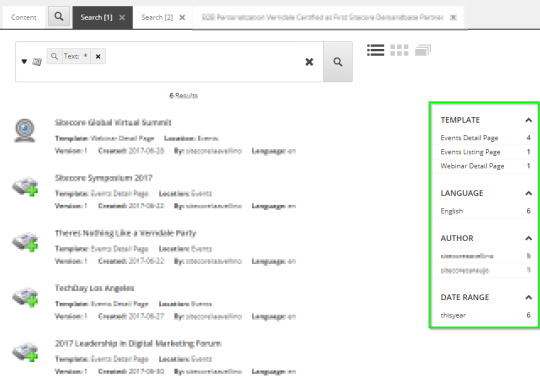
Pretty sure you have noticed that everytime you run a search in a bucket using the content editor you get some facets in the right bar.
The OOTB facets are:
Template
Language
Author
Date Range
On this post I am going to explain how to add a new facet to this search.
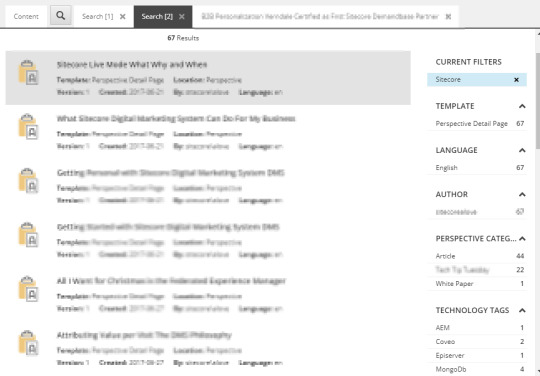
I have the following scenario: I have a bucket that holds different type of articles. An article item has a property that lets me differentiate from a news, whitepaper, article and more. These are just types of articles. This same article template has a property which is a set of tags.
My plan is to add two new facets to the bucket search interface, one for category and one for tags. This is going to be very useful considering that the bucket will contain a big amount of items in it.
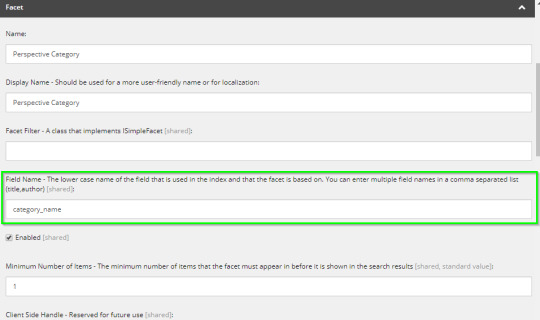
First, lets add two new facet items inside the Settings Facets folder. This folder is here: /sitecore/system/Settings/Buckets/Facets.
Write a name and display name, and setup the Field Name property, this property makes reference to the index property.
Second, lets add this facet to our bucket. To do this navigate either to the item that is a bucket or to the item template. Then in the Indexing section, add a new facet to the facets list property.

This is it :) Now if you search on your bucket you will have the new facets in the right column of the results. Clicking on it will let you filter down the results list.
Something that I haven't explained on this post but of course needs to be considered is that most probably you will have to create custom index fields for properties that are list properties. Otherwise in the facets you will get GUIDs instead of item names.
This post was created by Carlos Araujo. You can contact me in twitter @caraujo
0 notes
Text
Code snippet button - RTF Field
Useful Sitecore Powershell scripts
On this post I am going to list to very useful scripts when we are trying to move/copy items from one location to another and also when we want to change the item template using a powershell script.
Change item template
As Sitecore developers some times we are in the need to change the template of a large number of items.
For me the best approach to accomplish this requirement is by using a powershell script. The script will read the root node where it needs to look for items, and then it will iterate through its childs to change the template. For this blog post pourpose lets call this items articles.
Let´s see how the script looks like.
$rootItem = Get-Item master:/sitecore/content/Home/ArticlePages/Articles; $sourceTemplate = Get-Item "{162CBBF5-7064-4775-A70E-50536DB00484}"; $targetTemplate = Get-Item "{A0C65C02-E50D-411A-89A8-5190D204CBF7}"; Get-ChildItem $rootItem.FullPath -recurse | Where-Object { $_.TemplateName -eq $sourceTemplate.Name } | ForEach-Object { Set-ItemTemplate -Item $_ -TemplateItem $targetTemplate } Write-Host "Changing Items template process is complete.";
The code above reads the nodes below a root node, then based on the GUIDs of the original template and on the new template it iterates through the nodes and sets the new template.
Copy items from one location to another
The following powershell script is in charge of moving items from one location to another. The filter that we use is the item template.
$rootOfitemsToMove = Get-Item "/sitecore/content/articleItems/Articles"; $destinationItem = Get-Item "/sitecore/content/Home/ArticlePages/Articles"; $templateNameToMatch = "Article"; Write-Host "Moving items from: " $rootOfitemsToMove.Paths.FullPath " to: " $destinationItem.Paths.FullPath "…"; Get-ChildItem $rootOfitemsToMove.Paths.FullPath | Where-Object { $_.TemplateName -match $templateNameToMatch } | ForEach-Object { $name = $_.Name if(![string]::IsNullOrEmpty($name)) { Copy-Item -Path $_.ItemPath -Destination $destinationItem.Paths.FullPath; Write-Host "Item moved from: "$_.ItemPath " to: "$destinationItem.Paths.FullPath; } else { Write-Host "Couldn’t move Item: " $name; } } Write-Host "Moving items complete.";
In the above script we are reading a root node path, a destination path and the source template that we need to match.
The below likes are in charge of iterating the root node to get elements and move them into a different location. The command Copy-Item is the one in charge of copying the item from source to destination, if you just want to move the items then Move-Item is the command to use.
0 notes
Text
Sitecore Index dependecies
On this post I want to cover a very simple but sometimes complex scenario with indexes and custom fields.
Lets look at the following structure:
Item A
Property X -> references Item K (property Y)
Item K
Property Y
There are sometimes where we are in the need of creating a custom index field that stores some information. Sometimes this information is not part of the current item properties but it is referenced by either another item or by a rendering datasource.
Based on the structure detailed above, whenever Item A is indexed, our custom field will read property X to get Item K and read property Y. The value from property Y will be evaluated and indexed as part of index document Item A. As you can see this scenario works, BUT there is an option that we are not covering yet.
Whenever property Y of item K is edited and updated, the custom field from Item A will not pick up that index update event, causing some inconsistency of data.
So now indexing.getDependencies pipeline comes to our rescue.!
As you may image what this pipeline does it it listens to changes in Item K and whenever change is made, it will also trigger an index event for Item A. Pretty simple right?, now lets see at some code of how it works.
First we need to declare a new class that implements the
Sitecore.ContentSearch.Pipelines.GetDependencies.BaseProcessor
in the process method we are going to write the code that we need to determine if the dependency exists. Every item will go throgh this pepeline, so we need to make sure we are covering only the scenario that we need.
public override void Process(GetDependenciesArgs args) { Assert.IsNotNull(args.IndexedItem, "indexed item"); Assert.IsNotNull(args.Dependencies, "dependencies"); Item item = args.IndexedItem as SitecoreIndexableItem; if (item == null) return; if (item.TemplateID == IScheduled_Event_ItemConstants.TemplateId) { using (new DatabaseSwitcher(Factory.GetDatabase(item.Database.Name))) { var scheduleId = item.ParentID.ToString(); var eventDependencies = EventRepository.FindAllSearchResultItem(p => p.Schedule == scheduleId).ToList(); args.Dependencies.AddRange(eventDependencies.Select(x => (SitecoreItemUniqueId)x.Uri)); } } }
Now lets add the proper configuration in a Sitecore config file:
The path file will look like this:
<pipelines> <indexing.getDependencies help="Processors should derive from Sitecore.ContentSearch.Pipelines.GetDependencies.BaseProcessor"> <processor type="Demo.Extensions.Pipelines.GetDatasourceDependencies,Demo.Extensions" resolve="true"/> </indexing.getDependencies> </pipelines>
This post was created by Carlos Araujo in collaboration with Francisco Quintanilla. You can contact me in twitter @caraujo
0 notes
Text
Powershell - Remove Unicode Character 'ZERO WIDTH SPACE'
In a recent import process from a content gathering tool into Sitecore we noticed a weird behavior. The import process was including a zero width space in every text field (single line, multi line, rich text). This is something not easy to see, because the space is not a tangible character. This of course is a bug in the gathering content tool, although since we didn’t have any option we ended up using it.
At a first sight editors and developers didn’t notice this weird character. Then when a null or empy validation was being done, the validation was passing when the field was empty (well we know now that it wasn’t empty :) ).
After some research we noticed this ZERO WIDTH SPACE, its HTML entity is:
To fix this issue we came up with a simple powershell script that will remove this character from the fields that we need.
cd 'master:/sitecore/content/demo/Home/ImportedData' Get-ChildItem -Recurse . | Where-Object {$_.TemplateName -eq 'Data One' -Or $_.TemplateName -eq 'Data Two'} | ForEach-Object { $originalName = $_.Name $emailAddress = $_.Fields["Email Address"].Value $twUrl = $_.Fields["Twitter Handle"].Value Write-Host "Started Process for " $originalName -f Green; "Updating Email Address Value" $_.Editing.BeginEdit() $_.Fields["Email Address"].Value = $emailAddress.Replace(([char]8203).ToString(),""); $_.Editing.EndEdit() "Updating Twitter Handle Value" $_.Editing.BeginEdit() $_.Fields["Twitter Handle"].Value = $twUrl.Replace(([char]8203).ToString(),""); $_.Editing.EndEdit() "" }
What we do in the script is access the imported items and then access the fields that we need to clean. Once we get the field we remove the 8203 character by converting it into a char value.
I hope you find it useful. Thanks for reading.
This post was created by Carlos Araujo. You can contact me in twitter @caraujo
0 notes
Text
PowerShell - Setup image alt properties
Sometimes, honestly quite often, images uploaded to Sitecore media library have the Alt property empty. This causes a warining in Sitecore.
It is also true that since a bunch of images were uploaded, going through each one of them to update the property is complicated.
Today I want to present a solution to this particular issue. PowerShell scripts.
Let's take a look at the following code:
cd 'master:/sitecore/media library/DEMO/Images' Get-ChildItem -Recurse . | Where-Object { [string]::IsNullOrEmpty($_.Fields["Alt"]) -And $_.TemplateName -eq 'Image' } | ForEach-Object { $originalName = $_.Name $altValue = $originalName -Replace "-", " " Write-Host "Alt property value " -nonewline; Write-Host $originalName -f Yellow -nonewline; Write-Host " to " -nonewline; Write-Host $altValue -f Green; $_.Editing.BeginEdit() $_.Fields["Alt"].Value = $altValue; $_.Editing.EndEdit() "" }
First we are setting up the path where our project images live on, in our case is master:/sitecore/media library/DEMO/Images
Then we iterate through the child items inside that node that have the Alt property empty.
Then we come up with the Alt value. In this case we use the original name without dashes inside it.
And finally we store the value in the Alt property.
As you noticed simple task, simple PowerShell script and at the same time very useful.
This post was created by Carlos Araujo. You can contact me in twitter @caraujo
0 notes
Text
PowerShell Initial Experience
PowerShell a Windows PowerShell tool used in IT for desktop and server management. Sitecore PowerShell Extensions is a Sitecore module that provides a CLI and scripting environment for automating tasks.
The scripts that we can run through the CLI is capable of making native calls to the Sitecore API and gives us the option to manipulate the content. The syntax that is used is called PowerShell syntax.
PowerShell scripts are very powerful, this is why everywhere I searched for it I noticed always the same warning. Avoid installing Sitecore PowerShell Extensions in content delivery environemnts.
The Sitecore PowerShell Extensions can be downloaded from the Sitecore Marketplace.
For more information on the collaborators and on the module you can find it in the Git repository: https://git.io/spe.
I've heard about SPE from a long time now, all of I heard was nice. But it is recently that I started to put my hands on it.
My initial experience with SPE was because I needed to setup ALT values to images inside the media library. As you know Sitecore warns you as editor that an image is missing the ALT property. This warining could become quite annoying, and once you have a bunch of images in the media library it could become quite a process to go and update each ALT image property.
While thinking on a bulk process to acomplish what I need, SPE came to my attention. I didn't think about it twice and installed it. Inmediatly I started to write the needed code in the CLI to make my goal happen. In a future post I will write about how to script this task.
What I can say for now from my initial experience with SPE is that it Rocks!
This post was created by Carlos Araujo. You can contact me in twitter @caraujo
0 notes
Text
How to add a button to the ribbon
How to add a button to the ribbon
In this post I will explain how to add a custom button to the Sitecore Content Editor ribbon.
There are three main concepts.
The first one is Sitecore Ribbon. It is the top section of different menus that content editor offer to the editors. The second one is a Sitecore strip. Strip is the complete group of buttons that belong to a specific set. A ribbon is composed of many Sitecore strips. The third one is Sitecore chunk. Chunk is a specifc group of button(s). A Sitecore strip is composed of different Sitecore chunks.

These are the general steps to add a button to the Sitecore ribbon:
Inside the Core database

Create a chunk. The most important properties of this is the Click property. This property will contain an alias that later will be hooked to a portion of code that does the job of this button. For this import the Click property value is: democom:instagramimport

Add the chunk to either a new strip or to an existint strip. Link the refernce property to the chunk previously created.

Add the new strip to the ribbon. This is needed only if in the previous step you created a new strip instead of using an existing one. In the default ribbon, add a new system reference and link in the reference property to the previously craeted strip.
We have completed all the steps needed to add a new button to the ribbon. Now it is time to setup the code that will execute the action for when the button is clicked.
First lets create a public class that inhertis from the Sitecore.Shell.Framework.Commands.Command class. We will need to override the Execute method behavior. Here is where the functionality of the button will live. Let's look at the code:
public override void Execute(CommandContext context) { if (context == null) return; try { Log.Info("InstagramImportCommand Started!", this); ProgressBox.Execute("Instagram Import API", "Instagram", "Applications/32x32/refresh.png", Refresh); Log.Info("InstagramImportCommand Finished!", this); } catch (Exception ex) { Log.Error("Error!", ex, this); } } public void Refresh(params object[] parameters) { InstagramManager.Refresh(); }
In the Execute method we are calling the Refresh method from this same class that will execute the functionality that I need. As you can notice we are setting up a ProgressBox tool, this will allow the editor to know that the process is still executing.
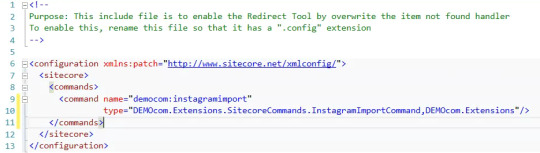
The final step is to include a config file that will link the alias (democom:instagramimport) that we have setup for the chunk and the class that will handle the click of the button.
This post was developed for Sitecore 8.1 version.
This post was created by Carlos Araujo. You can contact me in twitter @caraujo
0 notes
Text
Sorting Single Line Text properties
There are times where you need to bring items from the index, and you need to sort those items by a Sitecore property. For example a title property.
Let's call this property Title and it will be of type: single line text.
Very soon you will find out that your results are not getting back sorted by Title. And the reason is because single line text properties are stored tokenized.
There are two ways to work around this issue.
Change the default index configuration (I do not recommend this one).
Create a custom computed index field.
I am going to ellaborate a bit more on the second alternative "Create a custom computed index field".
The plan here is to build a custom field that will host the same data as the single line text field but it will saved it untokenized. Tokenized means that the data will be saved in the index separated by tokens, two words will be saved as two tokens, one for each world. Un-Tokenized means that the data will be stored in the index as a one single token. When we are sorting we need to sort it based on the single token, not by every token.
To accomplish our work we need to:
Create a class that inherits from IComputedIndexField interface.
Setup the COmputeFieldValue to pull the data that we need from an item.
Setup the configuration file for this new custom field.
Lets create a class named RecipeTitleSortField and lets assume we will get the Title field from the Sitecore items.
public class TitleSortField : IComputedIndexField { public object ComputeFieldValue(IIndexable indexable) { var item = indexable as SitecoreIndexableItem; if (item == null || item.Item == null) return string.Empty; if (!item.Item.Template.BaseTemplates.Any(x => x.ID.Equals(new ID("{5452138F-4DA0-4DE6-95F5-F5B9469BABBF}")))) return string.Empty; var titleValue = new StringBuilder(); // this is fine because the FieldID for PageTitle is consistent across all page templates var pageTitleField = indexable.GetFieldByName("Title"); if (pageTitleField == null) return null; var fieldValue = pageTitleField.Value.ToString(); titleValue.Append(fieldValue); return titleValue; } public string FieldName { get; set; } public string ReturnType { get; set; } }
Now lets see the declaration of the custom field:
<configuration xmlns:patch="http://www.sitecore.net/xmlconfig/"> <sitecore> <contentSearch> <indexConfigurations> <defaultLuceneIndexConfiguration type="Sitecore.ContentSearch.LuceneProvider.LuceneIndexConfiguration, Sitecore.ContentSearch.LuceneProvider"> <fieldMap type="Sitecore.ContentSearch.FieldMap, Sitecore.ContentSearch"> <fieldNames hint="raw:AddFieldByFieldName"> <field fieldName="_titlesortfield" storageType="yes" indexType="UN_TOKENIZED" vectorType="NO" boost="1f" type="System.String" settingType="Sitecore.ContentSearch.LuceneProvider.LuceneSearchFieldConfiguration, Sitecore.ContentSearch.LuceneProvider" /> </fieldNames> </fieldMap> <documentOptions type="Sitecore.ContentSearch.LuceneProvider.LuceneDocumentBuilderOptions, Sitecore.ContentSearch.LuceneProvider"> <fields hint="raw:AddComputedIndexField"> <field fieldName="_titlesortfield" returnType="string">DEMO.IndexComputedFields.TitleSortField, DEMO</field> </fields> </documentOptions> </defaultLuceneIndexConfiguration> </indexConfigurations> </contentSearch> </sitecore> </configuration>
As you see first we are declaring the _titlesortfield and we are telling Lucene to save it "UN_TOKENIZED". This will do the trick for us while sorting. And at the bottom we are declaring the class that will be in charge of pulling the data.
0 notes
Text
Sitecore RTF Field Edition using GlassMapper
Updating Sitecore item values using GlassMapper
There are times where we need to programatically either create or update a Sitecore item. Sitecore is very flexible and through their API this is possible.
When altering items through the API you need to consider, which database you want to alter the item in. Normally this should happen in master database like for example when developing an import process. This is the scenario that I will cover in this post. First I am going to show you how to use the API directly and then I am going to show you how to do this using GlassMapper objects.
The traditional way to update a Sitecore item would be through the Sitecore API doing something like this:
//Use a security disabler to allow changes using (new Sitecore.SecurityModel.SecurityDisabler()) { //You want to alter the item in the master database, so get the item from there Database db = Sitecore.Configuration.Factory.GetDatabase("master"); Item sitecoreItem = db.Items["/sitecore/content/home"]; //Open the editing state sitecoreItem.Editing.BeginEdit(); try { //perform the editing sitecoreItem.Fields["MyProperty"].Value = "This is the updated value"; } finally { //Clossing the editing state sitecoreItem.Editing.EndEdit(); } }
After we run this code the MyProperty property value will change.
As you may know, Glassmapper is a very popular and robust ORM. You can work in code with the classes that are representing the Sitecore templates. This makes the interaction between Sitecore items and code more natural.
As you noticed we used the Sitecore API directly in the sitecoreItem object, we didn't use GlassMapper ORM.
Now lets do the same thing with GlassMapper.
sitecoreItem.MyProperty = "This is the updated value"; try { using (new SecurityDisabler()) { SitecoreServiceMaster.Save(sitecoreItem); } } catch (Exception exception) { Log.Warn($"Failed to update Job item {sitecoreItem.id} : {exception.Message}", exception, this); return false; }
Using GlassMapper for updating values is very straightforward, the code is simpler since we can use an object from the Sitecore template to acomplish our needs. We ended up accessing directly to the MyProperty value, then using the SitecoreService we updated the value into the Master database.
Until now everything seems very simple with GlassMapper until you have to update an Rich Text Field (RTF) property. If you try to update an RTF property using the same approach you will get an error, telling you that to edit and RTF property you need to access the raw value of it.
The error says:
It is not possible to save data from a rich text field when the data isn’t raw.Set the SitecoreFieldAttribute setting property to SitecoreFieldSettings.RichTextRaw for property Description on type SitecoreDemo.Models.sitecore.templates.SitecoreDemo.Testing.Items.IMyRtfProperty
After some research I was able to identify what is happening. Because of an implementation decision from Glasmapper creator (Michael Edwards) there is a restriction to update RTF properties (see the end of this post). Although there is a simple way to make it work too.
The declaration of RTF fields in the classes needs to have the following annotation to be able to edit it in code.
[SitecoreField("MyRtfProperty", Setting = SitecoreFieldSettings.RichTextRaw)] public virtual string MyRtfProperty {get; set;}
The setting SitecoreFieldSettings.RichTextRaw is the one that let us use this property as raw property, therefore it allow us to make changes in it. After this, changes made to RTF properties follow the same pattern as in the previous GlassMapper example.
There is a reason why GlassMapper creator did this, it is to allow easy rendering and allow Experience Editor capabilities in the view when resolving RTF properties.
If you need to edit RTF properties I would suggest declaring the property twice, one for regular use and one for update/save motives. Something like this:
[SitecoreField("MyRtfProperty", ReadOnly = true)] string MyRtfProperty { get; set; } [SitecoreField("MyRtfProperty", Setting = SitecoreFieldSettings.RichTextRaw)] string MyRtfPropertyRaw { get; set; }
As refence you can take a look at the followig post where more details are explained.
This post was created by Carlos Araujo. You can contact me in twitter @caraujo
0 notes
Text
Sitecore Site Search Crawler Approach
Sometimes there is the need to provide the ability to do a site search that will return results based on the page HTML content. Sometimes this approach can be handled by querying each desired property of a Sitecore Item of Page type, some other times a custom search field could be implemented, and this custom field will contain different values including the needed Sitecore item properties and some datasources that belong to different page renderings. Sometimes reading the datasources, reading list page properties might be difficult and might complicate the development of this custom field.
The custom index field is the right approach to follow, although we could populate it a little bit different. The approach that I am proposing in this post is the crawler approach. The idea behind this approach is to populate the custom field using the content of the page that the user sees when hitting a page. Normally when a site visitor runs a site search query, he/she is really waiting to see a result back that contains what he searched for, this approach really hits this requirement.
The technical recipe for handling this approach is:
Declare a new custom computed index field
Create the code that will compute the content of this field
Inside the computed index field determine if its a page Sitecore item
Generate the URL for this page
Get the HTML response
Crawl the HTML
Save the important HTML content into the custom field
Note: We don’t need content that is in every single page i.e. Main Menu, Footer, Copyright, etc.
Now lets go deeper with each step of the previous list.
Declare a new custom index field
To create a new custom index field you need to do two things. First declare the field and its type and second detail which class will process this field.
<?xml version="1.0" encoding="UTF-8"?> <configuration xmlns:patch="http://www.sitecore.net/xmlconfig/"> <sitecore> <contentSearch> <indexConfigurations> <defaultLuceneIndexConfiguration type="Sitecore.ContentSearch.LuceneProvider.LuceneIndexConfiguration, Sitecore.ContentSearch.LuceneProvider"> <fieldMap type="Sitecore.ContentSearch.FieldMap, Sitecore.ContentSearch"> <fieldNames hint="raw:AddFieldByFieldName"> <field fieldName="_sitesearchfield" storageType="yes" indexType="TOKENIZED" vectorType="NO" boost="1f" type="System.String" settingType="Sitecore.ContentSearch.LuceneProvider.LuceneSearchFieldConfiguration, Sitecore.ContentSearch.LuceneProvider" /> </fieldNames> </fieldMap> <documentOptions type="Sitecore.ContentSearch.LuceneProvider.LuceneDocumentBuilderOptions, Sitecore.ContentSearch.LuceneProvider"> <fields hint="raw:AddComputedIndexField"> <field fieldName="_sitesearchfield" returnType="string">DEMO._Classes.IndexComputedFields.SiteSearchField, DEMO</field> </fields> </documentOptions> </defaultLuceneIndexConfiguration> </indexConfigurations> </contentSearch> </sitecore> </configuration>
In the code above you can notice that we have declared a new custom field named: _sitesearchfield. This field is TOKENIZED string. Also you can see that this computed field has a class associated to it DEMO._Classes.IndexComputedFields.SiteSearchField this class will compute the content of this field.
Create the code that will compute the content of this field
The class below does the job of generating the content of the custom field. First the class identifies if the current item that is being indexed is of type Page. Then it queries the page using the generated URL. Then it strips out all the html code and it only considers the content inside a specific HTML id. This is to prevent saving un relevant content that is present in every page. Content like the header, footer, copyrights and random banners.
public class SiteSearchField : IComputedIndexField { public object ComputeFieldValue(IIndexable indexable) { var item = indexable as SitecoreIndexableItem; if (item == null || item.Item == null) return string.Empty; string url = null; string content = string.Empty; try { if (item.Item.Paths.FullPath.StartsWith("/sitecore/content/") && item.Item.TemplateInheritsFrom(new TemplateID(IWeb_Base_WebpageConstants.TemplateId))) { #region PageUrl using (new SiteContextSwitcher(Factory.GetSite(AppSettingsHelper.GetPublixSitecoreSiteName()))) { url = LinkManager.GetItemUrl(item, new UrlOptions() { AlwaysIncludeServerUrl = true }); } #endregion #region WebRequestToPage // Request the web page using (var client = new WebClient()) { string pageContent = client.DownloadString(url); // Parse the page's html using HtmlAgilityPack HtmlDocument htmlDocument = new HtmlDocument(); htmlDocument.LoadHtml(pageContent); // remove all html tags and keep just the relevant content HtmlNode mainContainer = htmlDocument.GetElementbyId(AppSettingsHelper.GetSectionMainContentId()); content = mainContainer != null ? GetAllInnerTexts(mainContainer) : null; } #endregion return content; } } catch (WebException webException) { Log.Warn($"Failed to populate field {indexable.Id} ({url}): {webException.Message}", webException, this); throw; } catch (Exception exc) { Log.Error($"An error occurred when indexing {indexable.Id}: {exc.Message}", exc, this); } return content; } protected virtual string GetAllInnerTexts(HtmlNode node) { node.Descendants() .Where(n => n.Name == "script" || n.Name == "style") .ToList() .ForEach(n => n.Remove()); return RemoveWhitespace(node.InnerText.Replace(Environment.NewLine, " ")); } private static string RemoveWhitespace(string inputStr) { const int n = 5; StringBuilder tmpbuilder = new StringBuilder(inputStr.Length); for (int i = 0; i < n; ++i) { string scopy = inputStr; bool inspaces = false; tmpbuilder.Length = 0; for (int k = 0; k < inputStr.Length; ++k) { char c = scopy[k]; if (inspaces) { if (c != ' ') { inspaces = false; tmpbuilder.Append(c); } } else if (c == ' ') { inspaces = true; tmpbuilder.Append(' '); } else { tmpbuilder.Append(c); } } } return tmpbuilder.ToString(); } public string FieldName { get; set; } public string ReturnType { get; set; } }
Inside the computed index field determine if its a page Sitecore item
if (item.Item.Paths.FullPath.StartsWith("/sitecore/content/") && item.Item.TemplateInheritsFrom(new TemplateID(IWeb_Base_WebpageConstants.TemplateId)))
This line is in charge of identifying if the current item is a page type and that it is inside the Sitecore content tree.
Generate the URL for this page
using (new SiteContextSwitcher(Factory.GetSite(AppSettingsHelper.GetPublixSitecoreSiteName()))) { url = LinkManager.GetItemUrl(item, new UrlOptions() { AlwaysIncludeServerUrl = true }); }
First we need to switch to the right site context otherwise we would be trying to generate a URL based on the index job context. Then using the link manager we can create the site URL for this specific item.
Get the HTML response
using (var client = new WebClient()) { string pageContent = client.DownloadString(url); // Parse the page's html using HtmlAgilityPack HtmlDocument htmlDocument = new HtmlDocument(); htmlDocument.LoadHtml(pageContent); // remove all html tags and keep just the relevant content HtmlNode mainContainer = htmlDocument.GetElementbyId(AppSettingsHelper.GetSectionMainContentId()); content = mainContainer != null ? GetAllInnerTexts(mainContainer) : null; }
Here we get the webpage content using System.Net.Webclient
Crawl the HTML
Once we have the webpage content we stored it in a HtmlDocument (HtmlAgilityPack) and we proceed to getting only the HTML id that has the main content of the page. Then using some utilities we remove the HTML tags and any javascript or CSS line declarations.
protected virtual string GetAllInnerTexts(HtmlNode node) { node.Descendants() .Where(n => n.Name == "script" || n.Name == "style") .ToList() .ForEach(n => n.Remove()); return RemoveWhitespace(node.InnerText.Replace(Environment.NewLine, " ")); }
Save the important HTML content into the custom field
Now that we have the content that we want to save in this custom field, that later will be used to query information for the site search functionality, we just return the value of the final string.
This post was created by Carlos Araujo. You can contact me in twitter @caraujo
1 note
·
View note
Text
Sitecore and Solr configuration
.li{ margin-bottom:10px; }
On this post I would like to detail a few important steps that you should follow when setting up Solr as the search engine for your Sitecore instance.
For this post I am using Sitecore 8.1 160302 (Update 2). The recommended Solr version is Solr 5.4.1, you can download it from here: http://archive.apache.org/dist/lucene/solr/
Install SOLR 5.4.1 to your local environment.
Copy the directory {installation location}\solr-5.4.1\server\solr\configsets\basic_configs to {installation location}\solr-5.4.1\server\solr\ and rename it sitecore_analytics_index.
Open up Sitecore CMS and navigate to the Control Panel.
Go to the link action "Generate the Solr Schema.xml file". Navigate to the schema.xml file under the directory you copied in the previous step. Replace the old schema file with the newly generated schema. The schema.xml file attached to this page already has all the needed fields, use that file if you want to skip this step and jump to step 7.
Open up the schema file and add the following field <fieldType name="pint" class="solr.TrieIntField"/>
The Sitecore schema generator may not include the dynamic fields for multiple languages needed for multi-site solution. Check to make sure you have the following fields in the schema.xml file. <dynamicField name="*_t_da" type="text_general" indexed="true" stored="true" /> <dynamicField name="*_t_de" type="text_general" indexed="true" stored="true" /> <dynamicField name="*_t_ja" type="text_general" indexed="true" stored="true" />
Add a file to the root of "sitecore_analytics_index" folder and name it core.properties "properties is the extension". Open up the file in a text editor and add the following on the first line, name=sitecore_analytics_index.
You will need a CORE for each index. Copy and paste the sitecore_analytics_index folder you created above for each of the indexes listed below. You will need to replace the text in the core.properties file for each of the cores with their name. In Sitecore 8.1, the following indexes are setup by default:
sitecore_analytics_index
sitecore_core_index
sitecore_fxm_master_index
sitecore_fxm_web_index
sitecore_list_index
sitecore_marketing_asset_index_master
sitecore_marketing_asset_index_web
sitecore_marketingdefinitions_master
sitecore_marketingdefinitions_web
sitecore_master_index
sitecore_suggested_test_index
sitecore_testing_index
sitecore_web_index
social_messages_master
social_messages_web
This is the file structure tree for a Sitecore core inside Solr

Once you have all the indexes/cores setup you have two options either run Solr from the command window or install it as a service. From a local development perspective I prefer to run it from the command window to avoid populating the services list with different Solr instances/versions.
To run it from the command window you can do the following:
To start it
Open a command prompt and navigate to the Solr bin folder {installation location}/bin
Type solr start
Top stop it:
Open a command prompt and navigate to the Solr bin folder {installation location}/bin
Type solr stop -p 8983 Note: I am assuming you are running Solr in the default port (8983)
This post was created by Carlos Araujo. You can contact me in twitter @caraujo
0 notes