
Don't wanna be here? Send us removal request.
Statistics
We looked inside some of the posts by solfox486 and here's what we found interesting.
Average Info
Notes Per Post
1
Likes Per Post
1
Reblog Per Post
0
Reply Per Post
0
Time Between Posts
48 seconds
Number of Posts By Type
Text
3
Last Seen Tumblr Blogs


Fun Fact
Forty percent of Tumblr users are between the ages of 18 to 25.
Text
Mac Os X 10.11 El Capitan Download

Warning: Please follow these instructions at your own risk. I am not responsible for any damage or information loss that could result from following this guide. Also, note that installing OS X on PC is illegal. Please buy a real Mac if you're satisfied with your Hackintosh. This guide is for evaluation purposes only.
El Capitan 10.11 Download Free
Mac Os X 10.11 El Capitan Iso Download
El Capitan Os X Download
Requirements
Softonic-recensie Yosemite just got bigger. El Capitan, or Mac OS X 10.11, is the latest update of Apple’s operating system for Mac. This marks the first time in a while that the release of OS X and iOS (iOS 9) have appeared almost simultaneously – allowing for more synergy between the platforms.This also benefits Mac users, as usual they are left waiting as Apple’s mobile platform has.
Download Mac OS X 10.11 – El Capitan. DMG without Apple Store. Direct download links from our server – The file were tested by Macdrug.
Open that app from your Applications folder to begin installing the operating system. MacOS Sierra 10.12 can upgrade El Capitan, Yosemite, Mavericks, Mountain Lion, or Lion; OS X El Capitan 10.11 can upgrade Yosemite, Mavericks, Mountain Lion, Lion, or Snow Leopard; OS X Yosemite 10.10 can upgrade Mavericks, Mountain Lion, Lion, or Snow Leopard.
An Intel-based PC with UEFI bios
A USB flash drive with at least 16GB capacity
A dedicated hard drive (SSD highly recommended)
A computer running OS X (10.9 or later) for preparing the installation USB flash drive
I chose to avoid the UniBeast installer (by Tonymacx86) because of its commercialized nature, as described here. Here is a vanilla guide to installing El Capitan on your PC!
Preparing the USB Installation Drive
First things first. We need to prepare a USB thumb drive that will contain the installation files as well as the bootloader and custom kexts for our specific Hackintosh build.
Download El Capitan from the Mac App Store
Head over to your existing OS X environment running 10.9 or later and open the Mac App Store.
Search for 'El Capitan' and click Download. The download is completely free if you're running OS X 10.9+.
Wait for the download to finish (this could take some time).
Format the USB Drive
Open Disk Utility in Applications/Utilities and locate your USB device. Make sure you've backed up anything important on that drive as it will be erased forever.
Select it, and then on the right, click the partition tab.
Click Curent Layout and change it to 1 Partition.
Set the Name to USB.
Set the Format to Mac OS Extended (Journaled).
Click Options and select GUID Partition Table.
Click Apply to format the drive.
Copy the Installation Files to the USB Drive
Now that we've downloaded the installation files from the Mac App Store and formatted our USB drive, let's copy the installation files to it.
Run the following command in the Terminal (Applications/Utilities):
The command will run a script inside the Install OS X El Capitan application that will copy the installation files to the USB drive.

This process takes about 15 minutes. Go out for a quick run, or a hamburger, or both. When you come back, it should have finished.
Installing a Bootloader
If you tried to boot from the USB drive as is after the previous step on a PC, it wouldn't work. We need a bootloader that makes it possible to boot OS X on x86 and x86_64 PCs.
There are 3 popular bootloaders to choose from.
Clover
Chameleon
Chimera
I went with Clover as it seems to be the most popular choice among other El Capitan installers, mostly for the following reasons:
Clover is an open-source EFI-based bootloader created on Apr 4, 2011. It has a totally different approach from Chameleon and Chimera. It can emulate the EFI portion present on real Macs and boot the OS from there instead of using the regular legacy BIOS approach used by Chameleon and Chimera. For many, Clover is considered the next-gen bootloader and soon it will become the only choice since BIOS in being replaced by UEFI in every new motherboard. One big feature of Clover is that iMessage, iCloud, the Mac App Store works along with Find My Mac, Back To My Mac and FileVault since Clover can use the EFI partition. (Read more)
Install Clover on Your USB Drive
Installing Clover on your USB drive is relatively easy. It involves running an installation wizard and selecting some options.
Download the latest Clover installer from here.
El Capitan 10.11 Download Free
Run the installer.
Click Continue twice.
Click Change Install Location and set it to your formatted USB drive.
Click Customize and check the following options:
(x) Install for UEFI booting only
(x) Install Clover in the ESP
( ) Drivers64UEFI
(x) OsxAptioFixDrv-64 - fixes memory map created by AMI Aptio EFI. Booting OS X is impossible otherwise.
Click Install and wait for the installation to finish. It shouldn't take more than a minute.
Copy Essential Kexts to the USB Drive
Next, we'll need to copy some kexts (kernal extensions, similar to drivers on Windows) to the USB drive.
FakeSMC.kext - open source SMC device driver/emulator developed by netkas. Tricks OS X into thinking it's installed on Apple hardware. Absolutely required for Hackintosh installation.
NullCPUPowerManagement.kext - disables AppleIntelCPUPowerManagement.kext which may cause kernel panics when you try to boot from the USB drive. It's optional, copy it only if you get an AppleIntelCPUPowerManagement-related kernel panic.
ApplePS2Controller.kext and AppleACPIPS2Nub.kext - adds support for PS2 devices (such as PS2 keyboard/mouse). They're optional, copy them only if you still use PS2 devices.
Download these files from here and copy them to the EFI mounted volume at /EFI/Clover/kexts/10.11/.
Now that the installation USB drive is ready, let's install OS X El Capitan!
Boot from the USB Drive
Restart your computer and boot from the USB drive (Press Esc/F8/Del to access the boot selection menu).
Use the arrow keys to select Boot OS X Install from Install OS X El Capitan (It should be selected by default). Press the spacebar and select Boot Mac OS X in verbose mode. Verbose mode means that you'll be able to see exactly what's going on under the hood as OS X attempts to boot up its installer. You'll be able to see the exact error message if booting fails.
Press Enter and cross your fingers. Clover will now boot the installer from your USB drive. This could take some time, in my case, it takes around 5 minutes (Don't worry -- the startup time is around 5 seconds after installing on an SSD).
Did it fail?
It's more than likely that the boot will fail. Don't panic (ha-ha), as kernel panics usually mean that you forgot to copy an essential kext to the EFI partition. Look up the exact error you're getting before the boot log comes to an end and search Google for a solution.
Once you find an additional kext that your system needs, you'd attempt to copy it to the EFI volume, only to discover that it's gone! Not to worry, it's just unmounted and hidden. Follow this guide to mount the hidden partition, and then, follow the Copy Essential Kexts section above to copy it to the USB drive's EFI partition.
Format the Target Hard Drive
Mac Os X 10.11 El Capitan Iso Download
Once the installation wizard boots, the next step is to prepare the hard drive that you want to install OS X on.
Click Continue, followed by Disk Utility.
Select the target drive to install to (not the USB drive!) and click the Erase button. Make sure to back up anything important on that drive, as it will be deleted forever.
Set the Name to El Capitan.
Set the Format to OS X Extended (Journaled).
Set the Scheme to GUID Partition Map.
Click Erase to format the drive.
El Capitan Os X Download
Install OS X to the Target Drive
Exit the Disk Utility and click Install OS X.
Click Show All Disks and select the drive you just formatted to install OS X on it. Finally, click Install.
The process takes about 25 minutes. Be patient. For me, it hung at the end ('1 second remaining') for around 5 minutes. Don't be tempted to reset or cancel the installation.
When that's done, the system will reboot. Make sure to boot from the USB device again, and select Boot OS X Install from Install OS X El Capitan once again, in verbose mode. The installation is a two-part process that continues once you re-boot into the USB drive.
Finally, after about 25 more minutes, OS X El Capitan should be successfully installed on the target drive.
Boot into El Capitan via the USB Device
After the second reboot, boot from the USB device once again, but this time, select Boot OS X from El Capitan, and select verbose mode.
Press Enter and cross your fingers again. If all goes well, you'll be presented with the setup wizard:


Take a minute to set up your new Hackintosh. Once you're done, there are a few things you need to do to finish off the installation.
Reinstall Clover on the Hackintosh Drive
In the previous step, we used Clover on our USB drive to boot our Hackintosh. This is fine, but most of us aren't going to keep that USB drive plugged in forever. Let's make it possible to boot El Capitan independently by reinstalling Clover on it.
Go back up to the Install Clover on Your USB Drive section and follow the steps again, but this time, select your El Capitan volume instead of the USB drive.
Once again, copy the essential kexts to the EFI partition that shows up after installing Clover.
Finally, make sure to add Clover EFI boot options which is possible by pressing Clover Boot Options in the Clover boot window (if there are 2 boot options -- find the one for your SATA drive). I literally spent 3 hours figuring out why Clover would not boot when I disconnected the USB drive before I figured out that I need to manually add the EFI boot options.
Now you'll be able to boot directly from the El Capitan hard drive, as it should be!
Audio and Networking
If you're lucky, audio and networking will work right out of the box. If not, you're on your own from here. You'll need to research your exact hardware (by using System Information in Applications/Utilities) and searching Google to find the right kext or installer to make it work on El Capitan.
Clover Themes
The default Clover theme is pretty ugly (no offense). Check out this theme database to improve Clover's appearance.
This is YosemiteLogin by xenatt:
Enjoy!
That's it! Enjoy your new Hackintosh, and if you absolutely love it, consider buying a Mac!
0 notes
Text
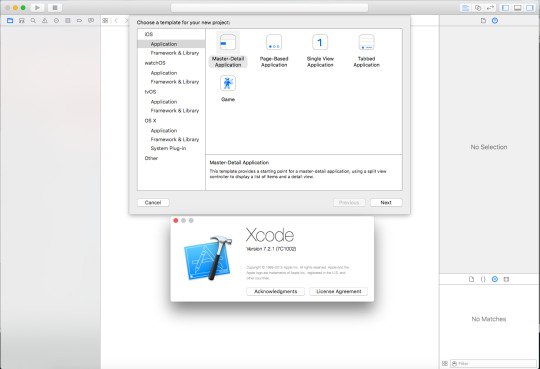
Xcode 10.11

Question or issue on macOS:
Xcode 10 Download For Mac
Xcode For Macos High Sierra
Xcode 10.13
Xcode 10.11.6 Download
I am trying to update Command line tools on my mac osx.
All downloads are hosted by Apple. Links on this site take you directly to Apple’s download pages. This is not an official Apple website. Please consider donating to help maintain it. Xcode - Wikipedia has a complete compatibility listing for Xcode, what version works with which version of OS X. It also includes a listing of versions of Xcode’s support libraries for things like iOS and iWatch, for each version. I am searching for a proper IDE for iOS developement but MAC OS X version is 10.11.6 & because of this I am unable to install XCode. It says 'I should have MAC OS X 10.12+'. Developers who want to make use of the Xcode 8 SDKs from the command line must choose the SDK with xcode-select. Developers on OS X El Capitan who have installed versions of the Command Line Tools (OS X 10.11) for Xcode 8 Beta should install Command Line Tools (OS X 10.11) for Xcode 7.3.1.
1 Swift 5.5 is available as part of Xcode 13. 2 Swift 5.5 Windows 10 toolchain is provided by Saleem Abdulrasool.Saleem is the platform champion for the Windows port of Swift and this is an official build from the Swift project.
But when I run the update command, I get this error:
This doesn’t work either:
What is the exact string I should specify after sofwareupdate -i?
How to solve this problem?
Solution no. 1:
For future travelers, here’s a version-agnostic approach. First, run softwareupdate --list. This will probably take a couple of minutes. When it’s done, you’ll see a bulleted (with an asterisk) output like this:
Find the bullet that refers to the Xcode command line tools. Copy that entire line (except the asterisk…). In the above case, you would copy: Command Line Tools (macOS High Sierra version 10.13) for Xcode-10.1
Then, run the install command (as shown by Brendan Shanks) with what you copied inside quotes:
Solution no. 2:
I’m going to answer a slightly different question here, because this question came up when I searched for a solution to my problem. Hopefully it’ll help someone (and it’ll surely help me next time I run into the same issue).
I wanted to upgrade the command line tools from version 8 to 9. The App Store didn’t suggest this upgrade, and neither did softwareupdate --list.
installed the new version of the tools. But clang --version still gave 8.0.0 as the version number. xcode-select -r and rebooting didn’t solve this issue.
xcode-select -p returned /Applications/Xcode.app/Contents/Developer, and clang --version reported an installation directory under there. I thought I’d start over again.
deleted version 8 of the tools. But xcode-select --install said the command line tools were already installed.
Now, sudo xcode-select -p returns /Library/Developer/CommandLineTools/.
It seems that the problem was that the new version of the tools are installed to a different directory, and xcode-select -r is not clever enough to find the latest version.
Solution no. 3:
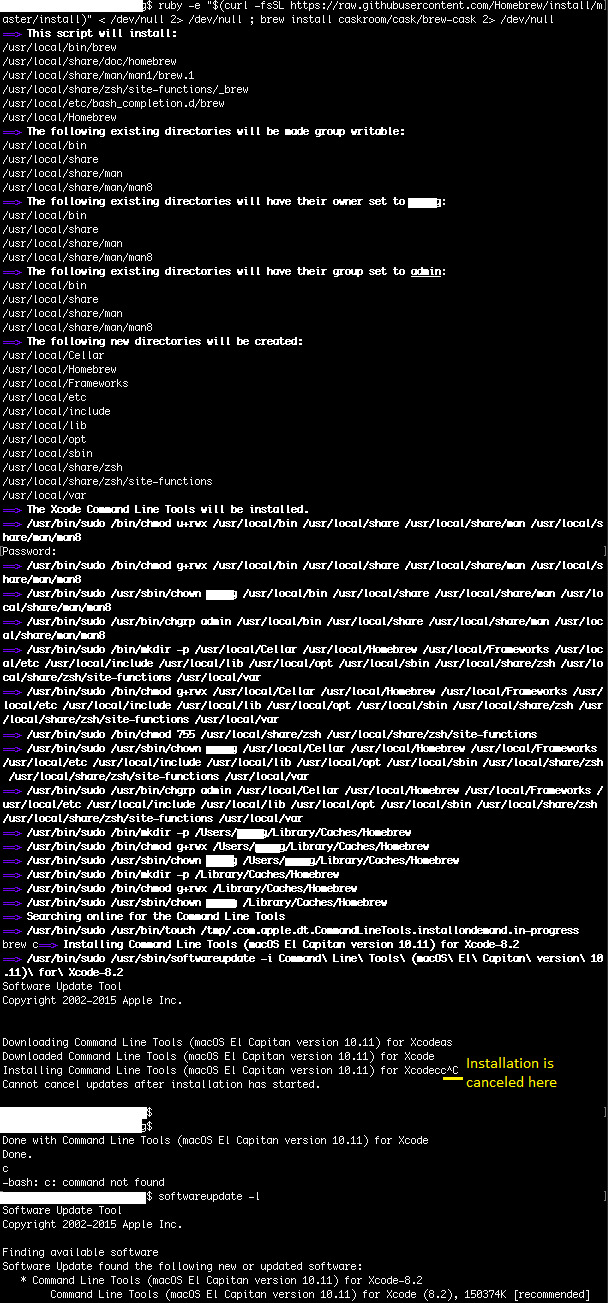
Run softwareupdate -i 'Command Line Tools (macOS El Capitan version 10.11) for Xcode-8.2'. The quotes are important.
Solution no. 4:
I faced similar problem on MacOS Mojave version 10.14.3 with Xcode 10.3 installed. The real problem was, when I installed the Xcode 10.3, I deleted the “Xcode-beta.app” first and then installed the new version. Therefore, when I tried installing CLion for C++ development and configuring it, CMake gave me error And Updating Command Line Tool didnt work for me:
and showed me this response in terminal
Then I tried to check the version of Clang using:
And the response lead me to the real problem i.e. Active Developer path was still pointing to Old version of Xcode that I had already deleted.
Therefore, I switched the active developer path to latest Xcode App installed using:
And everything worked like a charm automatically.
Solution no. 5:
Xcode 10 Download For Mac
I ran the same command with sudo and that did the trick.
sudo softwareupdate -i 'Command Line Tools (macOS El Capitan version 10.11) for Xcode-8.2'
Solution no. 6:
when upgrading to MacOS Catalina, Version 10.15.* you can install the command line tools for xcode 11.3 like this:
Hope this helps!
Xcode for Mac OS and iOS
With Xcode you can work inside one window, split windows, and even compare options side by side. Source and project code can be shared across both platforms.
MacOS app developer made simple and easy
Design great apps on either Mac, iPad, or iPhone using Xcode.
MacOS or iOS developers need look no further than the Xcode developer tool to design great apps.
Xcode featuresSwift UI, which offers up its own syntax. Easy to read and write, Swift UI will help keep your apps smaller and download faster by using less code.
Updated functionality now lets you code, test and debug all inside one window. Debugging is done via the Xcode IDE. This added plus can identify errors in syntax and logic, and often fix the code for you.
Newly introduced dark mode is built into Xcode. Interface builder allows you to switch between light and dark modes, or even view them side by side.
The drag and drop function helps you to make changes to visual UI elements, quickly and easily. For developers who prefer multiple editing panes, Xcode provides you with total control of your work area. You can view your design changes instantly in another window.
Use the devices window to simulate other environments. If your users have slow networks or run in extreme heat, you can test those conditions out before releasing your app. For ease of use, source and project code can be shared by Mac and iPad, allowing you to convert existing iPad apps into Mac apps. The changes will take effect across both platforms.
Where can you run this program?
You can run Xcode on OS X 10.8 Mountain Lion or iOS 7 and above.
Is there a better alternative?
With its solid functionality, multiple panes, and shared source code, there is no need to look at any alternatives when choosing an app development tool.
Our take
App development tools have come a long way. Xcode is the perfect tool for experienced developers. To be able to code, test, and debug inside the same window, this download will certainly save development time.
Should you download it?
Yes. You won't need another developer tool once you install Xcode. You can share code across OS or iOS.
Highs
Develop apps for any iOS platform
Bad code corrected by Xcode IDE
Code, test, and debug inside one window
Switch between light and dark mode
Simulate user environments for testing
Lows
Xcode For Macos High Sierra
May not be suitable for beginners
Apple developer membership required
Interface isn’t always easy to use
Xcode 10.13
Xcodefor Mac
Xcode 10.11.6 Download
12.5
0 notes
Text
Serna Free For Mac

Syntext Serna Free is an easy-to-use yet powerful solution for WYSIWYG XML authoring. Serna Free is intended for personal use at home, documenting open-source projects, education, and other non-commercial uses. Authors with virtually no XML experience can start working with structured content in a familiar environment that looks much like a conventional word processor. Serna employs XSLT and XSL-FO to render documents in print-like appearance. This approach gives a lot of opportunities for document rendering, such as localized generated content, profiled views, composition of a document from multiple chunks, in-line attribute editing, and others. Serna offers exceptional DITA 1.1 support and comes with integrated DITA Open Toolkit. Flexible visualization of DITA maps and topics with the ability to resolve referred content and in-place editing of local conrefs greatly simplify DITA authoring. Serna Free Key Features: * Available for Microsoft Windows™ (2000, XP, Vista), Linux, Mac OS X, and Sun Solaris/SPARC * Built-in support for all popular document types (DITA, Docbook, XHTML, TEI P4, NITF, etc) * On-the-fly document validation against XML Schemas * Context-sensitive element help * Entity and XInclude in-place editing * Drag-and-drop with on-the-fly validation * UNICODE support and multilingual spell checking * User interface localized into several languages (including Chinese, Dutch, French, German, Igbo, Italian, Norwegian, Russian, Swedish)
Free Download Macgo software latest version and upgrades; Macgo trial versions are without any dated and functional limitations on Mac OS X Yosemite 10.10/Mavericks 10.9 and Windows 10/8/7. Serna Free for Mac OS X 4.1 Released: June 16, 2012 Added: June 16, 2012 Visits: 424 Syntext Serna Free is an easy-to-use yet powerful solution for WYSIWYG XML authoring. Free McDonald’s Later. Get free large Fries when you download the McDonald’s app and join MyMcDonald’s Rewards. Get your choice of Hash Browns, Vanilla Cone, McChicken® or a Cheeseburger free after your first purchase.Free large Fries valid 1x thru 12/31/21 for first time app users at participating McDonald’s.
Serna Free XML editor is an easy-to-use open source multiplatform WYSIWYG XML editor specially designed for those who wish to smoothly adopt the XML technology Without the knowledge about XML technology.
Indeed, Serna Free is the most powerful among free and open source XML editors for WYSIWYG authoring. Anyone can start working with structured content in a familiar environment that looks much like a conventional word processor.
Serna Free Open Source XML editor is probably the best XML editor if you are searching for a free open source WYSIWYG XML authoring tool. Serna Free combines the unique WYSIWYG approach with intuitive behavior to help writers with virtually no XML experience to freely author XML documents.
Features of Serna Free – open source XML editor
simple and user-friendly interface localized into several languages, which looks much like a conventional word processor.
Flexible XML Document View and Profiling
Exceptional support for the DITA XML format and comes with integrated DITA Open Toolkit.
Built-in support for all popular XML document types, such as DITA, Docbook, XHTML, TEI P4, NITF, and others
Easy to renders XML documents using XSLT/XSL-FO style sheets to show them close to the final output.
On-the-fly XML validation with XML Schema allows assisted XML editing and guarantees the quality and consistency of your XML documents.
Drag-and-drop editing allow you to quickly and easily change the order of any XML document portions in ContentMap, Editing Window, or between them, as well as between several opened XML documents. Instant XML validation always keeps your document consistent and suggests allowed positions to drop content.
XML Document Template Support

Serna Free For Mac Free
Download: Serna Free XML editor
1 note
·
View note