A cookery blog by a spoonie, for spoonies (and everyone else)
Don't wanna be here? Send us removal request.
Statistics
We looked inside some of the posts by spooniechef and here's what we found interesting.
Average Info
Notes Per Post
2M
Likes Per Post
840K
Reblog Per Post
684K
Reply Per Post
876
Time Between Posts
30 days
Number of Posts By Type
Text
13
Photo
3
Note
1
Last Seen Tumblr Blogs


Fun Fact
The KCSC sent more than 20K requests to delete posts related to prostitution and porn to Tumblr from January to June 2017.
Text
Do any of u have decent recipes that are like 5 ingredients (not including spices) and take 45 mins or less to prepare i gotta stop eating sandwiches for dinner
136K notes
·
View notes
Text
When I was little my mom’s meatloaf was my favorite food. But ONLY her meatloaf. I didn’t like anyone else’s, and she told me that she would teach me how to make it when I was older. And when I was like 19? She finally taught me, but she told me never to tell anyone else and I was like weird but okay
Anyway, she was super fucking homophobic and abusive to me when I told her I was gay, so here’s the recipe
4-6 lbs of Hamburger/turkey burger
1 pk onion soup mix OR ranch mix
1 TBs ketchup
1 Tbs spicy brown mustard,
1 Tbs bbq sauce
1 Tbs steak sauce
1 egg
mix, shape into a loaf in a big pan, and bake at 350 for 2 hrs (maybe 2 and a half if you’re feeling dangerous)
You can get almost all of these ingredients at the dollar store, and have leftovers if it’s just you. The leftovers make great tacos if (taco seasoning is also like a dollar). Enjoy your revenge loaf
317K notes
·
View notes
Text
I can't do much but maybe this will interest someone. This cookbook is by a classically trained autistic chef, made for people with sensory issues. It's sold 1/6th of its initial run because apparently no one wants to have an autistic person interviewed on TV.
Apparently it's also very funny.
Spread this around! I bet someone here can use this.
25K notes
·
View notes
Text
Pizza (0-1 Spoon)
It's been awhile, but here I am again. Significant spoon shortage owing to the whole thing where I have a job, and also a move to a new-ish flat. The good part is that the new-ish flat has a larger and better organised kitchen, and trying to cook in it is not the most depressing thing on earth, so hopefully I'll be able to post more.
Anyway - one of the things I did the last few month was treat myself to Becky Excell cookbooks, because the one I have is great and I figured more was equally great. Searching through How To Make Anything Gluten-Free, I found a recipe for three-ingredient pizza dough. Which I was dubious about, since my last attempt at gluten-free pizza dough tasted like stale Ritz crackers and despair, same as basically every store-bought gluten-free pizza I'd ever had. Except worse, because I'd also made an absolute mess of the kitchen that I then had to clean up. But Becky Excell had never steered me wrong before, so I figured I'd give it a shot.
She wins again. I did some searching afterwards, and turns out that this works out well with regular flour too, not just gluten-free flour. A lot of recipes seem to have different measurements and wet-to-dry ratios, so I'll give the recipe as per my cookbook and talk about the rest in the notes. The notes will also have some notes and suggestions on sauces and toppings. But we start with the dough.
Here's what you'll need:
1 and 3/4 cup self-raising flour (plus extra for dusting)
1 and 1/4 cup Greek yoghurt
1/4 teaspoon xanthan gum (if gluten-free flour)
Pinch of salt
Seriously, it is that easy. Apparently the yoghurt makes the bread more tender and also sort of stands in for the yeast - something about the acid content of the yoghurt. Definitely doesn't taste like there's yoghurt in it, so I figure it's a similar thing to how using mayonnaise in a chocolate cake will stand in for the eggs and keep the whole thing moist.
Here's what you do:
Mix all the ingredients together in a good-sized bowl with a rubber spatula
When mostly mixed, start mixing with your hands until you get a sticky ball
Dust a convenience surface with flour and start kneading your dough until it's uniform, smooth, and not sticky
Note: if the dough is too dry, knead in a dollop more yoghurt; if it's too sticky, knead in more flour.
Cover and let rest for 30 minutes
What you do with it after that is up to you - it's versatile. You can let it chill overnight, or freeze as is, or form it into a pizza base (pr pizza bases; see below) and then freeze. This basically means that with just the littlest bit of preparation, you can have pizza pretty much whenever.
Now, for the actual pizza prep, some notes:
This recipe will make two thin-crust (5mm thick) pizzas or one thick-crust (1cm thick) pizza. If you're going for thin crust, just divide the dough in half and repeat the process below twice.
Get your largest frying pan and shape your pizza dough so that it fits the bottom of the frying pan perfectly. Then put the pan on the stove on high heat and dry-fry the pizza dough - 2mins on one side, 1min on the other. After flipping the dough, firmly pat it with a spatula throughout the frying - that'll encourage it to fluff up.
There are a lot of options for the pizza sauce. The recipe I had recommends making your own (~3/4 cup of passata, 1 tsp garlic oil, dried Italian spices and salt / pepper to taste), but there are store-bought jar versions that work out just as well. Or, if you don't like tomatoes, try using pesto sauce instead of tomato sauce. There's also white pizza, which involves brushing the dough with olive oil, garlic, and some red pepper flakes to taste and then topping it with ricotta and parmesan as well as mozzarella. Whatever sauce you're using, just spread it on the centre of the pizza base, leaving about a 1/2 inch clear for a crust.
Again, toppings are entirely up to you. Mozzarella's the standard and fine if you just want a margharita. After that? Well. The best part about making your own pizza is that you're not at the mercy of what your local pizzaria thinks will sell, toppings-wise, and what you put on it is nobody's business but yours.
So basically, top your pizza however and bake at 220 degrees celcius / 200 fan (425 farenheit) for 8-10 minutes until the cheese is light golden-brown.
FEAST.
As a side note, if you decide to make two separate thin-crust pizzas with a view to saving one for the next day? Here's a helpful Reddit thread on the best ways to reheat pizza.
I swear, having space to cook makes all the difference. And I am now the kind of person who needs a pizza peel. (It makes the base easier to flip when you dry-fry it because a spatula just is not enough; use two if you don't have a pizza peel or a cake slice.)
7 notes
·
View notes
Text
the comments on this banana bread recipe go crazy

78K notes
·
View notes


Text

dice a handful of brown mushrooms and sweat down with a pinch of salt and black pepper with some diced bacon and a knob of butter, deglaze with white wine
add minced garlic, a big pinch of kashmiri chili powder, a bit of minced parsley, two drained cans of clams (save the juice), a handful of flour, stir and sweat down for a bit.
add your clam juice and a big squeeze of lemon and a big glug of your salted pasta water and a double pinch of shaved parmesan. cook down for a bit. add al dente noodles and a big handful diced parsley and herbs. cook till noodles are at desired texture. plate and top with more parmesan and black pepper and a squeeze of lemon. serve to beloved while she plays through the third dragon age (romancing solas, who she believes to be autistic)
70 notes
·
View notes
Note
Hi! Sorry if this random advice is annoying. Not sure if you did first aid at home or went to urgent care for your burns, but just in case, if you do go to the ER they can give you a prescription burn ointment that you can't find in stores (or at least I haven't been able to). When I got 2nd degree burns from boiling water it helped with the pain + recovery. They can also tell you how to prevent scarring during the year after it heals
Thank you so much for the advice! I did do first aid at home - I've taken a few first aid courses and have had worse burns than this, so I knew how to proceed. I managed to prevent the worst of it with some gentle cool water to prevent the burn from setting in too badly, and then Germolene (if you're not from the UK, it's an antiseptic ointment with a mild topical analgesic). There's some tenderness and swelling that could be incipient blister just under where my fingers start, and it still hurts, but it's nowhere near as bad as it was when I first got the injury, and it could have been a lot worse.
6 notes
·
View notes
Text
The NEVER AGAIN Files 1 - Coq au Vin
When I have the spooks to keep this blog updated, it's mainly a recipe blog along with hints and tips. Thing is, hints and tips aren't always "try this". Sometimes, they are "avoid this like the plague". I won't be including the entire recipe, mostly because the entire "fun" of the evening culminated in my accidentally pouring about a cup and a half's worth of very recently boiled water directly on my right palm and there is pain like you wouldn't believe. (Mostly I'm typing to see what pain management strategies might be useful for work tomorrow.)
So here's the first thing - from initial prep to "on the plate and eating it"? This recipe takes days. Or at least it does in the recipe I found. 24 hours marinading in red wine and herbs, about an hour and a half prep and cooking time, and then the recipe has the audacity to say "for best results, stick in the fridge and reheat it the next day because all the flavours will soak in better--" yadda yadda. This is the kind of meal you prepare days in advance to impress somebody.
Second, it's about eight different kinds of fiddly. You have to reduce the wine you used to marinade the chicken. You have to make beef stock (and the recipe I used had more of the audacity to say, "homemade is best" and I'm like, "I don't have beef bones just lying around, entity; you will have stock made from boullion cubes and you will like it). You then have to brown and/or otherwise heat every single piece of this recipe separately. The chicken. The bacon chunks. The mushrooms. The onions. Then you have to make a roux, effectively. Then you can finally add everything to the pot ... but then you have to let it simmer on the stove and then move a heavy-ass casserole dish full of Stuff to the oven and cook it on low heat for 45 minutes.
And did I mention, "Then let it sit for a day and heat up gently the following day for Best Flavour"? So it wants you to do all that and then not eat it, at a point where even able-bodied people are probably never going to want to look at their kitchen again so dinner's going to be an issue.
Don't even get me started on the washing up.
Here's the recipe I used. There's probably an easier recipe out there, but I get the impression that part of the whole Thing about this dish is about layering flavours and the like, so maybe not. Either way, I wanted a casserole dish specifically so I could make recipes like this and if they're anything like this, I Have Made An Error.
Next time, I'll share the jambalaya recipe. That was way less painful.
3 notes
·
View notes
Text
Produce Issues (variable spoons)
Not recipes so much this time, but a short PSA for Americans, because the issues they're about to be facing are pretty much the exact ones we faced with Brexit over here, except worse.
With all the bullshit going on, there's a pretty good chance that produce is going to get mega-expensive over there. A lot of people talk about growing your own vegetable garden, without thinking about how the people who are going to be hit hardest by price increases probably don't have a house with a garden, or in fact a house at all, and many are lucky to have an entire apartment to themselves. That makes having a vegetable garden difficult ... but it doesn't make it impossible.
Storytime: when I was diagnosed with fibromyalgia a few years ago, I needed something. I didn't specifically know what I needed, but I knew in general. I was so angry and scared and ... well, mostly depressed. I'd been down the depression road before, and I recognised the signs well enough. I needed something to get me through the worst of it - something that I could look at and feel productive, like I wasn't a waste of space. And, most of all, something I'd have to actually continue getting out of bed in the morning for. Turned out that for me, the thing I needed was a garden.
I'm fortunate. I live in a decent-sized apartment with no flatmates, a few decent window ledges and even a balcony. Less fortunate in that all of it's north-facing and I live in the UK so it doesn't get a lot of sun at the best of times. Still, I've managed to get some pretty wonderful things out of my windowsill and balcony garden. Mostly herbs, which gives me cookery herbs, medicinal herbs, and just nice-tasting herbs for tea, but vegetables and fruit too. There are varieties of strawberries and tomatoes that do just fine in shaded areas, and peas and some varieties of lettuce will grow faster than you can eat them all. I haven't done so well that I could completely stop buying produce, but I'll get there one day.
I can't give you all the tips - it'll take too long. But I can give you some basic ones, and the titles of a few books that might be helpful for you overall. (I didn't link to the books because regional booksellers.)
Indoor Kitchen Gardening by Elizabeth Millard. This one lets you know how best to use the space you have available and how to take advantage of any lighting conditions you might have in your home.
No-Waste Kitchen Gardening by Katie Elzer-Peters. This one's particularly good because while some of the suggestions are better for outside, it's a guide to how you can grow more fruit and veg from the remnants of the stuff you bought - onions and stuff.
If you do have a balcony, best thing you can get is the humble grow-bag. It's basically like a pot, but ... fabric, sort of. They go well with "No-Waste Kitchen Gardening" because potatoes, onions, and carrots can be regrown from the leftovers of purchased ones, and if you can manage that, you've got a recursive source of staple vegetables.
Another good investment if you have a decent-sized balcony is a composter bin. Potting soil can be expensive, and turning your food waste into compost as well as a source of recursive vegetables will nourish your produce and help make a bag of potting soil stretch.
If you don't live directly in a city (and maybe even if you do, if you've got green spaces in your area), you could also look into foraging. I actually have a forager's guide, but it's for the UK. For Americans, I did a bit of a search and found the 50-State Foraging Guide, which gives basic information and information about regional foraging guides. If you've got the spoons for it, it's nice to be out in the fresh air foraging for things.
If you're going to try medicinal herbal teas, do your research and find a reputable guide. There are lots of them around, so read carefully and try to avoid ones that sound too ... witchy, I guess. I have a copy of Rosemary Gladstar's Medicinal Herbs, which I check against my copy of Culpeper's Complete Herbal - Culpeper's is old, but it's been an authority on herbal medicine for hundreds of years, so it's still pretty helpful.
Things are really tough for everyone right now, I know. There's so much going on, and so little of it's good, and it's easy to feel depressed and powerless. I honestly did find that growing things helped me feel less powerless on the whole. I'd made life happen! I'd created life out of dirt and water and hope. I've had mornings when my breakfast was alpine strawberries fresh off the plant. I've got coq au vin marinading in the fridge with three sprigs of thyme I got just by walking onto the balcony and snipping them off with the kitchen knife. I found there's no going back to dried oregano when you've had it fresh. I've learned how to dry various herbs and even my cayenne peppers. All of that was because I lavished love and attention on a pot of dirt. Which is how I think about it, because seeing an indoor garden for its mental health benefits is a lot better for ... well, the mental health ... than thinking about things like this being necessary because capitalism is bullshit and designed to crush us all.
I hope this helps. I know that nurturing something green and useful helped me. But seriously - even if you just have a little windowsill - oregano, thyme, rosemary, mint, lemon balm. They will survive anything you throw at them. Then work up to basil because homemade pesto sauce is awesome. (Though you can make lemon balm pesto too, and it's less pernickety about its growing conditions than basil tends to be.)
42 notes
·
View notes
Text


bunjy recipe book- Mushrooms Stroganoff
you will need:
1 lb large baby bella or portabella mushrooms, thickly sliced. just big ol slabs of mushroom
1 medium white or yellow onion, diced
olive oil
2 tbsp butter
5 garlic cloves, diced
1 tsp dijon mustard
1 tbsp soy sauce
2 tbsp worcestershire sauce
1 tbsp flour (gluten-free ok)
1 cup beef or veggie broth
3/4 cup heavy cream
1/4 cup sour cream
12 oz of spiral noodles, precooked and drained
salt and pepper
first, take a large saucepan and heat it on medium-high heat with a good big glug of olive oil. wait until the oil is shimmering, then add in your mushrooms and a good couple shakes of salt. they should shriek and stick a bit, this is fine! just give it a minute until it smells really roasty before you start stirring them, that way they'll start to sear. eventually, they will release their own liquid and you can step back from the pan a bit. saute until the liquid is reabsorbed and the mushrooms are brown and much smaller, then add in the butter and melt it down, and immediately add the onion. saute until the onion is translucent, then add in the flour and garlic, and mix vigorously. the flour will form a paste on the bottom of the pan, and that's fine! cook for about a minute until the garlic is fragrant and the flour smells roasty, then add in your broth and stir, making sure to scrape up all the stuff off the bottom of the pan and reincorporate it into the sauce. add in the cream, soy sauce, mustard, and worcestershire sauce, and reduce to a vigorous simmer. continue to stir while the sauce reduces a bit for maybe 5-10 minutes. once the sauce is thickened, take a measuring cup with your sour cream and carefully add a few good spoonfuls of the simmering sauce into it and mix it up! this will temper the sour cream so it doesn't break when it is incorporated into the sauce. when the sour cream in the measuring cup is warm and fairly liquid, add it to the pan and mix it in. simmer for maybe another 5-10 minutes, add salt and pepper to taste, then kill the heat, add your noodles, and mix it all together. serve warm and enjoy!
939 notes
·
View notes
Text
Helpful Household Items: Air Fryer
To use the meme format: "I've only had my air fryer for a week and a half, but if anything happened to it, I would kill everyone in this room and then myself". I mean, not literally, but largely because I'm not in that place in my life anymore and live alone, but you get what I mean. I had some gift voucher and it was about enough to get myself a small air fryer - only two litre capacity. It seemed a good compromise; I didn't have to spend any money, I could see how an air fryer could or could not change my life, and I could get a new, bigger one if it worked out.
...Okay, I mostly got an air fryer so I could try this quasi-recipe that Jordan Howlett tripped over, so here's your recipe for the post:
youtube
I haven't tried that yet, but I will tell you this much: it has absolutely changed my life, and honestly, I think every spoonie should own one. Here's a few examples of why:
It's great for when the physical spoons are lacking. I'm not just talking about bad pain days, either. My experience with fibromyalgia has involved a fair few days where my grip strength is hit and miss, or when I have spasms so my motor control is equally hit and miss. But as long as you're keeping things in a single layer, you hardly even have to turn anything in an air fryer (though I grant it sometimes helps). No bending to put things into or pull things out the oven, no shoving things around a skillet, nothing like that. Just put a thing in the drawer, set it to the right parameters, and withdraw the drawer when done.
To add to that - little to no cleaning. You're using little to no oil, so all it takes is lining it with parchment and a quick wipe-down when done. Washing a skillet is hell on bad days, especially if your skillet is a good heavy one.
It's also great when mental spoons are lacking. My personal experience with a combination of ADHD and brain fog is that sometimes I forget when something's in the oven, mostly when I'm doing oven chips or something. Or I get a little unsure as to exactly how long a piece of meat should be in the oven for the level of done-ness I want. Or both. Either way, I could go to the rigamarole of getting an egg timer and setting it and the like ... or I could have a nice little machine that not only automatically beeps like the microwave when it's done, it also turns itself off like the microwave when it's done. So if I, say, got involved in something I couldn't easily pause because I didn't realise my food would be ready in two minutes, I don't have to worry about it burning.
There's an economic benefit as well. I'm single. I live alone. Even if I got (when I get) a larger air fryer, running one of those to cook a chicken leg quarter or a a salmon fillet has to be easier on the electric bill than doing it in a full-sized oven. Because of the size, it also pre-heats faster than a full-sized oven, just because there's less space to heat.
Seriously, I used it to cook salmon for dinner tonight. Done perfectly with little to no effort. Mine is small, but the basket is the perfect size for a serving of fish or a chicken leg quarter or just the right number of tater tots. Mostly I want a bigger one for when I have company or when I want to do chicken nuggets and tater tots. Also to make a decent-sized batch of potato chips, or frozen fries where I don't have to stop midway through to shake up the contents of the container because their shape doesn't lend well to a single layer in a basket that small. I worried about the space it took up until I learned that an air fryer can also serve as a dehydrator. So I could get rid of my dehydrator, put a good-sized air fryer in its place, and ... I dunno, keep the little one around for emergencies?
No, not for emergencies - for small batches of the above recipe so I don't end up becoming 80% sugar by volume.
7 notes
·
View notes
Photo


dere you go
689K notes
·
View notes
Text
Slow Cooker Beef Pot Roast (0-1 spoon)
I know it's been about half-past forever. Between work and some home issues, I haven't really had the spoons for much. But that's kind of perfect because it means that I do have things to say in this particular bit of journal. Yes, mostly I was doing my tried-and-true regular recipes, but this month I decided to further explore the possibilities of my multicooker (Instant Pot kind of thing but without the brand name recognition). The pressure cooker function is great if you want soup or stew, but this month, I tried the slow cooking function. Honestly, this was a bit of a revelation for me, for reasons I'll go into in a bit more detail once I'm done with the recipe. It's all going to be approximates, mind you - but the best recipes generally are.
So, here's what you'll need
1 good-sized chunk of beef (see notes; somewhere in the 2-3lb range)
1 onion, quartered
3 cups of chopped root vegetables (carrots, parsnips, turnips)
Whole garlic cloves (to taste)
2-3 cups beef stock
1 cup red wine
2 bay leaves
Other herbs and spices to taste (see notes)
Here's what you do:
Sear the outside of the beef - you can use the browning function on your multicooker to do that, but doing it on the stove is quicker
Add the onion, root vegetables, garlic, bay leaves, and other herbs to the multicooker
Place the beef on top of the vegetables; add liquid
Cover and cook on low setting for 6-8 hours
Take out the beef to let it rest for 20 minutes
If you want gravy, strain the remaining liquid into a small saucepan, simmer on medium heat to reduce and gradually stir in maybe 1 tbsp cornstarch to thicken.
FEAST
A few notes:
The best thing about the slow cooker is that you can put everything together the night before. While you're putting together one night's dinner, you can just chop a couple of extra veg, spend another five minutes or so searing the meat, then put everything together in the inner pot of your multicooker and leave it covered in the fridge overnight. Just take it out of the fridge 20 minutes or so before you start cooking it.
The other good thing is that this literally needs nothing else done with it. No watching, no stirring, no nothing. You can switch on your multicooker or even set it to switch itself on at the appropriate time, go to work or whatever, and not only come home with dinner sorted, but you will come home with your whole home smelling wonderful. Then, all you have to do is make gravy if you want to.
Yet another good thing about the slow cooker is that it encourages use of the tougher, and generally cheaper, cuts of meat. The slow cooking breaks it down very well - as an example, I used silverside in mine (nearest to the rump, generally known as a drier and tougher cut) and when it was done and properly rested, it was so tender it fell apart when I so much as tried to get the binding string off. So you get several days' worth of lovely meals at a halfway reasonable price.
As to the beef stock and red wine, looking over several slow cooker beef recipes has led me to believe that as long as there's a certain amount of liquid in there for your beef to soak up, you're good. So experiment with whatever liquids, herbs and spices you want. Honestly, next time I'm going for less beef stock and a half-cup of A1.
I'm going to be doing other things with the slow cooker, so I promise there will be more to watch on this space. If nothing else, I'm having a vegetarian friend of mine over to dinner next month and I figure I should share recipes for things like the planned butternut squash risotto and the no-bake gingerbread cheesecake. Also, Sunday will see me take delivery of a small air fryer, which I feel like will very much improve my quality of life and certainly inspire me to new heights of cookery. And hey, running one of those is cheaper than heating up a single portion of tater tots in the oven.
So ... not dead, just reeeeeeeeeally lacking in spoons. But now I've found some ways to save a few, and this is as good a place as any to spend them.
16 notes
·
View notes
Text

i had to make a solution for this for myself, mostly because of depression, but it makes a nice How To for folks who are low on spoons or could use some help in the kitchen.
Fortunately i was a professional cook for over a decade. UNfortunately the first post i made explaining it was suuuuper long. Let's see if i can do better
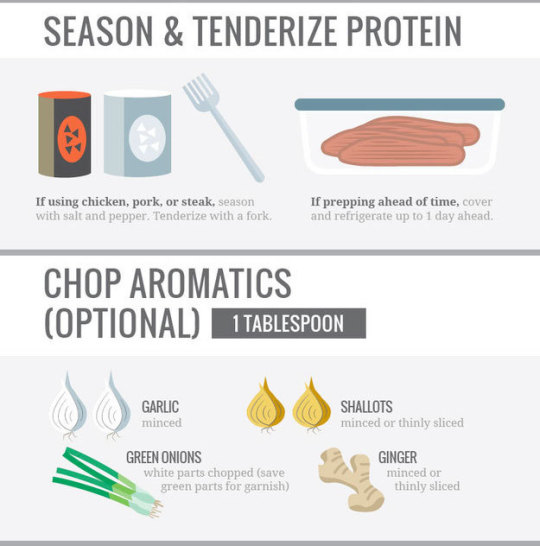
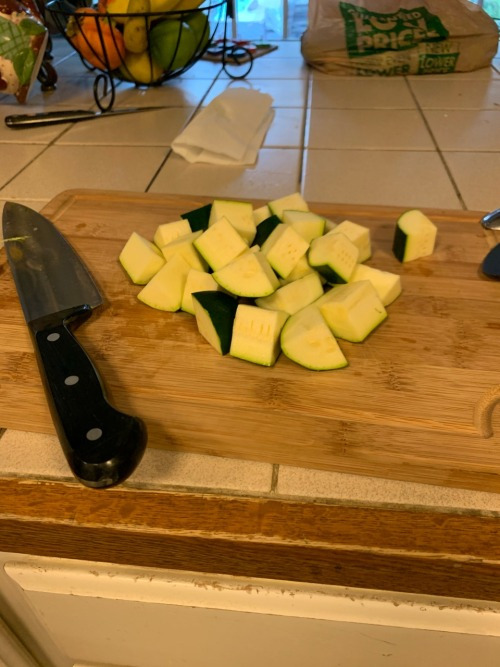
So you select any protein that you can cook in a frying pan -- chicken breasts, ground beef, pork chops, sausages, steak, chicken thighs, whatever. You also select one or two types of veggie (mushrooms or tubers also work, i just did this with potatoes and carrots for dinner tonight).
[i like cooking for vegetarians, but this is how i cook for myself when i'm low on spoons - perhaps i'll do another post for meatless meals]
You'll also need some kind of oil, and a sauce or two of your choice in a bottle. All cooking gear is a large frying pan with lid (i prefer non-stick) a spatula, a cutting board, and a knife.
You cut the veggies into bite size pieces, cut up enough for two meals. One kind of veggie is fine, or you can do mix two or three
Put frying pan on medium heat with a little oil. Tubers or mushrooms or go in the pan a few minutes before the protein. 2 portions of the protein goes in the pan, about 5 minutes with lid (don't worry you can still get a good sear on both sides)
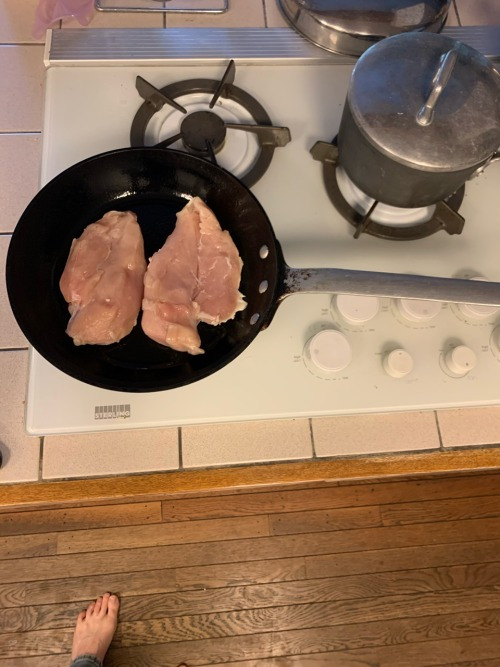
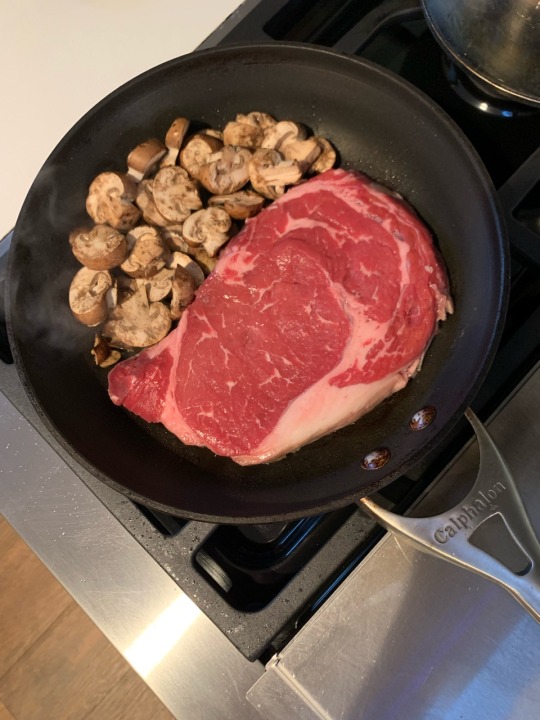
Now flip your protein if it's flip-able and add normal veggies, put the lid back on another five-ish minutes.
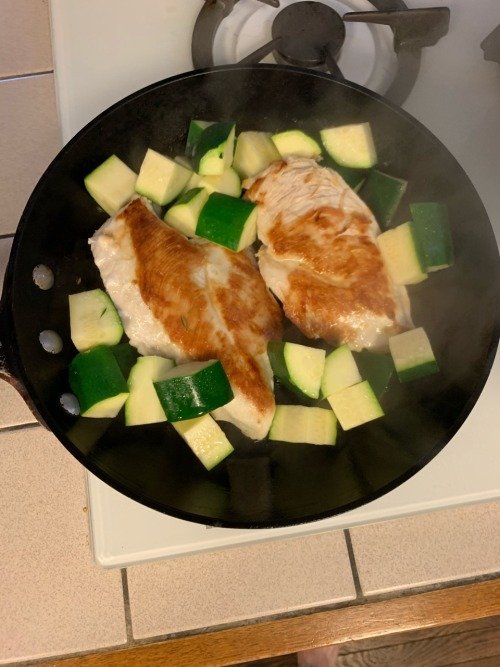
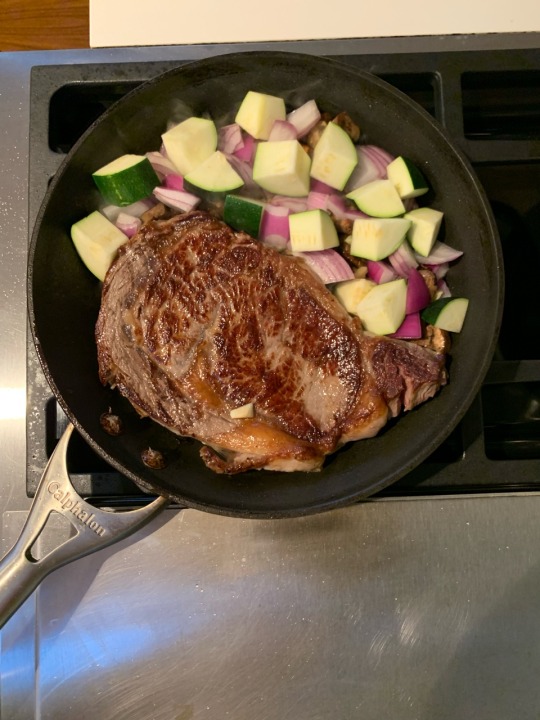
Take your protein out and put it with one portion of the veggies in a microwave safe container. That's going to be your lunch tomorrow. Put the other portion of protein on a plate to rest (you have to let a cooked protein sit a couple minutes before you serve it or when you cut into it all the juices run out and it goes dry - the liquids thicken as it cools, preventing this drying out if you let it rest, the goal is to serve it very warm but not hot hot)
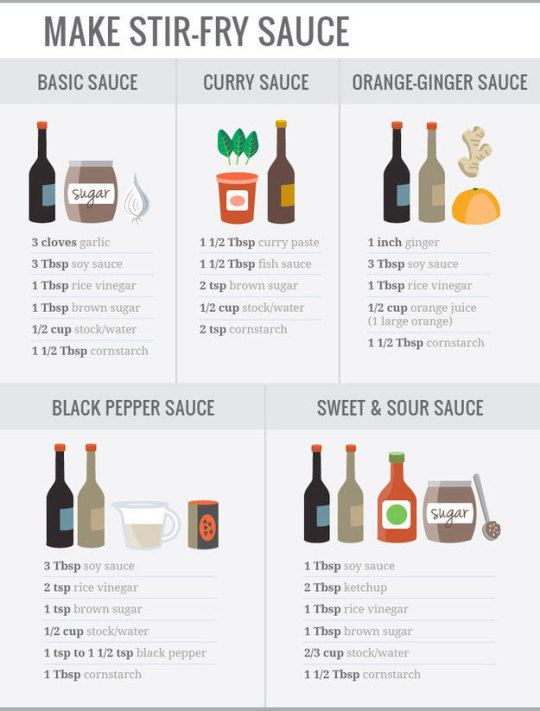
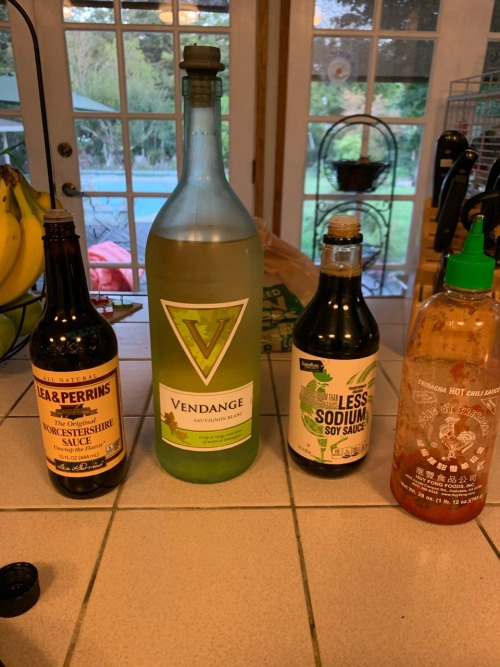
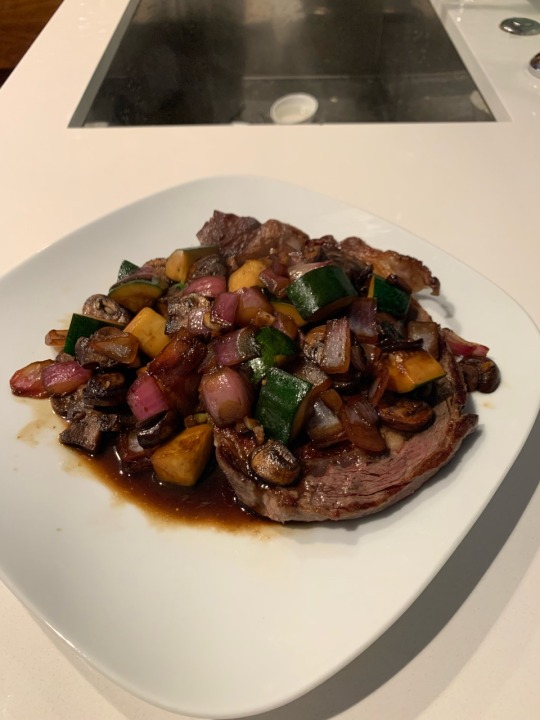
While it's resting, pour some sauce from your bottle in the pan with the rest of the veggies and turn up the heat. A single sauce/bottle is fine, i like to get fancy and mix a couple. Two examples of personal favorite mixes are 1: bbq sauce and a hot sauce like sriracha 2: roughly equal parts low sodium soy sauce and worcestershire (makes something similar to a teriyaki sauce) A swallow of wine is almost always a great option if you want to add that to your sauce too, just add it to the pan before the other sauces so the alcohol has time to burn off.

...
Here is the important bit. While your veggies are finishing, wash your cutting board and chef knife. Then when you dump your veggies and sauce over your protein on the plate, while it is still too hot to eat, you wash your frying pan and spatula before you eat. Now the only dishes you have left to do are your plate and fork. Maybe a steak knife.
...
The whole thing takes about 35 minutes even with washing the dishes, and that includes your lunch for the next day- just pour a different sauce on and stick it in the microwave for a couple minutes (or five minutes back in the frying pan) and you have a full healthy lunch with a different flavor
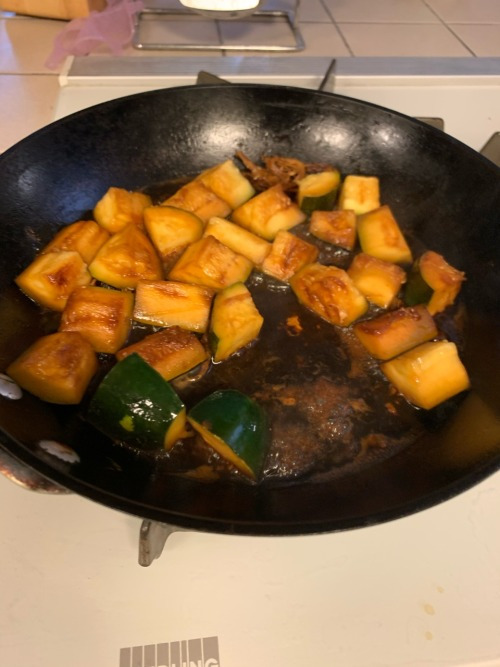
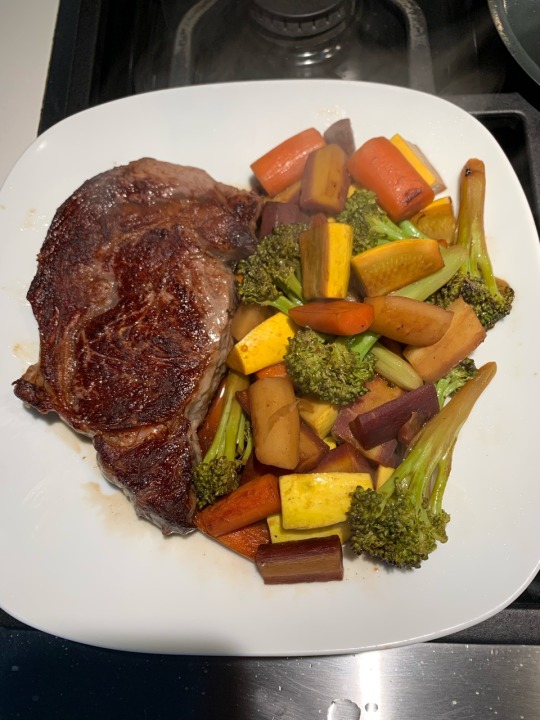
You can use this technique every single meal and it yields hundreds of combinations, from pork and potatoes bbq, to salmon and broccoli teriyaki, to chicken and zucchini in a soy glaze.
It will keep you down to less than an hour of kitchen time per day total for both lunch and dinner including all dish clean up, uses the least dishes, the least effort, requires the least technique, and is, depending on what you pick out, very affordable
here are a couple more examples from this month; i didn’t take pictures of the salmon i did recently, but you get the idea
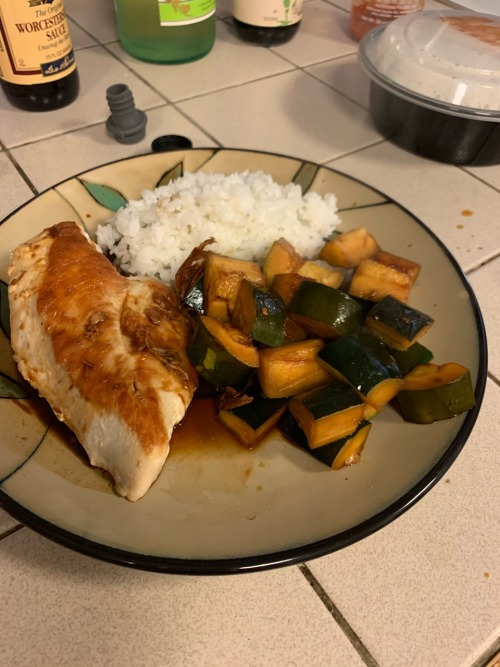
it's not super fancy, but it is easy, affordable, quick, and any flavors you want. Hope this helps some folks
Happy Cooking!
27K notes
·
View notes
Text
Gluten-Free Fish Sticks (1 spoon)
I learned two interesting things today. The first is that if you're struggling for gluten-free breadcrumbs, gluten-free cornflakes are a perfectly acceptable substitute (and yes, you have to specify gluten-free corn flakes Because Reasons). The second is "the spoon test" for frying things. There's apparently a temperature range for deep or deep-ish frying and if you don't have a digital thermometer handy (or if, like me, you can't really be bothered to dig it out of the utensils drawer), dip the handle of a wooden spoon into the oil. If little bubbles start forming on the wood, you're ready to start frying.
This I learned from my Becky Excell Quick + Easy Gluten-Free cookbook. I was determined to try some new recipes, and I tried one that she-called Cornflake-Crusted Cod Goujons but I thought that was kind of pretentious so I call them fish sticks. Well, in my case they were more fish nuggets, but never mind. As the cookbook title indicates, it's pretty easy. A little messy, but it involves cornstarch, so I guess that follows.
Here's what you'll need:
5 tablespoons cornstarch
1 teaspoon salt
1/2 teaspoon pepper
2 medium eggs
4-ish cups gluten-free cornflakes
Two fillets of cod or other white fish (not too chunky)
Neutral oil for frying
I figure you can probably add a few more interesting seasonings if you want to - I don't actually have plain pepper in the house so I used garlic pepper, and that was nice. I might be more adventurous next time.
Here's what you do:
Mix the cornstarch, salt, and pepper (and any other spices you might like); spread onto a good-sized dinner plate
Add the eggs to a separate bowl; beat well
Add the cornflakes to a larger bowl; crush well (don't leave any whole flakes)
Cut your cod into strips about 4" x 1.5" x 1", or nearest estimate (see notes)
Start heating your oil to 180C (356F) or use the spoon test as mentioned above
While the oil is heating, dredge your fish pieces through the cornflour mixture, then the egg, then the cornflakes (press down hard in the last step to make sure the cornflakes stick)
When the oil is ready, add your crumb-coated fish and cook for 5-6 minutes, turning over once halfway through. While they're cooking, line a plate with paper towels to absorb excess oil
Transfer your cooked fish to the plate with the paper towels; cook any pieces of fish that didn't fit in the pan the first time
Apart from the thing about the spoon test and the notes about seasonings, only four things stand out in terms of making things easier on yourself.
This probably goes without saying, but if you're particularly given to brain fog issues for any reason, set-up is key. Make sure all your bowls and plates are set up like the salad section at Subway, so you can just take the fish from cornstarch to egg to crumbs to waiting-to-cook plate in a line. I did not do that and I got turned around a couple of times.
The cookbook recipe says to use your hands to crush the cornflakes, and I am here to tell you no, that is a terrible idea if you have pain issues. Cornflakes, especially gluten-free ones, are surprisingly tough. Use a potato masher or something. I couldn't speak to the efficacy of using a blender, but that might work too.
As mentioned in the recipe part, I don't know if my cod was too chunky or what, but cutting a fillet of fish isn't usually an exact science, because the fillets themselves are irregular and things can fall apart. I ended up with several lumps the approximate size of a chicken nugget, and that works fine. Just as long as all the pieces are approximately the same size, it probably doesn't matter whether you have perfectly shaped sticks or not.
Keep paper towels or a damp J-cloth handy. Between the cornstarch, egg, and cornflake crumbs, your hands will get messy and have lumps of mixture stuck to them, so it's good to have a way of cleaning off the detritus between pieces of fish.
It sounds more involved than it is, honestly. They probably do need additional seasoning in the cornstarch mixture, and definitely some tartar sauce, but overall it's nice to be able to have breaded fish again that didn't come way too expensive and over-processed in the tiny gluten-free shelf in the frozen foods aisle at my local grocery store.
7 notes
·
View notes