A Pharmacy student || Studying , Praying and Fangirling at the same time || || Indonesian || 21 years old
Don't wanna be here? Send us removal request.
Statistics
We looked inside some of the posts by stationeryaddictstudies and here's what we found interesting.
Average Info
Notes Per Post
220K
Likes Per Post
122K
Reblog Per Post
98K
Reply Per Post
227
Time Between Posts
1 month
Number of Posts By Type
Photo
4
Note
1
Text
10
Video
2
Last Seen Tumblr Blogs


Fun Fact
130K people were victims of a chain letter scam that affected Tumblr in May 2011.


Note
Hello! Your embroidery is beautiful! Do you perhaps have tips or could recommend webpages/videos on how to embroider? I'm especially interested in how to do these mushrooms/flowers, which kind of stitches (?)/styles produce these artworks? Thank you for posting your gorgeous results!
Hello, and thank you!
I learned embroidery mostly from books, and have somehow watched hardly any embroidery videos. But I know there are lots and lots of websites and videos out there.
The main book I refer to now for embroidery is 18th Century Embroidery Techniques by Gail Marsh, but the Reader’s Digest Complete Guide to Needlework is my go-to book for anything that’s not in the 18th century one.The Readers Digest one is VERY thick and has a huge range of stuff from quilting to bobbin lace, and an excessively large number of embroidery stitches. It’s a very common book and if your local library doesn’t have it you can get a secondhand copy for pretty cheap. (Here’s one on etsy for $7.) And it’s just one of many similar needlework guidebooks, so it ought to be pretty easy to obtain one. The 18th century one still has a lot of stuff that typical needlework guides don’t though, like metal embroidery.
But you asked specifically about the mushrooms and flowers I’ve posted, and I’m happy to report that those require only a few basic stitches! Needlework guides are full of dozens of different stitches and variations, but most projects only require a small number of them.
Here’s a breakdown of what I’ve been using, with links to tutorials for each stitch.
Satin Stitch - This is one of the most common, especially for flowers and leaves and other such solid shapes. I prefer to use one strand for this, so I don’t have to un-twist anything.

You can also do Padded Satin Stitch, which is the same except you work it on top of one or more layers of satin stitch, or some other filling stitch. This makes it more 3 dimensional. For my waistcoat I’m not padding it though, I want my shapes to be nice and flat like a picture.
Long and short stitch - Very similar to satin stitch, but with longer and shorter bits so you can fill a larger area, or blend different colours together. This shows up a lot on shaded flowers and leaves. I used it to do a little bit of shading on my tree stump, and to fill in the wider part of my green mossy ground, because you don’t want to make your satin stitches excessively long.

This little sample I did a few years ago illustrates it more clearly.

Stem Stitch - Also fairly similar to satin stitch, but done thin and very slanted. It’s pretty easy to vary the thickness, like I’m doing for my maple twigs.

French Knots - These take a little practice because you need to get the tension right, but they’re not difficult. I’m using them for the dots on my mushrooms. The mushrooms themselves and their little patches of substrate are done in satin stitch, and the French knots added on top afterwards.

For the ferns I’m using stem stitch for the stalk, and to do the leaves I just do little straight lines coming off them. These are easy, you just bring the needle up at the tip of the leaf and back down again at the end that’s attached to the stalk, or the other way around, whichever. This probably has a name but I don’t know what it is.
(However, you can get a similar fern effect with Fly Stitch. Or, if you want your leaf placement to alternate, with Feather Stitch.)

The brown fanned out triangles on the border are done like my fern leaves too. Just in on one side and out on the other to make little straight stitches. The clusters of 3 green dots are French knots, and the solid green and brown lines on either side are satin stitch.

Split Stitch - That Beardsley inspired waistcoat I made all those years ago was almost entirely done in split stitch, with the exception of a few French knots here and there. Chain Stitch produces a very similar effect though.

Backstitch - This is a stitch I mostly use for garment construction, and it produces nice strong seams, but it’s also good for embroidering thin and fairly smooth outlines. It’s what I used for most of the embroidery on my monster waistcoat.

There are a lot more embroidery stitches, but that’s most of what I’ve been using!
Taken individually the stitches themselves are fairly easy, and when you use them all together in different shapes and colours you get something that can look much more complicated than it really is. I hope this is sufficient to get you started on whatever it is you’re looking to embroider.
Remember to always do samples before starting a Big Project!
2K notes
·
View notes


Text


Piece of advice regarding the last 10 days of Ramadan from Yasmin Mogahed 🌙
383 notes
·
View notes
Text
20 Common Interview Questions, What They Really Mean, and How to Smartly Answer Them
This is a sheet given to me by my college’s business department and I thought it was helpful so I’ve typed it up fr you guys. All credits to my college business department.
1. Tell me about yourself. What it means: What are your career goals for the next 1-3 years/5-10 years?
This question might come in different forms, but it is the most often asked question in interviews, especially at the start. Have a short statement prepared that describes a little about your past, a lot about your present, and a little about your future that essentially answers the question, “Why are we sitting across from each other and talking today?” Be careful that it does not sound rehearsed and be sure you sound excited about the opportunity and fully engaged. Limit your answer to relevance with the interview. Talk about things you have done that relate to the position you are interviewing for and show strategy in your thinking that led you to this interview. Start with the item farthest back, work up to the present and touch on the future. Let the recruiter know how this position ties into the career map you have planned. Set the footing to shift from a mundane interview into impactful dialogue.
2. How did you choose this line of work?
They are looking for people who are strategic and apply critical thinking to decisions. Have a good answer ready, showing passion for the field.
3. Why did you leave your last job? or Why do you want to leave your job? or What did you enjoy/not enjoy about your last job?
Stay positive regardless of the circumstances. Don’t refer to a major problem with management and never speak ill of supervisors, co-workers or the company. If you do, you will be sullied. Keep smiling and talk about leaving for a hopeful, forward-looking reason (i.e. chance to make an impact, use skills, etc.).
4. What experience do you have in this field? or Why should we hire you? or Give me an example from your experience or education that shows your readiness for this role.
Speak about specifics that relate to the position for which you are applying. If you do not have specific experience, get as close as you can (aka make it up). It is critical that you prepare by unpacking your brain, and know how to tie your experiences/skills to the position description. Give them your best pitch and smile!
5. What do co-workers/former employers say about you?
Be prepared with a quote or two. Either a specific statement or a paraphrase will work. “Jamal Clark, a colleague at Smith Company, always said I was the hardest worker he’d ever known.” It is as powerful as Jamal saying it at the interview himself. Trouble answering this? Ask former colleagues and professional friends for their opinions!
6. What do you know about our firm? or Why do you want to work for us? Or Why do you want the job?
These questions are the primary reason to do research on the organization before the interview. Find out where they have been and where they are going. What are the current issues? Who are the major players? Can you get behind their mission? Crucial research includes reviewing their “About Us” webpages, googling current events where they were involved, and looking on Glassdoor.com to get the scoop on positive things their employees are saying. This takes thought and should be based on the research you have done on the organization as a whole plus a mention of the specific position. Know that job description very well! Sincerity is extremely important. Relate response to long-term career goals. A flat answer here may end the interview, so be prepared.
7. What kind of salary do you need?
It’s a loaded question and a thorny game that you will probably lose if you answer first. So, try not to answer it. Instead, consider discussing how the experience this opportunity offers is the main compensation you are seeking. Or, if you want the conversation to unfold, try, “What is the pay range someone with my skill set and degree could expect for this position?” In some cases, the interviewer will tell you. If not, say that it can depend on the details of the job and ask if you can discuss at a later stage in the interviewing process so you more fully understand the responsibilities of the position. If the interviewer presses, be sure you have done your research on appropriate salaries and give a $7k pay range that makes sense for your lifestyle, your experience, your location, and the position. Use salary.com, Glassdoor.com and Bureau of Labor Statistics to do your research.
8. Provide an example of your ability to think quickly and clearly on your feet.
Companies are looking for innovative thinkers who do not need to be coddled and who truly are up to the challenges of business, most of which require timely, analytical, and creative people. Have a robust STAR** story ready to address this question.
9. Tell me about a time when you helped get a team focused and led them to success.
You are, of course, a team player, right? Be sure to have examples ready: specific stories that show you often perform for the good of the team rather than for personal success are good evidence of your team attitude. Do not brag; just say it in a matter-of-fact tone. This is a key point. Use the STAR** method to stay focused and provide a thorough reply.
10. Are you applying for other jobs?
Be honest but do not spend a lot of time in this area. Keep the focus on this job and what you can do for this organization. Anything else is a distraction.
11. Have you ever been asked to leave a position? I
f you have not, say no. If you have, be honest, be brief and avoid saying negative things about yourself, the people or organization involved. Find the positive spin.
12. What is your greatest strength? Follow Up: Tell me about a time when this professional strength made the difference between success and failure.
Numerous answers are good, just stay optimistic and truthful. A few good examples: ability to prioritize, work under pressure, solve problems or focus on projects, perhaps professional expertise, leadership skills, positive attitude, reporting skills… but be able to prove your reply with a STAR** story.
13. What kind of person would you refuse to work with?
Do not be trivial. It should take disloyalty to the organization, violence, or criminal behavior to get you to refuse to work with a colleague. Minor objections may label you as a whiner. If the version of this question is, “What type of person do you prefer not to work with?”, again don’t be trivial, lengthy, or negative. Focus on discussing your ability to work well with just about anyone.
14. Tell me about a time when you had an idea to improve a process.
They are looking to see that you can (a) take enough ownership to even think about improvements, (b) think creatively and challenge norms, © present enhancements to others with emotionally intelligence, and (d) consider risks of change. Have a great STAR** story!
15. Tell me about a problem you had with a supervisor.
This is a test - If you fall for it and start tearing up an old boss, you failed. Stay positive and either reply that you have not had any trouble with a supervisor if that’s the case, or provide a short STAR** story about how you constructively worked to solve the issue and how your relationship was strengthened as a result. Focus on the happy result!
16. What motivates you to do your best on the job? or What do you expect from your employer?
This is personal - be accurate and honest, yet relevant to the job - but examples for motivation are: Challenge, Achievement, Recognition, Positive Impact, Helping Others. For expectations, you can discuss motivation first and then add something like, “I expect that my employer will communicate her needs clearly so I can drive toward strong results.” Add anything you deem fitting here, but avoid coming off as entitled or high maintenance.
17. Do you have any blind spots or weaknesses?
Tricky question - Do not reveal personal areas of concern but focus on how you want to grow professionally. In discussing weakness, focus on the BUT, i.e. “In the past I have put a lot of pressure on myself, but I have been overcoming that as my skills sharpen and challenges lessen.”
18. Tell me about a time that you had to analyze several solutions to make a sound decision.
This question dives into the ability to create a framework for strategic thinking and proves you have a set process to make good decisions. Tell a STAR** story where the situation is not simple and you can give specifics on the pros and cons assessed, the sources of information tapped into, the info gathered, and insights made to come to a conclusion.
19. How do you stay organized?
Attending to details, planning, organizing, and prioritizing work takes skill. Talk about how you manage your life or work using specific methods, as well as tools you use. You can even provide a STAR** story that speaks to how these qualities led to a success at some point in your life, career, or education.
20. What questions do you have for me?
Interviews should go both ways. Have about 5 good questions ready to ask so you can gather the information you need to make a well-informed decision. These questions should be informational in nature and allow you to understand the position and company better while reinforcing your interest and enthusiasm. This is not a good time to talk about benefits, pay, etc. That info will come in time.
**The STAR Technique is a way to frame answers to behavioral questions in an organized manner that will give the interviewer the most information about your past experience. (This is the part where the paper says to have at least 10 of these ready but I think that’s insane. Have a couple and be prepared to tweak them based on the question. Don’t use the same few for the same interview. i’d say having about 3-5 ready is good enough.) As you prepare to answer each question, organize your response for clarity by answering each of the following components of the STAR technique:
What was the Situation in which you were involved?
What was the Task you needed to accomplish?
What Actions did you take?
What Results did you achieve?
IMPORTANT TIPS: Give a good amount of detail to paint a very clear picture at each step, focus on YOU versus the group, and if the Result wasn’t very positive or does not place you in a great light, that it is not interview material!
20K notes
·
View notes
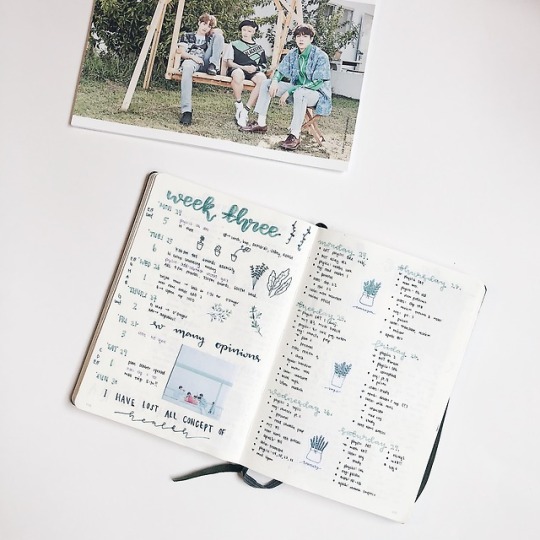
Text
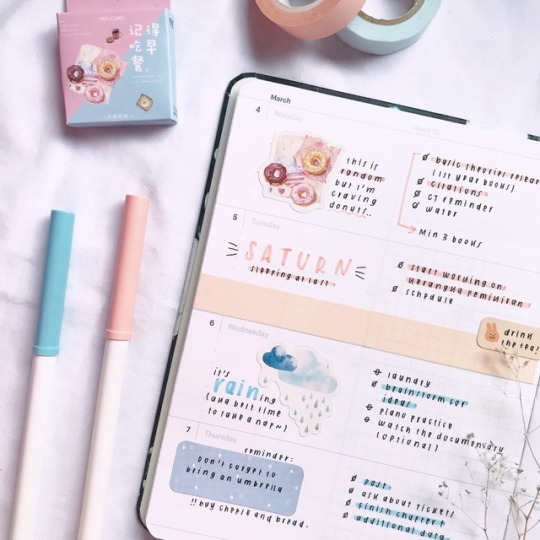

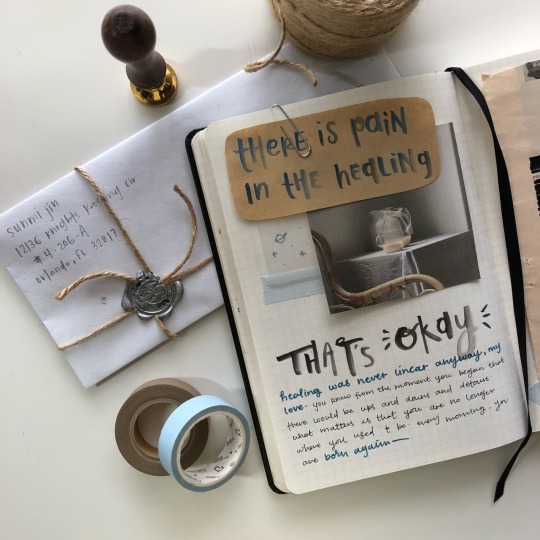
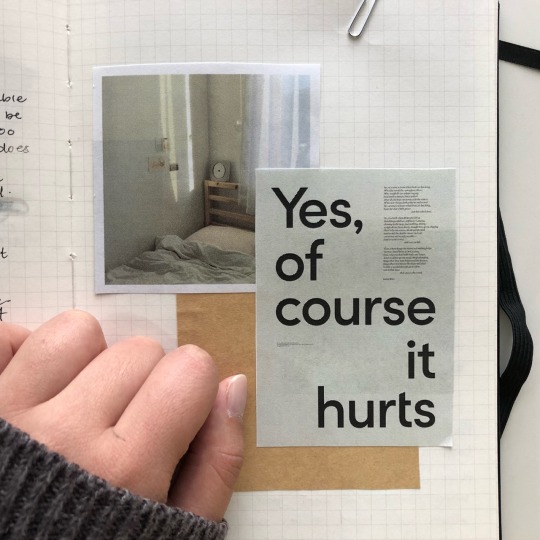
Last week’s spread. (*´∀`*)
Youtube channel
Instagram
Twitter
1K notes
·
View notes
Photo


4/2/18 | hello! sorry i’ve been away for so long but i’ve had a lot going on, especially with my AS levels. i started a new journal for the beginning of the year, and i love the rhodia webnotebook! the pages are so smooth it’s amazing lmao, anyway here is a photographic embodiment of my current aesthetic (i really love grey)
210 notes
·
View notes
Text
Mucad Ibrahim - 3
Abdullahi Dirie - 4
An unnamed 12 year old
Sayyad Milne - 14
Hamza Mustafa - 16
Talha Rashid - 21
Tariq Omar - 24
Ozair Kadir - 24
Ansi Alibava - 25
Syed Areeb Ahmed - 26
Ramiz Vora - 28
Farhaj Ahsan - 30
Mojammel Hoq - 30
Atta Elayyan - 33
Junaid Mortara - 35
Hussain Al-Umari - 36
Mohammed Omar Faruk - 36
Junaid Ismail - 36
Osama Adnan Abu Kwik - 37
Zeeshan Raza - 38
Kamel Darwish - 39
Haroon Mahmood - 40
Sohail Shahid - 40
Hosne Ara Parvin - 42
Syed Jahandad Ali - 43
Khaled Mustafa - 45
Mohammad Imran Khan - 47
Naeem Rashid - 50
Matiullah Safi - 55
Amjad Hamid -57
Lilik Abdul Hamid - 58
Arifbhai Mohamedali Vora - 58
Ghulam Hussain - 60s
Karam Bibi - 60s
Musa Vali Suleman Patel - 60
Abdelfattah Qasem - 60
Ashraf Ali - 61
Mohsin Al-Harbi - 63
Linda Armstrong - 65
Maheboob Khokhar - 65
Muhammed Abdusi Samad - 66
Ali Elmadani - 66
Munir Suleiman - 68
Ahmed Jamal al-Din Abdul Ghani - 68
Hussein Moustafa - 70
Abdukadir Elmi - 70
Haji-Daoud Nabi - 71
Musa Nur Awale - 77
Ashraf Al-Masri - unknown
Ashraf al-Morsi - unknown
Zakaria Bhuiyan - missing - unconfirmed
These are the names that should be on everyones dashboard right now. Not eggboy. Not the murderer. And certaintly not a Clinton.
37K notes
·
View notes
Text


ig: @lattejourn // There’s this small whisper in my heart that had always yearned for a start. ✉
5K notes
·
View notes
Text

Hey guys, so I’m nearing the end of my senior year, and it’s been great so far! I accomplished my academic tasks efficiently and didn’t burn myself out, and I think the main contributor to my success as a student is my organization system. This system has been refined throughout my high school years, but I think now I’ve finally found the most effective methods.
Please remember that this isn’t the only organization system you can adopt; this is just the one that works the best for me, and I hope that by sharing it with you, you’ll gain a new perspective on how to stay organized as a high school student.

The first thing I wanna talk about is my notebook system, which I briefly mentioned in my Guide to Note-Taking.
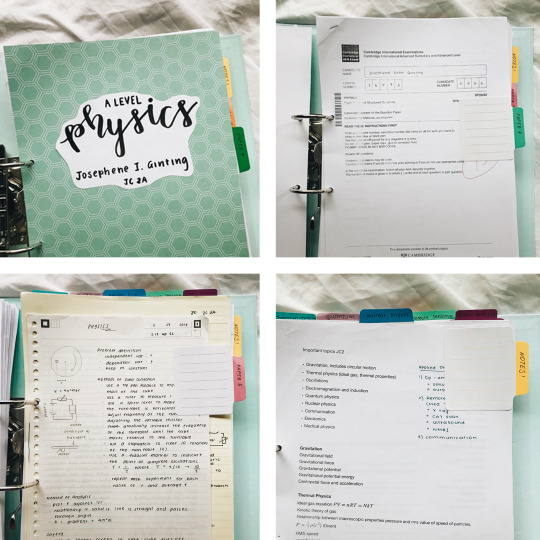
My notebook system comprises three types of notebooks: the Everything Notebook, the subject notebook, and the revision notebook.
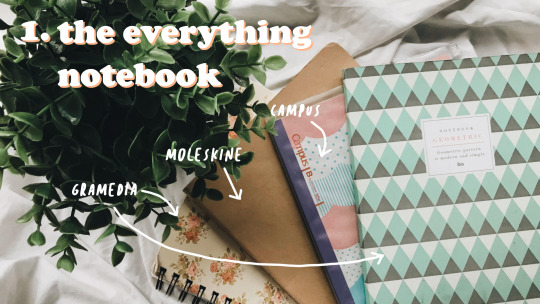
The Everything Notebook
The first stage is in-class notes. I only bring one notebook to school every day. I call it my Everything Notebook, and this is where I write down all of the notes I take in class. This way, I don’t have to lug around six notebooks where I’m only going to use a few pages in each of them that day.
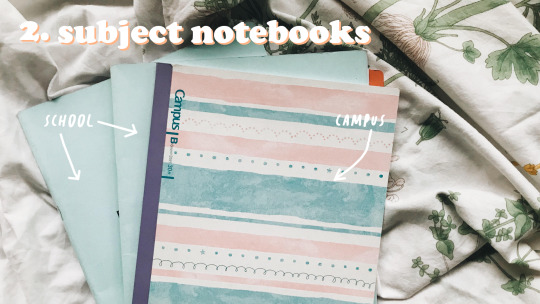
Subject Notebooks
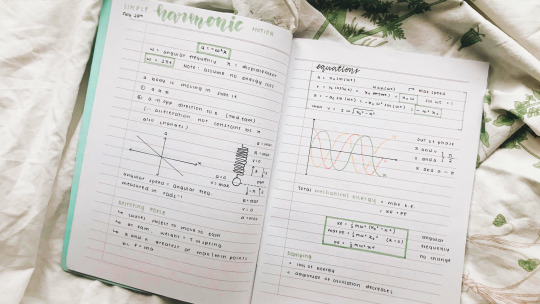
At the end of the day, I would revise my notes and compare them to the syllabus so I know where we are in the learning process. I would then transfer my class notes from my Everything Notebook to my different subject notebooks. This is stage two. I also start to jazz up my notes because I use the notes in my subject notebooks to study for tests.
In addition to my class notes, I include material from my teachers’ notes that they might not have elaborated on, as well as points in the syllabus (I’m currently taking A2) that were only glazed over briefly, or not at all, in some cases. (Note: this does not mean they completely skip a chapter or topic; it’s more like they missed a few bullet points that should be in my notes but aren’t. An example would be if we’re learning about phenol reactions and the teacher forgot to mention the use of FeCl3 as a test for phenol.)
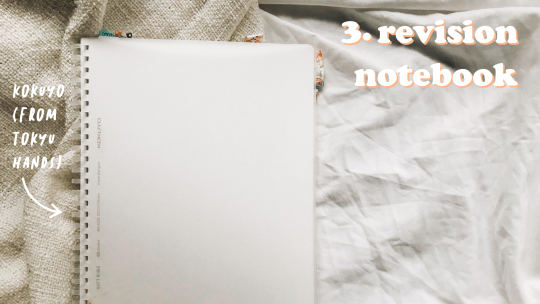
Revision Notebooks
Stage three comes a little later, when exam week is just around the corner. Essentially, I rewrite and improve my notes from my five different subject notebooks into a single revision notebook or binder. (Recently, I’ve opted for a revision notebook because they’re lighter and easier to carry around.)
Because my teachers don’t always teach in the order of the syllabus, the first thing I do is organize my notes according to the syllabus. I would then fill in any other missing gaps in the material that hadn’t been filled in stage two.
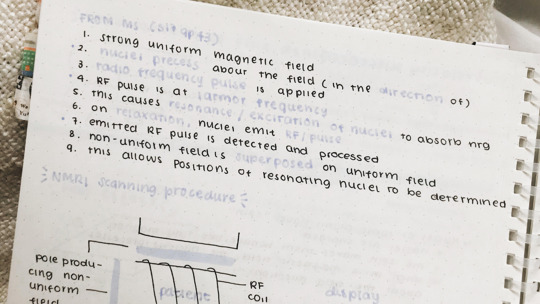
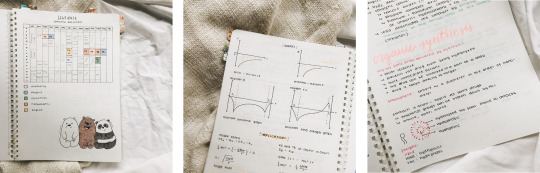
When compiling material for my revision notebook, I use as many sources as possible: my own notes, my teachers’ notes, youtube videos, online sites, and my favorite, the mark scheme! I add in some answers from past papers (explanations only, so no calculations) mainly to secure marks. It’s safer to memorize definitions straight from the mark scheme than from the textbook or from handouts. I also do this to ease my memorization, especially for topics that require lengthy explanations. It’s a lot easier to remember the 6 points I need to explain the principles of NMRI than to remember everything in the four-page handout my teacher gave me.

Folders and binders are essential to organizing your papers. Some people keep a single accordion folder for all their papers, but for me it’s just too heavy to carry around all the time. The same goes for subject folders that are brought to school every day.
Instead, my binder/folder system comprises my Everything Folder and my subject binders.
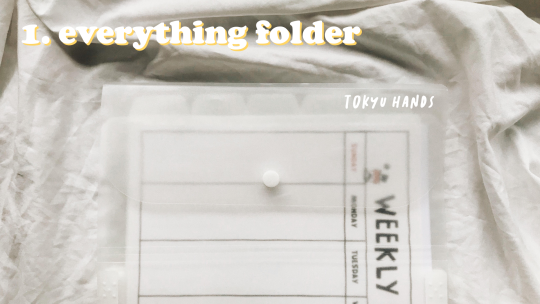
The Everything Folder
The folder I carry with me to school every day is this A4 folder I got from Tokyu Hands. It has 5 pockets, one for each day of the week, so all the papers I receive on Monday will go behind the first divider, and so on.
Some people also keep blank papers in their folders; I don’t because my school has its own lined paper and graphing pads that I keep under my desk that I use if a teacher asks us to do an assignment on those papers. If I do work at home, I prefer to just use a plain A4 paper or a legal pad.
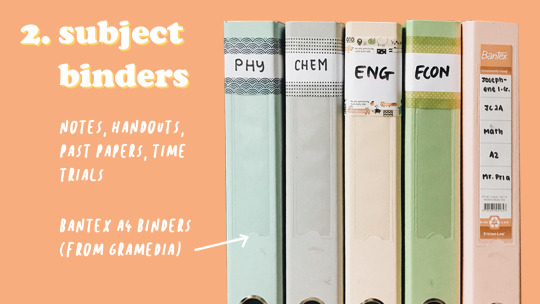
Subject Binders
At the end of the week, I’ll sort my papers into my subject binders. Sometimes I’ll keep some papers in the folder if I think I’ll be needing it the next week. This usually only applies to worksheets because all my teachers’ notes are available on Google Classroom, so I can access them even if I don’t physically have them.
Each of these binders have sections inside them:
Physics: 1 for handouts, notes, and tests, 1 for Paper 4 (Theory), 1 for Paper 5 (Practical Planning). I included extra tabs to mark the different topics in the handouts section.
Chemistry: same as Physics.
Economics: 1 for Paper 3 (MCQ), 1 for Paper 4 (Case Study and Essay). A lot of my Economics material is online, though.
English: 1 for Paper 3 (Text and Discourse analysis), and 2 for Paper 4 (Language Topics, which includes 1 for Child Language Acquisition, 1 for World Englishes). Past papers, handouts, and notes all go under their respective topics.
Mathematics: I just keep everything together because I never revise math and just constantly do past papers.
This makes it easier for me to revise each subject because I can just take one binder with me instead of a messy folder with everything just shoved in there.

I keep a magazine file for each of my A-Level subjects (English and Mathematics are combined). All my textbooks, revision guides, and subject notebooks are kept here, so if I need to revise one subject, that’s the magazine file I’ll take out.
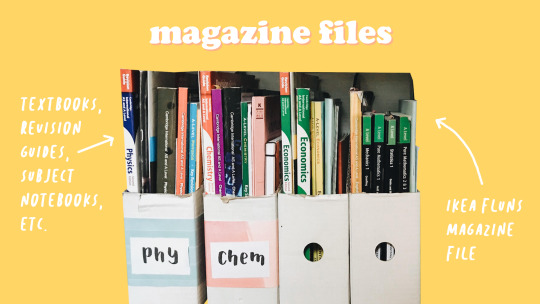
These magazine files prevent any small things (like my book of flashcards) from being shoved to the back of my bookshelf, or materials from different subjects from getting mixed up.

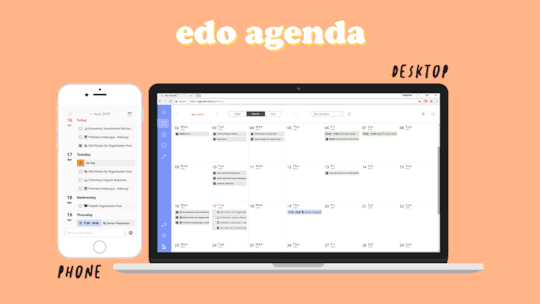
In my senior year, I mostly plan using this app called Edo Agenda. It syncs across all my devices for free and has all the features I need: a to do list to organize tasks, monthly and weekly calendars to organize events, a journal to organize notes and memos.
I used to bullet journal regularly, but it takes too much time during weekdays, so now I just bullet journal for the therapeutic effects it gives me, and I use an app for organizing tasks and events. Sometimes at the end of each week, I’ll transfer my tasks to my bullet journal and then decorate the page, but again, this is just for its therapy.

Organizing your school supplies is just as important as organizing your papers and notes. With a more organized backpack and pencil case, you won’t waste time looking for your things at the bottom of an abyss.

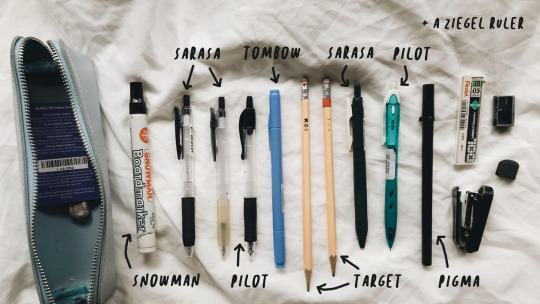
Pencil Case
I don’t find it necessary to bring so much stationery to school unless I plan on making notes at school (usually during revision week).
Backpack
Because we’re already in the revision term, I don’t really carry a lot of things in my everyday backpack, just the following:
Pencil case
Everything Notebook
Everything Folder
Revision notebook
Kindle
Phone
Wallet
Earphones
Calculator
Speaker
Drinking bottle
A pouch with things like a hairbrush, pads, and lip balm
And that’s all for now! I hope this post will help you organize your school life (if you haven’t already) or at least provide some useful insights on some ways to stay organized as a high school student.
45K notes
·
View notes
Text


10.28.2018
And she’s back! The long hiatus from Tumblr is over, and I’m back with more content, tips, and inspo for y’all 😊
Presenting my blue spread for this week (yes I started bullet journaling again!!) It really calmed me down to see all my tasks down on paper. For once, I felt like my life was together.
Have a great day ya stunner 😘
🎵: Paramore - Fake Happy
404 notes
·
View notes
Photo
[10/10/18]
0.64
i love min yoongi. thank you for coming to my ted talk
currently listening to:
seesaw - bts
924 notes
·
View notes
Photo

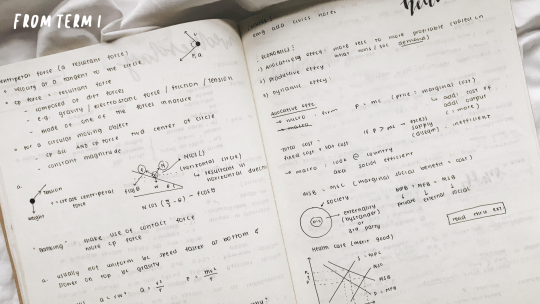
Exam preparations. A month early. :O
10K notes
·
View notes
Text
[WORLDWIDE GIVEWAY] BT21 X VT Cosmetics Lippie Stick

YOU CAN WIN ONE OF THESE SUPER CUTE BT21 X VT LIPPIE STICKS!!
HOW?
You just need to follow me @mimibtsghost & @kpopcloud and reblog this post to enter (You can reblog more than once to increase your chances of winning ^^). You need to keep your msg box open so we can contact you and if you don’t answer within 24 hours the prize will go to someone else.
WHAT?
There will be two winners for a BT21 X VT Cosmetics exclusive collab Lippie Stick. You can choose whatever color you want once you win
WHEN?
From Oct 13 to Oct 20, 2018 midnight KST.
WHERE?
The giveaway is open WORLDWIDE so don’t hesitate to enter. It’s easy~
WHAT IF I WANT OTHER BT21 PRODUCTS NOW?
I was sent a lot of asks from you friends asking me where to get BT21 merch. WELL! REJOICE! I found the PERFECT shop where you can get BT21 merch and other official merch WORLDWIDE. It’s https://kpopcloud.com. But this is not all (I sound like those sellers on tv again hahhah) you can use a coupon for either free worldwide shipping or 10% off: MimiBtsGhost1 for 10% off the entire order or MimiBtsGhost2 for FREE worldwide shipping on the entire order.
10K notes
·
View notes