
Statistics
We looked inside some of the posts by stuccohq and here's what we found interesting.
Average Info
Notes Per Post
630
Likes Per Post
4
Reblog Per Post
626
Reply Per Post
0
Time Between Posts
2 months
Number of Posts By Type
Text
17
Last Seen Tumblr Blogs


Fun Fact
Tumblr’s reach among the 26-to-35-year-olds in the US is 11%.
Text
Local Stucco Repair Contractors in Orlando FL
If you live in beautiful Florida you are probably used to our hurricane seasons by now... We don’t think our stucco homes like them very much at all.
A lot of times these Florida hurricanes can turn small stucco damage neglected over time from a tiny stucco repair to a huge stucco repair project... Wood rot and all.
But no worries! You still have couple of months to get ready. If you already noticed some stucco damage on your home please contact Stucco HQ - your local stucco repair contractor to get it taken care of.
Stucco HQ offers free stucco repair quotes and consultations for any residential and commercial projects.
youtube
Our stucco contractors serve entire Orlando, FL metro area and if you live in the Orlando, FL area could be found by searching stucco repair near me, stucco contractors near me or simply stucco repair Orlando FL...
Our service are can by seen here:
https://www.google.com/maps?cid=4993435536930949161
We look forward to helping you with your stucco project.
628 notes
·
View notes
Text
Stucco Water Damage: Causes and Solutions
Stucco Water Damage: Causes and Solutions
A house clad entirely in stucco is a thing of beauty. There’s no doubt about that. Many homeowners prefer cloaking their houses with this type of exterior because of its benefits. For one, stucco’s top-notch quality makes it last for a long time.
It is also excellent in hiding flaws, is fungi-resistant, and is naturally equipped with thermo-regulating properties – the house will stay cool during summer and warm come winter season.
Apart from that, stucco resists moisture and is water-resistant. The latter is not an absolute, by the way. Stucco can be susceptible to water damage, too.
Bumps on the surface is an early sign of water damage. If not treated early the delamination will cause parts of it to fall off.
The first step in determining what kind of water damage you’re working with. You can ask an expert to perform a moisture test or leak detection test to determine where the water is coming from. The stucco expert will then be able to filter out the root cause before performing a treatment.
Stucco Water Damage Causes
Improper stucco composition
The durability of the stucco will come from a well-balanced mixture of Portland cement, sand, and water.
Each ingredient should conform to the standard specification set by the National Institute of Standards and Technology of the Department of Commerce. Apart from that, the mixture needs to be completely cured before depending on the wall’s integrity.
Improper composition or curing means you might have to deal with water leaking through your walls or cracks forming.
Faulty stucco installation
No matter how great the quality of the stucco is, if it’s not installed right, the outcome will still be mediocre.
A break in the three-coat stucco (scratch coat, brown coat, and the finish coat) application, for instance, will cause a big problem later on. Same is true for installing stucco directly on a wooden lath.
Unsuitable use of flashing
Flashing acts as a protective barrier between the water and the seams of the house. Aluminum is favored because it’s lightweight and inexpensive. But the possibility of corrosion overrides those benefits. Once it decays, water will easily ooze through the holes.
Cracks
Stress cracks in stucco are caused by a lot of factors including earthquakes, direct impact, expansion, or strong winds.
It doesn’t matter whether it’s a hairline crack or a wide pattern crack. Water will seep through any crack it can find in your stucco.
Stucco Water Damage Solutions
Before you even think of fixing your water-damaged stucco, make sure you fix the cause of the water damage. Whether you have a burst pipe, a leaking air conditioner, or whatever else, fixing that should be your first priority. Even if the water damage appears to be a fluke, you don’t want to repair the same stucco twice.
Here is a general approach to repairing water damaged stucco:
youtube
Here are some additional steps you can take to prevent water damage to your stucco in the future:
Applying a drainage plane material to prevent water from entering the wall
Preventing the migration of vapor by applying a vapor barrier
Applying a patching compound to the areas of the wall where the loose stucco has fallen away
Modification of weep screeds to guarantee the proper drainage of water
Application or improvement of sealants
Stucco repair cost
Stucco water damage restoration cost will vary per case. This will depend on the extent of the damage and the materials that will be used.
Does homeowners insurance cover stucco damage?
The repairs to your water damaged stucco may be covered by your homeowner’s insurance.
Typically, whether or not the damage to your stucco is covered depends on the exact cause. Rain and flood damage aren’t covered in many policies, but the damage caused by interior water sources, such as a leaking washing machine, are. Read this post on the differences between water damage and flood damage, or consult your policy issuer.
The other issue is whether or not the stucco was applied by a licensed contractor. A typical homeowner’s insurance policy doesn’t cover work done by unlicensed contractors, and many synthetic stucco distributors sell directly to applicators who may or may not be licensed. That’s just one more reason it’s always better to call a licensed contractor for any work on your home, no matter how minor.
Disclaimer: This article was originally posted by TSC Restoration. Original article can be read by clicking HERE.
Stucco Contractors Recommendations
If you are experiencing stucco water damage and need stucco repair services place contact licensed & insured local stucco contractors to give you a free written quote for the necessary repairs needed for your project. We look forward to speaking with you today!
This article was curated from www.StuccoHQ.com
Read StuccoHQ - Feed here: https://www.stuccohq.com/stucco-water-damage-causes-and-solutions/ Republished via Stucco HQ Feed
1 note
·
View note
Text
Stucco Installation, Procedures and Guidelines
[caption id="attachment_2094" align="aligncenter" width="690"] Image Source: Kirk Giordano Plastering Inc. | YouTube Channel [/caption]
Stucco Installation, Procedures and Guidelines
The following document is based on the 2010 FBC, FBCR, ASTM C926, ASTM C1063, and other Application Guides regarding Stucco installation, procedures and practices. This document is not all inclusive and does not cover all the requirements for compliant installation of stucco. This document is meant to be used as a guide to address some of the common installation and proper application issues found during field inspections.
Stucco Installation Over Masonry:
Conventional stucco over masonry surfaces may be applied with two or three coats. Two-coat systems over masonry consist of: first coat = 3/8 inch thick and finish coat = 1/8 inch thick; or over cast concrete consist of: first coat = 1/4 inch thick and finish coat = 1/8 inch thick. Three-coat systems consist of: first coat = 1/4 inch thick, second coat = 1/4 inch thick, and finish coat = 1/8 inch thick over both masonry and cast concrete.
When required by ASTM C 926, Section 5.2.2; an exterior bonding agent, conforming to ASTM C 932, shall be used on all masonry surfaces. In lieu of a bonding agent, a dash coat, roughing the surface, or metal lath are also acceptable methods for bonding.
FBC 2510.3 Installation, references ASTM C 926 requires form ties or other obstructions (including masonry cut nails for clean out opening forms) to be removed or trimmed back even with the surface of the solid base. In addition, if the nails are to be trimmed flush and left in place, they need to be corrosion resistant as would be required for lath or other metal accessories, ASTM C 926 section 5.2 and C 1063 section 6.
Stucco Installation Over Wood:
Conventional stucco over wood should always be applied as a three-coat system. Scratch coat =3/8 inch thick, brown coat =3/8 inch thick, and finish coat =1/8 inch thick. The scratch coat must be scored horizontally on vertical surfaces. Successive coats should be applied as soon as possible after the underlying coat has sufficient strength and rigidity to resist damage when the next coat is applied. A mist cure shall be maintained as needed for climatic conditions.
Where structural wood panels are used for sheathing, a minimum 1/8 inch separation shall be provided.
The weather resistant barrier (WRB) must be installed per Sections R703.6.3 of the Florida Building Code Residential and 1404.2.1 of the Florida Building Code. Where cement plaster (stucco) is to be applied to lath over frame construction, measures shall be taken to prevent bonding between the cement plaster and the water resistive barrier. A bond break shall be provided between the water resistive barrier and the cement plaster (stucco) consisting of one of the following:
1. Two layers of an approved water resistant barrier material, or
2. One layer of an approved water resistant barrier over an approved plastic house wrap, or
3. Other approved methods or materials applied in accordance with the manufacturer’s installation instructions.
Lathing shall be connected to the framing members 7 inches on center. Lath shall be attached to horizontal wood framing members with 1.5 inch roofing nails and to vertical wood framing members with 6d common nails or 1 inch roofing nails driven to penetration of not less than ¾ inch, or 1 inch wire staples driven flush with the plaster base. Staples shall have crowns not less than ¾ inch and shall engage not less than three strands of lath and penetrate the wood framing members not less than ¾ inch. The fasteners must penetrate the wood framing members not less than 3/4 inch and not be installed randomly in the wall sheathing.
Expanded 3/8” Rib Lath shall be attached to horizontal and vertical wood framing members with nails or staples to provide not less than 1 ¾” penetration into horizontal wood members, ¾” penetration into vertical wood framing members.
Lapping of metal plaster base. Side laps shall be secured to framing members. They shall be tied between supports with wire at intervals not more than 9 inches. Lath shall be lapped ½ inch at the sides, 1 inch at ends. Where end laps occur between the framing members, the ends of the sheets shall be laced or wire tied.
Lathing shall be self-furring or furred out from solid bases and comply with ASTM C 1063, Table 3. Maximum on center spacing of framing members shall be no more than 24 inches. Lath weight should be minimum 2.5 lb/sqyd.
Lath accessories shall have perforated or expanded flanges, to permit complete embedment in the plaster, and be designed to receive the specified thickness of plaster. Accessories include control joints, expansion joints, corner bead, casing bead (plaster stop), cornerite, weep screed, etc.
Control joints (expansion and contraction) shall be installed in walls to delineate areas not more than 144 sq. ft. on vertical surfaces and 100 sq. ft. on horizontal surfaces. The distance between control joints shall not exceed 18 feet, in either direction, or exceed length- to-width ratio of 2-1/2 to 1. The ASTM standard requires the paper to be installed, continuous, behind the joint material and that lath shall not be continuous through control joints, but shall be stopped and fastened (wire tied) on each side of the control joint. All accessories must be installed to receive a minimum 7/8 inch application for a three-coat system over wood.
Control joints must be continuous through decorative bands or other embellishments, so they will not restrict panel movement.
Typical locations for control joints would include: off corners of windows, structural plate lines (expecting minimal movement) and junctures of dissimilar substrates.
Typical locations for expansion joints would include: structural plate lines (expecting significant movement) and at structure expansion joints.
Accessories and end laps of metal lath, where they occur between framing members, may be stapled or nailed to the substrate or wired; 9 inches on center for end laps and 18 inches on center for accessories.
At the intersections of vertical and horizontal control joints, the horizontal control joint shall be cut to fit and butted to the continuous, uninterrupted, vertical control joint. Embed all accessory ends, angles, butts, and intersections in sealant at time of installation.
In wood-frame construction, accent features (foam, accent strips, banding, and trim) should be installed over the brown coat, using adhesive and minimum fasteners penetrating the stucco. (See Recommended Practice Section)
Alternative methods: (accent features applied directly over metal lath)
1. Accent features may be installed directly over metal lath when they are properly flashed or the WRB and lath extend over the top section of the accent feature.
2. Accent features may be installed directly over metal lath when they are isolated from the stucco as prescribed in ASTM C 926, Sec. A2.3.3. This method may require a renewable backer-rod and sealant joint.
3. A proprietary detail, using synthetic stucco and reinforcing mesh.
NOTE: Details for alternative methods must be shown on plans and approved by the Building Official.
The termination of the stucco at the base of a wood structure shall be per ASTM C-926, Section A2.2.2.
A weep screed shall be installed per ASTM Standard 1063-06 section 7.11.5. See below:
A foundation weep screed shall have a sloped, solid, or perforated, ground or screed flange to facilitate the removal of moisture from the wall cavity and vertical attachment flange not less than 3.5 inches long. The bottom edge of the weep screed is placed not less than 1 inch below the joint formed by the foundation and framing. The water resistive barrier and lath shall entirely cover the vertical attachment flange and terminate at the top edge of the nose or ground flange.
Raw earth, grade shall be not less than 4 inches below the nose of the weep screed, paved surfaces shall be not less than 2 inches below the nose of the weep screed.
Roof lines shall be not less than 2 inches below the stucco termination.
[caption id="attachment_2078" align="aligncenter" width="690"] Image Source: http://www.irccdd.com/Applications/Stucco/Guidelines.pdf[/caption] [caption id="attachment_2080" align="aligncenter" width="690"] Image Source: http://www.irccdd.com/Applications/Stucco/Guidelines.pdf[/caption]
Please note the position of the wood structural panel (OSB or plywood), in the RECOMMENDED illustration. It is raised off the concrete and aligned with the face of the foundation. Care must be taken to construct foundation walls straight and true. In areas where the bottom of the wood structural panel is exposed, it shall have an ‘Exterior’ Bond Classification (‘Exposure 1’ is not rated for long-term exposure) or be otherwise protected as shown in the ALTERNATIVE illustration, or as approved by the Building Official. BOAF Informal Interpretation Number 2656, attached, may be used by the Building Official for guidance as to the intent of the Florida Building Code.
[caption id="attachment_2082" align="aligncenter" width="696"] Image Source: http://www.irccdd.com/Applications/Stucco/Guidelines.pdf[/caption]
FBC-R703.15 Drained assembly wall over mass assembly wall. Requires flashing or other approved drainage system (similar to the detail above), installed as required by section R703.8, at the base of framed walls over masonry walls. One-piece and two-piece accessories are available to meet this requirement.
Separation shall be provided where stucco plaster abuts dissimilar materials, openings, and fenestration products and the juncture shall be sealed with sealant. See FBC-R703.6.5, R612.12 and ASTM C 926, Sec. 7.1.4.
The weather-resistant barrier (WRB), bond-break, lath, and stucco shall be installed to the top of the wall top plate, including behind soffits. Where walls butt into perpendicular walls, rough framing shall not contact perpendicular wall sheathing; provide sufficient space to install continuous WRB, bond-break, lath, and stucco.
2010 FBC, Sec. R703.6.5 Fenestration states: The juncture of exterior plaster and fenestration products shall be sealed with a sealant complying with Section R612.12. The documents referenced in Section R612.12 specify types of sealant and sealant joints, with backer-rod. This method of sealing joints around windows is the recommended practice.
Recommended Practice:
The following recommended practices, when carefully done, will provide enhanced protection against water intrusion into framed wall systems.
Installing accent features (foam, accent strips, banding, and trim) over a proper stucco base coat (Scratch and brown coats) helps eliminate a major source of moisture intrusion. This method is highly encouraged and considered Recommended Practice.
Installing a strip of self-adhering flashing or self-sealing membrane under trim, banding, and lath accessories (both vertical and horizontal) helps protect against water intrusion where fasteners penetrate the WRB.
Self-furring, paper-back lath (made with 10-minute, Grade D paper) over house wrap meets all of the requirements of the Florida Building Code. Self-furring, unbacked lath over two layers of WRB, consisting of a layer of 60-minute, Grade D paper (or better) over a layer of house wrap will provide enhanced protection against water intrusion.
When installing the WRB’s, care must be taken to keep the membranes tight into the corner, so the lath can be installed without puncturing the WRB’s.
In multistory, frame construction, where stucco wall covering is continuous past a floor; a weep screed should be provided, with expansion/contraction capabilities, or other effective means to drain away any water that may get behind the plaster.
NOTE: This guide was republished from IRCCDD.COM INDIAN RIVER COUNTY/CITY OF VERO BEACH BUILDING DIVISION 1801 27th Street, Vero Beach, FL 32960 Phone: (772) 226-1260. This guide can be read in its entirety here. StuccoHQ.com is not associated with INDIAN RIVER COUNTY/CITY OF VERO BEACH BUILDING DIVISION in any way.
Take a look at this very informative stucco installation video.
youtube
This article was curated from www.StuccoHQ.com
Read StuccoHQ - Feed here: https://www.stuccohq.com/stucco-installation-procedures-and-guidelines/ Republished via Stucco HQ Feed
1 note
·
View note
Text
The Benefits of Using Stucco
The Benefits of Using Stucco
Written by Albert Carrillo for Walls & Ceilings Magazine.
Back in the early ’80s, I was cutting my teeth in the stucco industry. It was in Tucson, Ariz., where stucco was king; EIFS, the relative newcomer, a close second. Back then, it was the cladding du jour, the go-to for all the buildings. A building could be made “distinct” by adding pop-outs, lots of pop-outs. It was no “walk in the park” working the walls, but in retrospect it was a very profitable and rewarding career. It was because of my choice to be a plasterer that I am where I am today.
In my storied career, I have seen building cladding fads come and go: glass, metal, wood, brick, all gaining momentum but eventually, the tide turned back to stucco and EIFS. Today, we are seeing an increase in the selection of engineered metal and glass facades and a more aggressive decline in the selection of stucco. I still believe stucco remains one of the most affordable and versatile claddings for all types of construction. After all, with its versatility and affordable cost (compared to other engineered claddings) and our current construction uptick, one would think the plastering trade would be prospering, growing and attracting the multitudes. It is my opinion that this is not the case and in reality, stucco is just maintaining a status quo. So, it begs the question why?
Is Weather the Culprit?
Now, I must admit that in the southwest, for six to eight months, the hotbox summertime takes a toll on the body and minds of our plasterers. It is just plain difficult to apply stucco in extremely hot temperatures. One must have experience dancing in the devil’s heat to ensure a good stucco cladding application. In fact, all through the Sunbelt states—where stucco is very popular—this hot-boxing effect exists. (Same dance with some humidity variations; taxing the bodies of the applicators; challenging their abilities to apply stucco.) But, I don’t think excessive heat is the reason for stucco just maintaining a status quo.
And what about the other side of the thermal coin, such as the states north of the Mason-Dixon line, where temperatures are mostly shivering cold? Back in the ’80s and ’90s, I was surprised to see stucco gaining popularity in these areas. Skilled craftsmen and women rallied behind the cladding and helped to grow the stucco market albeit for very short application seasons. I suppose that just like anywhere else, it was aesthetically popular and versatile, ergo desired. But similar to the Sunbelt states, stucco is not taking the leaps in preference it once did. No, I don’t believe the cold is the reason for stucco just maintaining the status quo.
From Northern California to the Canadian border, stucco has been a very popular cladding choice. It was successfully installed for years in this rainy, mostly always-moist, environment. Here, the art of tenting a building was perfected so stucco could be installed during the rains. Some really hot wet weather and cold wet weather added challenges to the wroughting of the cement cladding. Nevertheless, not the reason for stucco just maintaining a status quo.
Wet cement is a very burdensome product to manipulate. It contains heavy elements like sand, cement, and water that when combined, place a heavy load on the applicators. Despite this heavy load, a skilled plasterer makes application look as easy as putting on a pair of pants. They have mastered the ability to move this heavy, wet, plastic mix that would rather splash to the ground from a mixer to a relatively flat surface, than the exterior walls. I have many (old) friends suffering from joint pain and overall body aches from slinging the mud. It is just plain old hard work being a plasterer. Still, even this is not the reason for stucco just maintaining a status quo.
Stick to the Stuff You Know
If I were to focus on a “best reason why” our plastering trade is just maintaining a status quo, I would place the spotlight on the constant downward pressure developers, and builders, are placing on the trade. The price to apply a square yard of plaster has not increased comparatively, in relation to the current economies of construction. In the stucco heyday, the builders reviewed bids to select the most competent, not just take the lowest bid.
Today, the “lowest-bid-gets-the-job” selection process places undeserving stress on stucco contractors to just come out of the gate cheap. Interestingly enough, the buildings aren’t getting cheaper to build and surely don’t have a cheaper sales price reflecting the cheaper application price spiral. Following in the downward whirlpool are the wages a man or woman earns to sling mud. And shoveled into the mix is the willingness for survival (I’m sure) of the manufacturers and material suppliers to keep lowering their prices. For the labor burden put on an applicator, cheaper is not better. So, the inquiring minds, the thinkers, the best-of-the-best wander to greener pastures or retirement. Their knowledge is passed on by those left, not through a formal training but rather by word of mouth. Remember the Gorilla story?
I believe in our current environment there are increasingly unfounded perceptions that stucco is a troublesome cladding. It is not the applicators, because heck, anyone can apply stucco, moreover the perception is directed at the actual stucco cladding. Therein lies a real danger. More and more we are seeing enhanced stucco assemblies, engineered with double-sheathed foam sandwiches over vapor impermeable building wraps with high-performance drainage cavity components and product additives to supposedly eliminate labor steps. Yeesh, can we just stop the madness?
Just like a soupy stucco mix, a watered-down version of skilled craftsmen and the knowledge they carry, lends to weak stucco. This is the chink in the armor that allows stucco “issues” to become more prevalent. I saw a great T-shirt that had printed on the back: “Skilled Labor isn’t Cheap and Cheap Labor isn’t Skilled.” What a very simple premise, an understanding of the very basics of quality construction. Unlike products like computers, automobiles and high-tech gadgets, plaster application cannot be improved solely by advanced product technology.
Quality stucco claddings still rely on a blend of the toils of the body and application knowledge. I believe if we can reestablish a truly trained and knowledgeable workforce, we have the courage to provide service at a fair price, we provide plasterers a living wage and if the crick doesn’t rise, then, we can grow our plaster trade.
Original article about benefits of using stucco was published on www.wconline.com
Check out educational video about traditional stucco and EIFS below:
youtube
You might need to stucco crack repair, or need stucco chimney repair services, or just fix your damaged stucco on your home or place of business. If you are looking for professional stucco repair contractor or experienced stucco installation company in your area please do not hesitate to call one of Stucco HQ's local offices and talk to our friendly staff. They will set up free stucco quote appointment with one of our professional and experienced stucco estimators. You will receive a written and detailed quote about your stucco project without any obligations or any strings attached. We hope you found this article informative and useful and look forward to speaking with you soon.
This article was curated from www.StuccoHQ.com
Read StuccoHQ - Feed here: https://www.stuccohq.com/benefits-of-using-stucco/ Republished via Stucco HQ Feed
0 notes
Text
Stucco Siding Application

© Michael Shake | Dreamstime.com Stucco siding is durable, highly resistant to weather, and easy to maintain.
Stucco Siding Application
Expert advice on stucco siding, including advantages and drawbacks, with helpful a diagram and photos of stucco wall construction.
In This Article:
Traditional Stucco Construction
Thin-Coat Stucco Systems
Exterior Insulation and Finish Systems (EIFS)
Cost of Stucco
Stucco is a plaster-like exterior finish that is popular as a siding material on many types of homes, from Southwest and European-style to contemporary. Because stucco is essentially concrete, it has several considerable advantages over siding materials such as wood. First, it is tough and durable—when properly maintained, it will last 50 years or more. And it’s seamless, so weather doesn’t have cracks and crevices to penetrate. Because it’s a form of masonry, it isn’t prone to damage from fire, rot, or insects and it does a good job of blocking noise.
On the downside, stucco can be brittle and, as a result, crack with settling of the house or with earthquakes. This said, stucco is formulated today with epoxy, making it more elastic and thus less likely to fracture. If stucco does crack, it can be repaired, as discussed in the article How to Repair Stucco.
One more downside is that, in extremely rainy regions, water can soak into stucco, eventually penetrating walls. With any stucco installation, proper flashing is an absolute must to prevent damage to the interior of the wall. Application must ensure that any water penetrating through the material will be carried away properly.
Check what local stucco contractors advise before you paint stucco. If painting is an option, choose a 100 percent acrylic latex paint specially formulated for stucco surfaces. Also see How to Paint Stucco.
Traditional Stucco Construction
Traditional stucco is made from a mixture of Portland cement, fine sand, water, and hydrated lime. In addition, it may contain acrylic or glass fiber additives that improve its strength and flexibility.
[caption width="376" align="alignright"]
©Don Vandervort, HomeTips This old-style stucco construction utilizes wire “stucco netting” and horizontal slats as spacers between the sheathing and the stucco.
[/caption]
It is applied wet in three coats: a base layer called the “scratch coat,” a second “brown coat,” and a final “finish coat.”
After the first coat is applied, a notched trowel is used to “scratch” the surface with horizontal grooves so that the next brown coat has something to grip. Then comes the brown coat and, finally, the finish coat.
Before each successive coat is applied, the previous is allowed to dry—typically a day or two before applying the brown coat, and from one to two weeks before applying the finish coat. In hot weather, each coat is lightly sprayed with water periodically so that it cures slowly and evenly—drying too quickly will weaken it. And the final coat may crack from shrinkage if it doesn’t cure slowly.
Stucco is applied over a base of wire mesh that grips it and helps to prevent it from cracking. The diagram above shows how an older stucco wall is built—note how this is different than the newer type of construction shown in the photos below. With the older type, chicken-wire-like mesh called “stucco netting” is fastened over horizontal wooden slat spacers to allow pockets for the stucco to squish into and grip.
[caption id="" align="aligncenter" width="720"]
Don Vandervort, HomeTips © 1997-2019 | HomeTips Building paper is applied over plywood or oriented-strand board sheathing, and then wire mesh is attached.
[/caption]
With newer stucco construction, a much heavier, three-dimensional wire lath is nailed, screwed, or stapled to directly to studs beneath the base of weather barrier and sheathing. Contemporary forms of wire lath include woven-wire lath, welded wire lath, and expanded metal lath.
[caption id="" align="aligncenter" width="720"]
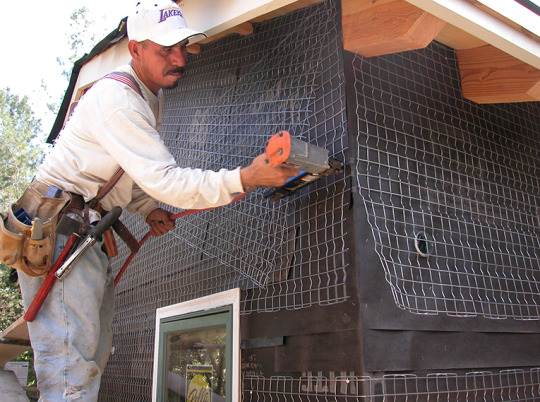
Don Vandervort, HomeTips © 1997-2019 | HomeTips Wire lath is fastened onto the wall in preparation for stucco. Where doubled-up, it will be trimmed.
[/caption]
Because stucco is porous, the base—typically plywood or oriented-strand board sheathing—must have at least one layer of weather-resistant, vapor-permeable asphalt-impregnated building paper (“felt”) or plastic-based building wraps or stucco wraps. This barrier must reject weather and water but allow vapor to escape. In many cases, two layers are used because the stucco sticks to the top layer, making it less effective. A “weep screed” at the foundation line allows water to drain away.
[caption id="" align="aligncenter" width="720"]
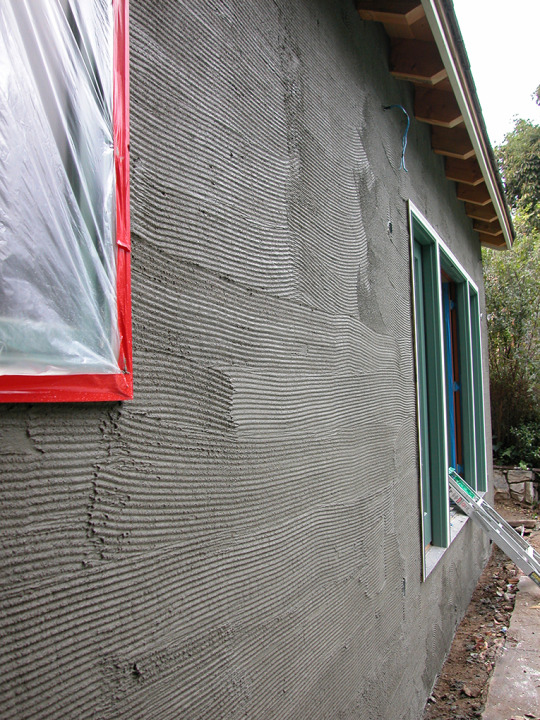
Don Vandervort, HomeTips © 1997-2019 | HomeTips The scratch coat has horizontal grooves so the next coat will have something to grab onto.
[/caption]
The first two coats can be troweled or sprayed onto the wall. The final coat is typically troweled onto the surface and given one of many possible textures, from smooth to sandy or irregular.
[caption id="" align="aligncenter" width="720"]
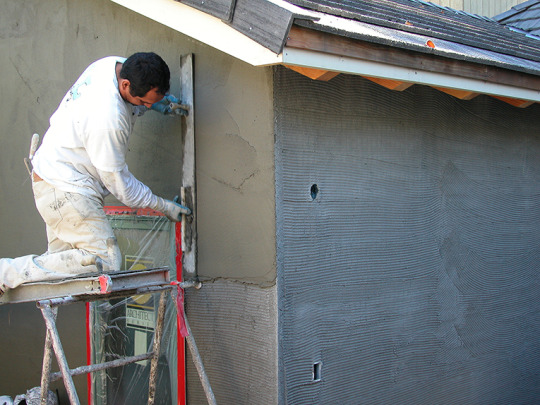
Don Vandervort, HomeTips © 1997-2019 | HomeTips A long, flat screeding tool is used for leveling and smoothing the second “brown” coat.
[/caption]
Rather than painting stucco, pigment is typically mixed into the final coat. A popular option is to use an acrylic-based finish as the final coat. Because acrylic finishes are resilient, they are far less likely to crack and also help minimize moisture penetration into the stucco.
[caption id="" align="aligncenter" width="720"]
Don Vandervort, HomeTips © 1997-2019 | HomeTips The final finish coat is tinted so the walls don’t have to be painted.
[/caption]
Stucco can also be applied over properly primed solid masonry surfaces such as concrete block, brick, or older stucco. To ensure adhesion, however, it should not be applied over a painted surface without sandblasting first.
Thin-Coat Stucco Systems
Modern synthetic stucco can be applied as one base layer and a finish layer, which is thinner and has a shorter application period than conventional stucco—closer to one week than two.
The base for this system is similar to the one discussed above: wire mesh over weather-resistant, vapor-permeable building paper. The makeup of the material is different, however. The base coat, mixed with only water and sand, contains chopped fiberglass and acrylic polymers that make it stronger.
The finish coat is typically a colored elastomeric formula mixed with a fine aggregate. The result is a smooth, water-resistant finish that is less likely to crack than ordinary stucco. It usually looks a little more uniform in color, too.
One downside is that, because it is thinner than traditional stucco, it can be damaged more easily. Another is that, if soaked, it takes longer to dry out. And last but not least, these systems are proprietary and must be applied precisely to specifications or the warranties may be voided.
Exterior Insulation and Finish Systems (EIFS)
This form of synthetic stucco, known to professionals as EIFS, short for exterior insulation and finishing system, is different than traditional stucco. With EIFS, panels are covered with an acrylic coating that looks like plaster. The panels may be foam- or fiber-cement board siding (foam has considerably higher insulation values). The polymers are generally sprayed onto the panels.
EIFS systems have a reputation of moisture-related problems, primarily because of improper application. Fundamentally, if not properly backed by a membrane, flashing, and proper drainage system, water can become trapped in the walls, causing rot and mold. Before opting for an EIFS system, do your homework! High-quality professional installation is absolutely imperative.
Cost of Stucco
Stucco isn’t as expensive as a premium-grade cedar siding, but costs considerably more than vinyl or fiber-cement siding. The only way to really get a fix on cost is to get an estimate, but figure it will probably cost from $6 to $11 per square foot for materials and labor.
This article was written by Don Vandervort for HomeTips.com and was curated by StuccoHQ.com Stucco Siding Application article can be read in its entirety by following this link.
About Don Vandervort Don Vandervort developed his expertise more than 30 years ago as Building Editor for both Sunset Books and Home Magazine. He has written more than 30 home improvement books and countless magazine articles. He appeared regularly on HGTV’s “The Fix,” and served as MSN’s home expert. Don founded HomeTips in 1996.
From StuccoHQ.com editor:
Check out this educational video from about stucco installation process. This video below explains how to install exterior stucco using QUIKRETE.
youtube
We encourage you to contact your local StuccoHQ office to schedule Free stucco repair estimate. Like with any home repair project - time is not on your side, and a small stucco repair might turn into a huge project that will cost you more time and money.
This article was originally published on www.StuccoHQ.com
from StuccoHQ - Feed https://www.stuccohq.com/stucco-siding-application/ via Stucco HQ Feed
0 notes
Text
1 Coat vs 3 Coat Stucco Process
[caption id="attachment_1728" align="aligncenter" width="690"] Image Credit: www.echotape.com[/caption]
1 Coat vs 3 Coat Stucco: Understanding the Difference
Stucco provides a durable, low maintenance finish that adds lots of character to a house. It can be applied with either a one coat or three coat process, but there is some confusion about the methods. For example, one coat stucco is actually a two-step process. Let’s take a look at each technique as well as the advantage that each has to offer.
What is Three Coat Stucco?
Three coat is the original stucco process, consisting of paper and wire, a scratch coat, a brown coat and a finish, or “top” coat. In industry terms — lath, scratch and brown. The finish coat is not considered a step because it is needed on every type of application that is used, so they are mainly referring to the stages up until the finish coat.
More specifically, a lath of an asphalt-infused paper is applied over a weather-resistant barrier. Then a layer of furred chicken wire (meaning it sticks off the wall a little bit) is applied. Next comes the scratch coat, which is a base layer of field-mixed Portland cement, sand, lime, and water with a series of horizontal lines scratched into it. Then comes the brown coat. This layer is applied with a darby, or long trowel, to make sure the cement is applied evenly. Finally a finish coat is put on with a hawk and trowel and it can be applied in a variety of textures. These coats come in a range of colors so no additional painting is needed.
The big advantage to three coat is its strength and durability. Since it is twice as thick as one coat it’s better able to hold up to wear and tear. The two drawbacks are time and cost. It can take weeks for each layer to be applied and cure. As a result, the extra materials and labor make three coat more expensive than the one coat option.
What Is One Coat Stucco?
The term one coat stucco refers to a blend of Portland cement, sand, fibers, special proprietary chemicals and water. This method speeds up the three coat stucco process by combining the scratch and brown coat into a single application of 3/8″ to 1/2″ thick. It is typically applied over a rigid foam board and lath to provide an Energy Code required Continuous Insulated durable cladding.
That said, the term “one coat” is a misnomer because the first iteration had the colored finish coat mixed into the blend. Unfortunately, it resulted in uneven color and fibers that were visible at top layer so the two coat method was adapted.
What Are The Benefits of One Coat Stucco?
The one coat method is growing in popularity between stucco contractors due to the advantages of speed and cost. Unlike three coat, one coat saves money because the application takes approximately half the time resulting in quicker job completions, reduced labor costs, low maintenance and life-cycle cost ratio. Yet, One Coat Stucco provides the all the same benefits expected from three coat stucco…durability, design flexibility and fire resistance. The downside is that the thinner depth makes it is more susceptible to damage and need for stucco repair.
Common Problems with Stucco and Home Building
Stucco is actually a porous material and is designed to allow the absorption of water. Housewrap, or water-resistive barrier, acts as a drainage plane, and as the stucco dries, water flows down the building paper and weeps out the bottom of the stucco. As long as the sheathing stays dry and water does not get trapped in the wall cavity, problems will be rare. But… they do still happen.
It’s important that high performance building professionals and contractors be aware of these issues for they are far less forgiving when water enters the system. For example: the use of housewrap as a water-resistant barrier (WRB). Housewrap is primarily an air barrier with water-resistive qualities. As a results of changes to building codes which specified the use of WRBs, contractors should be aware that in order to function properly there needs to be a space between the stucco and the WRB so that water can dry out. If this is not adhered to as a best practice, water can get trapped and degrade the entire wall assembly, not only leading to the growth of black mold, but deteriorate the structural integrity of the building.
Also, improper window flashings continue to be an issue, as the stucco cladding is most vulnerable to excessive quantities of water entering the wall assembly at window flashings and roof wall connections.
How Is Tape Used in Stucco Applications?
You may not be aware that adhesive tape is an important tool used in exterior stucco application or stucco repair. Stucco composite can damage windows and frames if it accidentally comes in contact with it during the application process, so contractors make sure to mask them off using a tape that is specifically designed to keep a strong hold against plaster and withstand intense sunlight and fluctuating temperatures.
It is also important for the tape to be able to hold up heavy plastic sheeting that is used to keep windows and other surfaces clean and protected while stucco is being applied. Additionally, tape is used to create a watertight seal to protect surfaces not meant to get wet, as explained in the common problems section. (Plus, one of the steps in stucco application involves applying a light spray of water over the stucco surface to help it set!)
So why use specialty stucco tape instead of something more generic? It all comes down to choosing right tool for the job. Stucco work requires tapes that are designed specifically to survive the weight of plaster; adhere to multiple surfaces, not just concrete and wood; and leave no residue when it’s removed 7, 10 or even 60 days later. This means it needs to stand up to a multitude of elements, including sun, rain, wind and even severe temperatures, before removing cleanly.
If you are involved in stucco contracting work, be sure to choose a tape designed with stucco purposes in mind in order to ensure a clean, high quality job. Take a look at ECHOtape’s stucco masking solutions. And if you still have questions about stucco tape or any of our other pressure sensitive tapes, please contact www.EchoTape.com. They love solving tape challenges!
youtube
This article was originally published on www.EchoTape.com and can be read in it entirety here.
This article was originally published on www.StuccoHQ.com
from StuccoHQ - Feed https://www.stuccohq.com/1-coat-vs-3-coat-stucco-process/ via Stucco HQ Feed
0 notes
Text
Why Does Stucco Crack?
[caption width="480" align="alignleft"]Image Credit: www.mcgarryandmadsen.com[/caption] This article was written by McGarry and Madsen Inspection and was published first on www.mcgarryandmadsen.com
Why Does Stucco Crack?
There are three types of stucco finish walls on Florida homes: stucco on concrete block, Exterior Insulated Finishing System or EIFS (also called synthetic stucco), and stucco on wood frame construction. Stucco over concrete block has limited problems compared to the other two, and EIFS already has well-known and documented moisture intrusion problems, along with lawsuits dating back to the mid-1990s. So let’s look at the defects found in the third type: stucco that is applied over a paper-backed metal lath on wood frame wall construction, which was especially popular in Florida during the building boom of 2004 to 2008.
When buckling, ripples and stains appear in stucco, like in the photo above, homeowners get worried. But the trouble begins with small cracks like the ones shown below, barely visible, that let water into the wall.
The inherent problem with stucco on a wood frame structure is that wood moves around—expanding, shrinking, and sometimes twisting—with changes in humidity. Wood is also somewhat flexible. Stucco, on the other hand, is comparatively stable and stiff, but it expands and contracts with changes in temperature more than wood. When you apply a stucco surface to a wood wall, there must be built-in details to keep the differing movement of the two materials from cracking the less-flexible stucco.
The Florida Building Code uses the ASTM C-926-06 specifications for the application of stucco, which refers to it by the more technically correct name of “Portland Cement-Based Plaster.” The specs are based on these five time-tested standards:The Florida Building Code uses the ASTM C-926-06 specifications for the application of stucco, which refers to it by the more technically correct name of “Portland Cement-Based Plaster.” The specs are based on these five time-tested standards:
1) THICKNESS Stucco should be at applied in three coats, at least 7/8” thick (not including any texture) to resist cracking.
2) FLEXIBLE EXPANSION JOINTS Placed at regular intervals along the wall, they absorb the expansion and contraction of the stucco due to temperature changes. These are also called control joints.
3) WEEP SCREED A weep opening at the bottom of the wall lets any water that penetrates the stucco drain out behind it, instead of getting trapped and rotting the wall framing. When a wood-frame second floor is built on a concrete block first-floor structure, the weep screed will be a strip located at the bottom of the second floor level.
4) CASING BEADS These wrap around anything that penetrates the stucco surface—such as windows, doors, and soffit returns—to provide a gap that can be caulked and prevents hairline cracks that will admit water into the wall.
5) DRIPS At any change of plane from a vertical to a horizontal under-surface of the stucco, a drip edge lets water fall off at the corner and not migrate sideways due to surface tension.
All of this differs dramatically in complexity from the installation of regular siding, which depends on simple down-lapping of smaller pieces of building material for waterproofing, and movement is absorbed by the numerous overlapping joints, plus caulk around doors and windows.
If any of the five anti-cracking measures are ignored, you will have a stucco problem. Maybe not immediately, because it takes a few years for the initial small cracks to let in some water, which rusts the steel lath, and opens the cracks further, letting in even more water...and so forth. But it will happen.
Here’s a listing of how each one of the five can be done wrong:
1) THICKNESS When the total of the three coats of stucco dips below 7/8-inch thick, those areas are more prone to cracking. Sometimes only two coats are applied, with not enough curing time between coats. Also, if the backing paper and lath is sloppily installed, it can create pockets of thin coverage.
2) FLEXIBLE EXPANSION JOINTS The total area of stucco between expansion joints should not exceed 144 square feet, with the additional restrictions that the joints not be more than 18 feet apart along the wall and a length-to-height ratio that does not exceed 2.5 to 1. The expansion joints should be tied to the metal lath only, not attached to the wall sheathing underneath, so that the joints can move independently from the wall structure. Metal lath that is continuous behind the expansion, connecting both panels, defeats the joint. Expansion joints that are placed too far apart or attached directly to the wall sheathing will also not do their job. A crack along the side of an expansion is an indication that it was likely not installed properly.
[caption width="437" align="alignleft"]Image Credit: www.mcgarryandmadsen.com / Mark Cramer[/caption]
3) WEEP SCREED No matter how carefully stucco is installed, some small cracks will appear over time. Trapped water wets the wood structure and starts rot when there is no opening at the bottom of the wall or the opening is obstructed. Some weep screeds have protective tape over the drain holes that should be removed after installation and gets forgotten.
4) CASING BEADS Sometimes they are simply not installed. Without a groove to apply flexible caulk, cracked stucco along the side of a window frame is a common place for the stream of rainwater that runs down the side of a window to enter the wall.
[caption width="484" align="alignnone"]Image credit: www.mcgarryandmadsen.com[/caption]
It begins as in the photo above, but buckling stucco and staining follow over time. The photo below shows typical damage in the wall framing from this defect.
[caption width="437" align="alignnone"]Image Credit: www.mcgarryandmadsen.com / Mark Cramer[/caption]
5) DRIPS They are not as aesthetically pleasing as a simple corner bead where vertical surfaces return back horizontally, but ugly water intrusion damage ensues if a 1/4” minimum drip edge is not installed. The photo below shows the rotted wood sheathing found under the stucco at the corner of an open porch with this defect.
[caption width="437" align="alignnone"]Image Credit: www.mcgarryandmadsen.com / Mark Cramer[/caption]
Other defects that can cause stucco cracking include: not enough fasteners securing the metal lath, undersize fasteners that do not penetrate deep enough into the wall sheathing, improper lapping of the building wrap to the weep screed, and not leaving the required 1/8” gap between sheathing panels. Because many of the defects that allow water entry are concealed by the stucco itself, they cannot be verified without digging into the wall. But their symptoms bloom and spread on the wall surface over time.
It usually takes five to seven years or more from time of construction to see clear signs of distress in stucco walls that are the result of defective stucco installation. But every stucco finish will develop a few hairline cracks, so we recommend checking for them at least once a year, and sealing the cracks with a masonry caulk.
Repainting the walls and touching up the caulking every 7 to 10 years is also a good idea, since paint and caulk are your first layer of protection from water intrusion. Because home builders occasionally claim that inadequate maintenance of the wall finish is a contributing factor in stucco failure claims from their customers, your diligent maintenance may have the added benefit of helping you secure your claim for damage to your home if it is due to defective stucco installation.
When the cracks multiply and get worse, in spite of your maintenance and repairs, we suggest calling a professional inspector for further evaluation. The one you choose should be familiar with the installation standards and have some experience in diagnosing stucco problems, plus carry a couple of moisture sensing tools, such as an infrared camera and an electronic moisture meter, in their tool bag.
If you are wondering why older homes with stucco walls don’t have the same severe cracking problems as outlined above, it is because most of them are stucco over concrete block. The block has a similar rate of expansion and contraction as stucco, and concrete block is more forgiving of a little moisture intrusion. It can absorb and dissipate through evaporation any small amounts of water that penetrate the stucco.
The thickness of stucco, along with sufficient curing time between coats, also makes a stronger surface, and older homes that are of similar stucco-over-metal-lath are more likely to have been done correctly.
###
If you noticed any stucco crack on your home or commercial property and are in need of stucco crack repair contractor please do not hesitate to call Stucco HQ office located near you and schedule a free stucco repair estimate.
98d438fcf3b1f238b53a3bf4da71170f0889317bf5882856b36d7453d8bc457298d438fcf3b1f238b53a3bf4da71170f0889317bf5882856b36d7453d8bc4572POSTLINK98d438fcf3b1f238b53a3bf4da71170f0889317bf5882856b36d7453d8bc457298d438fcf3b1f238b53a3bf4da71170f0889317bf5882856b36d7453d8bc4572 was originally published on www.StuccoHQ.com
0 notes
Text
The Art and Architecture of Stucco
The Art and Architecture of Stucco
Stucco is a mortar mixture that is commonly used as an exterior siding application on houses. Historically it has been used as a sculpting medium for architectural ornamentation. Stucco can be made by mixing sand and lime with water and various other ingredients, most often cement. Like frosting on a cracked layer cake, a good layer of stucco can enrich a once-shabby exterior.
The plaster-like material, however, has many decorative uses and is found throughout the world. For centuries stucco has been used not only in Middle Eastern mosques, but also as ornate Rococo ornamentation in Bavarian pilgrimage churches.
The Stucco Wall
Stucco is more than a thin veneer but it is not a building material—a "stucco wall" is not structurally made of stucco. Stucco is the finish applied to the wall.
Usually, wooden walls are covered with tar paper and chicken wire or galvanized metal screening called casing bead. Interior walls may have wooden laths. This framework is then covered with layers of stucco mixture. The first layer is called a scratch coat, and then a brown coat is applied to the dried scratch coat. The tinted finish coat is the surface everyone sees.
For masonry walls, including damaged brick and concrete block that a homeowner wishes to hide, preparation is easier. A bonding agent is usually brushed on, and then the stucco mixture is applied directly to the power-washed and prepared masonry surface. How to repair stucco? Historic preservationists have written extensively on the topic in Preservation Brief 22.
Definitions
Stucco is often defined by both how it is made and where (and how) it is applied.
Historic preservationists in Great Britain describe a common stucco as a combination of lime, sand and hair—with the hair "long, strong, and free of dirt and grease, from the horse or ox." A 1976 Time-Life home repair book describes stucco as "mortar containing hydrated lime and asbestos"—probably not a recommended additive today. The 1980 Penguin Dictionary of Architecture simply describes stucco as "Plasterwork usually rendered very smooth or modeled as in stucco ceilings." The Dictionary of Architecture and Construction covers all bases:
stucco 1. An exterior finish, usually textured; composed of Portland cement, lime, and sand, which are mixed with water. 2. A fine plaster used for decorative work or moldings. 3. Simulated stucco containing other materials, such as epoxy as a binder. 4. A partially or fully calcined gypsum that has not yet been processed into a finished product.
Decorative Stucco
Although stucco-sided homes became popular in twentieth century America, the concept of using stucco mixtures in architecture goes back to ancient times. Wall frescoes by ancient Greeks and Romans were painted on fine-grained hard plaster surfaces made of gypsum, marble dust, and glue.
This marble dust compound could be molded into decorative shapes, polished to a sheen, or painted. Artists like Giacomo Serpotta became stucco masters, incorporating figures into the architecture, like the male nude sitting on a window cornice in the Oratory of the Rosary in Saint Lorenzo in Sicily, Italy.
Stucco techniques were elaborated by the Italians during the Renaissance and the artistry spread throughout Europe. German craftsmen like Dominikus Zimmermann took stucco designs to new artistic levels with elaborate church interiors, such as The Wieskirche in Bavaria. The exterior of this pilgrimage church is truly Zimmermann's Deception. The simplicity of the walls on the outside belie the extravagant interior ornamentation.
About Synthetic Stucco
Many homes built after the 1950s use a variety of synthetic materials that resemble stucco. Mock stucco siding is often composed of foam insulation board or cement panels secured to the walls. Although synthetic stucco may look authentic, real stucco tends to be heavier. Walls made of genuine stucco sound solid when tapped and will be less likely to suffer damage from a hard blow. Also, genuine stucco holds up well in wet conditions. Although it is porous and will absorb moisture, genuine stucco will dry easily, without damage to the structure—especially when installed with weep screeds.
One type of synthetic stucco, known as EIFS (Exterior Insulation and Finish Systems), has long been associated with moisture problems. The underlying wood on EIFS-sided homes tended to suffer rot damage. A simple Web search for "stucco lawsuit" reveals plenty of problems up and down the East coast beginning in the 1990s. "Experts say stucco can be done right, or it can be done quickly," reported Florida's 10NEWS-TV. "And when builders are trying to put homes up as fast - or as cheap - as possible, they often choose the latter."
Other types of synthetic stucco are quite durable, and the AIA's magazine, Architect, reports that building codes and commercial products have changed in the past few years. It's always a wise to have a professional inspection before purchasing a stucco-sided home.
Examples of Use
Stucco siding is most often found on Mission Revival style and Spanish and Mediterranean style homes.
When traveling to southern US environs, notice that concrete block is often used for sturdy, wind-resistant, energy-efficient homes and public buildings like schools and town halls. Many times these blocks are finished with only a hearty paint, but a coating of stucco is said to increase the value (and status) of these concrete block homes. There's even an abbreviation for the practice—CBS for "concrete block and stucco."
When visiting the Art Deco buildings throughout Miami Beach, Florida, note that most are stucco over block. We've been told that developers who insist on a stucco finish on wood frame structures end up having a heap of moisture problems.
Stephen Walker wrote to us [www.thoughtco.com] about his problematic stucco:
we have a straw bale home 100 miles s of San Antonio, Tx. It is very hot, humid, cold, very hot, windy with some downpours. The Portland stucco finish is badly cracked and chipping. Inside, the stucco is ok with some small cracks. The house is 10 yrs old. We were told to seek out a "stucco restoration specialist". Your article was very interesting. Can you help us?
Not all stucco problems are the same. A wall made of straw bale will have different needs than concrete block or timber frame construction. Consulting a "stucco restoration specialist" who may know nothing about straw bale construction might be a mistake. Stucco recipes are not "one size fits all." Mixtures are many.
Having said all that, you can buy premixed and preformulated stucco. Both DAP and Quikrete sell bags and buckets of the mixture at big box stores and even on Amazon.com. Other companies, such as Liquitex, supply stucco mixtures for artists.
The Art and Architecture of Stucco was written by Jackie Craven for ThoughtCo.com Jackie Craven, Doctor of Arts in Writing, has over 20 years of experience writing about architecture and the arts. She is the author of two books on home decor and sustainable design and a collection of art-themed poetry.
Check out this informative video about stucco:
youtube
Visit our stucco repair page to learn more about stucco. For free stucco repair estimates please search for your city on the right side of this page and fill out stucco quote request form or call the number on that page to reach our local office.
98d438fcf3b1f238b53a3bf4da71170f0889317bf5882856b36d7453d8bc457298d438fcf3b1f238b53a3bf4da71170f0889317bf5882856b36d7453d8bc4572POSTLINK98d438fcf3b1f238b53a3bf4da71170f0889317bf5882856b36d7453d8bc457298d438fcf3b1f238b53a3bf4da71170f0889317bf5882856b36d7453d8bc4572 was originally published on www.StuccoHQ.com
0 notes
Text
Coquina Stucco Repair Services Announcement
Coquina Stucco Repair Services
It is finally available! Stucco HQ is proud to announce the fact that we are now offering Coquina stucco repair services to homeowners and business owners in Central Florida area. Though it is not the most popular siding exterior option we still have quite a few homes and commercial buildings that have Coquina shell stucco as their stucco exterior. At some point Florida climate, building settling, etc. all have their part in these properties needing stucco repair, in this case Coquina stucco repair.
Our office received a lot of calls, from homeowners mostly, that inquired about Coquina stucco repair services and asking for a free estimate on repairs. Stucco HQ decided to start taking care of these calls starting immediately. We issued a Press Release letting everyone know that we are now stucco repair contractors who provide Coquina stucco repair services. You can read republished Press Release below...
***
NOTE: This Press Release was originally published on www.MarketersMedia.com/Coquina-Stucco-Repair-Orlando-FL-Area-Services
https://marketersmedia.com/stucco-repair-contractor-in-orlando-fl-announces-coquina-stucco-repair-services/382466
98d438fcf3b1f238b53a3bf4da71170f0889317bf5882856b36d7453d8bc457298d438fcf3b1f238b53a3bf4da71170f0889317bf5882856b36d7453d8bc4572POSTLINK98d438fcf3b1f238b53a3bf4da71170f0889317bf5882856b36d7453d8bc457298d438fcf3b1f238b53a3bf4da71170f0889317bf5882856b36d7453d8bc4572 was originally published on www.StuccoHQ.com
0 notes
Text
Plan Your Next Remodel
How to Plan Your Next Remodel Like a Pro
(Without Going Nuts in the Process)
Anyone who’s ever tried to manage a remodel can tell you that it’s a huge undertaking. Between trying to stay on time, on budget and on top of a thousand moving parts, it can feel like another full-time job. It’s far from impossible though. In fact, with a little prep work and organization, you can plan a home improvement project like a pro, even if you’ve never tackled one before.
If you’re just about ready to plan your next remodel, this post is for you. We outline the steps needed for every aspect of these projects. Keep reading to get the scoop on all the work that goes into planning a remodel — and how you can pull it off the right way.
Develop your vision
First thing’s first: You can’t move forward on your remodel until you know what the final product will be. This is truly one situation where you need to work backward. Once you have an end point in mind, you can go about creating a step-by-step plan on how to get there.
Start by making a list of any must-have features. For example, you might want a kitchen remodel that includes an oversized island or a guest room/office combo. Then, use sites like Freshome to gather design inspiration. You know you’re ready to move on to the next step once you have a clear picture of what the completed project will look like. Jot down these details so you can refer to them later.
Set a budget
Next, it’s time to create a budget for the project. There are plenty of templates online you can use to keep the process organized, but your goal should be to go through each factor of your remodel, one at a time, and find a realistic estimate for it. Consider factors like getting permits, acquiring the necessary materials, expected labor costs and expenditures for aesthetic touches.
Odds are, if you’ve been dreaming about remodeling your home for a while, you probably have a figure in mind. Use these estimates to determine if that figure is realistic. If not, consider making some changes to your design plan or saving up for a little while longer.
Build your team
The next step is to figure out who exactly is going to work on the remodel. If you’re planning on bringing in the pros, now is the time to get your quotes. Research qualified contractors and pick two or three to interview and ask for project estimates. From there, you can narrow down which company seems like it best suits your needs and bring it on board.
Even if you’re planning on the DIY route, if you’re working with multiple people, you want to go through each task — from laying flooring to painting walls — and delegate who is responsible. Nothing slows down a remodel more than confusion over who’s in charge.
Create a schedule
By now, you should have a firm idea of all the steps required to bring your project to fruition. At this point, all you really need to do is put them in the order that makes the most sense. Once you have an ideal start date in mind, go to each of your team members, in turn, and ask for an estimate of how long the project should take. Then, lay out these time frames, accordingly.
If you’ve never planned a remodel before, don’t be afraid to rely on professional advice. Ask how remodels like yours have gone in the past and which order of tasks makes the most sense. For example, if you’re remodeling a bathroom, is it better to work on plumbing or lay tile first? You never know what you may learn in the process.
Prepare for the unexpected
Let’s be honest, despite our best efforts, no remodel is ever going to go perfectly to plan. The best thing you can do for yourself — and your stress levels — is to assume a few setbacks will happen and plan for them. Be sure to pad both your budget and schedule for unforeseen expenditures and timing snafus.
Honestly, even though we know you’re probably invested in getting the project done as soon as possible, the more breathing room you leave, the better you will feel.
Preparing for a remodel is tricky. Sometimes it seems like there are too many moving parts to keep track of. That doesn’t mean it can’t be done. All it takes is a little forethought and organization. When you’re ready to plan your next remodel, keep these tips in mind. They’ll help you create a framework to bring your vision to life.
How to Plan Your Next Remodel Like a Pro was written by Tara Mastroeni for FreshHome.com.
98d438fcf3b1f238b53a3bf4da71170f0889317bf5882856b36d7453d8bc457298d438fcf3b1f238b53a3bf4da71170f0889317bf5882856b36d7453d8bc4572POSTLINK98d438fcf3b1f238b53a3bf4da71170f0889317bf5882856b36d7453d8bc457298d438fcf3b1f238b53a3bf4da71170f0889317bf5882856b36d7453d8bc4572 was originally published on www.StuccoHQ.com
0 notes
Text
How To Choose Right Caulk For Any Surface
How to Choose Right Caulk for Any Surface
Image credit: Kirk Giordano Plastering
Caulk is used to create a waterproof or insulating seal between building materials. Examples where caulk is used to fill a gap include: between a tub and tile, countertop and backsplash, or window and frame. Although applications may seem similar, the key to a successful seal is to make sure you use the correct caulk for the job.
A bead of caulk should be thin and consistent. The best caulking jobs are the ones you don't notice, so apply the caulk sparingly and clean up any residue quickly before it dries. [Check out our advice on how to remove old caulk and the right way to caulk a tub.]
Concrete Caulk
This type of caulk should be used where concrete slabs meet or where they meet with a building. A polyurethane caulk works best here, but silicone will also do.
Siding, Windows, and Door Caulk There are a variety of caulk compounds that will create air and watertight seals around windows and doors. These include polymer, silicone polymer, paintable silicone, and butyl rubber caulks.
Kitchen and Bath Caulk This caulk needs to be water resistant to prevent mold and mildew buildup. Look for a siliconized acrylic or polymer caulk. They are often called kitchen and bath or tub and tile caulk.
Glass Caulk Silicone and siliconized acrylic work best for glass. But read the label to make certain it adheres to glass surfaces.
Gutter Caulk Gutter sealant or caulk will be called butyl rubber. This caulk is ideal for below grade applications and outdoor waterproof needs.
Roofing Caulk Roofing caulk is available in gun grade or brush grade, based on how it will be applied. This polymer caulk must adhere to metal, masonry, or asphalt roofing materials.
Above article was written by Timothy Dahl and appeared first on www.PopularMechanics.com. Read original How to Choose the Right Caulk for Any Surface article.
Now that we have given proper credit to whom credit is due we would like to talk about the right caulk for stucco repair projects.
Stucco Crack Repair Caulk and Sealants
We have actually came across a great article on one of the stucco repair websites in Jacksonville, FL about this exact subject. Our friends recommended a tree different types of caulk / sealants that they use for various types of stucco. We agree with them and will mention the here.
In their Top Stucco Crack Repair Caulk and Sealants post Stucco Repair Pros of Jacksonville, FL recommend:
Mor-Flexx Caulk Mor-Flexx is elastomeric with powerful adhesion. This means it stretches and won’t tear, crack, or pull away. It Spans gaps up to 3″ wide with no slump. Textured and paintable, its easy to clean up with soap and water.
Through the Roof Sealant Through the Roof is the clear, ultra-elastic sealant made to permanently stop and prevent roof leaks. It effectively seals around a variety of roof fixtures without the messy look of asphalt. Plus, Through the Roof won’t dry hard and crack like traditional asphalt repair products and lasts 20 times longer. It expands and contracts with temperature changes, leaving you with a stucco crack repair that sticks but won’t stick out. Lastly, in case you need to use it for surfaces other than stucco, it adheres to metal, plastics, asphalt, brick, ceramic tiles, concrete, stone, mortar, stucco, polyurethane, glass, terra cotta, cement, wood, cloth/canvas and polyisobutylene.
Red Devil 0646 Ideal for patching cracks in steps and sidewalks or repairing mortar between bricks, stone and cinder block. Red Devil’s 0646 has a textured finish that blends with stucco and provides excellent outdoor durability. Ideal for exterior stucco crack repair use, it is also easy to clean up with water.
Check out this video to learn how to use caulk for small DIY stucco repair projects.
youtube
We hope both of these articles we re-posted above shed some light on what type of caulks you need to be using for a given project. If you need any help with your stucco repair project and need to experienced hire local stucco repair contractor please call our office at (407) 258-2826 to schedule Free stucco repair quote and Stucco HQ contractors will run to your rescue.
98d438fcf3b1f238b53a3bf4da71170f0889317bf5882856b36d7453d8bc457298d438fcf3b1f238b53a3bf4da71170f0889317bf5882856b36d7453d8bc4572POSTLINK98d438fcf3b1f238b53a3bf4da71170f0889317bf5882856b36d7453d8bc457298d438fcf3b1f238b53a3bf4da71170f0889317bf5882856b36d7453d8bc4572 was originally published on www.StuccoHQ.com
0 notes
Text
Stucco Chimney Repair Services Announced
Stucco Chimney Repair Services
It is our pleasure to announce brand new addition to our service portfolio. Stucco HQ will now offer stucco chimney repair services for our residential customers. Free stucco repair quotes will be offered to everyone who needs to repair their stucco chimney. Interested homeowners can call our office at (407) 258-2826 and our friendly staff will help you set up free stucco repair estimate for your home.
We issued a press release which talks about this development which we have re-posted below.
NOTE: This Press Release was originally published on www.MarketersMedia.com/Stucco-Chimney- Repair-Orlando-FL
98d438fcf3b1f238b53a3bf4da71170f0889317bf5882856b36d7453d8bc457298d438fcf3b1f238b53a3bf4da71170f0889317bf5882856b36d7453d8bc4572POSTLINK98d438fcf3b1f238b53a3bf4da71170f0889317bf5882856b36d7453d8bc457298d438fcf3b1f238b53a3bf4da71170f0889317bf5882856b36d7453d8bc4572 was originally published on www.StuccoHQ.com
0 notes
Text
Stucco Crack Repair Services Announcement
Stucco Crack Repair Service Available
Stucco HQ is excited to announce new addition to our already wide range of stucco services available. We have added stucco crack repair services to our service portfolio. We will be able to provide professional stucco crack repair services that include most requested stucco crack services in our area. Services like quikrete stucco crack repair, exterior plaster crack repair, large stucco crack repair, hairline stucco crack repair, acrylic stucco crack repair and every other important exterior crack repair service needed.
What would be stucco crack repair cost? Well, every situation is unique, but we are dedicated to providing best stucco crack repair services in the area using the best quality stucco crack repair products available on the market. Our stucco repair technicians have years of training and on-the-job experience when it comes to any stucco repair situation, including stucco crack repair. Believe us when we say we know how to repair cracks in stucco exterior. We repair stucco siding repair cracks permanently!
Stucco HQ has issued a statement announcing this development. You can read the original Press Release below.
NOTE: This Press Release was originally published on www.MarketersMedia.com/Orlando-FL-Stucco-Crack-Repair
98d438fcf3b1f238b53a3bf4da71170f0889317bf5882856b36d7453d8bc457298d438fcf3b1f238b53a3bf4da71170f0889317bf5882856b36d7453d8bc4572POSTLINK98d438fcf3b1f238b53a3bf4da71170f0889317bf5882856b36d7453d8bc457298d438fcf3b1f238b53a3bf4da71170f0889317bf5882856b36d7453d8bc4572 was originally published on www.StuccoHQ.com
0 notes
Text
Commercial Stucco Repair Services Announcement
Commercial Stucco Repair Services Launch
Stucco HQ is proud to announce that we are now able to offer commercial stucco repair services to property owners in Central Florida. Commercial stucco services have been requested by local commercial property owners for quite a while and we were so busy helping residential homeowners with their stucco repair needs that our leadership felt we would be spreading ourselves “too thin” and would not be able to provide the quality we dedicated ourselves to.
Well, we are here to announce that Stucco HQ will be able to take care of stucco commercial buildings in our local area! Commercial stucco repair is now part of our service portfolio and we can call ourselves local commercial stucco repair contractor. We encourage all interested parties to request free commercial stucco repair quote by calling our office at (407) 258-2826 or by filling out stucco estimate request form available on every page of our website.
Please read original Press Release which talks about this development below.
NOTE: This Press Release was originally published on www.MarketersMedia.com/Commercial-Stucco-Repair-Contractors-Orlando-FL
98d438fcf3b1f238b53a3bf4da71170f0889317bf5882856b36d7453d8bc457298d438fcf3b1f238b53a3bf4da71170f0889317bf5882856b36d7453d8bc4572POSTLINK98d438fcf3b1f238b53a3bf4da71170f0889317bf5882856b36d7453d8bc457298d438fcf3b1f238b53a3bf4da71170f0889317bf5882856b36d7453d8bc4572 was originally published on www.StuccoHQ.com
0 notes
Text
Use Tax Refund On Home Improvements To Boost Resale Value
Image credit: Scott Lewis / Flickr.com
Money saving expert Matt Granite outlines the top 3 ways you can increase the value of your home with these simple home improvement projects.
February signals the start of tax season, a time when many Americans gain nearly $3,000 on average in the form of a tax refund, according to the IRS.
Splurging on a vacation or iPhone X is tempting, but as a homeowner, sinking refund cash into your house may be smarter, especially if debts are already under control, says Lisa Greene-Lewis, a certified public accountant and tax expert at TurboTax.
Even small home improvements can nudge home value — and your quality of life — in a positive direction. But how do you decide what to do?
The first question to ask, says Craig Webb, editor in chief of Remodeling magazine, is “How long do I plan to stay in the home?” The answer dictates how much you should spend on home improvements and which projects to prioritize.
If you’re staying put, focus on changes that make your life better and improve value, Webb says. Fix what’s broken before thinking about curb appeal.
Here are some home improvement ideas in several price ranges so you can put that tax refund to work.
Home Improvements Around $100
1. Replace cabinet hardware. Changing knobs or handles is fairly simple, but gives the whole room a new look, says Colin Shaw, owner of Shaw Remodeling in Niantic, Connecticut. 2. Seal the driveway. You’ll reduce unsightly cracks and slow deterioration of the concrete or asphalt. 3. Get the HVAC system serviced. Regular cleaning can add 10 years to the life of your system, says Laura Hales, a real estate agent and owner of Hales and Associates in Overland Park, Kansas.
Home Improvement Around $500
1. Add a tile backsplash. Backsplashes provide an instant transformation at a fraction of what a full kitchen remodel costs. 2. Refresh interior paint. New paint in main rooms brightens the whole house, and doing it yourself saves on labor costs, Hales says. 3. Insulate the attic. Buyers love energy efficiency, and you’ll love lower utility bills.
Home Improvement Around $1,000
1. Get a new front door. Shaw recommends fiberglass doors that don’t swell or contract with the weather. 2. Replace inefficient appliances like the water heater, toilet, refrigerator or dishwasher. 3. Tile the bathroom floor. Heavy foot traffic leaves flooring dingy. Opt for bright, easy-to-clean tile instead.
Home Improvements Around $3,000
1. Install new kitchen countertops. Almost all buyers want granite, quartz and other solid surfaces, Hales says. 2. Replace the garage door. A new garage door recoups around 98% of its cost in improved home value, according to Remodeling magazine’s 2018 Cost vs. Value report. 3. Enhance your landscaping. Stone pavers, a fire pit or exterior lighting boost curb appeal and functionality.
NOTE: Original article Getting a tax refund? Use it on home improvements to boost resale value was originally posted on www.usatoday.com by Beth Buczynski of NerdWallet. NerdWallet is a USA TODAY content partner providing general news, commentary and coverage from around the web. Its content is produced independently of USA TODAY.
From our editor...
Stucco Repair Home Improvements
As always we have to add our 2 cents to the conversation. And you guessed it... It will be about stucco repair.
In our humble opinion it is very important to have exterior of your home in the best possible shape it can be. This is what protects the rest of your home from the elements. Being stucco repair contractors we know stucco very well. And we also know what kind of effect damaged stucco can have on the rest of residential or commercial structure.
Our experience can tell you that a small hairline crack or what used to be small stucco problem is can turn in a full blown stucco water damage repair project if homeowner or business owner doesn't take care of it right away.
Because each stucco repair situation is unique it is very hard to put a Dollar amount on a hypothetical repair. But to be sure that every stucco problem gets taken care of we provide FREE stucco repair estimates for both residential and commercial customers.
We advise homeowners ad commercial property owners to do walk around their home or commercial building at least once per year and look at the condition their exterior stucco wall is in. If they notice any stucco cracks, any buckling stucco, or if their exterior stucco wall has any holes in it to take care of these types of stucco damage situations as soon as possible.
We can's stress enough to people that time is not on their side. What could have been a small repair can quickly turn into an expensive stucco repair project.
If you need help identifying stucco damage or need professional help with your stucco repair project please do not hesitate to call Stucco HQ. Our friendly staff can be reached at (407) 258-2826 during business hours. They will answer your questions and help you schedule your FREE No-Obligation Quote. We are waiting for your cal!
98d438fcf3b1f238b53a3bf4da71170f0889317bf5882856b36d7453d8bc457298d438fcf3b1f238b53a3bf4da71170f0889317bf5882856b36d7453d8bc4572POSTLINK98d438fcf3b1f238b53a3bf4da71170f0889317bf5882856b36d7453d8bc457298d438fcf3b1f238b53a3bf4da71170f0889317bf5882856b36d7453d8bc4572 was originally published on www.StuccoHQ.com
0 notes
Text
Stucco Crack Repair Cost
Stucco Crack Repair Cost
Stucco is a durable siding material and it is a de facto choice for most homeowners. While the material is strong and reliable, there will be instances when the stucco will suffer some damage. The damage can be minor and subtle or it could be severe. Hairline stucco cracks are extremely common in most homes.
You don’t need to be anxious about hairline stucco crack, but you should not ignore them either. Minor problems can quickly make way for a crisis, especially when the weather is not your best friend. Older homes will obviously be more vulnerable when stucco cracks. You could have a damaged wood lath over time and your home can suffer from water damage.
Do not wait for moisture buildup in the walls and do not expose the underlying structures to rain, snow or strong winds. If you spot a crack in your stucco siding, repair it as soon as you can. You will save money and avert major heartaches. Life would be a lot easier and less expensive if stucco crack repair is done sooner than later.
In this article you will learn:
Pros and Cons of DIY Stucco Crack Repair
DIY Stucco Crack Repair Cost
Professional Stucco Crack Repair Cost
Cost of Stucco Crack Repair Materials
DIY Stucco Crack Repair Video
Pros and Cons of DIY Stucco Crack Repair
There are some problems that most homeowners can take care of without hiring an expert. Hairline stucco crack is one such problem. It is not imperative to hire a hairline stucco crack repair professional if you can make do with a stucco crack repair kit over the weekend. However, if you have substantial chips or deep cracks, if your stucco has warped or if there is an underlying problem that has caused the damage, then it is better to hire a professional. Only those homeowners with enough masonry expertise should attempt to repair severe stucco cracks.
The most noteworthy advantage of DIY stucco crack repair is the cost. Most stucco repair contractors charge between $40 and $50 per hour, or in some cases $60 to $120 per square foot. In light of this you can potentially save hundreds of dollars that you would otherwise have to spend on stucco contractor. You may not save much on materials.
The most notable disadvantage of DIY stucco crack repair is the futility of the whole project coupled with potential risks. You may fail to effectively repair the crack. This will compel you to hire a professional but only after you have already paid for the repair kit and spent a considerable amount of time trying to fix the crack yourself. The potential risks are the primary reason why it is a bad idea to try and repair a stucco crack unless you have the expertise needed.
You may damage existing and otherwise healthy stucco in the process. You could aggravate the problem and cause damage to the underlying structures.
DIY Stucco Crack Repair Cost
The cost of stucco crack repair products will depend on its size and the strength of the concrete. Hairline cracks will need the smallest kits. They can cost as low as $5 bucks or as much as $30 bucks. If you want stronger concrete, you will have to pay more. Cracks that are deeper or if you have holes in your stucco, then you would need to look for larger kits and they may cost close to fifty bucks. The brand you choose and if there are any additives in the mix among other factors will influence the actual cost.
Hairline cracks can be fixed with kits that don’t really need you to mix cement. They are the easiest to work with but they are futile for larger cracks or holes. Many kits available today are premixed. You don’t need any prepping and can get straight to the task at hand. You would still need to prep the surface or the area that will be receiving the patch. Don’t have loose materials, dust or dirt and stucco that may have come off or is not firmly adhered before you apply the patch.
Always use kits exactly as the manufacturer suggests in the instructions. Pay attention to the dry time. Many kits have a suggested timeframe by when you should be using the stucco. Simple mistakes before, during or after which is the dry time can cost you the entire kit. Not only would you have to buy another kit but you will need to prep the area again.
Professional Stucco Crack Repair Cost
Severe damages to your stucco will demand a licensed stucco repair contractor. Attempting to repair it yourself is not wise or practical. The cost of hiring a professional for stucco crack repair can cost you anywhere from $40 to $50 an hour. Not all stucco companies work on an hourly basis. Many will charge you or offer a quote that is based on the surface area. You can expect quotes ranging from $60 to $120 per square foot. These are nationwide averages. The actual cost depends on where you live and may be more or less than these averages. For instance labor cost in Orlando, FL is 2% higher than the national average, and labor cost in Jacksonville, FL is 1% lower than the national average. It is not uncommon to find professionals that charge less than $40 per hour or more than $120 per square foot.
The actual stucco crack repair cost will depend on many factors. If the cracks are in areas that are not easy to reach, then it would be factored into the cost. Many homes have unconventional windows, doors and other architectural components that complicate the repair job. The severity and extent of the damage is the most important factor in terms of cost. Large cracks or deep holes will be costlier to repair. Relatively smaller cracks or holes with underlying water damage will also cost more.
Any quote you receive will be influenced by the cost of material needed to complete the repair, the operational costs of the professional including transportation and the cost of additional tasks that are unavoidable such as prepping the work site and protecting existing structure, specific finishes after stucco repair and eventual cleanup.
When you get a quote, all costs will be included. You may be given a breakup of materials and labor. Quotes may not have breakups of setup time, mobilization or debris removal. The generic quotes are not relevant in every scenario. The specifics of any stucco project will determine the particulars of the estimate.
For instance, some stucco damages may require removal, relocation, repairing or even modifying the existing framing and surfacing, electrical and plumbing installations, possibly uninstalling air conditioning systems or HVAC units and remediation of hazardous materials, such as lead or asbestos. A professional must also ensure that your repair and other components are in compliance with the latest building codes.
Cost of Stucco Crack Repair Materials
A bag of 80lb to 90lb of stucco costs around $10 to $15. Such a bag can be good enough for an area of 100 sq. ft. to 180 square feet. Effectively, it costs 5 to 10 cents per square foot. Synthetic stucco will cost around $40 to $50 for a bucket of 5 gallons. Such a bucket is good enough for 100 sq. ft. to 250 square feet. Effectively, it costs 25 five to 50 cents per square foot.
You may need finishing materials. Depending on the quality and thickness of the mix along with the possibility of requiring new vapor barrier and metal lath, the finishing materials can cost $20 to $50 bucks. If you need to paint your home, which is often necessary after major stucco repairs, then you might have to factor in a cost of $700 to $1200 for a typical 1500 square foot home.
Contractors will determine the actual overall stucco crack repair cost after factoring in all the aforementioned details. Multistory homes will be costlier to repair. Homes with too many architectural fixtures will take longer for contractors to repair as the design features slow down the progress. You may have to factor in an additional day of labor cost, which could be around $400. You may have to pay permit or inspection fees to your local building department for the stucco repair project.
DIY Stucco Crack Repair Video
youtube
Stucco Crack Repair Cost was originally published on www.StuccoHQ.com
0 notes
Text
Kissimmee FL Expansion
Stucco Repair Kissimmee FL Services Expansion
Stucco HQ is proud to announce their expansion to Kissimmee, FL. We will now be able to provide stucco repair Kissimmee FL services to residential home owners as well as commercial customers. As with any of our services we will be offering FREE No Obligation stucco repair estimates in writing to let property owners assess the investment involved in repairing their home or business.
To schedule your Free Estimate in Kissimmee, FL please call our Orlando offices at (407) 258-2826 and our friendly staff will help you set it up. You can also fill out our Stucco Repair Estimate Request Form.
NOTE: This Press Release was originally published on www.MarketersMedia.com/Kissimmee-FL.
Stucco HQ provides full spectrum of stucco services in these areas:
Altamonte Springs, FL Apopka, FL Casselberry, FL Celebration, FL Clermont, FL
Davenport, FL Haines City, FL Kissimmee, FL Lake Mary, FL Lakeland, FL
Maitland, FL Orlando, FL Oviedo, FL Poinciana, FL Polk City, FL
Saint Cloud, FL Sanford, FL Winter Heaven, FL Winter Park, FL
Kissimmee FL Expansion was originally published on www.StuccoHQ.com
0 notes