# //example.com will use the current page's protocol
Explore tagged Tumblr posts
Visit Tumblr Blog
Explore Tumblr blogs with no restrictions, modern design and the best experience.
Last Seen Tumblr Blogs


Fun Fact
BuzzFeed published a report claiming that Tumblr was utilized as a distribution channel for Russian agents to influence American voting habits during the 2016 presidential election in Feb 2018.
Text
Absolute Link: The Complete Guide to Utilizing It
In the world of web development and search engine optimization (SEO), Absolute link play a crucial role in connecting different web pages. Among the various types of links, absolute links hold significant importance. Understanding what absolute links are and how to utilize them can greatly enhance your website's visibility and user experience. In this article, we will explore the concept of absolute links, their advantages, and best practices for implementing them effectively.
What is an Absolute Link?
An absolute link, also known as an absolute URL, is a complete web address that includes the full path to a specific webpage. It consists of the protocol (such as HTTP or HTTPS), domain name, subdirectory (if applicable), and the filename or extension of the page. Absolute links provide a direct and unambiguous reference to a web resource, allowing users and search engines to navigate seamlessly across websites.
Absolute Link vs. Relative Link
To understand the significance of absolute links, it's important to differentiate them from relative links. While absolute links provide a complete web address, relative links specify the path to a resource relative to the current location. Relative links are commonly used within a website to connect pages internally. However, when it comes to external references or navigation across different domains, absolute links are preferred.
The Importance of Absolute Links in SEO
Absolute links have several advantages in the realm of SEO. Search engines rely on links to discover and index web pages, and absolute links provide a clear and definitive path for search engine crawlers to follow. By using absolute links, you ensure that search engines can accurately navigate and understand the structure of your website, which can positively impact your search rankings. Additionally, absolute links contribute to better user experience. When users encounter absolute links, they can easily identify the destination of the link and trust that it will take them to the intended page. This transparency helps reduce bounce rates and enhances user engagement, leading to improved conversion rates.
How to Create an Absolute Link
Creating an absolute link is a straightforward process. To generate an absolute link, you need to include the protocol (HTTP or HTTPS), followed by the domain name, any subdirectories, and the filename or extension of the page. For example, an absolute link to a blog post titled "SEO Best Practices" on the website "example.com" would appear as follows: https://www.example.com/blog/seo-best-practices. To ensure the accuracy and validity of absolute links, it's essential to double-check the link address before implementation. One incorrect character or missing component can lead to broken links and negatively impact user experience and SEO.
Best Practices for Using Absolute Links
To maximize the benefits of absolute links, it's important to follow these best practices: - Use absolute links for external references or when linking across different domains. - Ensure that all absolute links are correctly formatted with the appropriate protocol (HTTP or HTTPS) and valid domain name. - Avoid using generic anchor text like "click here" and instead utilize descriptive anchor text that reflects the destination page. - Regularly check the absolute links on your website to ensure they are functioning correctly and haven't become broken or outdated. - Consider implementing absolute links for important internal pages to provide a consistent and reliable user experience. By adhering to these best practices, you can harness the power of absolute links to enhance your website's SEO and user engagement.
Common Mistakes to Avoid
While absolute links offer numerous benefits, it's crucial to be aware of common mistakes that can hinder their effectiveness. Here are some mistakes to avoid: - Using absolute links unnecessarily within your own website when relative links would suffice. - Neglecting to update absolute links when making changes to your website's structure or domain. - Including broken or incorrect links that lead to non-existent pages. - Overusing anchor text with keywords in absolute links, which can be seen as spammy by search engines. - Failing to regularly audit and update absolute links, resulting in outdated or broken references. By avoiding these mistakes, you can maintain the integrity and effectiveness of your absolute links.
Benefits of Using Absolute Links
Utilizing absolute links offers several benefits for your website and SEO efforts: - Improved search engine visibility: Absolute links provide search engine crawlers with a clear path to navigate and index your web pages effectively. - Enhanced user experience: Clear and direct absolute links improve user engagement, reduce bounce rates, and increase the likelihood of conversions. - Consistency across domains: When linking to external websites or resources, absolute links ensure that users are directed to the correct page regardless of any changes in the destination site's structure. - Easier management and troubleshooting: Absolute links make it easier to identify and fix broken links, as the complete URL provides valuable information for diagnosis. By leveraging these benefits, you can optimize your website's performance and achieve your SEO goals.
Absolute Links in Social Media
The use of absolute links extends beyond websites and can be applied to social media platforms as well. When sharing content on social media, using absolute links ensures that users are directed to the desired web page accurately. Whether it's a blog post, product page, or landing page, absolute links help maintain consistency and improve the user experience across different platforms.
Tools and Resources for Absolute Link Management
Managing and monitoring absolute links can be simplified with the help of various tools and resources. Here are a few recommended options: - Link checker tools: Tools like Xenu's Link Sleuth and W3C Link Checker can scan your website for broken or incorrect links, allowing you to quickly identify and rectify any issues. - Google Search Console: This free tool provided by Google offers insights into your website's performance, including indexing status, search queries, and link data. - Content management systems (CMS): Popular CMS platforms like WordPress and Drupal often include built-in link management features that help maintain the integrity of your absolute links. By utilizing these tools and resources, you can effectively manage your absolute links and ensure their optimal performance. Also Read: How Local SEO Services in Houston Can Be the Best Decision?
Conclusion
Absolute links are an essential component of effective web development and SEO strategies. By understanding their purpose, creating them correctly, and implementing best practices, you can enhance your website's visibility, user experience, and search engine rankings. Remember to regularly audit and update your absolute links to keep them functional and relevant. Embrace the power of absolute links and unlock the full potential of your website's online presence.
FAQs
Q. What is the difference between absolute links and relative links? A. Absolute links provide a complete web address, including the protocol, domain name, and page path, while relative links specify the path to a resource relative to the current location. Q. Why are absolute links important for SEO? A. Absolute links help search engine crawlers navigate and index web pages accurately, leading to improved search rankings. They also enhance user experience by providing transparent and trustworthy navigation. Q. How do I create an absolute link? A. To create an absolute link, include the protocol (HTTP or HTTPS), followed by the domain name, any subdirectories, and the filename or extension of the page. Q. What are the best practices for using absolute links? A. Best practices for using absolute links include using them for external references or across different domains, ensuring correct formatting, using descriptive anchor text, and regularly checking for broken links. Q. Can We use absolute links on social media? A. Yes, We can use them on social media sites. Q. Are there any tools to help manage absolute links? A. Yes, there are tools such as link checkers and content management systems that can assist in managing and monitoring the performance of absolute links. Read the full article
0 notes
Text

#Protocol-relative URLs have no protocol specified. For example# //example.com will use the current page's protocol#typically HTTP or HTTPS.
0 notes
Link
In order to show up in search results, your content needs to first be visible to search engines. It’s arguably the most important piece of the SEO puzzle: If your site can’t be found, there’s no way you’ll ever show up in the SERPs (Search Engine Results Page).
How do search engines work?
Search engines have three primary functions:
Crawl: Scour the Internet for content, looking over the code/content for each URL they find.
Index: Store and organize the content found during the crawling process. Once a page is in the index, it’s in the running to be displayed as a result to relevant queries.
Rank: Provide the pieces of content that will best answer a searcher’s query, which means that results are ordered by most relevant to least relevant.
What is search engine crawling?
Crawling is the discovery process in which search engines send out a team of robots (known as crawlers or spiders) to find new and updated content. Content can vary — it could be a webpage, an image, a video, a PDF, etc. — but regardless of the format, content is discovered by links.
What’s that word mean?
Having trouble with any of the definitions in this section? Our SEO glossary has chapter-specific definitions to help you stay up-to-speed.
Google bot starts out by fetching a few web pages, and then follows the links on those webpages to find new URLs. By hopping along this path of links, the crawler is able to find new content and add it to their index called Caffeine — a massive database of discovered URLs — to later be retrieved when a searcher is seeking information that the content on that URL is a good match for.
What is a search engine index?
Search engines process and store information they find in an index, a huge database of all the content they’ve discovered and deem good enough to serve up to searchers.
Search engine ranking
When someone performs a search, search engines scour their index for highly relevant content and then orders that content in the hopes of solving the searcher’s query. This ordering of search results by relevance is known as ranking. In general, you can assume that the higher a website is ranked, the more relevant the search engine believes that site is to the query.
It’s possible to block search engine crawlers from part or all of your site, or instruct search engines to avoid storing certain pages in their index. While there can be reasons for doing this, if you want your content found by searchers, you have to first make sure it’s accessible to crawlers and is indexable. Otherwise, it’s as good as invisible.
By the end of this chapter, you’ll have the context you need to work with the search engine, rather than against it!
In SEO, not all search engines are equal
Many beginners wonder about the relative importance of particular search engines. Most people know that Google has the largest market share, but how important it is to optimize for Bing, Yahoo, and others? The truth is that despite the existence of more than 30 major web search engines, the SEO community really only pays attention to Google. Why? The short answer is that Google is where the vast majority of people search the web. If we include Google Images, Google Maps, and YouTube (a Google property), more than 90% of web searches happen on Google — that’s nearly 20 times Bing and Yahoo combined.
Crawling: Can search engines find your pages?
As you’ve just learned, making sure your site gets crawled and indexed is a prerequisite to showing up in the SERPs. If you already have a website, it might be a good idea to start off by seeing how many of your pages are in the index. This will yield some great insights into whether Google is crawling and finding all the pages you want it to, and none that you don’t.
One way to check your indexed pages is “site:yourdomain.com”, an advanced search operator. Head to Google and type “site:yourdomain.com” into the search bar. This will return results Google has in its index for the site specified:
The number of results Google displays (see “About XX results” above) isn’t exact, but it does give you a solid idea of which pages are indexed on your site and how they are currently showing up in search results.
For more accurate results, monitor and use the Index Coverage report in Google Search Console. You can sign up for a free Google Search Console account if you don’t currently have one. With this tool, you can submit sitemaps for your site and monitor how many submitted pages have actually been added to Google’s index, among other things.
If you’re not showing up anywhere in the search results, there are a few possible reasons why:
Your site is brand new and hasn’t been crawled yet.
Your site isn’t linked to from any external websites.
Your site’s navigation makes it hard for a robot to crawl it effectively.
Your site contains some basic code called crawler directives that is blocking search engines.
Your site has been penalized by Google for spammy tactics.
Tell search engines how to crawl your site
If you used Google Search Console or the “site:domain.com” advanced search operator and found that some of your important pages are missing from the index and/or some of your unimportant pages have been mistakenly indexed, there are some optimizations you can implement to better direct Googlebot how you want your web content crawled. Telling search engines how to crawl your site can give you better control of what ends up in the index.
Most people think about making sure Google can find their important pages, but it’s easy to forget that there are likely pages you don’t want Googlebot to find. These might include things like old URLs that have thin content, duplicate URLs (such as sort-and-filter parameters for e-commerce), special promo code pages, staging or test pages, and so on.
To direct Googlebot away from certain pages and sections of your site, use robots.txt.
Robots.txt
Robots.txt files are located in the root directory of websites (ex. yourdomain.com/robots.txt) and suggest which parts of your site search engines should and shouldn’t crawl, as well as the speed at which they crawl your site, via specific robots.txt directives.
How Googlebot treats robots.txt files
If Googlebot can’t find a robots.txt file for a site, it proceeds to crawl the site.
If Googlebot finds a robots.txt file for a site, it will usually abide by the suggestions and proceed to crawl the site.
If Googlebot encounters an error while trying to access a site’s robots.txt file and can’t determine if one exists or not, it won’t crawl the site.
Optimize for crawl budget!
Crawl budget is the average number of URLs Googlebot will crawl on your site before leaving, so crawl budget optimization ensures that Googlebot isn’t wasting time crawling through your unimportant pages at risk of ignoring your important pages. Crawl budget is most important on very large sites with tens of thousands of URLs, but it’s never a bad idea to block crawlers from accessing the content you definitely don’t care about. Just make sure not to block a crawler’s access to pages you’ve added other directives on, such as canonical or noindex tags. If Googlebot is blocked from a page, it won’t be able to see the instructions on that page.
Not all web robots follow robots.txt. People with bad intentions (e.g., e-mail address scrapers) build bots that don’t follow this protocol. In fact, some bad actors use robots.txt files to find where you’ve located your private content. Although it might seem logical to block crawlers from private pages such as login and administration pages so that they don’t show up in the index, placing the location of those URLs in a publicly accessible robots.txt file also means that people with malicious intent can more easily find them. It’s better to NoIndex these pages and gate them behind a login form rather than place them in your robots.txt file.
You can read more details about this in the robots.txt portion of our Learning Center.
Defining URL parameters in GSC
Some sites (most common with e-commerce) make the same content available on multiple different URLs by appending certain parameters to URLs. If you’ve ever shopped online, you’ve likely narrowed down your search via filters. For example, you may search for “shoes” on Amazon, and then refine your search by size, color, and style. Each time you refine, the URL changes slightly:
https://www.example.com/products/women/dresses/green.htm
https://www.example.com/products/women?category=dresses&color=green
https://example.com/shopindex.php?product_id=32&highlight=green+dress &cat_id=1&sessionid=123$affid=43
How does Google know which version of the URL to serve to searchers? Google does a pretty good job at figuring out the representative URL on its own, but you can use the URL Parameters feature in Google Search Console to tell Google exactly how you want them to treat your pages. If you use this feature to tell Googlebot “crawl no URLs with ____ parameter,” then you’re essentially asking to hide this content from Googlebot, which could result in the removal of those pages from search results. That’s what you want if those parameters create duplicate pages, but not ideal if you want those pages to be indexed.
Can crawlers find all your important content?
Now that you know some tactics for ensuring search engine crawlers stay away from your unimportant content, let’s learn about the optimizations that can help Googlebot find your important pages.
Sometimes a search engine will be able to find parts of your site by crawling, but other pages or sections might be obscured for one reason or another. It’s important to make sure that search engines are able to discover all the content you want indexed, and not just your homepage.
Ask yourself this: Can the bot crawl through your website, and not just to it?
Is your content hidden behind login forms?
If you require users to log in, fill out forms, or answer surveys before accessing certain content, search engines won’t see those protected pages. A crawler is definitely not going to log in.
Are you relying on search forms?
Robots cannot use search forms. Some individuals believe that if they place a search box on their site, search engines will be able to find everything that their visitors search for.
Is text hidden within non-text content?
Non-text media forms (images, video, GIFs, etc.) should not be used to display text that you wish to be indexed. While search engines are getting better at recognizing images, there’s no guarantee they will be able to read and understand it just yet. It’s always best to add text within the <HTML> markup of your webpage.
Can search engines follow your site navigation?
Just as a crawler needs to discover your site via links from other sites, it needs a path of links on your own site to guide it from page to page. If you’ve got a page you want search engines to find but it isn’t linked to from any other pages, it’s as good as invisible. Many sites make the critical mistake of structuring their navigation in ways that are inaccessible to search engines, hindering their ability to get listed in search results.
Common navigation mistakes that can keep crawlers from seeing all of your site:
Having a mobile navigation that shows different results than your desktop navigation
Any type of navigation where the menu items are not in the HTML, such as JavaScript-enabled navigations. Google has gotten much better at crawling and understanding Javascript, but it’s still not a perfect process. The more surefire way to ensure something gets found, understood, and indexed by Google is by putting it in the HTML.
Personalization, or showing unique navigation to a specific type of visitor versus others, could appear to be cloaking to a search engine crawler
Forgetting to link to a primary page on your website through your navigation — remember, links are the paths crawlers follow to new pages!
This is why it’s essential that your website has a clear navigation and helpful URL folder structures.
Do you have clean information architecture?
Information architecture is the practice of organizing and labeling content on a website to improve efficiency and findability for users. The best information architecture is intuitive, meaning that users shouldn’t have to think very hard to flow through your website or to find something.
Are you utilizing sitemaps?
A sitemap is just what it sounds like: a list of URLs on your site that crawlers can use to discover and index your content. One of the easiest ways to ensure Google is finding your highest priority pages is to create a file that meets Google’s standards and submit it through Google Search Console. While submitting a sitemap doesn’t replace the need for good site navigation, it can certainly help crawlers follow a path to all of your important pages.
Ensure that you’ve only included URLs that you want indexed by search engines, and be sure to give crawlers consistent directions. For example, don’t include a URL in your sitemap if you’ve blocked that URL via robots.txt or include URLs in your sitemap that are duplicates rather than the preferred, canonical version (we’ll provide more information on canonicalization in Chapter 5!).
If your site doesn’t have any other sites linking to it, you still might be able to get it indexed by submitting your XML sitemap in Google Search Console. There’s no guarantee they’ll include a submitted URL in their index, but it’s worth a try!
Are crawlers getting errors when they try to access your URLs?
In the process of crawling the URLs on your site, a crawler may encounter errors. You can go to Google Search Console’s “Crawl Errors” report to detect URLs on which this might be happening – this report will show you server errors and not found errors. Server log files can also show you this, as well as a treasure trove of other information such as crawl frequency, but because accessing and dissecting server log files is a more advanced tactic, we won’t discuss it at length in the Beginner’s Guide, although you can learn more about it here.
Before you can do anything meaningful with the crawl error report, it’s important to understand server errors and “not found” errors.
4xx Codes: When search engine crawlers can’t access your content due to a client error
4xx errors are client errors, meaning the requested URL contains bad syntax or cannot be fulfilled. One of the most common 4xx errors is the “404 – not found” error. These might occur because of a URL typo, deleted page, or broken redirect, just to name a few examples. When search engines hit a 404, they can’t access the URL. When users hit a 404, they can get frustrated and leave.
5xx Codes: When search engine crawlers can’t access your content due to a server error
5xx errors are server errors, meaning the server the web page is located on failed to fulfill the searcher or search engine’s request to access the page. In Google Search Console’s “Crawl Error” report, there is a tab dedicated to these errors. These typically happen because the request for the URL timed out, so Google-bot abandoned the request. View Google’s documentation to learn more about fixing server connectivity issues.
Thankfully, there is a way to tell both searchers and search engines that your page has moved — the 301 (permanent) redirect.
Create custom 404 pages!
Customize your 404 page by adding in links to important pages on your site, a site search feature, and even contact information. This should make it less likely that visitors will bounce off your site when they hit a 404.
Say you move a page from example.com/young-dogs/ to example.com/puppies/. Search engines and users need a bridge to cross from the old URL to the new. That bridge is a 301 redirect.
When you do implement a 301:When you don’t implement a 301:
Link EquityTransfers link equity from the page’s old location to the new URL.Without a 301, the authority from the previous URL is not passed on to the new version of the URL.
IndexingHelps Google find and index the new version of the page.The presence of 404 errors on your site alone don’t harm search performance, but letting ranking / trafficked pages 404 can result in them falling out of the index, with rankings and traffic going with them — yikes!
User ExperienceEnsures users find the page they’re looking for.Allowing your visitors to click on dead links will take them to error pages instead of the intended page, which can be frustrating.
The 301 status code itself means that the page has permanently moved to a new location, so avoid redirecting URLs to irrelevant pages — URLs where the old URL’s content doesn’t actually live. If a page is ranking for a query and you 301 it to a URL with different content, it might drop in rank position because the content that made it relevant to that particular query isn’t there anymore. 301s are powerful — move URLs responsibly!
You also have the option of 302 redirecting a page, but this should be reserved for temporary moves and in cases where passing link equity isn’t as big of a concern. 302s are kind of like a road detour. You’re temporarily siphoning traffic through a certain route, but it won’t be like that forever.
Watch out for redirect chains!
It can be difficult for Googlebot to reach your page if it has to go through multiple redirects. Google calls these “redirect chains” and they recommend limiting them as much as possible. If you redirect example.com/1 to example.com/2, then later decide to redirect it to example.com/3, it’s best to eliminate the middleman and simply redirect example.com/1 to example.com/3.
Once you’ve ensured your site is optimized for crawlability, the next order of business is to make sure it can be indexed.
Indexing: How do search engines interpret and store your pages?
Once you’ve ensured your site has been crawled, the next order of business is to make sure it can be indexed. That’s right — just because your site can be discovered and crawled by a search engine doesn’t necessarily mean that it will be stored in their index. In the previous section on crawling, we discussed how search engines discover your web pages. The index is where your discovered pages are stored. After a crawler finds a page, the search engine renders it just like a browser would. In the process of doing so, the search engine analyzes that page’s contents. All of that information is stored in its index.
Read on to learn about how indexing works and how you can make sure your site makes it into this all-important database.
Can I see how a Google-bot crawler sees my pages?
Yes, the cached version of your page will reflect a snapshot of the last time Googlebot crawled it.
Google crawls and caches web pages at different frequencies. More established, well-known sites that post frequently like https://www.abc.com will be crawled more frequently than the much-less-famous website, http://www.xyz.com (if only it were real…)
You can view what your cached version of a page looks like by clicking the drop-down arrow next to the URL in the SERP and choosing “Cached”:
You can also view the text-only version of your site to determine if your important content is being crawled and cached effectively.
Are pages ever removed from the index?
Yes, pages can be removed from the index! Some of the main reasons why a URL might be removed include:
The URL is returning a “not found” error (4XX) or server error (5XX) – This could be accidental (the page was moved and a 301 redirect was not set up) or intentional (the page was deleted and 404ed in order to get it removed from the index)
The URL had a noindex meta tag added – This tag can be added by site owners to instruct the search engine to omit the page from its index.
The URL has been manually penalized for violating the search engine’s Webmaster Guidelines and, as a result, was removed from the index.
The URL has been blocked from crawling with the addition of a password required before visitors can access the page.
If you believe that a page on your website that was previously in Google’s index is no longer showing up, you can use the URL Inspection tool to learn the status of the page, or use Fetch as Google which has a “Request Indexing” feature to submit individual URLs to the index. (Bonus: GSC’s “fetch” tool also has a “render” option that allows you to see if there are any issues with how Google is interpreting your page).
Tell search engines how to index your site
Robots meta directives
Meta directives (or “meta tags”) are instructions you can give to search engines regarding how you want your web page to be treated.
You can tell search engine crawlers things like “do not index this page in search results” or “don’t pass any link equity to any on-page links”. These instructions are executed via Robots Meta Tags in the <head> of your HTML pages (most commonly used) or via the X-Robots-Tag in the HTTP header.
Robots meta tag
The robots meta tag can be used within the <head> of the HTML of your webpage. It can exclude all or specific search engines. The following are the most common meta directives, along with what situations you might apply them in.
index/noindex tells the engines whether the page should be crawled and kept in a search engines’ index for retrieval. If you opt to use “noindex,” you’re communicating to crawlers that you want the page excluded from search results. By default, search engines assume they can index all pages, so using the “index” value is unnecessary.
When you might use: You might opt to mark a page as “noindex” if you’re trying to trim thin pages from Google’s index of your site (ex: user generated profile pages) but you still want them accessible to visitors.
follow/nofollow tells search engines whether links on the page should be followed or nofollowed. “Follow” results in bots following the links on your page and passing link equity through to those URLs. Or, if you elect to employ “nofollow,” the search engines will not follow or pass any link equity through to the links on the page. By default, all pages are assumed to have the “follow” attribute.
When you might use: nofollow is often used together with noindex when you’re trying to prevent a page from being indexed as well as prevent the crawler from following links on the page.
noarchive is used to restrict search engines from saving a cached copy of the page. By default, the engines will maintain visible copies of all pages they have indexed, accessible to searchers through the cached link in the search results.
When you might use: If you run an e-commerce site and your prices change regularly, you might consider the noarchive tag to prevent searchers from seeing outdated pricing.
Here’s an example of a meta robots noindex, nofollow tag:
<!DOCTYPE html> <html> <head> <meta name=”robots” content=”noindex, nofollow” /> </head> <body>…</body> </html>
This example excludes all search engines from indexing the page and from following any on-page links. If you want to exclude multiple crawlers, like googlebot and bing for example, it’s okay to use multiple robot exclusion tags.
Meta directives affect indexing, not crawling
Google-bot needs to crawl your page in order to see its meta directives, so if you’re trying to prevent crawlers from accessing certain pages, meta directives are not the way to do it. Robots tags must be crawled to be respected.
X-Robots-Tag
The x-robots tag is used within the HTTP header of your URL, providing more flexibility and functionality than meta tags if you want to block search engines at scale because you can use regular expressions, block non-HTML files, and apply sitewide noindex tags.
For example, you could easily exclude entire folders or file types (like moz.com/no-bake/old-recipes-to-noindex):
<Files ~ “/?no-bake/.*”> Header set X-Robots-Tag “noindex, nofollow” </Files>
The derivatives used in a robots meta tag can also be used in an X-Robots-Tag.
Or specific file types (like PDFs):
<Files ~ “.pdf$”> Header set X-Robots-Tag “noindex, nofollow” </Files>
For more information on Meta Robot Tags, explore Google’s Robots Meta Tag Specifications.
WordPress tip:
In Dashboard > Settings > Reading, make sure the “Search Engine Visibility” box is not checked. This blocks search engines from coming to your site via your robots.txt file!
Understanding the different ways you can influence crawling and indexing will help you avoid the common pitfalls that can prevent your important pages from getting found.
Ranking: How do search engines rank URLs?
How do search engines ensure that when someone types a query into the search bar, they get relevant results in return? That process is known as ranking, or the ordering of search results by most relevant to least relevant to a particular query.
To determine relevance, search engines use algorithms, a process or formula by which stored information is retrieved and ordered in meaningful ways. These algorithms have gone through many changes over the years in order to improve the quality of search results. Google, for example, makes algorithm adjustments every day — some of these updates are minor quality tweaks, whereas others are core/broad algorithm updates deployed to tackle a specific issue, like Penguin to tackle link spam. Check out our Google Algorithm Change History for a list of both confirmed and unconfirmed Google updates going back to the year 2000.
Why does the algorithm change so often? Is Google just trying to keep us on our toes? While Google doesn’t always reveal specifics as to why they do what they do, we do know that Google’s aim when making algorithm adjustments is to improve overall search quality. That’s why, in response to algorithm update questions, Google will answer with something along the lines of: “We’re making quality updates all the time.” This indicates that, if your site suffered after an algorithm adjustment, compare it against Google’s Quality Guidelines or Search Quality Rater Guidelines, both are very telling in terms of what search engines want.
What do search engines want?
Search engines have always wanted the same thing: to provide useful answers to searcher’s questions in the most helpful formats. If that’s true, then why does it appear that SEO is different now than in years past?
Think about it in terms of someone learning a new language.
At first, their understanding of the language is very rudimentary — “See Spot Run.” Over time, their understanding starts to deepen, and they learn semantics — the meaning behind language and the relationship between words and phrases. Eventually, with enough practice, the student knows the language well enough to even understand nuance, and is able to provide answers to even vague or incomplete questions.
When search engines were just beginning to learn our language, it was much easier to game the system by using tricks and tactics that actually go against quality guidelines. Take keyword stuffing, for example. If you wanted to rank for a particular keyword like “funny jokes,” you might add the words “funny jokes” a bunch of times onto your page, and make it bold, in hopes of boosting your ranking for that term:
Welcome to funny jokes! We tell the funniest jokes in the world. Funny jokes are fun and crazy. Your funny joke awaits. Sit back and read funny jokes because funny jokes can make you happy and funnier. Some funny favorite funny jokes.
This tactic made for terrible user experiences, and instead of laughing at funny jokes, people were bombarded by annoying, hard-to-read text. It may have worked in the past, but this is never what search engines wanted.
The role links play in SEO
When we talk about links, we could mean two things. Backlinks or “inbound links” are links from other websites that point to your website, while internal links are links on your own site that point to your other pages (on the same site).
Links have historically played a big role in SEO. Very early on, search engines needed help figuring out which URLs were more trustworthy than others to help them determine how to rank search results. Calculating the number of links pointing to any given site helped them do this.
Backlinks work very similarly to real-life WoM (Word-of-Mouth) referrals. Let’s take a hypothetical coffee shop, Jenny’s Coffee, as an example:
Referrals from others = good sign of authority
Referrals from yourself = biased, so not a good sign of authority
Referrals from irrelevant or low-quality sources = not a good sign of authority and could even get you flagged for spam
No referrals = unclear authority
Example: Many different people have all told you that Jenny’s Coffee is the best in town
Example: Jenny claims that Jenny’s Coffee is the best in town
Example: Jenny paid to have people who have never visited her coffee shop tell others how good it is.
Example: Jenny’s Coffee might be good, but you’ve been unable to find anyone who has an opinion so you can’t be sure.
This is why PageRank was created. PageRank (part of Google’s core algorithm) is a link analysis algorithm named after one of Google’s founders, Larry Page. PageRank estimates the importance of a web page by measuring the quality and quantity of links pointing to it. The assumption is that the more relevant, important, and trustworthy a web page is, the more links it will have earned.
The more natural backlinks you have from high-authority (trusted) websites, the better your odds are to rank higher within search results.
The role content plays in SEO
There would be no point to links if they didn’t direct searchers to something. That something is content! Content is more than just words; it’s anything meant to be consumed by searchers — there’s video content, image content, and of course, text. If search engines are answer machines, content is the means by which the engines deliver those answers.
Any time someone performs a search, there are thousands of possible results, so how do search engines decide which pages the searcher is going to find valuable? A big part of determining where your page will rank for a given query is how well the content on your page matches the query’s intent. In other words, does this page match the words that were searched and help fulfill the task the searcher was trying to accomplish?
Because of this focus on user satisfaction and task accomplishment, there’s no strict benchmarks on how long your content should be, how many times it should contain a keyword, or what you put in your header tags. All those can play a role in how well a page performs in search, but the focus should be on the users who will be reading the content.
Today, with hundreds or even thousands of ranking signals, the top three have stayed fairly consistent: links to your website (which serve as a third-party credibility signals), on-page content (quality content that fulfills a searcher’s intent), and RankBrain.
What is RankBrain?
RankBrain is the machine learning component of Google’s core algorithm. Machine learning is a computer program that continues to improve its predictions over time through new observations and training data. In other words, it’s always learning, and because it’s always learning, search results should be constantly improving.
For example, if RankBrain notices a lower ranking URL providing a better result to users than the higher ranking URLs, you can bet that RankBrain will adjust those results, moving the more relevant result higher and demoting the lesser relevant pages as a byproduct.
Like most things with the search engine, we don’t know exactly what comprises RankBrain, but apparently, neither do the folks at Google.
What does this mean for SEOs?
Because Google will continue leveraging RankBrain to promote the most relevant, helpful content, we need to focus on fulfilling searcher intent more than ever before. Provide the best possible information and experience for searchers who might land on your page, and you’ve taken a big first step to performing well in a RankBrain world.
Engagement metrics: correlation, causation, or both?
With Google rankings, engagement metrics are most likely part correlation and part causation.
When we say engagement metrics, we mean data that represents how searchers interact with your site from search results. This includes things like:
Clicks (visits from search)
Time on page (amount of time the visitor spent on a page before leaving it)
Bounce rate (the percentage of all website sessions where users viewed only one page)
Pogo-sticking (clicking on an organic result and then quickly returning to the SERP to choose another result)
Many tests, including Moz’s own ranking factor survey, have indicated that engagement metrics correlate with higher ranking, but causation has been hotly debated. Are good engagement metrics just indicative of highly ranked sites? Or are sites ranked highly because they possess good engagement metrics?
What Google has said
While they’ve never used the term “direct ranking signal,” Google has been clear that they absolutely use click data to modify the SERP for particular queries.
According to Google’s former Chief of Search Quality, Udi Manber:
“The ranking itself is affected by the click data. If we discover that, for a particular query, 80% of people click on #2 and only 10% click on #1, after a while we figure out probably #2 is the one people want, so we’ll switch it.”
Another comment from former Google engineer Edmond Lau corroborates this:
“It’s pretty clear that any reasonable search engine would use click data on their own results to feed back into ranking to improve the quality of search results. The actual mechanics of how click data is used is often proprietary, but Google makes it obvious that it uses click data with its patents on systems like rank-adjusted content items.”
Because Google needs to maintain and improve search quality, it seems inevitable that engagement metrics are more than correlation, but it would appear that Google falls short of calling engagement metrics a “ranking signal” because those metrics are used to improve search quality, and the rank of individual URLs is just a byproduct of that.
What tests have confirmed
Various tests have confirmed that Google will adjust SERP order in response to searcher engagement:
Rand Fishkin’s 2014 test resulted in a #7 result moving up to the #1 spot after getting around 200 people to click on the URL from the SERP. Interestingly, ranking improvement seemed to be isolated to the location of the people who visited the link. The rank position spiked in the US, where many participants were located, whereas it remained lower on the page in Google Canada, Google Australia, etc.
Larry Kim’s comparison of top pages and their average dwell time pre- and post-RankBrain seemed to indicate that the machine-learning component of Google’s algorithm demotes the rank position of pages that people don’t spend as much time on.
Darren Shaw’s testing has shown user behavior’s impact on local search and map pack results as well.
Since user engagement metrics are clearly used to adjust the SERPs for quality, and rank position changes as a byproduct, it’s safe to say that SEOs should optimize for engagement. Engagement doesn’t change the objective quality of your web page, but rather your value to searchers relative to other results for that query. That’s why, after no changes to your page or its backlinks, it could decline in rankings if searchers’ behaviors indicates they like other pages better.
In terms of ranking web pages, engagement metrics act like a fact-checker. Objective factors such as links and content first rank the page, then engagement metrics help Google adjust if they didn’t get it right.
The evolution of search results
Back when search engines lacked a lot of the sophistication they have today, the term “10 blue links” was coined to describe the flat structure of the SERP. Any time a search was performed, Google would return a page with 10 organic results, each in the same format.
In this search landscape, holding the #1 spot was the holy grail of SEO. But then something happened. Google began adding results in new formats on their search result pages, called SERP features. Some of these SERP features include:
Paid advertisements
Featured snippets
People Also Ask boxes
Local (map) pack
Knowledge panel
Sitelinks
And Google is adding new ones all the time. They even experimented with “zero-result SERPs,” a phenomenon where only one result from the Knowledge Graph was displayed on the SERP with no results below it except for an option to “view more results.”
The addition of these features caused some initial panic for two main reasons. For one, many of these features caused organic results to be pushed down further on the SERP. Another byproduct is that fewer searchers are clicking on the organic results since more queries are being answered on the SERP itself.
So why would Google do this? It all goes back to the search experience. User behavior indicates that some queries are better satisfied by different content formats. Notice how the different types of SERP features match the different types of query intents.
Query IntentPossible SERP Feature Triggered
InformationalFeatured snippet
Informational with one answerKnowledge Graph / instant answer
LocalMap pack
TransactionalShopping
It’s important to know that answers can be delivered to searchers in a wide array of formats, and how you structure your content can impact the format in which it appears in search.
Localized search
A search engine like Google has its own proprietary index of local business listings, from which it creates local search results.
If you are performing local SEO work for a business that has a physical location customers can visit (ex: dentist) or for a business that travels to visit their customers (ex: plumber), make sure that you claim, verify, and optimize a free Google My Business Listing.
When it comes to localized search results, Google uses three main factors to determine ranking:
Relevance
Distance
Prominence
Relevance
Relevance is how well a local business matches what the searcher is looking for. To ensure that the business is doing everything it can to be relevant to searchers, make sure the business’ information is thoroughly and accurately filled out.
Distance
Google use your geo-location to better serve you local results. Local search results are extremely sensitive to proximity, which refers to the location of the searcher and/or the location specified in the query (if the searcher included one).
Organic search results are sensitive to a searcher’s location, though seldom as pronounced as in local pack results.
Prominence
With prominence as a factor, Google is looking to reward businesses that are well-known in the real world. In addition to a business’ offline prominence, Google also looks to some online factors to determine local ranking, such as:
Reviews
The number of Google reviews a local business receives, and the sentiment of those reviews, have a notable impact on their ability to rank in local results.
Citations
A “business citation” or “business listing” is a web-based reference to a local business’ “NAP” (name, address, phone number) on a localized platform (Yelp, Acxiom, YP, Infogroup, Localeze, etc.).
Local rankings are influenced by the number and consistency of local business citations. Google pulls data from a wide variety of sources in continuously making up its local business index. When Google finds multiple consistent references to a business’s name, location, and phone number it strengthens Google’s “trust” in the validity of that data. This then leads to Google being able to show the business with a higher degree of confidence. Google also uses information from other sources on the web, such as links and articles.
Organic ranking
SEO best practices also apply to local SEO, since Google also considers a website’s position in organic search results when determining local ranking.
In the next chapter, you’ll learn on-page best practices that will help Google and users better understand your content.
[Bonus!] Local engagement
Although not listed by Google as a local ranking factor, the role of engagement is only going to increase as time goes on. Google continues to enrich local results by incorporating real-world data like popular times to visit and average length of visits…
Curious about a certain local business’ citation accuracy? Moz has a free tool that can help out, aptly named Check Listing.
…and even provides searchers with the ability to ask the business questions!
Undoubtedly now more than ever before, local results are being influenced by real-world data. This interactivity is how searchers interact with and respond to local businesses, rather than purely static (and game-able) information like links and citations.
Since Google wants to deliver the best, most relevant local businesses to searchers, it makes perfect sense for them to use real time engagement metrics to determine quality and relevance.
You don’t have to know the ins and outs of Google’s algorithm (that remains a mystery!), but by now you should have a great baseline knowledge of how the search engine finds, interprets, stores, and ranks content. Armed with that knowledge, let’s learn about choosing the keywords your content will target in Chapter 3 (Keyword Research)!
2 notes
·
View notes
Text
How Web Workers Work in JavaScript – With a Practical JS Example
In this article, I will walk you through an example that will show you how web workers function in JavaScript with the help of WebSockets.
I think it's helpful to work with a practical use case because it is much simpler to understand the concepts when you can relate them to real life.
So in this guide, you will be learning what web workers are in JavaScript, you'll get a brief introduction to WebSockets, and you'll see how you can manage sockets in the proper way.
This article is quite application/hands-on oriented, so I would suggest trying the example out as you go along to get a much better understanding.
Let’s dive in.
Table of contents
Prerequisites
Before you start reading this article, you should have a basic understanding of the following topics:
What are web workers in JavaScript?
A web worker is a piece of browser functionality. It is the real OS threads that can be spawned in the background of your current page so that it can perform complex and resource-intensive tasks.
Imagine that you have some large data to fetch from the server, or some complex rendering needs to be done on the UI. If you do this directly on your webpage then the page might get jankier and will impact the UI.
To mitigate this, you can simply create a thread – that is a web worker – and let the web worker take care of the complex stuff.
You can communicate with the web worker in a pretty simple manner which can be used to transfer data to and fro from the worker to the UI.
Common examples of web workers would be:
Dashboard pages that display real-time data such as stock prices, real-time active users, and so on
Fetching huge files from the server
Autosave functionality
You can create a web worker using the following syntax:
const worker = new Worker("<worker_file>.js");
Worker is an API interface that lets you create a thread in the background. We need to pass a parameter, that is a <worker_file>.js file. This specifies the worker file the API needs to execute.
NOTE: A thread is created once a Worker call is initiated. This thread only communicates with its creator, that is the file which created this thread.
A worker can be shared or used by multiple consumers/scripts. These are called shared workers. The syntax of the shared worker is very similar to that of the above mentioned workers.
const worker = new SharedWorker("<worker_file>.js");
You can read more about SharedWorkers in this guide.
History of web workers
Web workers execute in a different context, that is they do not execute in a global scope such as window context. Web workers have their own dedicated worker context which is called DedicatedWorkerGlobalScope.
There are some cases where you can't use web workers, though. For example, you can't use them to manipulate the DOM or the properties of the window object. This is because the worker does not have the access to the window object.
Web workers can also spawn new web workers. Web workers communicate with their creator using certain methods like postMessage, onmessage, and onerror. We will look into these methods closely in the later sections of this article.
Brief Introduction to Web Sockets
A web socket is a type of communication that happens between two parties/entities using a WebSocket protocol. It actually provides a way to communicate between the two connected entities in a persistent manner.
You can create a simple web socket like below:
const socket = new WebSocket("ws://example.com");
Over here we have created a simple socket connection. You'll notice that we have passed a parameter to the WebSocket constructor. This parameter is a URL at which the connection should be established.
You can read more about web sockets by referring to the Websockets link in the prerequisites.
Use Case Description
NOTE: Context, Container, and Class diagrams drawn in this blog post don't accurately follow the exact conventions of these diagrams. They're approximated here so that you can understand the basic concepts.
Before we start, I would suggest reading up on c4models, container diagrams, and context diagrams. You can find resources about them in the prerequisites section.
In this article, we are going to consider the following use case: data transfer using web workers via socket protocol.
We are going to build a web application which will plot the data on a line chart every 1.5 seconds. The web application will receive the data from the socket connection via web workers. Below is the context diagram of our use case:
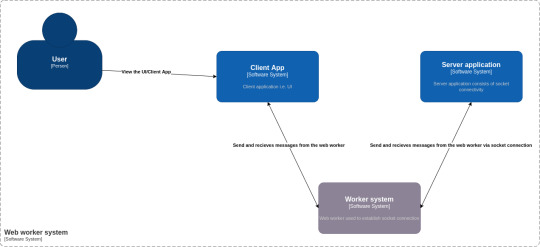
Container Diagram
As you can see from the above diagram, there are 4 main components to our use case:
Person: A user who is going to use our application
Software system: Client App – This is the UI of our application. It consists of DOM elements and a web worker.
Software system: Worker system – This is a worker file that resides in the client app. It is responsible for creating a worker thread and establishing the socket connection.
Software system: Server application – This is a simple JavaScript file which can be executed by node to create a socket server. It consists of code which helps to read messages from the socket connection.
Now that we understand the use case, let's dive deep into each of these modules and see how the whole application works.
Project Structure
Please follow this link to get the full code for the project that I developed for this article.
Our project is divided into two folders. First is the server folder which consists of server code. The second is the client folder, which consists of the client UI, that is a React application and the web worker code.
Following is the directory structure:
├── client │ ├── package.json │ ├── package-lock.json │ ├── public │ │ ├── favicon.ico │ │ ├── index.html │ │ ├── logo192.png │ │ ├── logo512.png │ │ ├── manifest.json │ │ └── robots.txt │ ├── README.md │ ├── src │ │ ├── App.css │ │ ├── App.jsx │ │ ├── components │ │ │ ├── LineChartSocket.jsx │ │ │ └── Logger.jsx │ │ ├── index.css │ │ ├── index.js │ │ ├── pages │ │ │ └── Homepage.jsx │ │ ├── wdyr.js │ │ └── workers │ │ └── main.worker.js │ └── yarn.lock └── server ├── package.json ├── package-lock.json └── server.mjs
To run the application, you first need to start the socket server. Execute the following commands one at a time to start the socket server (assuming you are in the parent directory):
cd server node server.mjs
Then start the client app by running the following commands (assuming you are in the parent directory):
cd client yarn run start
Open http://localhost:3000 to start the web app.
Client and Server Application
The client application is a simple React application, that is CRA app, which consists of a Homepage. This home page consists of the following elements:
Two buttons: start connection and stop connection which will help to start and stop the socket connection as required.
A line chart component - This component will plot the data that we receive from the socket at regular intervals.
Logged message - This is a simple React component that will display the connection status of our web sockets.
Below is the container diagram of our client application.
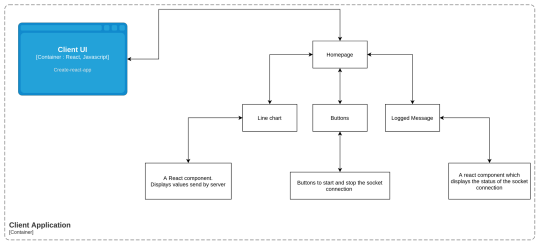
Container Diagram: Client Application
Below is how the UI will look:
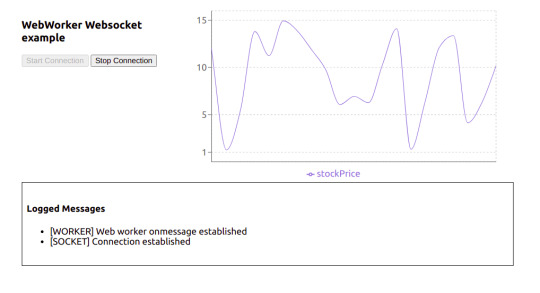
Actual UI
To check out the code for the client UI, go to the client folder. This is a regular create-react-app, except that I have removed some boilerplate code that we don't need for this project.
App.jsx is actually the starter code. If you check this out, we have called the <Homepage /> component in it.
Now let's have a look at the Homepage component.
const Homepage = () => { const [worker, setWorker] = useState(null); const [res, setRes] = useState([]); const [log, setLog] = useState([]); const [buttonState, setButtonState] = useState(false); const hanldeStartConnection = () => { // Send the message to the worker [postMessage] worker.postMessage({ connectionStatus: "init", }); }; const handleStopConnection = () => { worker.postMessage({ connectionStatus: "stop", }); }; //UseEffect1 useEffect(() => { const myWorker = new Worker( new URL("../workers/main.worker.js", import.meta.url) ); //NEW SYNTAX setWorker(myWorker); return () => { myWorker.terminate(); }; }, []); //UseEffect2 useEffect(() => { if (worker) { worker.onmessage = function (e) { if (typeof e.data === "string") { if(e.data.includes("[")){ setLog((preLogs) => [...preLogs, e.data]); } else { setRes((prevRes) => [...prevRes, { stockPrice: e.data }]); } } if (typeof e.data === "object") { setButtonState(e.data.disableStartButton); } }; } }, [worker]); return ( <> <div className="stats"> <div className="control-panel"> <h3>WebWorker Websocket example</h3> <button id="start-connection" onClick={hanldeStartConnection} disabled={!worker || buttonState} > Start Connection </button> <button id="stop-connection" onClick={handleStopConnection} disabled={!buttonState} > Stop Connection </button> </div> <LineChartComponent data={res} /> </div> <Logger logs={log}/> </> ); };
As you can see, it's just a regular functional component that renders two buttons – a line chart, and a custom component Logger.
Now that we know how our homepage component looks, let's dive into how the web worker thread is actually created. In the above component you can see there are two useEffect hooks used.
The first one is used for creating a new worker thread. It's a simple call to the Worker constructor with a new operator as we have seen in the previous section of this article.
But there are some difference over here: we have passed an URL object to the worker constructor rather than passing the path of the worker file in the string.
const myWorker = new Worker(new URL("../workers/main.worker.js", import.meta.url));
You can read more about this syntax here.
If you try to import this web worker like below, then our create-react-app won’t be able to load/bundle it properly so you will get an error since it has not found the worker file during bundling:
const myWorker = new Worker("../workers/main.worker.js");
Next, we also don’t want our application to run the worker thread even after the refresh, or don’t want to spawn multiple threads when we refresh the page. To mitigate this, we'll return a callback in the same useEffect. We use this callback to perform cleanups when the component unmounts. In this case, we are terminating the worker thread.
We use the useEffect2 to handle the messages received from the worker.
Web workers have a build-in property called onmessage which helps receive any messages sent by the worker thread. The onmessage is an event handler of the worker interface. It gets triggered whenever a message event is triggered. This message event is generally triggered whenever the postMessage handler is executed (we will look more into this in a later section).
So in order for us to send a message to the worker thread, we have created two handlers. The first is handleStartConnection and the second is handleStopConnection. Both of them use the postMessage method of the worker interface to send the message to the worker thread.
We will talk about the message {connectionStatus: init} in our next section.
You can read more about the internal workings of the onmessage and postMessage in the following resources:
Since we now have a basic understanding about how our client code is working, then let's move on to learn about the Worker System in our context diagram above.
Worker System
To understand the code in this section, make sure you go through the file src/workers/main.worker.js.
To help you understand what's going on here, we will divide this code into three parts:
A self.onmessage section
How the socket connection is managed using the socketManagement() function
Why we need the socketInstance variable at the top
How self.onmessage works
Whenever you create a web worker application, you generally write a worker file which handles all the complex scenarios that you want the worker to perform. This all happens in the main.worker.js file. This file is our worker file.
In the above section, we saw that we established a new worker thread in the useEffect. Once we created the thread, we also attached the two handlers to the respective start and stop connection buttons.
The start connection button will execute the postMessage method with message: {connectionStatus: init} . This triggers the message event, and since the message event is triggered, all the message events are captured by the onmessage property.
In our main.worker.js file, we have attached a handler to this onmessage property:
self.onmessage = function (e) { const workerData = e.data; postMessage("[WORKER] Web worker onmessage established"); switch (workerData.connectionStatus) { case "init": socketInstance = createSocketInstance(); socketManagement(); break; case "stop": socketInstance.close(); break; default: socketManagement(); } }
So whenever any message event is triggered in the client, it will get captured in this event handler.
The message {connectionStatus: init} that we send from the client is received in the event e. Based on the value of connectionStatus we use the switch case to handle the logic.
NOTE: We have added this switch case because we need to isolate some part of the code which we do not want to execute all the time (we will look into this in a later section).
How the socket connection is managed using the socketManagement() function
There are some reasons why I have shifted the logic of creating and managing a socket connection into a separate function. Here is the code for a better understanding of the point I am trying to make:
function socketManagement() { if (socketInstance) { socketInstance.onopen = function (e) { console.log("[open] Connection established"); postMessage("[SOCKET] Connection established"); socketInstance.send(JSON.stringify({ socketStatus: true })); postMessage({ disableStartButton: true }); }; socketInstance.onmessage = function (event) { console.log(`[message] Data received from server: ${event.data}`); postMessage( event.data); }; socketInstance.onclose = function (event) { if (event.wasClean) { console.log(`[close] Connection closed cleanly, code=${event.code}`); postMessage(`[SOCKET] Connection closed cleanly, code=${event.code}`); } else { // e.g. server process killed or network down // event.code is usually 1006 in this case console.log('[close] Connection died'); postMessage('[SOCKET] Connection died'); } postMessage({ disableStartButton: false }); }; socketInstance.onerror = function (error) { console.log(`[error] ${error.message}`); postMessage(`[SOCKET] ${error.message}`); socketInstance.close(); }; } }
This is a function that will help you manage your socket connection:
For receiving the message from the socket server we have the onmessage property which is assigned an event handler.
Whenever a socket connection is opened, you can perform certain operations. To do that we have the onopen property which is assigned to an event handler.
And if any error occurs or when we are closing the connection then, we use onerror and onclose properties of the socket.
For creating a socket connection there is a separate function altogether:
function createSocketInstance() { let socket = new WebSocket("ws://localhost:8080"); return socket; }
Now all of these functions are called in a switch case like below in the main.worker.js file:
self.onmessage = function (e) { const workerData = e.data; postMessage("[WORKER] Web worker onmessage established"); switch (workerData.connectionStatus) { case "init": socketInstance = createSocketInstance(); socketManagement(); break; case "stop": socketInstance.close(); break; default: socketManagement(); } }
So based on what message the client UI sends to the worker the appropriate function will be executed. It is pretty self-explanatory on what message which particular function should be triggered, based on the above code.
Now consider a scenario where we placed all the code inside self.onmessage.
self.onmessage = function(e){ console.log("Worker object present ", e); postMessage({isLoading: true, data: null}); let socket = new WebSocket("ws://localhost:8080"); socket.onopen = function(e) { console.log("[open] Connection established"); console.log("Sending to server"); socket.send("My name is John"); }; socket.onmessage = function(event) { console.log(`[message] Data received from server: ${event.data}`); }; socket.onclose = function(event) { if (event.wasClean) { console.log(`[close] Connection closed cleanly, code=${event.code} reason=${event.reason}`); } else { // e.g. server process killed or network down // event.code is usually 1006 in this case console.log('[close] Connection died'); } }; socket.onerror = function(error) { console.log(`[error] ${error.message}`); }; }
This would cause the following problems:
On every postMessage call made by the client UI, there would have been a new socket instance.
It would have been difficult to close the socket connection.
Because of these reasons, all the socket management code is written in a function socketManagement and catered using a switch case.
Why we need the socketInstance variable at the top
We do need a socketInstance variable at the top because this will store the socket instance which was previously created. It is a safe practice since no one can access this variable externally as main.worker.js is a separate module altogether.
Communication between the UI and the socket via web worker
Now that we understand which part of the code is responsible for which section, we will take a look at how we establish a socket connection via webworkers. We'll also see how we respond via socket server to display a line chart on the UI.

End-to-end flow of the application
NOTE: Some calls are purposefully not shown in the diagram since it will make the diagram cluttered. Make sure you refer to the code as well while referring to this diagram.
Now let's first understand what happens when you click on the start connection button on the UI:
One thing to notice over here is that our web worker thread is created once the component is mounted, and is removed/terminated when the component is unmounted.
Once the start connection button is clicked, a postMessage call is made with {connectionStatus: init}
The web worker’s onmessage event handler which is listening to all the message events comes to know that it has received connectionStatus as init. It matches the case, that is in the switch case of main.worker.js. It then calls the createSocketInstance() which returns a new socket connection at the URL: ws://localhost:8080
After this a socketManagement() function is called which checks if the socket is created and then executes a couple of operations.
In this flow, since the socket connection is just established therefore, socketInstance’s onpen event handler is executed.
This will send a {socketStatus: true} message to the socket server. This will also send a message back to the client UI via postMessage({ disableStartButton: true}) which tells the client UI to disable the start button.
Whenever the socket connection is established, then the server socket’s on('connection', ()=>{}) is invoked. So in step 3, this function is invoked at the server end.
Socket’s on('message', () => {}) is invoked whenever a message is sent to the socket. So at step 6, this function is invoked at the server end. This will check if the socketStatus is true, and then it will start sending a random integer every 1.5 seconds to the client UI via web workers.
Now that we understood how the connection is established, let's move on to understand how the socket server sends the data to the client UI:
As discussed above, socket server received the message to send the data, that is a random number every 1.5 second.
This data is recieved on the web worker’s end using the onmessage handler.
This handler then calls the postMessage function and sends this data to the UI.
After receiving the data it appends it to an array as a stockPrice object.
This acts as a data source for our line chart component and gets updated every 1.5 seconds.
Now that we understand how the connection is established, let's move on to understand how the socket server sends the data to the client UI:
As discussed above, socket server recieved the message to send the data, that is a random number, every 1.5 seconds.
This data is recieved on the web worker’s end using the socket's onmessage handler.
This handler then calls the postMessage function of the web worker and sends this data to the UI.
After receiving the data via useEffect2 it appends it to an array as a stockPrice object.
This acts as a data source for our line chart component and gets updated every 1.5 seconds.
NOTE: We are using recharts for plotting the line chart. You can find more information about it at the official docs.
Here is how our application will look in action:
Working Example
Summary
So this was a quick introduction to what web workers are and how you can use them to solve complex problems and create better UIs. You can use web workers in your projects to handle complex UI scenarios.
If you want to optimize your workers, read up on the below libraries:
Thank you for reading!
Follow me on twitter, github, and linkedIn.
If you read this far, tweet to the author to show them you care.
1 note
·
View note
Link
1) ls
Need to figure out what is in a directory? ls is your friend. It will list out the contents of a directory and has a number of flags to help control how those items are displayed. Since the default ls doesn't display entries that begin with a ., you can use ls -a to make sure to include those entries as well.
nyxtom@enceladus$ ls -a ./ README.md _dir_colors _tern-project _vimrc install.sh* ../ _alacritty-theme/ _gitconfig _tmux/ alacritty-colorscheme* .git/ _alacritty.yml _profile _tmux.conf .gitignore _bashrc _terminal/ _vim/ imgcat.sh*
Need it in a 1 column layout (one entry per line)? Use ls -1. Need to include a longer format with size, permissions, and timestamps use ls -l. Need those entries sorted by last changed use ls -l -t. Need to recursively list them? Use ls -R. Want to sort by file size? Use ls -S.
2) cat
Need to output the contents of a file. Use cat! Bonus: use cat -n to include numbers on the lines.
nyxtom@enceladus$ cat -n -s _dir_colors 1 .red 00;31 2 .green 00;32 3 .yellow 00;33 4 .blue 00;34 5 .magenta 00;35 6 .cyan 00;36 7 .white 00;37 8 .redb 01;31 9 .greenb 01;32
3) less/more
Are finding that "cat-ing" a file is causing your terminal to scroll too fast? Use less to fix that problem. But wait, what about more? less is actually based on more. Early versions of more were unable to scroll backward through a file. In any case, less has a nice ability to scroll through the contents of a file or output with space/down/up/page keys. Use q to exit.
Need line numbers? use less -N
Need to search while in less? Use /wordshere to search.
Once you're searching use n to go to the next result, and N for the previous result.
Want to open up less with search already? Use less -pwordshere file.txt
Whitespace bothering you? less -s
Multiple files, what!? less file1.txt file2.txt
Next file is : and then hit n, previous file is : then hit p
Need to pipe some log output or the results of a curl? Use curl dev.to | less
Less has bookmarks? Yep. Drop a marker in less for the current top line with m then hit any letter as the bookmark like a. Then to go back, hit the '(apostrophe key) and the bookmark letter to return (in this case a).
Want to drop into your default editor from less right where you are currently at and return back when you're done? Use v and your default terminal editor will open up at the right spot. Then once you've quit/saved in that editor you will be right back where you were before. 😎 Awesome! 🎉
4) curl
Curl is another essential tool if you need to do just about any type of protocol request. Here is a small fraction of ways you can interact with curl.
GET `curl https://dev.to/
Output to a file curl -o output.html https://dev.to/
POST curl -X POST -H "Content-Type: application/json" -d '{"name":"tom"}' http://localhost:8080
BASIC AUTH `curl -u username:password http://localhost:8080
drop into cat cat | curl -H 'Content-Type: application/json' http://localhost:8080 -d @-
HEAD curl -I dev.to
Follow Redirects curl -I -L dev.to
Pass a certificate, skip verify curl --cert --key --insecure https://example.com
5) man
If you are stuck understanding what a command does, or need the documentation. Use man! It's literally the manual and it works on just all the built in commands. It even works on itself
$ man man NAME man - format and display the on-line manual pages SYNOPSIS man [-acdfFhkKtwW] [--path] [-m system] [-p string] [-C config_file] [-M pathlist] [-P pager] [-B browser] [-H htmlpager] [-S section_list] [section] name ... DESCRIPTION man formats and displays the on-line manual pages. If you specify section, man only looks in that section of the manual. name is normally the name of the manual page, which is typically the name of a com- mand, function, or file. However, if name contains a slash (/) then man interprets it as a file specification, so that you can do man ./foo.5 or even man /cd/foo/bar.1.gz. See below for a description of where man looks for the manual page files. MANUAL SECTIONS The standard sections of the manual include: 1 User Commands 2 System Calls 3 C Library Functions 4 Devices and Special Files 5 File Formats and Conventions 6 Games et. Al. 7 Miscellanea 8 System Administration tools and Deamons Distributions customize the manual section to their specifics, which often include additional sections.
6) alias
If you ever need to setup a short command name to execute a script or some complicated git command for instance, then use alias.
alias st="git status" alias branches="git branch -a --no-merged" alias imgcat="~/dotfiles/imgcat.sh"
Bonus: add these to your ~/.bashrc to execute these when your shell starts up!
7) echo
The "hello world" of any terminal is echo. echo "hello world". You can include environment variables and even sub commands echo "Hello $USER".
8) sed
Sed is a "stream editor". This means we can do a number of different ways to read some input, modify it, and output it. Here's a few ways you can do that:
Text substitutions: echo 'Hello world!' | sed s/world/tom/
Selections: sed -n '1,4p' _bashrc (n is quiet or suppress unmatched lines, 1,4p is p print lines 1-4.
Multiple selections: sed -n -e '1,4p' -e '8-10p' _bashrc
Every X lines: sed -n 1~2p _bashrc (use ~ instead of , to denote every 2 lines (in this case 2)
Search all/replace all: sed s/world/tom/gp (g for global search, p is to print each match instance)
NOTE the sed implementation might differ depending on the system you are using. Keep this in mind that some flags might be unavailable. Take a look at the man sed for more info.
9) tar
If you need to create an archive of a number of files. Don't worry, you'll remember these flags soon enough!
-c create
-v verbose
-f file name
This would look like:
tar -cvf archive.tar files/
By default, tar will create an uncompressed archive unless you tell it to use a specific compression algorithm.
-z gzip (decent compression, reasonable speed) (.gz)
-j bzip2 (better compression, slower) (*.bz2)
tar -cvfz archive.tar.gz files/
Extraction is done with:
-x extract
Similar options for decompression options and verbose:
# extract, verbose, gzip decompress, filename tar -xvzf archive.tar.gz
10) cd
Change directories. Not much to it! cd ../../, cd ~ cd files/ cd $HOME
11) head
head [-n count | -c bytes] [file ...] head is a filter command that will display the first count (-c) lines or bytes (-b) of each of the specified files, or of the standard input if no files are specified. If count is omitted, it defaults to 10.
If more than a single file is specified, each file is preceded by a header consisting of the string ''==> XXX <=='' where XXX is the name of the file.
head -n 10 ~/dotfiles/_bashrc`
12) mkdir
mkdir creates the directories named as operands, in the order specified, using mode rwxrwxrwx (0777) as modified by the current umask. With the following modes:
-m mode: Set the file permission bits of the final directory created (mode can be in the format specified by chmod
-p Create intermediary directories as required (if not specified then the full path prefix must already exist)
-v Verbose when creating directories
13) rm
remove the non-directory type files specified on the command line. If permissions of the file do not permit writing, and standard input is terminal, user is prompted for confirmation.
A few options of rm can be quite useful:
-d remove directories as well as files
-r -R Remove the file hierarchy rooted in each file, this implies the -d option.
-i Request confirmation before attempting to remove each file
-f Remove files without prompting confirmation regardless of permissions. Do not display diagnostic messages if there are errors or it doesn't exist
-v verbose output
14) mv
mv renames the file named by the source to the destination path. mv also moves each file named by a source to the destination. Use the following options:
-f Do not prompt confirmation for overwriting
-i Cause mv to write a prompt to stderr before moving a file that would overwrite an existing file
-n Do not overwrite an existing file (overrides -i and -f)
-v verbose output
15) cp
copy the contents of the source to the target
-L sumbolic links are followed
-P Default is no symbolic links are followed
-R if source designates a directory, copy the directory and entire subtree (created directories have the same mode as the source directory, unmodified by the process umask)
16) ps
Display the header line, followed by lines containing information about all of your processes that have controlling terminals. Various options can be used to control what is displayed.
-A Display information about other users' processes
-a Display information about other users' processes as well as your own (skip any processes without controlling terminal)
-c Change command column to contain just exec name
-f Display uid, pid, parent pid, recent CPU, start time, tty, elapsed CPU, command. -u will display user name instead of uid.
-h Repeat header as often as necessary (one per page)
-p Display about processes which match specified process IDS (ps -p 8040)
-u Display belonging to the specified user (ps -u tom)
-r Sort by CPU usage
UID PID PPID C STIME TTY TIME CMD F PRI NI SZ RSS WCHAN S ADDR 501 97993 78315 0 5:28PM ?? 134:30.10 Figma Beta Helpe 4004 31 0 28675292 316556 - R 0 88 292 1 0 14Aug20 ?? 372:58.39 WindowServer 410c 79 0 8077052 81984 - Ss 0 501 78315 1 0 Thu04PM ?? 17:55.75 Figma Beta 1004084 46 0 5727912 109596 - S 0 501 78377 78315 0 Thu04PM ?? 22:16.66 Figma Beta Helpe 4004 31 0 5893304 59376 - S 0 501 70984 70915 0 Wed02PM ?? 8:58.36 Spotify Helper ( 4004 31 0 9149416 294276 - S 0 202 266 1 0 14Aug20 ?? 108:51.87 coreaudiod 4004 97 0 4394220 6960 - Ss 0 501 70979 70915 0 Wed02PM ?? 2:09.53 Spotify Helper ( 4004 31 0 4767800 49764 - S 0 501 97869 78315 0 5:28PM ?? 0:32.51 Figma Beta Helpe 4004 31 0 5324624 81000 - S 0 501 70915 1 0 Wed02PM ?? 9:53.82 Spotify 10040c4 97 0 5382856 92580 - S 0
17) tail
Similar to head, tail will display the contents of a file or input starting at the given options:
tail -f /var/log/web.log Commonly used to not stop the output when the end of the file is reached, but wait for additional data to be appended. (Use -Fto follow when the file has been renamed or rotated)
tail -n 100 /var/log/web.log Number of lines
tail -r Input is displayed in reverse order
tail -b 100 Use number of bytes instead of lines
18) kill
Send a signal to the processes specified by the pid
Commonly used signals are among:
1 HUP (hang up) 2 INT (interrupt) 3 QUIT (quit) 6 ABRT (abort) 9 KILL (non-catchable, non-ignorable kill) 14 ALRM (alarm clock) 15 TERM (software termination signal)
You will typically see a kill -9 pid. Find out the process with ps or top!
19) top
Need some realtime display of the running processes? Use top for this!
Processes: 517 total, 3 running, 3 stuck, 511 sleeping, 3013 threads 16:16:07 Load Avg: 2.54, 2.63, 2.57 CPU usage: 12.50% user, 5.66% sys, 81.83% idle SharedLibs: 210M resident, 47M data, 17M linkedit. MemRegions: 153322 total, 5523M resident, 164M private, 2621M shared. PhysMem: 16G used (2948M wired), 431M unused. VM: 2539G vsize, 1995M framework vsize, 14732095(0) swapins, 17624720(0) swapouts. Networks: packets: 81107619/74G in, 103172624/63G out. Disks: 44557301/463G read, 15432059/228G written. PID COMMAND %CPU TIME #TH #WQ #PORTS MEM PURG CMPRS PGRP PPID STATE BOOSTS %CPU_ME %CPU_OTHRS UID FAULTS COW MSGSENT MSGRECV SYSBSD 97993 Figma Beta H 53.0 02:19:46 26 1 271 347M+ 0B 109M 78315 78315 sleeping *0[1] 0.00000 0.00000 501 5042481+ 5175 29897392+ 8417371+ 19506598+ 62329 Slack Helper 21.6 05:18.63 20 1 165+ 123M- 0B 27M 62322 62322 sleeping *0[4] 0.00000 0.00000 501 2124802+ 13816 813744+ 435614+ 1492014+ 0 kernel_task 9.6 07:47:25 263/8 0 0 106M 0B 0B 0 0 running 0[0] 0.00000 0.00000 0 559072 0 1115136682+ 1057488639+ 0 60459 top 5.5 00:00.65 1/1 0 25 5544K+ 0B 0B 60459 83119 running *0[1] 0.00000 0.00000 0 3853+ 104 406329+ 203153+ 8800+
20) and 21) chmod, chown
File permissions are likely a very typical issue you will run into. Judging from the number of results for "permission not allowed" and other variations, it would be very useful to understand these two commands when used in conjunction with one another.
When you list files out, the permission flags will denote things like:
-rwxrwxrwx
- denotes a file, while d denotes a directory. Each part of the next three character sets is the actual permissions. 1) file permissions of the owner, 2) file permissions of the group, 3) file permissions for others. r is read, w is write, x is execute.
Typically, chmod will be used with the numeric version of these permissions as follows:
0: No permission 1: Execute permission 2: Write permission 3: Write and execute permissions 4: Read permission 5: Read and execute permissions 6: Read and write permissions 7: Read, write and execute permissions
So if you wanted to give read/write/execute to owner, but only read permissions to the group and others it would be:
chmod 744 file.txt
With chown you can change the owner and the group of a file as such as chown $USER: file.txt (to change the user to your current user and to use the default group).
22) grep
Grep lets you search on any given input, selecting lines that match various patterns. Usually grep is used for simple patterns and basic regular expressions. egrep is typically used for extended regex.
If you specify the --color this will highlight the output. Combine with -n to include numbers.
grep --color -n "imgcat" ~/dotfiles/_bashrc 251:alias imgcat='~/dotfiles/imgcat.sh'
23) find
Recursively descend the directory tree for each path listed and evaluate an expression. Find has a lot of variations and options, but don't let that scare you. The most typical usage might be:
find . -name "*.c" -print print out files where the name ends with .c
find . \! -name "*.c" -print print out files where the name does not end in .c
find . -type f -name "test" -print print out only type files (no directories) that start with the name "test"
find . -name "*.c" -maxdepth 2 only descend 2 levels deep in the directories
24) ping
Among many network diagnostic tools from lsof to nc, you can't go wrong with ping. Ping simply sends ICMP request packets to network hosts. Many servers disable ICMP responses, but in any case, you can use it in a number of useful ways.
Specify a time-to-live with -T
Timeouts -t
-c Stop sending and receiving after count packets.
-s Specify the number of data bytes to send
PING dev.to (151.101.130.217): 56 data bytes 64 bytes from 151.101.130.217: icmp_seq=0 ttl=58 time=17.338 ms 64 bytes from 151.101.130.217: icmp_seq=1 ttl=58 time=32.732 ms 64 bytes from 151.101.130.217: icmp_seq=2 ttl=58 time=14.288 ms 64 bytes from 151.101.130.217: icmp_seq=3 ttl=58 time=15.166 ms 64 bytes from 151.101.130.217: icmp_seq=4 ttl=58 time=16.465 ms --- dev.to ping statistics --- 5 packets transmitted, 5 packets received, 0.0% packet loss round-trip min/avg/max/stddev = 14.288/19.198/32.732/6.848 ms
25) sudo
This command is required if you want to do actions that require the root or superuser or another user as specified by the security policy.
sudo ls /usr/local/protected
Conclusion
There are a lot of really useful commands available. I simply could not list them all out here without doing them a disservice. I would add to this list a number of very important utilities like df, free, nc, lsof, and loads of other diagnostic commands. Not to mention, many of these commands actually deserve their own post! I plan on writing more of these in the coming weeks. Thanks! If you have suggestions, please feel free to leave a comment below!
0 notes
Text
In Depth Cookies In JavaScript Sagar Jaybhay
New Post has been published on https://is.gd/1WgGsV
In Depth Cookies In JavaScript Sagar Jaybhay

In this article we will understand In Depth about Cookies in JavaScript. By reading this article you will able to create Cookies, Delete Cookie By Sagar Jaybhay.
If you see web application works on HTTP protocol and the HTTP protocol is a stateless protocol. The meaning of this is when we request some data, web page after filling some information on the webpage the webserver does not remember anything about that request after processing that request but we want our web application to remember users choice.
This means if I fill my first name on the page after the subsequent request the page should know what information I filled in that textbox but the page doesn’t remember that so why this happens because web pages use the HTTP protocol to serve the webpage and HTTP is stateless.
Meaning that after processing the request of client web server doesn’t remember about the client settings to remember this we have several options but one of the easiest and common way is use cookies.
function setCookies() var firstName=document.getElementById('firstname').value; // alert(firstName); if(firstName!="") debugger document.getElementById('firstname').value=firstName; document.cookie="fname = "+firstName+";"//expires=Mon, 17 Feb 2020 00:21:00 UTC;"; window.onload=function() var cookiearray=document.cookie.split('=') document.getElementById('firstname').value=cookiearray[1]
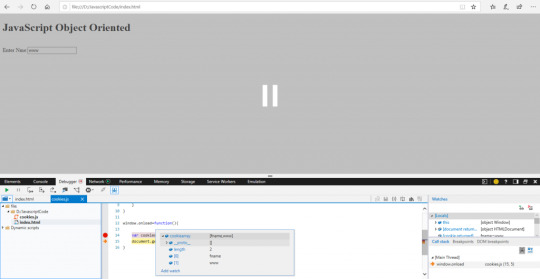
Cookies In JavaScript
What are Cookies?
Cookies are small text files that browser stores in the client’s machine. It is a string of name-value pair which is separated by semi-column.
How did cookies save on machines?
document.cookie="fname = "+firstName+"; expires=Mon, 17 Feb 2020 00:21:00 UTC;";
How to read cookies?
var doc=document.cookie;
Cookie Attribute
;path=path (e.g., ‘/‘, ‘/mydir‘) by default cookies are valid for only web pages in the directory of a current web page stored and its descendent but if you want to set valid for root then path=’/ ’
;domain=domain (e.g., ‘example.com‘ or ‘subdomain.example.com‘). it specifies the domain for which cookie is valid.
;max-age=max-age-in-seconds (e.g., 60*60*24*365 or 31536000 for a year)
;expires=date-in-GMTString-format If neither expires nor max-age specified it will expire at the end of the session.
; secure Cookie to only be transmitted over the secure protocol as https which ensures the cookie is always encrypted when transmitting from client and server.
;samesite SameSite prevents the browser from sending this cookie along with cross-site requests.
Expires and max-age-attribute: if you want to create a persistent cookie that is a cookie that is not deleted after the browser is closed for this either use expires or max-age.
What is the difference between expires and max-age attribute?
With expires attribute, you can set the expiry date. This expire attribute is obsolete and very few browsers support this attribute.
Max-age: this attribute you can set the expiry in time and seconds and most of them are supports.
You also save the JSON object in the cookie.
How to check Cookie is enable or not?
this.navigator.cookieEnabled
above statement returns true if a cookie is enabled.
How to check JavaScript is enabled or Not?
The easiest way to detect the javascript is enabled or not by using the noscript tag. The content in noscript is displayed only when javascript is not enabled by the browser.
GitHub Link:- https://github.com/Sagar-Jaybhay/JavaScriptInBrowser
0 notes
Photo

5 jQuery.each() Function Examples
This is an extensive overview of the jQuery.each() function — one of jQuery’s most important and most used functions. In this article, we’ll find out why and take a look at how you can use it.
What is jQuery.each()
jQuery’s each() function is used to loop through each element of the target jQuery object — an object that contains one or more DOM elements, and exposes all jQuery functions. It’s very useful for multi-element DOM manipulation, as well as iterating over arbitrary arrays and object properties.
In addition to this function, jQuery provides a helper function with the same name that can be called without having previously selected or created any DOM elements.
jQuery.each() Syntax
Let’s see the different modes in action.
The following example selects every <div> element on a web page and outputs the index and the ID of each of them:
// DOM ELEMENTS $('div').each(function(index, value) { console.log(`div${index}: ${this.id}`); });
A possible output would be:
div0:header div1:main div2:footer
This version uses jQuery’s $(selector).each() function, as opposed to the utility function.
The next example shows the use of the utility function. In this case the object to loop over is given as the first argument. In this example, we'll show how to loop over an array:
// ARRAYS const arr = [ 'one', 'two', 'three', 'four', 'five' ]; $.each(arr, function(index, value) { console.log(value); // Will stop running after "three" return (value !== 'three'); }); // Outputs: one two three
In the last example, we want to demonstrate how to iterate over the properties of an object:
// OBJECTS const obj = { one: 1, two: 2, three: 3, four: 4, five: 5 }; $.each(obj, function(key, value) { console.log(value); }); // Outputs: 1 2 3 4 5
This all boils down to providing a proper callback. The callback’s context, this, will be equal to its second argument, which is the current value. However, since the context will always be an object, primitive values have to be wrapped:
$.each({ one: 1, two: 2 } , function(key, value) { console.log(this); }); // Number { 1 } // Number { 2 }
`
This means that there's no strict equality between the value and the context.
$.each({ one: 1 } , function(key, value) { console.log(this == value); console.log(this === value); }); // true // false
`
The first argument is the current index, which is either a number (for arrays) or string (for objects).
1. Basic jQuery.each() Function Example
Let’s see how the jQuery.each() function helps us in conjunction with a jQuery object. The first example selects all the a elements in the page and outputs their href attribute:
$('a').each(function(index, value){ console.log(this.href); });
The second example outputs every external href on the web page (assuming the HTTP(S) protocol only):
$('a').each(function(index, value){ const link = this.href; if (link.match(/https?:\/\//)) { console.log(link); } });
Let’s say we had the following links on the page:
<a href="https://www.sitepoint.com/">SitePoint</a> <a href="https://developer.mozilla.org">MDN web docs</a> <a href="http://example.com/">Example Domain</a>
The second example would output:
https://www.sitepoint.com/ https://developer.mozilla.org/ http://example.com/
We should note that DOM elements from a jQuery object are in their "native" form inside the callback passed to jQuery.each(). The reason is that jQuery is in fact just a wrapper around an array of DOM elements. By using jQuery.each(), this array is iterated in the same way as an ordinary array would be. Therefore, we don’t get wrapped elements out of the box.
With reference to our second example, this means we can get an element's href attribute by writing this.href. If we wanted to use jQuery's attr() method, we would need to re-wrap the element like so: $(this).attr('href').
The post 5 jQuery.each() Function Examples appeared first on SitePoint.
by Florian Rappl via SitePoint https://ift.tt/31lGCD3
0 notes
Text
From Following Posts and Blogrolls (Following Pages) with OPML to Microsub Servers and Readers

I’m still tinkering away at pathways for following people (and websites) on the open web (in my case within WordPress). I’m doing it with an eye toward making some of the UI and infrastructure easier in light of the current fleet of Microsub servers and readers that will enable easier social reading without the centralized reliance on services like Facebook, Twitter, Instagram, Snapchat, Medium, LinkedIn, et al.
If you haven’t been following along, here are some relevant pieces for background:
The beginnings of a blogroll
A Following Page (aka some significant updates to my Blogroll)
OPML files for categories within WordPress’s Links Manager
Was WP Links the Perfect Blogroll All Along? by Ton Zijlstra
Generally I’ve been adding data into my Following Page (aka blogroll on steroids) using the old WordPress Links Manager pseudo-manually. (There’s also a way to bulk import to it via OPML, using the WordPress Tools Menu or via /wp-admin/import.php?import=opml). The old Links Manager functionality in WordPress had a bookmarklet to add links to it quickly, though it currently only seems to add a minimal set–typically just the URL and the page title. Perhaps someone with stronger JavaScript skills than I possess could improve on it or integrate/leverage some of David Shanske’s Parse This work into such a bookmark to pull more data out of pages (via Microformats, Schema.org, Open Graph Protocol, or Dublin Core meta) to pre-fill the Links Manager with more metadata including page feeds, which I now understand Parse This does in the past month or so. (If more than one feed is found, they could be added in comma separated form to the “Notes” section and the user could cut/paste the appropriate one into the feed section.) Since I spent some significant time trying to find/dig up that old bookmarklet, I’ll mention that it can be found in the Restore Lost Functionality plugin (along with many other goodies) and a related version also exists in the Link Library plugin, though on a small test I found it only pulled in the URL.
Since it wasn’t completely intuitive to find, I’ll include the JavaScript snippet for the Links Manager bookmarklet below, though note that the URL hard coded into it is for example.com, so change that part if you’re modifying for your own use. (I haven’t tested it, but it may require the Press This plugin which replaces some of the functionality that was taken out of WordPress core in version 4.9. It will certainly require one to enable using the Links Manager either via code or via plugin.)
javascript:void(linkmanpopup=window.open('https://exanple.com/wp-admin/link-add.php?action=popup&linkurl='+escape(location.href)+'&name='+escape(document.title),'LinkManager','scrollbars=yes,width=750,height=550,left=15,top=15,status=yes,resizable=yes'));linkmanpopup.focus();window.focus();linkmanpopup.focus();
Since I’ve been digging around a bit, I’ll note that Yannick Lefebvre’s Link Library plugin seems to have a similar sort of functionality to Links Manager and adds in the ability to add a variety of additional data fields including tags, which Ton Zijlstra mentions he would like (and I wouldn’t mind either). Unfortunately I’m not seeing any OPML functionality in the plugin, so it wins at doing display (with a huge variety of settings) for a stand-alone blogroll, but it may fail at the data portability for doing the additional OPML portion we’ve been looking at. Of course I’m happy to be corrected, but I don’t see anything in the documentation or a cursory glance at the code.
In the most ideal world, I’d love to be able to use the Post Kinds Plugin to create follow posts (see my examples). This plugin is already able to generally use bookmarklet functionality to pull in a variety of meta data using the Parse This code which is also built into Post Kinds.
It would be nice if these follow posts would also copy their data into the Links Manager (to keep things DRY), so that the blogroll and the OPML files are automatically updated all at once. (Barring Post Kinds transferring the data, it would be nice to have an improved bookmarklet for pulling data into the Links Manager piece directly.)
Naturally having the ability for these OPML files be readable/usable by Jack Jamieson’s forthcoming Yarns Microsub Server for WordPress (for use with social readers) would be phenomenal. (I believe there are already one or two OPML to h-feed converters for Microsub in the wild.) All of this would be a nice end -to-end solution for quickly and easily following people (or sites) with a variety of feeds and feed types (RSS, Atom, JSONfeed, h-feed).
An additional refinement of the blogroll display portion would be to have that page display as an h-feed of h-entries each including properly marked up h-cards with appropriate microformats and discoverable RSS feeds to make it easier for other sites to find and use that data. (This may be a more IndieWeb-based method of displaying such a page compared with the OPML spec.) I’ll also note that the Links Manager uses v1 of the OPML spec and it would potentially be nice to have an update on that as well for newer discovery tools/methods like Dave Winer’s Share Your OPML Subscription list, which I’m noting seems to be down/not functioning at the moment.
#blogroll#blogrolls#feed readers#follow posts#following page#itch#javascript#Links Manager#Microsub#OPML#OPML subscription#Post Kinds Plugin#Yarns#IndieWeb#WordPress
0 notes
Text
Relative Urls For Website Performance
A relative URL is any URL that doesn't explicitly specify the protocol (e.g., " http:// " or " https:// ") and/or domain ( www.example.com ), which forces the visitor's web browser (or the search engine bots) to assume it refers to the same site on which the URL appears.
Relative Link
A relative link, on the other hand, takes advantage of the fact that the server knows where the current document is. Thus, if we want to link to another document in the same directory, we don't need to write out the full URL. All we need to use is the name of the file.
Relative Path vs Absolute Path:
Absolute paths contain a complete URL, which includes a protocol, the website’s domain name and possibly a specific file, subfolder, or page name. For example: <a href="http://domain.com/ourfolder">A Folder</a>
The URL here, http://domain.com/ourfolder, can be entered into a browser’s search bar, and we’ll be taken where we want to go. While our personal browser may let we omit the protocol, https://, we should always include the protocol when coding absolute links to make sure they work for all visitors.
Conversely, a relative link only includes the name of a specific file or page, which is relative, to the current path. If we keep all of our website’s files in a single directory, we can establish links between pages as follows: <a href="/ourfolder/">The Home page of my website</a>
Relative URLs come in three flavors: 1. Path-Relative URLs
<a href="services/video-production/corporate-videos"> <a href="corporate-videos">
The URL begins with the name of a page, or the name of a path (folder, directory, whatever) containing a page. Browsers assume this link refers to a page that is either in the same directory as the page on which the link appears, or in a subdirectory below it. For example, let's say site has a Services section, and under that have a subsection calledVideo Production , and that the overview page for this service has the URL: http://example.com/services/video-production <a href="video-production"> Having no domain or foreslashes, this link is assumed by browsers to be relative to the path of the page on which it appears, correctly calculating the absolute URL for this link as: "http://example.com/services/video-production/" This is a perfectly valid use for path-relative URLs.
2. Root-Relative URLs Examples: <a href="/services/"> <a href="/services/video-production"> The leading foreslash before "services" indicates that this URL is relative to the root of the site's URL structure, rather than the path of the page on which it appears. In this case, the absolute URL is calculated to be: "http://example.com" + "/services/video-production" Root-relative URLs are probably the safest kind of relative URL overall, both for minimizing the potential for human error, and for simplifying site maintenance. When absolute URLs aren't an option, root-relative URLs are probably best. 3. Protocol-Relative URLs Examples: <a href="//services/"> <a href="//services/video-production"> The double-leading-foreslash ("//") tells the browser to use the same connection scheme or protocol (i.e., either HTTP or HTTPS) as used to request the page on which the URL appears, so if this URL is on a page whose URL begins “https://", then protocol-relative URLs on that page should also begin with "https://". Screenshot before applying snippets of code:

Screenshot after applying snippets of code:

#Web Design and Development Company#Best web design company in Mohali#web development company in India#Best Seo Services Company in india
0 notes
Text
rel=canonical: the ultimate guide
Joost de Valk
Joost de Valk is the founder and Chief Product Officer of Yoast. He’s a digital marketer, developer and an Open Source fanatic.
A canonical URL lets you tell search engines that certain similar URLs are actually the same. Because sometimes you have products or content that can be found on multiple URLs — or even multiple websites. By using canonical URLs (HTML link tags with the attribute rel=canonical) you can have these on your site without harming your rankings. In this ultimate guide, I’ll discuss what canonical URLs are, when to use them, and how to prevent or fix a few common mistakes!
Table of contents
What is the canonical link element?
The rel=canonical element, often called the “canonical link”, is an HTML element that helps webmasters prevent duplicate content issues. It does so by specifying the “canonical URL”, the “preferred” version of a web page – the original source, even. And this improves your site’s SEO.
The idea is simple. If you have several versions of the same content, you pick one “canonical” version and point the search engines at it. This solves the duplicate content problem where search engines don’t know which version to show in their results.
The SEO benefit of rel=canonical
Choosing a proper canonical URL for every set of similar URLs improves the SEO Company of your site. This is because the search engine knows which version is canonical, and can count all the links pointing at the different versions as links to the canonical version. In concept, setting a canonical is similar to a 301 redirect, only without the actual redirecting.
The history of rel=canonical
The canonical link element was introduced by Google, Bing, and Yahoo! in February 2009. If you’re interested in its history, I would recommend Matt Cutts’ post from 2009. This post gives you some background and links to different interesting articles. Or watch the video of Matt introducing the canonical link element. Because, although the idea is simple, the specifics of how to use it are often a bit more complex.
The process of canonicalization
Ironic side note
The term Canonical comes from the Roman Catholic tradition, where a list of sacred books was created and accepted as genuine and named the canonical Gospels of the New Testament. The irony is it took the Roman Catholic church about 300 years and numerous fights to come up with the canonical list, and they eventually chose four versions of the same story…
When you have several choices for a product’s URL, canonicalization is the process of picking one of them. Luckily, it will be obvious in many cases: one URL will be a better choice than others. But in some cases, it might not be as obvious. This is nothing to worry about. Even then it’s still pretty simple: just pick one! Not canonicalizing your URLs is always worse than canonicalizing your URLs.
How to set canonical URLs
Let’s assume you have two versions of the same page, each with exactly – 100% – the same content. The only difference is that they’re in separate sections of your site. And because of that the background color and the active menu item are different – but that’s it. Both versions have been linked to from other sites, so the content itself is clearly valuable. So which version should search engines show in results?
For example, these could be their URLs:
https://example.com/wordpress/SEO Company-plugin/
https://example.com/wordpress/plugins/SEO Company/
A correct example of using rel=canonical
The situation described above occurs fairly often, especially in a lot of e-commerce systems. A product can have several different URLs depending on how you got there. But this is exactly what rel=canonical was invented for. In this case, you would apply rel=canonical as follows:
Pick one of your two pages as the canonical version. This should be the version you think is the most important. If you don’t care, pick the one with the most links or visitors. When all these factors are equal, flip a coin. You just need to choose.
Add a rel=canonical link from the non-canonical page to the canonical one. So if we picked the shortest URL as our canonical URL, the other URL would link to the shortest URL in the <head> section of the page – like this:
<link rel="canonical" href="https://example.com/wordpress/SEO Company-plugin/" />
It’s as easy as that! Nothing more, nothing less.
What this does is “merge” the two pages into one from a search engine’s perspective. It’s a “soft redirect”, without actually redirecting the user. Links to both URLs now count as the single, canonical version of the URL.
Want to know more about the use of rel=canonical on category and product pages of your eCommerce site? I also discuss this topic in this Ask Yoast video.
Setting the canonical URL in Yoast SEO
Our Yoast SEO WordPress plugin lets you change the canonical URL of several page types in the plugin settings. You only need to do this if you want to change the canonical to something different from the current page’s URL. Yoast SEO Company already renders the correct canonical URL for almost any page type in a WordPress install.
For posts, pages, and custom post types, you can edit the canonical URL in the advanced tab of the Yoast SEO Company metabox:
Setting a canonical URL in Yoast SEO Company
For categories, tags and other taxonomy terms, you can change the canonical URL in the same place in the Yoast SEO Company metabox. If you have other advanced use cases, you can also use the wpSEO Company_canonical filter to change the Yoast SEO Company output.
When should you use canonical URLs?
Yoast Duplicate Post
Canonicals can help you out when your site benefits from similar content on different pages. Creating these pages can take up a lot of your time. If you’re looking for an easy way to duplicate posts or pages, Yoast Duplicate Post is the plugin for you!
This plugin can save you loads of time by copying things like the text, featured image, meta data, and SEO Company optimizations. That way you don’t have to start from scratch with every new page. Just don’t forget to set a canonical if your copied page is very similar to the original.
301 redirect or canonical
If you are unsure whether to do a 301 redirect or set a canonical, what should you do? The answer is simple: you should always do a redirect, unless there are technical reasons not to. If you can’t redirect because that would harm the user experience or be otherwise problematic, then set a canonical URL.
Should a page have a self-referencing canonical URL?
In the image above, we link the non-canonical page to the canonical version. But should a page set a rel=canonical for itself? This question is a much-debated topic amongst SEO Companys. At Yoast, we strongly recommend having a canonical link element on every page and Google has confirmed that’s best. That’s because most CMS’s will allow URL parameters without changing the content. So all of these URLs would show the same content:
https://example.com/wordpress/SEO Company-plugin/
https://example.com/wordpress/SEO Company-plugin/?isnt=it-awesome
https://example.com/wordpress/SEO Company-plugin/?cmpgn=twitter
https://example.com/wordpress/SEO Company-plugin/?cmpgn=Facebook
The issue is that if you don’t have a self-referencing canonical on the page that points to the cleanest version of the URL, you risk being hit by this. And if you don’t do it yourself, someone else could do it to you and cause a duplicate content issue. So adding a self-referencing canonical to URLs across your site is a good “defensive” SEO Company move. Luckily, our Yoast SEO Company plugin takes care of this for you.
Cross-domain canonical URLs
Perhaps you have the same piece of content on several domains. There are sites or blogs that republish articles from other websites on their own, as they feel the content is relevant for their users. In the past, we’ve had websites republishing articles from Yoast.com as well (with express permission).
But if you had looked at the HTML of every one of those articles you’d found a rel=canonical link pointing right back to our original article. This means all the links pointing to their version of the article count towards the ranking of our canonical version. They get to use our content to please their audience, and we get a clear benefit from it too. This way everybody wins!
Faulty canonical URLs: common issues
There are many examples out there of how a wrong rel=canonical implementation can lead to huge issues. I’ve seen several sites where the canonical on their homepage pointed at an article, only to see their home page disappear from search results. But that’s not all. There are other things you should never do with rel=canonical. Here are the most important ones:
Don’t canonicalize a paginated archive to page 1. The rel=canonical on page 2 should point to page 2. If you point it to page 1, search engines will actually not index the links on those deeper archive pages.
Make them 100% specific. For various reasons, many sites use protocol-relative links, meaning they leave the http / https bit from their URLs. Don’t do this for your canonicals. You have a preference, so show it.
Base your canonical on the request URL. If you use variables like the domain or request URL used to access the current page while generating your canonical, you’re doing it wrong. Your content should be aware of its own URLs. Otherwise, you could still have the same piece of content on – for instance – example.com and www.example.com and have each of them canonicalize to themselves.
Multiple rel=canonical links on a page cause havoc. When we encounter this in WordPress plugins, we try to reach out to the developer doing it and teach them not to, but it still happens. And when it does, the results are wholly unpredictable.
Read more: 6 common SEO mistakes and how to avoid them »
rel=canonical and social networks
Facebook and Twitter honor rel=canonical too, and this might lead to weird situations. If you share a URL on Facebook that has a canonical pointing elsewhere, Facebook will share the details from the canonical URL. In fact, if you add a ‘like’ button on a page that has a canonical pointing elsewhere, it will show the like count for the canonical URL, not for the current URL. Twitter works in the same way. So be aware of this when sharing URLs or when using these buttons.
Advanced uses of rel=canonical
Canonical link HTTP header
Google also supports a canonical link HTTP header. The header looks like this:
Link: <https://www.example.com/white-paper.pdf>; rel="canonical"
Canonical link HTTP headers can be very useful when canonicalizing files like PDFs, so it’s good to know that the option exists.
Using rel=canonical on not so similar pages
While I wouldn’t recommend this, you can use rel=canonical very aggressively. Google honors it to an almost ridiculous extent, where you can canonicalize a very different piece of content to another piece of content. However, if Google does catch you doing this, it will stop trusting your site’s canonicals and thus cause you more harm…
Using rel=canonical in combination with hreflang
We also talk about canonical in our ultimate guide to hreflang. That’s because it’s very important that when you use hreflang, each language’s canonical points to itself. Make sure that you understand how to use canonical well when you’re implementing hreflang, as otherwise, you might kill your entire hreflang implementation.
Conclusion: rel=canonical is a power tool
Rel=canonical is a powerful tool in an SEO Company’s toolbox. Especially for larger sites, the process of canonicalization can be very important and lead to major SEO Company improvements. But like with any power tool, you should use it wisely as it’s easy to cut yourself. I hope this guide has helped you gain an understanding of this powerful tool and how (and when) you can use it.
Keep reading: WordPress SEO: The definitive guide to higher rankings for WordPress sites »
SEO Company by DBL07.co
Via http://www.scpie.org/relcanonical-the-ultimate-guide/
source https://scpie.weebly.com/blog/relcanonical-the-ultimate-guide
0 notes
Text
rel=canonical: the ultimate guide
Joost de Valk
Joost de Valk is the founder and Chief Product Officer of Yoast. He’s a digital marketer, developer and an Open Source fanatic.
A canonical URL lets you tell search engines that certain similar URLs are actually the same. Because sometimes you have products or content that can be found on multiple URLs — or even multiple websites. By using canonical URLs (HTML link tags with the attribute rel=canonical) you can have these on your site without harming your rankings. In this ultimate guide, I’ll discuss what canonical URLs are, when to use them, and how to prevent or fix a few common mistakes!
Table of contents
What is the canonical link element?
The rel=canonical element, often called the “canonical link”, is an HTML element that helps webmasters prevent duplicate content issues. It does so by specifying the “canonical URL”, the “preferred” version of a web page – the original source, even. And this improves your site’s SEO.
The idea is simple. If you have several versions of the same content, you pick one “canonical” version and point the search engines at it. This solves the duplicate content problem where search engines don’t know which version to show in their results.
The SEO benefit of rel=canonical
Choosing a proper canonical URL for every set of similar URLs improves the SEO Company of your site. This is because the search engine knows which version is canonical, and can count all the links pointing at the different versions as links to the canonical version. In concept, setting a canonical is similar to a 301 redirect, only without the actual redirecting.
The history of rel=canonical
The canonical link element was introduced by Google, Bing, and Yahoo! in February 2009. If you’re interested in its history, I would recommend Matt Cutts’ post from 2009. This post gives you some background and links to different interesting articles. Or watch the video of Matt introducing the canonical link element. Because, although the idea is simple, the specifics of how to use it are often a bit more complex.
The process of canonicalization
Ironic side note
The term Canonical comes from the Roman Catholic tradition, where a list of sacred books was created and accepted as genuine and named the canonical Gospels of the New Testament. The irony is it took the Roman Catholic church about 300 years and numerous fights to come up with the canonical list, and they eventually chose four versions of the same story…
When you have several choices for a product’s URL, canonicalization is the process of picking one of them. Luckily, it will be obvious in many cases: one URL will be a better choice than others. But in some cases, it might not be as obvious. This is nothing to worry about. Even then it’s still pretty simple: just pick one! Not canonicalizing your URLs is always worse than canonicalizing your URLs.
How to set canonical URLs
Let’s assume you have two versions of the same page, each with exactly – 100% – the same content. The only difference is that they’re in separate sections of your site. And because of that the background color and the active menu item are different – but that’s it. Both versions have been linked to from other sites, so the content itself is clearly valuable. So which version should search engines show in results?
For example, these could be their URLs:
https://example.com/wordpress/SEO Company-plugin/
https://example.com/wordpress/plugins/SEO Company/
A correct example of using rel=canonical
The situation described above occurs fairly often, especially in a lot of e-commerce systems. A product can have several different URLs depending on how you got there. But this is exactly what rel=canonical was invented for. In this case, you would apply rel=canonical as follows:
Pick one of your two pages as the canonical version. This should be the version you think is the most important. If you don’t care, pick the one with the most links or visitors. When all these factors are equal, flip a coin. You just need to choose.
Add a rel=canonical link from the non-canonical page to the canonical one. So if we picked the shortest URL as our canonical URL, the other URL would link to the shortest URL in the <head> section of the page – like this:
<link rel="canonical" href="https://example.com/wordpress/SEO Company-plugin/" />
It’s as easy as that! Nothing more, nothing less.
What this does is “merge” the two pages into one from a search engine’s perspective. It’s a “soft redirect”, without actually redirecting the user. Links to both URLs now count as the single, canonical version of the URL.
Want to know more about the use of rel=canonical on category and product pages of your eCommerce site? I also discuss this topic in this Ask Yoast video.
Setting the canonical URL in Yoast SEO
Our Yoast SEO WordPress plugin lets you change the canonical URL of several page types in the plugin settings. You only need to do this if you want to change the canonical to something different from the current page’s URL. Yoast SEO Company already renders the correct canonical URL for almost any page type in a WordPress install.
For posts, pages, and custom post types, you can edit the canonical URL in the advanced tab of the Yoast SEO Company metabox:
Setting a canonical URL in Yoast SEO Company
For categories, tags and other taxonomy terms, you can change the canonical URL in the same place in the Yoast SEO Company metabox. If you have other advanced use cases, you can also use the wpSEO Company_canonical filter to change the Yoast SEO Company output.
When should you use canonical URLs?
Yoast Duplicate Post
Canonicals can help you out when your site benefits from similar content on different pages. Creating these pages can take up a lot of your time. If you’re looking for an easy way to duplicate posts or pages, Yoast Duplicate Post is the plugin for you!
This plugin can save you loads of time by copying things like the text, featured image, meta data, and SEO Company optimizations. That way you don’t have to start from scratch with every new page. Just don’t forget to set a canonical if your copied page is very similar to the original.
301 redirect or canonical
If you are unsure whether to do a 301 redirect or set a canonical, what should you do? The answer is simple: you should always do a redirect, unless there are technical reasons not to. If you can’t redirect because that would harm the user experience or be otherwise problematic, then set a canonical URL.
Should a page have a self-referencing canonical URL?
In the image above, we link the non-canonical page to the canonical version. But should a page set a rel=canonical for itself? This question is a much-debated topic amongst SEO Companys. At Yoast, we strongly recommend having a canonical link element on every page and Google has confirmed that’s best. That’s because most CMS’s will allow URL parameters without changing the content. So all of these URLs would show the same content:
https://example.com/wordpress/SEO Company-plugin/
https://example.com/wordpress/SEO Company-plugin/?isnt=it-awesome
https://example.com/wordpress/SEO Company-plugin/?cmpgn=twitter
https://example.com/wordpress/SEO Company-plugin/?cmpgn=Facebook
The issue is that if you don’t have a self-referencing canonical on the page that points to the cleanest version of the URL, you risk being hit by this. And if you don’t do it yourself, someone else could do it to you and cause a duplicate content issue. So adding a self-referencing canonical to URLs across your site is a good “defensive” SEO Company move. Luckily, our Yoast SEO Company plugin takes care of this for you.
Cross-domain canonical URLs
Perhaps you have the same piece of content on several domains. There are sites or blogs that republish articles from other websites on their own, as they feel the content is relevant for their users. In the past, we’ve had websites republishing articles from Yoast.com as well (with express permission).
But if you had looked at the HTML of every one of those articles you’d found a rel=canonical link pointing right back to our original article. This means all the links pointing to their version of the article count towards the ranking of our canonical version. They get to use our content to please their audience, and we get a clear benefit from it too. This way everybody wins!
Faulty canonical URLs: common issues
There are many examples out there of how a wrong rel=canonical implementation can lead to huge issues. I’ve seen several sites where the canonical on their homepage pointed at an article, only to see their home page disappear from search results. But that’s not all. There are other things you should never do with rel=canonical. Here are the most important ones:
Don’t canonicalize a paginated archive to page 1. The rel=canonical on page 2 should point to page 2. If you point it to page 1, search engines will actually not index the links on those deeper archive pages.
Make them 100% specific. For various reasons, many sites use protocol-relative links, meaning they leave the http / https bit from their URLs. Don’t do this for your canonicals. You have a preference, so show it.
Base your canonical on the request URL. If you use variables like the domain or request URL used to access the current page while generating your canonical, you’re doing it wrong. Your content should be aware of its own URLs. Otherwise, you could still have the same piece of content on – for instance – example.com and www.example.com and have each of them canonicalize to themselves.
Multiple rel=canonical links on a page cause havoc. When we encounter this in WordPress plugins, we try to reach out to the developer doing it and teach them not to, but it still happens. And when it does, the results are wholly unpredictable.
Read more: 6 common SEO mistakes and how to avoid them »
rel=canonical and social networks
Facebook and Twitter honor rel=canonical too, and this might lead to weird situations. If you share a URL on Facebook that has a canonical pointing elsewhere, Facebook will share the details from the canonical URL. In fact, if you add a ‘like’ button on a page that has a canonical pointing elsewhere, it will show the like count for the canonical URL, not for the current URL. Twitter works in the same way. So be aware of this when sharing URLs or when using these buttons.
Advanced uses of rel=canonical
Canonical link HTTP header
Google also supports a canonical link HTTP header. The header looks like this:
Link: <https://www.example.com/white-paper.pdf>; rel="canonical"
Canonical link HTTP headers can be very useful when canonicalizing files like PDFs, so it’s good to know that the option exists.
Using rel=canonical on not so similar pages
While I wouldn’t recommend this, you can use rel=canonical very aggressively. Google honors it to an almost ridiculous extent, where you can canonicalize a very different piece of content to another piece of content. However, if Google does catch you doing this, it will stop trusting your site’s canonicals and thus cause you more harm…
Using rel=canonical in combination with hreflang
We also talk about canonical in our ultimate guide to hreflang. That’s because it’s very important that when you use hreflang, each language’s canonical points to itself. Make sure that you understand how to use canonical well when you’re implementing hreflang, as otherwise, you might kill your entire hreflang implementation.
Conclusion: rel=canonical is a power tool
Rel=canonical is a powerful tool in an SEO Company’s toolbox. Especially for larger sites, the process of canonicalization can be very important and lead to major SEO Company improvements. But like with any power tool, you should use it wisely as it’s easy to cut yourself. I hope this guide has helped you gain an understanding of this powerful tool and how (and when) you can use it.
Keep reading: WordPress SEO: The definitive guide to higher rankings for WordPress sites »
SEO Company by DBL07.co
source http://www.scpie.org/relcanonical-the-ultimate-guide/ source https://scpie1.blogspot.com/2020/06/relcanonical-ultimate-guide.html
0 notes
Photo

Protocol-relative URLs have no protocol specified. For example, //example.com will use the current page's protocol, typically HTTP or HTTPS. https://www.instagram.com/p/Cn1g3sEtBzv/?igshid=NGJjMDIxMWI=
0 notes
Text
rel=canonical: the ultimate guide
Joost de Valk
Joost de Valk is the founder and Chief Product Officer of Yoast. He’s a digital marketer, developer and an Open Source fanatic.
A canonical URL lets you tell search engines that certain similar URLs are actually the same. Because sometimes you have products or content that can be found on multiple URLs — or even multiple websites. By using canonical URLs (HTML link tags with the attribute rel=canonical) you can have these on your site without harming your rankings. In this ultimate guide, I’ll discuss what canonical URLs are, when to use them, and how to prevent or fix a few common mistakes!
Table of contents
What is the canonical link element?
The rel=canonical element, often called the “canonical link”, is an HTML element that helps webmasters prevent duplicate content issues. It does so by specifying the “canonical URL”, the “preferred” version of a web page – the original source, even. And this improves your site’s SEO.
The idea is simple. If you have several versions of the same content, you pick one “canonical” version and point the search engines at it. This solves the duplicate content problem where search engines don’t know which version to show in their results.
The SEO benefit of rel=canonical
Choosing a proper canonical URL for every set of similar URLs improves the SEO Company of your site. This is because the search engine knows which version is canonical, and can count all the links pointing at the different versions as links to the canonical version. In concept, setting a canonical is similar to a 301 redirect, only without the actual redirecting.
The history of rel=canonical
The canonical link element was introduced by Google, Bing, and Yahoo! in February 2009. If you’re interested in its history, I would recommend Matt Cutts’ post from 2009. This post gives you some background and links to different interesting articles. Or watch the video of Matt introducing the canonical link element. Because, although the idea is simple, the specifics of how to use it are often a bit more complex.
The process of canonicalization
Ironic side note
The term Canonical comes from the Roman Catholic tradition, where a list of sacred books was created and accepted as genuine and named the canonical Gospels of the New Testament. The irony is it took the Roman Catholic church about 300 years and numerous fights to come up with the canonical list, and they eventually chose four versions of the same story…
When you have several choices for a product’s URL, canonicalization is the process of picking one of them. Luckily, it will be obvious in many cases: one URL will be a better choice than others. But in some cases, it might not be as obvious. This is nothing to worry about. Even then it’s still pretty simple: just pick one! Not canonicalizing your URLs is always worse than canonicalizing your URLs.
How to set canonical URLs
Let’s assume you have two versions of the same page, each with exactly – 100% – the same content. The only difference is that they’re in separate sections of your site. And because of that the background color and the active menu item are different – but that’s it. Both versions have been linked to from other sites, so the content itself is clearly valuable. So which version should search engines show in results?
For example, these could be their URLs:
https://example.com/wordpress/SEO Company-plugin/
https://example.com/wordpress/plugins/SEO Company/
A correct example of using rel=canonical
The situation described above occurs fairly often, especially in a lot of e-commerce systems. A product can have several different URLs depending on how you got there. But this is exactly what rel=canonical was invented for. In this case, you would apply rel=canonical as follows:
Pick one of your two pages as the canonical version. This should be the version you think is the most important. If you don’t care, pick the one with the most links or visitors. When all these factors are equal, flip a coin. You just need to choose.
Add a rel=canonical link from the non-canonical page to the canonical one. So if we picked the shortest URL as our canonical URL, the other URL would link to the shortest URL in the <head> section of the page – like this:
<link rel="canonical" href="https://example.com/wordpress/SEO Company-plugin/" />
It’s as easy as that! Nothing more, nothing less.
What this does is “merge” the two pages into one from a search engine’s perspective. It’s a “soft redirect”, without actually redirecting the user. Links to both URLs now count as the single, canonical version of the URL.
Want to know more about the use of rel=canonical on category and product pages of your eCommerce site? I also discuss this topic in this Ask Yoast video.
Setting the canonical URL in Yoast SEO
Our Yoast SEO WordPress plugin lets you change the canonical URL of several page types in the plugin settings. You only need to do this if you want to change the canonical to something different from the current page’s URL. Yoast SEO Company already renders the correct canonical URL for almost any page type in a WordPress install.
For posts, pages, and custom post types, you can edit the canonical URL in the advanced tab of the Yoast SEO Company metabox:
Setting a canonical URL in Yoast SEO Company
For categories, tags and other taxonomy terms, you can change the canonical URL in the same place in the Yoast SEO Company metabox. If you have other advanced use cases, you can also use the wpSEO Company_canonical filter to change the Yoast SEO Company output.
When should you use canonical URLs?
Yoast Duplicate Post
Canonicals can help you out when your site benefits from similar content on different pages. Creating these pages can take up a lot of your time. If you’re looking for an easy way to duplicate posts or pages, Yoast Duplicate Post is the plugin for you!
This plugin can save you loads of time by copying things like the text, featured image, meta data, and SEO Company optimizations. That way you don’t have to start from scratch with every new page. Just don’t forget to set a canonical if your copied page is very similar to the original.
301 redirect or canonical
If you are unsure whether to do a 301 redirect or set a canonical, what should you do? The answer is simple: you should always do a redirect, unless there are technical reasons not to. If you can’t redirect because that would harm the user experience or be otherwise problematic, then set a canonical URL.
Should a page have a self-referencing canonical URL?
In the image above, we link the non-canonical page to the canonical version. But should a page set a rel=canonical for itself? This question is a much-debated topic amongst SEO Companys. At Yoast, we strongly recommend having a canonical link element on every page and Google has confirmed that’s best. That’s because most CMS’s will allow URL parameters without changing the content. So all of these URLs would show the same content:
https://example.com/wordpress/SEO Company-plugin/
https://example.com/wordpress/SEO Company-plugin/?isnt=it-awesome
https://example.com/wordpress/SEO Company-plugin/?cmpgn=twitter
https://example.com/wordpress/SEO Company-plugin/?cmpgn=Facebook
The issue is that if you don’t have a self-referencing canonical on the page that points to the cleanest version of the URL, you risk being hit by this. And if you don’t do it yourself, someone else could do it to you and cause a duplicate content issue. So adding a self-referencing canonical to URLs across your site is a good “defensive” SEO Company move. Luckily, our Yoast SEO Company plugin takes care of this for you.
Cross-domain canonical URLs
Perhaps you have the same piece of content on several domains. There are sites or blogs that republish articles from other websites on their own, as they feel the content is relevant for their users. In the past, we’ve had websites republishing articles from Yoast.com as well (with express permission).
But if you had looked at the HTML of every one of those articles you’d found a rel=canonical link pointing right back to our original article. This means all the links pointing to their version of the article count towards the ranking of our canonical version. They get to use our content to please their audience, and we get a clear benefit from it too. This way everybody wins!
Faulty canonical URLs: common issues
There are many examples out there of how a wrong rel=canonical implementation can lead to huge issues. I’ve seen several sites where the canonical on their homepage pointed at an article, only to see their home page disappear from search results. But that’s not all. There are other things you should never do with rel=canonical. Here are the most important ones:
Don’t canonicalize a paginated archive to page 1. The rel=canonical on page 2 should point to page 2. If you point it to page 1, search engines will actually not index the links on those deeper archive pages.
Make them 100% specific. For various reasons, many sites use protocol-relative links, meaning they leave the http / https bit from their URLs. Don’t do this for your canonicals. You have a preference, so show it.
Base your canonical on the request URL. If you use variables like the domain or request URL used to access the current page while generating your canonical, you’re doing it wrong. Your content should be aware of its own URLs. Otherwise, you could still have the same piece of content on – for instance – example.com and www.example.com and have each of them canonicalize to themselves.
Multiple rel=canonical links on a page cause havoc. When we encounter this in WordPress plugins, we try to reach out to the developer doing it and teach them not to, but it still happens. And when it does, the results are wholly unpredictable.
Read more: 6 common SEO mistakes and how to avoid them »
rel=canonical and social networks
Facebook and Twitter honor rel=canonical too, and this might lead to weird situations. If you share a URL on Facebook that has a canonical pointing elsewhere, Facebook will share the details from the canonical URL. In fact, if you add a ‘like’ button on a page that has a canonical pointing elsewhere, it will show the like count for the canonical URL, not for the current URL. Twitter works in the same way. So be aware of this when sharing URLs or when using these buttons.
Advanced uses of rel=canonical
Canonical link HTTP header
Google also supports a canonical link HTTP header. The header looks like this:
Link: <https://www.example.com/white-paper.pdf>; rel="canonical"
Canonical link HTTP headers can be very useful when canonicalizing files like PDFs, so it’s good to know that the option exists.
Using rel=canonical on not so similar pages
While I wouldn’t recommend this, you can use rel=canonical very aggressively. Google honors it to an almost ridiculous extent, where you can canonicalize a very different piece of content to another piece of content. However, if Google does catch you doing this, it will stop trusting your site’s canonicals and thus cause you more harm…
Using rel=canonical in combination with hreflang
We also talk about canonical in our ultimate guide to hreflang. That’s because it’s very important that when you use hreflang, each language’s canonical points to itself. Make sure that you understand how to use canonical well when you’re implementing hreflang, as otherwise, you might kill your entire hreflang implementation.
Conclusion: rel=canonical is a power tool
Rel=canonical is a powerful tool in an SEO Company’s toolbox. Especially for larger sites, the process of canonicalization can be very important and lead to major SEO Company improvements. But like with any power tool, you should use it wisely as it’s easy to cut yourself. I hope this guide has helped you gain an understanding of this powerful tool and how (and when) you can use it.
Keep reading: WordPress SEO: The definitive guide to higher rankings for WordPress sites »
SEO Company by DBL07.co
source http://www.scpie.org/relcanonical-the-ultimate-guide/ source https://scpie.tumblr.com/post/621953893879971840
0 notes
Text
rel=canonical: the ultimate guide
Joost de Valk
Joost de Valk is the founder and Chief Product Officer of Yoast. He’s a digital marketer, developer and an Open Source fanatic.
A canonical URL lets you tell search engines that certain similar URLs are actually the same. Because sometimes you have products or content that can be found on multiple URLs — or even multiple websites. By using canonical URLs (HTML link tags with the attribute rel=canonical) you can have these on your site without harming your rankings. In this ultimate guide, I’ll discuss what canonical URLs are, when to use them, and how to prevent or fix a few common mistakes!
Table of contents
What is the canonical link element?
The rel=canonical element, often called the “canonical link”, is an HTML element that helps webmasters prevent duplicate content issues. It does so by specifying the “canonical URL”, the “preferred” version of a web page – the original source, even. And this improves your site’s SEO.
The idea is simple. If you have several versions of the same content, you pick one “canonical” version and point the search engines at it. This solves the duplicate content problem where search engines don’t know which version to show in their results.
The SEO benefit of rel=canonical
Choosing a proper canonical URL for every set of similar URLs improves the SEO Company of your site. This is because the search engine knows which version is canonical, and can count all the links pointing at the different versions as links to the canonical version. In concept, setting a canonical is similar to a 301 redirect, only without the actual redirecting.
The history of rel=canonical
The canonical link element was introduced by Google, Bing, and Yahoo! in February 2009. If you’re interested in its history, I would recommend Matt Cutts’ post from 2009. This post gives you some background and links to different interesting articles. Or watch the video of Matt introducing the canonical link element. Because, although the idea is simple, the specifics of how to use it are often a bit more complex.
The process of canonicalization
Ironic side note
The term Canonical comes from the Roman Catholic tradition, where a list of sacred books was created and accepted as genuine and named the canonical Gospels of the New Testament. The irony is it took the Roman Catholic church about 300 years and numerous fights to come up with the canonical list, and they eventually chose four versions of the same story…
When you have several choices for a product’s URL, canonicalization is the process of picking one of them. Luckily, it will be obvious in many cases: one URL will be a better choice than others. But in some cases, it might not be as obvious. This is nothing to worry about. Even then it’s still pretty simple: just pick one! Not canonicalizing your URLs is always worse than canonicalizing your URLs.
How to set canonical URLs
Let’s assume you have two versions of the same page, each with exactly – 100% – the same content. The only difference is that they’re in separate sections of your site. And because of that the background color and the active menu item are different – but that’s it. Both versions have been linked to from other sites, so the content itself is clearly valuable. So which version should search engines show in results?
For example, these could be their URLs:
https://example.com/wordpress/SEO Company-plugin/
https://example.com/wordpress/plugins/SEO Company/
A correct example of using rel=canonical
The situation described above occurs fairly often, especially in a lot of e-commerce systems. A product can have several different URLs depending on how you got there. But this is exactly what rel=canonical was invented for. In this case, you would apply rel=canonical as follows:
Pick one of your two pages as the canonical version. This should be the version you think is the most important. If you don’t care, pick the one with the most links or visitors. When all these factors are equal, flip a coin. You just need to choose.
Add a rel=canonical link from the non-canonical page to the canonical one. So if we picked the shortest URL as our canonical URL, the other URL would link to the shortest URL in the <head> section of the page – like this:
<link rel="canonical" href="https://example.com/wordpress/SEO Company-plugin/" />
It’s as easy as that! Nothing more, nothing less.
What this does is “merge” the two pages into one from a search engine’s perspective. It’s a “soft redirect”, without actually redirecting the user. Links to both URLs now count as the single, canonical version of the URL.
Want to know more about the use of rel=canonical on category and product pages of your eCommerce site? I also discuss this topic in this Ask Yoast video.
Setting the canonical URL in Yoast SEO
Our Yoast SEO WordPress plugin lets you change the canonical URL of several page types in the plugin settings. You only need to do this if you want to change the canonical to something different from the current page’s URL. Yoast SEO Company already renders the correct canonical URL for almost any page type in a WordPress install.
For posts, pages, and custom post types, you can edit the canonical URL in the advanced tab of the Yoast SEO Company metabox:
Setting a canonical URL in Yoast SEO Company
For categories, tags and other taxonomy terms, you can change the canonical URL in the same place in the Yoast SEO Company metabox. If you have other advanced use cases, you can also use the wpSEO Company_canonical filter to change the Yoast SEO Company output.
When should you use canonical URLs?
Yoast Duplicate Post
Canonicals can help you out when your site benefits from similar content on different pages. Creating these pages can take up a lot of your time. If you’re looking for an easy way to duplicate posts or pages, Yoast Duplicate Post is the plugin for you!
This plugin can save you loads of time by copying things like the text, featured image, meta data, and SEO Company optimizations. That way you don’t have to start from scratch with every new page. Just don’t forget to set a canonical if your copied page is very similar to the original.
301 redirect or canonical
If you are unsure whether to do a 301 redirect or set a canonical, what should you do? The answer is simple: you should always do a redirect, unless there are technical reasons not to. If you can’t redirect because that would harm the user experience or be otherwise problematic, then set a canonical URL.
Should a page have a self-referencing canonical URL?
In the image above, we link the non-canonical page to the canonical version. But should a page set a rel=canonical for itself? This question is a much-debated topic amongst SEO Companys. At Yoast, we strongly recommend having a canonical link element on every page and Google has confirmed that’s best. That’s because most CMS’s will allow URL parameters without changing the content. So all of these URLs would show the same content:
https://example.com/wordpress/SEO Company-plugin/
https://example.com/wordpress/SEO Company-plugin/?isnt=it-awesome
https://example.com/wordpress/SEO Company-plugin/?cmpgn=twitter
https://example.com/wordpress/SEO Company-plugin/?cmpgn=Facebook
The issue is that if you don’t have a self-referencing canonical on the page that points to the cleanest version of the URL, you risk being hit by this. And if you don’t do it yourself, someone else could do it to you and cause a duplicate content issue. So adding a self-referencing canonical to URLs across your site is a good “defensive” SEO Company move. Luckily, our Yoast SEO Company plugin takes care of this for you.
Cross-domain canonical URLs
Perhaps you have the same piece of content on several domains. There are sites or blogs that republish articles from other websites on their own, as they feel the content is relevant for their users. In the past, we’ve had websites republishing articles from Yoast.com as well (with express permission).
But if you had looked at the HTML of every one of those articles you’d found a rel=canonical link pointing right back to our original article. This means all the links pointing to their version of the article count towards the ranking of our canonical version. They get to use our content to please their audience, and we get a clear benefit from it too. This way everybody wins!
Faulty canonical URLs: common issues
There are many examples out there of how a wrong rel=canonical implementation can lead to huge issues. I’ve seen several sites where the canonical on their homepage pointed at an article, only to see their home page disappear from search results. But that’s not all. There are other things you should never do with rel=canonical. Here are the most important ones:
Don’t canonicalize a paginated archive to page 1. The rel=canonical on page 2 should point to page 2. If you point it to page 1, search engines will actually not index the links on those deeper archive pages.
Make them 100% specific. For various reasons, many sites use protocol-relative links, meaning they leave the http / https bit from their URLs. Don’t do this for your canonicals. You have a preference, so show it.
Base your canonical on the request URL. If you use variables like the domain or request URL used to access the current page while generating your canonical, you’re doing it wrong. Your content should be aware of its own URLs. Otherwise, you could still have the same piece of content on – for instance – example.com and www.example.com and have each of them canonicalize to themselves.
Multiple rel=canonical links on a page cause havoc. When we encounter this in WordPress plugins, we try to reach out to the developer doing it and teach them not to, but it still happens. And when it does, the results are wholly unpredictable.
Read more: 6 common SEO mistakes and how to avoid them »
rel=canonical and social networks
Facebook and Twitter honor rel=canonical too, and this might lead to weird situations. If you share a URL on Facebook that has a canonical pointing elsewhere, Facebook will share the details from the canonical URL. In fact, if you add a ‘like’ button on a page that has a canonical pointing elsewhere, it will show the like count for the canonical URL, not for the current URL. Twitter works in the same way. So be aware of this when sharing URLs or when using these buttons.
Advanced uses of rel=canonical
Canonical link HTTP header
Google also supports a canonical link HTTP header. The header looks like this:
Link: <https://www.example.com/white-paper.pdf>; rel="canonical"
Canonical link HTTP headers can be very useful when canonicalizing files like PDFs, so it’s good to know that the option exists.
Using rel=canonical on not so similar pages
While I wouldn’t recommend this, you can use rel=canonical very aggressively. Google honors it to an almost ridiculous extent, where you can canonicalize a very different piece of content to another piece of content. However, if Google does catch you doing this, it will stop trusting your site’s canonicals and thus cause you more harm…
Using rel=canonical in combination with hreflang
We also talk about canonical in our ultimate guide to hreflang. That’s because it’s very important that when you use hreflang, each language’s canonical points to itself. Make sure that you understand how to use canonical well when you’re implementing hreflang, as otherwise, you might kill your entire hreflang implementation.
Conclusion: rel=canonical is a power tool
Rel=canonical is a powerful tool in an SEO Company’s toolbox. Especially for larger sites, the process of canonicalization can be very important and lead to major SEO Company improvements. But like with any power tool, you should use it wisely as it’s easy to cut yourself. I hope this guide has helped you gain an understanding of this powerful tool and how (and when) you can use it.
Keep reading: WordPress SEO: The definitive guide to higher rankings for WordPress sites »
SEO Company by DBL07.co
source http://www.scpie.org/relcanonical-the-ultimate-guide/
0 notes
Text
Original Post from Rapid7 Author: Robert Lerner
Earlier this month, Verizon released its 2019 Data Breach Investigation Report. It revealed, unsurprisingly, that a good chunk of breaches were the result of attacks at the application layer and that there was a major shift (almost to the 50% crossover point) in payment card breach volume sources to compromising web servers.
Rapid7’s own [Master] Chief Data Scientist Bob Rudis and our Rapid7 Labs research team pored over the report to identify some key points to help the Rapid7 community navigate through this sea of information. In his blog post summarizing the top findings in the 2019 Verizon DBIR report, Bob provided some guidance to help you better safeguard your organization, and the following section really hit home for me:
“It’s time to get serious about adopting critical security headers like Content Security Policy and designing web applications modularly to enable clean and easy use of subresource integrity attributes on resources you load. While you can start with just focusing on the core pages that deal with logins and payment card transactions, you should consider adopting these two technologies holistically across all web-facing components. If you source your e-commerce applications from a third party, ensure you mandate the use of these technologies in your procurement processes.”
During my spare time, I’ve built both an auditing tool and a tool to retrieve the Top 500 list from Moz to better understand how the world’s largest companies use headers. Through this, I’ve discovered the best place to address vulnerabilities is within your software itself. Click here to evaluate your site.
Browsers may have varying or even no support for the various security headers, so they should be part of defense in depth and not viewed as a holistic solution.
As this project plays very nicely into how you can heed Bob’s advice, I’ve created a series of real-world scenarios in which attackers can manipulate unsecured HTTP headers and how to prevent your organization from falling victim to tactics used to exploit them. But before I get into the fun stuff, let’s start with a refresher on what HTTP headers are.
What are HTTP headers?
Before you even see a page load or download file, your browser (or any client, such as cURL, wget, etc.) and a server have a conversation. During this conversation, the browser may ask for a specific resource, request a specific language, and tell the server what type of browser you are using.
The server responds with information, such as how many bytes are ready to be sent, the type of server being used, and the cookies to set.
Here’s an example request:
GET /index.html HTTP/1.1 Host: www.rapid7.com User-Agent: Mozilla/5.0 (X11; Ubuntu; Linux x86_64; rv:66.0) Gecko/20100101 Firefox/66.0 Accept: text/html,application/xhtml+xml,application/xml;q=0.9,*/*;q=0.8 Accept-Language: en-US,en;q=0.5 Accept-Encoding: gzip, deflate, br Referer: https://www.google.com/?q=best+dast+ever Connection: keep-alive Upgrade-Insecure-Requests: 1
Here’s an example response:
200 OK Connection: Keep-Alive Content-Encoding: gzip Content-Type: text/html; charset=utf-8 Date: Mon, 31 Feb 2020 00:00:00 GMT Last-Modified: Mon, 18 Jan 2019 02:36:04 GMT Server: Apache Transfer-Encoding: chunked X-Frame-Options: DENY (Response body here)
As you can see, there’s a lot of conversations going on behind the scenes—and this happens several times for each page you requested. Not all of these headers are strictly for rendering your page: Some tell the site not to track you (such as DNT headers), while others tell the browser not to allow frames on the site (such as X-Frame-Options). Sometimes these headers leak into the user realm (bet you’ve seen a few 404: File Not Found pages). The better you know your site, the more restrictive you can be when configuring your headers, and the more secure your site can be.
I will cover the most common security headers you will find on servers across the internet. For each of these headers, I’ll provide a standards document if one is available (such as a Working Draft or RFC), assuming the scope isn’t too broad (the entire HTTP specification, for example). I will also include additional resources and links to the CWEs, where applicable. This document uses the term “media types” to refer to what was previously called “MIME Types,” as IANA has changed the terminology.
Custom headers and the “X-” prefix
Standards organizations—what would we do without them? RFC 2047 §5.1 states that any nonstandard HTTP header be denoted and prefixed with “X-” (hence many of the headers in this blog). RFC 6648 deprecates this. Chances are that the legacy “X-” headers will outlive this blog post, so for nearly all purposes and intents, these should be used in lieu of their non-prefixed alternatives.
Imagine, if you will…
In this hypothetical scenario, imagine you are checking your employer’s intranet forum and you see a topic that catches your eye: “An estimated 60% of the workforce will be laid off this week!”
Panic ensues until the inevitable HR memo comes out stating that this forum post is false and no one is getting laid off. An investigation into how this could have happened uncovers that your organization has fallen victim to a social engineering scheme. But how did this schemer get in?
Here are some examples of vulnerabilities that may have been exploited:
You can set your account’s password without providing your current password
There is a cross-site scripting (XSS) vulnerability in the forums
The forum admin only skimmed this wonderful blog entry.
These would allow the attacker to wreak havoc by using the following tactics:
Make a really crafty forum topic title that everyone will click and talk about
Leverages the XSS vulnerability within a forum topic
Executes var cookie = document.cookie;
Makes an XMLHttpRequest to their server with this cookie value
Stand up a server to receive these cookies
Make a cURL request back to the server, using the cookie to authenticate
Set the password to a new value
Log the user out
In this situation, anybody who clicks the forum topic will instantly have their account password reset and be logged off. With this tactic, attackers will be collecting accounts like Pokémon.
So, which headers can help us out here?
HTTP is a stateless protocol, which means it cannot associate state between two requests. Sessions are a technique of providing a unique identifier to your site’s users, allowing them to persist login state across several page loads. These may be persisted across URLs (bad) or across cookies (good). Because of that, we need to ensure we protect information from being stolen. There are three security-focused attributes within a cookie header, but today we are going to focus on HTTPOnly:
Cookie attributes
Example
Set-Cookie: id=Rapid7; Expires=Wed, 06 Mar 2019 02:42:26 GMT; Secure; HttpOnly; SameSite=strict
HTTPOnly attribute
The HTTPOnly flag informs the browser that the cookie may only be transmitted via HTTP—that is, it is not available to java script in the form of alert(document.cookie);. This greatly reduces the utility in an XSS attack.
Secure attribute
As discussed, there is little excuse for not using HTTPS throughout your application. The “Secure” flag instructs the browser to only send this cookie value to requests made via HTTPS. If your connection is subject to an HTTP Downgrade and MiTM attack, this cookie will not be transmitted which will prevent account theft.
SameSite attribute
Can I Use?
The SameSite attribute is used to control how cookies are applied to requests when they originate from a third-party domain. If a user is logged into example.com, they can click around the site and maintain logged-in state. If they then visit rapid7.com, and Rapid7 links back to Example.com to leverage an XSRF vulnerability, then this will be executed against the user’s account on example.com.
If the SameSite attribute is set to Strict, the previous example would fail. The browser would detect this and not transmit the cookies—therefore, the attack would apply to a guest account.
By setting the HTTPOnly flag on our cookies, we instruct the browser that it may not send the cookie to the browser via Javascript’s document.cookie. This single-handedly would have mitigated the kill chain I’ve presented earlier where an account could be compromised. Another header that would have been useful is:
X-XSS-Protection
Example
X-XSS-Protection: 1; mode=block
Moz Top 500
This header is present on 35% of sites. Many browsers have built in XSS protection that site operators can control. A blank setting disables the protection mechanism, and an attribute of “1” instructs the browser to attempt to sanitize the content. Finally, setting the header to “1; mode=block” tells the browser to stop rendering the page. The latter option is recommended.
This header enables the in-built XSS filtering or blocking that browsers use, and therefore may have also blocked this attack by restricting access to the page where the XSS vulnerability existed.
Other scenarios
The decision to go with the account theft model was to illustrate a real-world situation that could be dire to an organization without backups or that is visible to the public. Cookies can simply be stored, with no programmatic action being performed. It is possible for a stolen cookie to be used to perform any number of actions on your site, from buying items to deleting customers.
Other ways to limit this attack include:
Regenerate cookie values and expire the previous value whenever the following happens:
A user authenticates, or after logoff
A user changes roles, such as logging into an admin panel
After several page loads, this limits the validity period
Limit the session duration
Set either a “0” on the session cookie, or an explicit expiry time. (Also enforce this server-side, since spoofing this on the client is really easy.)
Leverage an additional identifier along with the cookie, such as the user’s IP address, user agent, or other information.
Write secure code
So, what are you waiting for? Go and evaluate your site to verify that your web server is correctly responding with headers designed for security, and stay tuned for my next blog on “Hidden Helpers: Security-Focused HTTP Headers.”
Looking to identify security vulnerabilities in your web applications? Try InsightAppSec today for free.
Get Started
#gallery-0-5 { margin: auto; } #gallery-0-5 .gallery-item { float: left; margin-top: 10px; text-align: center; width: 33%; } #gallery-0-5 img { border: 2px solid #cfcfcf; } #gallery-0-5 .gallery-caption { margin-left: 0; } /* see gallery_shortcode() in wp-includes/media.php */
Go to Source Author: Robert Lerner Hidden Helpers: Security-Focused HTTP Headers Original Post from Rapid7 Author: Robert Lerner Earlier this month, Verizon released its 2019 Data Breach Investigation Report.
0 notes
Text
SEO: Understanding Sitemaps for Ecommerce Stores
Sitemaps inform search engines which pages on a website should be crawled, and may help search engines discover and index those pages.
While sitemaps can be a simple text file listing the URLs of all of the pages you’d like to have indexed, they can also be an XML document carrying more information.
Are Sitemaps Required?
No, your ecommerce site doesn’t require a sitemap. That is the short answer. If your site is well built, with a navigable hierarchy and proper links, search engine crawlers should be able to discover your pages and index them.
There are several cases where Google and other search engines do, however, recommend a sitemap. For example, a sitemap can aid discovery on a large website with many pages. It can help a site with lots of content pages connected by only a few links, such as product detail pages. And a sitemap can help a new site that may not have many inbound links.
As Google explained, “Using a sitemap doesn’t guarantee that all the items in your sitemap will be crawled and indexed, as Google processes rely on complex algorithms to schedule crawling. However, in most cases, your site will benefit from having a sitemap, and you’ll never be penalized for having one.”
Automatically Generated
A good ecommerce platform or content management system will typically generate a sitemap automatically. What’s more, with a little help from a developer you can define how those sitemaps are created.
If your ecommerce platform doesn’t do it, there are also third-party sitemap generators or sitemap generation code libraries.
In short, you should not have to create a sitemap manually for your ecommerce business. Nonetheless, understanding how sitemap markup works and what it communicates may help your company’s search engine optimization efforts.
An XML sitemap can help search engines discover and index pages on your ecommerce site.
XML Sitemap Format
XML sitemaps are the most popular format for sharing link information with search engines.
The XML schema for the sitemaps protocol allows your site to communicate a page’s URL, when it was last updated, and how often it is updated.
An XML sitemap begins with the XML document type declaration. This declaration describes the rule set, if you will, that the document will follow. It is worth mentioning that XML sitemaps must be UTF-8 encoded, which is a method of converting letters, numbers, and other characters into a universal format.
<?xml version="1.0" encoding="UTF-8"?>
All of the specific pages described in the sitemap should be wrapped in a urlset tag, opened and closed. And this tag should include a reference for the current version of the sitemap XML schema, which at the time of writing was version 0.9.
<urlset xmlns="http://www.sitemaps.org/schemas/sitemap/0.9"> … </urlset>
For each page listed in the XML sitemap, there should be a URL tag. This tag is the parent, and all of the other tags that describe a page are this tag’s children.
<urlset xmlns="http://www.sitemaps.org/schemas/sitemap/0.9"> <url>...</url> <url>...</url> <url>...</url> </urlset>
There are at least two possible child tags to describe a page listed on an XML sitemap. The example below describes two category pages.
<urlset xmlns="http://www.sitemaps.org/schemas/sitemap/0.9"> <url> <loc>https://example.com/mens-hats</loc> <lastmod>2018-09-30</lastmod> </url> <url> <loc>https://example.com/ladies-hats</loc> <lastmod>2018-09-14</lastmod> </url> </urlset>
I’ll explain each of these tags individually.
<loc>https://example.com/mens-hats</loc>
First, the loc (for location) tag provides the canonical page URL. This is the official version of the page. This link should include the preferred version of your site’s fully qualified domain name.
The URL must also be escaped for non-alphanumeric characters and URL encoded according to the RFC-3986 standard. This is something that can be done programmatically. Finally, don’t include session IDs or parameters.
<lastmod>2018-09-30</lastmod>
The lastmod tag simply tells the search engine the last time the page in question was changed. The date should be listed as a four-digit year, two-digit month, and two-digit day format.
The lastmod tag may also pass minutes and seconds following the World Wide Web Consortium date and time format.
The XML schema also supports two other child tags: changefreq and priority. But Google has indicated that it does not use these tags when it reads your sitemap.
Submit a Sitemap
Once created, your sitemap should be submitted to Google, Bing, and other target search engines. You have a few options.
First, include a link in your robots.txt file. Simply include the path to your sitemap prefaced with the word “sitemap” and a colon.
Sitemap: https://example.com/sitemap.xml
Next, you can submit the sitemap directly to a search engine. For Google, open the sitemaps report in the Google Search Console. Then enter the relative URL for the sitemap — for example: /sitemap.xml — and click submit.
For Bing, navigate to the Bing Webmaster Tools, open the “Configure My Site” section, and select “sitemaps.” Then enter and submit the sitemap URL.
Finally, you may also submit the sitemap with an HTTP GET request or ping. When you visit a specific URL and provide your sitemap address as a parameter (see the examples for Google and Bing below), the search engine will capture that address. This can be done programmatically, but even pasting the link in a browser’s address bar will work.
If your sitemap were at https://example.com/sitemap.xml, you would use that address at the end of the GET request URL. Notice how the sitemap URL fits into the ping addresses below.
To Google.
http://www.google.com/ping?sitemap=https://example.com/sitemap.xml
To Bing.
http://www.bing.com/ping?sitemap=https://example.com/sitemap.xml
This content was originally published here.
0 notes